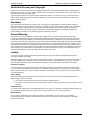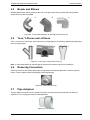
1
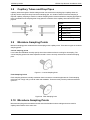
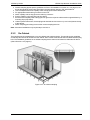
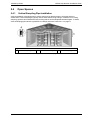
VESDA
Pipe Network Installation Guide
September 2012
Document: 10255_06
Part Number: 30008
VESDA by Xtralis
VESDA Pipe Network Installation Guide
Intellectual Property and Copyright
This document includes registered and unregistered trademarks. All trademarks displayed are the trademarks of
their respective owners. Your use of this document does not constitute or create a licence or any other right to use
the name and/or trademark and/or label.
This document is subject to copyright owned by Xtralis AG („Xtralis”). You agree not to copy, communicate to the
public, adapt, distribute, transfer, sell, modify or publish any contents of this document without the express prior
written consent of Xtralis.
Disclaimer
The contents of this document is provided on an “as is” basis. No representation or warranty (either express or
implied) is made as to the completeness, accuracy or reliability of the contents of this document. The manufacturer
reserves the right to change designs or specifications without obligation and without further notice. Except as
otherwise provided, all warranties, express or implied, including without limitation any implied warranties of
merchantability and fitness for a particular purpose are expressly excluded.
General Warning
This product must only be installed, configured and used strictly in accordance with the General Terms and
Conditions, User Manual and product documents available from Xtralis. All proper health and safety precautions
must be taken during the installation, commissioning and maintenance of the product. The system should not be
connected to a power source until all the components have been installed. Proper safety precautions must be taken
during tests and maintenance of the products when these are still connected to the power source. Failure to do so
or tampering with the electronics inside the products can result in an electric shock causing injury or death and may
cause equipment damage. Xtralis is not responsible and cannot be held accountable for any liability that may arise
due to improper use of the equipment and/or failure to take proper precautions. Only persons trained through an
Xtralis accredited training course can install, test and maintain the system.
Liability
You agree to install, configure and use the products strictly in accordance with the User Manual and product
documents available from Xtralis.
Xtralis is not liable to you or any other person for incidental, indirect, or consequential loss, expense or damages of
any kind including without limitation, loss of business, loss of profits or loss of data arising out of your use of the
products. Without limiting this general disclaimer the following specific warnings and disclaimers also apply:
Fitness for Purpose
You agree that you have been provided with a reasonable opportunity to appraise the products and have made
your own independent assessment of the fitness or suitability of the products for your purpose. You acknowledge
that you have not relied on any oral or written information, representation or advice given by or on behalf of Xtralis
or its representatives.
Total Liability
To the fullest extent permitted by law that any limitation or exclusion cannot apply, the total liability of Xtralis in
relation to the products is limited to:
i. in the case of services, the cost of having the services supplied again; or
ii. in the case of goods, the lowest cost of replacing the goods, acquiring equivalent goods or having the goods
repaired.
Indemnification
You agree to fully indemnify and hold Xtralis harmless for any claim, cost, demand or damage (including legal costs
on a full indemnity basis) incurred or which may be incurred arising from your use of the products.
Miscellaneous
If any provision outlined above is found to be invalid or unenforceable by a court of law, such invalidity or
unenforceability will not affect the remainder which will continue in full force and effect. All rights not expressly
granted are reserved.
www.xtralis.com
i
VESDA Pipe Network Installation Guide
VESDA by Xtralis
Scope
The VESDA Pipe Network Installation Guide is written for those involved with the design specifications,
management, installation and maintenance of VESDA systems. It is assumed that those using this guide will
have knowledge of the local codes and standards. It is recommended that pipe network installers attend an
approved VESDA training course.
Document Conventions
The following typographic conventions are used in this document:
Convention Description
Bold
Used to denote: emphasis.
Used for names of menus, menu options, toolbar buttons.
Italics
Used to denote: references to other parts of this document or other
documents. Used for the result of an action.
The following icons are used in this document:
Convention Description
Caution: This icon is used to indicate that there is a danger to
equipment. The danger could be loss of data, physical damage, or
permanent corruption of configuration details.
Warning: This icon is used to indicate that there is a danger of electric
shock. This may lead to death or permanent injury.
Warning: This icon is used to indicate that there is a danger of inhaling
dangerous substances. This may lead to death or permanent injury.
Contact Us
UK and Europe
+44 1442 242 330
D-A-CH
+49 4347 903 0
The Americas
+1 781 740 2223
Middle East
+962 6 588 5622
Asia
+86 21 5240 0077
Australia and New Zealand
+61 3 9936 7000
www.xtralis.com
ii
www.xtralis.com
VESDA by Xtralis
VESDA Pipe Network Installation Guide
Codes and Standards Information for Air Sampling Smoke Detection
We strongly recommend that this document is read in conjunction with the appropriate local codes and standards
for smoke detection and electrical connections. This document contains generic product information and some
sections may not comply with all local codes and standards. In these cases, the local codes and standards must
take precedence. The information below was correct at time of printing but may now be out of date, check with your
local codes, standards and listings for the current restrictions.
FCC Compliance Statement
This equipment has been tested and found to comply with the limits for a Class B digital device, pursuant to part 15
of the FCC Rules. These limits are designed to provide reasonable protection against harmful interference in a
residential installation. This equipment generates, uses and can radiate radio frequency energy and, if not installed
and used in accordance with the instruction, may cause harmful interference to radio communications. However,
there is no guarantee that interference will not occur in a particular installation. If this equipment does cause
harmful interference to radio or television reception, the user is encouraged to try to correct the interference by one
or more of the following measures; re-orientate or relocate the receiving antenna, increase the separation between
the equipment and receiver, connect the equipment to a power outlet which is on a different power circuit to the
receiver or consult the dealer or an experienced radio/television technician for help.
FDA
This Xtralis product incorporates a laser device and is classified as a Class 1 laser product that complies with FDA
regulations 21 CFR 1040.10. The laser is housed in a sealed detector chamber and contains no serviceable parts.
The laser emits invisible light and can be hazardous if viewed with the naked eye. Under no circumstances should
the detector chamber be opened.
FM Hazardous Applications
3611 Hazardous Approval Warning: Exposure to some chemicals may degrade the sealing of relays used on the
detector. Relays used on the detector are marked “TX2-5V”, “G6S-2-5V” or “EC2-5NU”.
VESDA detectors must not be connected or disconnected to a PC while the equipment is powered in an FM
Division 2 hazardous (classified) location (defined by FM 3611).
FM Approved Applications
The product must be powered from VPS-100US-120 or VPS-100US-220 only.
ONORM F3014
ONORM F3014, transport times for all tubes (including capillaries) must not exceed 60 seconds from any hole. This
means that the pre-designed pipe networks that include capillaries cannot be used.
AS1603.8
The performance of this product is dependent upon the configuration of the pipe network. Any extensions or
modifications to the pipe network may cause the product to stop working correctly. You must check that ASPIRE2
approves alterations before making any changes. ASPIRE2 is available from your VESDA ASD distributor.
AS1851.1 2005
Maintenance Standards. Wherever this document and the AS1851.1 differ, AS1851.1 should be followed in
preference to this document.
European Installations
The product must use a power supply conforming to EN54: Part 4.
www.xtralis.com
iii
VESDA Pipe Network Installation Guide
VESDA by Xtralis
This page is intentionally left blank.
iv
www.xtralis.com
VESDA by Xtralis
VESDA Pipe Network Installation Guide
Table of Contents
1
2
3
Introduction
3
1.1
3
Installation Steps
5
2.1
2.2
5
5
5
6
Pipe Network Installation
Microbore Tube Network Installation
Components of a Pipe Network
3.1
3.2
3.3
3.4
3.5
3.6
3.7
3.8
3.9
3.10
3.11
3.12
3.13
4
Pipe Network
Pipe Line
Microbore Tube
Couplings, Socket Unions and Expansion Joints
Bends and Elbows
Tees, Y-Pieces and J-Pieces
Reducing Connectors
Pipe Adaptors
Capillary Tubes and Drop Pipes
Miniature Sampling Points
Microbore Sampling Points
Mounting Fixtures
Solvent Cement
Labels
7
7
7
7
8
8
8
8
9
9
9
10
10
11
Working with Pipes
13
4.1
4.2
4.3
4.4
4.5
4.6
4.7
4.8
4.9
13
13
13
14
15
15
15
15
15
Cutting Pipes
Joining and Bonding
Cementing Pipes Together
Mounting
Bending Pipes
Drilling Sampling Holes
Labelling
Using Capillaries, Microbore and Drop Pipes
Using Capillaries and Drop Pipes
Installing Pipe Networks
17
5.1
5.2
5.3
5.4
17
21
26
29
Ceilings and Floors
Return Air Grilles and Air Ducts
Cabinet and Rack Detection
Open Spaces
Recording Pipe Network Details
Index
www.xtralis.com
31
33
1
VESDA Pipe Network Installation Guide
VESDA by Xtralis
This page is intentionally left blank.
2
www.xtralis.com
VESDA by Xtralis
1
VESDA Pipe Network Installation Guide
Introduction
The VESDA system is an aspirated smoke detection system. It is dependent upon a properly designed and
installed air sampling pipe network. Pipe network design is explained in the VESDA Pipe Network Design
Guide. This guide instructs the reader on how to install an efficient air sampling pipe network. It informs the
reader about the components used in a pipe network Installation and guidelines in their application.
Procedures for some of the more common installations are explained.
Installation should be performed after the site survey and ASPIRE2 modelling have finished. Once the
installation is finished you can move on to commissioning the VESDA system.
This step requires you to install the pipework as specified in design documents and record any changes to the
plan that you are required to make. These details will be included in the hand-over documentation which will be
given to the customer when the system is commissioned.
1.1
Pipe Network
The VESDA early warning aspirating smoke detection system collects air samples through sampling holes on
a network of pipes. The airflow within a protected area carries the air samples to the sampling holes.
Conventional smoke detectors wait for the smoke to migrate through the detector, VESDA actively draws air
samples into the sampling system. These samples are transported through the pipe network to the detector.
Legend
A
End Cap with hole
B
Air samples
C
Airflow entering a sampling
hole
D
Air sampling pipe
E
Detector
Figure 1-1: VESDA air sampling system using pipes
Legend
B
SECTOR
ALARM
PROGRAM
FAULT
F1 . . . Fn
ALL
A
Detector
B
Microbore tubes
000 .. . 999
CODE REQUIRED
1
2
3
4
5
6
7
8
9
10
11
12
13
14
15
?
MENU
TEST
000
SCAN
ISOLATE
SOUNDER
SILENCE
RESET
20.0
ACCEPT
STOP
10.0
FIRE 2
4.0
ALERT
0.01
FIRE 1
ACTION
1.0
0.1
A
Figure 1-2: VESDA VFT-15 air sampling system using Microbore tubes
www.xtralis.com
3
VESDA Pipe Network Installation Guide
VESDA by Xtralis
This page is intentionally left blank.
4
www.xtralis.com
VESDA by Xtralis
2
VESDA Pipe Network Installation Guide
Installation Steps
These instructions are the basic sequence of steps you will be required to perform when installing a pipe
network. Information on installing into a range of environments is covered in depth in Chapter 5. Information on
the theory of good pipe network design can be found in the VESDA Pipe Network Design Guide.
2.1
Pipe Network Installation
The normal procedure for installation is:
1. Check the design documents to gather information on the size and configuration of the pipes. The
design documents could include pipe network design specifications, an ASPIRE2 Installation Data
Pack (IDP), or a pre-engineered design.
2. Mark the spots where the detector is to be installed.
3. Measure and mark the spots for pipe mounting clips as per the design documents.
4. Install the detector. For further information refer to the detector documentation.
5. Install the mounting clips as per the design documents.
6. Mount and join the pipes onto the clips, as per the guidelines in Section 4.4. Do not glue the pipes at
this stage.
7. Drill sampling holes in the pipe ensuring that the spacing between sampling holes is as per the design
documents and the holes are at the correct orientation.
8. Check if the design documents require end caps with holes. Install as required.
9. Run the pipe to the detector.
10. Insert the pipes into the detector ensuring there is a minimum of 500 mm (20 in.) of straight pipe before
the pipe enters the detector. Do not glue the pipes to the detector manifold.
11. Update the design documents with any changes that may have been made to the original plan. If the
installed system is significantly different to the original plan you may need to use ASPIRE2 to check
that the new design will actually work.
12. After all the tests have been completed bond the pipes together using the appropriate cement solvent.
Do not glue the pipes running into the detector manifold, as this can make it impossible to service the
detector, and will void the warranty.
13. Use appropriate labels and tag the sampling pipe and sampling holes.
14. Update the design documents with any further changes that may have been made during the tests, and
give a copy of the updated design documents to the person who will be commissioning the system.
2.2
Microbore Tube Network Installation
Note: For reliable smoke detection and flow monitoring performance, the VESDA VFT-15 detector must be
connected to a balanced network containing equal length Microbore Tubes of 50 m (164 ft). Where the
distance between the detector and sampling hole is less than 50m (164ft), refer to the VESDA VFT-15
Product Guide for information on using a combination of reduced diameter Microbore Tubes and
reducing connectors to achieve the required system performance.
The following instructions provide the basic sequence of steps when installing a microbore tube network for
use with the VESDA VFT-15 detector:
1. Check the design documents to gather information on the location of sampling points. Update the
design documents with any changes that may have been made to the original plan.
2. Mark the spot where the detector is to be installed.
3. Install the detector. For further information refer to the detector Product Guide or Installation Sheet.
4. Insert the microbore tubes into the detector. Do not glue the microbore tubes to the detector manifold.
5. Run the microbore tubes to the required sampling locations ensuring there are no kinks. It is
recommended that excess tubing be coiled close to the sampling point end. Check if the design
documents require sampling point components. Refer to Section 3.9 on page 9. Install as required.
6. Unused inputs on the detector should be looped to one another using short lengths of microbore tubes.
For example, if the VESDA VFT-15 detector has unused inputs 9 to 15, one way of connecting the
unused inputs would be to use short pieces of microbore tubes to connect inputs 9 to 12, 10 to 13, 11 to
14 and have input 15 capped off.
www.xtralis.com
5
VESDA Pipe Network Installation Guide
VESDA by Xtralis
7. Update the design documents with any further changes that may have been made during the tests, and
give a copy of the updated design documents to the person who will be commissioning the system.
Caution:
6
Do not insert ANY object into the inlet ports other than the correct size of tubes. Doing so may
cause damage to the delicate electronic flow sensor components mounted just inside each port
opening, and void the warranty.
www.xtralis.com
VESDA by Xtralis
3
VESDA Pipe Network Installation Guide
Components of a Pipe Network
This section describes various components used in constructing a pipe network and guide lines that should be
observed in using these components. It is unlikely that all the components mentioned here will be used in
every installation and some projects may require components other than those mentioned here.
3.1
Pipe Line
The sampling pipe used for the pipe network is normally a low cost 19 mm to 25 mm (0.75 to 1 in) ID PVC
pipe. We recommend the use of 21 mm (0.83 inch) ID, smooth bore pipe. The internal diameter for the pipes
may vary depending upon design requirements. The sampling pipe used must also comply with local codes
and standards.
Figure 3-1: A section of VESDA pipe
3.2
Microbore Tube
Sampling for the VESDA VFT-15 detector is achieved through flexible microbore tubes.
The VESDA VFT-15 detector requires that each microbore tube has a fixed length of 50m (164 ft), 6mm (0.24”)
OD, 4mm (0.16”) ID and comprises one sampling point at the end. It is recommended that excess microbore
tube be coiled near the sampling point end and for good aesthetic practice be run through the roof or floor
spaces.
Note: For reliable smoke detection and flow monitoring performance, the VESDA VFT-15 detector must be
connected to a balanced network containing equal length Microbore Tubes of 50 m (164 ft). Where the
distance between the detector and sampling hole is less than 50m (164ft), refer to the VESDA VFT-15
Product Guide for information on using a combination of reduced diameter Microbore Tubes and
reducing connectors to achieve the required system performance.
3.3
Couplings, Socket Unions and Expansion Joints
Couplings, socket unions, and expansion joints are used to connect pipes together.
A.
B.
Figure 3-2: Coupling joint (A) and socket unions (B)
For information on expansion joints, refer to Section 4.3 on page 13.
Couplings are the usual way to connect two pieces of pipe.
Socket unions are typically used where the pipes may have to be periodically dismantled for maintenance.
Socket unions are also used where it is important to have the correct orientation of sampling holes, for
example, sampling pipes over air grilles.
Expansion joints are used in environments where pipes are likely to expand and contract due to variation in
temperature, for example, sampling pipes in refrigerated warehouses.
www.xtralis.com
7
VESDA Pipe Network Installation Guide
3.4
VESDA by Xtralis
Bends and Elbows
Bends and elbows are used to change the direction of the pipe. Bends having a wider radius are preferred,
though elbows are also acceptable.
A.
B.
C.
Figure 3-3: A wide radius bend (A), 45° bend (B), and 90° elbow (C)
3.5
Tees, Y-Pieces and J-Pieces
Tees, Y-Pieces and J-Pieces are used for branching a sampling pipe or for attaching capillaries and drop pipes
to the air sampling pipe.
A.
B.
C.
Figure 3-4: Y-Piece (A), Tee (B) and J-Piece (C)
Note: It is important that the air sampling pipe is branched in the direction away from the detector.
3.6
Reducing Connectors
Reducing connectors are used to attach pipes having different internal/outer diameters. These are typically
used to connect capillary tubes and drop pipes to the sampling pipe.
Figure 3-5: Reducing Connector
3.7
Pipe Adaptors
The pipe adaptor is used to connect imperial size pipes to the detectors pipe Inlet manifold. All detectors
shipped to U.S.A. include pipe adaptors where applicable.
Figure 3-6: Pipe Adaptor
8
www.xtralis.com
VESDA by Xtralis
3.8
VESDA Pipe Network Installation Guide
Capillary Tubes and Drop Pipes
Capillary tubes are lengths of flexible tubing that are connected to the sampling pipe. Capillary tubes are
typically used to sample air away from the air sampling pipe, or in instance where focused air sampling is
required. Capillary sampling is used for in-cabinet sampling and in instances where the sampling pipe requires
to be concealed from the sampling area. Drop pipes are a variation of the capillary tube and serve the same
purpose.
Legend
3.9
A
Tee adaptor
B
Sampling pipe
C
Reducing connector
D
Capillary tube
E
Flush sampling pint
F
Miniature sampling point
Miniature Sampling Points
Miniature sampling points are attached to the sampling end of capillary tubes. There are two types of miniature
sampling points:
Conical sampling points
Local codes and standards normally specify the minimum distance from the ceiling for air sampling. The
conical sampling points meet these requirements and is more commonly selected as a miniature sampling
point.
Figure 3-7: Conical Sampling Point
Flush Sampling Points
Flush sampling points are normally used when there is a need to conceal the pipe network. Flush sampling
points may not comply with your local codes and standards. These are mostly used for performance based
systems.
Figure 3-8: Flush Sampling Point
3.10 Microbore Sampling Points
Microbore sampling points are attached to the end of the flexible microbore tubing and can be used for
capillary tubes that are of the same size.
www.xtralis.com
9
VESDA Pipe Network Installation Guide
VESDA by Xtralis
Note: Ensure the same type of sampling points is used for all microbore tubing connected to a single
detector.
Sintered End of Line Filter
It is recommended that a sintered end of line filter is used at the end of every capillary tube. This will ensure
that airflow is not impeded by blockages such as insects nesting within the capillary tube.
Figure 3-9: Sintered End of Line Filter
Flush End of Line Filter
This type of sampling point provides both a sturdy, safe and aesthetically pleasing end point. It can be
screwed to walls or ceilings while the small maze grid over the sampling hole acts as a filter.
Figure 3-10: Flush End of Line Filter
3.11 Mounting Fixtures
The sampling pipe is mounted using the appropriate pipe mounting options. Some of the mountings commonly
used are illustrated below:
Figure 3-11: Pipe mounting fixtures (pipe clips, self-locking ties, saddle strap)
3.12 Solvent Cement
Solvent cement is used to bond pipes together. It may also be used to bond pipe accessories such as
couplings, socket unions, bends, elbows, tees, Y-pieces, J-pieces, and end caps to the pipe.
10
www.xtralis.com
VESDA by Xtralis
VESDA Pipe Network Installation Guide
3.13 Labels
Sampling point labels – There are two labels to identify sampling holes:
l
l
l
l
Miniature sampling point label: These are round labels with a hole in the center to fit around the
miniature sampling points. Refer to Figure 3-12.
Sampling point decal: This decal is wrapped around a pipe on the sampling hole. The decal has a
hole in the center. The hole in the decal must be aligned to the sampling hole drilled into the pipe. Refer
to Figure 3-13.
Pipe label: This label identifies the pipe as being a smoke detector pipe and warns against tampering
with it. Refer to Figure 3-14.
Test Point label: This label identifies a sampling point which is used for test purposes. It is normally
the last sampling point on the main pipe or branch pipe. Refer to Figure 3-15.
T PAINT
NO
ETECTION
ED
®
SDA FIR
E
V
STEM - DO
SY
FIRE
DETECTION
SYSTEM
DO NOT
PAINT
FIRE
DETECTION
SYSTEM
DO NOT
PAINT
Figure 3-12: Miniature Sampling Point label
Figure 3-13: Sampling Point decal
CAUTION CAUTION CAUTION
VESDA SMOKE DETECTOR SAMPLING PIPE
DO NOT REMOVE, PAINT OR OBSTRUCT
Figure 3-14: Pipe label
TM
Install Date:
Test Point #:
TM
Detector Zn #:
Transport Time (sec):
Pipe #:
Suction Pressure (Pa):
www.xtralis.com
part no. 29624
document no. 18715
Figure 3-15: Test Point label
www.xtralis.com
11
VESDA Pipe Network Installation Guide
VESDA by Xtralis
This page is intentionally left blank.
12
www.xtralis.com
VESDA by Xtralis
4
VESDA Pipe Network Installation Guide
Working with Pipes
The following guidelines will assist with the successful installation of a pipe network:
4.1
Cutting Pipes
If the pipes need to be cut use the right tools to cut the pipe. Use pipe cutting shears or wheel type plastic tube
cutter. It is important that the cutting edge of the shears and cutter are sharp. Ensure that the cut is square.
Square cuts provide maximum bonding area. Remove all loose plastic. Beveling the end will make it easier to
fit in to the socket and prevent solvent cement from being wiped from the joining surface during final
assembly.
Figure 4-1: Pipe Cutting Shears
Note: Remember to remove all dust and shavings created when cutting the pipe as they can block sampling
holes and impacts on the efficient performance of a pipe network.
4.2
Joining and Bonding
When joining the pipes ensure that the pipes are inserted all the way to the “lip” inside the coupling or adaptor.
Failing to do so will create a turbulence due to expansion of space between the pipe end and the coupling lip.
Figure 4-2: Turbulence created due to a gap in pipe coupling
All joints (except the joint to the detector) should be bonded using appropriate solvent cement. It is advisable
to bond the joints only after the final tests have been completed and required adjustments have been made.
4.3
Cementing Pipes Together
Bonding, cementing or gluing pipes is all done using the same process. Apply your glue/cement/bonding agent
to the outside of the pipe and insert into the other pipe. If you were to put it on the inside of a pipe, it will build
up when the other pipe is inserted. This build-up will affect the airflow characteristics inside the pipe and may
cause unpredictable behavior.
You should never bond, glue or cement the pipes that connect to the detector.
Legend
A
Do not apply solvent
cement on the inside
B
Apply solvent cement on the
outside
Figure 4-3: Applying solvent cement
www.xtralis.com
13
VESDA Pipe Network Installation Guide
VESDA by Xtralis
Where there is likelihood of high level of temperature fluctuations, use expansion joints or U bends to allow for
the expansion and contraction of pipes.
Legend
A
Expansion joint
B
Standard pipe joint
Figure 4-4: Expansion joints
The diagram above shows expansion (A) and standard (B) pipe joints. The diagrams at the top show how the
pipe network will look at room temperature, the diagrams at the bottom show what happens after the
refrigeration system has been turned on and the pipe shrinks. Note that once the standard pipe has shrunk the
pipes are no longer air tight and the detector will not be able to detect smoke.
U bend arrangement
It is important to allow for the expansion or contraction of the sampling pipes where there is likelihood of high
level of temperature fluctuations. It is recommended to use 'U' bends in longer pipe runs to prevent buckling.
Refer to Figure 4-5.
Figure 4-5: U bend
4.4
Mounting
The pipe network should be mounted as per the design and ASPIRE2 specifications. The fittings used for
mounting will depend upon the design and site requirements.
l
l
l
l
14
To minimize flexing the pipes should be secured every 1.5 m (5 ft.)
Pipes should be suspended between 25 -100 mm (1 - 4 inches) below the ceiling
Note: This is subject to local codes and standards and pipe network design specifications.
Where expansion or contraction of pipes is likely either after installation or on a continuous basis, place
pipe clips 0.5m (1.5 ft) away from any bends, couplings and socket unions as these may interfere with
the movement of the pipe. It is recommended to use appropriate pipe supports which don't clamp
securely around the pipe, thus allowing the pipe to freely expand and contract within.
Refer to Chapter 5 for details on mounting requirements for specific types of installations.
www.xtralis.com
VESDA by Xtralis
4.5
VESDA Pipe Network Installation Guide
Bending Pipes
Whenever possible, use the appropriate precast pipe bends. Where no precast bends are available pipes can
be bent within certain limits to change pipe direction or to go around small obstructions. When bending a pipe:
l
l
l
l
Use Bending springs
Use Pipe Benders
Do not bend on sharp objects or heat the pipe
Replace any pipe bends that have kinks
The ASPIRE2 modelling software is used to test if a proposed pipe network will meet customer and local
authority codes and standards. Bends that are not entered onto the design will cause there to be differences
between the expected pipe network performance, and the performance that will be tested during
commissioning. If the changes are too great the commissioning engineer will have to investigate and may
require that pipework to be replaced to meet the original specification.
4.6
Drilling Sampling Holes
Sampling holes are drilled into the pipes once the pipe network is installed.
l
l
l
l
l
l
l
4.7
The ASPIRE2 Installation Data Pack (IDP) coordinates the positions of the sampling holes.
Drill sampling holes at the positions marked in the IDP.
The IDP will specify the diameter required for each sampling hole on the grid.
It is important that correct diameter sampling hole is drilled as the hole size effects the performance
efficiency of the VESDA System. The size of sampling holes may be different for each hole in a pipe
network so check the size required for each hole in the IDP.
Holes MUST be drilled at 90° to the pipe. If the drill is at an angle, the sampling hole will not be round
and may effect air flows.
The hole must only be into the pipe and not through the other side of the pipe.
The sampling hole should be drilled at slow drill speed with a sharp drill bit, to avoid dust, debris or burrs
enter the sampling pipe.
Labelling
Adhesive labels to identify the sampling pipe and the sampling holes and Sampling Points are available from
Xtralis. These should be used to identify:
l
l
l
l
The Pipes as Smoke Detector sampling pipes
Sampling Holes
Sampling Points
Test Points
For further information on the different label types, refer to Section 3.13 on page 11.
4.8
Using Capillaries, Microbore and Drop Pipes
4.9
Using Capillaries and Drop Pipes
Typically a capillary is a flexible tubing having a maximum length of 8 m (26.25 ft.). To maintain an acceptable
level of air flow we recommend the use of 21 mm (0.83 inch) ID pipe for drop pipes. The minimum capillary ID
is 4 mm (0.2 inch). A variation of the capillary tube is the 12.5 mm (half inch) ID rigid drop pipe. Drop pipes of
up to 4 m (13 ft.) are acceptable, but should be verified against ASPIRE2 calculations.
Where multiple capillary tubes are used, the length for each capillary should be approximately the same. A
sampling hole (suggested 2 mm (0.079 in.) diameter) is required at the end of each capillary tube or drop pipe.
All capillary tubes which are close to the limits suggested above should be checked by ASPIRE2 before
installation.
www.xtralis.com
15
VESDA Pipe Network Installation Guide
VESDA by Xtralis
Installations using microbore (for the VESDA VFT-15) are similar to installations using capillaries, but only
require the microbore tubing to be run to the sampling point and a microbore sampling point fitting. The VESDA
VFT-15 detector requires that each microbore tube has a fixed length of 50m (164 ft), 6mm (0.24”) OD, 4mm
(0.16”) ID and comprises one sampling point at the end. It is recommended that excess microbore tube be
coiled near the sampling point end and for good aesthetic practice be run through the roof or floor spaces.
Note: For reliable smoke detection and flow monitoring performance, the VESDA VFT-15 detector must be
connected to a balanced network containing equal length Microbore Tubes of 50 m (164 ft). Where the
distance between the detector and sampling hole is less than 50m (164ft), refer to the VESDA VFT-15
Product Guide for information on using a combination of reduced diameter Microbore Tubes and
reducing connectors to achieve the required system performance.
16
www.xtralis.com
VESDA by Xtralis
5
VESDA Pipe Network Installation Guide
Installing Pipe Networks
Pipe network designs are specific to a site and are dependant upon site conditions, the application, customer
requirements and local codes and standards. Installing pipe networks requires knowledge of the components
used, guidelines that should be followed, and an understanding of the more commonly used air sampling
options. For information on the theory of pipe networks refer to the VESDA Pipe Network Design Guide.
This section of the manual contains the instructions for installing pipe networks into the common types of
sites. For information on installing pipe networks to specialized environments refer to the VESDA Application
Design Guides.
5.1
Ceilings and Floors
5.1.1
On Ceiling
On-Ceiling installation is the most common type of installation and is often installed in a standard room not
having any special requirements. The pipes are installed directly onto the ceiling of the area to be protected.
Figure 5-1: Typical on-ceiling installation
The normal procedure for installing an on-ceiling pipe network is:
1. Check the design documents to gather information on the size and configuration of the pipes. The
design documents could include pipe network design specifications, or an ASPIRE2 Installation Data
Pack (IDP) or a pre-engineered design.
2. Mark the spot where the detector is to be installed.
3. Measure and mark the spots for pipe mounting clips as per the design documents.
4. Install the detector. For further information refer to the detector documentation.
5. Secure the pipe mounting clips to the ceiling ensuring that the distance between the ceiling and the
pipe is according to the design documents.
6. Mount and join the pipes onto the clips, as per the guide lines in Section 4.4 on page 14. Do not glue the
pipes at this stage.
7. Drill sampling holes in the pipe ensuring that the spacing between sampling holes is as per the design
documents and the holes are at the correct orientation.
8. Check to see if the design documents require end caps with holes. Install as required.
9. Run the pipe to the detector.
10. Insert the pipes into the detector ensuring there is a minimum of 500 mm (20 in.) of straight pipe before
the pipe enters the detector. Do not glue the pipes to the detector manifold.
www.xtralis.com
17
VESDA Pipe Network Installation Guide
VESDA by Xtralis
11. Update the design documents with any changes that may have been made to the original plan. If the
installed system is significantly different to the original plan you may need to use ASPIRE2 to check
that the new design will actually work.
12. After all the tests have been completed bond the pipes together using the appropriate cement solvent.
Do not glue the pipes running into the detector manifold, as this can make it impossible to service the
detector, and will void the warranty.
13. Use appropriate labels and tag the sampling pipe, sampling holes and test points where required.
14. Update the design documents with any further changes that may have been made during the tests.
5.1.2
In-Ceiling Installation
In-Ceiling installations are pipe networks in the ceiling void between the roof of the building and the false
ceiling panels.
Figure 5-2: Typical installation in a ceiling void
1. Check the design documents to gather information on the size and configuration of the pipes. The
design documents could include pipe network design specifications, or an ASPIRE2 Installation Data
Pack (IDP) or a pre-engineered design.
2. Mark the spot where the detector is to be installed.
3. Identify and measure the spots for securing the pipe as required by the design documents and
guidelines for mounting pipes. Refer to Section 4.2 on page 14. Ceiling joists and/or support beams can
be used to secure the pipe.
4. Install the detector. See the detector documentation for details.
5. Secure the pipe using appropriate conduit clamps or self locking ties ensuring that the distance
between the roof and the pipe is according to the design specifications. For further information refer to
Section 3.11 on page 10.
6. When securing the pipes follow the guidelines discussed in Section 4.2 on page 13. Do not glue the
pipes at this stage. Special attention needs to be given to the expansion and contraction of pipes in
ceiling voids, as the pipes are likely to be subjected to a higher level of temperature fluctuations. In
areas of wide temperature fluctuations, it is strongly suggested that expansion Joints are used to
counter the higher rates of expansion and contraction of the sampling pipe.
7. Drill sampling holes on the underside or side of the pipe ensuring that the spacing between sampling
holes is as per the design documents and the holes are at the correct angle.
8. Check to see if the design documents requires end caps with a hole. Install as required.
9. Run the pipe to the detector.
10. Insert the pipes into the detector pipe inlet manifold. Refer to the relevant detector manual for further
information.
11. To avoid potential effects of pressure differentials it is recommended that sampled air is exhausted
from the detector back to the ceiling void.
12. Mark the design documents with any changes that may have been made during installation.
13. After all the tests have been completed bond the pipes together using the appropriate cement solvent.
Do not glue the pipes running into the detector manifold, as this can make it impossible to service the
detector, and will void the warranty.
14. Use appropriate labels and tag the sampling pipe, sampling holes and test points where required. Refer
to Section 3.13 on page 11.
15. Mark the design documents with any further changes that may have been made during the tests.
18
www.xtralis.com
VESDA by Xtralis
5.1.3
VESDA Pipe Network Installation Guide
Floor Void Installation
Installations in the under floor void require considerations similar to the In-Ceiling Void Installation.
Figure 5-3: Typical under floor installation
The Guidelines to be followed for Floor Void Installations include:
1. Refer to the guidelines for In-ceiling installations for general guidelines.
2. Supporting posts can be used to secure the pipe.
3. As the initial smoke layer normally takes up the top 10% of the void height, pipes should be placed as
close to the floor as possible.
4. Secure the pipe using appropriate conduit clamps or self locking ties ensuring that the distance
between the floor and the pipe is according to the design specification. For further information, refer to
Section 3.11 on page 10.
5.1.4
Inter-beam
Inter-beam sampling is used in areas having large beams as defined by local fire code and standards, or as per
site requirements. Design documents will specify the requirement for inter-beam sampling.
The three methods for inter-beam sampling are:
Sampling Pipe Traversing inside of the Beam Pocket - Bend the sampling pipe, where the depth of the
beam allows the pipe to be bent without it cracking or crinkling (refer to Section 4.5 on page 15).
Legend
A
Sampling Pipe
B
Beam Pockets
C
Sampling holes
Figure 5-4: Inter-beam sampling using pipe bends
Walking Sticks - Walking sticks are attached to the sampling pipe. The walking stick is a length of riser pipe.
Attach a bend or an elbow at the top end of the riser pipe. Fix an appropriate length of pipe to the bend or elbow
and drill a sampling hole (as specified in the design documents) into the pipe. Close the end of the pipe with an
end cap. Attach the walking stick to a Tee adaptor using a reducing connector (if required). Join the Tee to the
sampling pipe at the specified spot.
Legend
A
Sampling Pipe
B
Beam Pockets
C
Sampling holes
Figure 5-5: Inter-beam sampling using a walking stick
Underside of the Beams - Run the sampling pipe with sampling holes facing down, along the underside of
the beams.
www.xtralis.com
19
VESDA Pipe Network Installation Guide
VESDA by Xtralis
Legend
A
Sampling Pipe
B
Beam Pockets
C
Sampling holes
Figure 5-6: Inter-beam sampling
5.1.5
Capillary Tubes, Microbore and Drop Pipes Installation
5.1.6
Capillary Tubes and Drop Pipes Installation
Capillary tubes and drop pipes are used to monitor the environment from areas away from the sampling pipe.
Capillary tubes and drop pipes are typically used for Concealed and In-Cabinet sampling.
Guidelines for Capillary and drop pipes:
1. Install the sampling pipe using Tee adaptors where the capillary tubes or drop pipes need to be
attached.
2. Fix appropriate sized reducing connection to the Tee
3. Connect capillary tube or drop pipe to the reducing connector
4. Run the capillary or the drop pipe to the required sampling point
5. Attach sampling point fitting
Note: Microbore only requires steps 4 and 5.
5.1.7
Concealed Sampling
Concealed sampling is used when there is a requirement for aesthetics or for security. Capillary tubes and
drop pipes are normally used for concealed sampling. The ceiling void is used to lay the sampling pipe.
Capillary tubes are routed to the required location and penetrate the ceiling, generally using something to hide
the tube. The end of the tube is either restricted with a capillary cap or left fully open.
In situations where discreet sampling is required to maintain the aesthetics of the protected area, the capillary
tube can be concealed behind a ceiling rose, wound down a chandelier support chain or can sit flush with the
ceiling cornice. The sampling holes can be concealed by using a flush sampling point or a sampling point
inserted inside the end of the sampling pipe.
1. Follow the guidelines in Section 5.1.2 on page 18.
2. Then follow the guidelines in Section 5.1.5 on page 20.
Figure 5-7: Concealed sampling points
20
www.xtralis.com
VESDA by Xtralis
VESDA Pipe Network Installation Guide
5.2
Return Air Grilles and Air Ducts
5.2.1
Return Air Grilles
Return air grille sampling is used to monitor the grille air drawn to an exhaust ventilation system or to an air
handling unit (AHU). The pipe network design will specify where return air sampling is required.
Figure 5-8: Return air grille sampling
The guidelines that need to be considered in a return air grille sampling installation:
1. Follow the guidelines specified in Section 5.1 on page 17 then use the guidelines below.
2. Fix appropriate pipe mounting clips or pipe clamps with standoff posts over the return air grille.
3. Sampling pipes on return air grilles having high velocity air flows which may require mounting on
standoff posts to keep the sampling pipe 25 mm to 200 mm (1 to 8 inches) away from the grille. Refer
to the pipe network design for requirements.
Figure 5-9: Pipe position on a return air grille
Return air grilles may be removed and replaced for maintenance. To ensure the orientation of sampling holes
are maintained at the correct angle once the air grille is replaced:
l
l
Cut sampling pipe of specified diameter to the length of the air grille.
Fix appropriate pipe mounting clips or pipe clamps with standoff posts over the return air grille.
4. Connect the sampling pipe using socket unions and do not glue them in place. The socket unions must
be between the end of the air grille and the mounting clips or pipe clamps. Refer to Figure 5-9 for
details.
www.xtralis.com
21
VESDA Pipe Network Installation Guide
VESDA by Xtralis
Generally, a VESDA VLP or VESDA VLS detector should not monitor more than four AHUs, a VESDA VLC
should not monitor more than two, and a VESDA VLF should not monitor more than one AHU.
Legend
A
Sampling Pipe
B
Return grille
C
End cap without a hole
D
Sampling hole
Figure 5-10: Sampling over a return air grille
5. Drill sampling holes as specified in the design documents.
6. The pipework must always have an end cap without a hole in it.
5.2.2
Supply Air Sampling
Refer to Return Air Grilles (Section 5.2.1), or use a Duct design (Section 5.2.3).
22
www.xtralis.com
VESDA by Xtralis
5.2.3
VESDA Pipe Network Installation Guide
Duct Sampling and Condensation
Duct sampling allows you to monitor the return and supply air within the protected enclosure. The sampling
pipe is connected to a sampling probe to sample the air from within the duct. To avoid the potential effects of
pressure differentials the air is exhausted back into the duct through an exhaust probe. The exhaust probe
holes must also face the same direction as the intake probe holes.
The detector must be installed in the inverted position when sampling air from ducts. This is done because
condensation may occur when the dew point temperature of the duct air is at or above the ambient
temperature of the detector. This usually occurs when the temperature of the humid duct air is higher than the
ambient temperature of the detector.
In this situation, longer pipe runs outside the duct should be used. Initial regular inspections must be carried
out to determine whether there is condensation forming inside the pipes, especially during the winter season.
Smoke tests should be conducted regularly in the first two months of installation.
Duct Installation Considerations
l
l
l
l
l
l
l
l
In air-return ducts, the detector must be installed where the static pressure is not below -500Pa and the
air duct velocity is not above 20 m/sec (4,000 fpm). Static pressure is the pressure generated by the
fan to deliver a specific flow-rate in the duct. Static pressure is a function of the flow-rate and
impedance of the duct system. Convert to volumetric flow rate.
Always vent the exhaust pipe back into the duct even when the duct pressure is sometimes very small
(e.g. less then 20Pa). This is because the duct system operation may change in the future.
In air-return (negative pressure) ducts, the detector must be installed away from any fans and closer to
air vents; this reduces large negative pressures.
For air-return (negative pressure) ducts, the detector must be installed before humidifiers, heating coils,
and filters.
In air-return (negative pressure) ducts, the detector must be installed before fresh air intakes.
Do not sample from multiple ducts (i.e. use a different detector for each duct).
Do not sample duct and ambient environments together.
For a detector mounted on the duct, ensure no tangible vibrations exist when the duct system is in full
operation. If vibrations exist, insert visco-elastic foam between the detector’s mounting bracket and
the external surface of the duct.
Probe Installation
The differential pressure across the inlet and exhaust pipe needs to be kept within ±10Pa in the presence of
airflow, regardless of duct air velocity.
Differential pressure is created by the orientation of the holes on both pipes in relation to the duct flow. This
differential pressure across the inlet and exhaust pipes will either aid or impede the flow through the detector.
A very low differential pressure ensures the normal operation of the detector. To achieve this, perform the
following steps:
1. Ensure the duct system is operating and airflow is present in the duct.
2. Drill holes in the inlet and exhaust pipes as required, draw a line along the holes to the end of the pipe.
3. Insert the pipes in the duct, and rotate the pipe until the line indicates that the holes are facing into the
airflow
4. Using the Manometer testing (Figure 5-11) or flexible U testing (Figure 5-12) methods to minimize the
pressure differential.
5. When you are happy with the pipe orientation, mark the position of the pipes’ orientation on the duct
and pipes.
6. Secure the pipe installation and run pipe to the detector.
Face the holes of both pipes to the airflow and slightly rotate the pipes so the pressure reading is within
±10Pa. Mark the position of the pipes’ orientation on the pipe and the outside of the duct. Connect the detector
after securing the pipe network.
www.xtralis.com
23
VESDA Pipe Network Installation Guide
VESDA by Xtralis
Legend
A
Air flow
B
Rubber grommet
C
Sampling pipe
D
Exhaust pipe
E
Manometer pressure
Figure 5-11: Manometer testing
Connect the pipe ends to a U-shape clear flexible tube that contains water.
Legend
A
Air flow
B
Rubber grommet
C
Sampling pipe
D
Exhaust pipe
E
Clear flexible tube
F
Water is level
Figure 5-12: Flexible U-tube testing
Face the holes on both pipes to the airflow and slightly rotate the pipes so the water level on both sides of the
tube is the same. Mark the position of the pipes’ orientation on the pipe and the side of the duct. Connect the
detector after securing the pipe network.
24
www.xtralis.com
VESDA by Xtralis
VESDA Pipe Network Installation Guide
Sampling probe installation:
1. Drill holes through the sides of the duct so that the intake probe can be inserted across the width of the
duct. The holes should be in the middle of the duct.
2. Drill the required number (and size) of sampling holes in the probe. Make a mark on the end of the probe
in line with the holes.
3. Insert the probe through the duct, and attach an end-cap without a hole in it.
4. Use the mark on the end of the probe to ensure that the holes on the probe face 20° to 45° above or
below the direction of the airflow.
5. Ensure that the holes where the intake probe enters and exits the duct are properly sealed and made air
tight.
6. Join the sampling probe to the sampling pipe network running to the detector.
Legend
A
Air duct
B
Air intake probe
C
Air exhaust probe
D
Grommets (sealed)
E
End caps without a hole
Figure 5-13: Return air duct sampling
Exhaust probe installation:
Always install the sampling probe, then install the exhaust probe.
1. On the same side of the duct that the sampling probe was inserted you will need to drill another hole for
the exhaust probe. The hole should be:
l
l
Downwind of the sampling probe by at least 300 mm (1 ft.)
A quarter the height of the duct up from the bottom. This is done so that the air hitting the exhaust probe
has not been disturbed by hitting the sampling probe first.
1. Drill the same number (and size) of sampling holes used in the sampling probe. Make a mark on the
end of the probe in line with the holes.
2. Attach an end-cap (without a hole), and insert the probe a third the way into the duct.
3. Use the mark on the end of the probe to ensure that the holes on the probe face 20° to 45° above or
below the direction of the airflow. These holes need to face the same direction as those used in the
sampling probe.
4. Ensure that the hole where the exhaust probe enters the duct is properly sealed and made air tight.
5. Join the exhaust probe to the exhaust pipe network running from the detector.
Legend
A
Air duct
B
Air intake probe
C
Air exhaust probe
D
Central air flow
Figure 5-14: The location of probes in duct
www.xtralis.com
25
VESDA Pipe Network Installation Guide
5.3
VESDA by Xtralis
Cabinet and Rack Detection
Legend
A
Retainer clips
B
Sampling hole
C
Equipment cabinets
D
Capillary tubes
E
Rigid drop pipe
F
Under floor void
Figure 5-15: In-cabinet sampling using capillaries & drop pipes
5.3.1
In-Cabinet Installation
In-Cabinet sampling uses capillary tubes, microbore or drop pipes to sample the air from within a cabinet,
such as a switching console or an equipment rack. A capillary tube or microbore can be inserted into the
cabinet either from the top of the cabinet, or from the under floor void.
Warning:
Caution:
Ensure that the power is switched off prior to commencing work on the cabinet. Make sure that
there are no electrical wires that may be damaged while drilling the hole.
Check to see that dust or debris such as metallic shavings from drilling the holes will not
damage the equipment.
In-Cabinet sampling installation from the top:
1. Determine the entry point into the cabinet - Drill an appropriate size hole in the cabinet top, or use an
existing cable entry port.
2. Install the sampling pipe using Tee adaptors where the capillary tubes or drop pipes are to be run to the
cabinet.
3. Attach appropriate sized reducing connection to the Tee.
4. Attach capillary tube or drop pipes to the reducing connector.
5. Run the capillary or the drop pipe into the cabinet.
6. Unless specified otherwise, insert the capillary tube or drop pipe just below the interior of the cabinet
top to a depth of 25 mm to 50 mm (1 to 2 inches).
7. Attach sampling point fitting to ensure the correct sampling hole size.
Note: Microbore installations only require steps 1 and 5 to 7.
In-Cabinet sampling installation from under the floor:
Warning:
Caution:
Ensure that the Power is switched off prior to commencing work on the cabinet. Make sure that
there are no electrical wires that may be damaged while drilling the hole.
Check to see that dust or debris such as metallic shavings from drilling the holes will not
damage the equipment.
1. Determine the entry point into the cabinet - Drill an appropriate size hole in the cabinet floor, or use an
existing cable entry port.
26
www.xtralis.com
VESDA by Xtralis
VESDA Pipe Network Installation Guide
2. Install a sampling pipe as per the guidelines for Floor Void Installation in Section 5.1.3 on page 19, but
do not drill sampling holes unless specified in the pipe network design or IDP specifications.
3. Use Tee adaptors where the capillary tubes or drop pipes need to be attached.
4. Fix appropriate sized reducing connection to the Tee.
5. Attach capillary tube or drop pipe to the reducing connector.
6. Run the capillary or the drop pipe into the cabinet.
7. Ensure that the capillary tube or drop pipe runs right to the top of the cabinet and is supported there by a
mounting clip or pipe clamp.
8. Unless specified otherwise, the sampling hole should be 25 mm to 50 mm (1 to 2 inches) below the top
of the cabinet.
9. Attach sampling point fitting to ensure the correct sampling hole size.
Note: Microbore installations only require steps 1 and 6 to 9.
5.3.2
On-Cabinet
The sampling pipe is installed directly over the cabinets that need monitoring. The sampling holes are drilled
so that they face into the air stream from the cabinet. Each cabinet must have at least one dedicated sampling
hole. The installation guidelines for on-cabinet sampling are the same as for Return Air Grilles and Air Ducts
(refer to Section 5.2 on page 21).
Figure 5-16: On-cabinet sampling
www.xtralis.com
27
VESDA Pipe Network Installation Guide
5.3.3
VESDA by Xtralis
In-Rack Installation
In rack installations are typically found in warehouses and other areas using high-bay racking. The sampling
pipe is installed in between two racks along their length, or within the racking. Pipes may need to be fitted at
different heights to enable effective detection of any incipient smoke at different levels. Instructions for
installing the sampling pipe:
1. Whenever possible lay the pipe between two racks so that it can not be accidentally damaged as items
are moved into and out of the racks. Typically this would be along the inside of the horizontal and
vertical support beams and posts.
2. Secure the sampling pipe to the support beams and post using appropriate support, for example
mounting clamps or self locking ties.
3. Drill sampling holes as specified in the pipe network design or the IDP following the guidelines in
Section 4.6 on page 15.
4. Connect, but do not glue or bond the sampling pipes to the detector. There must not be any bends in
last 500mm (20in) running into the detector.
5. Update the grid overlay and IDP with any changes made to the original plans.
6. After all the tests have been completed bond the pipes together using the appropriate cement solvent.
Do not glue the pipes to the detector pipe inlet.
7. Use appropriate labels and tag the sampling pipe, sampling holes and test points where required.
Figure 5-17: In-rack Installation
Figure 5-18: Installation between racking
28
www.xtralis.com
VESDA by Xtralis
VESDA Pipe Network Installation Guide
5.4
Open Spaces
5.4.1
Vertical Sampling Pipe Installation
Vertical installation of sampling pipes is used to sample air at different layers to offset the effects of
stratification. Vertical sampling is typically used in areas that have high ceilings. In addition to On-ceiling
sampling, pipes are also installed vertically ensuring that air can be sampled at different heights. To install
Vertical sampling pipes follow the guidelines for Ceilings and Floors in Section 5.1 on page 17.
Legend
A
Detail of sampling hole
B
Stratified smoke layer
C
Vertical sampling holes
Figure 5-19: Vertical sampling
www.xtralis.com
29
VESDA Pipe Network Installation Guide
VESDA by Xtralis
This page is intentionally left blank.
30
www.xtralis.com
VESDA by Xtralis
6
VESDA Pipe Network Installation Guide
Recording Pipe Network Details
Once you have finished installing the pipe network you will need to update the design documents with any
modifications. It is critical that you record any changes from the original plan for the commissioning and
testing phases at the site.
If significant changes to the original plan were required you should retest the new proposed pipe network
before installing it. Failure to retest the design with ASPIRE2 may lead to the installation of a pipe network
that does not meet customer and local fire authority codes and standards.
After updating the design documents you must give a copy to the person who will be commissioning the
system. The details of the person who will be commissioning can usually be found in the ASPIRE2
Installation Data Pack (IDP).
www.xtralis.com
31
VESDA Pipe Network Installation Guide
VESDA by Xtralis
This page is intentionally left blank.
32
www.xtralis.com
VESDA
VESDA by Xtralis Pipe Network Installation Guide
Index
installation
5
intake probe
A
25
J
adaptor
8, 10
j-pieces
tee adaptor
9
aspirating smoke detection
3
B
bend
8, 10, 15
joining
13
joint
expansion joint
13
standard pipe joint
13
bending
L
elbow
8
pipes
15
springs
15
bonding
13
labels
miniature sampling point
11
pipe label
11
sampling point
11
C
M
8, 15
capillaries
capillary tubes
9
cementing
13
condensation
23
couplings
microbore
15
mounting
14
fixtures
P
7
cutting pipes
13
D
drop pipe
9, 15
duct
23
exhaust pipe
23
exhaust probe
25
inlet pipe
23
manometer
23
probes
25
E
elbow
8, 10
10
pipe
7
adaptor
8
benders
15
bends
10
bonding
13
cementing
13
clip
10
contraction
couplings
cutting
13-14
7
13
diameter
7-8
drop pipe
8-9, 15
end cap
10
elbow
10
exhaust probe
25
end cap
10
expansion joint
7
expansion
expansion joint
G
gluing
gluing
13
I
in-cabinet
www.xtralis.com
j-pieces
joints
9
network
13-14
7, 13
13
8, 10
13
3
33
VESDA by Xtralis Pipe Network Installation Guide
PVC
7
reducing connectors
8
shrink
VESDA
13
socket unions
7
standard pipe joint
13
tees
8
y-pieces
8, 10
pipe adaptor
8
pipe benders
15
pipe network
3
components
7
plastic ratchet
10
R
radius
8
reducing connectors
8
S
saddle strap
10
sampling
in-cabinet
9
sampling holes
drilling
15
sampling pipe
9
sampling points
conical
9
flush
9
miniature
9
sampling probe
25
installation
25
socket unions
7, 10
solvent cement
10
T
tee
8, 10
temperature
13-14, 23
Y
y-pieces
34
8, 10
www.xtralis.com