Transcript
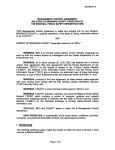
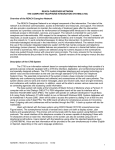
2. Intermittently pressing and releasing the HOUR button will advance the hour
for the time of day in one hour increments. Press the hour button as necessary
until the correct hour is displayed.
INSTRUCTIONS & WARRANTY
Model# 72018 / 72018CN
Thank you for your purchase of this quality clock. The utmost care has gone into
the design and manufacture of your clock. Please read these instructions carefully
and store them in a safe place for future reference.
PRODUCT DESCRIPTIONS
1. AM / PM indicator
2. TIME display
3. ALARM ON indicator
4. ALARM TIME / CALENDAR
5. SNOOZE / LIGHT button
6. YEAR indicator
7. TEMPERATURE display
8. ALARM ON/OFF button
9. C°/F° TEMPERATURE button
10. HOUR / MONTH button
11. MINUTE / DATE button
12. 12/24 HOUR / YEAR button
13. TIME SET / ALARM SET /
CALENDAR SET slide switch
14. DISPLAY Mode button
15. BATTERY compartment
Note: When setting the hour be sure you are in the correct AM or PM time period.
When the “PM” indicator appears on the display, the time displayed is in the 12
hour period between 12:00 noon and midnight.
SETTING UP YOUR CLOCK FOR DESK TOP USE
The clock cover is also to be used as a stand for your digital travel alarm clock.
The following steps explains how to set up the cover for desk top use
STEP 2
STEP 1
3. Intermittently pressing and releasing the MINUTE button will advance the
minutes for the time of day in one minute increments. Press the minute button
as necessary until the correct minute is displayed.
4. When the desired time setting is reached for both the hour and minutes, move
the slide switch to the RUN position (last position on slide switch all the way to
the right).
SETTING THE CALENDAR
1. Move the slide switch located on the back of the clock to CALENDAR SET
position (3rd position on slide switch).
Note: The YEAR “Yr” indicator will appear on the display. The year, month and
date digits on the display will begin to flash indicating you are in the calendar
setting mode.
2. Intermittently pressing and releasing the YEAR button will advance the year in
one year increments. Press the year button as necessary until the correct year
is displayed.
Cover in closed position (as shown)
protects the digital display during
storage and travel.
Gently lift up the cover and swing
open towards the back of the clock.
STEP 4
STEP 3
3. Intermittently pressing and releasing the MONTH button will advance the
month in one month increments. Press the month button as necessary until the
correct month is displayed.
4. Intermittently pressing and releasing the DATE button will advance the date in
one day increments. Press the date button as necessary until the correct date
is displayed.
5. When the correct year, month and date settings are reached, slide the
CALENDAR SET switch to the RUN position (last position on slide switch
all the way to the right).
SETTING THE ALARM TIME
1. Move the slide switch located on the back of the clock to the ALARM SET
position (2nd position on slide switch).
Note: The alarm time digits on the display will begin to flash indicating you are in
the alarm time setting mode.
FRONT OF CLOCK
2. Intermittently pressing and releasing the HOUR button will advance the hour
for the alarm time in one hour increments. Press the hour button as necessary
until the correct alarm hour is displayed.
Note: When setting the hour be sure you are in the correct AM or PM time period.
When the “PM” indicator appears on the display, the time displayed is in the 12
hour period between 12:00 noon and midnight.
3. Intermittently pressing and releasing the MINUTE button will advance the
minutes for the alarm time in one minute increments. Press the minute button
as necessary until the correct alarm time is displayed.
GETTING STARTED
Your clock includes 1 button cell battery (already installed) with an insulating
plastic tab to prevent the clock from running during shipment. To start your clock,
remove the tab by pulling the tab away from the battery compartment located on
the back of the clock.
SETTING THE TIME
1. Move the slide switch located on the back of the clock to the TIME SET position
(1st position on slide switch all the way to the left).
Note: The time digits on the display will begin to flash indicating you are in the
time setting mode.
REPLACING THE BATTERY
1. Remove the battery compartment cover located on the back of the clock by
sliding the cover away from the clock
2. Install one fresh lithium button cell battery “CR2032” battery into the battery
compartment. Make sure the polarity is correct. The + side of the battery
should be facing up.
3. Replace the battery compartment cover.
IMPORTANT: Extended storage can cause batteries to leak and damage the unit.
Leaky batteries should be discarded immediately. Skin burns or other personal
injury can result. Always dispose of batteries according to federal, state and local
regulations.
CARE OF YOUR CLOCK
1. Store the clock without batteries when not in use.
2. A soft cloth or paper towel may be used to clean your clock. Do not use
corrosive cleanser or chemical solutions on the clock. Keep the clock clean and
dry to avoid any problems.
ACTIVATING THE ALARM ON/OFF
1. The ALARM ON / OFF button is located on the back of the clock. To turn the
alarm on, press the alarm button. The ALARM ON indicators will appear on the
digital display indicating the alarm is activated.
3. Avoid putting the clock in a highly humid environment such as poolside or in a
bathroom.
USING THE SNOOZE
To use the snooze, press the SNOOZE / LIGHT area on top of the clock when the
alarm is sounding. The alarm will be silenced temporarily, but will resume sounding
after 5 minutes.
The following instructions explain how to operate your Westclox digital clock.
The clock is now ready for desk
top use in the open position
(as shown)
4. When the desired alarm time setting is reached for both the hour and minutes,
move the slide switch to the RUN position (last position on slide switch all the
way to the right).
2. To turn the alarm off, press the ALARM ON/OFF button. The ALARM ON
indicators will no longer be shown on the display indicating the alarm is
deactivated.
BACK OF CLOCK
Fold the cover in towards the back of
the clock, carefully inserting the cover
into the slot on the back of the clock.
Note: The clock stand must be set up for the snooze to operate. Please refer to
the SETTING UP YOUR CLOCK FOR DESK TOP USE section in this user manual
USING THE BACKLIGHT
Press the SNOOZE / LIGHT area on the top of the clock to activate the display
backlight. The backlight will stay on for 5 seconds each time it is pressed.
Note: The clock stand must be set up for the snooze to operate. Please refer to
the SETTING UP YOUR CLOCK FOR DESK TOP USE section in this user manual
SWITCHING BETWEEN 12 & 24 HOUR TIME MODES
Press the 12/24 / YEAR button to switch between the 12 and 24 hour.
SWITCHING BETWEEN °C AND °F TEMPERATURE FORMATS
Press the °C and °F button to switch between °C and °F temperature.
SWITCHING BETWEEN ALARM TIME AND DATE DISPLAY
Press the DISPLAY MODE button to switch between the alarm time and date .
4. Do not expose the clock to direct sunlight, extreme hot or cold temperatures.
ONE-YEAR LIMITED WARRANTY
NYL Holdings LLC warrants the original consumer purchaser of this product that
it shall be free of defects in materials and workmanship for one year from the
purchase date of this product. Defects caused by tampering, improper use,
unauthorized modifications or repairs, immersion in water or abuse are not
covered by this warranty. If a defect covered by this warranty occurs during the
warranty period, package your clock carefully and send it to the following
address:
Att: Repair center
NYL Holdings LLC
1212 East Broward Blvd. Suite 203
Fort Lauderdale, FL 33301
(954) 462-6848
You must include a Proof of Purchase, either the original receipt or a photocopy
and a check or money order for USD $7.95 to cover the cost of shipping and
handling. Also include your return address inside the package. NYL Holdings LLC
will repair or replace the clock and return it to you. NYL Holdings LLC will not be
liable for any loss or damages, including incidental or consequential damages of
any kind: from any breach of warranty either expressed or implied relating to the
product. Since some states do not allow the exclusion or limitation of incidental or
consequential damages, these limitations may not apply to you. This warranty
gives you specific legal rights, and you may have other rights that vary from state
to state.
Printed in China
Model# 72018 / 72018CN