1
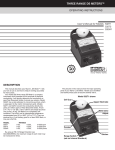
Ice Maker
User Manual
Part# IMA
www.KoolTekCoolers.com P:877-Kool-Tek
Table Of Contents
Introduction
2
Parts Description and Illustration
2
Ice Maker Specifications
3
Features and Benefits
3
Control Panel Operation
4
Safety and Installation
4
Important Safety Instructions
4
Electrical Requirements
4
Space Requirements
4
Operating Instructions
5
Ice Maker Operation
5
Care and Cleaning/Maintenance
6
Notes/Tips
6
Troubleshooting
7
2
Introduction
Congratulations on your purchase of a Kool Tek Ice Maker. To ensure that you
enjoy years of trouble-free operation, keep this manual which contains valuable
information about how to operate and maintain your Ice Maker properly and
safely. Please read carefully.
We have engineered this portable ice maker to produce ice at the touch of a
button. The unique curved shape ice allows liquid to flow over it more easily,
eliminating splashing. Simply pour tap water into the Ice maker.
Ready to use within 10-15 minutes.
(Note: it may take more time to produce the ice cubes on the initial use.)
Parts Description and Illustration of Unit
8. Water Inlet Tube
9. Water Drain Plug
10. Compressor
11. Water inlet
12. Water Pump
13. Lid
14. Control Board
1. Inner liner
2. Water Reservoir
3. Ice Collecting Tray
4. Ice Storage Basket
5. Ice Shovel
6. Water Tray
7. Evaporator
3
SPECIFICATIONS
Daily Ice Output
Ice Storage Capacity
Compressor
Water Reservoir Capacity
Dimensions
Unit Weight Net/Gross (Lbs.)
33 Lbs/24 hours
2.9 Lbs Approximately 150 ice cubes
High Efficiency CFC Free (R134a)
1.2 Gallons
14”W x 17 3/4”H x 16”D
48.6 Lbs. (22 kg.)
Features and Benefits
The ice maker is different from traditional commercial ice makers. The Kool Tek
ice maker is suitable for use in office, break rooms and homes
•
•
1.
2.
3.
4.
5.
6.
It is micro computerized and makes ice fast and easy.
Through each cycle, the ice maker completes the following steps:
Water filling
Ice making
Water releasing
Ice dropping
Ice transfer
Ice storage
4
Control Panel Operation
ON/OFF Press to turn unit on. Ice maker will restart automatically.
Safety and Installation
IMPORTANT SAFETY INSTRUCTIONS
WARNING:
To reduce the risk of fire, electric shock or injury when using your
ice maker, follow these basic precautions.
•
•
•
•
•
•
Plug into grounded 3 prong outlet.
Do not remove ground prong.
Do not use an adapter.
Do not use an extension cord.
Disconnect power before servicing
Do not pull directly on wire when plugging and unplugging the unit.
1.lf the supply cord is damaged, it must be replaced by the manufacturer or its
service agent or a similarly qualified person in order to avoid a hazard.
2.The appliance must be positioned so that the plug is accessible
3.The appliance shall not be exposed to rain
4.Fill with potable water only.
Space Requirements
•
•
•
•
•
•
During transportation, the incline angle of the cabinet should not be over 45’
Do not turn the ice maker upside down. Compressor and sealed system
problems can occur.
The ice maker should be placed on a horizontal properly leveled surface.
To ensure proper ventilation for your ice maker, allow for a 6” (150mm)
space at the top, back and on each side of the ice maker.
Before using the ice maker for the first time, please wait 12 hours after
positioning it in a proper place.
Clean the inner liner, ice collecting tray, water box, ice shovel and
evaporator frequently.
5
Operating Instructions
Starting your ice maker
STEP 1. Connect water line to water inlet valve
STEP 2. Press ON/OFF button to turn unit on.
The ice maker will begin to work.
Ice Maker Operation
The ice making process is as follows:
• Water is pumped into the water tray from the water reservoir. It takes about
40 seconds.
• Ice making cycle begins. The evaporator in the water tray starts to form ice on
the evaporator” fingers” WARNING: Do not touch evaporator while unit is
making ice. The evaporator will cause a burn.
• It takes approximately 6 to 14 minutes (depending on ice selection) for the ice
making cycle to complete. Once completed, the water tray will tilt forward, the
remaining water will flow back to the water reservoir and the ice cubes will drop
from the” fingers” .You will hear a sound as the ice cubes are released.
• In about 30 seconds, the water tray will tilt backward and the ice shovel will start
to push the ice into the ice collecting section. Once the water tray returns to its
leveled position, the second ice making cycle begins.
When the ice cubes are collected and reach the ice bin sensor, the ice maker will
stop operating and the” ice full” indicator will illuminate. When the ice is below the
sensor, the ice maker will re-start the cycle.
For best performance water temperature should be between 60º-75ºF
Notes/Tips:
• It is normal for the compressor and condenser surfaces to reach
temperatures of 160ºF during operation and surrounding areas may be hot
to the touch .
• Due to fast freezing ,ice cubes may appear “cloudy”. This is actually trapped
air in the water and does not affect the taste or quality of the ice.
• When defrosting or leaving the unit turned off, prop and leave the door open
at least two inches. This allows air to dry the inside of the cabinet, reducing
the chance for mildew.
6
Care and Cleaning Maintenance
• If the compressor stops for any reason such as water shortage, too much ice,
power off ,etc. do not restart the system right away. Wait 3 minutes, then restart
the ice maker.
• Remove the drain plug to drain the remaining water from the water reservoir
when the ice maker will not be used for long periods of time. Screw the drain
plug back in place after the water has been drained.
• Always charge with fresh water before starting ice production at initial
installation and after long shutoff period.
• Please clean the ice maker regularly. When cleaning, unplug the unit and
remove the ice cubes. Use a diluted solution of water and hydrogen peroxide
to clean the inside and outside surface of the ice maker. Do not spray ice
maker with chemicals or diluted agents such as acid, gasoline, or oil. Rinse unit
thoroughly before starting.
Troubleshooting
This troubleshooting section is to be used only as a guideline to assist in
determining any problems.
Problem
Possible Cause
The compressor works
abnormally with a buzzing
noise.
The voltage is lower than
recommended.
Stop the ice maker and do not restart it
until the voltage is normal
No Ice
There is no water
Press the stop button, fill with water, wait
3 minutes and press the start button to
restart. Or when the water has reached
the fill line the ice maker will restart
automatically Check Water connection
Indicator lights on display are
not on
Blown fuse
Replace fuse
No power
Turn power on
The water temperature in the
water storage box or ambient
is too low
Stop the machine and reset the ice making
time. Restart the machine after turning
unit off.
The ice made are too large
with pieces sticking together
Conditions for ice making
cycle are right but no ice is
made.
Suggested Solution
The water box does not turn
Check that automatic shovel is not jammed
Refrigerant leaks
Sealed system is blocked
Call for service
Please note: If there is a power failure or the power cord is disconnected or if
someone accidentally pushes the off power button during an ice making cycle,
small ice chips could possibly be produced during the restart cycle and when the
cycle is complete these smaller chips will lodge in the automatic shovel causing
the shovel to jam. If this should occur, the ice chips will have to be removed by
disconnecting the power cord and gently pushing the shovel to the rear of the
cabinet and removing the ice chips, then restarting.
7