1
192321932018001
OFFICE PRO UPS 625VA USER MANUAL
IMPORTANT SAFETY INSTRUCTIONS
SAVE THESE INSTRUCTIONS
This manual contains important instructions that should be followed during installation and maintenance of the UPS and batteries.
CAUTION- Intended for installation in a temperature controlled environment.
- Maximum ambient temperature 95°F.
- Servicing of batteries should be performed or supervised by personnel knowledgeable of batteries and the required precautions. Keep
unauthorized personnel away from battery.
- To reduce the risk of fire, connected only to a circuit provided with 20 amperes maximum branch circuit over current protection in accordance with the national
Code, ANSI/NFPA 70.
SETUP
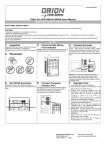
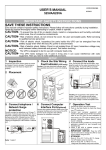
1 Inspection
Inspect the UPS upon receipt. Notify the carrier
and dealer if there is damage. The package is
recyclable; save it for reuse or dispose of it
properly.
3 Check the Site Wiring 4 Connect the loads
First, connect the UPS to the AC input power source.
Fault Indicator
Next, plug your computer, monitor, or other devices into
Caution: If the site wiring fault indicator lights,
get a qualified electrician to correct the building
wiring.
the receptacles on the rear of the UPS. To use the UPS
as a master “On/Off” switch, make sure that all of the
connected devices are switched “On”.
2 Placement
Caution: To prevent an overloading condition, do not
connect a laser printer to the backup outlets. These
UPS outlets provide battery power to the connected
equipment when utility voltage is outside acceptable
limits.
5 Connect telephone /
Network Surge
protection
(Optional) Provide an RJ11/RJ45 connector to
extend the connection of the
telecommunication/network cable.
6 Connect Computer
Interface Port
(Optional) Connect the optional interface cable
to the USB interface port on the back of the
UPS. Connect to the computer. See software
documentation for installation instructions.
7 Operation Test
1. Connect the UPS to the wall receptacle.
2. Press the Power button on the front panel, verify that
the Green Line (
) LED is on.
3. Connect your computer equipment to the receptacles
on the back of the UPS. Unplug the input power
cable of the UPS from the wall receptacle to check if
the Line (
) LED is flashing every 3 seconds. The
audible alarm will beep periodically.
4. The ups is now running on internal battery to support
the connected equipment.
5. Reconnect the ups to the wall receptacle to complete
the test. The audible alarm will silence and the
Green Line LED will be visible.
6. IMPORTANT: Plug the UPS into the wall outlet to
charge the internal battery for a minimum of 8 hours
prior to using the UPS.
7. STORAGE:
Store at -15 to +30 °C (+5 to +86 °F), charge the UPS
battery every six months.
Store at +30 to +45 °C (+86 to +113 °F), charge the
UPS battery every three months.
Orion Power Systems, Inc.
8640 Philips Hwy
Jacksonville, FL 32256
Toll-Free: 877-385-1654
www.orionpowersystems.com
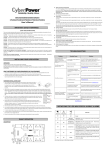
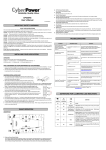
FRONT PANEL EXPLANATIONS
1. Line LED (
):
Green LED remains lit when utility power is normal.
Green LED flashes every 3 seconds and audible alarm
beeps continuously with utility power failure.
Green LED flashes every 3 seconds when the UPS is in
battery charging mode, no audible alarm.
Green LED flashes every 0.5 seconds with audible alarm
sounding every 0.5 seconds in battery low condition.
Green LED remains lit and audible alarm sounds
continuously when the UPS is in overload condition.
REAR PANEL EXPLANATIONS
3
1
2
1. AC Inlet
2. Backup Outlets: 2pcs NEMA5-15R
3. Computer Interface: USB communication port.
4. RJ11/RJ45 connector
5. Site Wiring Fault Indicator:
6. AC Circuit Breaker. (625/8A, 525/7A)
7. Bypass Outlets: 2pcs NEMA5-15R
3 5
2. Check Battery LED (
):
Red LED remains lit for battery failure.
3. Main Switch:
a. To Control on/off the UPS when Utility is normal.
b. To enable “DC-Start” Function when Utility fails. (To enable
DC Start properly, you are recommended to connect <80%
output load with the UPS only).
c.When using the “DC-Start”, ensure the equipment connected to the UPS is switched
on. It is not recommended to add other equipment after the DC-Start function is
activated.
4
1
6
7
2
REPLACING THE BATTERY
Note: Once the battery is disconnected,
the loads are not protected from power
outages.
1. Use a phillips head screwdriver to remove the two
front panel screws and slide down the panel.
2. Gently Pull the battery out of the UPS.
3. Loosen the black wire from the negative (-) terminal
and red wire from the positive (+) terminal.
4. Connect the battery leads to the new battery.
5. Note: Small sparks at the battery connectors are
normal during connection.
6. Slide the battery into the UPS.
7. Close the front panel and fasten two screws.
8. Dispose of the old battery properly at an
appropriate recycling facility.
TROUBLESHOOTING
When your UPS malfunctions during operation, please check the table below. Please consult Orion Power Systems Online Technical
Support or call Orion Power Systems for assistance with problems that cannot be resolved using the troubleshooting guide.
Situation
Check Items
Utility power is normal but the 'Line' LED is not 1. Is the power switch on?
on.
2. Is the fuse good?
3. Is the power cord loose?
'Line' LED flashes every second but no output Battery voltage is too low
Audible alarm beeps continuously when Utility Check for overload condition.
power is normal.
Alarm buzzer beeps for 10 seconds followed
by UPS shutdown
No LEDs display on the front panel
UPS does not provide expected back up time. 1. The UPS battery is weak due to recent outage.
2. The UPS battery is near the end of its service life.
The UPS operates normally, but the site wiring Building wiring error such as missing ground or hot
fault indicator is lit.
to neutral wire reversal.
Solution
1. Press Power On button on front of unit.
2. Replace fuse with same rating.
3. Re-connect the power cord properly.
Recharge the UPS for 24 hours.
Reduce connected load by removing one or
more devices.
Reduce connected load by removing one or
more devices. Restart ups.
Contact Orion Power Systems Technical Support
1. Charge the battery.
2. If the battery is near the end of its service life,
replace the battery.
Have a qualified electrician correct the building
wiring.
Orion Power Systems, Inc.
8640 Philips Hwy
Jacksonville, FL 32256
Toll-Free: 877-385-1654
www.orionpowersystems.com