1
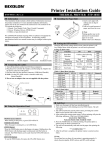
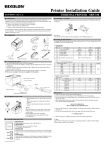
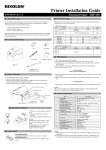
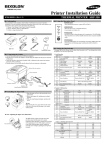
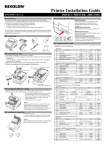
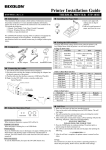
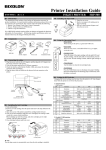
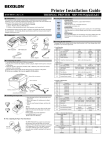
Printer Installation Guide
THERMAL PRINTER SRP-340
KN04-00068A (Rev.1.1)
◈ Information
◈ Using the Operation Panel
This Installation Guide includes a brief outline of information necessary for product
installation. For more detailed installation information, please refer to the user manual in the
enclosed CD. The contents of the CD include the following.
1. Manual: User Manual, Code Chart, Control Commands
2. Drivers: Windows Drivers, OPOS Drivers
3. Utilities: a logo download tool
• POWER (LED)
When turning on the power, a green LED will be lit.
We at BIXOLON maintain ongoing efforts to enhance and upgrade the functions and quality
of all our products. In following, product specifications and/or user manual content may be
changed without prior notice.
• PAPER (LED)
Red LED will be lit when the paper roll is running low. The LED
blinks when the printer is in self-test standby mode or macro execution
standby mode.
• ERROR (LED)
When an error occurs, a red LED will be lit.
(e.g. no paper, cover ajar, etc.)
◈ Components
• FEED (Button)
Press the FEED button once to discharge extra paper. Holding down
the FEED button will discharge paper continuously until the button is
released.
Procuct Installation CD
Cable Cover
Paper Roll
CD
◈ Setting the Dip Switches
Changing Dip Switch settings must be done when the printer is off. Any changes done while
the printer is on will not be processed.
SRP-340
AC/DC Adaptor
Power Cord
Installation Guide
◈ Connecting the Cables
1. Turn off the printer and the host ECR (host computer).
2. Plug the power cord into the Adaptor, and then plug the Adaptor into the power connector
of the printer.
3. Check the interface cable (Serial, Parallel, USB, or Ethernet), and connect the interface
connector cable accordingly.
4. Plug the drawer kick-out cable into the drawer kick-out connector on the printer.
※ Do not use an adapter that was not supplied with the printer.
Drawer kick-out connector
Power connector
1. Serial Interface
• DIP Switch 1
SW
Function
1-1
Auto Line Feed
1-2
Flow Control
1-3
Data Length
1-4
Parity Check
1-5
Parity Selection
1-6
1-7
Baud rate Selection (bps)
1-8
• DIP Switch 2
SW
Function
2-1
Auto cutter control
2-2
Internal bell control
2-3
Auto Cutter
2-4
Reserved
2-5
Print Density
2-6
2-7
Near-End Sensor Status
2-8
Adaptor
Interface connector
Interface cable
(Serial/Parallel/USB/Ethernet)
Drawer
kick-out
cable
Power cord
◈ Installing the Paper Roll
1. Open the paper roll cover by pressing the coveropen button.
2. Insert a new paper roll, making sure to align it
properly.
3. Pull out a small amount of paper, and close the
cover.
※ Note
When closing the cover, press down on the center
of the cover to ensure that the paper is in contact
with the roller.
Printing quality may not be optimum if
recommended paper is not used. (Refer to the
User's Manual.)
※ Note: Adjusting the Paper Near-End Sensor
Near end sensor tab
The SRP-340 has a paper near-end sensor that
provides notice that the paper roll is nearly
exhausted. When the paper is running low, the
lamp on the apparatus is lit red. If the lamp is
activated even when sufficient paper remains,
adjust the near-end sensor setting by pushing the
tab upward towards1.
External buzzer control
OFF
Disable
DTR/DSR
8 bits
No
ODD
Default
OFF
OFF
OFF
OFF
OFF
OFF
ON
OFF
Refer to the following Table 1
ON
Full cut
Internal bell disable
Auto cutter disable
-
OFF
Partial cut
Internal bell enable
Auto cutter enable
-
Refer to the following table 2
Default
OFF
OFF
OFF
OFF
OFF
OFF
OFF
Disable
External buzzer
enable
Enable
External buzzer
disable
ON
Enable
-
OFF
Disable
-
Default
OFF
OFF
OFF
OFF
OFF
OFF
ON
OFF
ON
Full cut
Internal bell disable
Auto cutter disable
-
OFF
Partial cut
Internal bell enable
Auto cutter enable
-
Default
OFF
OFF
OFF
OFF
OFF
OFF
OFF
External buzzer control
2. Parallel / USB Interface
• DIP Switch 1
SW
Function
1-1
Auto Line Feed
1-2
Reserved
1-3
Reserved
1-4
Reserved
1-5
Reserved
1-6
Reserved
1-7
Reserved
1-8
Reserved
• DIP Switch 2
SW
Function
2-1
Auto cutter control
2-2
Internal bell control
2-3
Auto Cutter
2-4
Reserved
2-5
Print Density
2-6
2-7
Near-End Sensor Status
2-8
ON
Enable
XON/XOFF
7 bits
Yes
EVEN
Refer to the following table 2
Disable
External buzzer
enable
• Table 1 – Baud Rate (bps) Selection
Transmission Speed
1-6
2400
ON
4800
ON
9600
OFF
19200
OFF
38400
OFF
57600
OFF
115200
ON
• Table 2 – Print Density Selection
Print Density
2-5
1 (Light)
ON
2 (Medium)
OFF
3 (Dark)
ON
Enable
External buzzer
disable
1-7
OFF
OFF
ON
OFF
ON
OFF
ON
1-8
OFF
ON
OFF
OFF
ON
ON
ON
2-6
ON
OFF
OFF
OFF
OFF
Default
9600
Default
2
◈ Self Test
1. Make sure the paper roll has been installed properly.
2. Turn on the power while holding down the FEED button. The self-test begins.
3. The self-test prints the current printer status, providing the control ROM version and the
DIP switch setting.
4. After printing the current printer status, self-test printing will print the following, and
pause. (The PAPER LED light blinks.)
SELF-TEST PRINTING.
PLEASE PRESS THE FEED BUTTON.
5. Press the FEED button to continue printing. The printer prints a pattern using the built-in
character set.
6. The self-test automatically ends and cuts the paper after printing the following.
*** COMPLETED ***
7. After the self-test is complete, the printer returns to normal on-line status.
※ Note
The self-test lets you know if your printer is operating properly. It checks the print quality,
ROM version, and DIP switch settings.
◈ Specifications
Item
Printing Method
Dot Density
Printing Width
Characters per line (default)
Printing Speed *1)
Printer
Receive Buffer Size
SMPS Input Voltage
Frequency
SMPS Output Voltage
Temperature
Humidity
Paper
Mechanism Head Life *2)
Auto Cutter
Mechanism MCBF *2)
Paper Type
Roll Width
Roll Diameter
Paper Thickness
Paper Tube
Details
Thermal Line Printing
180 dpi (7dots/mm)
72 mm
42 (Font A)
56 (Font B)
56 (Font C)
47.28 lines/sec
200 mm/sec
4K Bytes
100~240 VAC
50/60 Hz
24 VDC
0 ~ 45 ℃ (Operating)
-20 ~ 60 ℃ (Storage)
10 ~ 80 % RH (Operating)
10 ~ 90 % RH (Storage)
Except for paper
150Km
1,800,000 Cuts
70,000,000 Lines
Paper Roll
79.5±0.5 mm
Max 83mm
0.062~0.075 mm
Inner: Ø12mm (0.47”)
Outer: Ø18mm (0.71”)
◈ Installing Windows Driver for the Printer with
Parallel (IEEE1284) Interface
1. Run Win SRP-340_Vx.x.x.exe.
2. Select the Next button from initial installation window.
3. Select one from Parallel Port section of the Port Type window, and select the Next
button (refer to Fig 1).
4. Select Yes and restart the computer (refer to Fig 2).
5. After restarting the computer, select Start > Settings > Printers and Faxes > BIXOLON
SRP-340 Icon > Right Mouse Click > Properties.
6. Select General tab from the Properties window and select Print Test Page to check
whether printer setup has been done correctly.
◈ Installing Windows Driver for the Printer with
USB Interface
1. Run Win SRP-340_Vx.x.x.exe.
2. Select the Next button from initial installation window.
3. Select USB from the Port Type window, and select the Next button (refer to Fig 1).
4. Turn the printer off and on, and click the OK button
※ Note
*1) Printing speed may be slower depending on the data transmission speed and the
combination of control commands.
*2) The above values are calculated under printing level 2 with recommended paper at
normal temperature.
The values may vary with environment temperature, printing level, etc.
5. After restarting the computer, select Start > Settings > Printers and Faxes > BIXOLON
SRP-340 Icon > Right Mouse Click > Properties.
6. Select General tab from the Properties window and select Print Test Page to check
whether printer setup has been done correctly.
◈ Installing Windows Driver for the Printer with
Serial(RS-232C) Interface
Refer to the separate Ethernet Interface Card User’s Manual. (Refer to CD)
1. Run Win SRP-340_Vx.x.x.exe.
2. Select the Next button from the initial installation window.
3. Select one of serial port in Serial Port section from the Port Type window, and select the
Next button.
◈ Installing Windows Driver for the Printer with
Ethernet Interface
◈ WEEE (Waste Electrical and Electric Equipment)
This marking shown on the product or its literature, indicates that is should not be
disposed with other household wastes at the end of its working life, To prevent
possible harm to the environment or human health from uncontrolled waste disposal,
please separate this from other types of wastes and recycle it responsibly to promote
the sustainable reuse of material resources. Household users should contact either the
retailer where they purchased this product, or their local government office, for details
of where and how they can take this item for environmentally safe recycling. Business
users should contact their supplier and check the terms and conditions of the purchase
contract. This product should not be mixed with other commercial wastes for disposal.
☎ BIXOLON Co., Ltd.
● Website http://www.bixolon.com
(Fig 1)
4. Select Yes and restart the computer.
● Korea Headquarters
(Add) 7~8F, (Sampyeong-dong), 20, Pangyoyeok-ro241beon-gil,
Bundang-gu, Seongnam-si, Gyeonggi-do, 463-400, Korea (ROK)
(Tel.) +82-31-218-5500
● U.S. Office
(Add) BIXOLON America Inc., 3171 Fujita St, Torrance, CA 90505
(Tel.) +1-858 764 4580
● Europe Office
(Add) BIXOLON Europe GmbH, Tiefenbroicher Weg 35 40472 Düsseldorf
(Tel.) +49 (0)211 68 78 54 0
(Fig 2)
5. After restarting the computer, select Start Menu > Settings > Printers and Faxes >
BIXOLON SRP-340 icon > Right Mouse Click > Properties.
6. Select the Port tab and Port Settings from the Properties windows, set the parameters
reported from the self-test result, and select the OK button.