1
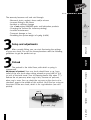
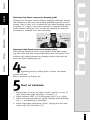
User manual
2oo7
www.magura.com
German Suspension Technology
Hugin 2007
User
Manual
Danger:
This symbol means possible danger to your health and even life if
you do not follow the instructions given, or if the necessary safety
instructions are not followed.
Attention:
This symbol warns you of inappropriate handling that could lead
to serious damage to the material and/or the environment.
Note Icon:
This symbol gives you additional information about the general
handling of the product or indicates paragraphs in this manual,
which have to be read carefully.
1
English
Francais
Nederlands
Explanations
Italiano
This user manual gives you detailed instructions on the set up of
your rear shock. You can find more information on the web at:
http://www.magura.com . If you still have questions, please place
them in the forum at www.magura.com.
This user manual is part of the product. Do not hand over the
product to third parties without this manual.
Pictures and descriptions may vary to the product being explained.
Technical details are subject to change with out prior notice.
Español
1. Introduction
1.1 MAGURA Hugin Rear Shock and it’s applications
1.2 Assembly
1.3 Before every ride
1.4 During the ride
1.5 After a crash or accident
1.6 Further references
2. Maintenance and warranty
2.1 Maintenance
2.2 Warranty
3. Glossary, Adjustment and Setup
3.1 Preload
3.2 Rebound damping
3.3 Compression damping
3.4 Albert Plus
4. Data
5. Short cut instruction
Deutsch
Content
Deutsch
English
Francais
Nederlands
1
Dear Customer,
congratulations! You have just become a member of the MAGURA
mountain bike community. We believe that our products result in a
higher ride quality and hope you will enjoy our products for many
years to come. You now own a high end rear shock, that was designed and assembled in Germany. Please take the time to read this
manual carefully, so you can become familiar with your new rear
shock and find out how to get the best set-up for your own expectations.
RIDE HARD
The Passion People
1
Hugin rear shock and its application
1
Assembly
Italiano
.1
Español
Introduction
The high-end rear shock Hugin is designed for x-country, marathon,
tour and enduro use. The lightweight and solid construction is made
for maximum durability and easy service. The large air chamber
volume allows low air pressure. The elastomer negative spring
adjusts itself to the riders weight. All settings are easily adjusted
without tools by the alloy knobs, you only need an air pump. The
genius damping system Albert Plus offers a separate and independently adjustable pedal platform, which eliminates pedal induced
bobbing on climbs. High and low speed compression damping can
be adjusted separately. Standard ball-and-socket mounts reduce
lateral forces on the rear shock to a minimum.
.2
If you are unsure about fitting the rear shock by your self onto
your bike, please consult your local Magura dealer. He´s got the
knowledge and specific tools for a proper assembly!
A badly fitted damper can cause accidents!
delivery content
rear shock,
pump,
hardware,
spacer,
Reducer sleeve
from D8 D6
2
Accessories depend on the model. Spec changes, especially on
small parts, are subject to change without prior notice !
3
Italiano
If you are unsure about fitting the rear shock by your self onto
your bike, please consult your local MAGURA dealer. He´s got the
knowledge and specific tools for a proper assembly!
A badly fitted damper can cause accidents!
Español
1 ball-and-socket mount
2 mounting hardware
3 O-rings
Nederlands
Francais
MAGURA rear shocks are sold with ball-and-socket mounts.
To achieve different mounting widths and diameters please use the
respective hardware with optional spacers. Assembly is as shown in
the picture.
English
If the rear shock is to be mounted vertically, the side with the
adjustment knobs should be on the upper part, allowing the dirt
to be wiped downwards off the piston.
Deutsch
If you assemble the rear shock by yourself, make sure it is compatible with your frame. Important is the shock length from eye to eye
(versions available: 165mm/6,5“, 190mm/7,5“, 200mm/7,88“,
222mm/8,75“), width and diameter of mounting hardware. The rear
shock must not collide with the frame, rockers or rear end, even
fully compressed. To check this, release air from the rear shock
while mounted to the frame and compress it completely. Check also,
that the rear shock is assembled without play. The Hugin rear shock
is designed for an optimum leverage ratio from 2 to 3. If in doubt
ask your bike manufacturer for the leverage ratio.
Deutsch
English
Francais
Nederlands
Italiano
Español
1
.3
1.3. Before every ride
Always wear a helmet.
Make sure the rear shock doesn´t have any mechanical external
damages.
Make sure the mounting bolts are tightened with the correct torque
(see the frame manufacturers manual). If they are not tightened correctly, they may become loose possibly resulting in an accident!
Check that you are using the correct air pressure. The rear shock
should only be ridden with correct air pressure. Minimum air pressure is 5 bar/70psi. Maximum air pressure is 20 bar/295 psi.
Look for eventual leakages on piston rod and valve. Loss of air
and/or oil induces bad performance and can destroy the rear shock.
1
1
.4
During the ride
If you hear strange noises after hard impacts, that sound as if
the rear shock is damaged, stop riding (further riding with this
shock could result in serious injury). Bring/send the rear shock
to an authorised dealer or to a MAGURA service centre.
.5
After crash or accident
Check the rear shock after a crash for any damage. The use of
damaged or an incorrectly working rear shock could result in serious
injury. Have your rear shock checked by an authorized dealer.
4
1
.6
Further references
Please note that hard and out of control landings can cause severe
damage to the rear shock with the consequence that it could endanger your health and/or life.
A incorrectly fitted rear shock in the frame could result in failure!
Please ensure, (you or your dealer),that it is fitted correctly. Check
that the fixing bolts are tightened to the correct torques, (see frame
manual).
.1
Maintenance and Warranty
Maintenance
5
Español
Italiano
We recommend cleaning your rear shock on a regular basis. Use
water, mild soap and a brush. Do not use degreaser or abrasive
cleaners. Do not use a power washer, as water may be forced
through the seals, destroying them, the internals and piston rods.
English
2
2
Francais
Manufacturer and dealer are also not liable for any overloading of
the bike and/or for any incorrect repair to the shock. Maximum
system weight including bike, biker and luggage should not exceed
130kg/285lbs. Maximum air pressure is 20 bar/295 psi.
Nederlands
The rear shocks of the Hugin range are intended for x-country,
marathon-, tour- and enduro use. The manufacturer and dealer are
not liable for any other use that surpasses these criteria or which
does not respect the security guidelines stated in this manual.
Deutsch
If you have doubts about the safety of your rear shock please
contact your dealer or ask one of MAGURA’s Service team, (see the
service centre for your country on the back of the manual.
Deutsch
English
Francais
Nederlands
Italiano
The rear shock Hugin features an oil damping system and grease
lubrication on the air side and thus requires little maintenance. They
therefore only need to be serviced once a year. Racers and those
who are permanently out riding, should consider that their components get more wear and tear and need servicing more often.
PLEASE NOTE!, MAGURA rear shocks must not be disassembled.
This work must only be carried out by MAGURA Service centres or
at MAGURA Germany, this is among other things due to the high
internal pressure.
Never open the screws, because the screws themselves and/or oil
and/or gas can be shot out of the rear shock, possibly causing
severe injuries!
Disassembly can only be done by MAGURA Service Centres or
MAGURA itself. The internal structure requires special tools and
special filling machines. Already small amounts of air can cause
malfunctioning of the rear shock.
2
Español
.2
Warranty
Parts, components and assemblies that are subject to normal wear
and tear are not covered under this warranty .
The warranty is no longer valid if the rear shock is used in any
way out with the terms stated in this manual. This also applies to
inappropriate set up, maintenance and service as explained in this
manual.
Like every other product, this rear shock also contains parts that
will wear during normal use. The life span of these parts depends
on the type and frequency of use, as well as care and maintenance.
Please note that the usual wear of parts is normal and therefore
no reason for concern. This applies especially to: bushings, seals
and the surface of the pistons and cylinders.
Warranty duration and laws may vary from state to state and/or
country to country.
Please note that a warranty case can only be handled if accompanied by proof of purchase.
6
The warranty becomes null and void through:
- Abnormal strain, neglect, abuse and/or misuse
- Incorrect fitting to the frame
- Accident or collision damage
- Use of not-original MAGURA parts and lubrication products
- Changing the surface (for instance painting)
- Incorrect maintenance
- Transport damage or loss
- Exceeding the system weight of 130kg (286lb)
3
3
The preload is the initial force, with which a spring is
compressed.
Adjustment of preload: Your rear shock should have a sag (sag=
travel of the rear shock when sitting relaxed on your bike) of 15%
to 20% of the total travel. Turn all damping knobs fully open (“-“).
Reduce the air pressure, when sag is less, increase air pressure,
when sag is more. You can check the sag area on the short cut instructions gage in the middle of this manual. You’ll find an o-ring on
the piston of the rear shock, which is for sag indication (see also
picture).
Italiano
100%
Francais
Preload
Nederlands
.1
English
After correctly fitting, you can start fine-tuning the settings
of your rear shock. You can use the explanations with the following
guidelines to get the perfect set up.
Deutsch
Setup and adjustments
7
Español
15%-20% „Sag“
Deutsch
English
1. The rear shock comes delivered with 8 bar/115psi air pressure
(max air pressure: 20 bar/285 psi).
Italiano
Nederlands
Francais
o-ring for
„Sag“-adjustment
1
2. Unscrew the valve cap and screw the pump head onto the valve.
With the MAGURA pump, screw the pump head on with the lever in
position A, once screwed on, flip the lever to position B.
Tip: don´t screw the pump head too tight onto the valve, otherwise
it will be difficult to flip the lever to position B.
3. Adjust air pressure for correct sag (15%-20% of total travel).
Correct sag can be checked easily with the gage on the short cut
instruction in the middle of this manual.
Español
4. Pressing button C completely: air is released step by step.
Just touching lightly on button C: air is released completely.
A
B
C
Max air pressure: 20 bar/285 psi.
5. Before unscrewing the MAGURA pump head from the valve, flip
the lever back to position A to avoid air loss.
6. Screw on the valve cap.
The adequate air pressure for your rear shock depends very
much on the linkage geometry of your bike and the rider weight,
therefore no standard pressure can be given.
A good starting pressure is 8 bar/ 115psi.
8
3
.2
Rebound damping
The rebound damping controls the rebound speed of the rear
shock. When the rebound speed is too low (high rebound damping)
the wheel looses contact to the ground, resulting in loss of control
and traction. At too low rebound damping (high rebound speed) the
wheel starts bouncing, resulting also in loss of control.
The compression damping controls the speed when compressing the rear shock. High compression damping increases the
compression force, low compression damping reduces the compression force.
Albert Plus speed sensitive
.4 compression damping
Your Hugin rear shock is equipped with the unique Albert Plus
damping system, for independent setting of high and low speed
compression damping. Pedal platform is adjusted separately and
individually from other settings with the low speed knob to
eliminate pedal stroke induced bobbing.
9
English
Francais
Compression damping
Nederlands
.3
Rebound knob (red)
Italiano
3
3
+
Español
The rear shock should
only bounce back 1 to 1,5
times. If it bounces back
more, increase (“+”)
rebound damping step
by step. If it stays compressed, decrease (“-“)
rebound damping.
Deutsch
Adjustment of rebound (red): The rear shock should not bounce
uncontrolled nor compress after an obstacle. Best for adjusting the
rebound damping is to roll down a small step (e.g. walk way) seated on your bike.
Deutsch
English
Francais
Adjustment Low Speed compression damping (gold):
Starting from the open position (knob completely released), observe
the movement of your rear shock while pedalling normally on even
ground. Does it move a lot? Increase the low speed damping turning
clockwise (“+”) step by step until movement is reduced. From this
pedal platform setting you can increase the damping for even less
movement or decrease it for more sensitivity.
+
Español
Italiano
Nederlands
High-Speed
(blue)
Low-Speed
(gold)
Adjustment High Speed compression damping (blue):
Does the rear shock top out on hard impacts, even with correct
sag (full travel with the o-ring pushed down from the piston)? Then
increase high speed compression damping step by step with the
blue knob until avoiding top out.
4
5
Data
Tightening torque on fixing bolts in frame: see owners
manual of frame.
Max air pressure: 20 bar/295 psi
Short cut instruction:
1. Starting form 8 bar/115 psi adjust correct sag (15% to 20% of
total travel) with gage, damping is all open („-„).
2. Adjust rebound (red), so it only bounces back 1 to 1,5 times.
3. Adjust low speed compression (gold): bobbing while pedalling:
turn „+“ until bobbing is eliminated.
4. Adjust high speed compression (blue): Topping out even with
correct sag? Turn blue knob (“+”).
10
User manual
2oo7
Kurzanleitung
Short cut instruction
Réglage rapide
Verkorte handleiding
Istruzioni Veloci
Instrucción breve
Deutsch
Anlegen der Messlehre
English
Placement of the gage
Francais
Positionnement de la règle
Nederlands
plaatsing van de ring
Italiano
Calibro di Regolazione del sag
Español
Aplicación del comprobador
Deutsch
1.
2.
3.
4.
Beginnend mit 8 Bar den korrekten Sag einstellen
(15%-20% des Gesamthubes) mit Lehre, dabei Dämpfung auf („-„)
Zugstufe einstellen, s. d. nur 1-1,5 mal Nachwippen
Druckstufe Low-Speed einstellen: Wippen bei pedalieren: „+“ drehen, bis wippen ausgeschaltet ist.
Druckstufe High-Speed einstellen: Trotz korrektem Sag schlägt der Dämpfer durch? Blau „+“ drehen
Kurzanleitung
English
1.
2.
3.
4.
Starting form 8 bar/115 psi adjust correct sag (15% to 20% of total travel) with gage,
damping is all open („-„).
Adjust rebound (red), so it only bounces back 1 to 1,5 times.
Adjust low speed compression (gold): bobbing while pedalling:turn „+“ until bobbing is eliminated.
Adjust high speed compression (blue): Topping out even with correct sag? Turn blue knob (“+”).
Short cut instruction
Francais
1.
2.
3.
4.
Commencez de régler le Sag (15-20% du débattement total) à partir d’une pression
de 8 bars avec la règle, toutes molettes amortissement dévissées.
Réglez la détente, afin qu’elle n’oscille qu’1-1,5 fois après choc.
Réglez la compression lente: vissez la molette dorée, jusqu’à supprimer le pompage.
Réglez la compression rapide: l’amortisseur talonne malgré un Sag correct? vissez la molette bleue.
Nederlands
1.
2.
3.
4.
Begin met 8 bar om de juiste sag in te stellen (15%-20% van de totale veerweg)
met de verstellingen open (naar de – gedraaid)
Rebound instellen, de demper mag maximaal 1 tot 1,5 maal na veren.
Compressiedemping lowspeed instellen: deinen bij pedaleren:
naar de + draaien totdat het deinen opgeheven is.
Compressiedemping highspeed instellen: Toch de juiste sag ingesteld en de demper slaat door?
Dan de blauwe knop naar de(+) draaien.
Verkorte handleiding
1.
Italiano
Réglage rapide
2.
3.
4.
Partire da 8 bar/115 psi ed aggiustare il sag (15 / 20% dell’escursione totale)
con regolazioni completamente aperte.
Regolare il ritorno (rosso) in modo che rimbalzi una volta – una volta e mezza.
Regolare la compressione a bassa velocità (oro) in modo da eliminare l’oscillazione dovuta
alla pedalata: girare “+” fino a quando l’oscillazione è eliminata.
Regolare la compressione ad alta velocità (blu): fine corsa anche con il sag corretto?
Gira la manopola blu (“+”).
Istruzioni Veloci
1.
Español
2.
3.
4.
Ajustar el Sag correcto con el comprobador, empezando con 8 bar
(15%- 20% del recorrido total), la amortiguación abierta („-„).
Ajustar rebote, para que sólo oscile 1 a 1,5 veces.
Ajustar compresión de velocidad baja (oro): Balanceo al pedalear? Girar „+“ hasta eliminar balanceo.
Ajustar compresión de velocidad alta (azul): Hace tope con el Sag correctamente ajustado?
Girar el dial azul en “+”.
Instrucción breve
MAGURA Bike Parts
GmbH & Co.
Heinrich Kahn Straße 24
D-89150 Laichingen
[email protected]
www.magura.com
MAGURA
Partners and Service
Centers Worldwide
Andorra
Esports Jorma
phone 376-844133
fax 376-843022
[email protected]
Australia
TMO Sports
phone 02-9695-7744
fax 02-9695-7844
[email protected]
Austria
MAGURA Austria
phone +49-7333-962613
fax +49-7333-962617
[email protected]
Belgium
Transmission
phone 010-244646
fax 010-244777
[email protected]
Canada
MAGURA USA
phone 618-3952200
fax 618-3954711
[email protected]
Denmark
Borandia APS
phone 47-107172
fax 47-107066
[email protected]
Cover: Apollo 11 | Inhalt: lines & points
© MAGURA 2006
All rights reserved
Printed in Germany
0689 646, 07.2006
Hotline | Helpdesk:
phone 09001-648124
(41 ct. per minute)
daily from 9 to 12 h
and 12.30 to 15.15 h
fax +49-7333-962651
[email protected]
Finland
Best Brakes Ky
phone 050-591 5863
fax 019-388485
[email protected]
Italy
Areab
phone 0438-435550
fax 0438-439847
[email protected]
Singapore
MAGURA ASIA Inc.
phone +886-4-23283739
fax +886-4-23283734
[email protected]
France
MAGURA Service
Center France
phone +49-7333-962643
fax 04-98106289
[email protected]
Japan
MC International
phone 06-6536-0901
fax 06-6536-0907
[email protected]
South Africa
Cycles Africa
phone 011-678-1548
fax 011-678-1548
[email protected]
Great Britain
MAGURA Bike Parts UK Ltd.
phone 01530-837195
fax 01530-811286
[email protected]
Korea
MAGURA ASIA Inc.
phone +886-4-23283739
fax +886-4-23283734
[email protected]
Greece
Nikos Maniatopoulos
phone 2610-993 045
fax 2610-990 424
[email protected]
Luxemburg
MAGURA Service
Center France
phone +49-7333-962643
fax +33-4-98106289
[email protected]
Hong Kong
MAGURA ASIA Inc.
phone +886-4-23283739
fax +886-4-23283734
[email protected]
Hungary
Mali Bicycle Technology
phone 01-4207563
fax 01-4205321
[email protected]
Ireland
Beara Bike Trading
phone 064-89134
fax 064-41334
[email protected]
Netherlands
MAGURA Nederlands
phone +49-7333-962614
fax +49-7333-962617
[email protected]
Norway
Botolfsen
phone 022-630610
fax 022-970662
[email protected]
Portugal
LPL-Artigos Desportivos
phone 021-4835354
fax 021-4835362
[email protected]
Spain
SAT MAGURA: Bicisport
Sólo para reparaciones y
servicio!
phone 93-3404480
fax 93-3404480
■ Bicicletas Monty
phone 93-6667111
fax 93-6667112
[email protected]
■ Casa Masferrer
phone 93-8463444
fax 93-8465355
[email protected]
■ Comet
phone 943-331393
fax 943-551407
[email protected]
■ Representaciones
Spinola & Perez
phone 619-702946
fax 93-2317731
[email protected]
■
Sweden
Jaguarverken AB
phone 060-669800
fax 060-669809
[email protected]
Switzerland
Intercycle
phone 041-9266511
fax 041-9266355
[email protected]
■ Amsler & Co.
phone 052-6473636
fax 052-6473637
[email protected]
■
Taiwan
MAGURA ASIA Inc.
phone 04-23283739
fax 04-23283734
[email protected]
USA
MAGURA USA
phone 6183952200
fax 6183954711
[email protected]
www.magurausa.com