1
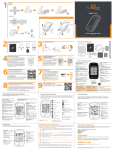
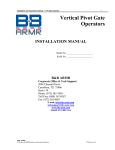
1 GENERAL 1.1 General Information 1 GENERAL Congratulations on purchasing this advanced multifunctional screeneye x. Take a moment to read this guide carefully. 1.1 General Information These resources provide important setup information and are designed to help you to get the most from your device. If you regularly carry out a sporting activity or wish to step up your training, the screeneye x is the perfect choice for you. An option would be to use several accessories like the maxrun, an accelerometer sensor that will be attached under your shoe layers. Another sensor would be the heart2feel x heart rate belt which can transmit your heart rate to the screeneye x visor. The design of this product have also been specifically developed to suit all body types and for easy use during your sport. This is a manual which can help you to use your screeneye x basic functions. For the latest product information and more details of the optional accessories and the free traininglab software, visit the osynce Web site at www.o-synce.com CAUTION! Always consult your physician before beginning or modifying any exercise program. If you have a pacemaker or other implanted electronic devices, consult your physician before using a heart rate monitor. 1 / 18 screeneye x 2 Scope of delivery 2.1 In the Box 2 Scope of delivery Strong electromagnetic fields and some 2.4 GHz wireless sensors can interfere with your heart rate monitor and other accessories. Sources of interference may include very high voltage power lines, electric motors, microwave ovens, 2.4 GHz cordless phones, and wireless LAN (Wi-Fi) access points. After you move away from the source of interference, the displayed rate data should return to normal. 2.1 In the Box 1x casing screeneye x Fig. 1 casing screeneye x Fig. 2 screeneye x Fig. 3 USB cable 1x screeneye x 1x USB cable screeneye x 2 / 18 2 Scope of delivery 2.2 Optional Compatible Accessories 2.2 Optional Compatible Accessories For more information about optional compatible accessories go to www.o-synce.com Some functions which are described in this manual are only accessible with the optional accessories. Such functions are marked as “optional”. heart2feel x Fig. 4 heart2feel x heart rate belt The screeneye x visor is ready to use with the heart2feel x heart rate belt. For more information about optional accessories, go to www.o-synce.com. You can also contact your o-synce dealer to purchase accessories. maxrun Fig. 5 maxrun foot pod sensor for running The screeneye x visor is ready to use with the maxrun foot pod sensor for running. For more information about optional accessories, go to www.o-synce.com. You can also contact your o-synce dealer to purchase accessories. 3 / 18 screeneye x 3 GETTING STARTED 3.1 Icons in the display 3 GETTING STARTED Before starting your very first exercise, you will need to pair the accessories with the screeneye x. Pairing is the connecting of sensors, between the screeneye x and the heart rate belt. Keep enough distance to other sensors while pairing. To pair optional sensors, select “SETTING” and press the middle button, then go to “PAIR” with front or rear button and select with middle button. When “YES” is blinking, be sure, that your sensors are activated, then confirm by pressing the middle button again. When pairing is done, “PAIRED” appears in the display. 3.1 Icons in the display Above high zone setting Below low zone setting Timer mode Heart rate sensor active (optional) Cadence (optional) Temperature Current time Lap time Heart rate in % of maximum heart rate (optional) Minutes per km Minutes per mile (optional) Distance in km Distance in miles (optional) screeneye x 4 / 18 3 GETTING STARTED 3.2 Function keys at the main menu 3.2 Function keys at the main menu Menu navigation The navigation is working with the front and rear button. Enter a menu by pressing the middle button. Fig. 6 Front button Middle button Rear button Functions keys Switch between the menues. Scroll through the menues. Return to the main menu by pressing the front button for 3 seconds. Select a menu. Start/Stop the stopwatch by pressing the middle button for 3 seconds. Reset the recorded values. Start a new lap. Switch between the menues. Scroll through the menues. Start the coach mode by pressing the rear button for 2 seconds. Turn on the display Press middle button for 5 seconds, to activate the display. The display goes into sleep mode if there is no interaction within 5 minutes. Display illumination The lightning is supplied by the green field on the visor and needs brightness. 3.3 Charging battery The screeneye x visor has a built in battery. It is to be charged by connecting the visor via USB to a computer or the optional charger. The battery charging time takes approximately 45 minutes. 5 / 18 screeneye x 4 Mode 4.1 Mode - SETTING 4 Mode TIME Front/ Rear SPORT Front/ Rear DATA Front/ Rear Setting Front/Rear Fig. 7 Main menu 4.1 Mode - SETTING In the setting mode you can adjust most settings of the screeneye x. If the screeneye x is active and the time is displayed, select “Setting” by pressing the front button 3 times. Press the middle button to open the “SETTING”. SETTING Middle TIME Front/ Rear UNIT Front/ Rear PAIR Front/ Rear VIEW Front/Rear Fig. 8 4.1.1 Menu SETTING Setting - TIME You can set the clock and date of the screeneye x here. Press the front button or the rear button and choose “TIME”. Open the menu “TIME” by pressing the middle button. The current value is blinking. Adjust the value by pressing the front or rear button. Confirm with the middle button. The values appear in the following order: Hour / Minutes / Year / Month / Day 4.1.2 Setting - UNIT You can set the units of speed, distance and temperature here. Press the front button and choose “UNIT”. Open the menu “UNIT” by pressing the middle button. DISTANCE km / mi PACE/SPEED CALIBRATE screeneye x The current setting is blinking. Switch between “km” or “mi” with the front or the rear button and confirm with the middle button. (optional) The current setting is blinking. Switch between “min/km – min/mi” (PACE) or “km/h – mi/h” (SPEED) by pressing the front or rear button, confirm with the middle button. (optional) Press the front button to set a calibration factor between 0.5 and 1.5. The first digit is blinking, adjust the value by pressing the front or rear 6 / 18 4 Mode 4.1 Mode - SETTING button, confirm with the middle button. Proceed the same way with the remaining digits. (optional) The calibration factor can only be set, if the EXPERT View is active (see chapter 4.1.4 VIEW) Calibration of the stride sensor improves the accuracy of speed, pace and distance measurements. It is recommended that you calibrate the stride sensor before using it for the first time, if there are significant changes in your running style, if you have new shoes or if you switch the sensor from your right shoe to your left one. The calibration should be done at the speed you normally run. The calibration factor is calculated from the measurement results in relation to the known path length. calibration factor = known path length / measured length with sensor Example: known path length = 10km measured length with sensor = 9,940km calibration factor = 10 / 9,940 = 1.006 TEMP The current setting is blinking. Choose the temperature scale “C” or “F” by pressing the front button and confirm with middle button. The temperature is displayed only. It is not stored and not transmitted when reading the data into the computer. A.LAP Off is blinking, press the front button to turn on the lap mode. The current distance is shown. Press middle button to set the distance for a lap. The first digit is blinking, adjust the value by pressing the front or rear button, confirm with the middle button. Proceed the same way with the remaining digits. (optional) The A.LAP value can only be set, if the EXPERT View is active (see chapter 4.1.4 VIEW) This value is the specific distance for one lap. If it is set, the lap will increase automatically (while the stopwatch is running) when the distance is reached (this function is optional and works only with the maxrun foot pod sensor). Read chapter 4.3.1 Stopwatch for further information. 4.1.3 Setting - PAIR What is pairing? Pairing is the connecting of sensors, e.g. your heart rate monitor with the screeneye x. After you have paired the first time, your screeneye x automatically recognizes the paired sensor each time it is activated. This process occurs automatically when you turn on the SPORT mode and only takes a few seconds when the sensors are activated and begin functioning correctly. Once paired, your screeneye x 7 / 18 screeneye x 4 Mode 4.2 Mode - TIME exclusively receives data from your own sensors, and you can go close to other sensors without interference. Move away (40 m) from other sensors while the screeneye x is trying to pair with your sensor for the first time. Bring your sensor within range (3 m) of the screeneye x. Press the front button and choose “PAIR”. Open the menu “PAIR” by pressing the middle button. Pair 4.1.4 YES is blinking, choose “yes” or “no” by pressing the front button and confirm with the middle button. Pairing is blinking for 15 seconds. After that it is shown which device has been paired. (SPD = Foot pod; HRM = Heart Rate Monitor; Radar = multisport sensor) “Pair” appears and the sensor is paired. VIEW Press the front button or the rear button and choose “VIEW”. Open the menu “VIEW” by pressing the middle button. The current mode is blinking. Switch between “SIMPLE” and “EXPERT” by pressing the front button and confirm your choice by pressing the middle button. The following options are only accessible in EXPERT-Mode. Coach-Mode (chapter 4.3.2) Detailed values of a single lap (chapter 4.4.2 Sessions) Access to calibration factor and A.Lap at the unit “setting dialog” The expert view is automatically activated if a workout is transferred with the traininglab software to the screeneye x (chapter 5.2.3 Workout editor). 4.2 Mode - TIME Press the middle button for 5 seconds to activate the display. “TIME” appears, and within 3 seconds the current time is shown. Navigate with the front or rear button to “TIME” and the current time is shown within 3 seconds. The time mode is invoked automatically after a minute of inactivity from any other mode (except from the “SPORT” mode). 4.3 Mode - SPORT Press the front button or the rear button and choose “SPORT”. Open the menu “SPORT” by pressing the middle button. screeneye x 8 / 18 4 Mode 4.3 Mode - SPORT Fig. 9 Mode - SPORT The display is divided into two parts which can show different values. Scroll through left screen part by pressing the front button. Indicates which percentage of maximum heart rate is achieved (optional). The maximum heart rate can be set via traininglab (see chapter 5) Shows the current covered distance (optional). Indicates the current Cadence (optional). Shows the current temperature (in °C or °F) Displays the current heart rate (optional). Scroll through right screen part by pressing the rear button. Shows the current speed depending on the settings made in chapter 4.1.2 Setting - UNIT (optional). Stopwatch (h:mm:ss) or (mm:ss) Displays the time for the current lap (h:mm:ss) or (mm:ss) Shows the current time (hh:mm) 123 Current HRT (Will skip Current HRT if it is shown on left hand side already. Optional.) If no sensor has been paired, only the current temperature is shown and the stopwatch is working. If a paired sensor is not linked at the beginning of the training (e.g. outside operating range), the corresponding modes will be also turned off. 4.3.1 Stopwatch At any mode, pressing the middle button for 2s will automatically switch to stopwatch mode and start the stopwatch function. The icon is blinking while the stopwatch is running. Pressing the middle button at any time the stopwatch is running will increase the lap. The current lap # and its time will be shown for 2 seconds. If a specific distance for the lap is set (see A.LAP in chapter 4.1.2 Setting - UNIT ), the lap will increase automatically when the distance is reached (this function is optional and works only with the maxrun footpod sensor). 9 / 18 screeneye x 4 Mode 4.3 Mode - SPORT Choosing will display the elapsed time for the current lap. To stop the stopwatch press the middle button for 2 seconds. The display shows “STOP”. After two more seconds “SAVED” indicates that the data is stored. Press the front or the rear button to return to the SPORT-Mode. Each training unit recorded with the stopwatch is stored as a new run. See chapter 4.4.2 Sessions The watch icon is blinking if the data are recorded. The icon turns on without blinking when no data is recording because of low battery or low memory. It can store up to 62 laps during a training unit. If the device runs out of memory, the stopwatch is stopped. 4.3.2 Coach At any mode, pressing the rear button for 2s will automatically switch to coach mode. “COACH” appears and after 3 seconds “START” indicates the readiness to run the loaded workout unit. Start the workout by pressing the middle button. Make sure that a previously created workout was loaded onto the visor. Otherwise “NO WKOUT” is shown and the coach mode will not start. The display is divided into two parts. The left side displays different values you can scroll through. The right side displays the duration (time or distance) of your current workout step as a count down. Scroll through left screen part by pressing the front button. Displays the current heart rate (optional). Shows the actual covered distance (optional). Indicates the current Cadence (optional). Shows the current speed depending on the settings made in chapter 4.1.2 Setting - UNIT (optional). The down arrow or the up arrow is blinking if the current value is below or over the target range which is set for the actual workout step. If no target is set, the arrows won’t appear. Pressing the middle button at any time the coach mode is running will switch to the next workout step. The current lap # and its time will be shown for 2s. To stop the coach mode press the middle button for 2 seconds. The display shows “STOP”. After two more seconds “SAVED” indicates that the data is stored. Press the middle button to return to the coach mode. Now you can leave the mode by pressing the front button for 2 seconds. screeneye x 10 / 18 4 Mode 4.4 Mode - DATA Each training unit recorded with the coach mode is stored as a new run. See chapter 4.4.2 Sessions If the device runs out of memory, the coach mode is stopped. The coach mode will be locked if the stopwatch is running and when battery or memory are low. 4.4 Mode - DATA DATA Middle TOTALS Front/ Rear SESSIONS Front/ Rear CLEAR Front/Rear Fig. 10 4.4.1 Menu DATA Totals Shows a total summary of all training units. Press the front or the rear button to scroll through the following values. Press the middle button to leave the menu. DST T 4.4.2 Shows the total distance covered. Shows the total training time. CAL Displays the total calories burned during all training units. FAT Displays the total amount of fat (in gram) burned during all training units. Sessions Each training unit recorded with the stopwatch is stored as a single run “R1, R2, …”. The date of this run is displayed on the right side. R1, R2, R3, …, Rx Scroll through the stored training units by pressing the front or rear button. Call the desired training unit by pressing the middle button. Depending on the temperature setting in chapter 4.1.2 Setting - UNIT the date format of the record is displayed in a different way. If degree “C” is set, the date format will be (d)d.mm. If degree “F” is set, it will be (m)m.dd SIMPLE View 11 / 18 screeneye x 4 Mode 4.4 Mode - DATA If the SIMPLE View is set (see chapter 4.1.4 VIEW) only the totals of the displayed training unit will be shown. Press the front or rear button to scroll through the values. Press the middle button to leave the menu. DST T Shows the covered distance of the run. Shows the training time. CAL Displays the calories burned during the training unit. FAT Displays the amount of fat (in gram) burned during the training unit. EXPERT View If the EXPERT View is set (see chapter 4.1.4 VIEW) it is possible to get detailed values of each lap of the training unit. Press the front or rear button to scroll through the laps. Press the middle button to open a single lap. Press the front button for 2 seconds to get back to choose another training unit. TOTALS Press the middle button for a total summary of the stored training unit. Press the front or rear button to scroll through the values (explained above in SIMPLE View). Press the middle button to leave the section. LAP 1, LAP 2, …, LAP x Press the middle button to get various values of the recorded lap. Scroll through by pressing the front or rear button. Press the middle button to switch to the next lap in current mode. Press the front button for 2 seconds to get back to lap choice. Values of the recorded lap. L1 DST Displays the total time of the lap Shows the covered distance of the lap IN Indicates the time within the training pulse range LO Indicates the time below the training pulse range HI Indicates the time above the training pulse range AVG Displays the average heart rate. Max Displays the maximum heart rate. AVG Displays the average speed. MAX Displays the maximum speed. The screeneye x visor can record up to 62 laps during a single training unit. Depending on the amount of the recorded data it can store up to 99 training sessions. screeneye x 12 / 18 4 Mode 4.4 Mode - DATA 4.4.3 Clear Press the front or the rear button to scroll through the following values. Press the middle button to delete the chosen data. ALL Clr r1 Clr, r2 Clr, …, rx Clr Totals Clr 13 / 18 Clear all recorded training units including total values. Delete a specific training unit. Clear all total values. screeneye x 5 Analayse the data with the traininglab software 5.1 Download & Installation 5 Analayse the data with the traininglab software 5.1 Download & Installation Go to download area on www.o-synce.com and download the traininglab software. Follow the instructions and install the software. 5.2 Upload & download the data Connect the screeneye x to an available USB port on your computer. The screeneye x displays “PC LINK”. Open the traininglab software on your PC and select the “Device” section 5.2.1 . Setup device Press the “Setup device” icon and select the screeneye x. Receive the current settings by pressing “Receive Settings” button. The following settings can be easily done. Time and date Gender, age, weight, size Setting for a single lap (auto stopwatch) Heart rate settings Units (distance, speed/pace, temperature, view) A.Lap settings Footpod settings Transfer your settings to the visor by pressing the “Transfer Settings” button. screeneye x 14 / 18 5 Analayse the data with the traininglab software 5.2 Upload & download the data 5.2.2 Import device Press the “Import device” icon and select the screeneye x. The software automatically starts to download the stored training sessions. 5.2.3 Workout editor Press the “Workout editor” icon to create a workout for the coach mode. Up to 20 steps can be added to a single workout. Transfer the workout by pressing the “Send workout” button 15 / 18 screeneye x 6 TROUBLESHOOTING 5.2 Upload & download the data 6 TROUBLESHOOTING If you have any problems, please take a look on our website http://www.o-synce.com/faq/ Sensors cannot be paired If pairing does not work, or if you get wrong data, or if the signal is temporarily lost, please check, if the distance to other sensors while pairing was bigger than 40 meters. Make sure, that there are no other sensors of the same kind nearby (within 40m) Make sure that the sensors are activated. Wet both sensors on the back (rubber area) of the heart2feel x heart rate belt to create a strong connection between your chest and the transmitter. Activate the maxrun foot pod with a few movements. Lost in the menu screeneye x Pressing the front button for 2 seconds takes you a menu level back. 16 / 18 7 ANNEX 7.1 Specifications 7 ANNEX 7.1 Specifications Length headband Resistance to water splash water protected Built-in battery 120 mAh, battery lasts about 20 h PC connection Micro USB Port Data storage Record rate 17 / 18 Size M/L = 57 cm (adjustable +/- 3 cm) More than 50 hours (depending on the features used, HF and speed need more memory than just HF), max. 62 laps per session, up to 9:59 hours per training Every 2 seconds screeneye x 8 LIMITED WARRANTY 7.1 Specifications 8 LIMITED WARRANTY This o-synce product is guaranteed to be free from defects in materials or workmanship for one year in the Countries of America and Asia and two years in the European Countries and Switzerland from the date of purchase. Within this period, o-synce will, at its sole discretion, repair or replace any components that fail in normal use. Such repairs or replacement will be made at no charge to the customer for parts or labor, provided that the customer is responsible for any transportation cost. This warranty does not cover failures due to abuse, misuse, accident, or unauthorized alteration or repairs nor does it include batteries. To obtain warranty service, contact your local o-synce authorized dealer or call o-synce Product Support in Germany for shipping instructions and an RMA tracking number. Securely pack the unit and a copy of the original sales receipt, which is required as the proof of purchase for warranty repairs. Write the tracking number clearly on the outside of the package. Send the unit, freight charges prepaid, to any o-synce warranty service station. Online Auction Purchases: Products sold through online auctions are not eligible for rebates or other special offers from o-synce. Online auction confirmations are not accepted for warranty verification. To obtain warranty service, an original or copy of the sales receipt from the original retailer is required. O-synce will not replace missing components from any package purchased through an online auction. International Purchases: A separate warranty is provided by international distributors for units purchased outside Germany. This warranty is provided by the local in-country distributor and this distributor provides local service for your unit. Distributor warranties are only valid in the area of intended distribution. Date of creation: 2012-06-18 screeneye x 18 / 18