1
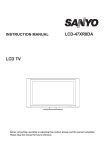
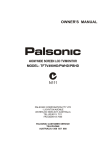
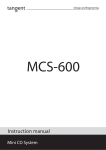
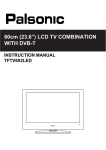
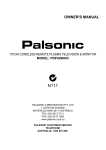
OWNER'S MANUAL
48CM WIDE SCREEN LED TV/MONITOR
MODEL: TFTV492LED
N111
PALSONIC CORPORATION PTY LTD
1 JOYNTON AVENUE
WATERLOO NSW 2017 AUSTRALIA
TEL:(02)9313 7111
FAX:(02)9313 7555
PALSONIC CUSTOMER SERVICE
TELEPHONE
AUSTRALIA:1300 657 888
IMPORTANT INFORMATION
If a television is not positioned in a sufficiently stable location, it can be
potentially hazardous due to falling. Many injuries, particularly to children, can
be avoided by taking simple precautions such as:
! Using cabinets or stands recommended by the manufacturer of the television.
! Only using furniture that can safety support the television.
! Ensuring the television is not overhanging the edge of the supporting
furniture.
! Not placing the television on tall furniture (for example, cupboards or
bookcases) without anchoring both the furniture and the television to a
suitable support.
! Not standing the televisions on cloth or other materials placed between the
television and supporting furniture.
! Educating children about the dangers of climbing on furniture to reach
the television or its controls.
Table of Contents
Important Safety Precautions..........................................................................................................................1
Important Notice............................................................................................................................................3
Preparations....................................................................................................................................................4
Identification of Controls ................................................................................................................................6
Connections....................................................................................................................................................9
Basic Operations...........................................................................................................................................12
Memorizing the Channels .............................................................................................................................14
Channel and Program Selection....................................................................................................................18
Picture Adjustment .......................................................................................................................................19
Sound Adjustment.........................................................................................................................................20
System Setup ................................................................................................................................................22
Rating and Lock Setup ..................................................................................................................................23
Timer Setup..................................................................................................................................................25
EPG Operation.............................................................................................................................................27
Teletext & Subtitle ........................................................................................................................................28
Screen setup for D-SUB (PC) Mode ............................................................................................................29
Troubleshooting............................................................................................................................................30
Specifications ................................................................................................................................................32
Important Safety Precautions
Electrical energy can perform many useful functions, but it can also cause personal injuries and property damage if improperly
handled. This product has been engineered and manufactured with the highest priority on safety. But IMPROPER USE CAN
RESULT IN POTENTIAL ELECTRICAL SHOCK OR FIRE HAZARD. In order to prevent potential danger, please read the
following instructions when installing, operating and cleaning the product. To ensure your safety and prolong the service life of
your new TV product, please read the following precautions carefully before using the product.
1. Read these instructions---All operating instructions must be read and understood before the product is operated.
2. Keep these instructions---These safety and operating instructions must be kept in a safe place for future reference.
3. Heed all warnings---All warnings on the product and in the instructions must be observed closely.
4. Follow all instructions---All operating instructions must be followed.
5.Attachments---Only use attachments/accessories specified by the manufacturer. Do not use attachments not
recommended by the manufacturer. Use of improper attachments can result in accidents.
6. Power source---This product is intended to be supplied by a listed power supply indicated on the marking label. If you are
not sure of the type of power supply to your home, consult your product dealer or local power company. For added
protection for this product during a lightning storm, or when it is left unattended and unused for long periods of time, unplug it
from the wall outlet and disconnect the cable system.
7.Power cord protection---Protect the power cord from being walked on or pinched particularly at plugs, convenience
receptacles, and the point where they exit from the apparatus.
Note: where the mains plug or an appliance coupler is used as the disconnect device, the disconnect device shall remain
readily operable.
8.Overloading---Do not overload wall outlets, extension cords, or convenience receptacles on other equipment as this can
result in a risk of fire or electric shock.
9.Entering of objects and liquids---Never insert an object into the product through vents or openings. High voltages are
present in the product, and inserting an object can cause electric shock and/or short internal parts. For the same reason, do
not spill water or liquid on the product.
10. Servicing---Refer all servicing to qualified service personnel. Servicing is required when the apparatus has been damaged
in any way, such as power-supply cord or plug is damaged, liquid has been spilled or objects have fallen into the apparatus, the
apparatus has been exposed to rain or moisture, does not operate normally, or has been dropped.
11.Damage requiring service---If any of the following conditions occurs, unplug the power cord from the AC outlet, and
request a qualified service person to perform repairs.
a. When the power cord or plug is damaged.
b. When a liquid is spilled on the product or when objects have fallen into the product.
c. When the product has been exposed to rain or water.
d. When the product does not operate properly as described in the operating instructions.
Do not touch the controls other than those described in the operating instructions. Improper adjustment of controls not
described in the instructions can cause damage, which often requires extensive adjustment work by a qualified technician.
e. If the product has been dropped or the cabinet has been damaged in any way.
f. When the product displays an abnormal condition or exhibits a distinct change in performance. Any noticeable abnormality
in the product indicates that the product needs servicing.
12. Replacement parts---In case the product needs replacement parts, make sure that the service person replaces parts
specified by the manufacturer, or those with the same characteristics and performance as the original parts. Use of
unauthorized parts can result in fire, electric shock and/or other danger.
13. Safety checks---Upon completion of service or repair work, request the service technician to perform safety checks to
ensure that the product is in proper operating condition.
14. Wall or ceiling mounting---When mounting the product on a wall or ceiling, be sure to install the product according to
the method recommended by the manufacturer. This is a safety feature.
1
Important Safety Precautions (Continued)
15. Stand---Use only with the cart, stand, tripod, bracket, or table specified by the
manufacturer, or sold with the apparatus. Do not place the product on an unstable
trolley, stand, tripod or table. Placing the product on an unstable base can cause the
product to fall, resulting in serious personal injuries as well as damage to the product.
When mounting the product on a wall, be sure to follow the manufacturer’s instructions.
Use only the mounting hardware recommended by the manufacturer.
16.Careful move---When a cart is used, use caution when moving the cart/apparatus
combination to avoid injury from tip-over. Sudden stops, excessive force and uneven
floor surfaces can cause the product to fall from the trolley.
Never attempt to move the TV unless the AC power cord has been disconnected.
17. Lightning---Unplug this apparatus during lightning storms or when unused for long
periods of time.
For added protection for this television equipment during a lightning storm, or when it is
left unattended and unused for long periods of time, unplug it from the wall outlet and
disconnect the antenna. This will prevent damage to the equipment due to lightning and
power-line surges.
18. Do not use this apparatus near water---for example, near a bathtub, washbowl,
kitchen sink, or laundry tub, in a wet basement, or near a swimming pool, and the like.
Do not use immediately after moving from a low temperature to high temperature
environment, as this causes condensation, which may result in fire, electric shock, or
other hazards.
The apparatus shall not be exposed to dripping or splashing and that no objects filled with
liquids, such as vases, shall be placed on the apparatus.
19. Clean only with dry cloth---Unplug this product from the wall outlet before
cleaning. Do not use liquid cleaners or aerosol cleaners. Use a damp cloth for cleaning.
20. Ventilation---Do not block any ventilation openings. Install in accordance with the
manufacturer instructions. The vents and other openings in the cabinet are designed for
ventilation. Do not cover or block these vents and openings since insufficient ventilation
can cause overheating and/or shorten the life of the product. Do not place the product on
a bed, sofa, rug or other similar surface, since they can block ventilation openings. This
product is not designed for built-in installation; do not place the product in an enclosed
place such as a bookcase or rack, unless proper ventilation is provided or the
manufacturer’s instructions are followed.
21.Heat sources---Do not install near any heat sources such as radiators, heat registers,
stoves, or other apparatus (including amplifiers) that produce heat.
22.Panel protection---The display panel used in this product is made of glass.
Therefore, it can break when the product is dropped or impacted upon by other objects.
Be careful not to be injured by broken glass pieces in case the display panel breaks.
23.Pixel defect---The display panel is a very high technology product, giving you finely detailed pictures. Occasionally, a few
non-active pixels may appear on the screen as a fixed point of blue, green or red. Please note that this does not affect the
performance of your product.
Warning: For continued safety, apparatus with class I construction shall be connected to a mains socket outlet with a
protective earthing connection.
2
Important Notice
About Temperature
Do not use in hot and cold rooms (locations)
! When the unit is used in rooms (locations) with low temperature, the picture may
leave trails or appear slightly delayed. This is not a malfunction, and the unit will
recover when the temperature returns to normal.
! Do not leave the unit in a hot or cold location. Also, do not leave the unit in a location
exposed to direct sunlight or near a heater, as this may cause the cabinet to deform
and the screen to malfunction.
! Storage temperature: 0°C to +50°C
! Working temperature: 5°C to +40°C
About After-Image
The extended use of fixed image program material can cause a permanent after-image
on the screen.
This background image is viewable on normal programs in the form of a stationary fixed
image. This type of irreversible screen deterioration can be limited by observing the
following steps:
A. Reduce the brightness/contrast setting to a minimum viewing level.
B. Do not display the fixed image for extended periods of time.
C. Turn the power off when not in actual use.
Important Information Regarding Use of Video Games, Computers,
Captions or Other Fixed Image Displays.
! Do not allow a still picture to be displayed for an extended period, as this can cause a
permanent after-image to remain on the screen.
Examples of still pictures include logos, video games, computer images, teletext and
images displayed in 4:3 mode.
CAUTIONS:
! The permanent after-image on the screen resulting from fixed image use is not an
operating defect and as such is not covered by the warranty.
! This product is not designed to display fixed images for extended periods of time.
Cleaning and
Maintenance
About Wall-mount
To clean this unit, wipe with a soft, dry cloth.
If the surfaces are extremely dirty, use a soft cloth dipped in a soap and water solution or
a weak detergent solution.
! Use eyeglass cleaner to remove stubborn dirt from the screen.
! Never use alcohol, paint thinner or benzine to clean this unit.
! Before using a chemically treated cloth, read the instructions that came with the
cloth carefully.
To avoid interference between the jacks, wall-mount bracket and wall, the
wall-mount bracket must be more than 40mm thick, and the RF or VGA cable
must have a 90-degree plug.
3
Preparations
Using the Remote Control
<
Use the remote control by pointing it towards the remote sensor window of the
set. Objects between the remote control and sensor window may prevent proper
operation.
30
30
5m
Cautions regarding use of remote control
<
Do not expose the remote control to shock. In addition, do not expose the remote
control to liquids, and do not place in an area with high humidity.
<
Do not install or place the remote control under direct sunlight. The heat may cause deformation
of the unit.
<
The remote control may not work properly if the remote sensor window of the main unit is under direct sunlight or strong
lighting. In such a case, change the angle of the lighting or the TV set, or operate the remote control closer to the remote
sensor window.
Installing the Batteries
If the remote control fails to operate the TV functions, replace the batteries in the remote control.
1 Open the battery cover.
2
Insert two size-AAA batteries.
<
(Place the batteries with their terminals corresponding to the (+)
and (–) indications in the battery compartment.)
3
Replace the cover and slide in reverse until the lock snaps.
Precaution on battery use
Improper use of batteries can result in a leakage of chemicals and/or explosion. Be sure to follow the instructions below.
<
Place batteries with their terminals corresponding to the (+) and (–) indications.
<
Different types of batteries have different characteristics. Do not mix batteries of different types.
<
Do not mix old and new batteries. Mixing old and new batteries can shorten the life of new batteries and/or cause old
batteries to leak chemicals.
<
Remove batteries as soon as they are non-operable. Chemicals that leak from batteries can cause a rash. If chemical
leakage is found, wipe with a cloth.
<
If the remote control is not used for an extended period of time, remove the batteries from the remote control.
<
The batteries (battery pack of batteries installed) shall not be exposed to excessive heat such as sunshine, fire or the like.
4
Preparations (continued)
Antenna Connection
INSTALL the unit in a room where direct light will not fall upon the screen. Total darkness or a reflection on the picture
screen may cause eyestrain. Soft and indirect lighting is recommended for comfortable viewing.
Optimum reception of color requires a good signal and will generally mean that an outdoor antenna must be used. The
exact type and position of the antenna will depend upon your particular area.
TV REAR
75-ohm coaxial cable (round cable)
RF
Note
=
It is recommended that the 75-ohm coaxial cable be used to eliminate interference and noise which may occur due to radio wave
conditions.
=
The antenna cable should not be bundled with the power cord.
Power Connection
Insert the AC plug into a conveniently located AC outlet.
Note
=
This product should be operated only from the type of power source indicated on the marking label.
=
Always unplug the AC cord from power outlet when not using for a long period of time.
5
Identification of Controls
Main Unit (front view/bottom view)
SOURCE MENU
1
CH
VOL
8
2
SOURCE MENU
3
4
5
CH
VOL
6
7
1. Remote Sensor.
2. Indicator.
3. POWER
Press this button to turn the unit ON from STANDBY mode. Press it again to turn the set back to STANDBY.
4. SOURCE
To access signal input select menu.
5. MENU
Press this button to access the MENU main page.
6. CH /
Press these two buttons to directly change the TV channel;
In OSD Menu, press these buttons to choose the OSD items.
7. VOL-/+
Press the VOL+ or VOL- button to directly increase or decrease the sound volume level;
In OSD Menu, press these buttons to adjust the value or setting of each item.
8. Power Switch.
Note:
Functions of VOL+/-, CH / , MENU, POWER and SOURCE are also provided to the remote control. This operation
manual provides a description based on operating functions with the remote control.
6
Identification of Controls (Continued)
RS-232
L AUDIO R
AV OUT
5
6
VIDEO
4
HDMI
Main Unit (rear view)
S/ PD IF
RF
Pr
D- Su b
PC IN
D-Sub
RF
2
3
VIDEO
1
7
L AUDIO R
Y
AUDIO
Pb
S/PDIF
COMPONENT IN
PC I N
AV IN
AUDI O
1. S/PDIF digital audio out terminal (coaxial)
Connect to the digital audio input of a digital audio component.
2. PC inputs
Connect to the D-SUB/AUDIO output jack on your computer.
3. Antenna input
Connect to your cable system or outdoor antenna.
4. RS232 interface
For service use . The user cannot operate the unit through this terminal.
5. AV outputs (Video, Audio L, R)
Connect to your VCR to record programs.
6. HDMI interface
7. COMPONENT inputs
Connect to the audio and component output jacks of a DVD player or Set-Top Box.
8. AV inputs (Video, Audio L, R)
Receive video/audio signal from external sources such as VCR or DVD player.
7
8
Identification of Controls (Continued)
Remote Control Unit
1 POWER: Switches the TV power on or Standby.
2 TV/Radio: Switches between TV and Radio mode. (DTV only)
1
3 EPG: Displays the Electronic Program Guide (DTV only).
3
14
15
4
16
2
5
4 FAV.LIST: Displays the favorite channel list.
5 FAV+/ FAV–: Selects the favorite channel.
6 0 – 9 number buttons: Press to enter channel numbers or
input password.
7 ZOOM: Selects the screen size.
8 MENU: Displays the main menu screen.
/6
/3
/4
/OK: Press the arrows to navigate through the
9 5
6
menus or adjust an item. Press OK to confirm a selection or
enter a sub-menu.
10 MUTE: Mutes the sound.
7
8
17
11 INFO: Displays the information banner.
18
12 VOL+/–: Increases or decreases the volume.
13 S.MODE: Selects sound mode.
14 STEREO: Selects bilingual, stereo or mono ( ATV only ), or
audio track(DTV only).
15 FREEZE: To freeze current picture.
16 SLEEP: Sets the sleep timer.
9
10
19
11
20
12
21
13
23
22
24
25
26
27
28
29
30
31
17
18
19
20
RECALL: Returns to the previous channel.
EXIT: Exits the menu screen.
SOURCE: Displays input source menu.
LIST: Displays the channel list.
21 CH / : Changes channel up and down.
22 P.MODE: Selects picture mode.
23
24
25
26
27
28
29
30
31
Below is teletext control buttons:
Colored buttons (RED/GREEN/YELLOW/BLUE): Direct
access to the colored items or corresponding pages. (Teletext)
TTX: Used to enter or exit teletext mode. (Teletext)
Subtitle: Displays the subtitle (DTV only), or the teletext
subpage (ATV only).
Size: Press this button several times to display the upper, then
the lower part of the screen and then return to the normal size
teletext page. (Teletext)
Index: Press this button to view the main index page.(Teletext)
Reveal: To reveal or hide the concealed information. (Teletext)
Hold: To stop or resume sub-page acquisition. (Teletext)
Update: Press the button to view the updated teletext page.
(Teletext)
Mix: Press the button to display the Teletext on the screen with
transparent background while viewing the TV program
simultaneously. (Teletext)
8
Connections
Cautions Before Connecting
Carefully check the terminals for position and type before making any connections.
The illustration of the external equipment may be different depending on your model.
Loose connectors can result in image or colour problems. Make sure that all connectors are securely inserted into their
terminals.
Refer to the operating manual of the external device as well.
When connecting an external device, turn the power off to avoid any issues.
Connecting a Camcorder
AV cable
AV cable
AV IN
Pb
VIDEO
“PlayStation”
Camcorder
or
L AUDIO R
Y
COMPONENT IN
Pr
Cables are often color-coded
to connectors. Connect red to
red, white to white, etc.
How to connect:
Connect the Audio/Video cables between the Audio (L/R)/Video jacks on the unit and camcorder.
To playback Camcorder
1. Turn on your TV, then press SOURCE button. The Input Source menu opens.
2. Press 5
or6
to select AV, then press OK to confirm.
3. Turn on your camcorder and set it to output mode. (For details, refer to your camcorder user manual.)
4. Insert the tape into the camcorder and press Play button.
Note
The operations of the camcorder may be different and is dependent on your model. Please read the user manual of your camcorder
to confirm operation.
Connecting Digital Coaxial Audio
Audio Processor
S/PDIF
AUDIO
PC IN
D-Sub
RF
or
Coaxial audio cable
S/PDIF IN
(Coaxial)
For a full Home Theater sound experience, you must connect your Hi-Fi or
Audio processor to the S/PDIF OUT(Coaxial) terminal on the TV side.
Note The S/PDIF OUT jack is available only when a digital TV channel is received.
9
HIFi System
Connections (Continued)
Connecting Component Video
Pb
DVD Player
AV IN
VIDEO
L AUDIO R
Y
COMPONENT IN
Pr
Cables are often color-coded
to connectors. Connect red to
red, white to white, etc.
Audio cable
Component video cable
To connect a device using component video:
Connect the Component Video cable between the Y, Pb, Pr input jacks on the unit and Y, Cb/Pb, Cr/Pr output jacks on the
device .
Connect the Audio cable between the AUDIO input jacks on the unit and AUDIO output jacks on the device.
To play component video from an external device:
1. Turn on your TV, then press SOURCE button. The Input Source menu opens.
2. Press 5
or6
to select Component, then press OK to confirm.
3. Turn on your external device and set it to the correct mode. See the device’s user guide for more information.
Connecting a Computer
S/PDIF
AUDIO
PC IN
D-Sub
RF
D-Sub cable
(analog RGB)
To monitor port
(15-pin D-Sub)
Audio cable
(stereo mini plugs)
To audio output jack
How to connect:
Connect a D-Sub cable between the D-SUB jack on the computer and the D-SUB input jack on the unit.
Connect an Audio cable between the AUDIO output on the computer and AUDIO input jack on the unit.
To play video from a computer
1. Turn on your TV, then press SOURCE button. The Input Source menu opens.
2. Press5
or6
to select D-SUB, then press OK to confirm.
3. Turn on your computer, and adjust the display properties as required.
10
Connections (Continued)
AV OUT
Equipment with
HDMI output
VIDEO
L AUDIO R
RS-232
Connecting an HDMI device
HDMI
HDMI cable
How to connect a device using HDMI Connection:
Connect the HDMI cable between the HDMI interface on the unit and HDMI output on the device.
To play from the device using HDMI:
1. Turn on your TV, then press SOURCE button. The Input Source menu opens.
2. Press 5
or6
to select HDMI, then press OK to confirm.
3. Turn on your device and set it to the correct mode. See the device’s user guide for more information.
Note
If the external device has DVI output only, use a DVI to HDMI adapter cable to connect to the HDMI terminal. Connect the audio
cable to the D-SUB AUDIO IN jack on the TV rear.
Cables are often color-coded to
connectors. Connect red to red,
white to white, etc.
AV OUT
VCR for Recording
S-VIDEO
HDMI
VIDEO
L AUDIO R
RS-232
Connecting a VCR (for Recording)
AV cable
How to connect:
Connect the Audio/Video cables between the Audio (L/R)/Video jacks on the unit and VCR.
To record program
1. Turn on your TV, select a program you wish to record.
2. Turn on your VCR, insert a videotape for recording.
3. Press the Record button to begin recording.
Note
! Only analog TV programs, and AV input sources can be output through the AV output jacks.
11
Basic Operations
Main Menu Overview
List of main menus to help you with operations
SOUND menu
PICTURE menu
Picture
Sound
Time
Option
Picture Mode
Contrast
Brightness
Lock
Picture
Channel
User
75
45
Color
Sharpness
Select
Sound
Time
Menu
0
Off
Off
Select
Return
Move
Menu
Return
OPTION menu
Option
Lock
Picture
Channel
28/Sep /2008 15:30
Off
Off
Sound
Time
Option
Language
English
Hearing Impaired
Off
Lock
Channel
Auto
SPDIF
Off
Sleep Timer
Auto Sleep
Audio Preference
Dolby Digital
Off
Time Zone
VIC GMT+10
Select
Move
Menu
Select
Return
LOCK menu
Picture
Channel
50
50
TIME menu
Picture
Lock
User
Next Page
Move
Clock
Off Time
On Time
Option
Auto Volume
Spatial
0
Prev Page
Time
Balance
50
50
Tint
Sound
Sound Mode
Treble
Bass
Sound
Time
Lock
Channel
Return
Picture
Sound
Time
Option
Lock
Channel
Auto Tuning
Off
Set Password
DTV Manual Tuning
Block Program
Parental Guidance
Menu
CHANNEL menu
Option
Lock Tuning
Move
ATV Manual Tuning
Programme Edit
No Block
Restore Factory Default
Select
Move
Menu
Select
Return
Move
Menu
Return
To navigate through the OSD main menu
1
2
3
4
With the power on, press MENU and the main menu screen displays.
Press 3
or4
to select menu. Press 6
to access the menu.
Within the menu, press 5
,6
,3
or4
navigate through the options or adjust
an option. Press OK to confirm a selection or enter a sub-menu.
Press MENU to return to previous menu. Press EXIT to exit the menu screen
directly. Or you may wait for a few seconds and the on-screen menu will
disappear from the screen automatically.
Note
=
Some menu items may be different when the unit works in different mode, and menu items that are not selectable are grayed out.
=
The Picture menu has more than one page, please use 5
or 6
to scroll through.
=
The illustrations and on-screen displays in this manual are for explanation purpose (some are enlarged, others cropped) and may
vary slightly from the actual ones.
12
Basic Operations (Continued)
Turning On/Off the Power
Turning On
Insert the power cord into the wall outlet. Press the Power Switch on the unit to power on.
If the unit is in standby mode, press Power button on the unit or the remote control to turn on the unit, and you will be ready
to use its features.
Turning Off
With the power on, press the Power button on the unit or on the remote control to turn off the unit, and put the unit in
standby mode. To cut off the power completely, press the Power Switch directly.
Selecting the Input Signal Source
1
2
3
Press SOURCE button.
Press 6
or 5
to select the input source. Options include:
! DTV — Watch the DTV signal.
! ATV — Watch the ATV signal.
! AV — Watch the signal from the AV input terminals.
! Component — Watch the signal from the COMPONENT input terminals.
! D-SUB — Watch the signal from the D-SUB input jack.
! HDMI — Watch the signal from the HDMI input jack.
Input Source
DTV
ATV
AV
Component
D-SUB
HDMI
Move
Select
Press 3
,4
or OK to confirm the selection.
Displaying the Information Banner
Press the INFO button to display the information banner. The information banner displays current status information such as
the channel number and signal source.
Depending on the mode, different information is displayed. In DTV mode, more information will be displayed. Below is an
example banner in DTV mode.
In DTV mode, the information banner may contain:
! Channel number and name.
! Current time.
! Current program name, start and end play times.
! Next program name and start and end play times.
! TV or Radio.
! Audio mode, audio track.
! Signal strength for current channel.
! Signal resolution.
! Subtitle, teletext.
2 ABC TV Sydney
DTV
SD MPEG
British Isles: A Natural History
Fri, Feb 27 2008 11:05
11:08
12:00
Next
English
Subtitle
576i
Teletext
Reserved for future use
Alan Titchmarsh continues his epic journey around the
British Isles and discovers why they are so diverse.
Note
=
The above OSD is only served as an example, and it is in DTV mode.
=
Information banner content varies, depending on the broadcaster and your settings.
13
Memorizing the Channels
When you turn on the TV for the first time, you should perform an auto channel search to set up stations on your TV.
Note: Be sure to select the proper input source (ATV/DTV) before operation.
Auto Channel Search
You should perform an auto channel search to search for all channels available and stores them in memory.
And before you start Auto Tuning, it is necessary to select a country firstly.
1
2
3
4
Picture
Press MENU and the main menu screen displays.
Sound
Time
Option
Channel
Auto Tuning
Press 3
or4
to select Channel menu, press 6
to access the menu.
DTV Manual
TuningSelection
Country
Australia
ATV Manual Tuning
Programme Edit Start
Cancel
Highlight Auto Tuning item, and press 4
or OK to access.
Now a confirmation box appears on the screen. Press 3
or4
to
highlight Start item, and then press OK to begin the auto
channel search.(If you want to cancel, press 4
to select Cancel
item, and use OK to confirm.)
Select
Move
Menu
Return
Channel Tuning
2 %...
5
Lock
Then the TV begins memorizing all ATV/DTV channels available in
your area. During the process, you can press MENU to skip the
search, or EXIT to stop.
Note
78.50MHz
TV
ATV
:2
Programme(s)
DTV
:0
Programme(s)
Radio :0
Programme(s)
Press <Menu> to skip.
=
In the confirmation box, the Country Selection item is defaulted to be Australia
Press <Exit> to exit.
and cannot be adjusted.
Manual Searching for DTV programs
If desired digital programs cannot be searched by Auto Tuning, you can make
use of DTV Manual Tuning to search programs manually.
Picture
Sound
Time
Option
Lock
Channel
Auto Tuning
1
2
In Channel menu, press 6
or5
to select DTV Manual Tuning
item, then press4
or OK to access.
DTV Manual Tuning
ATV Manual Tuning
Programme Edit
Highlight VHF CH (or UHF CH) item, press 3
or4
button to
select your desired channel number.
Select
3
Press OK to begin the manual DTV channel search.
Move
DTV Manual Tuning
At the bottom of the menu screen the DTV Signal strength bar is
displayed. You can make use of it to check how strong your DTV
signal is and whether you need to adjust your antenna or digital
cable input. The higher the signal strength is, the less likely you are
to experience picture degradation.
VHF CH
Then all the digital programs available in this channel will be
searched and stored. During the process, you can press MENU or
EXIT to exit the search.
14
6
Please select channel then
Press OK to search
Bad
4
Menu
Menu
Normal
Exit
Good
Select
Return
Memorizing the Channels (Continued)
Manual Searching for ATV programs
If desired analog programs cannot be searched by Auto Tuning, you can make
use of ATV Manual Tuning to search programs manually.
1
In Channel menu, press 6
or5
to select ATV Manual Tuning
item, then press4
or OK to access.
2
Highlight Storage To item, press 3
or4
button to select a channel
position in which you want to store.
3
Use 6
or5
to select Search item, press 3
or4
to begin the
manual ATV channel search.
Press 4
, the unit searches towards higher frequency;
Press 3
, the unit searches towards lower frequency.
4
Picture
Sound
Time
Option
Lock
Auto Tuning
DTV Manual Tuning
ATV Manual Tuning
Programme Edit
The search stops when a program is found and this program will be
stored in current channel, then press the RED button to save. During
the process, If you want to stop the search , please press EXIT button.
Select
Move
Menu
ATV Manual Tuning
Storage To
1
Color System
PAL
Audio System
BG
Current CH
Search
Fine-Tune
Frequency
1
Exit
445.25 MHz
SAVE
Select
Manual Fine Tuning
Fine Tuning is not necessary under normal conditions. However, in area of
inferior broadcast conditions where adjustment is necessary for a better
picture and sound effect, use Fine Tune.
ATV Manual Tuning
1
2
3
Navigate to ATV Manual Tuning submenu, highlight Current
CH item, press 3
or4
to select a channel you want to perform fine
tune.
Press 6
to select Fine-Tune item, and then use 3
or4
button to
fine tune until the best possible picture and sound are obtained.
During the process, press EXIT to exit, and RED button to save
the effect.
Storage To
1
Color System
PAL
Audio System
BG
Current CH
Search
Fine-Tune
Frequency
1
Exit
445.25 MHz
SAVE
Select
Note
=
Fine Tune is only for analog TV program.
Setting Audio System
Normally it is unnecessary to set audio system. However, if
abnormal sound occurs, you may try to adjust the audio system.
1
Navigate to ATV Manual Tuning submenu, press 5
or6
to
highlight the Audio System item.
2
Press 3
or4
to select the proper audio system. Press RED button
to save.
3
Press MENU to return to previous menu. Press EXIT to exit the
menu screen directly.
15
Channel
ATV Manual Tuning
Storage To
1
Color System
PAL
Audio System
BG
Current CH
Search
Fine-Tune
Frequency
1
Exit
SAVE
445.25 MHz
Select
Return
Memorizing the Channels (Continued)
Labeling Channels
If required, you can give a name to the programs.
Picture
1
Press MENU and the main menu screen displays.
2
Press 3
or4
to select Channel menu, press 6
to access the menu.
3
Press 6
or5
to select Programme Edit item, press 4
or OK to
open the Programme Edit menu.
Sound
Time
Programme Edit
Within the program list, press 6
or5
to select a channel you want to
edit, press GREEN button to start to label. Then a name symbol
appears alongside.
Move
Use 6
or5
to select character to input, use 3
or4
to move the cursor.
To delete the inputting, please press RED button.
After finishing inputting, press OK to confirm.
The maximum length of label is 5 characters.
Repeat the above steps to set up more channel labels.
Menu
1 S-03
2 C-42
3 S-04
4 C-04
TV
TV
DEL
NAME
MOVE
NAME
SKIP
Fav.List
! The labels of DTV channels are automatically assigned and cannot be changed by user.
! There will be no NAME item in DTV mode.
Setting Favorite Channels
You can set up favorite channels list so that you can quickly browse through your
favorite channels by using Favorite button.
Navigate to the Channel menu, press 5
or6
to select Programme
Edit item, press 4
or OK to open the Programme Edit menu.
Favourite List
TV
TV
2
3
Use 6
or5
to select your favorite program, use FAV.LIST button to
mark the selected program as favorite (a favorite symbol appears). To
cancel the favorite mark, just press FAV.LIST button again and the
symbol disappears. If the program list has more than one page, you can
press 6
or5
to scroll the page.
Repeat the above steps to set more favorite programs.
To exit, press EXIT button.
Now you can press FAV.LIST button to display the favorite list,
press 6
or5
to browse through the favorite programs and press
OK to access the channel. Or you can use FAV+/FAV- to cycle
among the favorite channels.
16
Return
Programme Edit
TV
Note
1
Channel
ATV Manual Tuning
TV
5
Lock
DTV Manual Tuning
Select
4
Option
Auto Tuning
TV
TV
Move
1 S-03
2 C-42
3 S-04
4 C-04
OK
Select
Memorizing the Channels (Continued)
Channel List Management
After auto search, a default channel list is created. You can make use of Programme Edit menu to select program, to skip
unnecessary channels, to delete channels, to sort programs, and to create a favorite channel list.
To skip unnecessary channels
After auto search, you can skip unnecessary channels so that only the channels you want to watch can be selected by
CH / CH .
1
2
3
Navigate to Channel menu and press 6
or5
to select Programme Edit item
and then press 4
or OK to access.
Programme Edit
TV
Press 6
or5
to select your unwanted channel, press BLUE button and a skip
symbol appears alongside the selected channel in the list, which means this
channel will be skipped.
If you want to skip more channels, repeat the above steps to set more skip
symbols to more channels.
Press EXIT to quit the list. Now when you press CH / , these unwanted
channels will be skipped.
TV
TV
TV
DEL
1 S-03
2 C-42
3 S-04
4 C-04
NAME
MOVE
SKIP
SKIP
Fav.List
Note
=
If the Programme Edit menu has more than one page, you may press5
or6
to scroll the page upward or downward.
=
To restore a skipped channel, navigate to the Programme Edit menu, select the channel and press BLUE button to cancel the skip symbol.
To sort channels
This function allows you to arrange the channel order.
1
2
3
Programme Edit
Select the channel you want to move in the Programme Edit menu.
TV
TV
TV
Press YELLOW button and a move symbol appears alongside the
selected channel in the list, then use 5
or6
to move the channel
upward or downward to a desired new position. Press YELLOW
button again to finish the sorting.
Repeat the above steps for each channel you wish to move.
TV
DEL
1 S-03
2 C-42
3 S-04
4 C-04
NAME
MOVE
MOVE
SKIP
Fav.List
Note
=
If the Programme Edit menu has more than one page, you may press5
or6
to scroll the page upward or downward.
=
The order of the DTV channels is automatically assigned and cannot be changed by user.
=
There will be no MOVE item in DTV mode.
To delete channels
This function allows you to delete your unwanted channels.
1
2
3
Programme Edit
Select the channel you want to delete in the Programme Edit menu.
TV
TV
TV
Press RED button and a delete symbol appears alongside the
selected channel in the list. Press RED button again to finish the
delete.
Repeat the above steps for more channels you want to delete.
TV
DEL
1 S-03
2 C-42
3 S-04
4 C-04
NAME
MOVE
Note
=
If the Programme Edit menu has more than one page, you may press5
or6
to scroll the page upward or downward.
=
The deleted channels cannot be found unless you perform a channel search again.
17
DEL
SKIP
Fav.List
Channel and Program Selection
Please note: your new TV is capable of receiving both radio and TV broadcasts. And for TV reception, your new TV is capable
of receiving both traditional analog channels and digital channels.
When watching digital TV program and you want to listen to radio program, simply press TV/Radio button to
switch. To return to TV program, press TV/Radio button again. (When watching analog TV program, the TV/Radio
button does not work.)
The TV allows channel and program selection in the following ways:
Method 1— Using CH
Press the CH
CH or CH
or CH
or CH to cycle among all available channels. The skipped channels can not be selected by
button.
Note
=
By using CH
or CH
, you can not select analog channels in DTV mode, or digital channels in ATV mode.
Method 2— Using RECALL button
Press RECALL to switch to the previously tuned channel.
Press RECALL again to switch back to the currently tuned channel.
Note
=
RECALL will not work if no channel has been changed after TV is turned on.
Method 3— Using 0 – 9 and OK button
Press the 0 – 9 number buttons to input a channel number, then wait for some seconds or press OK to go directly to that
channel.
When selecting, the TV will indicate the channel through the information banner.
Note
=
By using 0 – 9 number buttons, you can not select analog channels in DTV mode, or digital channels in ATV mode.
=
When in Radio mode, you can press TV/Radio button to switch to TV mode.
=
If you input one-digit or two-digit channel number, you can press OK to go directly to the channel without waiting.
Method 4— Using channel list
Channel List
Press LIST button to display the channel list. Use 5
or6
to select a channel and then press
OK button.
1 S-03
2 C-42
3 S-04
4 C-04
TV
TV
TV
TV
Note
=
If the channel list has more than one page, you may press 5
or6
to scroll the page upward or
downward.
Move
OK
Select
Favourite List
Method 5— Using favorite channel list
TV
TV
After you have created the favorite channel list, you can press FAV.LIST button to display
the favorite channel list. Use 5
or6
to select a channel and then press OK button.
TV
TV
1 S-03
2 C-42
3 S-04
4 C-04
Note
=
You can directly press FAV+/ FAV– button to cycle among the favorite channels.
Move
18
OK
Select
Picture Adjustment
Customizing the Picture
1
2
3
4
Press MENU and the main menu screen displays.
Press 3
or4
to select Picture menu, press 6
to access the menu.
Within the menu, press 5
or 6
to scroll through the page upward or downward,
and press 5
,6
,3
,4
to navigate through the options or adjust an option.
Press MENU to return to previous menu. Press EXIT to exit the menu screen directly.
Picture
Sound
Time
Option
Picture Mode
Contrast
Brightness
Lock
Channel
User
75
45
Color
Sharpness
50
50
Tint
0
Prev Page
Select
Picture
Sound
Option
Channel
16:9
Off
Screen
Prev Page
Menu
Lock
Cool
Noise Reduction
Next Page
Move
Time
Color Temperature
Aspect Ratio
Select
Return
Next Page
Move
Menu
Return
Option
Description
Picture Mode
Selects a desired picture mode. You can select from Standard, Dynamic, Mild and User.
Standard: Select for a standard picture.
Dynamic: Select for a bright and vivid picture.
Mild: Select for a finely detailed picture.
User: The picture quality you set.
Note: To quickly change the picture mode, press the P.MODE button on the remote control repeatedly.
Contrast
Adjusts image contrast.
Brightness
Adjusts screen brightness for easier viewing of dark picture such as night scenes and black hair.
Color
Adjusts color saturation.
Sharpness
Adjusts image sharpness and displays a sharp image.
Tint
Adjusts tint for image.
Note: The Tint item is only for NTSC system.
Color Temperature
Aspect Ratio
Selects one of three automatic color adjustments. Sets to Warm to enhance hotter colors such as
red, or set to Cool to see less intense colors with more blue. You can select from Warm, Cool
and Normal.
You can select the aspect ratio (display proportions) according to your video signal type or personal
preference. You can select from 16:9, Zoom1, Zoom2 , Auto and 4:3.
16:9: Displays a 16:9 picture.
Zoom1: Enlarges the picture to fill the full screen.
Zoom2: Enlarges the picture, the top and bottom portions may be cropped.
Auto: Displays picture automatically in proper ratio .
4:3: Displays a 4:3 picture.
Note: You can press the ZOOM button repeatedly to select a desired aspect ratio.
When selecting Zoom1/Zoom2, you may use 5
or 6
to move the picture upward or downward, or press4
or 3
to zoom
in or out the picture.
For the sake of protecting the screen, please do not display the image in 4:3 mode for extended periods of time.
Noise Reduction
Select from Low/Middle/High to reduce noise in the picture, commonly called snow.
Select Off to turn off this function.
19
Sound Adjustment
Adjusting the Volume
Using the volume buttons (VOL+ and VOL – )
Press the VOL + or VOL- to increase or decrease the volume.
Using the Mute
Press the MUTE button to temporarily turn off all sound. To restore the sound, press the MUTE button again.
Adjusting the Sound
1
2
Press MENU and the main menu screen displays.
3
Within the menu, press 5
or 6
to navigate through the options,
press3
or4
to adjust an option.
4
Picture
Press 3
or4
to select Sound menu, press 6
to access the menu.
Press MENU to return to previous menu. Press EXIT to exit the
menu screen directly.
Sound
Time
Option
Sound Mode
Treble
Bass
Channel
50
50
Balance
Auto Volume
Off
Spatial
Off
Select
Lock
User
0
Move
Menu
Return
Option
Description
Sound Mode
Selects a desired sound mode. You can select from Standard, Music, Movie, Sports and User.
Standard: Select for normal programs.
Music: Select for a music program.
Movie: Select for a movie program.
Sports: Select for a sports program.
User: The sound quality you set.
Note: To quickly change the sound mode, press the S.MODE button repeatedly.
Treble
Adjusts Treble (high sounds).
Bass
Adjusts Bass (low sounds)
Balance
Adjusts volume balance (left and right volumes).
Auto Volume
Select On to equalize overall volume levels across all channels.
Select Off to turn off the auto volume control.
Spatial
Select On to turn on the surround sound effect. The benefits of surround sound are enormous.
You can be completely enveloped in sound, just as if you were at a concert hall or cinema.
Select Off to turn off surround sound.
20
Sound Adjustment (Continued)
Stereo/Bilingual Selection (for analog channels)
You can quickly select sound multiplex mode by using the STEREO button on the remote control.
NICAM Broadcast Selection
This enables the selection of the reception mode when receiving a NICAM signal. To let you enjoy NICAM broadcasting, this
TV set receives NICAM system stereo, bilingual, and monaural broadcasts.
Stereo
When the TV set is receiving a stereo broadcast, press the STEREO button to select Stereo or Mono. When Mono is
selected, the TV sound is output monaurally.
Bilingual
When the TV set is receiving a bilingual program, press the STEREO button to select NICAM DUAL A or NICAM
DUAL B.
IGR (German stereo system) Broadcasts
This enables the selection of the reception mode when receiving an IGR signal. To let you enjoy IGR broadcasting, this TV set
receives IGR system stereo and bilingual broadcasts.
Stereo
When the TV set is receiving a stereo broadcast, press the STEREO button to select Stereo or Mono. When Mono is
selected, the TV sound is output monaurally.
Bilingual
When the TV set is receiving bilingual program, press the STEREO button to select DUAL A or DUAL B.
Audio Track Selection (for digital channels)
The digital-TV transmission system is capable of simultaneous transmission of many audio tracks (for example,
simultaneous translations of the program into foreign languages, or different commentators for sport events). You can
press STEREO button to select the audio track.
Note
=
The availability of these additional “multi-tracks” depends upon the broadcaster.
21
System Setup
System Setup
You may change system settings such as Hearing impaired, SPDIF, Audio Preference etc. by making use of Option menu.
1
2
Press MENU and the main menu screen displays.
3
Within the menu, press 5
,6
,3
,4
to navigate through the options
or adjust an option.
4
Press MENU to return to previous menu. Press EXIT to exit the
menu screen directly.
Press 3
or4
to select Option menu, press 6
to access the menu.
Option
Description
Language
Selects on-screen menus language.
Picture
Sound
Time
Option
Language
English
Hearing Impaired
Off
Lock
Channel
Auto
SPDIF
Audio Preference
Select
Dolby Digital
Move
Menu
Return
Note: The default selection of this item is English, and cannot be adjusted.
Hearing Impaired
(Only for digital programs)
SPDIF
Press 3
/4
to select On to display the subtitles (if available) for the hearing impaired.
Select Off to turn off the function.
Selects the digital audio output mode for S/PDIF. You can select Auto or PCM.
(Only for digital programs) Auto: Output audio signal by the rule: If current audio track is in Dolby Digital format, then Dolby
Digital format will be selected. If current audio track is in MPEG, then PCM format will be selected.
PCM: Output audio signal by PCM format.
Note: To select Auto is recommended.
Audio Preference
Selects the audio track to output. You can select MPEG or Dolby Digital.
(Only for digital programs) MPEG: If the program has MPEG and Dolby Digital tracks, select MPEG to output MPEG track in
preference.
Dolby Digital: If the program has MPEG and Dolby Digital tracks, select Dolby Digital to output
Dolby Digital track in preference.
22
Rating and Lock Setup
Password Setup
The Password setup sub-menu is used to set a new system password or to change an existing system password. By default, the
system password is 0000 and you may change it. To access Parental Guidance, to lock or unlock channels, to view locked
channels, etc., the system password is required.
To create a new password
Picture
1
Press MENU and the main menu screen displays.
Press 3
/4
to select Lock menu, press 6
to access the menu.
Lock
Channel
Off
Please enter Password
English
- - - -
Parental Guidance
3
Press 5
or6
to select Set Password item, and then press 4
or
OK button to access its submenu.
4
Use the number buttons to input a new password (4- digit).
Off No Block
Restore Factory Default
Picture
Select
Move
Sound
Time
Menu
Option
Lock
Lock Tuning
Off
Please enter Password
Set Password
New English- - - -
Block Program
Return
Channel
- - - Off No Block
Confirm
Parental Guidance
Note
! Be sure to write down your password and retain it for future use. If you
do forget the password, the unit provides a super password “2580”.
Please DO NOT let your children know the super password.
Option
Block Program
Now a password is required to input. Use number buttons to input
the correct password (the default password is 0000).
Input the new password again.
Now the new password has been created successfully.
Time
Set Password
2
5
Sound
Lock Tuning
Restore Factory Default
Select
Move
Menu
Return
Block Program Setup
The Block Program function blocks any channels that you do not want to
watch or that you do not want your children to watch.
Picture
1
Sound
Time
Navigate to the Lock menu and input the correct password to
access.
Lock Tuning
2
Use 5
or6
to highlight Block Program item, press 4
or OK to
access.
Parental Guidance
3
Now the Block Program screen opens. Use 5
or6
to select the
channel you want to lock, then press GREEN button to set lock to
the channel. A lock symbol appears alongside the locked channel.
4
Repeat the above steps for each program you wish to lock.
5
Press MENU to return to previous menu. Press EXIT to exit the
menu screen directly. Then the Block Program comes into effect
for the Locked channel.
Note
call up Block Program screen, then use GREEN button to unlock the
channel, and the lock symbol will disappear.
23
Lock
Channel
Off
Set Password
Block Program
No Block
Restore Factory Default
Select
Move
Menu
Block Program
TV
TV
TV
OK
! To view a locked channel, just input the password.
! To cancel channel lock, use password to enter into the Lock menu, and
Option
20 S-48
21 S-51
22 S-56
Select
LOCK
Return
Rating and Lock Setup (Continued)
Parental Guidance Setup (DTV only)
Parental Guidance blocks programs according to their classification so that
children can not view certain programs.
Picture
Sound
Time
Option
Lock Tuning
Lock
Channel
Off
Set Password
Block Program
1
Navigate to the Lock menu and input the correct password to
access.
2
Press 5
or6
to highlight the Parental Guidance item.
3
Use3
or4
to select your desired
rating.
Use the “Block All” setting to completely
block all viewing. The menu can still be
accessed to unblock all programs.
Parental Guidance
No Block
Restore Factory Default
Select
Move
Press MENU to return to previous
menu. Press EXIT to exit the menu
screen directly.
Return
G (General Audiences): Content not
offensive to most viewers.
PG (Parental Guidance Suggested):
Content is such that parents may not want
their children to view the program.
Block All
M (Mature Audience): Suitable for mature
audience.
Block PG and above
MA(Mature Adult Audience): May contain
mature themes, profane language, graphic
violence, and sexual situations.
Block M and above
Block G and above
Block MA and above
Block AV and above
AV (Adult Audience): Strong violence.
4
Menu
Block R and above
R (Restricted viewing): Not for children
under age 17. Strong elements of sex
and/or violence.
No Block
Lock Tuning Setup
Making use of Lock Tuning you can protect some TV settings from being
accidentally changed.
1
Navigate to the Lock menu and input the correct password to
access.
2
Now the Lock Tuning item will be highlighted automatically.
Picture
Sound
Time
Option
Lock Tuning
Lock
Channel
Off
Set Password
3
Block Program
Parental Guidance
Use 3
or4
to turn on or turn off the Lock Tuning.
Once you turn on Lock Tuning, all items in Channel Menu can not be
accessed by the user without the correct password. To cancel, use
password to enter into Lock Menu and set Lock Tuning item to OFF.
No Block
Restore Factory Default
Select
Move
Menu
Return
Restoring Factory Default
Running this function to reset all settings to its original factory condition.
1
Navigate to the Lock menu and input the correct password to
access.
2
Press 5
or6
to select the Restore Factory Default item, press 4
Set Password
Block Program
or OK to activate the function.
Picture
Sound
Lock Tuning
Parental Guidance
3
Time
Now the screen will display a dialog box for you to confirm your
operation. Use 3
or4
to toggle between YES or NO item, and
press OK to confirm your operation.
Select
! This function will clear most of your customized settings. So make sure you do want to reset
24
Lock
Channel
OffOff
Are you sure?
English
Yes
No BlockNo
Restore Factory Default
Note
all settings to its original factory condition before you perform this operation.
Option
Move
Menu
Return
Timer Setup
Time Zone Selection
To obtain local time, you should first set local time zone. and it depends on
your local station whether has broadcast time zone information.
Picture
Sound
1
2
Press MENU and the main menu screen displays.
3
Press 5
or6
to select Time Zone item, and then press 3
or4
to
Time Zone
select the appropriate one.
Press 3
or4
to select Time menu, press 6
to access.
Time
Clock
Off Time
On Time
Option
Lock
Channel
28/Sep /2008 15:30
Off
Off
Off
Sleep Timer
Auto Sleep
Off
VIC GMT+10
Select
Move
Menu
Return
Current Time Setup
Make use of this function can set the current time for the TV.
1
2
3
Navigate to the Time menu, press 6
to access.
Press 5
or6
to select Clock item, Press4
or OK to access the
submenu.
Within the menu, use 5
or6
to highlight the Date, Month, Year,
Hour or Minute item, and use 3
or4
to adjust the values.
When finished, use 5
or6
to select Close and press OK to
confirm the setting.
Picture
Sound
Time
Clock
Off Time
On Time
Option
Lock
Channel
28/Sep /2008 15:30
Off
28
Date
Off
Sep
Month
Year Off 2008
15
Hour Off
Minute
VIC GMT+1030
Sleep Timer
Auto Sleep
Time Zone
Close
Return
Note
! Before setting Off timer and On timer, please set the Clock for the TV.
! Once TV switch to DTV channel and success to get the current time from DTV channel, the Clock item will be displayed
automatically, and cannot be adjusted.
Select
Move
Menu
On Timer Setup
With On Timer function On, the TV will automatically turn on at the preset time.
1
2
Navigate to the Time menu, press 6
to access.
Press 5
or6
to select On Time item, Press 4
or OK to access
the submenu.
Picture
Sound
3
Now the Activate item will be highlighted automatically, press
3
or4
to select On . (If you want to cancel setting, please choose
Off )
4
Press 5
or6
to select Hour or Minute item, and press 3
or4
to
Auto Sleep
adjust the value.
Time Zone
5
After setting On Timer, you can press 5
,6
,3
or4
to navigate
through the following three options and adjust the options .
Clock
Off Time
On Time
Sleep Timer
Option
Description
Volume
Sets desired volume for the On program.
Mode
Selects one source to be viewed through On timer.
Program Number
Selects a broadcasting program for On timer.
Option
Lock
Channel
28/Sep /2008 15:30
Off
Activate
On
Off
00
Hour
Off
00
Minute
00
Volume Off
DTV
Mode
VIC GMT+10
22 ABC TV
Close
Select
6
When finished, use 5
or6
to select Close item and press OK to confirm the setting.
7
Press to switch the TV to standby mode. At the preset time, the TV will
auto turn on and broadcast the preset program at the preset volume.
25
Time
Move
Menu
Return
Timer Setup (Continued)
Off Timer Setup
With Off Timer function On, the TV will automatically turn off at the preset time.
1
2
Navigate to the Time menu, press 6
to access.
Press 5
or6
to select Off Time item, press 4
or OK to access
the submenu.
Picture
Sound
Time
Clock
Off Time
On Time
3
Now the Activate item will be highlighted automatically, press
3
or4
to select On . (If you want to cancel setting, please choose Off )
4
Press 5
or6
to select Hour or Minute item, and press 3
or4
to
adjust the value.
When finished, use 5
or6
to select Close and press OK to confirm
the setting.
Option
Lock
Channel
28/Sep /2008 15:30
Off
ActivateOff
On
00
Hour
Off
00
Minute
Off
Sleep Timer
Auto Sleep
Time Zone
VIC GMT+10
Close
Select
Move
Menu
Return
Note
! Once you have set On timer or Off timer function, the unit will perform it everyday at the preset time.
Sleep Timer Setup
Sleep timer lets you select the amount of time before your TV turns itself off
automatically. This setting is cleared when the TV is turned off.
Picture
1
2
Navigate to the Time menu , press 6
to access.
3
Press 3
or4
to select the amount of the time; to turn off the timer,
please select Off.
Sound
Time
Option
Clock
Off Time
On Time
Press 5
or6
to select Sleep Timer item.
Lock
Channel
28/Sep /2008 15:30
Off
Off
Sleep Timer
Auto Sleep
Off
Off
Time Zone
VIC GMT+10
Select
Move
Menu
Return
Note
! You may directly press SLEEP button on the remote control to set sleep timer.
! After you have set sleep timer, when the last 30 seconds have come up, the Power Off screen will
appear to remind you after how many seconds the TV will power off. You can press any button to quit.
Auto Sleep Setup
When there is no signal input for a certain time, the unit will turn off
automatically.
Picture
Sound
1
2
Navigate to the Time menu, press 6
to access.
Clock
Off Time
On Time
Press 5
or6
to select Auto Sleep item.
Sleep Timer
Auto Sleep
3
Press 3
or4
to select On or Off.
Option
Lock
Channel
28/Sep /2008 15:30
Off
Off
Time Zone
Select
26
Time
Off
On
VIC GMT+10
Move
Menu
Return
EPG Operation
EPG
The Electronic Programme Guide (EPG) makes it possible for users to see details about the programme they are watching,
other programmes and even a schedule of the next 7 days. The information available includes the number and name of the
channel, the name and type of programme, the start and end time, and a summary. Thus viewers can easily select the
programmes they want to see.
Operation
1
Press the EPG button to open the EPG (Electronic
Program Guide). In the EPG window (as shown on
the right), several channels’ current and upcoming
program’s information will be displayed.
PROGRAMME GUIDE
28 Jul 2008 15:03
15:00
BLUE HEELERS
28 Jul
16:00
No information
70 7 HD Digital
BLUE HEELERS
No information
71 7 Digital 1
BLUE HEELERS
No information
72 7 Digital 2
BLUE HEELERS
No information
73 7 Digital 3
BLUE HEELERS
No information
DTV
7 7 Digital
2
3
Press YELLOW button to highlight the date bar,
use 3
or4
to select the proper date, and then
press YELLOW button again to exit.
Use 5
,6
,3
or4
to navigate among the channels
and program events, and press INFO button to get
more detailed information (if available) about the
programme you choose.
If you want to switch between TV and Radio
programmes, please press TV/Radio.
EXIT
Info
Press OK to tune to the channel you have selected.
To clear the EPG window, press EXIT button or EPG button.
Note
! The EPG will only work when you are receiving digital channels.
! To enable EPG to work properly, it is suggested to set the appropriate time zone.
27
DTV
72 7 Digital 2
15:00 - 16:00 BLUE HEELERS
TV/Radio
OK
DATE
Teletext & Subtitle
Teletext
What Is Teletext?
Your System receives Teletext signals broadcast by a TV network, and decodes them into graphical format for viewing.
News, weather and sports information, stock exchange prices and programme previews are among the many services
available.
To Turn On/Off Teletext
Select a TV channel providing the Teletext program.
Press TTX button to display the teletext.
Press TTX button again to switch back to TV screen.
Teletext control button list
!5
/6
button
Used to scroll page upward or downward.
! 0 – 9 button
Directly select any page by using 0 – 9.
! Colored buttons (RED/GREEN/YELLOW/BLUE)
Colored areas are displayed at the bottom of the screen. The 4 colored
buttons are used to access the items or corresponding pages.
! Hold button
Certain pages contain sub-pages which are automatically displayed
successively. This button is used to stop or resume sub-page acquisition.
! Reveal button
Press the button to reveal the concealed information such as games
solutions. Press the button again to hide the information.
! Size button
Press this button several times to display the upper, then the lower part of
the screen and then return to the normal size teletext page.
! Index button
In teletext mode, press this button to display the index page.
! Mix button
Press the button to display the Teletext on the screen with transparent
background while viewing the TV program simultaneously.
! Update button
Press the button to view the updated teletext page.
Subtitle
When watching digital programs, press Subtitle button to display the subtitle.
1
If the program has subtitle, simply press Subtitle button to display subtitle.
2
Press Subtitle again to cancel the subtitle.
When watching analog programs, press this button to display the teletext
subpage.
28
Screen Setup for D-SUB(PC) Mode
Before adjusting the screen, make sure that you select the correct source (D-SUB).
Screen Setup
1
Press MENU and the main menu screen displays.
2
Press 3
or4
to select the Picture menu, press 6
to access the menu.
3
Within the menu, press 5
or 6
to scroll through the page upward or downward until you select the Screen
item, then press 4
or OK to access.
4
Press 5
,6
,3
,4
to navigate through the options or adjust an option. To confirm, press OK.
5
Press MENU to return to previous menu. Press EXIT to exit the menu screen directly.
Picture
Sound
Time
Option
Color Temperature
Aspect Ratio
Noise Reduction
Lock
Channel
Picture
Cool
16:9
Off
Screen
Prev Page
Select
Option
Sound
Time
Option
Lock
Channel
Auto Adjust
Horizontal Pos.
Vertical Pos.
50
50
Size
Phase
0
60
Next Page
Move
Menu
Select
Return
Move
Menu
Return
Description
Auto adjust
Selects and activates to start auto adjustment. The set automatically adjusts the image settings,
such as position and phase.
Horizontal Position
Moves the image on the screen left or right.
Vertical Position
Moves the image on the screen up or down.
Size
Adjust the horizontal width of the image on the screen.
Phase
Improves the focusing of a stable image.
29
Troubleshooting
If, after reading these operating instructions, you have additional questions related to the use of your television, please call the
services center in your local area.
Before calling service, please check the symptoms and follow suggested solutions.
Remote Control
Problem
Remote control does not operate
Possible Solutions
! The batteries could be weak. Replace the batteries.
! Check the orientation of the batteries.
! Make sure the power cord is plugged in.
Video and Audio
Problem
Possible Solutions
No picture (screen not lit),
No sound
! Make sure the power cord is plugged in.
! Press POWER on the TV or on the remote control.
! Try another channel; it could be station trouble.
Dark, poor or no picture
(Screen lit), good sound
! Select a proper picture mode.
! Adjust the brightness in the video setting.
! Check the antenna connections.
No color/dark picture/color
is not correct
! Adjust the color saturation in the video setting.
Only snow and noise appear
on the screen
! Check the antenna connections.
! Try another channel; it could be station trouble.
Dotted lines or stripes
! Adjust the antenna.
! Move the TV away from noise sources such as cars, neon signs, or hair dryers.
Double images
! Using a highly directional outdoor antenna or a cable may solve the problem.
Good picture, no sound
! The sound may be muted. Press MUTE again to cancel.
! Make sure the stereo mode is set to stereo or mono.
Audio noise
! Communication problems may occur if infrared communication equipment (e.g.,
infrared cordless headphones) is used near the TV. Move the infrared
communication equipment away from the TV until the noise is eliminated.
30
Troubleshooting
General
Problem
One or some channels can’t be
displayed
Possible Solutions
! These channels may be locked. Please unlock them (see <Rating and Lock Setup>
section).
! These channels may be set skipped in the channel list. You may set it to not skipped or
select them with 0-9 number buttons.
Lost password
! You may use the super password (2580).
Some items can’t be accessed
! If a setting option appears in gray, this indicates that the settings option is unavailable
in current input mode.
TV cabinet creaks
! When the TV is in use, there is a natural rise in temperature, causing the cabinet to
expand or contract and may be accompanied by a slight creaking noise. This is not a
malfunction.
Some settings (such as volume
setting, etc.)may not be memorized
when the TV loses power or you
press main Power Switch to turn off
the TV.
! After you make some settings or adjustments, and within 30 seconds you turn off the
Control buttons do not operate
! Disconnect the power cord and wait for a few seconds. Then re-plug the power cord
TV by main Power Switch or the TV loses power, then the settings you have made
within 30 seconds may not be memorized. But you can use Power button to switch
the TV to standby mode before cutting off the power, then the settings can be
memorized.
and turn on the unit again.
Note
If your problem is not solved, turn your unit off and then on again.
Cautions:
Never attempt to repair a defective TV yourself.
31
Specifications
Type:
LED TV
Display Size diagonal:
19”
Power Supply:
AC220-240V 50/60Hz
Power Consumption:
25W
Dimensions(mm):
460 (W) x 333 (H) x 140(D)
Unit Weight(kg):
3.2
TV System:
Analogue: CCIR(PAL-B/G, NTSC(AV))
Digital: DVB-T(2K/8K OFDM)
Note
! Design and specifications are subject to change without notice.
32
PALSONIC CORPORATION PTY LTD
1 JOYNTON AVENUE
WATERLOO NSW 2017 AUSTRALIA
TEL:(02)9313 7111
FAX:(02)9313 7555
PALSONIC CUSTOMER SERVICE
TELEPHONE
AUSTRALIA:1300 657 888
5944036860
Ver.1.0