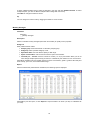
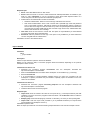
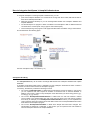
1
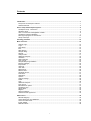
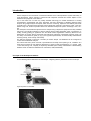
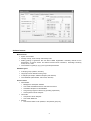
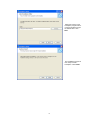
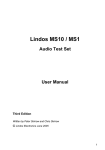
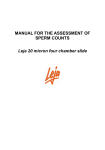
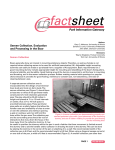
AutoSperm
Computer Assisted Semen Analysis
manual
MedCalc Softw are
this page intentionally left blank
© MedCalc Software bvba. All rights reserved. No part of this package, neither the documentation nor the
software may be reproduced, stored in a retrieval system, or transmitted in any form by electronic,
mechanical, photocopying, or any other means without the prior written permission of the publisher.
The author and the publisher make no representations or warrants with respect to the software and the
documentation and specifically disclaim any implied warranties of fitness for any particular purpose.
Microsoft, Excel, Windows and Windows Vista are trademarks or registered trademarks of Microsoft
Corporation in the United States and/or other countries.
AutoSperm and MedCalc are registered trademarks.
Version 5
AutoSperm
â
Copyright ã 1989-2009 MedCalc Software bvba
MedCalc Software
Broekstraat 52
B-9030 Mariakerke
Belgium
[email protected]
www.medcalcsoftware.com
www.autosperm.com
this page intentionally left blank
Contents
Introduction..........................................................................................................................................1
Principle of the AutoSperm method .....................................................................................................1
Software features ...............................................................................................................................3
How to setup the AutoSperm system ..................................................................................................5
AutoSperm setup - introduction ...........................................................................................................5
Hardware setup ..................................................................................................................................6
How to connect the DrawingBoard VI tablet .........................................................................................6
AutoSperm software installation ..........................................................................................................7
Running the program for the first time................................................................................................ 10
Setup: final steps .............................................................................................................................. 11
Counting procedure ........................................................................................................................... 12
Menu overview ................................................................................................................................... 14
Change Login ................................................................................................................................... 14
Login................................................................................................................................................ 14
Page Setup ...................................................................................................................................... 15
Exit .................................................................................................................................................. 15
New Sample..................................................................................................................................... 15
Sample dialog................................................................................................................................... 16
Sample............................................................................................................................................. 16
Analysis data.................................................................................................................................... 17
Additional analyses........................................................................................................................... 19
Validation ......................................................................................................................................... 20
Search Sample................................................................................................................................. 20
Print Journal ..................................................................................................................................... 22
Samples Requiring Validation ........................................................................................................... 23
Monthly Averages ............................................................................................................................. 24
Export Data ...................................................................................................................................... 25
Users list .......................................................................................................................................... 25
User data ......................................................................................................................................... 26
Referrers list..................................................................................................................................... 26
Referrer data .................................................................................................................................... 26
Calculate volume.............................................................................................................................. 27
Test tablet ........................................................................................................................................ 27
Calibration........................................................................................................................................ 28
Options ............................................................................................................................................ 29
Analysis settings............................................................................................................................... 29
Tablet............................................................................................................................................... 30
Lists ................................................................................................................................................. 30
Additional analyses........................................................................................................................... 31
Text macros ..................................................................................................................................... 31
Miscellaneous options....................................................................................................................... 31
AutoSperm help................................................................................................................................ 32
What's New? .................................................................................................................................... 32
Register ........................................................................................................................................... 32
About AutoSperm ............................................................................................................................. 33
Software license agreement .............................................................................................................. 33
Admin menu ....................................................................................................................................... 34
Recode Subgroup............................................................................................................................. 34
Collect Subgroups from Database ..................................................................................................... 34
Connect to SQL server...................................................................................................................... 34
Import datafile................................................................................................................................... 35
Rebuild Indexes................................................................................................................................ 36
i
How to customize the printed report ................................................................................................. 37
How to integrate AutoSperm in hospital infrastructure..................................................................... 39
autosperm.dll library ......................................................................................................................... 39
AutoSperm CS ................................................................................................................................. 40
AutoSperm cgi module...................................................................................................................... 40
Appendix A: Calculations .................................................................................................................. 42
ii
Introduction
Semen analysis is the cornerstone of functional evaluation of the male reproductive system and fertility. In
most laboratories, semen analysis is performed with subjective methods and results depend on the
skillfulness and judgment of the observer.
Up to now there has not been any widely available technology for reliable assessment of motility
characteristics. Sophisticated and costly equipment has been developed to establish objective sperm
analysis using image analysis techniques, which are time consuming, expensive and relatively inaccurate
(Comhaire et al., Objective semen analysis: has the target been reached?, Hum Reprod, 1992, 7:237-241;
Kamtchouing et al., Etude comparative entre trois méthodes d'analyse de sperme. Andrologie, 1991, 1:6164).
The AutoSperm method allows objective semen analysis using inexpensive equipment and fully validated
technology. The following elements of semen analysis are accurately assessed: sperm concentration, %
motility, motility grading (in agreement with the World Health Organization Laboratory Manual for the
Examination of Human Semen and Semen-Cervical Mucus Interaction, Cambridge University Press, 4th
ed, 1999), concentration of grade (a), (b), (c) and (d) motile spermatozoa, as well as motility characteristics
including velocity, linear velocity and linearity.
The data are acquired in less than 5 minutes per semen sample. The database can be configured to
contain data of additional analyses.
The method has been proven accurate, reproducible and clinically useful (Hinting et al., Validation of a
single step procedure for the objective assessment of sperm motility characteristics, Int J Androl, 1988,
11:277-287; Hinting et al., Capacity of objectively assessed sperm motility characteristics in differentiating
between semen of fertile and subfertile men. Fertil Steril, 1988, 50:635-639).
Principle of the AutoSperm method
A zoom drawing tube is attached to the microscope. A digitizing tablet is placed next to the microscope.
A grid is placed on the tablet.
1
The zoom of the drawing tube is adjusted so that the sides of the grid correspond with 100 μm in the
microscopic field.
The technician observes the spermatozoa in the visual field, together with the cursor on the grid. A motile
cell is registered by following the movement of the cell with the cursor, for a short period of time, whilst
keeping a button depressed. An immotile cell is registered by pressing a different button on the cursor.
After all cells in the grid have been registered, a third button is pressed and analyis continues on a
different visual field.
The AutoSperm program analyses the data from the digitizing tablet.
When a sufficient number of spermatozoa have been registered, a summary report is displayed.
2
Software features
Measurements
·
Sperm concentration
·
Average velocity, linear velocity and linearity index
·
Motility grading in agreement with the World Health Organization Laboratory Manual for the
Examination of Human Semen and Semen-Cervical Mucus Interaction, Cambridge University
Press, 4th ed., 1999.
·
Concentration of grade (a), (b), (c) and (d) motile spermatozoa
Database layout
·
2 sample groups: patients, laboratory
·
subgroups can be defined for both groups
·
3 analyses per sample, additional analysis (user-defined)
·
users database (administrator, technicians, referrers)
Access control
·
Administrator
– Manages the AutoSperm software
– Can create and delete technician and referrer accounts
– Can delete samples from the database
– Can grant login rights to referrers (by providing a password)
– Cannot perform semen analyses
·
Technician
– Can perform semen analyses
– Can create "Referrers"
·
Referrer
– Can retrieve results of own patients, in the patients group only.
3
Reporting
·
Export selected samples to Excel, or the MedCalc statistical software package;
·
Calculation of monthly averages (mean and median) of sperm concentration, grade (a) and grade
(a)+(b) motility as well as linear velocity, for quality control purposes. Averages can be exported to
Excel or MedCalc.
4
How to setup the AutoSperm system
AutoSperm setup - introduction
The AutoSperm system runs on any PC with Windows 2000, Windows XP, or Windows Vista. The
program has been certified for Windows Vista.
The data are stored in a SQL database, which can be SQL Server 2000, SQL Server 2005 or SQL Server
2005 Express (free from Microsoft). The database server can be installed locally or on a remote computer
in the network. If the server is on a remote machine then the database can be accessed simultaneously
from different terminals using the same AutoSperm program, or a special version of the software
(AutoSperm CS) which allows consultation of the data only.
AutoSperm stand-alone installation
In this scenario the AutoSperm system is installed on one PC which is used as the counting machine (with
the AutoSperm digitizing tablet attached to it) and which also holds the SQL database.
Required:
·
PC with Windows 2000, Windows XP or Windows Vista (PC with Windows XP SP2 is
recommended), and one free serial port (RS-232) to connect the AutoSperm digitizing tablet.
·
SQL Server 2000, SQL Server 2005 or SQL Server 2005 Express installed on the PC. SQL Server
2005 Express is a free product from Microsoft and is included on the AutoSperm installation CD.
·
The AutoSperm software takes less than 2 MB hard disk space.
AutoSperm in network environment
In this scenario the AutoSperm system is installed on one PC which is used as the counting machine (with
the AutoSperm digitizing tablet attached to it), and which connects to a SQL server on a remote machine in
the network. This offers the advantage that, using the AutoSperm program (or a special version of the
software which is AutoSperm CS), the data can be accessed simultaneously by different users.
Required:
·
A PC, which will serve as an AutoSperm counting machine, with Windows 2000, Windows XP or
Windows Vista (PC with Windows XP SP2 is recommended), and one free serial port (RS-232) to
connect the AutoSperm digitizing tablet.
·
Connection to a SQL server (the AutoSperm program requires full rights).
·
On other PCs in the network the AutoSperm software can also be installed, or a special version of
the software (AutoSperm CS) which allows data consultation only.
See also: How to integrate AutoSperm in hospital infrastructure (p. 39).
Database maintenance
For 15000 semen analyses, the size of the SQL autosperm5.mdf data file is about 115 MB. This file will
need to be backed up according to the institution’s policy (daily recommended). The SQL database and
tables will be created and maintained by the AutoSperm system – no manual interventions are required.
5
Hardware setup
The hardware for the AutoSperm system is shown in the following picture.
A zoom drawing tube is attached to the microscope.
The digitizing tablet is placed as close to the microscope as possible.
The black template with the white grid is positioned under the transparent plastic cover of the digitizing
tablet, so that the grid is in the center of the microscopic visual field.
How to connect the DrawingBoard VI tablet
All cable connections are made at the rear of the tablet. Turn off your computer and make sure the tablet
power switch is in the off position.
Connect the cursor to the appropriate jack on the digitizer's Connector Panel. The connector is keyed and
will only fit the correct jack. Do not force it.
Connect the RS232 serial cable to the serial jack on the Connector Panel. The connector will fit only the
correct jack. Connect the 9-pin connector of the serial cable to the serial port on your computer.
Plug the power supply into an AC outlet. Connect the power supply to the appropriate jack on the
Connector Panel. Turn the Power Switch on. The light on the cursor will turn on.
6
AutoSperm software installation
You install the software by executing the program autospermsetup.exe. During installation, you will see
the following panels:
After some initialization,
this Welcome panel
appears. Click Next.
Select the locations of
different shortcuts to the
AutoSperm program. Click
Next.
7
Select the location of the
AutoSperm program files. It
is recommended to accept
the default value. Click
Next.
The installation program is
now ready to install
AutoSperm. Click Install.
8
This panel shows the
installation status..
Installation is complete.
The Launch AutoSperm
option is checked by
default. You are now ready
to run AutoSperm for the
first time. Click Finish.
9
Running the program for the first time
The first time you run the AutoSperm program, you have to complete the following steps:
Provide connection data for the SQL server. If
you are using SQL Server 2005 Express,
complete the dialog box as shown here.
If you are using SQL server 2000 or 2005 on a
remote machine on the network, consult your
network administrator for connection details.
The database autosperm5 does not exist.
Click OK to create it.
You can now login to the program for the first
time. Use ADMIN for both login and
password.
10
Setup: final steps
Test the hardware
After the digitizing tablet has been connected to the computer, you complete the following steps:
·
Select Options in the Tools menu (p. 29).
·
Click the Tablet tab.
·
Select the tablet type (SummaSketch III, DrawingBoard III or DrawingBoard VI)
·
Select the communication port the tablet is connected to (usually 1 or 2).
·
Click the Test button (see Test tablet, p. 27)
Calibrate the system
See Calibration for details (p. 28).
Create AutoSperm users
Since as an administrator you cannot perform semen analyses in the AutoSperm system, you must create
one or more AutoSperm users (technicians).
To create a new user:
·
Select Users in the Tools menu.
·
Click the New button.
·
Complete the panel as explained on User data (p. 25).
11
Counting procedure
Procedure for DrawingBoard VI tablet
After liquefaction, an aliquot of 11.5 μL of thoroughly mixed, either undiluted or diluted fresh semen is
placed on a microscope slide and covered with a standard coverslip of 24 x 24 mm, to give a uniform
depth of 20 μm (11.5 μL divided by 576 mm2 is equal to 0.02 mm or 20 μm). Alternatively, an aliquot of 8
or 10 μL semen can be covered with a coverslip of 20 x 20 or 22 x 22 mm respectively.
Analysis is performed at room temperature (between 20 and 24°C) using the 40x objective.
Bring the sperm into focus. Move the tablet to locate the grid in the center of the visual field. Analysis starts
from the small square (A1, Figure 1) at the upper left corner of the large square grid. Each sperm present
in the small square must be classified. Motile spermatozoa are tracked by moving the cursor on the
digitizing tablet in such a way that the superimposition of the red light follows sperm movement as closely
as possible. While doing so button [1] of the cursor is pressed. After a predefined period of time you hear a
computer generated beep and you release the button. Since it is impossible to track the lateral head
movement, the sperm has to be tracked at its midpiece. The superimposition of the light point of the cursor
on the microscopic field must follow the movement of the sperm-midpiece as accurately as can be done by
hand.
Spermatozoa presenting non-progressive motility are identified by pressing button [1] of the cursor and
leaving the cursor on the spot.
Immotile spermatozoa are recorded by pressing button [2] of the cursor.
It is of the utmost importance to record each sperm which is present in a particular square at a given
moment of time. Do not wait for spermatozoa to enter the square, nor skip any present spermatozoa, as
this will cause unreliable results.
Figure 1: A diagrammatic representation of the sequence of analysis.
Analysis is continued until all spermatozoa in the first small square (A1) are characterized. Then you
proceed to the next small square (A2), following a well defined sequence. When all spermatozoa within the
large square are analyzed, press button [4] of the cursor. If, at this point, less than 60 spermatozoa are
characterized, the preparation is shifted to another visual field to continue the analysis of another large
square. The analysis is completed when a sufficient number of large squares has been evaluated to
characterize at least 60 spermatozoa. This is indicated by a computer generated triple beep.
It is possible to interrupt the procedure before 60 spermatozoa have been characterized. First complete
counting the cells in least 1 large square, press button [4] to indicate end-of-square, and next click the
Stop button in the dialog box on the screen.
You can cancel the analysis by pressing the [Esc] key or clicking the Cancel button.
The procedure described above yields optimal results in semen samples with sperm concentration
between 5 and 50 x106/mL. If the number of spermatozoa per visual field is less than 5, corresponding to
12
severe oligozoospermia, you can to classify each sperm present in the large square without scanning
through the small squares. If sperm concentration is high, it is suggested either to reduce chamber depth,
or to dilute the sample. In the former case only 8.6 μL of semen is placed under a 24 x 24 mm coverslip,
resulting in a chamber depth of 15 μm (8.6 μL divided by 576 mm2 is equal to 0.015 mm). It is, however,
not recommended to reduce the chamber depth bellow 15 μm, since this will hinder the free movement of
sperm and artificially reduce linearity. Alternatively, the sample can be diluted before being evaluated.
Dilution is preferentially done by means of cell free seminal plasma of the particular semen sample,
obtained by centrifugation. The reduction of chamber depth or the dilution factor must be recorded, and the
system automatically calculates sperm concentration taking into account these factors.
Remember
·
Change the visual microscopic field randomly. Do not search for motile cells if motility is low, or do
not search for cells if concentration is low.
·
Record every square: changing to another microscopic field must always be recorded by pressing
button [4], even if no cells were present in the square.
·
When you are following a cell but it moves out of the visual field, simply release button [1] of the
cursor and continue the analysis. If the cell was followed during a sufficient period of time (pre-set
in the settings and options menu) it will be taken into account for analysis.
13
Menu overview
Change Login
Command
File
Change Login
Description
Allows to login as another user, without having to exit the program.
Login
Description
Allows to access the AutoSperm software and database.
Required input
·
Login: your login name
·
Password: your password. Remember that your password is case-sensitive.
To change your password
After you have successfully logged in with your current password, select Users in the Tools menu
(referrers: select Referrers in the Tools menu). Next select your login name in the list and click Edit.
First login after installation of the program
After you have installed the AutoSperm software, you use ADMIN for login name as well as for password.
This will allow you to login as the AutoSperm administrator.
Next:
·
change your password (see above)
·
create user accounts for one or more technicians. Even if only one person will use the software,
you must create a new user account, and use this account to access to program for daily work. As
an administrator, you cannot perform semen analyses in the AutoSperm system.
14
Page Setup
Command
File
Page Setup
Description
Allows to set the margins of the printed report.
Required input
Enter the size, in millimeters, of the top, left, right and bottom margins for the printed report.
Exit
Command
File
Exit
Description
Stops the program.
Shortcut
Alt+F4
New Sample
Command
Sample
New Sample
Description
Allows to enter a new sample number.
Dialog box
Select the sample group: Patients or Laboratory. The sample number last entered for the selected group is
displayed as a reminder.
15
Enter the number of a new sample. The program will not accept a number that has been used already.
Click OK to proceed and go to the Sample dialog.
Sample dialog
The sample dialog box displays the sample number in its title bar.
You can switch between the following tabs:
·
Sample: sample identification
·
Analysis 1: a first analysis of the sample (e.g. analysis of the native sample)
·
Analysis 2: a second analysis of the sample (e.g. after sperm preparation)
·
Analysis 3: a third analysis of the sample (e.g. survival test after 24 hours)
·
Additional analyses: additional analyses and information.
· Validation: validation of results.
When you switch from one tab to another, the changes that you have made are saved in the database. If
you do not want your recent changes to be saved, click Cancel.
Click the Print button for a full printed report. Click OK to close and save the data.
Tip
When you click Print, the report will immediately be printed to the default printer. If you want to select a
printer first, press Ctrl+P or function key F11.
Sample
Required input
·
Patient record number: a record number that identifies the patient, (e.g. hospital record number).
·
Patient name: the patient's name, enter his last name first.
·
Date of birth: the patient's date of birth.
·
Partner name: the name of the partner.
·
Date of birth: the partner's date of birth.
16
·
Subgroup: select the code for the subgroup this sample will be classified into; e.g. PATIENT or
DONOR for patients or sperm donors.
·
Ejaculation date and time: data and time of ejaculation.
·
Abstinence (days): the number of days since the patient’s previous ejaculation.
·
Referrer 1 and 2: select the code of the referring doctor(s). If the referrer is not in the list, click the
New button. The date of the selected referrer are displayed below the code. Click Edit if you need
to make corrections.
·
Reference: enter a reference number.
Buttons
·
Print: print a complete report
·
OK: saves the data in the database and closes the dialog box
·
Cancel: closes the dialog box without saving the data in the database.
Tips
When you click Print, the report will immediately be printed to the default printer. If you want to select a
printer first, press Ctrl+P or function key F11.
Remember that when you switch from one tab to another, the changes that you have made are saved in
the database. If you do not want your recent changes to be saved, click the Cancel button.
Analysis data
Required input
·
Analysis: a description of the analysis, e.g. native semen, after preparation, etc.
·
Technician: the login name of the technician who performs or has performed the semen analysis.
·
Room temperature: enter the room temperature (optional).
·
Preparation depth: this is the depth of the counting chamber derived from the known volume of
semen and the dimensions (length and width) of the cover-glass:
17
·
The default sample preparation depth is entered in the Options section of the program (p. 29).
·
Dilution: if the semen used for analysis is diluted then you must enter the proportion of semen and
the proportion of diluent. If the semen is not diluted, enter the value 1 for proportion of semen and
the value 0 for proportion of diluent. The default dilution is entered in the Options section of the
program (p. 29).
·
Time after ejaculation: the time interval between time of ejaculation and the time of analysis, i.e.
the current time, is calculated by the program. If the value is not displayed or is not correct, you can
enter the correct time interval between ejaculation and semen analysis.
Analysis
Click the Start analysis button to start the counting procedure (see p. 12).
Results
·
The number of cells analyzed;
·
The number of motile cells counted;
·
Sperm concentration in 10 /mL;
·
Proportion of spermatozoa with grade (a), (b), (c) and (d) motility (in %) and concentration of
spermatozoa with grade (a), (b), (c) and (d) motility (in 106/mL).
A spermatozoon is classified as:
– grade (a): if it has a rapid linear progressive motility with linear velocity in excess of the lower
limit selected in the Options box.
– grade (b): if it has a slow or sluggish linear or non-linear movement; such a spermatozoon has a
linear velocity below the higher limit selected in the Options box, but a velocity in excess of the
lower limit selected in the in the Options box;
– grade (c): if it has a non-progressive motility; its velocity is below the higher limit selected in the
Options box;
– grade (d): if the spermatozoon is immotile.
·
Mean, standard deviation and median of velocity, linear velocity and linearity index, of grade (a), (b)
and (c) motile cells only.
·
Velocity is the total distance covered by the spermatozoa per unit of time and is expressed in
μm/sec.
·
Linear Velocity is the shortest distance between the first and the last point of measurement,
calculated per unit of time and is expressed in μm/sec (note that this is the theoretical definition;
AutoSperm uses a more advanced method for estimating linearity of cell movement, see p. 42).
·
Linearity Index (%) is the quotient of linear velocity divided by velocity, multiplied by 100.
6
Graphs
Click on Velocity graph, Linear Velocity or Linearity Index to obtain a histogram for the corresponding
parameter.
18
Buttons
·
Print: print a complete report
·
OK: saves the data in the database and closes the dialog box
·
Cancel: closes the dialog box without saving the data in the database.
Tips
When you click Print, the report will immediately be printed to the default printer. If you want to select a
printer first, press Ctrl+P or function key F11.
Remember that when you switch from one tab to another, the changes that you have made are saved in
the database. If you do not want your recent changes to be saved, click the Cancel button.
Additional analyses
Required input
This dialog panel can been configured by the AutoSperm administrator.
·
In the longer input fields you can enter text, the shorter input fields require numeric input.
·
In all input fields, you can enter a * sign, indicating that this information is not yet available and
needs to be completed.
·
Enter possible other comments and information in the Additional information box.
Buttons
·
Print: print a complete report
·
OK: saves the data in the database and closes the dialog box
·
Cancel: closes the dialog box without saving the data in the database.
Tips
When you click Print, the report will immediately be printed to the default printer. If you want to select a
printer first, press Ctrl+P or function key F11.
Remember that when you switch from one tab to another, the changes that you have made are saved in
the database. If you do not want your recent changes to be saved, click the Cancel button.
19
Validation
Required input
·
Click the Validated check mark when the results are complete and have been validated. In
addition, there is space to enter some final comments.
Buttons
·
Print: print a complete report
·
OK: saves the data in the database and closes the dialog box
·
Cancel: closes the dialog box without saving the data in the database.
Tips
When you click Print, the report will immediately be printed to the default printer. If you want to select a
printer first, press Ctrl+P or function key F11.
Remember that when you switch from one tab to another, the changes that you have made are saved in
the database. If you do not want your recent changes to be saved, click the Cancel button.
Search Sample
Command
Sample
Search Sample
Description
Allows to search for a sample using one or more search criteria.
20
Dialog box
Enter one or more search criteria. For sample number, record number, patient and partner name, you can
enter the first characters only. E.g. if you enter "sm", the program will locate all names beginning with sm,
such as Smith, Smythers, etc.
·
Sample group: select the Patients or Laboratory sample group.
·
Sample number: sample number.
·
Patient record number: a record number that identifies the patient, (e.g. hospital record number).
·
Patient name: the patient's name.
·
Date of birth: the patient's date of birth.
·
Partner name: the name of the partner.
·
Date of birth: the partner's date of birth.
·
Subgroup: select a possible subgroup code.
·
Ejaculation date: date of ejaculation. Enter two dates to specify a date range.
·
Referrer: select the code of the referring doctor.
· Reference: enter a reference number.
Click Search to obtain a list of samples satisfying the search criteria.
Click Reset to blank all the input fields.
21
Search results
The samples that satisfy the search criteria are listed in a grid.
To view the results of one sample, click on that sample in the grid and click Open, or double-click on the
sample; to print a report click Print.
To print multiple reports, select different samples in the grid, and click Print. To select multiple samples,
you click on different samples while holding down the Ctrl key.
Click Back to change the selection criteria.
Tip
You can change the column order by dragging the header to a new location.
Print Journal
Command
Reporting
Print Journal
Description
Allows to print a journal of samples that were analyzed on one day or in a date range.
Dialog box
Enter possible search criteria.
·
Sample group: select the Patients or Laboratory sample group.
22
· Ejaculation date: date of ejaculation. Enter one date or two dates to specify a date range.
Click Print to print a list, per day, of samples that were analyzed in the given date range.
Samples Requiring Validation
Command
Reporting
Samples Requiring Validation
Description
Allows to search for samples requiring validation.
Dialog box
Enter possible search criteria.
·
Sample group: select the Patients or Laboratory sample group.
· Ejaculation date: date of ejaculation. Enter two dates to specify a date range.
Click Search to obtain a list of samples satisfying the search criteria, and still requiring validation.
Search results
The samples in the selected date range, still requiring validation, are listed in a grid.
To view the results of one sample, click on that sample in the grid and click Open, or double-click on the
sample.
23
To batch validate multiple reports, select the samples in the grid, and click Validate selected. To select
multiple samples, you click on different samples while holding down the Ctrl key.
Click Back to change the selection criteria.
Tip
You can change the column order by dragging the header to a new location.
Monthly Averages
Command
Reporting
Monthly Averages
Description
Allows to calculate monthly averages (both mean and median) for quality control purposes.
Dialog box
Enter possible search criteria.
·
Sample group: select the Patients or Laboratory sample group.
·
Subgroup: select a possible subgroup code.
·
Ejaculation date: enter two dates to specify a date range.
·
Sperm concentration: enter a minimum value for sperm concentration.
·
Calculate per ... months: enter the number of months (1 to 12) to pool results. When you do not
have enough samples (less than 20) per month, it is advised to pool results from 2 or more months.
Click OK to calculate mean and median values for sperm concentration, grade A, grade A+B motility and
linear velocity, per month, in the selected date range.
Report
After the software has performed the calculations, the following report is displayed:
Click Print to print the report, or Click Export to export the data to an Excel (.xls file) or a MedCalc file
(.mc1 file).
24
Tip
When you click Print, the report will immediately be printed to the default printer. If you want to select a
printer first, press Ctrl+P or function key F11.
Export Data
Command
Reporting
Export Data
Description
Allows to export the data from the AutoSperm database as an Excel file or a MedCalc (see
http://www.medcalc.be/) file.
Dialog box
Enter possible search criteria.
·
Sample group: select the Patients or Laboratory sample group.
·
Subgroup: select a possible subgroup code.
·
Ejaculation date: date of ejaculation. Enter two dates to specify a date range.
· Referrer: the code of a referring doctor.
Next, complete the following fields:
·
Export to: enter the name of the Excel (.xls) or MedCalc (.mc1) file. If you enter the name of an
existing file, the file will be overwritten and the data it contains will be lost!
· Export what: select the data groups you want to export.
Click OK to create an Excel file with the selected data from the AutoSperm database.
Users list
Command
Tools
Users
Description
Allows to add users of the AutoSperm program, or update user information.
Required input
The users are listed in the main box of the dialog panel.
·
List active only: if this option is checked, then only the users that are marked as active are listed.
·
Click New to add a new user to the system. Note: only the Administrator can add new users.
·
Edit/View: click Edit to make changes. Note: the Administrator can make changes for all users.
Other users can only update their own data (including their password), but can View the data of
other users (but not their password).
·
Click Close to close this dialog box.
25
User data
Required input
·
ID & Login code: the identification code for this user, which will also serve as login name.
·
Name: the user's name.
·
Fist name: the user's first name.
·
Phone: phone number.
·
Mobile: mobile phone number.
·
E-mail: his/her email address.
·
Password: his/her email address.
·
Repeat password: repeat the same password
·
Active: mark the user as active. If the user is not marked as active, he/she will not be able to login,
and the identification code will not be listed in, for example, the Technician selection box when
performing a semen analysis.
Note: only the Administrator can change the active status of a user.
Click OK to save the changes.
Referrers list
Command
Tools
Referrers
Description
Allows to add referrers or update a referrer's data.
Required input
The referrers are listed in the main box of the dialog panel.
·
List active only: if this option is checked, then only the referrers that are marked as active are
listed.
·
Click New to add a new referrer to the system.
·
Click Edit to make changes.
· Click Close to close this dialog box.
Note: the Administrator can assign a password to a referrer and by doing so grant access to the
AutoSperm software and database. There referrers can login using their referrer code as login name, and
they can update their own data, including their password.
Referrer data
Required input
·
Identification code: the identification code for this referrer.
·
Name: the referrer's name.
·
Fist name: the referrer's first name.
·
Title: select, for example, Dr. or Prof.Dr, etc.
·
Address: the address to send printed reports to.
·
Phone: phone number.
26
·
Mobile: mobile phone number.
·
Fax: fax number.
·
E-mail: his/her email address.
·
Active: mark the user as active. If the referrer is not marked as active, his/her identification code
will not be listed in, for example, the Referrer selection box for a semen sample.
·
Password: his/her email address.
Note: only the Administrator can assign a password to a referrer and by doing so grant access to
the AutoSperm software and database. These referrers can login using their identification code as
login name.
· Repeat password: repeat the same password.
Click OK to save the changes.
Calculate volume
Command
Tools
Calculate volume
Description
Calculates the volume (in μL) needed in order to obtain a pre-specified preparation depth (μm), and given
the length (mm) and width (mm) of the cover slide.
Test tablet
Command
Tools
Test tablet
Description
This procedure allows to test the tablet. The position of the cursor on the tablet is shown. When you press
a button, the corresponding button in the dialog box is highlighted.
27
Calibration
Command
Tools
Calibration
Description
Allows to calculate the correction factor for measurement of velocity.
Zoom drawing tube
The black template with the white grid is positioned under the transparent plastic cover of the digitizing
tablet, so that the grid is in the center of the microscopic visual field.
Adjust the zoom of the drawing tube so that the superimposition of the square on the microscope slide
corresponds exactly to 100 x 100 micrometer (μm). Use a micrometer slide for verification (see Figure).
If the zoom of the drawing tube cannot be adjusted so that the size of the grid corresponds with 100 μm, it
should be set as close to 100 μm as possible, and the size of the grid as measured by the micrometer
must be entered in the Tablet section of the Options panel (p. 29)
Calculation of correction factor
Follow the instructions shown in the dialog box: place the cursor on the different corners of the grid as
illustrated on the screen and press a button on the cursor.
Having done that, the computer calculates the correction factor.
Click OK to save the newly calculated correction factor. Click Cancel to keep the previous correction
factor.
28
Options
Command
Tools
Options
Description
Allows to customize the AutoSperm software.
You can switch between the following tabs:
·
Settings: analysis settings.
·
Tablet: tablet settings and sound options
·
Lists: subgroups lists, referrer titles list.
·
Additional analyses: configuration of the additional analysis input panel.
·
Text macros: define text macros.
· Options: miscellaneous options.
When you switch from one tab to another, the changes that you have made are saved in an options file
(Settings and Text Macros) or in the database (Lists and Additional analysis). If you do not want your
recent changes to be saved, click Cancel.
Click OK to close and save the data.
Analysis settings
Default settings
·
Default preparation depth (μm): The default preparation depth is the default value for the semen
preparation chamber depth. Preparation depth is initialized as 20. This value will automatically be
displayed in the semen analysis dialog box.
·
Default dilution: If you preferentially work with diluted semen, you can enter the proportion semen
and proportion diluent that will appear automatically in the semen analysis dialog box.
Analysis
·
Delay time (msec): The hand being slow when starting to follow the sperm movement, the initial
observations for every motile spermatozoon will be inadequate. The delay time, expressed in
milliseconds, is the time fraction of initial observations that will be ignored for velocity calculations.
This value is set by the manufacturer and should not be changed by the user.
·
Track time per cell, excl delay (msec): The (maximum) track time per cell is the time required to
obtain adequate assessment of sperm motility characteristics. This value is set by the manufacturer
and should not be changed by the user.
·
Minimum track time, excl. delay (msec): If a cell has a high velocity and moves out the visual
field before the (maximum) track time is passed, the user should release the button of the cursor. If
the minimum track time as defined on this line is passed, the cell is taken into account for analysis.
This value is set by the manufacturer and should not be changed by the user.
·
Minimum number of cells: This is the minimum number of cells to be analyzed for adequate
reproducibility. Whenever a complete field has been analyzed, indicated by pressing the end-offield button on the cursor (button [4] on a DrawingBoard VI tablet), the number of cells already
analyzed is compared with this value. If the number of cells analyzed is lower than the set limit, it is
recommended to continue the analysis. As soon as the number of cells analyzed exceeds the set
limit, a triple beep is heard and calculation starts.
Motility grade classification
·
Grade a if linear velocity more than: The number entered here sets the lower limit of linear
velocity of grade (a) motile cells. Cells with a linear velocity higher than this value, will be classified
as grade (a). The default value is 21.99 μm/sec.
29
·
Grade c if velocity is less than: The number here sets the higher limit of velocity of grade (c)
cells. The default value is 5 μm/sec. Cells with a velocity lower than this value are classified as
grade (c). Cells with a velocity higher than this value, but with a linear velocity lower than the value
in the previous line, are classified as grade (b) cells.
Buttons
·
OK: saves the options and closes the dialog box
· Cancel: closes the dialog box without saving.
Remember: when you switch from one tab to another, the changes that you have made are saved. If you
do not want your recent changes to be saved, click Cancel.
Tablet
Tablet
·
Tablet type: select the type of tablet connected to the computer. The current version of AutoSperm
supports the SummaSketch III, DrawingBoard III, and DrawingBoard VI tablets.
·
Communication port: select the number of the RS-232 communication port the tablet is connected
to (usually number 1).
·
Click the Test button to test the tablet with the two preceding settings.
·
Velocity correction factor: Although this value can be set manually, it should be calculated using
the corresponding procedure in the Tools menu.
·
Size of tablet square (side in μm): The size of the square on the digitizing tablet. The
recommended value is 100 μm. If the zoom of the drawing tube cannot be adjusted so that the size
of the square corresponds with 100 μm, the closest size that can be obtained should be used. This
size must not be a rounded number (like 150 or 200): the exact size of the square, as measured
with a micrometer slide must be entered.
Sounds
·
Computer beep pitch and time: These numbers define the Beep sound produced by the
computer. This sound is hardware dependent. Recommended values are 1500 Hz for pitch and 20
msec for time.
Buttons
·
OK: saves the options and closes the dialog box
· Cancel: closes the dialog box without saving.
Remember: when you switch from one tab to another, the changes that you have made are saved. If you
do not want your recent changes to be saved, click Cancel.
Lists
Required input
·
Subgroups: define the sample subgroups for both sample groups. Enter one subgroup name per
text line.
For example, for the sample group Patients you can enter:
PATIENT
CRYO
For the sample group Laboratory you could enter:
DONOR
CANDIDATE DONOR
TEST
30
·
Referrer titles: titles (Dr., Prof.Dr., etc) that can be assigned to referrers.
Buttons
·
OK: saves the options and closes the dialog box
· Cancel: closes the dialog box without saving.
Remember: when you switch from one tab to another, the changes that you have made are saved. If you
do not want your recent changes to be saved, click the Cancel button.
Additional analyses
Required input
·
In this panel you can define up to 18 additional data fields for each semen sample. For each field,
you can specify whether the input needs to be a number, or can be text.
Buttons
·
OK: saves the options and closes the dialog box
· Cancel: closes the dialog box without saving.
Remember: when you switch from one tab to another, the changes that you have made are saved. If you
do not want your recent changes to be saved, click the Cancel button.
Text macros
Required input
·
In this panel you can define 10 text macros. A text macro is a short text that is assigned to the
combination of the Control key and a key on the numeric keypad.
Buttons
·
OK: saves the options and closes the dialog box
· Cancel: closes the dialog box without saving.
Remember: when you switch from one tab to another, the changes that you have made are saved. If you
do not want your recent changes to be saved, click the Cancel button.
Miscellaneous options
Required input
·
Lock sample data when results have been validated: when this option is checked the sample
and semen analysis data cannot be changed when the sample has been marked as validated.
·
Show validation status in sample dialog title: when this option is checked the sample dialog box
will display the text "(validated)" next to the sample number, when the sample has been marked as
validated.
·
Graphs show:
– histograms: in a histogram bars represent absolute number of cases.
– relative frequency distributions: in a relative frequency distribution bars represent the relative
number of cases (expressed as a percentage).
31
·
Graphs: use equal Y-scaling, per variable, for different analyses in the same sample: e.g.
when 2 analyses have been performed in the same sample, both graphs for Linear Velocity will
have the same Y-scaling, which facilitates comparison of the two graphs.
Buttons
·
OK: saves the options and closes the dialog box
· Cancel: closes the dialog box without saving.
Remember: when you switch from one tab to another, the changes that you have made are saved. If you
do not want your recent changes to be saved, click Cancel.
AutoSperm help
Command
Help
AutoSperm help
Description
Displays help.
You select AutoSperm help or press F1 to browse the comprehensive on-line documentation.
In Help, click one of the following tabs:
·
Click the Contents tab to browse through topics by category.
·
Click the Index tab to see a list of index entries, and then either type a word or scroll through the
list.
·
Click the Find tab to search for words or phrases that may be contained in a Help topic.
What's New?
This help page lists the more important changes and new features in recent versions of AutoSperm ®. The
most recent additions and changes are listed at the top.
Register
Command
Help
Register
Description
Allows to enter the registration data that you received from MedCalc Software.
Dialog box
·
User name: the name of the software licensee.
· Product key: the product key associated with the user name.
If you do not know your user name and product key, contact MedCalc software.
Click OK to proceed.
32
About AutoSperm
Command
Help
About AutoSperm
Description
Displays program version specific information and copyright notice.
Dialog box
This dialog box displays:
·
the AutoSperm version number
·
copyright notice
·
license information
· link to the AutoSperm website
Click OK to close.
Software license agreement
Use of the AutoSperm software is subject to the following software license. Use the software only after you
have agreed to abide by the terms and conditions of the software license agreement. By installing the
software and entering you user name and personal product key, you indicate acceptance of the software
license agreement.
Grant of license
The software is owned by MedCalc Software and is protected by United States copyright laws and
international treaty provisions.
By purchasing a single-user AutoSperm license, you obtain a non-transferable right to install the software
on your desktop and laptop computer not serving as network servers, and use the software nonconcurrently on these computers.
The software can be used on a network server when you purchase a network license for the required
number of concurrent users.
You may not share, sell, rent or lease the software. You may not transfer ownership of your license, user
name and product key. You may not reverse engineer, decompile, disassemble, or create derivative works
from the software. MedCalc Software reserves all rights not expressly granted to you in this license
agreement.
Disclaimer of warranties - Limitation of liability
The software is designed and offered as a general-purpose software, not for any user's particular purpose.
You accept that no software is error free. You are strongly advised to back-up your files regularly. To the
maximum extent permitted by applicable law MedCalc Software disclaims all warranties, conditions and
other terms, either express or implied (whether by statute, common law, collaterally or otherwise) including
but not limited to implied warranties of satisfactory quality and fitness for particular purpose with respect to
the software and the written materials that accompany the software. MedCalc Software and its suppliers
shall not be liable for any damages whatsoever (including without limitation, damages for loss of business
profits, business interruption, loss of business information or other pecuniary loss) arising out of the use or
inability to use the software. In any case MedCalc Software's entire liability under any provision of this
Agreement shall be limited to the amount actually paid by you for the software.
This license agreement may change without notice. The most recent version, which replaces any previous
version, is always available from: http://www.autosperm.com/license/
AutoSperm is a registered trademark of MedCalc software ...
33
Admin menu
To gain access to the Admin menu, you have to login as the AutoSperm administrator.
Recode Subgroup
Command
Admin
Recode Subgroup
Description
Allows to recode the sample subgroups in the database
Required input
·
Sample group: select the Patients or Laboratory sample group.
·
Old subgroup code: select the subgroup code from the list of all subgroup codes present in the
database for the selected sample group.
·
New subgroup code: select the new subgroup code from the list defined in the Options panel
(Lists section, p. 30).
Click OK to replace all occurrences of the old subgroup code with the new subgroup code.
Collect Subgroups from Database
Command
Admin
Collect Subgroups from Database
Description
Allows collect the subgroup codes from the database.
Required input
· Sample group: select the sample group, Patients or Laboratory.
Click OK to scan all samples belonging to the selected sample group; all subgroup codes will be collected
into the subgroup list (which can be edited in the Options panel).
Connect to SQL server
Command
Admin
Connect to SQL server
Description
Use this dialog to view or specify options when connecting to the Microsoft SQL Server.
34
Required input
·
Driver: select SQL Native Client or SQL Server.
·
Server: select the server to connect to. When SQL Server 2005 Express Edition is installed on your
local PC, enter .\sqlexpress. If you are connecting to SQL Server 2005 Express Edition on a
remote computer, use the computer name followed by \sqlexpress.
·
Authentication: two authentication modes are available:
– Windows Authentication: allows to connect through a Windows user account.
– SQL Server Authentication: when a user connects with a specified login name and password
from a non-trusted connection, SQL Server performs the authentication itself by checking to
see if a SQL Server login account has been set up and if the specified password matches the
one previously recorded. If SQL Server does not have a login account set, authentication fails,
and the user receives an error message.
·
User name: enter the user name to connect with. This option is only available if you have selected
to connect using SQL Server Authentication.
·
Password: enter the password for the login. This option is only available if you have selected to
connect using SQL Server Authentication.
Click OK to connect to the selected server.
Import datafile
Command
Admin
Import datafile
Description
Allows to import data from previous versions of MedCalc.
Before you can import the data, a conversion program should be executed, depending on the previous
AutoSperm version number.
Instructions for Version 3.6
·
Download the conversion program
http://www.autosperm.com/download/.
·
Save the convert3.exe file in the folder where AutoSperm 3.6 is installed in (e.g. c:\autosp\).
·
Execute convert3.exe
·
It is recommended to contact MedCalc software before you import the conversion file into
AutoSperm 5. Specific procedures may be needed to optimally import the old data into the new
version of the software.
convert3.exe
from
the
AutoSperm
download
site
Instructions for Version 4
·
Download the conversion program Converter_setup.exe from the AutoSperm download site
http://www.autosperm.com/download/.
·
Install and execute the conversion program.
Required input
·
Import from: enter the location and name of the import file (e.g. c:\autosp\convert5.txt) that was
created by one of the conversion programs mentioned above. Use the Browse button to locate the
file on your system.
·
Sample group: select the sample group, Patients or Laboratory, for which you are importing data.
·
Import code: enter the import code provided to you by MedCalc Software (not required when
importing data from AutoSperm version 4).
Click OK to import the data.
Note: the import procedure will not overwrite existing sample data which have the same sample number.
35
Rebuild Indexes
Command
Admin
Rebuild Indexes
Description
This command allows to rebuild the AutoSperm database indexes.
36
How to customize the printed report
The sample report created by AutoSperm is based on a template file named reporttemplate.htm, which is
located in the AutoSperm program directory (typically c:\program files\autosperm\).
This file is a standard HTML file which you can modify.
Before modifying the file, make a backup copy first.
The file must be saved as a UNICODE text file.
You can place your laboratory name and address in the template, and possibly add images such as a
laboratory logo.
The template can contain a large number of fields, listed below, which at the time of printing are replaced
with their corresponding values. For example, the field $$PATIENTNAME$$ will be replaced with the
patient name.
Patient and sample identification fields
$$SAMPLENUMBER$$
$$PATIENTNAME$$
$$PATIENTDOB$$
$$RECORDNUMBER$$
$$PARTNERNAME$$
$$PARTNERDOB$$
$$SUBGROUP$$
$$REFERENCE$$
$$NOTES$$
$$EJACULATIONDATE$$
$$EJACULATIONTIME$$
$$ABSTINENCE$$
Sample number
Patient name
Patient date of birth
Patient record number
Partner name
Partner date of birth
Subgroup code
Reference
Notes
Ejaculation date
Ejaculation time
Abstinence (days)
Referring doctors fields
There may be 2 referring doctors for each sample. Replace n in the field name with 1 or 2. E.g.
$$REFERRER1.NAME$$ is the name of the first referrer, and $$REFERRER2.NAME$$ is the name of
the second referrer.
$$REFERRERn.NAME$$
Referrer name
$$REFERRERn.FIRSTNAME$$
Referrer first name
$$REFERRERn.TITLE$$
Referrer title
$$REFERRERn.ADDRESS$$
Referrer address
$$REFERRERn.PHONE$$
Referrer phone
$$REFERRERn.MOBILE$$
Referrer mobile phone
$$REFERRERn.FAX$$
Referrer fax
$$REFERRERn.EMAIL$$
Referrer email
$$REFERRERn.LICENSE$$
Referrer license number
Semen analysis fields
There may be 3 semen analysis for each sample. Replace n in the field name with 1, 2 or 3. E.g.
$$AN1.CONCENTRATION$$ is the sperm concentration for the 1st semen analysis, and
$$AN2.CONCENTRATION$$ is the sperm concentration for the 2nd semen analysis.
$$ANn.ANALYSIS$$
$$ANn.ROOMTEMPERATURE$$
$$ANn.PREPARATIONDEPTH$$
$$ANn.DILUTIONSEMEN$$
$$ANn.DILUTIONDILUENT$$
$$ANn.TIMEAFTEREJAC$$
$$ANn.TOTALCELLS$$
$$ANn.NMOTILE$$
Analysis short description
Room temperature
Preparation depth
Dilution: proportion semen
Dilution: proportion diluent
Time after ejaculation
Total number of cells counted
Total number of motile cells counted
37
$$ANn.NSQUARES$$
$$ANn.CONCENTRATION$$
$$ANn.GRADEA$$
$$ANn.GRADEB$$
$$ANn.GRADEC$$
$$ANn.GRADED$$
$$ANn.GRADEACONC$$
$$ANn.GRADEBCONC$$
$$ANn.GRADECCONC$$
$$ANn.GRADEDCONC$$
$$ANn.VELOCITYMEAN$$
$$ANn.VELOCITYSD$$
$$ANn.VELOCITYMEDIAN$$
$$ANn.VELOCITYN$$
$$ANn.LINVELOCITYMEAN$$
$$ANn.LINVELOCITYSD$$
$$ANn.LINVELOCITYMEDIAN$$
$$ANn.LINVELOCITYN$$
$$ANn.LININDEXMEAN$$
$$ANn.LININDEXSD$$
$$ANn.LININDEXMEDIAN$$
$$ANn.LININDEXN$$
$$ANn.STR_MEAN$$
$$ANn.STR_SD$$
$$ANn.STR_MEDIAN$$
$$ANn.GRAPHVELOCITY$$
$$ANn.GRAPHLINVELOCITY$$
$$ANn.GRAPHLININDEX$$
Number of squares counted
Sperm concentration
% grade (a) motility
% grade (b) motility
% grade (c) motility
% grade (d) motility
Concentration of grade (a) motile spermatozoa
Concentration of grade (b) motile spermatozoa
Concentration of grade (c) motile spermatozoa
Concentration of grade (d) motile spermatozoa
Mean velocity
Standard Deviation for velocity
Median velocity
Number of cells used to calculate mean velocity (n)
Mean linear velocity
Standard Deviation for linear velocity
Median linear velocity
Number of cells used to calculate mean linear velocity (n)
Mean linearity index
Standard Deviation for linearity index
Median linearity index
Number of cells used to calculate mean linearity index (n)
Conditionally writes the text "Mean", if analysis n has been
performed
Conditionally writes the text "SD", if analysis n has been
performed
Conditionally writes the text "Median", if analysis n has been
performed
Shows a histogram for Velocity
Shows a histogram for Linear Velocity
Shows a histogram for Linearity Index
Additional analyses fields
There may be 20 additional analyses fields for each sample. Replace nn in the field name with 01, 02 ..
20. E.g. $$ADDINFO.01TXT$$ is the 1st description field and $$ADDINFO.01RES$$ is the 1st result field.
$$ADDINFO.12TXT$$ is the 12th description field and $$ADDINFO.12RES$$ is the 12th result field.
$$ADDINFO.nnTXT$$
$$ADDINFO.nnRES$$
$$ADDINFO.INFORMATION$$
Description
Result
Additional information
Validation fields
$$VALIDATED$$
$$VALIDATIONDATE$$
$$VALIDATEDBY$$
$$VALIDATIONCOMMENT$$
"Yes" if all analyses of the sample have been validated, "No"
otherwise
Date of validation
Validated by
Validation comments
Miscellaneous fields
$$PROGRAMPATH$$
$$COPYRIGHT$$
The AutoSperm program path, e.g. c:\Program
Files\AutoSperm\
Displays copyright information. This field must be included in
the report template or the report will fail to print.
38
How to integrate AutoSperm in hospital infrastructure
To integrate AutoSperm in existing hospital IT infrastructure, you can:
·
place the AutoSperm database on a central server running SQL Server 2000, SQL Server 2005 or
SQL Server 2005 Express Edition.
·
adapt the autosperm.dll library so you can exchange data between the AutoSperm database and
hospital databases.
·
use the AutoSperm CS program to allow consultation of the AutoSperm data on different terminals
connected to the central system using a graphic user interface (GUI).
· use the autospermcgi.exe program in web pages that allow data consultation using a web interface.
This is illustrated in the following figure:
See also: AutoSperm setup - introduction (p. 5)
autosperm.dll library
The autosperm.dll library can be used to exchange data between the AutoSperm database and hospital
databases.
A complete Visual Studio 2005 project is available from the AutoSperm download site which contains a
framework of functions that hook into the AutoSperm program.
In summary, the dll library contains the following functions:
·
The function InitAutoSpermDLL is called when the AutoSperm program is started. In this function
you can implement the code required to establish a connection with an external database. In
addition, this function is used to notify AutoSperm of the date format you will be using (dd.mm.yyyy,
mm.dd.yyyy or yyyy.dd.mm).
·
The function AutoSpermDLLGetIdentification is called when the user has entered a Patient
record number in the Sample dialog box and moves the input focus to the next field (by pressing
the Tab key for example). In the AutoSpermDLLGetIdentification function you can implement the
code to read the patient and partner names and dates of birth from the hospital database and return
these data to the AutoSperm program.
·
The function AutoSpermDLLSaveData is called when sample data have been changed. The
sample data are passed as a parameter. In this function you can implement the code needed to
save the AutoSperm data into the hospital database.
39
·
The function UnInitAutoSpermDLL is called when the AutoSperm program is closed. In this
function you can implement the code required to close the connection with your external database.
Download
A complete Visual Studio project
http://www.autosperm.com/download/.
autospermdll is available as
a
separate download
on
AutoSperm CS
AutoSperm CS is a lightweight version of AutoSperm and can be used for data consultation only. It does
not allow to modify data.
This program does not need a product key, or configuration by the user.
The connection with the SQL database is configured using the autosperm.ini file.
SQL Connection data
The connection with the SQL database is configured using the autosperm.ini file.
Example 1: autosperm.ini with SQL connection data
[SQLConnection]
SQLDriver="SQL Native Client"
SQLServer=".\SQLEXPRESS"
SQLWindowsAuthentication=1
SQLUserName=
SQLPassword=
Example 2: autosperm.ini with redirection
[SQLIniFile]
; path to autospermsql.ini file (should be absolute)
AutoSpermSQLIniFile=".\autospermsql.ini"
Example file autospermsql.ini
[SQLConnection]
SQLDriver="SQL Native Client"
SQLServer=".\SQLEXPRESS"
SQLWindowsAuthentication=1
SQLUserName=
SQLPassword=
Download
AutoSperm CS is available as a separate download on http://www.autosperm.com/download/.
AutoSperm cgi module
The autospermcgi.exe executable can be placed in the cgi-bin folder of your web server and can be
integrated in web page scripts allowing consultation of AutoSperm data using a web interface.
Command line parameters
The program's command line parameters are:
-r reference
: lists sample dates and numbers
-s samplenumber : returns report for samplenumber
40
-l logfile
-h
-v
-?
:
:
:
:
specifies logfile
returns "Content-type: text/html" header
displays copyright and version information
displays help
SQL Connection data
The connection with the SQL database is configured using the autosperm.ini file.
Example 1: autosperm.ini with SQL connection data
[SQLConnection]
SQLDriver="SQL Native Client"
SQLServer=".\SQLEXPRESS"
SQLWindowsAuthentication=1
SQLUserName=
SQLPassword=
Example 2: autosperm.ini with redirection
[SQLIniFile]
; path to autospermsql.ini file (should be absolute)
AutoSpermSQLIniFile=".\autospermsql.ini"
Example file autospermsql.ini
[SQLConnection]
SQLDriver="SQL Native Client"
SQLServer=".\SQLEXPRESS"
SQLWindowsAuthentication=1
SQLUserName=
SQLPassword=
Download
AutoSperm cgi is available as a separate download on http://www.autosperm.com/download/.
41
Appendix A: Calculations
n
Velocity
=
åSi
i=1
µm/sec
time
n
Linearity index
=
Linear velocity
=
100 ´
å gi
i=1
%
n´ P
Velocity ´ Linearity index
100
µm/sec
42