1
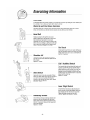
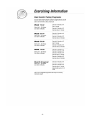
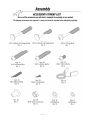
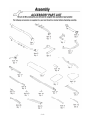
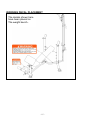
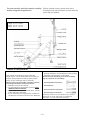
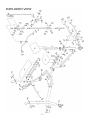
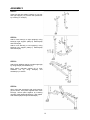
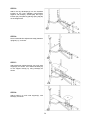
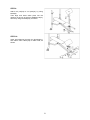
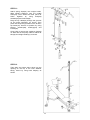
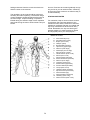
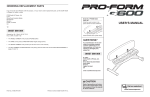
Pro Power Bench, Lat & Curl
Assembly & Manual
Please ensure that you read this manual carefully
before attempting to assemble or use your new
product and retain it for future reference
-1-
-2-
TABLE OF CONTENTS
BEFORE YOU START……………………………………………………………..4
SAFETY …………………………………………………………………………....5
EXERCISE INFORMATION ………………………………………………....6-12
ACCESSORY FITMENT LIST......................................................................13
ACCESSORY PART LIST............................................................................14
WARNING DECAL PLACEMENT ……………………………………………..15
BENCH OVERVIEW & DIMENSIONS………………………………………....16
EXPLODED VIEW ……………………………………………………………...17
PARTS LIST ……………………………………………………………………...18
ASSEMBLY……………………………………………………………………19-22
EXERCISE GUIDELINES……………………………………………………23-24
-3-
-4-
-5-
-6-
-7-
-8-
-9-
- 10 -
- 11 -
- 12 -
- 13 -
- 14 -
WARNING DECAL PLACEMENT
The decals shown here
have been placed on
The weight bench..
- 15 -
For your benefit, read this manual carefully
before using the weight bench.
Before reading further, please look at the
drawing below and familiarize yourself with the
parts that are labeled.
ASSEMBLED DIMENSIONS:
Height: 91.7 in. / 233 cm
Width: 43.3 in. / 110 cm
Depth: 69.7 in. / 177 cm
TOOLS NEEDED
Make Things Easier for Yourself
This manual is designed to ensure that the
weight bench can be assembled successfully by
anyone. Most people find that by setting aside
plenty of time, assembly will go smoothly.
Before beginning assembly, carefully read the
following information and instructions:
• Assembly requires two people.
• For help identifying small parts, see the PART
IDENTIFICATION CHART.
• Tighten all parts as you assemble them, unless
instructed to do otherwise.
• As you assemble the weight bench, make sure
all parts are oriented as shown in the drawings.
• Place all parts in a cleared area and remove the
packing materials. Do not dispose of the packing
materials until assembly is completed.
Grease and the following tools (not included)
may be required for assembly:
• Two adjustable wrenches
• One hammer
• One standard screwdriver
• One Phillips screwdriver
Assembly will be more convenient if you have a
socket set, a set of open-end or closed-end
wrenches, or a set of ratchet wrenches.
- 16 -
EXPLODED VIEW
- 17 -
PARTS LIST
Qty.
Pre.-assembled
No.
Part No.
Left Upright
1
No
29
PFM6240W-21
Front Leg End Cap
1
Pre.assembled
Yes
Right Upright
1
No
30
PFM6240W-22
Upright End Caps
2
Yes
PFM6240W-03
Front Stabilizer Bar
1
No
31
PFM2004-09
50mm Round Inner Caps
3
Yes
4
PFM6240W-04
Cross Brace
1
No
32
PFM2006-18
Foam Paddings
2
Yes
5
PFM6240W-05
Main Seat Support
1
No
33
PRK1-03
25mm Round Inner Caps
11
Yes
6
PFM6240W-06
Angle Support
1
No
34
PFM2240-19
25mm Round Angled Cap
1
Yes
7
PFM6240W-07
Leg Developer
1
No
35
PFM6240W-20
Plastic Bushing
1
Yes
8
PFM6240W-08
Incline/Decline Adjustment Bar
1
No
36
PFMS80WA-29
Spring Clips
3
No
No.
Part No.
1
PFM6240W-01
2
PFM6240W-02
3
Description
Description
Qty.
9
PFM6240W-09
Backrest Support Bars
2
No
37
PFM6240W-23
50 x 38mm Plastic Bushing
2
Yes
10
PFM6240W-10
Curl Post
1
No
38
PFM2240-32
25mm Square Inner Caps
4
Yes
11
PFM6240W-11
Left Support Plate
1
No
39
PFM6240W-31
Knob Bolt M10 x 55mm
1
No
12
PFM6240W-12
Pad Tubes
2
No
40
PFM6240W-24
Left Safety Hook
1
No
13
PFM6240W-13
Backrest
1
No
41
PFM6240W-25
Right Safety Hook
1
No
14
PFM6240W-14
Seat
1
No
42
PFM2240-26
Rubber Caps
2
Yes
15
PFM6240W-15
Curl Pad
1
No
43
PFM2240-14
M6 Aircraft Nuts
2
No
16
PFM6240W-16
Foam Rollers #70*#23*130L
4
No
44
PFM6240W-26
Lat Bar Top Frame
1
No
17
PFM6240W-17
Right Support Plate
1
No
45
PFM6240W-27
Lat Bar Middle Frame
1
No
18
PFM6240W-18
M10 x 80mm Carriage Bolts
4
No
46
PFM6240W-28
Lat Bar Bottom Frame
1
No
19
PFM6240W-19
M10 x 60mm Carriage Bolts
2
No
47
PFM6240W-29
Weight Holder
1
No
20
PFM2101-23
M10 x 75mm Bolt
1
No
48
PFMS80WA-14
Lat Bar
1
No
21
PFM2101-32
M10 x 55mm Bolt
1
No
49
PFM6240W-30
Top Cable
1
No
22
PFM2006-23
M8 x 15mm Bolts
4
No
50
PFM2241-12
Spring Clips
2
No
23
PFM2240-24
M6 x 38mm Bolts
8
No
51
PFMG3008-13
3" Pulley
1
No
24
PFM6240W-33
M5 x 15mm Bolts
2
No
52
PRK3B-05
38mm Square Inner Cap
1
Yes
25
PFM2230-06
M10 x 50mm Bolts
4
No
53
PFM4004-23
Bushing #16*#10.5
2
No
26
PRK1-06
M10 Washers
18
No
54
PFMS80WA-30
Rubber Ring
1
No
27
PFM2006-27
M8 Washers
4
No
55
PFM2240-23
M6 x 15mm Bolts
2
No
28
PRK1-05
M10 Nylon Locknuts
12
No
56
PFM6240W-32
33.4mm Square Inner Caps
1
Yes
57
#
User Manual
18
ASSEMBLY
STEP 1:
Insert left and right safety hook(40,41) into left
and right upright (1,2). Secure their placement
by screwing on nuts(43).
STEP 2:
Attach cross brace(4) to right upright(2) using
bolts(18) right support plate(17) washers(26)
and locknut(28)
Attach cross brace(4) to left upright(1) using
bolts(18) left support plate(11) washers(26)
and locknut(28)
STEP 3:
Attach front stabilizer bar(3) to angle support(6)
by using bolt(22) and washer(27).
Next, attach mainseat support (5) to front
stabalizer bar (3) using bolts(22) and
washers(27) to secure.
STEP 4:
Align main seat support(5) with angle support
(6), as shown, Then place together onto cross
brace(4). Secure parts together by inserting
carriage bolts(19)through(6)(5)(4), and tighten
with washers(26) and nylon locknuts(28).
19
STEP 5:
Attach the leg developer(7) into the brackets
located on the front stabilizer bar(3),Fasten
together with bolt(20), washers(26) and nylon
locknut (28). Complete by placing spring clip(36)
on the weight tube.
STEP 6:
Place incline/decline adjustment bar(8) between
uprights(1,2), as shown.
STEP 7:
Attach backrest support bars(9) onto main seat
support(5), as shown. Then attach backrest(13)
to the support bars(9) by using bolts(23) as
shown.
STEP 8:
Attach seat(14) to main seat support(5), with
bolts(23), as shown.
20
STEP 9:
Attach curl pad(15) to curl post(10), by using
bolts(55)
Then align and insert entire piece into the
opening on the top of the front stabilizer bar(3),
secure by using knob bolt(39), as shown.
STEP 10:
Insert pad tubes(12) through leg developer(7),
then attach foam rollers(16) to either side, as
shown.
21
STEP 11:
Attach spring clips(36) onto weight holder.
Slide weight holder(47) onto the middle
frame(45). Then attach the three piece lat
frame
together
by
using
bolts(25)
washers(26) and locknuts(28).
Drag the top cable(49) through the grooves
on the pulley wheel(51), as shown. Then
place into the spacing located on the lat bar’s
top frame(44). Secure it’s position by using
bolt(21), washers(26), bushings(53) and
locknut(28).
Once pulley is secure use carabiner clips(50)
on either end of the pulley cable to attach: lat
bar(48) and weight holder(47) as shown.
STEP 12
Then align and insert entire piece into the
opening on the top of the front stablizer
bar(3), secure by using knob bolt(39), as
shown
22
EXERCISE GUIDELINES
Cross Training
Cross training is an efficient way to get a complete
and well-balanced fitness program. An example of a
balanced program is:
THE FOUR BASIC TYPES OF WORKOUTS
Muscle Building
• Plan strength training workouts on Monday,
To increase the size and strength of your muscles,
Wednesday, and Friday.
push them close to their maximum capacity. Your
• Plan 20 to 30 minutes of aerobic exercise, such
muscles will continually adapt and grow as you
as running on a treadmill or riding on an
progressively increase the intensity of your exercise. exercise cycle or an elliptical exerciser, on
You can adjust the intensity level of an individual
Tuesday and Thursday.
exercise in
•Rest from both strength training and
two ways:
aerobic exercise for at least one full day each
• by changing the amount of resistance used
week to give your body time to regenerate.
• by changing the number of repetitions or sets performed. (A “repetition” is one complete cycle of an
The combination of strength training and
exercise, such as one sit-up. A “set” is a series of
aerobic exercise will reshape and strengthen
repetitions.)
The proper amount of resistance for each exercise your body, plus develop your heart and lungs.
depends upon the individual user. You must gauge
your limits and select the amount of resistance that
is right for you. Begin with 3 sets of 8 repetitions for
each exercise you perform. Rest for 3 minutes after
each set. When you can complete 3 sets of 12
repetitions without difficulty, increase the amount of
resistance.
PERSONALIZING YOUR EXERCISE PROGRAM
Determining the exact length of time for each
workout, as well as the number of repetitions or sets
completed, is an individual matter. It is important to
avoid overdoing it during the first few months of
your exercise pro- gram. You should progress at
your own pace and be sensitive to your body’s
Toning
signals. If you experience pain or dizziness at any
You can tone your muscles by pushing them to a
time while exercising, stop immediately and begin
cooling down. Find out what is wrong before
moderate percentage of their capacity. Select a
continuing. Remember that adequate rest and a
moderate amount of resistance and increase the
proper diet are important factors in any exercise
number of repetitions in each set. Complete as
many sets of 15 to20 repetitions as possible without program.
discomfort. Rest for1 minute after each set. Work
WARMING UP
your muscles by completing more sets rather than
by using high amounts of resistance.
Begin each workout with 5 to 10 minutes of
stretching and light exercise to warm up. Warming
Weight Loss
To lose weight, use a low amount of resistance and up prepares your body for more strenuous exercise
by increasing circulation, raising your body
increase the number of repetitions in each set.
temperature and delivering more oxygen to your
Exercise for 20 to 30 minutes, resting for a
muscles.
maximum of 30 seconds between sets.
WORKING OUT
Each workout should include 6 to 10 different
exercises. Select exercises for every major muscle
group, emphasizing areas that you want to develop
most. To give balance and variety to your
workouts, vary the exercises from session to
session. Schedule your workouts for the time of
day when your energy level is the highest. Each
workout should be followed by at least one day of
rest. Once you find the schedule that is right for
you, stick with it.
Rest for a short period of time after each set.
The ideal resting periods are:
• Rest for three minutes after each set for a
muscle-building workout.
• Rest for one minute after each set for a
toning workout.
• Rest for 30 seconds after each set for a
weight loss workout.
Plan to spend the first couple of weeks
familiarizing yourself with the equipment and
learning the proper form for each exercise.
EXERCISE FORM
COOLING DOWN
Maintaining proper form is an essential part of an
effective exercise program. This requires moving
through the full range of motion for each exercise,
and moving only the appropriate parts of the body.
Exercising in an uncontrolled manner will leave you
23
End each workout with 5 to 10 minutes of
stretching. Include stretches for both your arms
and legs. Move slowly as you stretch and do not
feeling exhausted. See the muscle chart below to
find the names of the muscles.
bounce. Ease into each stretch gradually and go
only as far as you can without strain. Stretching
at the end of each workout is an effective way to
increase flexibility.
The repetitions in each set should be performed
smoothly and without pausing. The exertion stage
of each repetition should last about half as long as
the return stage. Proper breathing is important.
Exhale during the exertion stage of each repetition
and inhale during the return stroke. Never hold your
breath.
STAYING MOTIVATED
For motivation, keep a record of each workout.
List the date, the exercises performed, the
resistance used, and the numbers of sets and
repetitions completed. Record your weight and
key body measurements at the end of every
month. Remember, the key to achieving the
greatest results is to make exercise a regular
and enjoyable part of your everyday life.
MUSCLE CHART
A.
B.
C.
D.
E.
F.
G.
H.
I.
J.
K.
L.
M.
N.
O.
P.
Q.
R.
S.
T.
U.
V.
W.
X.
24
Sternomastoid (neck)
Pectoralis Major (chest)
Biceps (front of arm)
Obliques (waist)
Brachioradials (forearm)
Hip Flexors (upper thigh)
Abductor (outer thigh)
Quadriceps (front of thigh)
Sartorius (front of thigh)
Tibialis Anterior (front of calf)
Soleus (front of calf)
Anterior Deltoid (shoulder)
Rectus Abdominus (stomach)
Adductor (inner thigh)
Trapezius (upper back)
Rhomboideus (upper back)
Posterior Deltoid (shoulder)
Triceps (back of arm)
Latissimus Dorsi (mid back)
Spinae Erectors (lower back)
Gluteus Medius (hip)
Gluteus Maximus (buttocks)
Hamstring (back of leg)
Gastrocnemius (back of calf)
Retailer
ARG
Retailer address
489-499 Avebury Boulevard
Saxon Gate West
Central Milton Keynes
Bucks,MK9 2NW
25