1
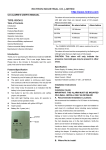
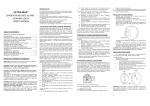
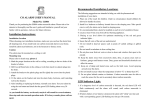
CARBON MONOXIDE ALARM USER’S MANUAL
Introduction
Thank you for purchasing the carbon monoxide alarm.
This is one Single Station alarm. Please take a few
minutes to thoroughly read this user’s guide and save for
future reference.
Product view
to detect CO.
Green LED: The green LED flashes every 30 seconds to indicate
the unit is operating properly.
Red LED: When a dangerous level of carbon monoxide is
detected the red LED will flashes and the alarm pattern will sound.
The CARBON MONOXIDE (CO) alarm monitors the air for the
presence of CO. The alarm will sound and be accompanied by the
flashing red LED light when there are high levels of CO
presence.
CAUTION: This alarm will only indicate the presence of
monoxide at the sensor. Carbon monoxide gas may present at
other area.
Specification:
Power Supply:
3×1.5V AA Size batteries.
Sensitivity & Time: 50ppm, alarms within 60~90 minutes
100ppm, alarms within 10~40 minutes
300ppm, alarms within 3 minutes
Standby Current: <40uA;
Alarm Current: <30mA
Operation Ambient Condition: -10~400C;20~90%R.H.
Features/Specification
Features:
·LCD displayer with a blue back ground light.
·Loud 85 decibel alarm.
·Permanent carbon monoxide sensor.
·Compliance with EN50291 standard.
·Powered by 3×1.5V AA size batteries.
·The alarm sound pattern is three short alarm beeps. The
red LED will flash while in alarm mode.
·Red LED flashes once every minute together with beep
alarm sound is an indication that the battery is low
(need replacement).
·Test/Reset button to test the unit electronics and verifies
proper unit operation and reset the unit during CO
alarm.
·Alarm memory feature: If the unit ever alarms, pressing
the button, green LED will flashes once every second
for one minute and the peak alarm level will be
indicated on the LCD.
·Green and red LED lights that indicate normal operation
and alarm status.
·The unit will sound ‘chirp’ and red LED flashes once as
power up.
·3 digits LCD displayer is optional. ‘Lo’ on the LCD
indicates low battery (need replacement) and ‘OU’ on
the LCD to indicate CO level over 999ppm. In normal
condition, LCD is be lit for a long time with “0PPM”
on the LCD. If the CO leakage is less than 20PPM, it
should show “0PPM” on the LCD Displayer.
In 4 minutes after the batteries are installed, the unit starts
Installation Instructions
Step 1
Installation Guide:
IMPORTANT: THIS ALARM MUST BE MOUNTED ON A
WALL. INSTALL ONLY AS DETAILED!
A. Recommended Installation Locations:
We recommend the installation of a CO Alarm in the following
locations.
For maximum protection we suggest an alarm be installed on each
level of a multilevel home including every bedroom, hallways,
finished attics and basements. Put alarm at both ends of bedroom
hallway or large room if hallway or room is more than 30ft. (9.1m)
long. If you have only one alarm, ensure it is placed in the hallway
outside of the main sleeping area, or in the main bedroom. Verify
the alarm can be heard in all sleeping areas.
Locate an alarm in every room where someone sleeps with the
door closed. The closed door may prevent the alarm from waking
the sleeper. Mounting the alarm on the ceiling in the center of the
room places it closest to all points in the room. Ceiling mounting
is preferred in ordinary residential construction. When mounting
an alarm on the ceiling, locate it at a minimum of 4” (10cm) from
the side wall (see Diagram A). If installing the alarm on the wall,
at a minimum of 4” (10cm) and a maximum of 12”(30.5cm) below
the ceiling (see Diagram below).
Do not install in garages, kitchens, furnace rooms or
bathrooms! INSTALL AT LEAST 15 FEET AWAY FROM
ANY FUEL BURNING APPLIANCE.
Do not install within 3ft(0.9m) of the following: The door to a
kitchen, or a bathroom that contains a rub or shower, forced air
ducts used for heating or cooling, ceiling or whole house
ventilating fans, or other high air flow areas. Avoid excessively
dusty, dirty or greasy areas. Dust, grease or household
chemicals contaminate the alarm’s sensors, causing it to not
operate properly.
Place the alarm where drapes or other objects will not block
the sensor. CO must be able to reach the sensors to accurately
detect these conditions. Do not install in peaks of vaulted
ceiling, ‘A’ frame ceilings or gabled roofs. Keep out of damp
and humid areas.
Install at least one foot away from fluorescent lights, electronic
noise may cause nuisance alarms. Extreme temperatures will
affect the sensitivity of the CO Alarm. Do not install in areas
where the temperature is colder than 40 degrees Fahrenheit
(4.4 Celsius) or hotter than 100 degrees Fahrenheit (37.8
Celsius). Place away from doors and windows that open to the
outside.
Step 2
Mounting Instructions:
1. Remove the mounting bracket from the back of the alarm
by twisting the alarm, then pull out the tab between battery
and battery contact to activate the battery.
2. After selecting the proper location for your CO Alarm,
drilling two Ø5.0mm holes in the ceiling or wall vertically
with the distance of 60mm and inserting two plastic roles
into the holes, then attaching the bracket to the plastic role
with the arrow down to the ground and screwing tightly
two screws in the two roles.
3. Aligning the arrow on the back of the alarm with the arrow
on the bracket, then snap the alarm on the bracket by
twisting the alarm.
Step 3
Testing the Alarm
CAUTION: Due to the loudness (85 decibels) of the alarm,
always stand an arms length away from the unit when
testing.
The test/reset button has two purposes. It tests the unit’s
electronics and reset the unit during CO alarm. After
installation, TEST THE UNITS ELECTRONICS by pressing
the test button for five seconds. A series of beeps will sound.
The unit needs to be tested weekly! If at anytime it does not
perform as described, verify power is connected correctly and
that the battery doesn’t need replacing. Clean dust and other
buildup off the unit. If it still doesn’t operate properly call our
agent.
B. Where Not to Install:
Operation Instructions
Test Feature
Press the test button for several seconds to test unit’s
1
electronics. The alarm will sound and LCD will be lit (for
the model with LCD).
Reset Feature
If the alarm is sounding, pressing the button will silence
the alarm for several minutes. After the duration, if the
CO condition that caused the alert continues, the alarm
will reactivate. If the CO level keeps from 70ppm to
200ppm, the duration is around 5 minutes. If the CO level
keeps over 200ppm, the duration is zero, i.e. the unit will
sound again soon. If the CO level keeps below 70ppm,
the unit will not reactivate longer.
Alarm Memory Feature
If you leave home for long time and during the period the
unit ever alarms, after you return and press the button for
several seconds, green LED will flashes once every
seconds and the peak alarm level will be indicated on the
LCD to alert you there is one CO alarm occurs. You
should check the possible CO and resolve it. Pressing the
button again, the unit will return to normal condition or
return to normal condition in one minute automatically.
LED indicator Operation
Red LED
Red Led will flash in conjunction with the alarm beep.
Therefore, the red LED will flash during a CO alarm, a
low battery mode chirp.
As you install the battery on the unit, the unit will
sound ‘chirp’ to indicate the battery installed properly,
and LCD will indicate ‘888PPM’.
Green LED
Green LED flashes once every 30 seconds to indicate
proper operation.
What To Do IF The Alarm Sounds
If alarm sounds:
1) Call your emergency services.
2) Immediately move to fresh air – outdoors or by an
open door/window. Do a head count to check that
all persons are accounted for. Do not reenter the
premises nor move away from the open
door/window until the emergency services
responders have arrived, the premises have been
aired out, and your alarm remains in its normal
condition.
Never restart the source of a CO problem until it
has been fixed. NEVER IGNORE THE ALARM!
The CO sensor sensitivity and setting is:
50ppm, within 60 to 90 minutes;
100ppm, within 10 to 40 minutes;
300ppm, within 3 minutes.
This carbon monoxide alarm is designed to detect
carbon monoxide gas from ANY source of
combustion. It is NOT designed to detect any other
gas.
Fire departments, most utility companies will perform
CO inspections, some may charge for this service.
Battery Replacement
If battery failure is detected the unit will ‘chirp’ one time. This
cycle will occur once every 30 seconds.
CAUTION: YOUR ALARM IS SEALED AND THE COVER
IS NOT REMOVABLE!
To replace the battery you must first remove the alarm from the
mounting bracket, then you can directly replace the battery.
After installing or changing the battery, reinstall your alarm. Test
your alarm by using the test button and check that the red LED
flashing once every 30 seconds.
Replace battery with qualified brands.
General Maintenance
To keep your CO Alarm in good working order, please follow
these simple steps:
·Verify the unit’s alarm and LED light operation by pushing the
test button once a week.
·Remove the unit from mounting bracket and vacuum the alarm
cover and vents with a soft brush attachment once a month to
remove dust and dirt. REINSTALL IMMMEDIATELY
AFTER CLEANING AND THEN TEST USING THE
TEST/RESET BUTTON!
·Never use detergents or other solvents to clean the unit.
·Avoid spraying air fresheners, hair spray, or other aerosols near
the CO Alarm.
Do not paint the unit. Paint will seal the vents and interfere with
the sensor’s ability to detect CO. Never attempt to disassemble the
unit or clean inside. This action will void your warranty.
WARNING: Reinstall the CO Alarm as soon as possible to assure
continuous protection.
When household cleaning supplies or similar contaminates are
used, the area must be well ventilated. The following substances
can affect the CO sensor and may cause false readings and damage
to the sensor: Methane, propane, iso-butane, iso-propanol, ethyl
acetate, hydrogen sulfide dioxides, alcohol based products, paints,
thinner, solvents, adhesives, hair spray, after shave, perfume, and
some cleaning agents.
Carbon Monoxide Safety Information
General CO Information
Carbon Monoxide (CO) is a colorless, and tasteless poison gas that
can be fatal when inhaled. CO inhibits the blood’s capacity to
carry oxygen.
Possible Source
CO can be produced when burning any fossil fuel: gasoline,
propane, natural gas, oil and wood .It Can be produced by any
fuel-burning appliance that is malfunctioning, improperly
installed ,or not ventilated Correctly. Possible sources include
furnaces, gas range/stoves, gas clothes dryers, water heaters,
portable fuel Burning space heaters, fireplace, wood-burning,
stoves and certain, swimming pool heaters, Blocked chimney or
Disconnected vent pipes, and a loose or cracked furnace
exchanger can also cause CO. Vehicles and other combustion
Engines running in a attached garage and using a charcoal/gas grill
or hibachi in an enclosed area are all possible sources of CO.
The following conditions can result in transient CO situations:
Excessive spillage or reverse venting of fuel-burning appliances
caused by outdoor ambient conditions such as: Wind direction
and/or velocity, including high gusts of wind heavy air in the
vent pipes (cold/humid air with extended periods between
cycles), negative pressure differential resulting from the use of
exhaust fans, simultaneous operation of limited internal air,
ven pipe connections vibrating loose from clothes dryers,
furnaces, or water heaters, obstructions in, or unconventional,
vent pipe designs which can amplify the above situations,
extended operation of unvented fuel-burning devices(range,
oven, fire-place, etc),temperature inversions which can trap
exhaust gasses near the ground, car idling in an open or closed
attached garage, or near a home.
CO Safety Tips
Every year have the heating system, vents, chimney and flue
inspected and cleaned by a qualified technician. Always install
appliances according to manufacturer’s instructions and adhere
to local building codes. Most appliances should be installed by
professionals and inspected after installation. Regularly
examine vents and chimneys or improper connections, visible
rust, or stains, and check for cracks in furnace heat exchangers.
Verify the color of flame on pilot lights and burners is blue. A
yellow or orange flame is a sign that the fuel is not burning
completely. Teach all household members. what the alarm
sounds like and how to respond.
Symptoms of CO poisoning
Initial carbon monoxide poisoning symptoms are similar to the
flu with no fever and can include dizziness, severe headaches,
nausea, vomiting and disorientation. Everyone is susceptible
but experts agree that unborn babies, pregnant women, senior
citizens and people with heart or respiratory problems are
especially vulnerable. If symptoms of carbon monoxide
poisoning are experienced seek medical attention immediately.
CO poisoning can be determined by a carboxyhemoglobin test.
The following symptoms are related to CARBON
MONOXIDE POISONING and should be discussed with ALL
members of the household:
1. Mild Exposure: Slight headache, nausea, vomiting,
fatigue (often described as ‘Flu-like’ symptoms).
2. Medium Exposure: Severe throbbing headache,
drowsiness, confusion, fast heat rate.
3. Extreme Exposure: Unconsciousness, convulsions,
cardiorespiratory failure, death.
The above levels of exposure relate to healthy adults. Levels
differ for those at high risk. Exposure to high levels of carbon
monoxide can be fatal or cause permanent damage and
disabilities. Many cases of reported carbon monoxide
poisoning indicate that while victims are aware they are not
well, they become so disoriented they are unable to save
themselves by either exiting the building, or calling for
assistance. Also, young children and household pets may be the
first effected. Familiarization with the effects of each level is
important.
2