1
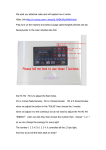
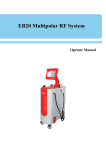
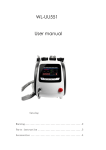
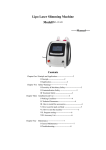
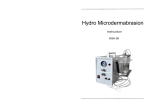
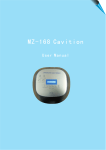
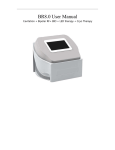
LS651
Laser Fat System
User manual
Warning
Dear user:
Thanks for using our company's products, in order to fully make use of
the products, we sincerely suggests follow:
◆◆Please read the instruction in detail and keep it well for further reading and
consulting.
◆◆Please follow the instruction to fit and operate the machine correctly.
◆◆Please do not remove and change any accessories of the machine.
◆◆It forbids others to open and remove the mainframe except the authorized
people in the company.
◆◆It forbids others to change and maintain the machine except the
professional people.
◆◆Please contact us if there is any trouble during operation.
This product does not belong to medical, please don’t use for disease treatment!
Parts Introduction
1
1 .LCD screen
2.Power supply line jack
3. General power switch
4.Laser 4-1 work head jack
5.Laser 4-2 work head jack
6.Laser 4-3 work head jack
7.Laser 4-4 work head jack
8.Laser 2-1 work head jack
附件架
9.Laser 2-2 work head jack
4
5
6
7
8
9
2
3
Accessories
Laser 2X
Laser 4X
2
Basal Operation
1.Put the accessories well and connect them to the host.
(1)Insert Laser 4-1 work head to [4];
(2)Insert Laser 4-2 work head to [5];
(3)Insert Laser 4-3 work head to [6];
(4)Insert Laser 4-4 work head to [7];
(5)Insert Laser 2-1 work head to [8];
(6)Insert Laser 2-2 work head to [9];
2.Insert power supply line to [2], turn on the General power
( Fig 1 )
switch [3].
3. As (Fig 1) shows, input default Password “000000” to
enter interface as (Fig 2).
4.Click any place on screen to enter function interface as
(Fig 3) shows.
Laser Function
1.Operation step of Laser 2X
( Fig 2 )
(1)Clean the skin, and according the treatment part to
choose the suit band ties and tied them up.
(2)Put the Laser 2X work heads into the band ties, the side
with Led contact to skin directly.
(3)Set intensity of every Laser 2X in interface (Fig 3) shows.
the range is 1(weak)~3(strong).
5W
Operation steps:
When the cursor “V” on the location “channel 1 1Hz”,
click”
”and ”
”to set the intensity of laser, the
range is 1HZ~1000HZ. OFF means that close channel
1.
( Fig 3 )
Then move the cursor “V” to the “channel 2 1HZ”, click
”
”and ”
” to set the intensity of laser, the range is
1HZ~1000HZ. OFF means that close channel 2. ......
(4)Setting work time
Click “Time” to enter interface (Fig 4). Click”
”and ”
”
one time to change one minute, click the number of time
directly to change ten minutes every time.30 minutes of
every treatment part.
(5)click “
“to start work.
( Fig 4 )
3
(6)The machine will pause automatically if the setting time is
over. Beautician take the Laser 2X work head out and
put them well, then loosen the band ties.
2.Operation step of Laser 4X
(1)Click the “Laser 4X” in interface (Fig 3) shows to enter
interface (Fig 5).
(2)The other steps please refer to “Laser 2X Function”.
( Fig 5 )
CAUTION LASER: Do not let the laser light
straightly shine upon the eyes in
Case of eyes hurt.
Others
( Fig 6 )
Click “set” as the(Fig 1) shows. Enter interface as (Fig 8):
Click“ basic setting ”,enter the selecting language interface.
Notes “advanced setting” is for manufacturer only.
Forbidden group
1.People with heart disease or high blood pressure, or configured cardiac pacemaker.
2.Patients with acute inflammation, asthma, deep vein thrombosis, thyroncus, cancer.
3.People with hemorrhagic disease, trauma or who is bleeding.
4.Pregnant women
5.Medical Plastic parts, or parts with artificial in filling inside.
6.People with metal inside the body(include metallic tooth)
7.Patient with skin inflammation or with edema.
8.People with an abnormal immune system.
9.Numb or insensitive to heat.
4
Technical parameters
Input:AC110V/60Hz □
AC220V/50Hz□
Power:≤50VA
Accessories list
1.Host
1set
2.Power supply line
1pc
3.User manual
1copy
4.Laser 2X work head
2pc
5.Laser 4X work head
4pc
6.Bind ties
1set
7.Accessory frame
1pc
8.Hexagonal screws
4pcs
9.Hexagon wrench
1pc
5