1
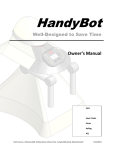
11111
HandyBot
®
Well-Designed to Save You Time
Owner’s Manual
Customer Service:
1-800-HANDYBOT or
[email protected]
Go to www.Handybot.com to
• Register your HandyBot
• Activate warranty
• Schedule Service
• Order Parts
• Download additional features
• Receive Online Support
• View online tutorials
HandyBot®
Page 2
Contents
Welcome & Warranty .............................................................................................................. 3
Parts List & Requirements ....................................................................................................... 3
Parts Diagram & Control Panel ............................................................................................... 4
Outdoor Tasks .......................................................................................................................... 5
Indoor Tasks............................................................................................................................. 6
Scheduling Tasks ..................................................................................................................... 7
Maintenance ............................................................................................................................. 7
Battery Charging .................................................................................................................. 7
Self-Clean & Water Refill ................................................................................................... 7
All Maintenance Tasks ........................................................................................................ 8
Frequently Asked Questions .................................................................................................... 9
Safety & Support Information ................................................................................................. 9
Index ...................................................................................................................................... 10
This document was completed as the final requirement for the Fundamentals of Technical Writing course at
Bellevue College, summer 2013. The original team consisted of:
J McCarty-Bell: Illustrator, SME, & Writer
Faith Iverson: Lead Editor & Writer
Tanade Mohamed: Editor, Tester & Writer
Instructor: Kim Hemmingway
Sherry Pace: Project Manager, Cover Design, & Writer
Sinthu Selvan: SME & Writer
Rachael Sewell: Publisher & Writer
HandyBot®
Page 3
Welcome & Warranty
We think you will be delighted with your purchase. This manual contains instructions for safe and efficient use of
your HandyBot. HandyBot is covered by a 3-year unlimited warranty from date of purchase when used in
accordance with the guidelines published in the HandyBot User Manual.
Take a moment to register your HandyBot online at www.HandyBot.com/register. Registration activates your
warranty and allows you to easily schedule maintenance, order parts, obtain support, and purchase upgrades.
Parts List
The following parts are included with your HandyBot purchase:
•
•
•
•
HandyBot
HandyBot owner’s manual
4 foot power cord
HEPA filter
•
•
•
•
HandyBot Performance Plus® oil, 12oz (Qty 2)
Concentrated fertilizer, 16 oz
Boundary wire
Boundary wire fasteners (Qty 100)
HandyBot Requirements
•
Storage area, at least 24 by 24 inches, sheltered from rain with unobstructed access to your home.
Suggested storage areas include a garage, patio, laundry room, or mud room.
•
120 volt electrical outlet within 4 feet of storage area.
•
Drainage area that can accommodate water, grass clippings and dust bin contents. A yard,
plant bed, or sewage drain is ideal.
•
Water hose long enough to reach the drainage area while attached to a water supply.
Initial Setup
HandyBot comes fully assembled, charged, and prefilled for fast setup. Follow these steps for first-time use:
1.
Remove HandyBot and its power cable from the packing box.
2.
Place HandyBot upright in the designated storage area.
3.
Plug the wide end of the power cord to the HandyBot docking port (see Parts Diagram, page 4),
and the other end into selected 120 Volt electrical outlet.
4.
Power-on by pressing the Stop/Resume button on the Control Panel.
HandyBot®
Parts Diagram
Control Panel
The Control Panel Main Menu consists of four main
functions, labeled as soft keys on the display:
A – Indoor
B – Outdoor
C – Maintenance
D – Schedule
Pressing the button for each function will display that
function’s specific menu.
Page 4
HandyBot®
Page 5
Outdoor Tasks
HandyBot mows and edges lawns, and waters and fertilizes outdoor areas.
Initial Outdoor Setup
1.
Tack the included boundary wire firmly to the ground along the outer perimeter of
HandyBot’s care perimeter. HandyBot will not move outside this perimeter.
2.
Move HandyBot anywhere inside the perimeter.
3.
For watering and fertilizing tasks, connect the Super Sprinkler to HandyBot’s left arm,
as shown in the Parts Diagram on page 4.
Quick Start for Outdoor Tasks
1.
Power-on by pressing the Stop/Resume button on the HandyBot Control Panel.
2.
On the Main Menu, press B (Outdoor).
3.
Select A (Mowing), B (Weeding), or C (Watering).
4.
Press A (Now), then <ENTER>.
5.
The selected outdoor task will begin immediately.
Advanced Outdoor Settings
Custom Mowing with Edging Option
1.
On the Main Menu, press B (Outdoor)
2.
Select A (Mowing)
3.
Select A (1inch), B (1 ½ inch), or C (2 inch) for desired lawn height.
4.
Press D to switch between EDGING ON and EDGING OFF.
5.
Press <ENTER>. Your selections will become the default mowing settings.
Custom Watering with Fertilizing Option
1.
On the Main Menu, press B (Outdoor).
2.
Press C (Watering) to display the Custom Watering Options.
3.
Select A (Lawn), C (Garden), or both to customize watering area.
4.
Press D to switch between FERTILIZER ON and FERTILIZER OFF.
5.
Press <ENTER>. Your selections will become the default watering settings.
HandyBot®
Page 6
Indoor Tasks
HandyBot vacuums floors, shampoos carpet, and mops hard surfaces.
Initial Indoor Setup
1. Setup task perimeters for each task using the included boundary wires.
2. Move HandyBot within the perimeter.
Quick Start for Indoor Tasks
1.
2.
3.
4.
5.
6.
Power-on by pressing the Stop/Resume button on the Control Panel.
On the Main Menu, press A (Indoor).
Select A (Vacuum), B (Shampoo), or C (Mop).
Press <ENTER> to select task and view Task Schedule Menu.
Press A (Now), then <ENTER>,
The selected task will begin immediately.
Advanced Indoor Settings
Custom Vacuuming
1.
2.
3.
4.
On the Main Menu, press A (Indoor).
Select A (Vacuum) to display the custom vacuuming options.
Choose the suction level A (Gentle), B (Normal), or C (Heavy Duty).
Press <ENTER>. Your selections will become the default vacuum settings.
Custom Shampooing & Mopping
1.
2.
3.
4.
On the Main Menu, press A (Indoor).
Select B (Shampoo), or C (Mop) to display the custom cleaning options.
Select cleaning level A (Gentle), B (Normal), or C (Deep Clean).
Press <ENTER>. Your selections will become the default settings.
HandyBot®
Page 7
Scheduling Tasks
When a task is selected from the A (Indoor), B (Outdoor), or C (Maintenance) Menu, the Control Panel displays a
Schedule Menu. Pressing D (Schedule) from the Main Menu also displays the Schedule Menu for the last task
viewed. In addition to the A (Now) option, tasks can be scheduled using the B (Time), or C (Date) menus.
Time Options
Date Options
Set Min.
AM/PM
Start/End
Set Day
Save Schedule
Maintenance
Regular care will ensure that HandyBot performs at its best and lasts for years to come. HandyBot automatically
calculates a maintenance schedule based on use and sensors.
When HandyBot’s strobe flashes, it indicates that maintenance or attention is required. The Control Panel will
display what action is needed.
The Maintenance Table on pages 7-8 outlines the maintenance tasks needed.
Battery Charging
Battery charging is part of HandyBot’s routine operation. HandyBot can operate for 12 hours on a full charge, but
automatically returns to its Home Base to recharge as needed. To extend battery life, HandyBot should be plugged
in for at least of 8 hours per day. HandyBot will not attempt to start a task unless there is enough battery charge to
complete it. If the battery is too low, HandyBot’s strobe light will flash and the Control Panel will indicate that a
battery recharge is needed.
Detailed Instructions for Self-Clean & Water Refill
The most common maintenance tasks are the Self-Clean Cycle and Water Refill. They can be completed together or
separately. Together they complete in less than 15 minutes. Both require the following steps:
1. Move HandyBot to the selected drainage area.
2.
Secure a water hose to the Water Input Valve.
3.
Turn the water on. HandyBot automatically stops the flow when the cleaning and/or refill completes.
4.
Power-on. On Main Menu, select C (Maintenance), then A (Self-Clean) and/or C (Water), <ENTER>, A
(Now).
5.
When the strobe flashes and the Control Panel reads TURN WATER OFF, turn the water source off.
6.
Detach the hose from HandyBot. Some water may be released in the drainage area during this step.
HandyBot®
Page 8
All Maintenance Tasks
Maintenance
Task
What is done?
Preparation
Blade Care
Sharpens, balances,
& tightens blades as
needed.
None. Note:
This task is loud.
Cleaner Refill
All-purpose
cleaner of your
choice
Fertilizer
Refill
HandyBot
Concentrated
Fertilizer
Exterior
Cleaning
Cleans exterior
surfaces
Moisten a clean
cloth
Frequency
Time
Needed
Every 7
acres or as
needed
30 min.
Instructions
Main Menu, C (Maintenance),
B (Blades), <ENTER>, A (Now)
As needed
< 2 min.
1. Power down HandyBot
2. Open fertilizer/cleaner storage lid
3. Add fertilizer/cleaner to the Fill
line
4. Close the lid securely
As needed
5-10
min.
Wipe surface & base with damp
cloth
1. Power down HandyBot
Filter
Change
Oil
Change
HandyBot HEPA
Filter
Changes the oil used
to lubricate
HandyBot’s moving
parts.
HandyBot
Performance
Plus® Oil
Every 3
months or as
needed
5 min.
2.
3.
4.
5.
Remove filter cover
Remove used filter
Insert clean filter
Replace filter cover
1. Apply 3 squirts of oil each
along both of HandyBot’s
telescoping shoulders.
Annually
30 min.
2. Press Main Menu C
(Maintenance), D (Oil),
<ENTER>, A (Now)
Restore All
Settings
Resets all options to
initial default values
None
As needed
<1 min.
Main Menu, C (Maintenance),
press both A&D while pressing
<ENTER>
Self-Clean
Removes debris
from interior
systems & cleans
outdoor wheels
See above
Weekly or
as needed
10 min.
See above
Water Refill
Provides water for
HandyBot tasks
See above
Weekly or
as needed
< 5 min.
See above
HandyBot®
Page 9
Frequently Asked Questions
How does the HandyBot navigate and avoid crashes?
HandyBot uses a stereoscopic vision system in its Upper Sensor Array to track its path. The HandyBot uses the
Global Positioning System (GPS) to control its location. A built-in crash sensor prevents collisions with walls,
furniture, and other obstacles.
Is HandyBot safe around children and animals?
Yes. When doing tasks, HandyBot detects and avoids people, pets and wildlife. If a person or animal comes too
close, HandyBot will flash its strobe, back away, and pause until the area is clear.
Is HandyBot waterproof?
No. HandyBot is water resistant, but not entirely waterproof. HandyBot should never be submerged in water. Use
the boundary wire to exclude any water features from the task area. Exposure to heavy rain or high pressure water
spray may result in more frequent maintenance alerts.
Can HandyBot handle stairs, slopes, and drop-offs?
Yes. HandyBot can move up or down slopes of up to 30%, and can step up or down abrupt vertical changes of 4 feet
or less. Use the boundary wire to protect HandyBot from any drop-offs greater than 4 ft. Greater changes of
elevation during a task will require more battery power.
Will HandyBot track dirt into my home after doing outdoor work?
No. HandyBot uses one set of wheels for indoors and another for outdoors. When switching to indoor tasks, the
outdoor wheels retract into sealed compartments, and the indoor wheels emerge. The Self-Clean maintenance task
cleans the outdoor wheels as needed.
Safety Information
WARNING: Risk of Electric Shock
•
Do not attempt to open or penetrate HandyBot’s external protective
covering.
•
Do not attempt battery replacement. Return to authorized dealer for
service.
CAUTION: Risk of Equipment Failure
•
Do not submerge HandyBot in water.
Support Information
Visit www.HandyBot.com to register your HandyBot and activate the warranty, schedule service, order parts, view
and download additional features, receive online support, and view online tutorials.
We sincerely hope that your HandyBot provides you with many years of excellent and reliable service. If you
have questions or comments about HandyBot, please contact us at [email protected] or 1-800HANDYBOT.
HandyBot®
Page 10
Index
A
Accessories. See Parts
Additional features, 1, 9
Alert Strobe. See Strobe
Animals, 8
Arms, 4
Guard, 4
Guarantee, 8
S
B
I- L
Barrier. See Boundary wire
Battery, 7, 9
Blades, dull, 8
Boundary wire, 3, 4, 5, 6, 9
Incline, See Slope
Kids. See Children
Lawn, 5
Light. See Strobe
Lubrication, 8
Safety, 9
Scheduling, 5
Scrubbing, 5
Self-Clean, 7, 8, 9
Sensors, 4, 9
Sharpening Blades, 8
Shoulders, telescoping, 4, 8
Slopes, 9
Sprinkler, 4, 5
Stairs, 9
Steps, 9
Strobe, 4, 7, 9
Suction, 6
M-N
T-V
Maintenance, 7, 8, 9
Mopping, 6
Mowing, 5
Navigation, 9
Noise, loud, 8
Telescoping. See Shoulders
Tutorials, online, 1, 9
Upper Sensor, 4, 9
Vacuuming, 6
Voltage, 3
O-P
W-Z
C
Carpet, 6
Caution. See Safety
Charging, 7
Children, 9
Control Panel, 3, 4, 5, 6, 7
Cord, power, 3
D
Danger. See Safety
Days, 5
Dirt, 9
Docking Port, 4
Drainage Area, 3, 7
E-F
Edging, 5
Equipment, 9
FAQ, 9
Fertilizer Reservoir, 4, 8
Filter, 3, 8
Flashing. See Strobe
Floors, 6
G
Garden, 5
GPS, 9
Grass, 3. See Lawn
H
Hazards. See Safety
Height, grass, 5
Obstacles, 9
Oil Change, 8
Online Support, 1, 9
Order Parts, 1, 9
Outlet, 3
Parts, 1, 3, 5, 8, 9
Perimeter, 5, 6
Pets, 9
Power, 6
R
Rain, 9
Refill
cleaner, 8
fertilizer, 8
water, 8
Registration, 1, 3, 9
Routine, 7. See Scheduling
Warning. See Safety
Warranty, 1, 3, 9
Water, 3, 4, 5, 7, 8, 9
Water Input Valve, 4, 7
Watering, 5
Weeding, 5
Wheels, 8, 9
Yard, 3