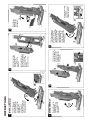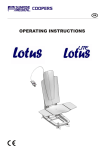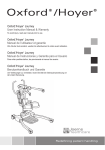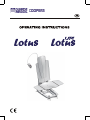
1
Important! Please read these Operating Instructions carefully before putting your bath lift into operation. Please observe all notes and in particular, the safety instructions given on page 5. GB Table of Contents 1 Important Information 5 1.1 1.2 1.3 1.4 1.5 Introduction Intended Use Guarantee / Warranty Disposal CE mark 5 5 5 5 2 Safety Information 5 2.1 2.2 2.3 2.4 Warnings and warning symbols General Information Notes concerning the hand control & charging Notes concerning the label 5 5 6 6 3 Description 6 3.1 Equipment provided 3.2 Accessories available 3.3 Technical data 6 6 6 4 Startup 7 4.1 4.2 4.3 4.4 4.5 4.6 4.7 Sequence of installation steps Assembling the suction pads Installing the lift in the bathtub Installing the seat assembly Handling and operation EMERGENCY OFF Disassembling the lift in the bathtub 7 7 7 7 7 8 8 5 Troubleshooting 8 6 Maintenance and Care 8 6.1 Cleaning and care 6.2 Maintenance and inspection 8 9 7. Instructions for installation / disassembly 10 3 GB 1 2 1 12 10 2 8 7 3 9 4 6 5 3 4 2 1 4 1 11 3 1.1 11.1 5 12 13 1 2 3 8 4 4 9 5 10 6 11 GB 1 Important Information 1.1 Introduction Congratulations on purchasing a Coopers product! You have made an excellent choice. We are sure that this product will make a big difference to your everyday life by allowing you to bath more independently. All our products are manufactured to the highest quality standards and subject to rigorous testing both post and during production. These operating instructions contain essential information on how to use your bath lift safely and correctly, so please keep these in a safe place. Captions and legends are described as follows: Example of Hand Control (4, Figure 1-1) (page number, Figure. No., Item number 1.5 CE Mark The technical requirements for the device are set forth in DIN standard EN-ISO 10535 and have been fulfilled. The product complies with the Directive concerning Medical Products, 93/42/EWG / DIN EN 60601-1-2 (Electromagnetic compatibility). 2 Safety Information 2.1 Warnings and warning symbols The following warnings and symbols are used throughout these operating instructions: Important! This note points out to additional information and useful hints. 2.2 General Information Only use the bath lift inside the bath tub and 1.2 Intended Use The bath lift is ONLY to be used for the purpose of bathing in the bath tub, by lowering and raising a person in and out of a bath tub. The bath lift must not be used as a stand, lifting device or in other way than the intended purpose. 1.3 Guarantee / Warranty The warranty for this device is 36 months and covers material defects and workmanship or processing faults, excluding components, which are subject to normal wear, e.g. Suckers. Defects resulting from excessive use, improper use, wilful damage or unauthorised repair or modification are also excluded from our warranty. Due to product liability reasons, all repair, maintenance and corrective maintenance work must only be carried out by authorised skilled professionals, and only by using spare parts designed for this lifter. 1.4 Disposal Important The product does not contain any hazardous substances. At the end of the product life, all components should be disposed of according to your local regulations and the respective material classification. Plastic materials may be recycled. Electrical components and PC boards may be disposed of in the form of electronic waste. Disposal must be in accordance with the relevant national regulations stipulated by law. for the purpose of bathing. Please keep hands away from all moving parts when product is in use. Persons suffering from limited mobility or other disabilities should only bath under the supervision of another person. Severely disabled persons must be attended by a professional nurse. Please observe the information/warnings provided on the product label. Avoid excessively using or overloading your bath lift. Please do not use oil based bathing products while using this product. Please observe the following instructions for the transport and storage of the bath lift: Ambient temperature between 00 C and 400 C Relative air humidity from 30 % to 75 % Air pressure from 700 hPa to 1060 hPa In the event of malfunctions, please contact your specialist supplier immediately. Do not carry out any modifications or other conversions to this product. The lowering mechanism in the lifting unit must NEVER be adjusted manually. Please make sure that the pins provided in the spindle lock are positioned correctly before bathing (4,Figure 1-10 dot-to-line scale). Please observe the additional instructions for cleaning the lift in the special washing machine or autoclave. 2.3 Notes concerning the Hand Control Do not throw the hand control into open fire; do not store it in the vicinity of heat sources. 5 GB Do not leave the hand control permanently connected to the charger. Please disconnect the charger from the power supply after use. Re-charge the storage battery of the hand control after use whenever possible. Please use the charger provided. The storage battery can only be replaced by a professional. CHARGING THE HAND CONTROL: Remove the jack socket on the cable of the hand control (4, Fig. 4-1.1) from the motor and connect it to the jack plug on the cable of the charger. Connect the charger (4, Fig. 4-11) to a suitable mains outlet. The charging process will be started if the LED (4, Fig.3-2) on the hand control (4, Fig. 4-1) flashes shortly and lights up permanently after approx. 2 seconds. To achieve full capacity a charging time of approx. 1 hour will be necessary if the storage battery is empty. On termination of the charging process the LED will be extinguished. After the charging process disconnect the hand control in reversed order. If the hand control remains connected to the charger and mains outlet, the charging status will be checked again after approx. 1.5 hours. The LED (4,Fig. 3-2) on the hand control will be lit up and the hand control will be recharged as necessary. This process will be repeated approx. every 1.5 hours. The request for re-charging will continue to be displayed on the hand control for approx. 1 hour (4, Fig. 3-2). Please use ONLY the charger provided to recharge the storage battery of the hand control. If the hand-control part is opened, we will no longer assume any warranty claims. The hand control will slightly warm up during the charging process. Please do not charge the storage battery anywhere that it is likely to get wet. 2.4 Type Label (4, Figure 5) 1 Rating 2 Type B Application Class 3 WEEE Designation 4 Rated voltage / Rated power consumption 5 Note (Please observe accompanying documents) 6 Protection Class 7 8 Mark of conformity 9 Test mark 10 Serial number 11 Period of production 12 Manufacturer 13 Product name 6 3 Description 3.1 Equipment provided Your Lotus bathlift should come complete with: Bath lift - Overview (4,Fig.1+2+4): 1 2 3 4 5 6 7 8 9 10 11 12 Hand control and helix cable Backrest Side flaps (foldable) (2x) Seat panel Suction pads Baseplate Spindle unit Lifting unit Slide/carriage Bolt - spindle 2x Charger Seat assembly, complete 3.2 Accessories available There are also a number of accessories available: Height adapter 20 mm (Set) Height adapter 40 mm (Set) Height adapter 60 mm (Set) Swivel transfer aid Slide transfer aid 3.3 Technical Data All information given in the table below refers to the standard version of the respective model. Model: Lotus Bath Lift Total length: 721 mm Total weight: 12.9 kg Seat width without side flap: 375 mm Seat width with side flap: 705 mm Height of backrest: 675 mm Width of backrest: 350 mm Min. seat height: 72 mm Max.seat height: 420 mm Max. inclination of backrest: 40° Max. Load-bearing capacity 140 kg Protection Class IP 66 Duty cycle 10% / 2min 90% / 18 min Charging time approx. 1h Weight of support system: 5.9 kg Weight of seat assembly: 4.4 kg Weight of baseplate: 2.2 kg Weight of hand control: 0.4 kg Packing dimensions (without baseplate: 379x376x739 mm Operating voltage 14.8V Rated current 6.6 A Storage battery: 12V / 1.2 Ah (Li-Ion) Charging unit: Input: 230 - 240 V~ / 50 Hz / 130 mA Output: 24V / 600 mA GB 4 Startup Important! Before starting up the bath lift please check all parts and components for visible signs of damage. Please note the instructions for installation and disassembly (10)! 2. Slightly tilt the lifting unit backward and insert it into the recess in the baseplate. Slide back to the end stop and tilt forward again until the lock catches in on both sides with an audible “click”. Important! Please check that both sides are securely locked. 3. Insert the jack socket of the hand control into the connector on the spindle unit. 4.1 Sequence of installation (4, Figure 1+2) 1. 2. 3. 4. Baseplate (including suction pads )(4, Figure 2-6) Lifting unit (4, Figure 1-8) Hand control and helix cable (4, Figure 1-1) Seat assembly (complete) (4, Figure 2-12) Important! Please note the instructions for installation and disassembly (10)! Ensure the suction pads and bath tub are free from dirt, oil, and grease before use. The locking mechanism of the lifting unit must fully engage in the baseplate with an audible “click”. 4.4 Installing the seat assembly 1. Move the bath lift to its upper (top) position. 2. Insert and position the snap-in lugs on the seat assembly against the matching grooves provided in the slide/carriage of the lifting unit. 3. Gently press the seat assembly down until it catches in the slide of the lifting unit with an audible “click.” The seat assembly is now connected to the lifting unit. Important! All four (4) snap-in lugs must be firmly engaged in the four grooves in the slide of the lifting unit. The locking pin on the rear side must visibly and audibly snap in. The locking mechanism of the seat assembly must fully engage in the slide/carriage of the lifting unit (visible/audible check). Before first use please ensure that all parts are working properly. Page 6 - Please note the remarks concerning Hand Control / Battery Charging 4. Fold the seat panel forward and flip out the side flaps onto the outer edge of the bath tub. Important! For safety reasons, ALWAYS enter and leave the bath tub in this fully raised position with the seat down! 4.2 Installation of suction pads For the assembly of suction pads with or without height adapters please refer to assembly sheet. Height adapters (accessories) are available to compensate for different bath tub depths. Bath tubs having a depth of less than 405 mm do not require any adapters for suction pads. -up to 425mm depth of bath tub use 20mm height adapters -up to 445mm depth of bath tub use 40mm height adapters -Up to 465mm depth of bath tub use 60mm height adapters 4.3 Assembly in the bath tub 1. Position the baseplate (with the suction pads installed) in the bath tub and press it firmly in place. Check that all four suction pads are attached securely to the baseplate. Important! baseplate in the centre of the rear edge of the Place bath tub. Firmly apply pressure to all four corners of the baseplate to engage suckers. Please ensure suckers are completely secured to bath tub surface. 4.5 Handling and Operation The bath lift is operated by means of the hand control (4, Figure 3) 1. 2. 3. 4. Emergency-Off button Monitoring display for storage battery Control button, Up Control button, Down If the “Down” button is pressed, the bath lift will drive down to the end position (bottom position). If the “Down” button is pressed continually, the backrest will be recline backward to approx. 40 °. Important! The lift may be stopped and used in any desired position, by releasing pressure on the directional button. If the pilot lamp of the hand control flashes (4, Figure 3-2), the lift can only be moved to the upper exit position (recharge storage battery immediately). The down movement of the lift will be locked. 7 GB 4.6 Emergency-Off Function Pressing the Emergency-Off button (4, Figure 3-1) causes the bath lift to stop immediately. The Down button is locked, and the bath lift can only be moved up by means of the Up button. If the emergency-off button is pressed during downstroke, the Down button is locked for about 15sec. And the bath lift can only be moved to the upper exit position by pressing the Up button. The emergency-off button should only be pressed if the lift does not stop immediately after releasing a control button (up/down) (4, Figure 3-3/4). 5 Troubleshooting Important! The table below shows a list of malfunctions and possible causes. If you should be unable to correct an error or malfunction by means of the stated remedies, please contact your specialist distributor directly. Malfunction Cause Lift does not move Faulty plug-type Check plug-type connection from hand connection control to drive unit 4.7 Disassembling the lift in the bath tub Important! Please note the instructions for installation and disassembly (10)! 1. After using the bath lift please move it to its upper (top) position. 2. Both side flaps should be folded in. 3 Fold up the seat panel until it catches in. 4. Pull out the locking pin and with the other hand hold the grip surfaces provided in the seat and pull up the seat assembly, holding it steady. Storage battery is empty Charge battery (see Section 2.3) Drive unit fault Have drive unit repaired by authorised specialist Defective helix cable Replace hand control Lift moves upward only Storage battery is empty Charge battery (see Section 2.3) Red lamp in hand Control is lit up Storage battery is empty Charge battery (see Section 2.3) Storage battery Defective electronics. Check / exchange Cannot be charged Defective storage by authorised battery. Defective specialist workshop power supply. 5. The seat assembly is now separated from the lifting unit. 6 Maintenance and Care 6. Move the slide of the lifting unit to the bottom position (without backrest tilt). 6.1 Cleaning and Care 7. Remove the jack socket of the hand control from the spindle unit. 8. In order to release the lifting unit please gently pull the release cable (grey) and tilt the lift backwards. Remove the lifting unit from the bath tub. Place it in a suitable (clean and dry) location Important! Place the bath lift in a safe place! 9. To dismantle the baseplate pull the tongues of the suction pads. Important! Please note installation instructions for the suction pads! Please loosen the front suction pads first, then loosen the rear suction pads. Make sure not to deform and damage the suction pads when placing the baseplate down. Remedy Adequate care of your bath lift is necessary for reasons of hygiene and to preserve a clean appearance. To clean this product please use soap or an appropriate plastic detergent, rinse it with hot water (max. 60° C) and wipe it dry afterwards. Important! We offer a special sanitary cleaner, which is available in a 1000 ml spray bottle. If the bath lift is used by several persons, we recommend using a disinfectant. When using cleaning agents and disinfectants, please observe the maintenance instructions and product information of the respective manufacturers with regard to the specific materials. Important! Please do not use any: - Solvents - Toilet cleaners - Hard brushes or sharp objects - Aggressive cleansing agents Never clean the drive unit and hand control by means of a pressure washer or steam cleaner. 8 GB 6.2 Maintenance and Inspection Always conduct a visual check for signs of external damage before using your bath lift. If malfunctions or signs of wear should occur on a component of your bath lift, please contact your specialist supplier immediately to order the required original spare parts or arrange for repair work. To maintain the functional safety of your bath lift, an authorised specialist should effect a visual and functional inspection at intervals of at least 24 months regarding following items: - Mechanical damages to the unit and the accessories - Inspection of cable joints and plug-in connections - Proper function due to the specification of the operating instructions - Completeness according to the scope of delivery Repair work should only be carried out by skilled and authorised specialist suppliers. When using this bathlift in the care industry, additional health and safety regulations may apply. Stamp of your specialist supplier/distributor: Sunrise Medical Limited High Street Wollaston West Midlands DY8 4PS England Email: Tele: Fax: [email protected] +44 (0)1384 446622 +44 (0)1384 446644 9 1 Move up the seat by a short distance. Fold up the side flap and seat against the backrest (1). 1 DISASSEMBLY 1 Insert the baseplate into the bath tub (1). Insert the lifting unit into the holding frame provided in the baseplate (2). | Fold lifting unit forward (3) to lock into position on both sides with audible click (4). 1 INSTALLATION 2 3 INSTRUCTIONS 3 2 4 4 3 2 2 1 Pull the pin (1) and the seat assembly (2) with the other hand. Separate the seat assembly from the lifting unit (3). Exerting light pressure, push the seat assembly down until it engages in the slide of the lifting unit with an audible click (2). Insert the snap in lugs on the seat assembly into the grooves provided (1) on the lifting unit. 3 1 2 3 2 Take off the lifting unit (2) from the baseplate. Gently pull the handle (1) horizontally and take the weight of the lifting unit and lift out (2) of the baseplate. Remove the baseplate from the bottom of the bath by lifting the edges of the suction pads (3). 3 1 Place down the Seat panel (1) Flip out the two side flaps (2). 2 1 Gently push the lifting unit forward and pull the handle to release the locking Sunrise Medical Limited High Street Wollaston West Midlands DY8 4PS England Email: Tele: Fax: [email protected] +44 (0)1384 446622 +44 (0)1384 446644 Subject to technical alterations.