1
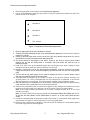
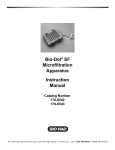
USER MANUAL
Rocket Immunoelectrophoresis Kit
Catalog No: IMI-KIT-1009 – for 5 experiments
Duration – 3 hours
Rocket Immunoelectrophoresis Kit contains
Standard reagents
and
Protocol
An ISO 9001:2000 Certified Company
IMGENEX INDIA PVT. LTD.
E-5, INFOCITY, KIIT POST OFFICE
BHUBANESWAR-751024
Tel: 0674-2743265, Fax: 0674-2741046
E-mail: [email protected]
Website: www.imgenexindia.com
Rocket Immunoelectrophoresis Manual
Rocket Immunoelectrophoresis Kit
I. PRINCIPLE
Antibodies are produced by the immune system in response to foreign macromolecules. Each antibody
binds specifically to one epitope on an antigen. This allows the use of antibodies for the detection and
quantification of specific proteins in complex mixtures. Antibodies are generally isolated from animal
serum, unless they are produced from tissue culture as monoclonals. The serum must be titrated to
determine antibody concentration and specificity. Concentration determinations are often needed for
antigen mixtures as well. Rocket immunoelectrophoresis is useful technique for these purposes.
Rocket Immunoelectrophoresis is a quantitative method for serum proteins which involves electrophoresis
of antigen into a gel containing antibody; the technique is restricted to detection of antigens that move to
the positive pole on electrophoresis. It is a rapid way to quantify antigen in complex samples. As the
antigen proteins enter the gel, they form a concentration gradient, which at some point gives the proper
concentration for precipitation with the antibody in the gel. The more concentrated the antigen, the further
it must run to be diluted to precipitable levels. The result is that each sample gives a “Rocket”, the length
of which is proportional to the concentration of antigen in the sample.
In the clinical laboratory, this technique is used diagnostically. It is utilized in examining certain serum
abnormalities, especially those involving immunoglobulins, urine protein, cerebrospinal fluid, pleural fluids
and other body fluids. In research, this procedure may be used to monitor antigen or antibody, to detect
impurities, analyze soluble antigens from plant and animal tissues, and microbial extracts.
II. OVERVIEW
"Quantification of proteins by electrophoresis into agarose containing the corresponding antibodies has
received the nickname rocket” (immuno) electrophoresis because the precipitates formed when the
migrating protein antigens are precipitated by the antibodies resemble upright rockets. Here antiserum is
included in the gel matrix as a result immuno precipitates will form, in a pattern dependent upon the
antigen concentration. This technique is much faster than immuno-diffusion, and has been applied in a
variety of geometries, to analyze simple or complex samples Agarose gels used in this technique have a
small number of fixed charges, which cause a phenomenon known as electroendosmosis. EEO causes a
slow net flow of water through the gel away from the positive electrode. At a pH of 8.5, antibodies are
nearly uncharged, and their slow electrophoretic migration is nullified by the EEO flow through the
agarose.
III. ADVANTAGES
•
•
•
•
This method is rapid, reliable, specific, and extremely accurate.
This Kit helps the student to understand the principle and basic function of this technique.
It is used to determine the concentration of antigen in a complex mixture.
Contains Standard reagents and protocol for better results.
[email protected]
2
www.imgenexindia.com
Rocket Immunoelectrophoresis Manual
IV. KIT COMPONENTS AND STORAGE
All the reagents should be stored at 2-8°C when not in use.
Sl No
Components
Quantity
1
Agarose
1.5 g
2
10X Assay Buffer
125 ml
3
Antiserum
1.9 ml
4
Test Antigen with dye
150 μl
5
Standard Antigen (A, B, C )
with dye
6
Glass plate
150 μl each
1
Additional items required (not included in the kit)
Glassware: Conical flask, Measuring cylinder.
Reagents: Alcohol, Distilled water.
Other Requirements: Electrophoretic apparatus, Micropipette, Tips, Gel puncher.
V. PREPARATION OF REAGENTS
NOTE: Included buffers and reagents are optimized for use with this kit. Substitution with other reagents
may not give optimal results.
Assay Buffer: Prepare 1X of Assay Buffer by diluting it with distilled water (Add 450 ml of distilled water
to 50 ml of 10X Assay buffer provided). The diluted 1X Assay buffer may be stored at 4°C. However, we
recommend preparing fresh 1X Assay buffer as per experimental requirement.
Clean the glass plate, electrophoretic apparatus with alcohol thoroughly to make it grease free and for
even spreading of agarose.
Concentration of Standard Antigen: 2 mg/ml (A), 1 mg/ml (B), 0.5 mg/ml (C).
VI. PROTOCOL (FOR 1 EXPERIMENT)
1. Prepare 10 ml of 1.0% agarose in 1X Assay Buffer by heating slowly till agarose dissolves
completely. Take care not to froth the solution.
2. Allow the molten agarose to cool to 55°C.
3. Add 350 µl of antiserum to 10 ml of agarose solution. Mix gently, ensure uniform distribution of
antiserum.
Note that temperature of molten agarose is around 55°C while adding antiserum. Higher temperature
will cause denaturation of the serum proteins while lower than 55°C will cause the gel to set
prematurely.
4. Pour the mix onto the glass plate (8 cm X 7 cm approximately) placed on a horizontal surface and
allow it to solidify.
[email protected]
3
www.imgenexindia.com
Rocket Immunoelectrophoresis Manual
5. Place the glass plate on the stand in the electrophoresis apparatus.
6. Punch ~4 mm diameter 4 wells with gel puncher or 200 µl micropipette tip towards one end of the
plate as shown in the template.
Standard A
Standard B
Standard C
Test Antigen
Figure 1. Template for Rocket Electrophoresis
7. Remove agarose gel plugs with a toothpick or forceps.
8. Transfer the stand containing the gel to the electrophoresis apparatus; ensure that the wells are
towards the cathode.
9. Gently lay the filter paper wicks over the ends of the gel, (they should overlap about 3 to 4 mm)
and allow them to become saturated with electrode buffer.
10. The wicks should be submerged in the buffer. Press on the wicks to ensure good contact
between the gel and the Assay buffer. If necessary, add more buffer, but take care not to
submerge the gel.
11. Load 20 µl each of the given standard antigen and test antigen to the wells. Loading of wells
should be carried out quickly to minimize diffusion from the well.
12. Carefully, connect the cord of the electrophoresis apparatus; insert the cords into the power
supply with the black cord in the black (negative) input and the red cord into the red (positive)
input.
13. Turn on and set the power supply for the required voltage (60 Volts). To ensure proper current
flow check for bubbles formed on the electrodes.
14. Electrophorese the samples, till the rockets are visible or the dye front reaches the edge. This
generally takes 2 to 2.5 hrs. Electrophoresis can be continued for an additional 15-20 minutes
after the dye has run out of the gel. This ensures better visibility of the precipitation peaks.
15. After electrophoresis is completed, turn off the power, unplug the power source, disconnect the
cords, and remove the glass plate from the electrophoresis tank.
16. Observe the precipitation peak or rocket formed against a dark background. Measure the rocket
height from the upper edge of the well to the tip of the rocket. Record your observations.
Note: If the rocket formation (precipitation) is not visible, incubate the plate at 37°C in a moist
chamber overnight).
Note: For better visibility the gel may be stained with Coomassie Brilliant Blue (CBB) stain for 1520 minutes and then destain it with CBB destain for 24-32 h or till the rocket peaks become
visible.
17. Construct a standard graph by plotting the height of the rocket on Y-axis (linear scale) against the
concentration of antigen on X-axis (log scale) on a semi-log graph sheet.
18. Determine the concentration of antigen in the test sample by reading the concentration against
the rocket height from the standard graph.
[email protected]
4
www.imgenexindia.com
Rocket Immunoelectrophoresis Manual
VII. RESULT
From the standard curve, determine and report concentration of antigen in the test sample.
VIII. REFERENCES
1. Laurell, CB. Anal Biochem 15:45-52 (1966)
2. Weeke, B. Scand J Immunol. 2 (Suppl 2):37-46 (1970).
IX. TROUBLESHOOTING
Problem
Probable Cause
Suggestion
Diffusion of antigen
Delay in loading of sample
Immediately run the sample
after loading.
Slow migration of the sample
High antigen concentration
Follow the protocol properly.
Increase the volt.
[email protected]
5
www.imgenexindia.com