1
explona
EXPLONA
www.explona.com
explona dakar
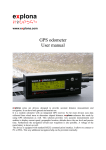
User manual
explona dakar is an intuitive to use advanced tripmeter. Its name is not a coincidence as it was
designed with Dakar rally in mind. Together with explona repeater/mini it allows to build
a measurement system suited to the needs of users. The main tripmeter can supply basic data to
several independently-controlled repeaters. In case of main unit malfunction the repeater switches
automatically to autonomous mode preserving integrity of measurements.
Its aluminum enclosure is waterproof and protects against various environment conditions. In every
light condition the readings are clear thanks to big LED display with brightness regulation. The
display can be turned off if needed.
The device has a quick recall of the distance reading from every other display mode. It is fully
configurable according to the needs of user. Apart from time and stop watch reading, all other
readings can be shown on any of three displays. Adjustable "odo" distance aids in navigation during
professional rallies. Basic modes of operation are possible from the wired remote controller unit.
There can be any number of external reset switches connected.
With an external GPS explona receiver all measurements are based on GPS. However if data
from GPS are unreliable it will revert to classic measurement mode. Furthermore with GPS the
track is recorded.
EXPLONA
www.explona.com
You should calibrate the device (cp. 3.1) after installation and each change of tyres. Imprecise
measurements can occur otherwise. The device is supplied not calibrated which is shown by
blinking "Cal Err" on display.
1. Features of explona dakar
●
Two independent distance counters: partial – "trip" and total – "odo". Both values decrease
when reversing. Maximum values are 999.9 and 9999 km (or miles) respectively. After that
a roll-over to 0 is made.
●
Quick recall of both partial ("trip") and total ("odo") distance.
●
Adjustable "odo" distance.
●
Speed measurement with 1km/h (mph) resolution.
●
Two units of measurement – SI (metric: km, km/h) and GB (imperial: mile, miles per hour).
●
When connected to external GPS explona receiver additional features are:
○
automatic choice of the best source of information,
○
automatic clock setting based upon chosen time zone,
○
compass – present direction of motion, course,
○
logging of the track,
○
garmin protocol support,
○
automatic calibration.
●
Battery-backed 24h clock.
●
Stop-watch of 1 second resolution. It counts independently of the voltage supply. Maximum
reading is 23:59:59 after which roll-over to 0:00:00 occurs (counting is not stopped).
●
Battery voltage measure. Resolution of 0,1V.
●
Data transmission to explona repeater.
●
"Stop" function – freezes distance measurement.
Other features:
●
Wired remote controller for basic operations.
●
Any number of external reset switches.
●
Non-volatile memory.
●
Easily distinguishable readings.
●
Fully configurable displays.
●
Three big LED displays. 7 steps of brightness, ability to turn the display off.
●
Anti reflex coating, ingress protection IP 65.
●
Easy mount thanks to universal fasting.
explona dakar f1.00 User manual
version 1
EXPLONA
www.explona.com
2. Operation of the explona dakar
2.1.Readings
On each of the three LED displays the following readings can be shown:
●
"trip" – short, partial distance,
●
"odo" – long, total distance,
●
"SoG" – speed (speed over ground),
●
"Accu" – battery voltage,
●
"CoG" – course (if external GPS explona receiver is connected and operational).
Additionally readings which can be shown on the bottom display:
●
"Hour" – present time,
●
"Stoper" – stop-watch.
In order to identify quickly the readings, the following distinction was made:
●
distance – value with a dot,
●
speed – value without dot,
●
voltage – "u" at the end,
●
course – three digits with a degree sign,
●
time – hour and minute with blinking dot between, without seconds,
●
stop-watch – readings with seconds.
explona dakar f1.00 User manual
version 1
EXPLONA
www.explona.com
2.2.Operation
All functions of explona dakar are accessible from keyboard or wired remote controller. Remote
controller allows to use most frequent functions: reset, freeze measurement and stop-watch. Remote
controller wiring allows to install connector in any place. Any number of external reset switches can
be connected.
2.3.Zeroing the distance
explona dakar has two distance counters:
●
short – "trip", reset by short press,
●
long – "odo", reset by long press.
Resetting is done by pressing:
●
red button ("enter") on the keyboard; if short distance wasn't shown it will be recalled on the
left display untouched; second press will reset,
●
red button on the remote,
●
external reset switch (if connected).
2.4.The "odo" adjustment
Sometimes it happens that tripmeter readings differ from a roadbook (eq. after a mistake turn). Odo
adjustment is necessary to change value, so it is correct again.
To adjust the long distance press "ADJ". If the long distance wasn't shown on display it will be
recalled on the left field. The last digit of a value will blink. Pressing "up" or "down" change value.
The corrected value can be accepted in two ways:
●
pressing "ADJ" again – new value is entered,
●
pressing "enter" – new value of a long distance is entered and short distance ("trip") is
simultaneously reset.
explona dakar f1.00 User manual
version 1
EXPLONA
www.explona.com
2.5.Change of the displayed value
The "F" key changes the display configuration. Pressing this key allows to change value on bottom
→ left → right display. The description of selected value will blink if being changed. Keys "up" and
"down" change the value. The value is accepted by pressing "F" or after a while of idle.
If explona is in "odo" adjustment mode the change of display configuration won't be possible.
2.6.The stop-watch
The device is equipped with 24h stop-watch. It can count time even without a power supply. Stopwatch can be operated only when it is shown on the bottom display. In order to show stop-watch
press "F" key (bottom display will start blinking) and set description "Stoper" using key "up" or
"down".
Stop-watch operation:
●
from the keyboard – press "F" key to make the bottom display blink. As long as the bottom
display blinks it can be operated with "enter" key,
●
from the remote controller – using black key.
Stop-watch works in the usual manner: pressing the keys shortly starts and stops counting of the
time. Longer press zeroes the stop-watch.
Change of the time while a stop-watch is running will change stop-watch readings. If change of
the time is necessary the stop-watch should be stopped then time changed and finally stopwatch restarted. Stop-watch is not affected by change of the time zone – it is recommended to
implement daylight saving time using time zones.
2.7.The "stop" function
The "stop" function allows to freeze distance measurements. It is indicated by showing "Stop" on
the distance readings.
The "stop" function is enabled and disabled by:
●
yellow button on the remote controller,
●
simultaneous pressing "F" and "ADJ".
2.8.Change of the brightness
Keys "up" and "down" change brightness of the display.
Decreasing the brightness below the minimum level turns off the display. It is indicated by
showing only dots on the display. All measures are continued but the keyboard is inactive to
prevent accidental changes. The "up" key turns the display on.
2.9.Information about a GPS explona receiver
Pressing and holding both "up" and "down" keys in basic mode (without blinking displays) invokes
information screen about the GPS explona receiver. The left display shows status of the antenna:
●
"GO" – all ok,
●
"Shrt" – antenna is shorted,
explona dakar f1.00 User manual
version 1
EXPLONA
●
www.explona.com
"Open" – no antenna (eg. disconnected, torn away).
The right display shows work mode ("no", "2d", "3d") and number of satellites used for navigation
purposes. If the receiver is not connected or is damaged the right display will show "dead".
2.10.Data transmission to explona repeater
Except for the configuration mode, the device constantly transmits data to explona repeater.
Current values of short distance "trip", speed "SoG" and (if GPS explona receiver is connected)
course "CoG" are sent.
2.11.Downloading the track
In order to download the track with garmin protocol:
1. turn off the device,
2. disconnect GPS explona receiver and replace it with connection cable,
3. turn the device on and enter the configuration mode (cp. 3),
4. select "Connect" menu (the garmin protocol is enabled now),
5. download the track,
6. turn the device off.
track is being recorded only when GPS explona receiver is connected and operating
correctly.
3. Configuration mode
Entering the configuration mode:
●
turn off and turn on the explona dakar,
●
hold "enter" key while the serial number is displayed,
●
the configuration menu will appear.
Blinking display shows an item which can be changed with "up" and "down" keys. "ADJ" or
"Enter" key switch between changing of the reading (left display blinks) and changing of the value
(right display blinks)
Configuration mode allows to set the following parameters:
●
"Cal" – calibration constant K (cp. 3.1),
●
"Hour" – time,
●
"rear" – rear gear indication level: positive – "Hi" or negative – "Lo". Additionally the
current state of the gear is shown: "F" when forward and "r" when reverse,
●
"zone" – time zone from GMT-12 to GMT+12 (in most of the Europe summer time is
GMT+2 and winter time is GMT+1),
explona dakar f1.00 User manual
version 1
EXPLONA
●
www.explona.com
"unit" – units of measurement:
○
SI – metric: km and km/h,
○
GB – imperial: miles and miles per hour.
●
"Connect" – this menu position enables communication with a PC using the garmin
protocol. It allows to download a track.
●
"Accept" – pressing "Enter" key stores the settings and leaves the configuration mode.
3.1.Calibration
Calibration is the process of determining the number of pulses per 1 km (or 1 mile) of the travelled
distance. This is necessary to accurately measure the distance if GPS explona receiver is not
present or GPS signal is insufficient. Calibration should be performed after installation and after
each change of tyres. The device is supplied not calibrated which is show by blinking "Cal Err" on
display. The calibration constant K should be in range 400–65535. If units of measurement are
changed (SI ↔ GB) the device needs to be calibrated again.
3.1.1.Automatic calibration with GPS explona receiver
Performing the calibration requires a section of a road of more then 1 km (or 1 mi) length. The
section must provide good quality of GPS signal. It shouldn't have obstacles covering the sky
(tunnels, trees, bridges, etc).
Calibration procedure:
1. enter the configuration mode (cp. 3) and wait approximately 1 minute for GPS receiver to
acquire current position
2. select "Cal" menu,
3. press "F" key, the calibration screen appears: the bottom display shows "GPScal", the left
display shows remaining distance and right one shows number of impulses counted so far,
4. drive,
5. after 1 km (or 1 mi) the calibration will end automatically,
6. select "Accept" menu and press "enter" key.
The device leaves GPS calibration mode if signal level was too low. The left display blanks and
"Cal" shows on the bottom display. In this case the calibration should be retried (press "F" key to
abort calibration and press "F" again to begin)
3.1.2.Calibration without GPS explona receiver
Performing the calibration requires a reference section of road. The length of the section should be
1km or 1mile depending on the choice of units. The more precise section will result in more precise
tripmeter measurements. The selected section of road can be:
●
reference section of measuring authorities,
●
distance between road markers,
●
measured by correctly calibrated other tripmeter,
●
measuring tape (although lot of patience is required).
explona dakar f1.00 User manual
version 1
EXPLONA
www.explona.com
Calibration procedure:
1. enter the configuration mode (cp. 3),
2. select "Cal" menu,
3. position your car at the beginning of the section,
4. press "F" key and wait 2 seconds (the device checks if GPS explona signal is not
available),
5. drive entire section, stop exactly at the end,
6. press and hold "enter" key until "Cal" menu appears,
7. select "Accept" menu and press "enter" key.
3.1.3.Manual correction of the calibration
If calibration constant K is known (e.g. it was determined previously for give set of wheels and car)
it can be set manually using "up" and "down" keys. This manual mode is helpful also to make small
adjustments if previous value gives constant over/understated results.
Calibration procedure:
1. enter the configuration mode (cp. 3),
2. select "Cal" menu,
3. press "ADJ" or "Enter" key to enter mode of changing value (the right display will blink)
4. use "up" and "down" keys to set appropriate value of K,
5. press "ADJ" or "Enter" key to confirm the change,
6. select "Accept" menu and press "Enter" key.
4. Installation
The device must be installed in a safe way. It should not endanger health of driver and
passenger during both regular work and accident. In particular it mustn't obstruct the airbags.
The installation can be performed in an authorized garage. Current list of authorized garages is
available on the website: www.explona.com
explona dakar f1.00 User manual
version 1
EXPLONA
www.explona.com
4.1.Contents of the set
The set contains of:
1. explona dakar,
2. remote controller,
3. remote controller wiring,
4. user manual and warranty card,
5. TX10 driver to adjust the fastenings,
6. set of stickers,
7. box.
4.2.Mechanical installation
The device should be permanently attached. It shouldn't restrict the field of view. The enclosure is
equipped with four fastenings. The TX10 driver (included) should be used if the fastenings need to
be adjusted or repositioned. Be careful not to unscrew both fastenings from one side simultaneously.
It may compromise the leak proof. All fastenings should be tighten after mount.
explona is specifically sealed to be leak proof.
Opening of the device breaks the seal and voids warranty.
4.3.Electrical installation
Power supply should be protected with a 3A to 5A fuse. The wiring should be connected according
to the drawing on the last page. Wire connections:
●
black "GND" – ground,
●
red "+12V" – power supply after ignition dedicated switch (explona doesn't have its own
switch),
●
green "SPEED" – speed impulses,
●
blue "REAR" – rear gear connection,
●
grey – data connection to explona repeater/mini.
Two-pin connector is used for remote controller. Additional external reset switches can be
connected parallel to the remote controller (see the schematics).
Four-pin connector is used for external GPS explona receiver or PC communication cable
(neither is in the set).
explona dakar f1.00 User manual
version 1
EXPLONA
www.explona.com
4.3.1.Connection of the speed signal
explona dakar can be directly connected to vehicles equipped with electrical speedometer or reed
switch sensor.
If vehicle has an electrical speedometer vehicle speed signal (VSS) from car's wiring should be
found. It can be accomplished with the use of voltmeter. When the ignition switch is turned on and
car is moving the voltage on speed signal should vary periodically (e.g. 0 i +12V or 0 i +5V).
If reed switch sensor is used one of its contacts should be connected to the "SPEED" wire and the
other to the ground.
If the car is equipped with mechanical speedometer or has no speedometer at all it is necessary to
use additional connection module. That module can accept signal from turn converter or sensor
mounted near wheels.
The calibration should be performed after installation of the device.
5. Troubleshooting
explona has a blank
display.
The display is turned off – press and hold the "up" key, it should
become brighter.
The power is not connected – check the device wiring.
"Cal Err" blinks on the The device is not calibrated. The measurements has no meaning. Do the
display.
calibration (cp. 3.1).
Connected repeaters
aren't working.
Leave the configuration mode (data is not sent).
Check the wiring.
PC communication using Enter configuration mode and select "Connect" menu. Communication
garmin protocol doesn't with PC is possible only in this setting.
work.
Does explona work
under water?
explona dakar f1.00 User manual
Ingress protection IP65 informs that device is protected from water jets
but it doesn't mean the device can be placed under water for
a prolonged time.
version 1
EXPLONA
explona dakar f1.00 User manual
www.explona.com
version 1
EXPLONA
www.explona.com
6. Technical data
External dimensions [mm]
enclosure: 160×82×32
with fastenings: 195×97×40
Enclosure
aluminum, black
Ingress protection
IP65 – dust tight, protected from water jets
Display
3 red LED display with 7 brightness steps, can be
turned off; anti reflex coating
Weight
710g
Operating voltage
10–40V DC
Power consumption
max 5W
Temperature range
-20–70 ºC
Partial distance resolution
10m
Total distance resolution
100m
Garmin interface
RS232, 8N1, 9600
Track record
from last 14 hours of driving
7. Rating plate
The disposed device mustn't be
placed as an unsorted municipal
waste, it must be collected
separately.
We reserve the right to change specifications without prior notice.
All trademarks are the property of the respective owners and are used for information purpose only.
© Copyright by explona Devel Team
explona dakar f1.00 User manual
version 1