1
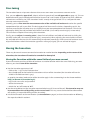
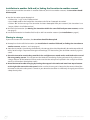
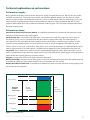
Sensetion
Soil moisture sensor
User manual | EN
Guide for the professional user
Dacom
PO Box 2243 | 7801 CE Emmen | The Netherlands
[email protected] | www.dacom.nl
Version: MAN.DSS.EN15.V1.0, 01-04-2015
Table of contents
Introduction and operation of the Sensetion.......................................................................................................... 4
Creating a Sensetion account................................................................................................................................... 5
Putting into use......................................................................................................................................................... 6
Fine-tuning................................................................................................................................................................ 7
Moving the Sensetion................................................................................................................................................ 7
Technical explanation on soil moisture................................................................................................................... 9
Power supply, integrated data storage and communication............................................................................... 10
Maintenance, troubleshooting and repair............................................................................................................. 10
Electromagnetic Compatibility (EMC).................................................................................................................... 11
Disassembly of the Sensetion after its lifespan..................................................................................................... 11
Soil type table.......................................................................................................................................................... 11
CE Declaration of Conformity................................................................................................................................. 12
Product specifications soil moisture sensor.......................................................................................................... 13
Getting started........................................................................................................................................................ 16
Sensetion soil moisture sensor User manual | EN
3
Introduction and operation of the Sensetion
Introduction
• If you purchase this device, you will own a soil moisture sensor that enables you to easily determine the
moisture content of the soil.
• For an optimal use of the Sensetion, you have to carefully read this user manual, follow the instructions and
properly maintain the device.
• This device is intended for use in both outdoor and indoor agriculture and horticulture.
• Always keep this user manual with the Sensetion. The user manual can also be downloaded from the
Dacom website: http://en.dacom.nl/products/sensetion/manual/.
Safety
• To ensure correct installation, the Sensetion is fitted with
a sharp screw tip! To avoid injuries, handle this device
with care!
• If you feel a strong resistance in the soil during
installation, the Sensetion may get damaged.
Immediately stop pushing and turning, remove the
Sensetion from the hole by turning in the opposite
direction and perform the installation at a new location.
To prevent injuries and damage,
please use the original packaging during
transport and storage
PLEASE NOTE
SHARP SCREW TIP
Description
The Sensetion is a ‘smart & simple’ to use soil moisture sensor with a mobile app. The Sensetion is equipped
with intelligent sensor technology and is easy to install. The soil moisture is measured in a layer of 25 cm. The
measured data is collected and sent by means of an integrated GPRS data logger. A solar panel provides the
necessary energy. Together with the Sensetion app you will have access to the current soil moisture status on
your smartphone anytime and anywhere:
• optimising cultivation from the palm of your hand
• ‘smart’ integrated system: rugged and waterproof according to IP-67
• ‘simple’ irrigation advice: current soil moisture status of your fields
• easy to install yourself
The Sensetion measures the volumetric soil moisture content based on measurable changes in the
dielectric constant of a soil layer. Soil moisture is the most influential factor in this regard. These changes
are converted into a DC voltage.
The volumetric soil moisture content is the ratio between the water volume (soil moisture) and the total
volume of the soil sample to be measured. The dimensionless parameter is expressed as a soil moisture
percentage (Vol.-%) or as a ratio (m3.m-3).
When putting the Sensetion into use, it is set to an average soil type. This provides a good indication of the
current soil moisture status. In addition, the Sensetion boasts unique extra features that ensure even more
accurate measurement results.
The accuracy of the Sensetion is enhanced by your own location-specific setting of the soil type. The
Sensetion app lets you choose between 15 types of soil (see Fine-tuning on page 7 and the Soil type table
on page 11).
4
User manual | EN Sensetion soil moisture sensor
Operation
The Sensetion consists of a completely integrated waterproof housing with
electronics. The electronics allow the soil moisture to be measured and wirelessly
communicated without an external power supply. The end of the measuring tube
is fitted with a screw tip, allowing easy installation of the Sensetion into a predrilled undersized hole.
The soil moisture is measured by 2 measuring cells of 10 cm each. Via an SDI-12
protocol, the analogue signal is converted to digital data which by default is
stored in the integrated data logger and sent to the Dacom database 4 times per
hour. The maximum storage capacity is 4 Mb. SDI-12 is an asynchronous, ASCII,
serial communications protocol for intelligent sensors that can monitor specific
environmental data with low power consumption.
Each Sensetion is calibrated during its production to ensure an accurate standard
output. The included app allows you to adjust the type of soil and the measuring
range, ensuring even more accurate measurement results thanks to the locationspecific settings.
Figure 1 Construction
Creating a Sensetion account
Prior to the installation, a Sensetion account should be created. There are two ways to do this: directly via
the Sensetion app or via the Dacom website: http://en.dacom.nl/sensetion-register/.
Creating a Sensetion account using the Sensetion app
Download the Sensetion app in the App Store® or the Google Play Store® and install the app on your
smartphone. On the home screen, click on ‘Register’. Enter a valid e-mail address on the registration
screen, enter a password and click on ‘Register’. Dacom will only use your e-mail address to send you service
messages. An e-mail with a validation link will be sent to the e-mail address you entered. Confirm the link
in the e-mail. The Sensetion account has now been created. Log in using your user name and password. The
Sensetion can now be installed and added to the account.
Creating a Sensetion account via the Dacom website
Go to My Sensetion (web version of the Sensetion app) via the customer login on the Dacom website:
http://en.dacom.nl/sensetion-register/ and click on ‘Register’. Enter a valid e-mail address and enter
a password. Dacom will only use your e-mail address to send you service messages. An e-mail with a
validation link will be sent to the e-mail address you entered. Confirm the link in the e-mail. The Sensetion
account has now been created. Log into the Sensetion app using your user name and password (see
Creating a Sensetion account using the Sensetion app on page 5). The Sensetion can now be installed and
added to the account.
Sensetion soil moisture sensor User manual | EN
5
Putting into use
Installation
The installation of the Sensetion is very simple. An example of an installation can be seen on the Dacom
website: http://en.dacom.nl/products/sensetion-2/installation-video/.
1. Use the auger (see Figure 2 Sensetion installation set on page 6) to drill an undersized hole with a
depth of at least 60 cm at the selected spot in the field. Pre-drilling a hole is necessary for a proper
installation. Otherwise, the Sensetion may be damaged, causing it to stop working correctly!
2. Put the Sensetion in the undersized hole and turn it clockwise into the soil up to the black marker line
using the twist tool (see Figure 2 Sensetion installation set on page 6), thereby aiming the solar panel
south (in the southern hemisphere north). The installation should be carried out using the Sensetion
installation set.
3. In the Sensetion app, click on the ‘+’ sign at the top of the screen ‘Field overview’. Use a smartphone to
scan the QR-code on the back of the Sensetion. The software is activated via a GPRS connection.
4. Enter a name for the field in which the installation is carried out, select the type of soil and click on
‘Save’. If no specific GPS coordinates are to be determined, click on ‘Save without location’.
5. Activate the Sensetion by moving the magnet in the twist tool once from top to bottom on the right
side next to the solar panel. Make sure that the magnet is located at the correct side of the twist tool and
that the solar panel is aimed at you. You will hear a beep shortly after. The installation is now complete
and after a short time an indication of the current soil moisture status can be read out! A demonstration
of the Sensetion app can be seen on the Dacom website:
http://en.dacom.nl/products/sensetion-2/demo-app/.
6. To adjust the field name and/ or type of soil, click on the relevant field in the screen ‘Field overview’.
Here you can also find unique extra features to ensure an optimal fine-tuning of the Sensetion (see Finetuning on page 7).
1
2
1. Auger
Tube of stainless steel
length 75 cm
diameter 2.8 - 3.5 cm
2. Twist tool (incl. magnet)
Rod of stainless steel
with bar magnet at 1 end
length 40 cm
diameter 1.6 cm
Figure 2 Sensetion installation set
General tip
Rocks near the tube and ‘air bubbles’ in the measurement area will have an adverse effect on the
measurement value. The ‘air bubbles’ can occur if you insert the Sensetion in an oversized hole or a
previously used installation point. A coarse soil structure (including stones) or mole tunnels can also
cause ‘air bubbles’. So, take this into consideration when installing the Sensetion.
6
User manual | EN Sensetion soil moisture sensor
Fine-tuning
The Sensetion boasts unique extra features that ensure even more accurate measurement results.
First, you can adjust the type of soil. Select 1 of the 15 types of soil (see Soil type table on page 11). This can
be done based on your knowledge of the field or by means of a soil sample. All types of soil have a different
soil moisture availability. So, if the Sensetion ‘knows’ exactly what type of soil it is in, it will provide more
accurate measurement results!
Secondly, you can fine-tune the measurement value of the available soil moisture based on the specific
composition of the soil in your field. The basic types of soil show small variations. Depending on this, the
value measured by the Sensetion may vary slightly from your own perception of soil moisture. This can be
adjusted by sliding the tab ‘Available soil moisture’ to the left (= less moist) or to the right (= more moist).
This will create an optimal fine-tuning of the Sensetion.
Finally, you can adjust the warning point (= lower limit of sufficient available soil moisture) by sliding the
tab ‘Alert’ to the left (= less moist) or to the right (= more moist). When adjusting the measurement value of
the available soil moisture, this will automatically be adjusted accordingly. If the current soil moisture status
of your field colours red on the Sensetion app with a message (irrigate), you are advised to irrigate.
Moving the Sensetion
There may be several reasons to move the Sensetion to another location. Depending on the reason of the
relocation, the Sensetion will need to be turned off or decoupled.
Moving the Sensetion within the same field and your own account
If you want to measure the available soil moisture at another location within the same field using your own
account, you should turn off the Sensetion.
1.Use the Sensetion app to turn it off.
• Click on the ‘+’ sign in the ‘Field overview’
•S
can the QR-code on the back of the Sensetion and turn off the Sensetion (the Sensetion will remain
visible in the field overview in grey)
or go to My Sensetion (web version of the Sensetion app) via the customer login on the Dacom website:
http://en.dacom.nl/sensetion-login/:
• L og in with user name and password
•S
elect the Sensetion
•S
witch the ‘on/ off’ button to ‘OFF’
2. Use the twist tool to turn the Sensetion counterclockwise until it is out of the soil. The Sensetion may not
be removed from the soil by pulling on the sensor head! This may cause the head of the tube to come
off, resulting in irreparable damage to the Sensetion!
3. Install the Sensetion at the new location (see Installation on page 6) and turn the Sensetion on following
the steps described in section 1.
Sensetion soil moisture sensor User manual | EN
7
Installation in another field and/ or linking the Sensetion to another account
If you want to install the Sensetion in another field and/ or link it to another account, the Sensetion should
be decoupled.
1. Use the Sensetion app to decouple it.
• Click on the ‘+’ sign in the ‘Field overview’
• Scan the QR-code on the back of the Sensetion and click on ‘Decouple Sensetion’
• Click on ‘OK’ in the message ‘The Sensetion has been decoupled from your account’ (the Sensetion is no
longer visible in the field overview)
2.Uninstall the Sensetion (see Moving the Sensetion within the same field and your own account, section
2 on page 7).
3. Install the Sensetion in the other field and/ or add it to another account (see Installation on page 6).
Placing in storage
If you want to store the Sensetion, the Sensetion should be decoupled.
1. Decouple and uninstall the Sensetion (see Installation in another field and/ or linking the Sensetion to
another account, section 1 and 2 on page 8).
2. Store the Sensetion. Considering the batteries, the storage place should preferably be not be too cold and
with a lot of sunlight. To prevent damage and breakage, it is best to hang the Sensetion vertically against
a wall.
3. Place the Sensetion 2 entire days outside in the sunlight once a month and 1 week before the start of
the new growing season. This will prevent the batteries from being discharged excessively and ensures
a longer lifespan of the batteries! Please make sure that the solar panel is placed in the sunlight and faces
south (in the southern hemisphere north).
4. Reset the Sensetion after charging by moving the magnet in the twist tool once from top to bottom
on the right side next to the solar panel. Make sure that the magnet is located at the correct side of the
twist tool and that the solar panel is aimed at you. Once the Sensetion is sufficiently charged, you will hear
a beep shortly after.
8
User manual | EN Sensetion soil moisture sensor
Technical explanation on soil moisture
Soil moisture supply
Only a portion of the total amount of soil moisture is readily available to the plant. We call this the ‘readily
available soil moisture’. The amount of available soil moisture depends primarily on the organic matter
content and the particle size distribution within the soil, or in other words, how fast water seeps away. The
crop should be irrigated once the amount of available soil moisture is likely to become too low. The soil
moisture deficit determines the number of millimetres to be irrigated. This will prevent dehydration due to
the water seeping away.
Soil moisture terms
Maximum Available Soil Moisture (MASM): is the difference between the amount of soil moisture at field
capacity and the amount at the wilting point.
Field capacity (FC): is the amount of water that a saturated soil can still retain after 2 to 3 days against
the force of gravity. The FC is important for the soil moisture supply to the crop. The field capacity, in
fact, determines the availability of water-soluble nutrients for the plant, the flushing of nutrients and the
irrigation. Once the field capacity has been reached, the soil is not yet completely saturated with water.
There is still air in the large- and medium-sized pores. So, in case of precipitation, it is possible for the soil to
contain more water than at field capacity. The field capacity depends on the distribution of the pore size.
Saturation: occurs when all the voids in the soil are completely filled with water. Although there is a lot of
water available for the crop, the water uptake will be very limited due to the lack of oxygen. If the situation in
excess of the field capacity persists, the plant will die.
Seepage: is water that drains to soil layers below the root zone.
Wilting Point (WP): the (permanent) wilting point is the level of moisture content of the soil where the plant
is not able to absorb any more water from the soil and, therefore, will wilt and die.
Readily Available Soil Moisture: is the difference between the amount of soil moisture at field capacity and
the amount at the refill point.
Saturation
Field capacity
Maximum
Available
soil moisture
Readily
Available
soil moisture
Total
amount of
soil moisture
Warning point
Refill point
Wilting point
Parched
Figure 3 Soil moisture terms
Sensetion soil moisture sensor User manual | EN
9
Power supply, integrated data storage and communication
Power supply
The operation of the Sensetion is possible thanks to an entirely autonomous power supply. This fully
integrated system consists of a monocrystalline solar panel, 2 rechargeable batteries and an optimised
charging circuit. The power management capacity is more than adequate to perform many measurements,
data logging and communication.
Data storage and communication
The Sensetion measures the soil moisture content once every 15 minutes. The measurement data are
stored in the internal memory. Depending on the power level, these data are sent to a database between 1
and 4 times every 4 hours via a GPRS connection. The internal memory is 4 Mb. After the installation of the
Sensetion, after a short time, a measurement result and advice will be displayed in the field overview of
the Sensetion app. For a good indication of the current soil moisture status, it is recommended to leave the
Sensetion at the same location throughout the growing season.
Maintenance, troubleshooting and repair
The Sensetion is sealed during the manufacture and, therefore, watertight (norm IP-67). The Sensetion is
made of new durable materials for rugged outdoor use and requires no specific maintenance. For a longlasting and reliable operation, the following points should be observed:
1.Do not remove the sealed Phillips screws at the bottom of the sensor head! In this case, the Sensetion
can no longer be sealed watertight. This allows unwanted entry of moisture, causing the Sensetion to
stop working. No repairs may be carried out! Once the sealing has been broken, the warranty will be void.
2.The Sensetion may not be removed from the soil by pulling on the sensor head! Use the twist tool to
turn the Sensetion counterclockwise until it is out of the soil.
3.If the Sensetion has not been used for a prolonged period of time, the Sensetion should be placed
2 entire days outside in the sunlight once a month and 1 week before the start of the new growing
season. This will prevent the batteries from being discharged excessively and ensures a longer lifespan of
the batteries!
Troubleshooting and repair
Any possible failures and problems can usually be solved by yourself or be repaired. Visit the Dacom website:
http://en.dacom.nl/products/sensetion/faq/ which shows a list of handy problem solvers. This will help
you find the solution for the failure step by step.
Warranty
The Sensetion is tested for correct operation before the device leaves the factory. For the duration of 1
year, from the date the Sensetion was put into use, Dacom guarantees that any defect in materials or
manufacturing defects will be repaired free of charge. To qualify for warranty, please contact
[email protected]. For the warranty terms and conditions, please refer to the Dacom website:
http://en.dacom.nl/general-terms-and-conditions/.
10
User manual | EN Sensetion soil moisture sensor
Electromagnetic Compatibility (EMC)
The Sensetion meets the provisions of the EU Directive 2014/30/EC (EMC Directive) and complies with the
applicable standards on the condition that the measuring tube of the Sensetion has been installed in the soil
or other material up to the black marker line during the measurements.
Failure to install the Sensetion this way may result in interference with nearby radio equipment. Should such
interference occur anyway, relocating and reinstalling the Sensetion at a distance of approximately 1 to 2
metres suffices.
The installation of several Sensetions at a close distance of each other will not result in any mutual
interference.
Disassembly of the Sensetion after its lifespan
Correct disposal of a used battery of this product
This marking on the Sensetion, manual or packaging indicates that the batteries in this product
should not be thrown away, mixed with other waste, at the end of their lifespan. The chemical
symbol Pb indicates that the lead content in the battery is higher than the reference level in
the Directive 2013/66/EC. If the used batteries are not handled correctly, these substances can be harmful to
human health or the environment.
To protect natural resources and to promote material reuse, please separate your waste batteries from other
types of waste and offer them for recycling to the free collection system for accumulators and batteries in
your area.
Soil type table
Type of soil
% Sand % Silt % Lutum % Org. Matter
1 Sand
70 - 100 < 10
< 10
< 1
2 Loamy sand
70 - 85 < 20
10 - 20
4 - 6
3 Sandy loam
50 - 100 5 - 40
15 - 20
0.3 - 2
4 Loamy sand (humic) 70 - 80 < 30
10 - 20
6 - 9
5 Peaty sand
50 - 80 < 20
< 5
18 - 20
6 Silt loam
20 - 50 50 - 80 < 20
4 - 5
7 Silt (loess)
< 20
80 - 100 < 10
2.5 - 5
8 Sandy loam (humic, muck) < 50
50 - 80 < 10
20 - 60
9 Loam
< 50
30 - 50 10 - 14
1 - 2.5
10 Sandy clay loam
< 40
< 50
14 - 25
3.5 - 9.5
11 Clay loam
< 40
< 40
25 - 35
1 - 3.5
12 Clay
< 30
< 35
35 - 65
1 - 9.5
13 Peaty clay
< 20
< 30
10 - 64
18 - 45
14 Clayey peat
< 10
< 25
10 - 80
30 - 65
15Peat
85
Sensetion soil moisture sensor User manual | EN
Field Capacity mm
9
25
31
36
37
38
43
52
33
35
45
60
63
59
69
Field
Capacity in/ ft.
1.1
3.0
3.7
4.3
4.4
4.6
5.2
6.2
4.0
4.2
5.4
7.2
7.6
7.1
8.3
11
CE Declaration of Conformity
Dacom
Waanderweg 68
7812 HZ Emmen
PO Box 2243
7801 CE Emmen
The Netherlands
[email protected]
www.dacom.nl
Phone: +31 591 632 474
Product
Model
: Soil moisture sensor
: Sensetion
On behalf of Dacom, based in Emmen in The Netherlands, the undersigned declares that the soil moisture
sensor model Sensetion complies with the provisions of the directives:
• 2014/30/EC (February 26, 2014) on electromagnetic compatibility;
Applicable standards: ETSI EN 301 489-1 V1.9.2, ETSI EN 301 489-7 V1.3.1;
• 2014/53/EC (April 16, 2014) on radio equipment and telecommunications terminal equipment and the
mutual recognition of their conformity;
Applicable standard: ETSI EN 301 511 V9.0.2;
• 2011/65/EC (June 8, 2011) on the restriction of the use of certain hazardous substances in electrical and
electronic equipment (RoHS);
• 2013/56/EC (November 20, 2013) on the use of batteries and accumulators;
• 2012/19/EC (July 4, 2012) on waste electrical and electronic equipment (WEEE).
Emmen, February 2015
Janneke W.M. Hadders
CEO Dacom
12
User manual | EN Sensetion soil moisture sensor
Product specifications soil moisture sensor
Specifications
Type number
Sensetion V1.0
Measurement principle
Volumetric soil moisture determination (m3.m-3 or Vol.-%.)
Measurement value
Full measurement range is 0.0 m3.m-3 to 1.0 m3.m-3
Measurement volume
>95% Of the soil moisture measurement takes place in a cylinder ground
around the tube with a diameter of 20 cm and a length of 25 cm
Environmental factors
Prolonged use in almost all soil types under extremely wet conditions (even in
water) with no failures or corrosion (IP-67 up to 5 metres)
For use in temperatures from -15°C to 75°C
Stabilisation time
Up to 60 minutes after being put into use
Response time
Less than 1 ms
Operation mode
Soil moisture measurement and data logging once every 15 minutes
Data transmission 1 to 4 times every 4 hours
Internal memory 4 Mb for maximum 1,000 values
Integrated power supply
Solar panel: 4.0 - 4.8V DC regulated
Batteries: 2 Cyclone sealed lead acid batteries, 2V/2.5 Ah
Power consumption: 19 mA, 23 mA maximum
Integrated modem
Cinterion BGS2-E/BGS2-W, omnidirectional quad-band
Frequency: GSM 850/900/1800/1900MHz
For use in temperatures from -30°C to 85°C
Fully compliant with EU RoHS Directive
Cover material
ASA Luran S 777K/PVC
Dimensions
141 cm x 10.4 cm x 11.3 cm
Weight
Approximately 1,370 gramme
Sensetion soil moisture sensor User manual | EN
13
14
User manual | EN Sensetion soil moisture sensor
Getting started
1. Download the Sensetion app in the App Store® or the Google Play Store®
2. Create a Sensetion account using the app:
a. Click on ‘Register’.
b. Enter a valid e-mail address and enter a password.
c. Confirm the information and click on ‘Register’. A confirmation e-mail will be sent to you.
d. Confirm the validation link in the e-mail.
e. Log in using your user name and password.
3. Installation of the Sensetion (an example of an installation can be seen on the Dacom website:
http://en.dacom.nl/products/sensetion-2/installation-video/):
a. Use the auger to drill an undersized hole with a depth of at least 60 cm at the selected spot in the field.
b. Put the Sensetion in the undersized hole and turn it clockwise into the soil up to the black marker line
using the twist tool and aim the solar panel south (in the southern hemisphere north).
c. In the Sensetion app, click on the ‘+’ sign at the top of the screen ‘Field overview’.
d. Use your smartphone to scan the QR-code on the back of the Sensetion.
e. In the app, enter a name for the Sensetion, select the type of soil and click on ‘Save’.
f. Activate the Sensetion by moving the magnet in the twist tool from top to bottom once on the right side
next to the solar panel. You will hear a beep shortly after.
4. Current soil moisture status (a demonstration of the Sensetion app can be seen on the Dacom website:
http://en.dacom.nl/products/sensetion-2/demo-app/):
a. Start the Sensetion app.
b. An indication of the current soil moisture status can be read out in the field overview after a short time.
Dacom
PO Box 2243 | 7801 CE Emmen | The Netherlands
[email protected] | www.dacom.nl
Version: MAN.DSS.EN15.V1.0, 01-04-2015