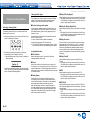
1
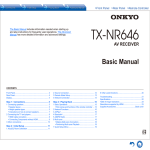
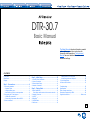
DTR-30.7
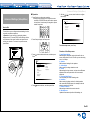
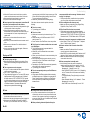
Basic Manual
The Basic Manual includes information needed
when starting up and also instructions for
frequently used operations. The Advanced
Manual has more detailed information and
advanced settings.
CONTENTS
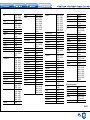
Front Panel������������������������������������������������������������������������� 3
Rear Panel������������������������������������������������������������������������� 4
Display�������������������������������������������������������������������������������� 5
Step 1: Connections����������������������������������������������6
1Connecting speakers������������������������������������������������������ 6
・・Speaker layout������������������������������������������������������������� 6
・・Height speaker types��������������������������������������������������� 6
・・Instructions on how to connect speakers��������������������� 8
2Connecting the TV and players��������������������������������������� 9
・・HDMI cable connection������������������������������������������������ 9
・・Connecting Components without HDMI��������������������� 10
3Other connections����������������������������������������������������������11
Step 2: Initial Setup���������������������������������������������12
1AccuEQ Room Calibration�������������������������������������������� 12
2Source Connection�������������������������������������������������������� 13
3Remote Mode Setup����������������������������������������������������� 14
4Network Connection������������������������������������������������������ 14
Step 3: Playing Back�������������������������������������������16
1Basic Operations����������������������������������������������������������� 16
・・Part names and functions of the remote controller���� 16
2Network Functions��������������������������������������������������������� 17
3AirPlay®������������������������������������������������������������������������� 17
4Bluetooth®��������������������������������������������������������������������� 18
5AM/FM Radio���������������������������������������������������������������� 18
6Multi-zone���������������������������������������������������������������������� 19
・・Making Multi-zone Connection����������������������������������� 19
・・Performing Multi-zone Playback�������������������������������� 20
7Quick Setup Menu��������������������������������������������������������� 20
8Other useful functions��������������������������������������������������� 21
Troubleshooting���������������������������������������������������������������� 22
Specifications������������������������������������������������������������������� 23
Table of image resolutions������������������������������������������������ 24
Resolutions supported by HDMI��������������������������������������� 24
Supplied Accessories������������������������������������������Back cover
En
Features
●● Equipped with 7 ch amplifier
●● Supports playback in Dolby Atmos format which
provides 360-degree placement and movement of
sounds including overhead sound
●● Supports playback in DTS:X, which is DTS's nextgeneration object-based surround sound technology
that includes height to deliver a fully-immersive listening
experience to your living room
●● Dolby Surround listening mode expands 2 ch, 5.1 ch or
7.1 ch source to available speaker configurations
●● Equipped with 4K compatible HDMI IN/OUT jacks
●● Equipped with 2 HDMI output jacks
●● Supports the HDMI Standby Through function which
allows signal transmission from players to the TV in
standby state
●● Supports HDCP2.2, a strict copy-protection for providing
high quality content (HDMI IN1 to IN3/HDMI OUT MAIN/
SUB)
●● Supports ARC (Audio Return Channel)
●● Supports USB storage playback
●● Supports variety of network functions such as Internet
Radio, DLNA, AirPlay etc.
●● Supports Wi-Fi and Bluetooth®
●● Equipped with a PHONO jack enabling connection with
a turntable (Compatible with MM cartridges)
●● Bi-Amping capability
●● A/V Sync Function to correct deviation of audio and
video
●● Multi-zone function which allows you to play a different
source in another room from the main room
●● 32 bit DSP (Digital Signal Processor) with excellent
calculation performance
●● Music Optimizer™ for compressed digital music files
●● Phase Matching Bass System
●● Automatic speaker setup available using supplied
calibrated microphone (AccuEQ Room Calibration)
●● Supports playback of MP3, WMA, WMA Lossless,
FLAC, WAV, Ogg Vorbis, Apple Lossless, DSD, Dolby
TrueHD via network and USB storage device (the
supported formats will differ depending on the use
environment)
Refer to the back cover for supplied accessories.
En-2
1
23
4
5
6
7
8
9
F
G H
I
J
K
(Australian models)
L
M
N
O
P
Q
R
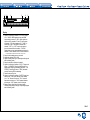
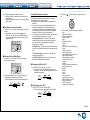
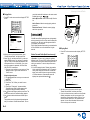
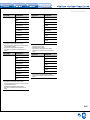
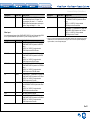
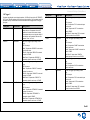
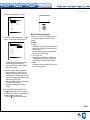
Front Panel
1zOn/Standby button: Turns the unit on or into standby
mode.
2Dolby Atmos indicator: Lights when playing Dolby
Atmos.
3DTS:X indicator: Lights when playing DTS:X.
4Tone and Tone Level buttons: Adjust the high tone
and low tone.
5Remote control sensor: Receives signals from the
remote controller.
6Display
7Listening Mode buttons: Allow you to select the
listening mode.
8Dimmer button (North American models): Switches
the brightness of the display.
RT/PTY/TP button (Australian models): Can be used
when receiving the station transmitting text information.
9Memory button: Registers a station.
FTuning Mode button: Switches the tuning mode.
GDisplay button: Switches the information on the
display.
HSetup button: Used when making settings.
ICursor buttons, Tuningjl button, Presetd c
button and Enter button: Move the cursor and
confirms the selection. When listening to AM/FM
broadcasting, tune in to the station with Tuningjl or
select the registered station with Presetd c.
JReturn button: Returns the display to the previous
state.
KMaster Volume: Allows you to adjust the volume.
LZone 2 button and Off button: Controls the multi-zone
function.
MZone 2 Level / button: Allows you to adjust the
speaker volume of a separate room.
NPhones jack: Stereo headphones with a standard plug
are connected.
OAUX Input HDMI jack: A HD camera or such other
device is connected.
PHybrid Standby indicator: Lights if the unit enters
standby mode when the HDMI Standby Through, USB
Power Out at Standby, Network Standby or Wakeup
from Bluetooth function is enabled.
QInput selector buttons: Switch the input to be played.
RSetup Mic jack: The supplied speaker setup
microphone is connected.
En-3
1
2
3
J K
4
5 6
L
7
8
9
G
F
M
H
I
N
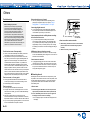
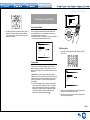
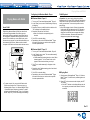
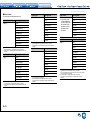
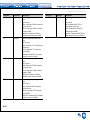
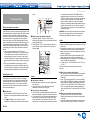
Rear Panel
1RI REMOTE CONTROL jack: An Onkyo product with RI
jack can be connected and synchronized with this unit.
2TUNER AM/FM (75Ω) terminal: The supplied antennas
are connected.
3USB port: A USB storage device is connected so that
music files stored in it can be played. USB devices can
be supplied with power when connected with a USB
cable.
4COMPONENT VIDEO IN jack: Component video input
jack
5ETHERNET port: Used for LAN connection
6VIDEO IN jacks: Composite video signals are input.
7RS232 port: Connected to the home control system.
()
8IR IN A/B, IR OUT jack: Connected to the multiroom
remote control kit. ()
912V TRIGGER OUT A/B/C jacks: Allows you to connect
a device with trigger input jack to enable power link
En-4
operation between the device and the unit. ()
¼¼
Special devices or cable connections are necessary to use the
control functions 7 to 9. Contact the specialized stores for more
information.
FHDMI IN/OUT jacks: Digital video signals and audio
signals are transmitted between the unit and the
connected devices.
GWireless antenna: Used for Wi-Fi connection or when
90°
using a Bluetooth-enabled device.
180°
90°
Adjust their angles according to the
180°
connection status.
HSPEAKERS terminals: Speakers
are connected. To use the Multizone function, connect the speakers
in the separate room to the ZONE2 speaker terminals.
IAC INLET: The supplied power cord is connected.
JDIGITAL IN COAXIAL/OPTICAL jacks: Digital audio
signals are input.
KGND terminal: The ground wire of the turntable is
connected.
LAUDIO IN jacks: Analog audio signals are input.
MPRE/LINE OUT ZONE 2 jack: Audio output jack
connected to the power amplifier and pre-main amplifier
for multi-zone playback in a separate room.
NPRE OUT jacks: A power amplifier or subwoofer with
built-in amplifier is connected.
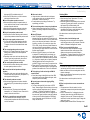
1 23
4
5
6
7
9
8
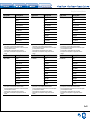
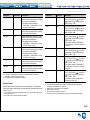
Display
1Lights in the following conditions. "Z2": Zone 2 output
is on. / "HDMI": HDMI signals are input and HDMI
input selector is selected. / "ARC": Audio signals are
input from ARC compatible TV and TV input selector
is selected. / "3D": Input signals are 3D. / "USB" ():
When input is "NET" and USB is connected and
selected. / "NET" (): "NET" input is selected and
the unit is connected to the network. / "DIGITAL":
Digital signals are input and the digital input selector is
selected. / Cursor indicators: NET or USB is controlled.
¼¼
"USB" and "NET" will flash if the connection is not correct.
2Stays lit when headphones are connected.
3Lights when playing NET or USB.
4Lights according to the type of input digital audio signals
and the listening mode.
5Stays lit when Music Optimizer is enabled.
6Lights in the following conditions. "AUTO": Tuning mode
is auto. / "TUNED": Receiving AM/FM radio.
flashes while tuning is automatically performed. / "FM
STEREO": Receiving FM stereo. / "RDS" (Australian
models): Receiving RDS broadcasting.
7Flashes when muting is on.
8Lights in the following conditions. "SLEEP": Sleep timer
has been set. / "ASb" (Auto Standby): Auto Standby
is on. / "ch": Channel is being set. / "Hz": Crossover
frequencies are being set. / "m/ft": Speaker distances
are being set. / "dB": Speaker volume is being set.
9Displays various information of the input signals.
Pressing Display displays the type of input digital signals
and the listening mode.
En-5
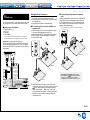
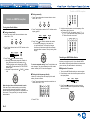
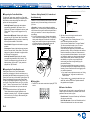
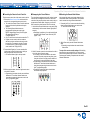
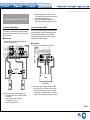
Step 1: Connections
Characteristics of speaker types
1Connecting speakers
Speaker layout
F
9
#
"
$
'
&
%
H
G
"# output front stereo sound and $
output center sound such as dialogs and
vocals. %& create back sound field. '
reproduces bass sounds and creates rich
sound field.
Connecting 78 speakers, 9F speakers
or GH speakers enables playback in 7.1
ch configuration. 78 (back) speakers
improve sense of envelopment created by
back sound field as well as seamlessness
of back sounds, providing more natural
sound experiences in the sound field.
9F or GH (height) speakers produce
surround effects on a height plane. This
unit can perform optimal sound field
processing for the type of height speakers
actually installed and registered in "Initial
Setup".
8
7
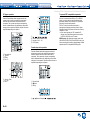
Dolby Surround listening mode. Install Top
Front speakers so that they are positioned
at a point between directly above the
listening position and directly above the
front speakers. Install Top Middle speakers
so they are directly above the listening
position. Install Top Rear speakers so
they are positioned at a point between
directly above the listening position and
directly above the back speakers. You can
select (a)(b), (c)(d) or (e)(f) on the
unit. For connection with the unit, use the
SPEAKERS BACK or HEIGHT terminals.
●● Dolby Laboratories recommends
placing the speakers as described in
"Installing speakers in ceiling" to obtain
the best Dolby Atmos effect.
Using Dolby Enabled Speakers
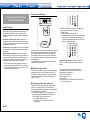
Height speaker types
Installing speakers in ceiling
Important: The power cord must be connected only after all other connections are
completed.
e
c
a
f
d
b
g
h
i
" # Front speakers
Center speaker
$
% & Surround speakers
Subwoofer
'
7 8 Back speakers
9 F Height speakers (Front High)
G H Height speakers (Rear High)
●● 5.1 ch: "#$%&'
●● 7.1 ch: "#$%&'+78 or
"#$%&'+9F or
"#$%&'+GH
78 speakers, 9F speakers and
GH speakers share the same speaker
terminals. Select either of the groups.
En-6
●● To enjoy the Dolby Atmos listening
mode, height speakers or back
speakers need to be installed. There
are a variety of height speakers apart
from this type. see the next section
for details.
●● To use the multi-zone function, see "6
Multi-zone" in "Step 3: Playing Back".
j
g h Dolby Enabled Speakers (Front)
i j Dolby Enabled Speakers (Surround)
a b Top Front
c d Top Middle
e f Top Rear
Ceiling speakers, etc. are used for
maximizing effects in Dolby Atmos or
A Dolby Enabled Speaker is specially
designed to be used as a height speaker.
There are two types of Dolby Enabled
Speakers; one type is designed to be
placed on top of other speakers such as
front speakers and surround speakers,
Step 1: Connections
and the other type is designed to be integrated with normal
speakers. Dolby Enabled Speakers placed with their
diaphragms facing toward the ceiling create higher effect
in the Dolby Atmos and Dolby Surround listening modes
by providing sounds echoing off the ceiling. You can select
(g)(h) or (i)(j) on the unit. For connection with the unit,
use the SPEAKERS BACK or HEIGHT terminals.
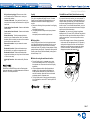
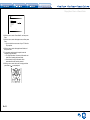
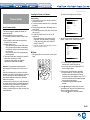
8FH
Right back
Or right height
#
Front R
" $ Front L
79G
Left back
Or left height
A speaker
configuration
where only one
back speaker is
connected is not
supported.
Center
1
2
3
4
5
6
7
8
on
t
C
en
te
Su r
rro
un
Back or Height
Back
Front High
Rear High
Top Front
Top Middle
Top Rear
Dolby Enabled Speaker (Front)
Dolby Enabled Speaker (Surround)
Fr
Connection
pattern
d
When playing Dolby Atmos, the speakers required depend
on how you have setup your back speakers or height
speakers. The following shows combinations of speakers
for reproducing Dolby Atmos.
'
Subwoofer with builtin power amplifier
: Required, : Optional
Connection of a subwoofer is optional.
Important: (North American models)
Connect speakers with 6 Ω to 16 Ω impedance. Using a
speaker with less impedance than the supported value
may result in failure.
Important: (Australian models)
Connect speakers with 4 Ω to 16 Ω impedance. You
have to change the setting if any of the speakers
have 4 Ω or more to less than 6 Ω impedance. Using
a speaker with less impedance than the setting may
result in failure. You can set up by viewing the guidance
displayed on the TV screen. Select the item with the
cursor buttons of the remote controller and press Enter
to confirm your selection. To return to the previous
Receiver and then
screen, press Return. Press
Setup on the remote controller. Select "2. Speaker" "Configuration" - "Speaker Impedance" and change the
default value from "6ohms" to "4ohms".
&
Surround R
%
Surround L
En-7
Step 1: Connections
Instructions on how to connect speakers
Cut and remove the plastic coating from the end of the
speaker cable, twist the core and connect it to the terminal.
Be sure to make correct connection between the unit's
jacks and speaker's jacks (+ to + and - to -) for each
channel. If connection is wrong, a bass sound may become
poor due to reverse phase. Up to two subwoofers with builtin power amplifier can be connected to the SUBWOOFER
jacks. Set the cut-off filter selection switch of the subwoofer
to DIRECT. If the subwoofer does not have a cut-off filter
selection switch but has a cut-off frequency adjusting dial,
turn it to the maximum frequency. If your subwoofer does
not have built-in power amplifier, you can connect a power
amplifier between the unit and the subwoofer.
●● The speaker setting is 7.1 channels at the time of
purchase. You can change it manually or by using
automatic speaker setting.
●● Short-circuiting the + cable and - cable or contacting
the cable core to the rear panel of the unit may cause
failure. Also do not connect two or more cables to one
speaker terminal or one speaker to several terminals.
En-8
When using commercially available banana plugs:
tighten the speaker terminals to the end and then insert
the banana plugs. Do not insert the core of speaker cable
directly into the hole for banana plug of speaker terminal.
(North American models)
Step 1: Connections
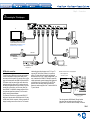
2Connecting the TV and players
TV
HDMI
IN
HDMI
OUT
To use the ARC function, connect to the ARC
compatible HDMI jack of the TV and make an
appropriate setting on the unit. See "2 Source
Connection" of "Step 2: Initial Setup".
Game console
HDMI
OUT
HDMI
OUT
HDMI cable
Blu-ray Disc/
DVD player
HDMI
OUT
HDMI
OUT
Satellite/Cable
set-top box, etc.
HDMI cable connection
The unit has many HDMI jacks on its rear panel and each
of them corresponds to an input selector button of the
same name on the front panel. For example, a Blu-ray Disc
player will be connected to the HDMI IN1 jack and the BD/
DVD button on the front panel will be used to listen to the
playback sound (if the player is CEC compliant, input will
be switched automatically when play is started). If you add
another Blu-ray Disc player, you can use any other jack
than HDMI IN1. It is possible to change assignment of the
input jacks and input selector buttons. For how to make
settings, see the Advanced Manual.
To connect the TV and the unit, connect the HDMI OUT
MAIN jack of the unit and the HDMI IN jack of the TV using
a HDMI cable. With this connection, it becomes possible to
display the setting screen of the unit on the TV or transmit
Personal computer
Streaming media player, etc.
video/audio signals from the player to the TV. If your TV
supports ARC (Audio Return Channel), it is possible to
play the TV sound with the AV receiver's speakers with
this connection only. If your TV does not support ARC, you
need, in addition to the HDMI OUT MAIN jack connection,
a digital optical cable connection between the digital audio
out optical jack of the TV and the DIGITAL IN OPTICAL
jack of the unit or an analog audio cable connection
between the audio output jack of the TV and the AUDIO IN
TV jack of the unit.
zz
Audio connection with a TV not supporting ARC
¼¼
Select an appropriate
connection for your TV.
TV
DIGITAL
OPTICAL
OUT
AUDIO
OUT
The unit supports the HDMI Standby Through function
that allows video and audio signal transmission from
players to the TV even if the unit is in standby. You have to
En-9
Step 1: Connections
modify the settings to enable the input selection link with
CEC (Consumer Electronics Control) compliant device,
connection with ARC compatible TV, and HDMI Standby
Through function. See "2 Source Connection" of "Step 2:
Initial Setup".
●● Another TV can be connected to the HDMI OUT SUB
jack. However, only the HDMI OUT MAIN terminal
supports CEC functions such as ARC.
●● To enjoy HDCP2.2 protected video, connect the player
to one of the HDMI IN1 to IN3 jacks and connect the
unit and the TV via HDMI. You will be unable to view
images protected by HDCP2.2 if your TV does not have
a HDCP2.2 compatible input jack.
●● To play 4K or 1080p video, use a high speed HDMI
cable or high speed HDMI with Ethernet cable.
1A player with a digital audio out jack can be connected.
Digital optical cable (OPTICAL)
¼¼
As the digital in optical jack of the unit has a
cover, push in the cable against the cover as it
is turned inside.
Digital coaxial cable (COAXIAL)
Video upconversion function
Video signals input to the VIDEO IN jack or the
COMPONENT VIDEO IN jacks will be upconverted
to HDMI signals and then output from the HDMI
output jack.
2A player with component video output jacks can be
connected.
Component video cable
¼¼
Its transmitted video has higher quality than
that of composite video cable.
3A player with a composite video output jack can be
connected.
Composite video cable
Connecting Components without HDMI
If your AV component does not have HDMI jack, use an
available jack of your component for cable connection with
this unit.
1
2
3
4A player with analog audio out jacks can be connected.
When using jacks 2 and 3 for video input, connect
to the audio input jacks corresponding to the jacks
connected at 2 and 3. (For example, when video input
connection is to the 2 BD/DVD jack, the audio input
connection should also be to the 4 BD/DVD jacks.)
¼¼
It is possible to change assignment of the input jacks and input
selector buttons. For how to make settings, see the Advanced
Manual.
¼¼
To enjoy multi-zone playback with a player, connect player to either
1 or 4 jacks.
Analog audio (RCA) cable
5Connect a turntable that uses an MM type cartridge and
does not have a built-in audio equalizer. If the connected
turntable has a built-in audio equalizer, connect it to the
4 Analog audio input jacks.
¼¼
If it uses an MC type cartridge, install an audio equalizer compatible
with MC type cartridge between the unit and the turntable by
connecting it to the 4 analog audio input jacks. For details, refer to
the turntable's instruction manual.
¼¼
If the turntable has a ground wire, connect it to the GND terminal of
this unit. If connecting the ground wire increases noise, disconnect it.
5
En-10
4
AV Receiver
¼¼
When you upconvert video signals input to
the COMPONENT VIDEO IN jacks and output
them from the HDMI OUT jack, set the output
resolution of the player to 480i or 576i. If the input
has 480p/576p or higher resolution, a message
prompting you to change the resolution setting
will appear. If your player does not support 480i or
576i output, use the VIDEO IN jack.
¼¼
If multiple video signal inputs are put into one input
system, HDMI signal output is prioritized.
Step 1: Connections
Network connection
3Other connections
AM/FM antenna connections
Connect the antennas to listen to AM/FM broadcast. When
listening to the broadcast for the first time, adjust the
antenna position and orientation to get the best reception.
You can enjoy Internet radio, DLNA and AirPlay by
connecting the unit to LAN. The unit can be connected to
the router with an Ethernet cable or to the wireless LAN
router with Wi-Fi connection. In case of wired connection,
connect the Ethernet cable to the Ethernet port. See "4
Network Connection" of "Step 2: Initial Setup" for Wi-Fi
settings.
Internet radio
AM loop antenna
(supplied)
Router
Indoor FM antenna
(supplied)
NAS
Fix with a tack on
the wall.
(North American models)
(Australian models)
Headphones connection
Connect stereo headphones with a standard plug (1/4
inch or ø 6.3 mm) to the Phones jack on the front panel.
Sound from the speakers will be off while you are using the
headphones.
●● If you selected any other listening mode than Stereo,
Mono and Direct, connecting headphones will switch the
listening mode to Stereo.
Assemble the AM loop antenna (supplied).
Power cord
This unit includes a removable power cord. Connect the
power cord to AC INLET of the unit and then connect to
the outlet. Always disconnect the outlet side first when
disconnecting the power cord. When the unit is turned on, a
large instantaneous current may flow affecting functionality
of the computer and other devices, so it is recommended to
use a separate outlet.
En-11
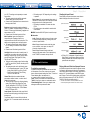
Step 2: Initial Setup
"Initial Setup" automatically starts on the TV when you first
turn the unit on.
Initial Setup
Language Select
Before Start
Setup is performed as a series of responses to questions
asked by the unit. Select the item with the cursors of the
remote controller and press Enter to confirm your selection.
To return to the previous screen, press Return.
●● Switch the input on the TV to that assigned to the unit.
English
Deutsch
Français
Español
Italiano
Nederlands
Svenska
SETUP Exit
1AccuEQ Room Calibration
The test tone coming from each speaker will be measured
to enable setting of the number of speakers, volume
level, each speaker's optimum crossover frequencies,
and distance from the primary listening position, and also
enable correction of distortion caused by the room acoustic
environment.
●● You cannot return to the previous screen during speaker
setup, even if you press Return.
1. Place the speaker setup microphone.
Initial Setup
Settings proceed in the following order:
AccuEQ Room Calibration
This step you can automatically calibrate
your room to get correct surround sound.
Would you like to calibrate your room now
1 AccuEQ Room Calibration
●● Automatic calibration for optimum speaker settings
2 Source Connection
●● Checking that each input source is connected correctly
●● HDMI link function settings
or later?
Select the language first. Next, a summary of the initial
settings is displayed. Select "Yes" in this screen and press
Enter on the remote controller.
Have you connected all the speakers and devices?
Now, would you like to start initial setup?
●● Settings required to operate other AV Components with
the Remote Controller
Do it Later
SETUP Exit
When the screen above is displayed, before starting the
procedure, place the supplied speaker setup microphone
at the measurement position by referring to the following
figure.
Initial Setup
Welcome to initial setup.
Before starting, please connect speakers and sources.
3 Remote Mode Setup
Do it Now
1st Step : AccuEQ Room Calibration
2nd Step : Source Connection
3rd Step : Remote Mode Setup
4th Step : Network Connection
Yes
No
SETUP Exit
4 Network Connection
●● Checking network connections
●● Wi-Fi settings
¼¼Firmware update notification: If the unit is connected via LAN and there
is firmware update available, the "Firmware Update Available" message will
appear. To execute updating, select "Update Now" with the cursor buttons of
the remote controller and press Enter.
When "Completed!" appears, press zOn/Standby on the main unit to turn
the unit into standby mode. Then updating will be completed. (The unit
automatically turns itself into standby mode after about 3 minutes even if
you do not press zOn/Standby, and updating will be complete.)
En-12
Re-doing initial setup: If you terminate the
procedure on the way or change the setting made in
the initial setup and want to call up the setup wizard
Receiver and then Setup on the
again, press
remote controller, select "8. Miscellaneous" - "Initial
Setup", and press Enter.
Listening area
Measurement position
with microphone
¼¼
Correct measurement will not be possible if the microphone is held
by hand. Measurement is not possible if headphones are being used.
Step 2: Initial Setup
¼¼
The subwoofer sound may not be detected since it is extremely
low frequencies. Set the subwoofer volume to around the half of its
maximum volume.
¼¼
Measurement may be interrupted if there is ambient noise or radio
frequency interference. Close the window and turn off the home
appliance and fluorescent light.
2. After placing the microphone at the measurement
position, select "Do it Now" with the cursors and
press Enter.
3. When "Please plug microphone that came in a
box with AV receiver" is displayed, connect the
microphone to the Setup Mic jack of the unit.
Setup Mic jack
Calibration
microphone
4. Select the settings for the connected speakers, the
type of the height speakers, and other appropriate
settings.
2Source Connection
AccuEQ Room Calibration
Speaker Channels
7.1ch
Subwoofer
Yes
Height Speaker
-----
Bi-Amp
No
Powered Zone2
No
Select how many speakers you have.
5. The test tones sound from the connected speakers
and automatic speaker setting starts.
Measurement will be made 3 times or more for each
speaker. It takes several minutes to be completed. Keep
the room as quiet as possible during measurement. If
any of the speakers do not produce the test tone, check
for disconnection.
●● During measurement, each speaker outputs the test
tones at a high volume. Be careful of sound leak
that may disturb your neighbors, or be careful not to
frighten young children.
6. When the measurement is completed, the
measurement result is displayed.
Press t/u on the remote controller to check the
settings. Press Enter with "Save" selected. To have the
settings reflected for all the speakers, select "On (All
Channels)" in the next screen and press Enter on the
remote controller.
●● Select "On (Except Front Left / Right)" to disable just
the front speakers.
●● If there is an error message, follow the on-screen
instruction to remove the error cause. If the
subwoofer was not detected, turn the volume of the
subwoofer up to maximum and then select "Retry".
7. When "Please unplug setup microphone." is
displayed, disconnect the microphone.
When the screen above is displayed, set the items with
the cursor buttons on the remote controller. Refer to
the on-screen diagram for "Speaker Channels", which
changes each time a different number of channels is
selected. When all the items have been set, press Enter
on the remote controller. After that, follow the guidance
displayed on the TV screen to operate the unit.
●● Refer to the content of an item, which appears on
the lower left of the screen when the cursor is on the
item.
Source Connection
The following CEC-compatible devices are found;
Do you wish to turn on the CEC link?
xxxxxxxxxxx
Yes
No
SETUP Exit
You can check the connections on the different inputs and
make HDMI link function settings.
ENTER Next
2. Select the desired input to check the connection and
press Enter.
Start playback of the selected device. If connection is
correct, video/audio of the input source selected on the
unit will be played.
3. After checking the connection, select "Yes" with the
cursors and press Enter.
●● If you select "No" and press Enter, the error cause
will be displayed. Follow the guidance to remove the
error cause and check the connection again.
4. Select "Yes" with the cursors and press Enter on the
remote controller to check the connection of other
inputs or select "No, Done Checking" and press
Enter to skip.
If you select "Yes", you will return to the screen of step
2.
If you select "No, Done Checking", you will proceed to
step 5.
5. Set the CEC link function.
Select "Yes" to enable the HDMI link function with CECcompliant equipment, then select "Yes" again in the next
screen.
1. When the Source Connection start screen is
displayed, select "Yes, Continue" with the cursors
and press Enter.
If you select "Yes", the connection with ARC compatible
TV and HDMI Standby Through function will be set to
"On" and enabled.
Initial Setup
Source Connection
This step will start to check if the
connections were made correctly.
Would you like to continue?
Yes. Continue
No. Skip
SETUP Exit
En-13
Step 2: Initial Setup
3Remote Mode Setup
Make the following preparations.
Wi-Fi connection requires an access point such
as wireless LAN router (). Write down the SSID
and password (key) of the access point if they are
shown in the label of the main body. If the access
point has an automatic setting button (may be
called differently according to the manufacturer),
you can set up without inputting the password.
For how to use the automatic setting button of the
access point, refer to its instruction manual.
Initial Setup
Remote Mode Setup
Preprograming remote will give you control
of other devices from AV receiver remote.
Would you like to setup your remote to
control your devices? This may take a while
depending on what and how many you have
connected. You can always come back to remote
¼¼
The unit supports Wi-Fi connection with 2.4 GHz
access point.
setup from setup “7-2 Remote Mode Setup”.
Yes, Continue
No, Skip
SETUP Exit
You can enable operation of the other components using
the remote controller of the unit. When the Remote Mode
Setup start screen is displayed, select "Yes, Continue"
with the cursors and press Enter on the remote controller.
Follow the guidance to select the desired Remote Mode
button and in the keyboard screen, enter the first three
characters of the brand name of the device you are going
to program and search for the remote control code. The
guidance will also explain how to set the remote controller.
4Network Connection
Initial Setup
Network Connection
Do you want to connect network connection?
It gives you network services that our AV
receiver support. If you wish to skip this step.
select “No. Skip”.
1. Select the method of Wi-Fi connection with the
cursors and press Enter.
Scan Networks: Use this unit to search for and connect
to a wireless LAN router or other access point.
Use iOS Device (iOS7 or later): Select this method to
let this unit share the Wi-Fi settings with your iOS device
and establish a Wi-Fi connection with ease.
If you selected "Scan Networks"
2. Select the SSID of the access point to be connected
with the cursor buttons and press Enter.
When the SSID of the access point appears on the TV
screen, select the desired access point.
●● If you changed the initial setting of the access point to
skip password entry, step 3 is unnecessary.
●● If you changed the initial setting of the access point
to hide the SSID, see "When the access point is not
displayed".
3. Select and set the authentication method.
The "Enter Password" screen may be displayed
automatically if the wireless LAN router does not have
an automatic setting button.
Yes
No, Skip
SETUP Exit
Wi-Fi Setup
Select the authentication method.
You can check the network connection and make the
Wi‑Fi setting. When the Network Connection start screen
is displayed, select "Yes" with the cursors and press Enter
on the remote controller. If you select "Wired" in the next
screen, you can view the LAN cable connection status. To
make the Wi-Fi setting, select "Wireless", press Enter on
the remote controller and follow the sections below.
En-14
Enter Password
Push Button
PIN code
When this screen is displayed, select and set one of the
three authentication methods: "Enter Password", "Push
Button" and "PIN code". See below for details of and
how to set each method.
Enter Password: Enter the password of the access point
to establish connection.
1Select "Enter Password" with the cursor buttons and
press Enter.
2Enter the password () on the keyboard screen, select
"OK" with the cursor buttons and press Enter.
¼¼
Select "A/a" and press Enter to toggle between upper and lower
case. Select "" or "" and press Enter to move the cursor to
the selected direction. Select
and press Enter to delete the
character at the left of the cursor position. To select whether to
mask the password with "" or display it in plain text, press D on
the remote control. Press +10 on the remote controller to switch
between upper and lower case. Press CLR to delete all the input
characters.
3If the security method of the access point to be
connected is WEP, select "Default Key ID", select "OK"
and press Enter.
Push Button: Use the automatic setting button of the
access point to establish connection.
1Select "Push Button" with the cursor buttons and press
Enter.
2Hold down the automatic setting button of the access
point for the necessary seconds, select "OK" with the
cursor buttons and press Enter.
PIN code: Select this method when the automatic setting
button of the access point is beyond the reach. Select "PIN
code" with the cursor buttons and press Enter to display the
8-digit PIN code. Register the displayed PIN code to the
access point, select "OK" with the cursor buttons and press
Enter. For how to register the PIN code to the access point,
refer to its instruction manual.
4. Select "Yes, Start to Check" in the network
connection confirmation screen.
Step 2: Initial Setup
When the access point is not displayed
Select "Other..." with the c cursor on the remote
controller and press Enter to display the keyboard
screen. Input the SSID and password. Make the
following settings according to the router setting.
WPA/WPA2 method
Select "WPA" or "WPA2" in "Security Method",
select "OK" and press Enter.
WEP method
Select "WEP" in "Security Method" and select
"Default Key ID". Then select "OK" and press Enter.
●● If encryption setting has not been made on the
wireless LAN router, select "None" in "Security
Method", select "OK" and press Enter.
If you selected "Use iOS Device (iOS7 or
later)"
2. On the iOS device, go to "Settings"-"Wi-Fi" and turn
on the setting, then select this unit in "SETUP NEW
AIRPLAY SPEAKER".
2. Tap "Next".
3. Select "Yes, Start to Check" in the network
connection confirmation screen.
¼¼ Privacy policy
A confirmation screen asking you to agree to the privacy
policy is displayed during network setting. Select "Yes" and
press Enter to indicate agreement.
ONKYO PRIVACY STATEMENT
When connection is successful
"Successfully Connected" is displayed on the screen.
Network Connection
MAC Address xxxxxxxxxxx
IP Address, Subnet Mask, Gateway, DNS Server
Gateway Ping
Internet Service Test
Successfully connected.
Next
SETUP Exit
If the screen is not displayed, try doing the setting again.
If "Push Button" connection with the wireless LAN router
does not work, try "Enter Password".
Terminating initial setup
After finishing the initial setup, keep "Finished" selected
and press Enter on the remote controller. Connection and
setting of the unit is now complete.
Audio output of connected players
To enjoy digital surround sound including Dolby Digital and
DTS, audio output should be set to "Bitstream output" on the
connected Blu-ray Disc Player or other device.
Depending on the settings on the Blu-ray Disc Player, there
may be cases when Dolby TrueHD, Dolby Atmos, and DTSHD Master Audio is not output according to the format of the
source.
In this case, in the Blu-ray Disc Player settings try setting "BD
video supplementary sound" (or secondary sound) to "Off".
Change the listening mode after changing the setting to
confirm.
To improve our products and services of Onkyo Corporation,
Onkyo may collect information about your receiver usage.
To know more about what type of information we collect and
how we use it please review Onkyo’s Privacy Policy at
http://www.onkyo.com/privacy/
I have read Onkyo’s Privacy Policy and agree to its terms.
Yes
No
En-15
Step 3: Playing Back
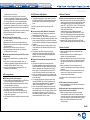
1Basic Operations
1z Receiver button: Turns the unit on or into standby
Part names and functions of the remote
controller
mode.
2Remote Mode/Input Selector buttons: Switch the
1
8
When using the remote controller to operate
the AV receiver: The remote controller of this unit
has the remote mode function for controlling other
devices. You cannot control this unit when the
remote controller is in the remote mode other than
RECEIVER mode (for controlling this unit). Be sure
to press 3 Receiver to select the RECEIVER mode
before starting operation.
2
9
3
F
G
4
5
1. Turning the power on.
Press 1 z Receiver on the remote controller to turn the
power on.
●● Switch the input on the TV to that assigned to the
unit. Use the TV's remote controller.
2. Select the input on the unit.
Press the 2 Input Selector button for the player you
want to listen to. Press TV to listen to the TV's sound.
You can also use the input selector buttons on the main
unit.
●● Input will automatically be selected if the TV or player
is CEC compliant and connected to the unit with
HDMI cable.
3. Select the desired listening mode.
After pressing 3 Receiver, press the 6 listening mode
buttons to switch the mode so that you can enjoy
different listening modes.
4. Adjust the volume with G VOL.
En-16
H
I
6
7
J
input to be played. Furthermore, by registering a
particular remote control code to a button, you can
switch the remote control mode to operate other
equipment by pressing that button.
3Receiver button: Switches the remote controller to the
mode for operating this unit.
4Cursor buttons and Enter button: Move the cursor
and confirms the selection.
5Setup button: Displays the screen for making various
settings for this unit.
6Listening mode buttons: Allow you to select the
listening mode.
Movie/TV button: You can select a listening mode
suitable for movies and TV programs.
Music button: You can select a listening mode suitable
for music.
Game button: You can select a listening mode suitable
for games.
Stereo button: You can select a listening mode for
stereo and all channel stereo sources.
●● For details on the listening modes, see the Advanced
Manual.
7Dimmer button: Switches the brightness of the display.
8Zone2 button: For use when the unit is connected with
a pre-main amplifier or speakers in a separate room and
sound is played there.
9Music OPT button: Turns on/off the MUSIC
OPTIMIZER function that improves the quality of the
compressed audio.
FMuting button: Temporarily mutes audio. Press again
to cancel muting.
GVolume buttons: Allow you to adjust the volume. This
button also cancels the muting.
HReturn button: Returns the display to the previous
state.
IQ button: Displays the Quick Setup menu that allows
you to quickly access the frequently used setting items
including sound quality adjustment.
JDisplay button: Switches the information on the
display.
Step 3: Playing Back
2Network Functions
You can enjoy sources such as Internet radio by connecting
the unit to a network. For details on the operation, see the
Advanced Manual.
●● OSDs (the feature to show information such as setting
menus on the TV) are not displayed when the OSD
language is set to Chinese. Operate by confirming the
display on the main unit.
●● This unit needs to be connected to the same router as a
computer or NAS device.
Home media
You can play music files in a shared folder on the computer
or NAS device connected to the network. Select the server
with the cursors, select the desired music file and press
Enter to start playback.
●● This unit needs to be connected to the same router as a
computer or NAS device.
USB
You can play music files on a USB storage device. Connect
the USB storage device to the USB port on the rear of the
unit, select the desired folder or music file with the cursors,
and press Enter to confirm and start playback.
Press NET on the remote controller to display the NET TOP
screen on the TV. Select the item with the cursors of the
remote controller and press Enter to confirm your selection.
¼¼
To return to the previous screen, press Return.
¼¼
Available services may vary depending on your area of residence.
Network
TuneIn Radio
Pandora
Spotify
SiriusXM Internet Radio
Slacker Personal Radio
Deezer
AirPlay
3AirPlay
®
You can enjoy the audio from iPhone®, iPod touch®, iPad®
and PCs with iTunes.
Important: This unit needs to be connected to the network
through the same router as the iOS terminal or PC.
Playing music files from an iPhone, iPod
touch, or iPad
Update the OS version on your iOS device to the latest
version before connecting it to this unit.
1. Press NET on the remote controller.
2. Tap the AirPlay icon, select this unit from the list of
devices displayed, and click "Done".
Internet radio services
The unit comes preset with Internet radio services such as
TuneIn Radio. After selecting the desired service, follow
the on-screen instructions, using the cursors to select radio
stations and programs, then press Enter to play.
●● Network services or contents may become unavailable if
the service provider terminates its service.
swipe from the bottom of the screen of the iOS device.
●● If the AirPlay icon is not displayed, confirm that this unit
and the iOS device are both connected to the router
correctly.
3. Play music files from an iPhone, iPod touch, or iPad.
Playing music files from a computer
●● AirPlay is compatible with iTunes 10.2 or later.
1. Press NET on the remote controller.
2. Turn on your computer and start iTunes.
3. Click the AirPlay icon of iTunes and select this unit
from the list of devices displayed.
4. Play iTunes music files.
●● If "6. Hardware"-"Power Management"-"Network
Standby" is set to on in the Setup menu, then once
AirPlay starts, this unit turns on automatically and the
"NET" input source is selected. Even if this setting
is "Off", if the unit is already on then the "NET" input
source can be selected.
●● Due to the characteristics of AirPlay wireless technology,
the sound produced on this unit may slightly be behind
the sound played on the AirPlay-enabled device.
●● Information such as the name of the track is displayed
on the unit's display during AirPlay playback.
●● There may be some differences in how operations are
performed depending on the iOS or iTunes version.
●● The on-screen displays are not displayed when the
OSD language is set to Chinese. Operate by confirming
the display on the main unit.
Volume: The volume of this unit and the AirPlayenabled device are linked. Take care that the
volume does not become too loud when you adjust
the volume on the AirPlay-enabled device. You may
damage the unit or the speakers. Stop play on the
AirPlay-enabled device immediately if the volume
becomes too loud at any point.
DLNA
You can play music files stored in the computer or NAS
device connected to the network. Select the server with the
cursors, select the desired music file and press Enter to
start playback.
●● The AirPlay icon is displayed in the control center if you
are using iOS 7 and later. To display the control center,
En-17
Step 3: Playing Back
4Bluetooth
®
You can wirelessly enjoy music files stored in a smartphone
or other Bluetooth-enabled device. The coverage area is 48
feet (15 meters).
●● The Bluetooth-enabled device needs to support the
A2DP profile.
●● Note that connection is not always guaranteed with all
Bluetooth-enabled devices.
Pairing
Pairing is necessary when connecting the Bluetoothenabled device for the first time. Before starting the
procedure, learn how to enable the Bluetooth setting
function and to connect with other devices on the
Bluetooth-enabled device.
1. Press Bluetooth on the remote controller.
The unit begins pairing and "Now Pairing..." is displayed.
2. While "Now Pairing..." is on the display, complete
connection on the Bluetooth-enabled device in the
nearby area within about 2 minutes.
If the name of this unit is displayed on the Bluetoothenabled device's display, select this unit. Paring will end
after a short time.
●● If a password is requested, enter "0000".
●● You can pair with another Bluetooth-enabled device
by pressing and holding the Bluetooth button until
"Now Pairing..." is on the display. This unit can store
the data of up to 8 paired devices.
Playing Bluetooth-enabled devices
If the unit is on and the Bluetooth-enabled device is
connected, the input will be automatically switched to
BLUETOOTH. Play music in this state.
●● It may take about a minute until connection is
established when the unit is on since the Bluetooth
function takes some time to start up.
●● If the volume setting on the Bluetooth-enabled device is
En-18
low, the sound will not be output from this unit.
●● Due to the characteristics of Bluetooth wireless
technology, the sound produced on this unit may slightly
be behind the sound played on the Bluetooth-enabled
device.
●● The on-screen displays are not displayed when the
OSD language is set to Chinese. Operate by confirming
the display on the main unit.
5AM/FM Radio
The Basic Manual explains the method using automatic
tuning. For manual tuning, see the Advanced Manual.
1. Press Tuner on the main unit several times to select
either "AM" or "FM".
2. Press Tuning Mode on the unit, so that the "AUTO"
indicator on the display lights.
3. Press Tuningjl on the unit.
The automatic tuning to a radio station starts. Searching
stops when one is tuned. When tuned into a radio
station, the "cTUNEDd" indicator on the display lights.
The "FM STEREO" indicator lights if the radio station is
an FM radio station.
TUNED
AUTO
FM STEREO
Actual display varies
depending on the country
or the region
Registering a radio station: You can register up to 40
of your favorite AM/FM radio stations.
1. Tune into the AM/FM radio station you want to
register.
2. Press Memory on the unit so that the preset number
on the display flashes.
3. Press Presetd c on the unit several times to select
a number between 1 and 40 while the preset number
is flashing (about 8 seconds).
4. Press Memory again on the main unit to register the
station.
When registered, the preset number stops flashing.
To select a preset radio station, press Presetd c on
the main unit or CH +/− on the remote controller.
●● To delete a preset station, after selecting the preset
number you want to delete with Presetd c on the main
unit, press Tuning Mode while holding down Memory
on the main unit. When the preset number is deleted, it
disappears from the display.
AM/FM frequency step setting
It may be necessary for you to change the
frequency step to tune the radio in your area.
Change the step with the following procedure. Note
that when this setting is changed, all radio presets
are deleted.
Receiver on the remote
1After pressing
controller, press Setup.
2.Use the cursor buttons to select "6. Hardware"
and press Enter.
3.Select "Tuner" with the cursor and press Enter.
4.Select "AM / FM Frequency Step" (North
American models) or "AM Frequency Step"
(Australian models) with the cursor and select
the frequency step for your area.
Step 3: Playing Back
6Multi-zone
You can listen to audio in a room (called Zone 2) other than
the one where this unit is located (called the main room).
Sources you can playback
●● External players (1)
●● NET (2)
●● Bluetooth
●● AM/FM Radio
1 Only analog and 2ch PCM audio signals can be output to Zone 2.
2 DSD and Dolby TrueHD audio signals cannot be output to Zone 2.
Making Multi-zone Connection
There are the following two methods of connection:
a. Connecting with a pre-main amplifier or a power amplifier
in a separate room
b. Connecting with speakers in a separate room
a. Connecting with a pre-main amplifier in a
separate room
b. Connecting with speakers in a separate
room
Connect the speakers in another room to the SPEAKERS
ZONE2 jacks of the unit using speaker cables. Note that
5.1 ch will be the maximum () in the main room during
Zone 2 playback. No sound will be output from the back
speakers and height speakers.
¼¼
In this case, the Dolby Atmos listening mode cannot be selected.
It is possible to play 2 ch source in a separate room while
7.1 ch source is being played in the main room.
Connect the PRE/LINE OUT ZONE2 jacks of the unit and
the line-in jacks of the pre-main amplifier in a separate
room with an RCA cable.
Important: Connection with external players
To listen to a player in Zone 2, you must connect using an
RCA cable, a digital optical cable (OPTICAL), or a digital
coaxial cable (COAXIAL). Some players may require audio
output setting.
DIGITAL
OPTICAL
OUT
Main room
AUDIO
OUT
Main room
Zone 2
Zone 2
These settings are required: After connecting
Receiver and then Setup
the speakers, press
on the remote controller, select "2. Speaker" "Configuration" and set "Powered Zone2" to "Yes".
●● Settings are required in order to control volume and
sound quality on this unit. To adjust it with the unit, press
Receiver and then Setup on the remote controller,
select "3 Audio Adjust" - "Multi Zone" - "Zone 2 Out"
and set the setting to "Variable". If you connect a power
amplifier, be sure to make the setting and adjust the
volume on this unit.
En-19
Step 3: Playing Back
Performing Multi-zone Playback
It is possible to perform playback in the main room and a
separate room at the same time, for example by playing
the Blu-ray Disc player in the main room where the unit is
placed while playing Internet radio in a separate room. It is
also possible to perform playback only in a separate room.
●● With external players, it is possible to play the same
source or different sources in the main room and
separate room.
●● With "NET" and "BLUETOOTH", you cannot select
different inputs for the main room and separate room.
For example, if "NET" has been selected in the main
room and then "BLUETOOTH" is selected as playback
source in the separate room, the input in the main room
will change to "BLUETOOTH" accordingly.
●● You cannot select separate network services for the
main room and another room with the "NET" input.
●● When listening to AM/FM broadcasting, you cannot
select different stations for the main room and separate
room. Therefore broadcasting of the same station will be
heard in the both rooms.
Playing Back
1. Press Zone2 on the remote controller, point the
remote controller at the main unit and press
zReceiver.
"Z2" lights on the main unit display and the multi-zone
function is enabled. (Zone 2 is now on.)
To control on the main unit: press Zone2 and within 8
seconds, press the input selector button of the source to be
played in the other room. (To play the same source in the
main room and separate room, press Zone2 twice.)
To adjust the volume on the main unit
To adjust the volume, press Zone2 on the remote controller
and then adjust with VOLj/l. Alternatively press Zone2
Level/ on the main unit. You can mute the sound by
pressing Muting on the remote controller.
To adjust the sound quality on the main unit
As for the operation, press Zone 2 on the main unit and
press Tone several times to display "Bass", "Treble" or
"Balance" on the main unit display. Display the desired
setting on the display and adjust it with + or −.
To turn off the function
After pressing Zone2 on the remote controller, press
zReceiver. Alternatively press Off on the main unit.
●● If ZONE 2 is on, power consumption during standby
becomes larger than normal.
●● While ZONE 2 is on, the RI linked system function
(interlink between Onkyo components) is disabled.
●● Pressing Input Selector on the remote controller while
you are using the remote controller for Zone 2 will
switch the controlled target to the main room. To control
Zone 2 again, press the Zone2 button to enter the Zone
control mode.
7Quick Setup Menu
2. Press Zone2 again on the remote controller and
press Input Selector of the input to be played in a
separate room.
●● If you turn the unit to standby during multi-zone
playback, the Z2 indicator is dimmed and the
playback mode is switched to playback in a separate
room only. Performing steps 1 and 2 while the unit
is in standby also switches the playback mode to
playback in a separate room only. To play the same
source in the main room and separate room, hold
down Zone2 for approximately 3 seconds.
En-20
You can perform common settings on the TV screen while
playing.
1. Press Q on the remote controller.
The Quick Setup menu is displayed on the connected
TV's screen.
Quick Setup
BD/DVD
Listening Mode
MOVIE/TV
Audio
MUSIC
HDMI
GAME
Information
2. Select the item with the cursors of the remote
controller and press Enter to confirm your selection.
●● To return to the previous screen, press Return.
3. Select the setting with the cursors buttons of the
remote controller.
Listening Mode: Select the listening mode from the
categories of "MOVIE/TV", "MUSIC" and "GAME". After
selecting the Listening Mode, press Enter button to confirm.
●● It cannot be set when audio is played from the TV's
speakers.
Audio: You can perform various audio settings including
audio quality and speaker level adjustment.
●● You cannot select this item when audio is output from
the TV's speakers.
Bass, Treble: Adjust volume of the front speaker.
●● It cannot be set if the listening mode is Direct.
Phase Matching Bass: Suppress phase shift in the
midrange to enhance bass sound. Thus smooth and
powerful bass sound can be obtained.
●● It cannot be set if the listening mode is Direct.
Center Level, Subwoofer Level: Adjust the speaker
level while listening to the sound. The adjustment you
made will be reset to the previous status when you turn
the unit to standby mode.
●● Changes may not be possible depending on the
settings in speakers.
●● This setting is not possible during Muting or when
using headphones.
A/V Sync: If the video is behind the audio, you can
delay the audio to offset the gap. Different settings can
be set for each input selector.
●● It cannot be set if the listening mode is Direct.
AccuEQ Room Calibration: Enable or disable the
settings made by automatic speaker setting. To enable
them, you should normally select "On (All Ch)", and to
disable just the front speakers, you should select "On
Step 3: Playing Back
(ex. L/R)". The setting can be separately set to each
input selector.
●● This setting cannot be selected if the automatic
speaker setting has not been performed.
●● It cannot be set if headphones are connected or the
listening mode is Direct.
Equalizer: Assign the equalizer settings adjusted in
"Setup"-"2. Speaker"-"Equalizer Settings" to "Preset1" to
"Preset3". The same sound field setting is applied to all
ranges when set to "Off".
●● It cannot be set if the listening mode is Direct.
Music Optimizer: Improve the quality of the
compressed audio. Playback sound of lossy
compressed files such as MP3 will be improved. The
setting can be separately set to each input selector.
●● The setting is effective in the signals of 48 kHz or
less. The setting is not effective in the bitstream
signals.
●● It cannot be set if the listening mode is Direct.
Late Night: Make small sounds to be easily heard. It
is useful when you need to reduce the volume while
watching a movie late night. You can enjoy the effect
only with Dolby Digital, Dolby Digital Plus, Dolby
TrueHD, and DTS sources.
●● Turning the unit to standby mode will set the setting
to "Off". In case of Dolby TrueHD, the setting will be
set to "Auto".
●● The setting cannot be used in the following cases.
–– If "Loudness Management" is set to "Off" when
playing Dolby Digital Plus or Dolby TrueHD.
–– When the input signal is DTS and "Dialog
Control" is other than 0 dB.
Cinema Filter: Adjust the soundtrack that was
processed to enhance its treble, in order to make it
suitable for home theater.
●● This function can be used in the following listening
modes: Dolby Digital, Dolby Digital Plus, Dolby
TrueHD, Multichannel, DTS, DTS-ES, DTS 96/24,
DTS-HD High Resolution Audio, DTS-HD Master
Audio, DTS Express, DSD.
●● This setting may be "Off" depending on the settings
in speakers.
Dialog Control: You can increase the dialog portion of
the audio in 1 dB steps up to 6 dB so that you can make
dialog easier to hear over background noise.
●● This setting is unavailable for content other than
DTS:X.
●● This setting may not be available for selection with
some content.
HDMI: Select the HDMI OUT jack to be used for output.
Checking the Input Format
Press Display on the remote controller several times to
switch the display of the main unit in order of:
Input source & volume
Listening mode
Information:
Audio: Displays the audio input source, format, number
of channels, sampling frequency, listening mode, and
number of output channels.
Video: Displays information such as the video input
source, resolution, color space, color depth, 3D
information, Aspect and output.
Tuner: Displays information such as the band,
frequency, and preset number. This is displayed only
when "TUNER" is selected as the input source.
8Other useful functions
To adjust the sound quality
It is possible to enhance or moderate the bass and treble
of front speakers. Press Tone on the main unit several
times to select the desired setting from "Bass", "Treble" and
"Phase Matching Bass", and adjust with +/-.
●● It cannot be set if the listening mode is Direct.
"Bass": Allows you to enhance or moderate the bass.
"Treble": Allows you to enhance or moderate the treble.
"Phase Matching Bass": Allows you to keep the clear
midrange and effectively enhance the bass.
Signal format
(Audio)
Sampling frequency
Input signal resolution
(Video)
●● If "Dolby D 5.1" is displayed in Signal format, the
Dolby Digital 5.1 ch signals are being input. When
listening to AM/FM radio, the band, frequency and
preset number are displayed.
Playing Audio and Video from Separate Sources
It is possible to play audio and video from different sources.
For example, you can play audio from the CD player and
video from the BD/DVD player. In this case, press BD/DVD
and then CD. Then start playback on the BD/DVD player
and CD player. This function is effective when an input with
audio only has been selected (CD, NET, BLUETOOTH,
TUNER or PHONO in the initial setting).()
¼¼When NET or BLUETOOTH is selected, press Mode on the remote
controller after pressing NET or Bluetooth on the remote controller.
Center Spread: Adjust the width of the sound field of
the front channel when playing in the Dolby Surround
listening mode.
To spread the width of the sound field to the left and
right, set to "On". To concentrate sound in the center, set
to "Off".
En-21
Others
Troubleshooting
Before starting the procedure
Problems may be solved by simply turning the
power on/off or disconnecting/connecting the
power cord, which is easier than working on the
connection, setting and operating procedure. Try
the simple measures on both the unit and the
connected device. If the problem is that the video
or audio is not output or the HDMI linked operation
does not work, disconnecting/connecting the HDMI
cable may solve it. When reconnecting, be careful
not to wind the HDMI cable since if wound the
HDMI cable may not fit well. After reconnecting, turn
off and on the unit and the connected device.
The AV receiver turns off unexpectedly.
●● The AV receiver will automatically enter standby mode when
Auto Standby or Sleep Timer is set and launched.
●● The protection circuit may have been activated. If this is the
case, when you turn the unit on again, "AMP Diag Mode" will
appear on the main unit’s display. The unit will then enter a
mode that detects abnormal conditions. If no problems are
detected, "AMP Diag Mode" will disappear and the unit will
return to a normal state. If "CHECK SP WIRE" appears on the
display, the speaker cables may be short-circuited. Turn the
unit off, and check to see if the cable core of any of the speaker
cables is in contact with that of another speaker cable or with
the rear panel. After that, turn the unit on again. If "NG" appears,
unplug the power cord immediately and contact your dealer.
There's no sound, or it's very quiet.
●● A wrong input selector button has been selected. Select a
correct input for the player. Also check that muting is not on.
●● Not all listening modes use all speakers.
There's no picture.
●● A wrong input selector button has been selected.
●● To display video from the connected player on the TV screen
while the unit is in standby, you need to enable HDMI Standby
Through function.
●● When the TV image is blurry or unclear, power cord or
connection cables of the unit may have interfered. In that case,
keep distance between TV antenna cable and cables of the unit.
●● If you connect a player supporting HDCP2.2, be sure to connect
it to one of the HDMI IN1 to IN3 jacks of the unit.
En-22
Video and audio are out of synch.
●● Video may be delayed relative to audio depending on the
settings and connections with your TV. Adjust in "Step 3:
Playing Back", "7 Quick Setup Menu", "A/V Sync".
Cannot play digital surround.
●● To enjoy digital surround sound including Dolby Digital and
DTS, audio output should be set to "Bitstream output" on the
connected Blu-ray Disc Player or other device.
Cannot output audio such as Dolby Atmos according
to the format of the source.
●● If you cannot output audio according to the format of the
source (Dolby TrueHD, Dolby Atmos, DTS-HD Master Audio,
etc.), in the Blu-ray Disc Player settings try setting "BD video
supplementary sound" (or secondary sound) to "Off". Change
the listening mode for each source after changing the setting to
confirm.
HDMI control does not function correctly.
●● Set the CEC link function of the unit to on. It is also necessary
holding
2.Press zOn/Standby. 1.While
down CBL/SAT,
● How to reset the remote controller:
1. While holding down Receiver on the remote controller,
press Q until the remote indicator stays lit (about 3
seconds).
2. Within 30 seconds, press Receiver again.
Remote
indicator
to make the HDMI linked system setting on the TV. See the TV's
instruction manual for details.
Cannot access to network.
●● Try plugging/unplugging the unit or the wireless LAN router or
check their power-on status. This will work well in many cases.
●● If the desired wireless LAN router is not in the access point list,
Receiver
it may be set to hide SSID or the ANY connection may be off.
Change the setting and try again.
Q
Resetting the unit
Resetting the unit to the status at the time of shipment may solve
the problem. If the measures above do not solve the problem, reset
the unit with the following procedure. If you reset the unit status,
your preferences will be reset to the defaults. Note them down
before starting reset.
● How to reset:
1. While holding down CBL/SAT on the main unit (note that
step 2 must be performed with this button pressed down)
2. Press zOn/Standby on the main unit ("Clear" appears on
the display and the unit returns to standby).
●● Do not unplug the power cord until "Clear" disappears from
the display.
Others
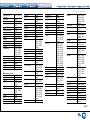
Specifications
Amplifier Section
Rated Output Power (North American)
With 8 ohm loads, both channels driven, from 20-20,000 Hz; rated 100
watts per channel minimum RMS power, with no more than 0.08% total
harmonic distortion from 250 milliwatts to rated output.
Surround Mode Output Power ()
(6 ohms, 1 kHz THD 0.9%) 170 W per channel
¼¼
Reference output for each speakers.
Depending on the source and the listening mode settings,
there may be no sound output.
Rated Output Power (Others)
7 ch × 160 W at 6 ohms, 1 kHz, 1 ch driven of 1% (IEC)
Dynamic Power ()
¼¼
IEC60268-Short-term maximum output power
240 W (3 Ω, Front)
210 W (4 Ω, Front)
120 W (8 Ω, Front)
THD+N (Total Harmonic Distortion+Noise)
0.08% (20 Hz - 20 kHz, half power)
Input Sensitivity and Impedance
200 mV/47 kΩ (LINE, 1 kHz 100 W/8 Ω)
3.5 mV/47 kΩ (PHONO MM)
Rated RCA Output Level and Impedance
1 V/470 Ω (PRE OUT)
1 V/470 Ω (SUBWOOFER PRE OUT)
100 mV/2.3 kΩ (ZONE2 LINE OUT)
1 V/2.3 kΩ (ZONE2 PRE OUT)
Phono Overload
70 mV (MM 1 kHz 0.5% Direct)
Frequency Response
5 Hz - 100 kHz/+1 dB, –3 dB (Direct mode)
Tone Control Characteristics
±10 dB, 20 Hz (BASS)
±10 dB, 20 kHz (TREBLE)
Signal to Noise Ratio
106 dB (LINE, IHF-A)
80 dB (PHONO MM, IHF-A)
Speaker Impedance
6 Ω - 16 Ω (North American)
4 Ω - 16 Ω or 6 Ω - 16 Ω (Others)
Video Section
Signal level
1.0 Vp-p/75 Ω (Component Y)
0.7 Vp-p/75 Ω (Component Pb/Cb, Pr/Cr)
1.0 Vp-p/75 Ω (Composite)
Correspoinding maximum resolution
480i/576i (Component)
Tuner Section
FM Tuning Frequency Range
87.5 MHz - 107.9 MHz(North American)
87.5 MHz - 108.0 MHz, RDS (Others)
AM Tuning Frequency Range
522/530 kHz - 1611/1710 kHz
Preset Channel
40
Network Section
Ethernet LAN
10BASE-T/100BASE-TX
Wireless LAN
IEEE 802.11 b/g/n standard
(Wi-Fi® standard)
2.4 GHz band:
1 - 11 ch (North American)
1 - 13 ch (Others)
(Wi-Fi® standard)
Bluetooth Section
Communication system
Bluetooth Specification version 2.1 +EDR (Enhanced Data Rate)
Maximum communication range
Line of sight approx. 15 m ()
Frequency band
2.4 GHz band
Modulation method
FHSS (Freq Hopping Spread Spectrum)
Compatible Bluetooth profiles
A2DP 1.2 (Advanced Audio Distribution Profile)
AVRCP 1.3 (Audio Video Remote Control Profile)
Supported Codecs
SBC
Transmission range (A2DP)
20 Hz - 20,000 Hz (Sampling frequency 44.1 kHz)
¼¼The actual range will vary depending on factors such as obstacles between
devices, magnetic fields around a microwave oven, static electricity,
cordless phone, reception sensitivity, antenna’s performance, operating
system, software application, etc.
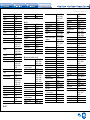
General
Power Supply
AC 120 V, 60 Hz (North American)
AC 220 - 240 V, 50/60 Hz (Others)
Power Consumption
6.4 A (North American)
630 W (Others)
0.1 W (Stand-by, North American)
0.15 W (Stand-by, Others)
2.6 W (Network Standby)
70 W (No-sound)
Dimensions (W × H × D)
435 mm × 174 mm × 326.5 mm
17-1/8" × 6-7/8" × 12-7/8"
Weight
10 kg (22 lbs.) (North American)
10.5 kg (23.1 lbs.) (Others)
●●HDMI
Input
IN1 (BD/DVD, HDCP2.2), IN2 (CBL/SAT, HDCP2.2), IN3 (STRM BOX,
HDCP2.2), IN4 (PC), IN5 (GAME), IN6, IN7, AUX INPUT HDMI (front)
Output
OUT MAIN (ARC), OUT SUB
Video Resolution
4K 60 Hz (RGB/YCbCr4:4:4/YCbCr4:2:2, 24 bit)
Audio Format
Dolby Atmos, Dolby TrueHD, Dolby Digital Plus, Dolby Digital, DTS:X,
DTS-HD Master Audio, DTS-HD High Resolution Audio, DTS 96/24, DTSES, DTS, DTS Express, DSD, Multichannel PCM (up to 8ch)
Supported
3D, Audio Return Channel, Deep Color, x.v.Color™, LipSync, CEC, 4K, Extended Colorimetry (sYCC601, Adobe RGB, Adobe YCC601),
Content Type, 3D Dual View, 21:9 Aspect Ratio Video Format
●●Video Inputs
Component
IN1 (BD/DVD), IN2 (GAME)
Composite
IN1 (CBL/SAT), IN2 (STRM BOX), IN3 (PC)
●●Audio Inputs
Digital
OPTICAL 1 (CD), 2 (TV)
COAXIAL (BD/DVD)
Analog
BD/DVD, CBL/SAT, STRM BOX, PC, GAME, TV, CD, PHONO
●●Audio Outputs
Analog
ZONE2 PRE/LINE OUT
PRE OUT (FRONT L/R, CENTER, SURROUND L/R, BACK or HEIGHT
L/R, 2 SUBWOOFER)
Speaker Outputs
FRONT L/R, CENTER, SURROUND L/R, BACK or HEIGHT or Bi-AMP
L/R, ZONE2 L/R
Phones
PHONES (Front, ø 6.3)
●●Others
Setup Mic
1 (Front)
RS2321
RI REMOTE CONTROL 1
USB
1 (Ver.1.1, 5 V/1 A)
Ethernet1
IR IN 2 (A/B)/IR OUT
1
12V TRIGGER OUT
3 (A: 100 mA, B: 25 mA, C: 25 mA)
Supports multi-language on-screen display
(North American) English, German, French, Spanish, Italian, Dutch,
Swedish, Chinese ()
(Others) English, German, French, Spanish, Italian, Dutch, Swedish,
Russian, Chinese ()
¼¼
OSD is not displayed when the input selector is "NET" or
"BLUETOOTH". Use the display on the main unit when operating the
unit.
Specifications and features are subject to change without notice.
En-23
Others
Table of image resolutions
Resolutions supported by HDMI
Refer to the following table for information about the image formats and resolutions output by this unit in
response to input signals
Input
HDMI
Component
Composite
Output HDMI
4K
4K
1080p/24
1080p
1080i
720p
480p/576p
480i/576i
1080p
1080i
720p
480p/576p
480i/576i
480i/576i
1080p/24
1080p
1080i
720p
480p/576p
Input
support
Content
protection
technology
480i/576i
HDMI input
IN1 to IN3
HDCP1.4
HDCP2.2
Display
resolution
720×480i
60 Hz
720×576i
50 Hz
720×480p
60 Hz
720×576p
50 Hz
1920×1080p
50/60 Hz
1680×720p
24/25/30/50/60 Hz
1920×1080p
24/25/30/50/60 Hz
2560×1080p
50/60 Hz
24/25/30 Hz
RGB/YCbCr4:4:4/
8/10/12/16 bit
YCbCr4:2:2
RGB/YCbCr4:4:4 8 bit
50/60 Hz
24/25/30 Hz
720×480i
60 Hz
720×576i
50 Hz
720×480p
60 Hz
720×576p
50 Hz
1920×1080i
50/60 Hz
1280×720p
24/25/30/50/60 Hz
1680×720p
24/25/30/50/60 Hz
1920×1080p
24/25/30/50/60 Hz
HDCP1.4
Remarks
24/25/30 Hz
50/60 Hz
YCbCr4:2:2
12 bit
YCbCr4:2:0
8/10/12/16 bit
RGB/YCbCr4:4:4/
8/10/12/16 bit
YCbCr4:2:2
RGB/YCbCr4:4:4 8 bit
YCbCr4:2:2
12 bit
YCbCr4:2:0
8/10/12/16 bit
RGB/YCbCr4:4:4/
8/10/12/16 bit
YCbCr4:2:2
RGB/YCbCr4:4:4/
8/10/12 bit
YCbCr4:2:2
24/25/30 Hz
2560×1080p
50/60 Hz
4K
(3840×2160p)
24/25/30 Hz
4K SMPTE
(4096×2160p)
24/25/30 Hz
50/60 Hz
50/60 Hz
¼¼With YCbCr4:2:2, Color Depth supported is 12 bit only.
En-24
Color Depth
RGB/YCbCr4:4:4/
8/10/12/16 bit
24/25/30/50/60 Hz YCbCr4:2:2
4K SMPTE
(4096×2160p)
HDMI input
IN4 to IN7
Front
Color space
1280×720p
4K
(3840×2160p)
Frame rate
RGB/YCbCr4:4:4 8 bit
YCbCr4:2:2
12 bit
YCbCr4:2:0
8 bit
RGB/YCbCr4:4:4 8 bit
YCbCr4:2:2
12 bit
YCbCr4:2:0
8 bit
Others
Precautions
For European Models
Declaration of Conformity
We declare, under our sole responsibility, that
this product complies with the standards:
–– Safety
–– Limits and methods of measurement of
radio disturbance characteristics
–– Limits for harmonic current emissions
–– Limitation of voltage changes, voltage
fluctuations and flicker
–– RoHS Directive, 2011/65/EU
–– Hereby, Onkyo Corporation, declares that this DTR-30.7 is in compliance
with the essential requirements and other relevant provisions of Directive
1999/5/EC.
–– С настоящето, Onkyo Corporation, декларира, че DTR-30.7 е в
съответствие със съществените изисквания и другитеприложими
разпоредби на Директива 1999/5/EC.
–– Onkyo Corporation tímto prohlašuje, že DTR-30.7 splňuje základní
požadavky a všechna příslušná ustanoveni Směrnice 1999/5/ES.
–– Undertegnede Onkyo Corporation erklærer herved, at følgende udstyr
DTR-30.7 overholder de væsentlige krav og øvrige relevante krav i direktiv
1999/5/EF.
–– Hiermit erklärt Onkyo Corporation, dass sich das Gerät DTR-30.7 in
Übereinstimmung mit den grundlegenden Anforderungen und den übrigen
einschlägigen Bestimmungen der Richtlinie 1999/5/EG befindet.
–– Käesolevaga kinnitab Onkyo Corporation seadme DTR-30.7 vastavust
direktiivi 1999/5/EÜ põhinõuetele ja nimetatud direktiivist tulenevatele
teistele asjakohastele sätetele.
–– ΜΕ ΤΗΝ ΠΑΡΟΥΣΑ Ο ΚΑΤΑΣΚΕΥΑΣΤΗΣ Onkyo Corporation ΔΗΛΩΝΕΙ
ΟΤΙ DTR-30.7 ΣΥΜΜΟΡΦΩΝΕΤΑΙ ΠΡΟΣ ΤΙΣ ΟΥΣΙΩΔΕΙΣ ΑΠΑΙΤΗΣΕΙΣ
ΚΑΙ ΤΙΣ ΛΟΙΠΕΣ ΣΧΕΤΙΚΕΣ ΔΙΑΤΑΞΕΙΣ ΤΗΣ ΟΔΗΓΙΑΣ 1999/5/ΕΚ
–– Por la presente, Onkyo Corporation, declara que este DTR-30.7 cumple
con los requisitos esenciales y otras exigencias relevantes de la Directiva
1999/5/EC.
–– Par la présente, Onkyo Corporation déclare que l’appareil DTR-30.7 est
conforme aux exigences essentielles et aux autres dispositions pertinentes
de la directive 1999/5/CE.
–– Con la presente Onkyo Corporation dichiara che questo DTR-30.7 è
conforme ai requisiti essenziali ed alle altre disposizioni pertinenti stabilite
dalla direttiva 1999/5/CE.
–– Ar šo Onkyo Corporation deklarē, ka DTR-30.7 atbilst Direktīvas 1999/5/EK
būtiskajām prasībām un citiem ar to saistītajiem noteikumiem.
–– Šiuo Onkyo Corporation deklaruoja, kad šis DTR-30.7 atitinka esminius
reikalavimus ir kitas 1999/5/EB Direktyvos nuostatas.
–– A Onkyo Corporation ezzennel kijelenti, hogy a DTR-30.7 típusú berendezés teljesíti az alapvető követelményeket és más 1999/5/EK irányelvben
meghatározott vonatkozó rendelkezéseket.
–– Hierbij verklaart Onkyo Corporation dat het toestel l DTR-30.7 in
overeenstemming is met de essentiële eisen en de andere relevante
bepalingen van richtlijn 1999/5/EG.
–– Niniejszym Onkyo Corporation deklaruje że DTR-30.7 jest zgodny
z zasadniczymi wymaganiami i innymi właściwymi postanowieniami
Dyrektywy 1999/5/EC.
–– Eu, Onkyo Corporation, declaro que o DTR-30.7 cumpre os requisitos
essenciais e outras provisões relevantes da Directiva 1999/5/EC.
–– Prin prezenta, Onkyo Corporation, declară că aparatul DTR-30.7 este
în conformitate cu cerinţele esenţiale şi cu alte prevederi pertinente ale
Directivei 1999/5/CE.
–– Onkyo Corporation týmto vyhlasuje, že DTR-30.7 a spĺňa základné
požiadavky a všetky príslušné ustanovenia Smernice 1999/5/ES.
–– Onkyo Corporation izjavlja, da je ta DTR-30.7 v skladu z bistvenimi
zahtevami in drugimi relevantnimi določili direktive 1999/5/ES.
–– Onkyo Corporation vakuuttaa täten että DTR-30.7 tyyppinen laite on
direktiivin 1999/5/EY oleellisten vaatimusten ja sitä koskevien direktiivin
muiden ehtojen mukainen.
–– Härmed förklarar Onkyo Corporation att denna DTR-30.7 följer de
väsentliga kraven och andra relevanta stadgar i Direktiv 1999/5/EC.
–– Hér með lýsir Onkyo Corporation því yfir að varan DTR-30.7 er í samræmi
við grunnkröfur og aðrar kröfur sem gerðar eru í tilskipun 1999/5/EC.
–– Onkyo Corporation erklærer herved at denne DTR-30.7 er i
overensstemmelse med vesentlige krav og andre relevante bestemmelser
i direktiv 1999/5/EC.
–– Ovime Onkyo Corporation, potvrđuje da je DTR-30.7 u suglasnosti sa
osnovnim zahtjevima i ostalim relevantnim odredbama Direktive 1999/5/
EC.
En-25
Others
License and Trademark Information
Manufactured under license from Dolby Laboratories. Dolby, Dolby
Atmos, Dolby Surround and the double-D symbol are trademarks of Dolby
Laboratories.
For DTS patents, see http://patents.dts.com. Manufactured under license from
DTS, Inc. DTS, the Symbol, DTS in combination with the Symbol, the DTS-HD
logo, and DTS-HD Master Audio are registered trademarks or trademarks of
DTS, Inc. in the United States and/or other countries. © DTS, Inc. All Rights
Reserved.
The Bluetooth® word mark and logos are registered trademarks owned by
Bluetooth SIG, Inc. and any use of such marks by Onkyo is under license.
Other trademarks and trade names are those of their respective owners.
Onkyo does not guarantee Bluetooth compatibility between the AV receiver and
all Bluetooth-enabled devices.
For compatibility between the AV receiver and another device with Bluetooth
technology, consult the device’s documentation and dealer. In some countries,
there may be restrictions on using Bluetooth devices. Check with your local
authorities.
SIRIUS, XM and all related marks and logos are trademarks of Sirius XM Radio
Inc. and its subsidiaries. All rights reserved.
"CINEMA FILTER" and "CINEMA FILTER (logo)" are trademarks of Onkyo
Corporation.
®
The terms HDMI and HDMI High-Definition Multimedia Interface, and the HDMI
Logo are trademarks or registered trademarks of HDMI Licensing LLC in the
United States and other countries.
DLNA®, the DLNA Logo and DLNA CERTIFIED® are trademarks, service
marks, or certification marks of the Digital Living Network Alliance.
This product is protected by certain intellectual property rights of Microsoft. Use
or distribution of such technology outside of this product is prohibited without a
license from Microsoft.
Windows and the Windows logo are trademarks of the Microsoft group of
companies.
QR Code is a registered trademark of DENSO WAVE INCORPORATED.
"x.v.Color" and "x.v.Color" logo are trademarks of Sony Corporation.
DSD and the Direct Stream Digital logo are trademarks of Sony Corporation.
MPEG Layer-3 audio coding technology licensed from Fraunhofer IIS and
Thomson.
The Wi-Fi CERTIFIED Logo is a certification mark of the Wi-Fi Alliance®.
AccuEQ, Music Optimizer, RIHD and WRAT are trademarks of Onkyo
Corporation.
"All other trademarks are the property of their respective owners."
AirPlay, iPad, iPhone, and iPod touch are trademarks of Apple Inc., registered
in the U.S. and other countries.
iPad Air and iPad mini are trademarks of Apple Inc.
"Made for iPod", "Made for iPhone" and "Made for iPad" mean that an
electronic accessory has been designed to connect specifically to iPod, iPhone,
or iPad, respectively, and has been certified by the developer to meet Apple
performance standards. Apple is not responsible for the operation of this device
or its compliance with safety and regulatory standards.
Please note that the use of this accessory with iPod, iPhone or iPad may affect
wireless performance.
AirPlay works with iPhone, iPad, and iPod touch with iOS 4.3.3 or later, Mac
with OS X Mountain Lion or later, and PC with iTunes 10.2.2 or later.
Apple, Apple TV and Safari are trademarks of Apple Inc., registered in the U.S.
and other countries.
En-26
DISCLAIMER
Through this device you are able to link to other services or
websites which are not under the control of any company which has
designed, manufactured or distributed/have distributed this device,
and its affiliates (collectively, "Company"). We have no control over
the nature, content and availability of those services. The inclusion
of any links does not necessarily imply a recommendation or
endorse the views expressed within them.
All information, content and services available through this device
belong to third parties and are protected by copyright, patent,
trademark and/or other intellectual property laws of applicable
countries.
The information, content and services provided through this device
are for your personal, noncommercial use only. Any information,
content or services may not be used in any manner other than
previously approved by the appropriate content owner or service
provider.
You may not modify, copy, republish, translate, exploit, create
derivative works, upload, post, transmit, sell or distribute in any
manner any information, content or services available through this
device, unless expressly permitted by the appropriate copyright,
patent, trademark and/or other intellectual property owner, including,
without limitation, content owner or service provider.
THE CONTENT AND SERVICES AVAILABLE THROUGH THIS
DEVICE ARE PROVIDED "AS IS".
COMPANY DOES NOT WARRANT INFORMATION, CONTENT OR
SERVICES SO PROVIDED, EITHER EXPRESSLY OR IMPLIEDLY,
FOR ANY PURPOSE.
COMPANY EXPRESSLY DISCLAIMS ANY WARRANTIES,
EXPRESS OR IMPLIED, INCLUDING BUT NOT LIMITED
TO, WARRANTIES OF TITLE, NON-INFRINGEMENT,
MERCHANTABILITY OR FITNESS FOR A PARTICULAR
PURPOSE.
Company makes no representation or warranty of any kind, express
or implied, about the completeness, accuracy, validity, legality,
reliability, suitability or availability with respect to the information,
content or services available through this device. Company shall not
be liable, whether in contract or tort, including negligence and strict
liability, for any direct, indirect, special, incidental or consequential
damages or any other damages arising out of, or in connection with,
any information contained in, or as a result of the use of any content
or service by you or any third party, even if Company has been
advised of the possibility of such damages, nor shall Company be
liable for any third party claims against users of this device or any
third party.
In no event shall Company be responsible nor liable for, without limiting the
generality of the foregoing, any interruption or suspension of any information,
content or service available through this device. Company is neither
responsible nor liable for customer service related to the information, content
and services available through this device. Any question or request for service
relating to the information, content or services should be made directly to the
appropriate content owners and services providers.
Others
GNU License
Important Notice Regarding Software
The software package installed in this product includes software licensed to Onkyo Corporation (hereinafter, called "Onkyo")
directly or indirectly by third party developers. Please be sure to read this notice regarding such software.
Notice Regarding GNU GPL/LGPL-applicable Software
This product includes the following software that is covered by GNU General Public License (hereinafter, called "GPL") or by
GNU Lesser General Public License (hereinafter, called "LGPL").
Onkyo notifies you that, according to the attached GPL/LGPL, you have right to obtain, modify, and redistribute software source
code for the listed software.
Package List
linux uClibcbusybox
libgcc libstdc++libmms
compat-wirelesswpa_supplicant dnsmasq
libiconvbluez dbus
iperffaad
GNU LESSER GENERAL PUBLIC LICENSE
Version 2.1, February 1999
Copyright (C) 1991, 1999 Free Software Foundation, Inc. 59 Temple Place, Suite 330, Boston, MA 02111-1307 USA Everyone
is permitted to copy and distribute verbatim copies of this license document, but changing it is not allowed.
[This is the first released version of the Lesser GPL. It also counts as the successor of the GNU Library Public License, version
2, hence the version number 2.1.]
Preamble
The licenses for most software are designed to take away your freedom to share and change it. By contrast, the GNU General
Public Licenses are intended to guarantee your freedom to share and change free software--to make sure the software is free
for all its users.
This license, the Lesser General Public License, applies to some specially designated software packages--typically libraries--of
the Free Software Foundation and other authors who decide to use it. You can use it too, but we suggest you first think carefully
about whether this license or the ordinary General Public License is the better strategy to use in any particular case, based on
the explanations below.
When we speak of free software, we are referring to freedom of use, not price. Our General Public Licenses are designed to
make sure that you have the freedom to distribute copies of free software (and charge for this service if you wish); that you
receive source code or can get it if you want it; that you can change the software and use pieces of it in new free programs; and
that you are informed that you can do these things.
To protect your rights, we need to make restrictions that forbid distributors to deny you these rights or to ask you to surrender
these rights. These restrictions translate to certain responsibilities for you if you distribute copies of the library or if you modify it.
For example, if you distribute copies of the library, whether gratis or for a fee, you must give the recipients all the rights that we
gave you. You must make sure that they, too, receive or can get the source code. If you link other code with the library, you must
provide complete object files to the recipients, so that they can relink them with the library after making changes to the library and
recompiling it. And you must show them these terms so they know their rights.
We protect your rights with a two-step method: (1) we copyright the library, and (2) we offer you this license, which gives you
legal permission to copy, distribute and/or modify the library. To protect each distributor, we want to make it very clear that there
is no warranty for the free library. Also, if the library is modified by someone else and passed on, the recipients should know that
what they have is not the original version, so that the original author's reputation will not be affected by problems that might be
introduced by others.
Finally, software patents pose a constant threat to the existence of any free program. We wish to make sure that a company
cannot effectively restrict the users of a free program by obtaining a restrictive license from a patent holder. Therefore, we
insist that any patent license obtained for a version of the library must be consistent with the full freedom of use specified in
this license.
Most GNU software, including some libraries, is covered by the ordinary GNU General Public License. This license, the GNU
Lesser General Public License, applies to certain designated libraries, and is quite different from the ordinary General Public
License. We use this license for certain libraries in order to permit linking those libraries into non-free programs.
When a program is linked with a library, whether statically or using a shared library, the combination of the two is legally speaking
a combined work, a derivative of the original library. The ordinary General Public License therefore permits such linking only if
the entire combination fits its criteria of freedom. The Lesser General Public License permits more lax criteria for linking other
code with the library.
We call this license the "Lesser" General Public License because it does Less to protect the user's freedom than the ordinary
General Public License. It also provides other free software developers Less of an advantage over competing non-free programs.
These disadvantages are the reason we use the ordinary General Public License for many libraries. However, the Lesser license
provides advantages in certain special circumstances.
For example, on rare occasions, there may be a special need to encourage the widest possible use of a certain library, so that it
becomes a de-facto standard. To achieve this, non-free programs must be allowed to use the library. A more frequent case is that
a free library does the same job as widely used non-free libraries. In this case, there is little to gain by limiting the free library to
free software only, so we use the Lesser General Public License.
In other cases, permission to use a particular library in non-free programs enables a greater number of people to use a large
body of free software. For example, permission to use the GNU C Library in non-free programs enables many more people to
use the whole GNU operating system, as well as its variant, the GNU/Linux operating system.
Although the Lesser General Public License is Less protective of the users' freedom, it does ensure that the user of a program
that is linked with the Library has the freedom and the wherewithal to run that program using a modified version of the Library.
The precise terms and conditions for copying, distribution and modification follow. Pay close attention to the difference between
a "work based on the library" and a "work that uses the library". The former contains code derived from the library, whereas the
latter must be combined with the library in order to run.
TERMS AND CONDITIONS FOR COPYING, DISTRIBUTION AND MODIFICATION
0. This License Agreement applies to any software library or other program which contains a notice placed by the
copyright holder or other authorized party saying it may be distributed under the terms of this Lesser General
Public License (also called "this License"). Each licensee is addressed as "you".
A "library" means a collection of software functions and/or data prepared so as to be conveniently linked with application
programs (which use some of those functions and data) to form executables.
The "Library", below, refers to any such software library or work which has been distributed under these terms. A "work based
on the Library" means either the Library or any derivative work under copyright law: that is to say, a work containing the Library
or a portion of it, either verbatim or with modifications and/or translated straightforwardly into another language. (Hereinafter,
translation is included without limitation in the term "modification".)
"Source code" for a work means the preferred form of the work for making modifications to it. For a library, complete source code
means all the source code for all modules it contains, plus any associated interface definition files, plus the scripts used to control
compilation and installation of the library.
Activities other than copying, distribution and modification are not covered by this License; they are outside its scope. The act of
running a program using the Library is not restricted, and output from such a program is covered only if its contents constitute a
work based on the Library (independent of the use of the Library in a tool for writing it). Whether that is true depends on what the
Library does and what the program that uses the Library does.
1. You may copy and distribute verbatim copies of the Library's complete source code as you receive it, in any
medium, provided that you conspicuously and appropriately publish on each copy an appropriate copyright
notice and disclaimer of warranty; keep intact all the notices that refer to this License and to the absence of any
warranty; and distribute a copy of this License along with the Library.
You may charge a fee for the physical act of transferring a copy, and you may at your option offer warranty protection in
exchange for a fee.
2. You may modify your copy or copies of the Library or any portion of it, thus forming a work based on the
Library, and copy and distribute such modifications or work under the terms of Section 1 above, provided that
you also meet all of these conditions:
a) The modified work must itself be a software library.
b) You must cause the files modified to carry prominent notices stating that you changed the files and the date
of any change.
c) You must cause the whole of the work to be licensed at no charge to all third parties under the terms of this
License
d) If a facility in the modified Library refers to a function or a table of data to be supplied by an application
program that uses the facility, other than as an argument passed when the facility is invoked, then you must
make a good faith effort to ensure that, in the event an application does not supply such function or table, the
facility still operates, and performs whatever part of its purpose remains meaningful.
(For example, a function in a library to compute square roots has a purpose that is entirely well-defined
independent of the application. Therefore, Subsection 2d requires that any application-supplied function or table
used by this function must be optional: if the application does not supply it, the square root function must still
compute square roots.)
These requirements apply to the modified work as a whole. If identifiable sections of that work are not derived
from the Library, and can be reasonably considered independent and separate works in themselves, then this
License, and its terms, do not apply to those sections when you distribute them as separate works. But when you
distribute the same sections as part of a whole which is a work based on the Library, the distribution of the
whole must be on the terms of this License, whose permissions for other licensees extend to the entire whole,
and thus to each and every part regardless of who wrote it.
Thus, it is not the intent of this section to claim rights or contest your rights to work written entirely by you; rather, the intent is to
exercise the right to control the distribution of derivative or collective works based on the Library.
In addition, mere aggregation of another work not based on the Library with the Library (or with a work based on the Library) on a
volume of a storage or distribution medium does not bring the other work under the scope of this License.
3. You may opt to apply the terms of the ordinary GNU General Public License instead of this License to a given
copy of the Library. To do this, you must alter all the notices that refer to this License, so that they refer to the
ordinary GNU General Public License, version 2, instead of to this License. (If a newer version than version 2 of
the ordinary GNU General Public License has appeared, then you can specify that version instead if you wish.)
Do not make any other change in these notices.
Once this change is made in a given copy, it is irreversible for that copy, so the ordinary GNU General Public License applies to
all subsequent copies and derivative works made from that copy.
This option is useful when you wish to copy part of the code of the Library into a program that is not a library.
4. You may copy and distribute the Library (or a portion or derivative of it, under Section 2) in object code or
executable form under the terms of Sections 1 and 2 above provided that you accompany it with the complete
corresponding machine-readable source code, which must be distributed under the terms of Sections 1 and 2
above on a medium customarily used for software interchange.
If distribution of object code is made by offering access to copy from a designated place, then offering
equivalent access to copy the source code from the same place satisfies the requirement to distribute the
source code, even though third parties are not compelled to copy the source along with the object code.
5. A program that contains no derivative of any portion of the Library, but is designed to work with the Library by
being compiled or linked with it, is called a "work that uses the Library". Such a work, in isolation, is not a
derivative work of the Library, and therefore falls outside the scope of this License.
However, linking a "work that uses the Library" with the Library creates an executable that is a derivative of the Library (because
it contains portions of the Library), rather than a "work that uses the library". The executable is therefore covered by this License.
Section 6 states terms for distribution of such executables.
When a "work that uses the Library" uses material from a header file that is part of the Library, the object code for the work may
be a derivative work of the Library even though the source code is not. Whether this is true is especially significant if the work
can be linked without the Library, or if the work is itself a library. The threshold for this to be true is not precisely defined by law.
If such an object file uses only numerical parameters, data structure layouts and accessors, and small macros and small inline
functions (ten lines or less in length), then the use of the object file is unrestricted, regardless of whether it is legally a derivative
work. (Executables containing this object code plus portions of the Library will still fall under Section 6.)
Otherwise, if the work is a derivative of the Library, you may distribute the object code for the work under the terms of Section 6.
Any executables containing that work also fall under Section 6, whether or not they are linked directly with the Library itself.
6. As an exception to the Sections above, you may also combine or link a "work that uses the Library" with the
Library to produce a work containing portions of the Library, and distribute that work under terms of your
choice, provided that the terms permit modification of the work for the customer's own use and reverse
engineering for debugging such modifications.
You must give prominent notice with each copy of the work that the Library is used in it and that the Library and its use are
covered by this License. You must supply a copy of this License. If the work during execution displays copyright notices, you
must include the copyright notice for the Library among them, as well as a reference directing the user to the copy of this
License. Also, you must do one of these things:
a) Accompany the work with the complete corresponding machine-readable source code for the Library
including whatever changes were used in the work (which must be distributed under Sections 1 and 2 above);
and, if the work is an executable linked with the Library, with the complete machine-readable "work that
uses the Library", as object code and/or source code, so that the user can modify the Library and then relink
to produce a modified executable containing the modified Library. (It is understood that the user who changes
the contents of definitions files in the Library will not necessarily be able to recompile the application to use
the modified definitions.)
b) Use a suitable shared library mechanism for linking with the Library. A suitable mechanism is one that (1)
uses at run time a copy of the library already present on the user's computer system, rather than copying
library functions into the executable, and (2) will operate properly with a modified version of the library, if the
user installs one, as long as the modified version is interface-compatible with the version that the work was
made with.
c) Accompany the work with a written offer, valid for at least three years, to give the same user the materials
specified in Subsection 6a, above, for a charge no more than the cost of performing this distribution.
d) If distribution of the work is made by offering access to copy from a designated place, offer equivalent
access to copy the above specified materials from the same place.
e) Verify that the user has already received a copy of these materials or that you have already sent this user a
copy.
For an executable, the required form of the "work that uses the Library" must include any data and utility programs needed for
reproducing the executable from it. However, as a special exception, the materials to be distributed need not include anything
that is normally distributed (in either source or binary form) with the major components (compiler, kernel, and so on) of the
operating system on which the executable runs, unless that component itself accompanies the executable.
It may happen that this requirement contradicts the license restrictions of other proprietary libraries that do not normally
accompany the operating system. Such a contradiction means you cannot use both them and the Library together in an
executable that you distribute.
7. You may place library facilities that are a work based on the Library side-by-side in a single library together
with other library facilities not covered by this License, and distribute such a combined library, provided that the
separate distribution of the work based on the Library and of the other library facilities is otherwise permitted,
and provided that you do these two things:
a) Accompany the combined library with a copy of the same work based on the Library, uncombined with any
other library facilities. This must be distributed under the terms of the Sections above.
b) Give prominent notice with the combined library of the fact that part of it is a work based on the Library, and
explaining where to find the accompanying uncombined form of the same work.
8. You may not copy, modify, sublicense, link with, or distribute the Library except as expressly provided under
this License. Any attempt otherwise to copy, modify, sublicense, link with, or distribute the Library is void, and will
automatically terminate your rights under this License. However, parties who have received copies, or rights,
from you under this License will not have their licenses terminated so long as such parties remain in full
compliance.
9. You are not required to accept this License, since you have not signed it. However, nothing else grants you
permission to modify or distribute the Library or its derivative works. These actions are prohibited by law if you
do not accept this License. Therefore, by modifying or distributing the Library (or any work based on the
Library), you indicate your acceptance of this License to do so, and all its terms and conditions for copying,
distributing or modifying the Library or works based on it.
10. Each time you redistribute the Library (or any work based on the Library), the recipient automatically receives
a license from the original licensor to copy, distribute, link with or modify the Library subject to these terms and
conditions. You may not impose any further restrictions on the recipients' exercise of the rights granted herein.
You are not responsible for enforcing compliance by third parties with this License.
11. If, as a consequence of a court judgment or allegation of patent infringement or for any other reason (not
limited to patent issues), conditions are imposed on you (whether by court order, agreement or otherwise) that
contradict the conditions of this License, they do not excuse you from the conditions of this License. If you
cannot distribute so as to satisfy simultaneously your obligations under this License and any other pertinent
obligations, then as a consequence you may not distribute the Library at all. For example, if a patent license
would not permit royalty-free redistribution of the Library by all those who receive copies directly or indirectly
through you, then the only way you could satisfy both it and this License would be to refrain entirely from
distribution of the Library.
If any portion of this section is held invalid or unenforceable under any particular circumstance, the balance of the section is
intended to apply, and the section as a whole is intended to apply in other circumstances.
It is not the purpose of this section to induce you to infringe any patents or other property right claims or to contest validity of
any such claims; this section has the sole purpose of protecting the integrity of the free software distribution system which
is implemented by public license practices. Many people have made generous contributions to the wide range of software
distributed through that system in reliance on consistent application of that system; it is up to the author/donor to decide if he or
she is willing to distribute software through any other system and a licensee cannot impose that choice.
This section is intended to make thoroughly clear what is believed to be a consequence of the rest of this License.
12. If the distribution and/or use of the Library is restricted in certain countries either by patents or by
copyrighted interfaces, the original copyright holder who places the Library under this License may add an
explicit geographical distribution limitation excluding those countries, so that distribution is permitted only in or
among countries not thus excluded. In such case, this License incorporates the limitation as if written in the
body of this License.
13. The Free Software Foundation may publish revised and/or new versions of the Lesser General Public License
from time to time. Such new versions will be similar in spirit to the present version, but may differ in detail to
address new problems or concerns.
Each version is given a distinguishing version number. If the Library specifies a version number of this License which applies to
it and "any later version", you have the option of following the terms and conditions either of that version or of any later version
published by the Free Software Foundation. If the Library does not specify a license version number, you may choose any
version ever published by the Free Software Foundation.
14. If you wish to incorporate parts of the Library into other free programs whose distribution conditions are
incompatible with these, write to the author to ask for permission. For software which is copyrighted by the
Free Software Foundation, write to the Free Software Foundation; we sometimes make exceptions for this. Our
decision will be guided by the two goals of preserving the free status of all derivatives of our free software and
of promoting the sharing and reuse of software generally.
NO WARRANTY
15. BECAUSE THE LIBRARY IS LICENSED FREE OF CHARGE, THERE IS NO WARRANTY FOR THE LIBRARY, TO THE
EXTENT PERMITTED BY APPLICABLE LAW. EXCEPT WHEN OTHERWISE STATED IN WRITING THE COPYRIGHT
HOLDERS AND/OR OTHER PARTIES PROVIDE THE LIBRARY "AS IS" WITHOUT WARRANTY OF ANY
KIND, EITHER EXPRESSED OR IMPLIED, INCLUDING, BUT NOT LIMITED TO, THE IMPLIED WARRANTIES OF
MERCHANTABILITY AND FITNESS FOR A PARTICULAR PURPOSE. THE ENTIRE RISK AS TO THE QUALITY AND
PERFORMANCE OF THE LIBRARY IS WITH YOU. SHOULD THE LIBRARY PROVE DEFECTIVE, YOU ASSUME THE
COST OF ALL NECESSARY SERVICING, REPAIR OR CORRECTION.
16. IN NO EVENT UNLESS REQUIRED BY APPLICABLE LAW OR AGREED TO IN WRITING WILL ANY COPYRIGHT
HOLDER, OR ANY OTHER PARTY WHO MAY MODIFY AND/OR REDISTRIBUTE THE LIBRARY AS PERMITTED
ABOVE, BE LIABLE TO YOU FOR DAMAGES, INCLUDING ANY GENERAL, SPECIAL, INCIDENTAL OR
CONSEQUENTIAL DAMAGES ARISING OUT OF THE USE OR INABILITY TO USE THE LIBRARY (INCLUDING BUT
NOT LIMITED TO LOSS OF DATA OR DATA BEING RENDERED INACCURATE OR LOSSES SUSTAINED BY YOU
OR THIRD PARTIES OR A FAILURE OF THE LIBRARY TO OPERATE WITH ANY OTHER SOFTWARE), EVEN IF
SUCH HOLDER OR OTHER PARTY HAS BEEN ADVISED OF THE POSSIBILITY OF SUCH DAMAGES.
END OF TERMS AND CONDITIONS
How to Apply These Terms to Your New Libraries
If you develop a new library, and you want it to be of the greatest possible use to the public, we recommend making it
free software that everyone can redistribute and change. You can do so by permitting redistribution under these terms (or,
alternatively, under the terms of the ordinary General Public License).
En-27
Others
To apply these terms, attach the following notices to the library. It is safest to attach them to the start of each source file to most
effectively convey the exclusion of warranty; and each file should have at least the "copyright" line and a pointer to where the
full notice is found.
<one line to give the library's name and an idea of what it does.>
Copyright (C) <year> <name of author>
This library is free software; you can redistribute it and/or modify it under the terms of the GNU Lesser General Public License as
published by the Free Software Foundation; either version 2.1 of the License, or (at your option) any later version.
This library is distributed in the hope that it will be useful, but WITHOUT ANY WARRANTY; without even the implied warranty
of MERCHANTABILITY or FITNESS FOR A PARTICULAR PURPOSE. See the GNU Lesser General Public License for more
details.
You should have received a copy of the GNU Lesser General Public License along with this library; if not, write to the Free
Software Foundation, Inc., 59 Temple Place, Suite 330, Boston, MA 02111-1307 USA
Also add information on how to contact you by electronic and paper mail.
You should also get your employer (if you work as a programmer) or your school, if any, to sign a "copyright disclaimer" for the
library, if necessary. Here is a sample; alter the names:
Yoyodyne, Inc., hereby disclaims all copyright interest in the library `Frob' (a library for tweaking knobs) written by James
Random Hacker.
signature of Ty Coon, 1 April 1990
Ty Coon, President of Vice
That's all there is to it!
GNU GENERAL PUBLIC LICENSE
Version 2, June 1991
Copyright (C) 1989, 1991 Free Software Foundation, Inc.59 Temple Place - Suite 330, Boston, MA 02111-1307, USA
Everyone is permitted to copy and distribute verbatim copies of this license document, but changing it is not allowed.
Preamble
The licenses for most software are designed to take away your freedom to share and change it. By contrast, the GNU General
Public License is intended to guarantee your freedom to share and change free software--to make sure the software is free for
all its users. This General Public License applies to most of the Free Software Foundation's software and to any other program
whose authors commit to using it. (Some other Free Software Foundation software is covered by the GNU Library General Public
License instead.) You can apply it to your programs, too.
When we speak of free software, we are referring to freedom, not price. Our General Public Licenses are designed to make sure
that you have the freedom to distribute copies of free software (and charge for this service if you wish), that you receive source
code or can get it if you want it, that you can change the software or use pieces of it in new free programs; and that you know
you can do these things.
To protect your rights, we need to make restrictions that forbid anyone to deny you these rights or to ask you to surrender the
rights. These restrictions translate to certain responsibilities for you if you distribute copies of the software, or if you modify it.
For example, if you distribute copies of such a program, whether gratis or for a fee, you must give the recipients all the rights
that you have. You must make sure that they, too, receive or can get the source code. And you must show them these terms so
they know their rights.
We protect your rights with two steps: (1) copyright the software, and (2) offer you this license which gives you legal permission
to copy, distribute and/or modify the software.
Also, for each author's protection and ours, we want to make certain that everyone understands that there is no warranty for this
free software. If the software is modified by someone else and passed on, we want its recipients to know that what they have is
not the original, so that any problems introduced by others will not reflect on the original authors' reputations.
Finally, any free program is threatened constantly by software patents. We wish to avoid the danger that redistributors of a free
program will individually obtain patent licenses, in effect making the program proprietary. To prevent this, we have made it clear
that any patent must be licensed for everyone's free use or not licensed at all.
The precise terms and conditions for copying, distribution and modification follow.
TERMS AND CONDITIONS FOR COPYING, DISTRIBUTION AND MODIFICATION
This License applies to any program or other work which contains a notice placed by the copyright holder saying it may
be distributed under the terms of this General Public License. The "Program", below, refers to any such program or work,
and a "work based on the Program" means either the Program or any derivative work under copyright law: that is to say, a
work containing the Program or a portion of it, either verbatim or with modifications and/or translated into another language.
(Hereinafter, translation is included without limitation in the term "modification".) Each licensee is addressed as "you".
Activities other than copying, distribution and modification are not covered by this License; they are outside its scope. The
act of running the Program is not restricted, and the output from the Program is covered only if its contents constitute a work
based on the Program (independent of having been made by running the Program). Whether that is true depends on what the
Program does.
You may copy and distribute verbatim copies of the Program's source code as you receive it, in any
medium, provided that you conspicuously and appropriately publish on each copy an appropriate copyright notice and disclaimer
of warranty; keep intact all the notices that refer to this License and to the absence of any warranty; and give any other recipients
of the Program a copy of this License along with the Program.
You may charge a fee for the physical act of transferring a copy, and you may at your option offer warranty protection in
exchange for a fee.
You may modify your copy or copies of the Program or any portion of it, thus forming a work based on the Program, and copy
and distribute such modifications or work under the terms of Section 1 above, provided that you also meet all of these conditions:
a)
You must cause the modified files to carry prominent notices stating that you changed the files and the
date of any change.
b)
You must cause any work that you distribute or publish, that in whole or in part contains or is derived from
the Program or any part thereof, to be licensed as a whole at no charge to all third parties under the terms of this License.
c)
If the modified program normally reads commands interactively when run, you must cause it, when started
running for such interactive use in the most ordinary way, to print or display an announcement including an appropriate copyright
notice and a notice that there is no warranty (or else, saying that you provide a warranty) and that users may redistribute the
program under these conditions, and telling the user how to view a copy of this License. (Exception: if the Program itself is
interactive but does not normally print such an announcement, your work based on the Program is not required to print an
announcement.)
These requirements apply to the modified work as a whole. If identifiable sections of that work are not derived from the Program,
and can be reasonably considered independent and separate works in themselves, then this License, and its terms, do not apply
to those sections when you distribute them as separate works. But when you distribute the same sections as part of a whole
which is a work based on the Program, the distribution of the whole must be on the terms of this License, whose permissions for
other licensees extend to the entire whole, and thus to each and every part regardless of who wrote it.
Thus, it is not the intent of this section to claim rights or contest your rights to work written entirely by you; rather, the intent is to
exercise the right to control the distribution of derivative or collective works based on the Program.
In addition, mere aggregation of another work not based on the Program with the Program (or with a work based on the
Program) on a volume of a storage or distribution medium does not bring the other work under the scope of this License.
You may copy and distribute the Program (or a work based on it, under Section 2) in object code or executable form under the
terms of Sections 1 and 2 above provided that you also do one of the following:
a)
Accompany it with the complete corresponding machine-readable source code, which must be distributed
under the terms of Sections 1 and 2 above on a medium customarily used for software interchange;or,
b)
Accompany it with a written offer, valid for at least three years, to give any third party, for a charge no more
En-28
than your cost of physically performing source distribution, a complete machine-readable copy of the corresponding source code,
to be distributed under the terms of Sections 1 and 2 above on a medium customarily used for software interchange; or,
c)
Accompany it with the information you received as to the offer to distribute corresponding source code.
(This alternative is allowed only for noncommercial distribution and only if you received the program in object code or executable
form with such an offer, in accord with Subsection b above.)
The source code for a work means the preferred form of the work for making modifications to it. For an executable work,
complete source code means all the source code for all modules it contains, plus any associated interface definition files, plus
the scripts used to control compilation and installation of the executable. However, as a special exception, the source code
distributed need not include anything that is normally distributed (in either source or binary form) with the major components
(compiler, kernel, and so on) of the operating system on which the executable runs, unless that component itself accompanies
the executable.
If distribution of executable or object code is made by offering access to copy from a designated place, then offering equivalent
access to copy the source code from the same place counts as distribution of the source code, even though third parties are not
compelled to copy the source along with the object code.
You may not copy, modify, sublicense, or distribute the Program except as expressly provided under this License. Any attempt
otherwise to copy, modify, sublicense or distribute the Program is void, and will automatically terminate your rights under
this License. However, parties who have received copies, or rights, from you under this License will not have their licenses
terminated so long as such parties remain in full compliance.
You are not required to accept this License, since you have not signed it. However, nothing else grants you permission to modify
or distribute the Program or its derivative works. These actions are prohibited by law if you do not accept this License. Therefore,
by modifying or distributing the Program (or any work based on the Program), you indicate your acceptance of this License to do
so, and all its terms and conditions for copying, distributing or modifying the Program or works based on it.
Each time you redistribute the Program (or any work based on the Program), the recipient automatically receives a license from
the original licensor to copy, distribute or modify the Program subject to these terms and conditions. You may not impose any
further restrictions on the recipients' exercise of the rights granted herein. You are not responsible for enforcing compliance by
third parties to this License.
If, as a consequence of a court judgment or allegation of patent infringement or for any other reason (not limited to patent
issues), conditions are imposed on you (whether by court order, agreement or otherwise) that contradict the conditions of this
License, they do not excuse you from the conditions of this License. If you cannot distribute so as to satisfy simultaneously your
obligations under this License and any other pertinent obligations, then as a consequence you may not distribute the Program
at all. For example, if a patent license would not permit royalty-free redistribution of the Program by all those who receive copies
directly or indirectly through you, then the only way you could satisfy both it and this License would be to refrain entirely from
distribution of the Program.
If any portion of this section is held invalid or unenforceable under any particular circumstance, the balance of the section is
intended to apply and the section as a whole is intended to apply in other circumstances.
It is not the purpose of this section to induce you to infringe any patents or other property right claims or to contest validity of
any such claims; this section has the sole purpose of protecting the integrity of the free software distribution system, which
is implemented by public license practices. Many people have made generous contributions to the wide range of software
distributed through that system in reliance on consistent application of that system; it is up to the author/donor to decide if he or
she is willing to distribute software through any other system and a licensee cannot impose that choice.
This section is intended to make thoroughly clear what is believed to be a consequence of the rest of this License.
If the distribution and/or use of the Program is restricted in certain countries either by patents or by copyrighted interfaces, the
original copyright holder who places the Program under this License may add an explicit geographical distribution limitation
excluding those countries, so that distribution is permitted only in or among countries not thus excluded. In such case, this
License incorporates the limitation as if written in the body of this License.
The Free Software Foundation may publish revised and/or new versions of the General Public License from time to time. Such
new versions will be similar in spirit to the present version, but may differ in detail to address new problems or concerns.
Each version is given a distinguishing version number. If the Program specifies a version number of this License which applies
to it and "any later version", you have the option of following the terms and conditions either of that version or of any later version
published by the Free Software Foundation. If the Program does not specify a version number of this License, you may choose
any version ever published by the Free Software Foundation.
If you wish to incorporate parts of the Program into other free programs whose distribution conditions are different, write to the
author to ask for permission. For software which is copyrighted by the Free Software Foundation, write to the Free Software
Foundation; we sometimes make exceptions for this. Our decision will be guided by the two goals of preserving the free status of
all derivatives of our free software and of promoting the sharing and reuse of software generally.
NO WARRANTY
BECAUSE THE PROGRAM IS LICENSED FREE OF CHARGE, THERE IS NO WARRANTY FOR THE PROGRAM, TO
THE EXTENT PERMITTED BY APPLICABLE LAW. EXCEPT WHEN OTHERWISE STATED IN WRITING THE COPYRIGHT
HOLDERS AND/OR OTHER PARTIES PROVIDE THE PROGRAM "AS IS" WITHOUT WARRANTY OF ANY KIND, EITHER
EXPRESSED OR IMPLIED, INCLUDING, BUT NOT LIMITED TO, THE IMPLIED WARRANTIES OF MERCHANTABILITY
AND FITNESS FOR A PARTICULAR PURPOSE. THE ENTIRE RISK AS TO THE QUALITY AND PERFORMANCE OF THE
PROGRAM IS WITH YOU. SHOULD THE PROGRAM PROVE DEFECTIVE, YOU ASSUME THE COST OF ALL NECESSARY
SERVICING, REPAIR OR CORRECTION.
IN NO EVENT UNLESS REQUIRED BY APPLICABLE LAW OR AGREED TO IN WRITING WILL ANY COPYRIGHT HOLDER,
OR ANY OTHER PARTY WHO MAY MODIFY AND/OR REDISTRIBUTE THE PROGRAM AS PERMITTED ABOVE, BE
LIABLE TO YOU FOR DAMAGES, INCLUDING ANY GENERAL, SPECIAL, INCIDENTAL OR CONSEQUENTIAL DAMAGES
ARISING OUT OF THE USE OR INABILITY TO USE THE PROGRAM (INCLUDING BUT NOT LIMITED TO LOSS OF DATA
OR DATA BEING RENDERED INACCURATE OR LOSSES SUSTAINED BY YOU OR THIRD PARTIES OR A FAILURE OF
THE PROGRAM TO OPERATE WITH ANY OTHER PROGRAMS), EVEN IF SUCH HOLDER OR OTHER PARTY HAS BEEN
ADVISED OF THE POSSIBILITY OF SUCH DAMAGES.
END OF TERMS AND CONDITIONS
How to Apply These Terms to Your New Programs
If you develop a new program, and you want it to be of the greatest possible use to the public, the best way to achieve this is to
make it free software which everyone can redistribute and change under these terms.
To do so, attach the following notices to the program. It is safest to attach them to the start of each source file to most effectively
convey the exclusion of warranty; and each file should have at least the "copyright" line and a pointer to where the full notice
is found.
<one line to give the program's name and an idea of what it does.>
Copyright (C) <year> <name of author>
This program is free software; you can redistribute it and/or modify it under the terms of the GNU General Public License as
published by the Free Software Foundation; either version 2 of the License, or (at your option) any later version.
This program is distributed in the hope that it will be useful, but WITHOUT ANY WARRANTY; without even the implied warranty
of MERCHANTABILITY or FITNESS FOR A PARTICULAR PURPOSE. See the GNU General Public License for more details.
You should have received a copy of the GNU General Public License along with this program; if not, write to the Free Software
Foundation, Inc., 59 Temple Place - Suite 330, Boston, MA 02111-1307, USA.
Also add information on how to contact you by electronic and paper mail.
If the program is interactive, make it output a short notice like this when it starts in an interactive mode:
Gnomovision version 69, Copyright (C) year name of author Gnomovision comes with ABSOLUTELY NO WARRANTY; for details
type `show w'. This is free software, and you are welcome to redistribute it under certain conditions; type `show c' for details.
The hypothetical commands `show w' and `show c' should show the appropriate parts of the General Public License. Of course,
the commands you use may be called something other than `show w' and `show c'; they could even be mouse-clicks or menu
items--whatever suits your program.
You should also get your employer (if you work as a programmer) or your school, if any, to sign a "copyright disclaimer" for the
program, if necessary. Here is a sample; alter the names:
Yoyodyne, Inc., hereby disclaims all copyright interest in the program `Gnomovision' (which makes passes at compilers) written
by James Hacker.
<signature of Ty Coon>, 1 April 1989
Ty Coon, President of Vice
This General Public License does not permit incorporating your program into proprietary programs. If your program is a
subroutine library, you may consider it more useful to permit linking proprietary applications with the library. If this is what you
want to do, use the GNU Library General Public License instead of this License.
Notice Regarding Third-party Software
This product includes the following software that is directly or indirectly licensed to Onkyo by third-party developers.
1.bfsh-sk
2.ixml
3.libcurl
4.libFLAC
5.libjpeg
6.libogg
7.libpng
8.libvorbis
9.ntp
10.OpenSSL
11.popt
12.
RSA Data Security, Inc. MD5 Message-Digest Algorithm
13.
thttpd 2.25b
14.zlib
15.
Apple Lossless
16.Boost
17.Expat
18.FastDelegate
19.Tremolo
20.Tremor
21.
Mersenne Twister
22.cURL
23.c-ares
24.LZ4
In response to requests from the copyright owners of each piece of software, Onkyo notifies you of the following:
1.bfsh-sk
2.ixml
3.libcurl
4.libFLAC
5.libjpeg
6.libogg
7.libpng
8.libvorbis
9.ntp
10.OpenSSL
11.popt
12.
RSA Data Security, Inc. MD5 Message-Digest Algorithm
13.
thttpd 2.25b
14.zlib
15.
Apple Lossless
16.Boost
17.Expat
18.FastDelegate
19.Tremolo
20.Tremor
21.
Mersenne Twister
22.cURL
23.c-ares
24.LZ4
(1) bfsh-sk
Copyright (c) 2007 Samuel KABAK
Permission is hereby granted, free of charge, to any person obtaining a copy of this software and associated documentation files
(the "Software"), to deal in the Software without restriction, including without limitation the rights to use, copy, modify, merge,
publish, distribute, sublicense, and/or sell copies of the Software, and to permit persons to whom the Software is furnished to do
so, subject to the following conditions:
The above copyright notice and this permission notice shall be included in all copies or substantial portions of the Software.
THE SOFTWARE IS PROVIDED "AS IS", WITHOUT WARRANTY OF ANY KIND, EXPRESS OR IMPLIED, INCLUDING
BUT NOT LIMITED TO THE WARRANTIES OF MERCHANTABILITY, FITNESS FOR A PARTICULAR PURPOSE AND
NONINFRINGEMENT. IN NO EVENT SHALL THE AUTHORS OR COPYRIGHT HOLDERS BE LIABLE FOR ANY CLAIM,
DAMAGES OR OTHER LIABILITY, WHETHER IN AN ACTION OF CONTRACT, TORT OR OTHERWISE, ARISING FROM, OUT
OF OR IN CONNECTION WITH THE SOFTWARE OR THE USE OR OTHER DEALINGS IN THE SOFTWARE.
(2) ixml
Copyright (c) 2000-2003 Intel Corporation All rights reserved.
Redistribution and use in source and binary forms, with or without modification, are permitted provided that the following
conditions are met:
*
Redistributions of source code must retain the above copyright notice, this list of conditions and the
following disclaimer.
*
Redistributions in binary form must reproduce the above copyright notice, this list of conditions and the
following disclaimer in the documentation and/or other materials provided with the distribution.
*
Neither name of Intel Corporation nor the names of its contributors may be used to endorse or promote
products derived from this software without specific prior written permission.
THIS SOFTWARE IS PROVIDED BY THE COPYRIGHT HOLDERS AND CONTRIBUTORS "AS IS" AND ANY EXPRESS OR
IMPLIED WARRANTIES, INCLUDING, BUT NOT LIMITED TO, THE IMPLIED WARRANTIES OF MERCHANTABILITY AND
FITNESS FOR A PARTICULAR PURPOSE ARE DISCLAIMED. IN NO EVENT SHALL INTEL OR CONTRIBUTORS BE LIABLE
FOR ANY DIRECT, INDIRECT, INCIDENTAL, SPECIAL, EXEMPLARY, OR CONSEQUENTIAL DAMAGES (INCLUDING, BUT
Others
NOT LIMITED TO, PROCUREMENT OF SUBSTITUTE GOODS OR SERVICES; LOSS OF USE, DATA, OR PROFITS; OR
BUSINESS INTERRUPTION) HOWEVER CAUSED AND ON ANY THEORY OF LIABILITY, WHETHER IN CONTRACT, STRICT
LIABILITY, OR TORT (INCLUDING NEGLIGENCE OR OTHERWISE) ARISING IN ANY WAY OUT OF THE USE OF THIS
SOFTWARE, EVEN IF ADVISED OF THE POSSIBILITY OF SUCH DAMAGE.
(3) libcurl
COPYRIGHT AND PERMISSION NOTICE
Copyright (c) 1996 - 2007, Daniel Stenberg, <[email protected]>.
All rights reserved.
Permission to use, copy, modify, and distribute this software for any purpose with or without fee is hereby granted, provided that
the above copyright notice and this permission notice appear in all copies.
THE SOFTWARE IS PROVIDED "AS IS", WITHOUT WARRANTY OF ANY KIND, EXPRESS OR IMPLIED, INCLUDING
BUT NOT LIMITED TO THE WARRANTIES OF MERCHANTABILITY, FITNESS FOR A PARTICULAR PURPOSE AND
NONINFRINGEMENT OF THIRD PARTY RIGHTS. IN NO EVENT SHALL THE AUTHORS OR COPYRIGHT HOLDERS
BE LIABLE FOR ANY CLAIM, DAMAGES OR OTHER LIABILITY, WHETHER IN AN ACTION OF CONTRACT, TORT OR
OTHERWISE, ARISING FROM, OUT OF OR IN CONNECTION WITH THE SOFTWARE OR THE USE OR OTHER DEALINGS
IN THE SOFTWARE.
Except as contained in this notice, the name of a copyright holder shall not be used in advertising or otherwise to promote the
sale, use or other dealings in this Software without prior written authorization of the copyright holder.
(4) libFLAC
Copyright (C) 2000,2001,2002,2003,2004,2005,2006,2007 Josh Coalson
Redistribution and use in source and binary forms, with or without modification, are permitted provided that the following
conditions are met:
-
Redistributions of source code must retain the above copyright notice, this list of conditions and the
following disclaimer.
-
Redistributions in binary form must reproduce the above copyright notice, this list of conditions and the
following disclaimer in the documentation and/or other materials provided with the distribution.
-
Neither the name of the Xiph.org Foundation nor the names of itsy be us contributors may be used to
endorse or promote products derived from this software without specific prior written permission.
THIS SOFTWARE IS PROVIDED BY THE COPYRIGHT HOLDERS AND CONTRIBUTORS "AS IS"AND ANY EXPRESS
OR IMPLIED WARRANTIES, INCLUDING, BUT NOT LIMITED TO, THE IMPLIED WARRANTIES OF MERCHANTABILITY
AND FITNESS FOR A PARTICULAR PURPOSE ARE DISCLAIMED. IN NO EVENT SHALL THE FOUNDATION OR
CONTRIBUTORS BE LIABLE FOR ANY DIRECT, INDIRECT, INCIDENTAL, SPECIAL, EXEMPLARY, OR CONSEQUENTIAL
DAMAGES (INCLUDING, BUT NOT LIMITED TO, PROCUREMENT OF SUBSTITUTE GOODS OR SERVICES; LOSS OF
USE, DATA, OR PROFITS; OR BUSINESS INTERRUPTION) HOWEVER CAUSED AND ON ANY THEORY OF LIABILITY,
WHETHER IN CONTRACT, STRICT LIABILITY, OR TORT (INCLUDING NEGLIGENCE OR OTHERWISE) ARISING IN ANY
WAY OUT OF THE USE OF THIS SOFTWARE, EVEN IF ADVISED OF THE POSSIBILITY OF SUCH DAMAGE.
(5) libjpeg
The authors make NO WARRANTY or representation, either express or implied, with respect to this software, its quality,
accuracy, merchantability, or fitness for a particular purpose. This software is provided "AS IS", and you,its user, assume the
entire risk as to its quality and accuracy.
This software is copyright (C) 1991-1998, Thomas G. Lane.
All Rights Reserved except as specified below.
Permission is hereby granted to use, copy, modify, and distribute this software (or portions thereof) for any purpose, without fee,
subject to these conditions:
If any part of the source code for this software is distributed, then this README file must be included, with this copyright
and no-warranty notice unaltered; and any additions, deletions, or changes to the original files must be clearly indicated in
accompanying documentation.
If only executable code is distributed, then the accompanying documentation must state that "this software is based in part on the
work of the Independent JPEG Group".
Permission for use of this software is granted only if the user accepts full responsibility for any undesirable consequences; the
authors accept NO LIABILITY for damages of any kind.
These conditions apply to any software derived from or based on the IJG code, not just to the unmodified library. If you use our
work, you ought to acknowledge us.
Permission is NOT granted for the use of any IJG author's name or company name in advertising or publicity relating to this
software or products derived from it. This software may be referred to only as "the Independent JPEG Group's software".
We specifically permit and encourage the use of this software as the basis of commercial products, provided that all warranty or
liability claims are assumed by the product vendor.
ansi2knr.c is included in this distribution by permission of L. Peter Deutsch, sole proprietor of its copyright holder, Aladdin
Enterprises of Menlo Park, CA. ansi2knr.c is NOT covered by the above copyright and conditions, but instead by the usual
distribution terms of the Free Software Foundation; principally, that you must include source code if you redistribute it. (See the
file ansi2knr.c for full details.) However, since ansi2knr.c is not needed as part of any program generated from the IJG code, this
does not limit you more than the foregoing paragraphs do.
The Unix configuration script "configure" was produced with GNU Autoconf. It is copyright by the Free Software Foundation but
is freely distributable. The same holds for its supporting scripts (config.guess, config.sub, ltconfig, ltmain.sh). Another support
script, install-sh, is copyright by M.I.T. but is also freely distributable.
It appears that the arithmetic coding option of the JPEG spec is covered by patents owned by IBM, AT&T, and Mitsubishi. Hence
arithmetic coding cannot legally be used without obtaining one or more licenses. For this reason, support for arithmetic coding
has been removed from the free JPEG software.
(Since arithmetic coding provides only a marginal gain over the unpatented Huffman mode, it is unlikely that very many
implementations will support it.) So far as we are aware, there are no patent restrictions on the remaining code.
The IJG distribution formerly included code to read and write GIF files. To avoid entanglement with the Unisys LZW patent, GIF
reading support has been removed altogether, and the GIF writer has been simplified to produce "uncompressed GIFs". This
technique does not use the LZW algorithm; the resulting GIF files are larger than usual, but are readable by all standard GIF
decoders.
We are required to state that
"The Graphics Interchange Format(c) is the Copyright property of ompuServe Incorporated. GIF(sm) is a Service Mark property
of CompuServe Incorporated."
(6) libogg
Copyright (c) 2002, Xiph.org Foundation
Redistribution and use in source and binary forms, with or without modification, are permitted provided that the following
conditions are met:
-
Redistributions of source code must retain the above copyright notice, this list of conditions and the
following disclaimer.
-
Redistributions in binary form must reproduce the above copyright notice, this list of conditions and the
following disclaimer in the documentation and/or other materials provided with the distribution.
-
Neither the name of the Xiph.org Foundation nor the names of its contributors may be used to endorse or
promote products derived from this software without specific prior written permission.
THIS SOFTWARE IS PROVIDED BY THE COPYRIGHT HOLDERS AND CONTRIBUTORS "AS IS" AND ANY EXPRESS
OR IMPLIED WARRANTIES, INCLUDING, BUT NOT LIMITED TO, THE IMPLIED WARRANTIES OF MERCHANTABILITY
AND FITNESS FOR A PARTICULAR PURPOSE ARE DISCLAIMED. IN NO EVENT SHALL THE FOUNDATION OR
CONTRIBUTORS BE LIABLE FOR ANY DIRECT, INDIRECT, INCIDENTAL, SPECIAL, EXEMPLARY, OR CONSEQUENTIAL
DAMAGES (INCLUDING, BUT NOT LIMITED TO, PROCUREMENT OF SUBSTITUTE GOODS OR SERVICES; LOSS OF
USE, DATA, OR PROFITS; OR BUSINESS INTERRUPTION) HOWEVER CAUSED AND ON ANY THEORY OF LIABILITY,
WHETHER IN CONTRACT, STRICT LIABILITY, OR TORT (INCLUDING NEGLIGENCE OR OTHERWISE) ARISING IN ANY
WAY OUT OF THE USE OF THIS SOFTWARE, EVEN IF ADVISED OF THE POSSIBILITY OF SUCH DAMAGE.
(7) libpng
COPYRIGHT NOTICE, DISCLAIMER, and LICENSE:
If you modify libpng you may insert additional notices immediately following this sentence.
This code is released under the libpng license.
libpng versions 1.2.6, August 15, 2004, through 1.4.0, January 3, 2010, are Copyright (c) 2004, 2006-2007 Glenn RandersPehrson, and are distributed according to the same disclaimer and license as libpng-1.2.5 with the following individual added to
the list of Contributing Authors:
Cosmin Truta
libpng versions 1.0.7, July 1, 2000, through 1.2.5 - October 3, 2002, are Copyright (c) 2000-2002 Glenn Randers-Pehrson, and
are distributed according to the same disclaimer and license as libpng-1.0.6 with the following individuals added to the list of
Contributing Authors:
Simon-Pierre Cadieux
Eric S. Raymond
Gilles Vollant
and with the following additions to the disclaimer:
There is no warranty against interference with your enjoyment of the library or against infringement. There is no warranty that
our efforts or the library will fulfill any of your particular purposes or needs. This library is provided with all faults, and the entire
risk of satisfactory quality, performance, accuracy, and effort is with the user.
libpng versions 0.97, January 1998, through 1.0.6, March 20, 2000, are Copyright (c) 1998, 1999 Glenn Randers-Pehrson, and
are distributed according to the same disclaimer and license as libpng-0.96, with the following individuals added to the list of
Contributing Authors:
Tom Lane
Glenn Randers-Pehrson
Willem van Schaik
libpng versions 0.89, June 1996, through 0.96, May 1997, are Copyright (c) 1996, 1997 Andreas Dilger Distributed according to
the same disclaimer and license as libpng-0.88, with the following individuals added to the list of Contributing Authors:
John Bowler
Kevin Bracey
Sam Bushell
Magnus Holmgren
Greg Roelofs
Tom Tanner
libpng versions 0.5, May 1995, through 0.88, January 1996, are Copyright (c) 1995, 1996 Guy Eric Schalnat, Group 42, Inc.
For the purposes of this copyright and license, "Contributing Authors" is defined as the following set of individuals:
Andreas Dilger
Dave Martindale
Guy Eric Schalnat
Paul Schmidt
Tim Wegner
The PNG Reference Library is supplied "AS IS". The Contributing Authors and Group 42, Inc. disclaim all warranties, expressed
or implied, including, without limitation, the warranties of merchantability and of fitness for any purpose. The Contributing Authors
and Group 42, Inc. assume no liability for direct, indirect, incidental, special, exemplary, or consequential damages, which may
result from the use of the PNG Reference Library, even if advised of the possibility of such damage.
Permission is hereby granted to use, copy, modify, and distribute this source code, or portions hereof, for any purpose, without
fee, subject to the following restrictions:
The origin of this source code must not be misrepresented.
Altered versions must be plainly marked as such and must not be misrepresented as being the original
source.
This Copyright notice may not be removed or altered from any source or altered source distribution.
The Contributing Authors and Group 42, Inc. specifically permit, without fee, and encourage the use of this source code as a
component to supporting the PNG file format in commercial products. If you use this source code in a product, acknowledgment
is not required but would be appreciated.
(8) libvorbis
Copyright (c) 2002-2004 Xiph.org Foundation
Redistribution and use in source and binary forms, with or without modification, are permitted provided that the following
conditions are met:
-
Redistributions of source code must retain the above copyright notice, this list of conditions and the
following disclaimer.
-
Redistributions in binary form must reproduce the above copyright notice, this list of conditions and the
following disclaimer in the documentation and/or other materials provided with the distribution.
-
Neither the name of the Xiph.org Foundation nor the names of its contributors may be used to endorse or
promote products derived from this software without specific prior written permission.
THIS SOFTWARE IS PROVIDED BY THE COPYRIGHT HOLDERS AND CONTRIBUTORS "AS IS" AND ANY EXPRESS
OR IMPLIED WARRANTIES, INCLUDING, BUT NOT LIMITED TO, THE IMPLIED WARRANTIES OF MERCHANTABILITY
AND FITNESS FOR A PARTICULAR PURPOSE ARE DISCLAIMED. IN NO EVENT SHALL THE FOUNDATION OR
CONTRIBUTORS BE LIABLE FOR ANY DIRECT, INDIRECT, INCIDENTAL, SPECIAL, EXEMPLARY, OR CONSEQUENTIAL
DAMAGES (INCLUDING, BUT NOT LIMITED TO, PROCUREMENT OF SUBSTITUTE GOODS OR SERVICES; LOSS OF
USE, DATA, OR PROFITS; OR BUSINESS INTERRUPTION) HOWEVER CAUSED AND ON ANY THEORY OF LIABILITY,
WHETHER IN CONTRACT, STRICT LIABILITY, OR TORT (INCLUDING NEGLIGENCE OR OTHERWISE) ARISING IN ANY
WAY OUT OF THE USE OF THIS SOFTWARE, EVEN IF ADVISED OF THE POSSIBILITY OF SUCH DAMAGE.
(9) ntp
This file is automatically generated from html/copyright.html
Copyright Notice
jpg "Clone me," says Dolly sheepishly
Last update: 20:31 UTC Saturday, January 06, 2007
The following copyright notice applies to all files collectively called the Network Time Protocol Version 4 Distribution. Unless
specifically declared otherwise in an individual file, this notice applies as if the text was explicitly included in the file.
Copyright (c) David L. Mills 1992-2007
Permission to use, copy, modify, and distribute this software and its documentation for any purpose with or without fee is hereby
granted, provided that the above copyright notice appears in all copies and that both the copyright notice and this permission
notice appear in supporting documentation, and that the name University of Delaware not be used in advertising or publicity
pertaining to distribution of the software without specific, written prior permission. The University of Delaware makes no
representations about the suitability this software for any purpose. It is provided "as is" without express or implied warranty.
The following individuals contributed in part to the Network Time Protocol Distribution Version 4 and are acknowledged as
authors of this work.
[1]Mark Andrews <[email protected]> Leitch atomic clock controller
[2]Bernd Altmeier <[email protected]> hopf Elektronik serial line and PCI-bus devices
[3]Viraj Bais <[email protected]> and [4]Clayton Kirkwood <[email protected]> port to WindowsNT 3.5
[5]Michael Barone <michael,[email protected]> GPSVME fixes
[6]Jean-Francois Boudreault <[email protected]>IPv6 support
[7]Karl Berry <[email protected]> syslog to file option
[8]Greg Brackley <[email protected]> Major rework of WINNT port. Clean up recvbuf and iosignal code into separate
modules.
[9]Marc Brett <[email protected]> Magnavox GPS clock driver
[10]Piete Brooks <[email protected]> MSF clock driver, Trimble PARSE support
[11]Reg Clemens <[email protected]> Oncore driver (Current maintainer)
[12]Steve Clift <[email protected]> OMEGA clock driver
[13]Casey Crellin <[email protected]> vxWorks (Tornado) port and help with target configuration
[14]Sven Dietrich <[email protected]> Palisade reference clock driver, NT adj. residuals, integrated Greg's Winnt port.
[15]John A. Dundas III <[email protected]> Apple A/UX port
[16]Torsten Duwe <[email protected]> Linux port
[17]Dennis Ferguson <[email protected]> foundation code for NTP Version 2 as specified in RFC-1119
[18]John Hay <[email protected]> IPv6 support and testing
[19]Glenn Hollinger <[email protected]> GOES clock driver
[20]Mike Iglesias <[email protected]> DEC Alpha port
[21]Jim Jagielski <[email protected]> A/UX port
[22]Jeff Johnson <[email protected]> massive prototyping overhaul
[23]Hans Lambermont <[email protected]> or [24]<[email protected]> ntpsweep
[25]Poul-Henning Kamp <[email protected]> Oncore driver (Original author)
[26]Frank Kardel [27]<kardel (at) ntp (dot) org> PARSE <GENERIC> driver (>14 reference clocks), STREAMS modules for
PARSE, support scripts, syslog cleanup, dynamic interface handling
[28]William L. Jones <[email protected]> RS/6000 AIX modifications, HPUX modifications
[29]Dave Katz <[email protected]> RS/6000 AIX port
[30]Craig Leres <[email protected]> 4.4BSD port, ppsclock, MagnavoxGPS clock driver
[31]George Lindholm <[email protected]> SunOS 5.1 port
[32]Louis A. Mamakos <[email protected]> MD5-based authentication
[33]Lars H. Mathiesen <[email protected]> adaptation of foundation code for Version 3 as specified in RFC-1305
[34]Danny Mayer <[email protected]>Network I/O, Windows Port, Code Maintenance
[35]David L. Mills <[email protected]> Version 4 foundation: clock discipline, authentication, precision kernel; clock drivers:
Spectracom, Austron, Arbiter, Heath, ATOM, ACTS, KSI/Odetics; audio clock drivers: CHU, WWV/H, IRIG
[36]Wolfgang Moeller <[email protected]> VMS port
[37]Jeffrey Mogul <[email protected]> ntptrace utility
[38]Tom Moore <[email protected]> i386 svr4 port
[39]Kamal A Mostafa <[email protected]> SCO OpenServer port
[40]Derek Mulcahy <[email protected]> and [41]Damon Hart-Davis <[email protected]> ARCRON MSF clock driver
[42]Rainer Pruy <[email protected]> monitoring/trap scripts, statistics file handling
[43]Dirce Richards <[email protected]> Digital UNIX V4.0 port
[44]Wilfredo Sanchez <[email protected]> added support for NetInfo
[45]Nick Sayer <[email protected]> SunOS streams modules
[46]Jack Sasportas <[email protected]> Saved a Lot of space on the stuff in the html/pic/ subdirectory
[47]Ray Schnitzler <[email protected]> Unixware1 port
[48]Michael Shields <[email protected]> USNO clock driver
[49]Jeff Steinman <[email protected]> Datum PTS clock driver
[50]Harlan Stenn <[email protected]> GNU automake/autoconfigure makeover, various other bits (see the ChangeLog)
[51]Kenneth Stone <[email protected]> HP-UX port
[52]Ajit Thyagarajan <[email protected]>IP multicast/anycast support
[53]Tomoaki TSURUOKA <[email protected]>TRAK clock driver
[54]Paul A Vixie <[email protected]> TrueTime GPS driver, generic TrueTime clock driver
[55]Ulrich Windl <[email protected]> corrected and validated HTML documents according to the HTML DTD
References
mailto: [email protected]
mailto: [email protected]
mailto: [email protected]
mailto: [email protected]
mailto: [email protected]
mailto: [email protected]
mailto: [email protected]
mailto: [email protected]
mailto: [email protected]
mailto: [email protected]
mailto: [email protected]
mailto: [email protected]
mailto: [email protected]
mailto: [email protected]
mailto: [email protected]
mailto: [email protected]
mailto: [email protected]
mailto: [email protected]
mailto: [email protected]
mailto: [email protected]
mailto: jagubox.gsfc.nasa.gov
mailto: [email protected]
mailto: [email protected]
mailto: [email protected]
mailto: [email protected]
http://www4.informatik.uni-erlangen.de/%7ekardel
mailto: kardel(at)ntp(dot)org
mailto: [email protected]
mailto: [email protected]
mailto: [email protected]
mailto: [email protected]
mailto: [email protected]
mailto: [email protected]
mailto: [email protected]
mailto: [email protected]
En-29
Others
mailto: [email protected]
mailto: [email protected]
mailto: [email protected]
mailto: [email protected]
mailto: [email protected]
mailto: [email protected]
mailto: [email protected]
mailto: [email protected]
mailto: [email protected]
mailto: [email protected]
mailto: [email protected]
mailto: [email protected]
mailto: [email protected]
mailto: pebbles.jpl.nasa.gov
mailto: [email protected]
mailto: [email protected]
mailto: [email protected]
mailto: [email protected]
mailto: [email protected]
mailto: [email protected]
(10) OpenSSL
LICENSE ISSUES
==============
The OpenSSL toolkit stays under a dual license, i.e. both the conditions of the OpenSSL License and the original SSLeay license
apply to the toolkit. See below for the actual license texts. Actually both licenses are BSD-style Open Source licenses. In case of
any license issues related to OpenSSL please contact [email protected].
OpenSSL License
--------------============================================
Copyright (c) 1998-2007 The OpenSSL Project. All rights reserved.
Redistribution and use in source and binary forms, with or without modification, are permitted provided that the following
conditions are met:
Redistributions of source code must retain the above copyright notice, this list of conditions and the
following disclaimer.
Redistributions in binary form must reproduce the above copyright notice, this list of conditions and the following disclaimer in the
documentation and/or other materials provided with the distribution.
All advertising materials mentioning features or use of this software must display the following acknowledgment:
"This product includes software developed by the OpenSSL Project for use in the OpenSSL Toolkit. (http://www.openssl.org/)"
The names "OpenSSL Toolkit" and "OpenSSL Project" must not be used to endorse or promote products derived from this
software without prior written permission. For written permission, please contact [email protected].
Products derived from this software may not be called "OpenSSL" nor may "OpenSSL" appear in their names without prior
written permission of the OpenSSL Project.
Redistributions of any form whatsoever must retain the following acknowledgment:
"This product includes software developed by the OpenSSL Project for use in the OpenSSL Toolkit
(http://www.openssl.org/)"
THIS SOFTWARE IS PROVIDED BY THE OpenSSL PROJECT "AS IS" AND ANY EXPRESSED OR IMPLIED WARRANTIES,
INCLUDING, BUT NOT LIMITED TO, THE IMPLIED WARRANTIES OF MERCHANTABILITY AND FITNESS FOR A
PARTICULAR PURPOSE ARE DISCLAIMED. IN NO EVENT SHALL THE OpenSSL PROJECT OR ITS CONTRIBUTORS
BE LIABLE FOR ANY DIRECT, INDIRECT, INCIDENTAL, SPECIAL, EXEMPLARY, OR CONSEQUENTIAL DAMAGES
(INCLUDING, BUT NOT LIMITED TO, PROCUREMENT OF SUBSTITUTE GOODS OR SERVICES; LOSS OF USE, DATA,
OR PROFITS; OR BUSINESS INTERRUPTION) HOWEVER CAUSED AND ON ANY THEORY OF LIABILITY, WHETHER IN
CONTRACT, STRICT LIABILITY, OR TORT (INCLUDING NEGLIGENCE OR OTHERWISE) ARISING IN ANY WAY OUT OF
THE USE OF THIS SOFTWARE, EVEN IF ADVISED OF THE POSSIBILITY OF SUCH DAMAGE.
============================================
This product includes cryptographic software written by Eric Young ([email protected]). This product includes software written
by Tim Hudson ([email protected]).
Original SSLeay License
--------------------------Copyright (C) 1995-1998 Eric Young ([email protected]) All rights reserved.
This package is an SSL implementation written by Eric Young ([email protected]).
The implementation was written so as to conform with Netscapes SSL.
This library is free for commercial and non-commercial use as long as the following conditions are aheared to. The following
conditions apply to all code found in this distribution, be it the RC4, RSA, lhash, DES, etc., code; not just the SSL code. The
SSL documentation included with this distribution is covered by the same copyright terms except that the holder is Tim Hudson
([email protected]).
Copyright remains Eric Young's, and as such any Copyright notices in the code are not to be removed.
If this package is used in a product, Eric Young should be given attribution as the author of the parts of the library used.
This can be in the form of a textual message at program startup or in documentation (online or textual) provided with the
package.
Redistribution and use in source and binary forms, with or without modification, are permitted provided that the following
conditions are met:
Redistributions of source code must retain the copyright notice, this list of conditions and the following
disclaimer.
Redistributions in binary form must reproduce the above copyright notice, this list of conditions and the following disclaimer in the
documentation and/or other materials provided with the distribution.
All advertising materials mentioning features or use of this software must display the following acknowledgement: "Eric Young
([email protected])"
The word `cryptographic' can be left out if the rouines from the library being used are not cryptographic related :-).
If you include any Windows specific code (or a derivative thereof) from the apps directory (application code) you must include an
acknowledgement: "This product includes software written by Tim Hudson ([email protected])"
THIS SOFTWARE IS PROVIDED BY ERIC YOUNG "AS IS" AND ANY EXPRESS OR IMPLIED WARRANTIES, INCLUDING,
BUT NOT LIMITED TO, THE IMPLIED WARRANTIES OF MERCHANTABILITY AND FITNESS FOR A PARTICULAR
PURPOSE ARE DISCLAIMED. IN NO EVENT SHALL THE AUTHOR OR CONTRIBUTORS BE LIABLE FOR ANY DIRECT,
INDIRECT, INCIDENTAL, SPECIAL, EXEMPLARY, OR CONSEQUENTIAL DAMAGES (INCLUDING, BUT NOT LIMITED
TO, PROCUREMENT OF SUBSTITUTE GOODS OR SERVICES; LOSS OF USE, DATA, OR PROFITS; OR BUSINESS
INTERRUPTION) HOWEVER CAUSED AND ON ANY THEORY OF LIABILITY, WHETHER IN CONTRACT, STRICT LIABILITY,
OR TORT (INCLUDING NEGLIGENCE OR OTHERWISE) ARISING IN ANY WAY OUT OF THE USE OF THIS SOFTWARE,
EVEN IF ADVISED OF THE POSSIBILITY OF SUCH DAMAGE.
============================================
(11) popt
En-30
Copyright (c) 1998 Red Hat Software
Permission is hereby granted, free of charge, to any person obtaining a copy of this software and associated documentation files
(the "Software"), to deal in the Software without restriction, including without limitation the rights to use, copy, modify, merge,
publish, distribute, sublicense, and/or sell copies of the Software, and to permit persons to whom the Software is furnished to do
so, subject to the following conditions:
The above copyright notice and this permission notice shall be included in all copies or substantial portions of the Software.
THE SOFTWARE IS PROVIDED "AS IS", WITHOUT WARRANTY OF ANY KIND, EXPRESS OR IMPLIED, INCLUDING
BUT NOT LIMITED TO THE WARRANTIES OF MERCHANTABILITY, FITNESS FOR A PARTICULAR PURPOSE AND
NONINFRINGEMENT. IN NO EVENT SHALL THE X CONSORTIUM BE LIABLE FOR ANY CLAIM, DAMAGES OR
OTHER LIABILITY, WHETHER IN AN ACTION OF CONTRACT, TORT OR OTHERWISE, ARISING FROM, OUT OF OR IN
CONNECTION WITH THE SOFTWARE OR THE USE OR OTHER DEALINGS IN THE SOFTWARE.
Except as contained in this notice, the name of the X Consortium shall not be used in advertising or otherwise to promote the
sale, use or other dealings in this Software without prior written authorization from the X Consortium.
(12) RSA Data Security, Inc. MD5 Message-Digest Algorithm
Copyright (C) 1991-2, RSA Data Security, Inc. Created 1991. All rights reserved.
License to copy and use this software is granted provided that it is identified as the "RSA Data Security, Inc. MD5 MessageDigest Algorithm" in all material mentioning or referencing this software or this function.
License is also granted to make and use derivative works provided that such works are identified as "derived from the RSA Data
Security, Inc. MD5 Message-Digest Algorithm" in all material mentioning or referencing the derived work.
RSA Data Security, Inc. makes no representations concerning either the merchantability of this software or the suitability of this
software for any particular purpose. It is provided "as is" without express or implied warranty of any kind.
These notices must be retained in any copies of any part of this documentation and/or software.
(13) thttpd 2.25b
Copyright c 2000 by Jef Poskanzer <[email protected]>. All rights reserved.
Redistribution and use in source and binary forms, with or without modification, are permitted provided that the following
conditions are met:
Redistributions of source code must retain the above copyright notice, this list of conditions and the
following disclaimer.
Redistributions in binary form must reproduce the above copyright notice, this list of conditions and the following disclaimer in the
documentation and/or other materials provided with the distribution.
THIS SOFTWARE IS PROVIDED BY THE AUTHOR AND CONTRIBUTORS "AS IS" AND ANY EXPRESS OR IMPLIED
WARRANTIES, INCLUDING, BUT NOT LIMITED TO, THE IMPLIED WARRANTIES OF MERCHANTABILITY AND FITNESS
FOR A PARTICULAR PURPOSE ARE DISCLAIMED. IN NO EVENT SHALL THE AUTHOR OR CONTRIBUTORS BE LIABLE
FOR ANY DIRECT, INDIRECT, INCIDENTAL, SPECIAL, EXEMPLARY, OR CONSEQUENTIAL DAMAGES (INCLUDING, BUT
NOT LIMITED TO, PROCUREMENT OF SUBSTITUTE GOODS OR SERVICES; LOSS OF USE, DATA, OR PROFITS; OR
BUSINESS INTERRUPTION) HOWEVER CAUSED AND ON ANY THEORY OF LIABILITY, WHETHER IN CONTRACT, STRICT
LIABILITY, OR TORT (INCLUDING NEGLIGENCE OR OTHERWISE) ARISING IN ANY WAY OUT OF THE USE OF THIS
SOFTWARE, EVEN IF ADVISED OF THE POSSIBILITY OF SUCH DAMAGE.
(14) zlib
zlib.h -- interface of the `zlib' general purpose compression library version 1.1.4, March 11th, 2002
Copyright (C) 1995-2002 Jean-loup Gailly and Mark Adler
This software is provided `as-is', without any express or implied warranty. In no event will the authors be held liable for any
damages arising from the use of this software.
Permission is granted to anyone to use this software for any purpose, including commercial applications, and to alter it and
redistribute it freely, subject to the following restrictions:
The origin of this software must not be misrepresented; you must not claim that you wrote the original
software. If you use this software in a product, an acknowledgment in the product documentation would be appreciated but is not
required.
Altered source versions must be plainly marked as such, and must not be misrepresented as being the original software.
This notice may not be removed or altered from any source distribution.
Jean-loup Gailly
Mark Adler
[email protected]@alumni.caltech.edu
"Contribution" shall mean any work of authorship, including the original version of the Work and any modifications or additions to
that Work or Derivative Works thereof, that is intentionally submitted to Licensor for inclusion in the Work by the copyright owner
or by an individual or Legal Entity authorized to submit on behalf of the copyright owner. For the purposes of this definition,
"submitted" means any form of electronic, verbal, or written communication sent to the Licensor or its representatives, including
but not limited to communication on electronic mailing lists, source code control systems, and issue tracking systems that are
managed by, or on behalf of, the Licensor for the purpose of discussing and improving the Work, but excluding communication
that is conspicuously marked or otherwise designated in writing by the copyright owner as "Not a Contribution."
"Contributor" shall mean Licensor and any individual or Legal Entity on behalf of whom a Contribution has been received by
Licensor and subsequently incorporated within the Work.
Grant of Copyright License.
Subject to the terms and conditions of this License, each Contributor hereby grants to You a perpetual, worldwide, non-exclusive,
no-charge, royalty-free, irrevocable copyright license to reproduce, prepare Derivative Works of, publicly display, publicly
perform, sublicense, and distribute the Work and such Derivative Works in Source or Object form.
Grant of Patent License.
Subject to the terms and conditions of this License, each Contributor hereby grants to You a perpetual, worldwide, non-exclusive,
no-charge, royalty-free, irrevocable (except as stated in this section) patent license to make, have made, use, offer to sell, sell,
import, and otherwise transfer the Work, where such license applies only to those patent claims licensable by such Contributor
that are necessarily infringed by their Contribution(s) alone or by combination of their Contribution(s) with the Work to which
such Contribution(s) was submitted. If You institute patent litigation against any entity (including a cross-claim or counterclaim
in a lawsuit) alleging that the Work or a Contribution incorporated within the Work constitutes direct or contributory patent
infringement, then any patent licenses granted to You under this License for that Work shall terminate as of the date such
litigation is filed.
Redistribution.
You may reproduce and distribute copies of the Work or Derivative Works thereof in any medium, with or without modifications,
and in Source or Object form, provided that You meet the following conditions:
You must give any other recipients of the Work or Derivative Works a copy of this License; and
You must cause any modified files to carry prominent notices stating that You changed the files; and
You must retain, in the Source form of any Derivative Works that You distribute, all copyright, patent, trademark, and attribution
notices from the Source form of the Work, excluding those notices that do not pertain to any part of the Derivative Works; and
If the Work includes a "NOTICE" text file as part of its distribution, then any Derivative Works that You distribute must include
a readable copy of the attribution notices contained within such NOTICE file, excluding those notices that do not pertain to any
part of the Derivative Works, in at least one of the following places: within a NOTICE text file distributed as part of the Derivative
Works; within the Source form or documentation, if provided along with the Derivative Works; or, within a display generated
by the Derivative Works, if and wherever such third-party notices normally appear. The contents of the NOTICE file are for
informational purposes only and do not modify the License. You may add Your own attribution notices within Derivative Works
that You distribute, alongside or as an addendum to the NOTICE text from the Work, provided that such additional attribution
notices cannot be construed as modifying the License.
You may add Your own copyright statement to Your modifications and may provide additional or different license terms and
conditions for use, reproduction, or distribution of Your modifications, or for any such Derivative Works as a whole, provided Your
use, reproduction, and distribution of the Work otherwise complies with the conditions stated in this License.
Submission of Contributions.
The data format used by the zlib library is described by RFCs (Request for Comments) 1950 to 1952 in the files
ftp://ds.internic.net/rfc/rfc1950.txt (zlib format), rfc1951.txt (deflate format) and rfc1952.txt (gzip format).
(15) Apple Lossless
Apache License
Version 2.0, January 2004
http://www.apache.org/licenses/
Unless You explicitly state otherwise, any Contribution intentionally submitted for inclusion in the Work by You to the Licensor
shall be under the terms and conditions of this License, without any additional terms or conditions.
Notwithstanding the above, nothing herein shall supersede or modify the terms of any separate license agreement you may have
executed with Licensor regarding such Contributions.
Trademarks.
TERMS AND CONDITIONS FOR USE, REPRODUCTION, AND DISTRIBUTION
Definitions.
"License" shall mean the terms and conditions for use, reproduction, and distribution as defined by Sections 1 through 9 of this
document.
"Licensor" shall mean the copyright owner or entity authorized by the copyright owner that is granting the License.
"Legal Entity" shall mean the union of the acting entity and all other entities that control, are controlled by, or are under
common control with that entity. For the purposes of this definition, "control" means (i) the power, direct or indirect, to cause the
direction or management of such entity, whether by contract or otherwise, or (ii) ownership of fifty percent (50%) or more of the
outstanding shares, or (iii) beneficial ownership of such entity.
This License does not grant permission to use the trade names, trademarks, service marks, or product names of the Licensor,
except as required for reasonable and customary use in describing the origin of the Work and reproducing the content of the
NOTICE file.
Disclaimer of Warranty.
Unless required by applicable law or agreed to in writing, Licensor provides the Work (and each Contributor provides its
Contributions) on an "AS IS" BASIS, WITHOUT WARRANTIES OR CONDITIONS OF ANY KIND, either express or implied,
including, without limitation, any warranties or conditions of TITLE, NON-INFRINGEMENT, MERCHANTABILITY, or FITNESS
FOR A PARTICULAR PURPOSE. You are solely responsible for determining the appropriateness of using or redistributing the
Work and assume any risks associated with Your exercise of permissions under this License.
Limitation of Liability.
"You" (or "Your") shall mean an individual or Legal Entity exercising permissions granted by this License.
"Source" form shall mean the preferred form for making modifications, including but not limited to software source code,
documentation source, and configuration files.
"Object" form shall mean any form resulting from mechanical transformation or translation of a Source form, including but not
limited to compiled object code, generated documentation, and conversions to other media types.
"Work" shall mean the work of authorship, whether in Source or
Object form, made available under the License, as indicated
by a copyright notice that is included in or attached to the work (an example is provided in the Appendix below).
"Derivative Works" shall mean any work, whether in Source or Object form, that is based on (or derived from) the Work and
for which the editorial revisions, annotations, elaborations, or other modifications represent, as a whole, an original work of
authorship. For the purposes of this License, Derivative Works shall not include works that remain separable from, or merely link
(or bind by name) to the interfaces of, the Work and Derivative Works thereof.
In no event and under no legal theory, whether in tort (including negligence), contract, or otherwise, unless required by applicable
law (such as deliberate and grossly negligent acts) or agreed to in writing, shall any Contributor be liable to You for damages,
including any direct, indirect, special, incidental, or consequential damages of any character arising as a result of this License
or out of the use or inability to use the Work (including but not limited to damages for loss of goodwill, work stoppage, computer
failure or malfunction, or any and all other commercial damages or losses), even if such Contributor has been advised of the
possibility of such damages.
Accepting Warranty or Additional Liability.
While redistributing the Work or Derivative Works thereof, You may choose to offer, and charge a fee for, acceptance of
support, warranty, indemnity, or other liability obligations and/or rights consistent with this License. However, in accepting such
obligations, You may act only on Your own behalf and on Your sole responsibility, not on behalf of any other Contributor, and only
if You agree to indemnify, defend, and hold each Contributor harmless for any liability incurred by, or claims asserted against,
such Contributor by reason of your accepting any such warranty or additional liability.
Others
END OF TERMS AND CONDITIONS
APPENDIX: How to apply the Apache License to your work.
To apply the Apache License to your work, attach the following boilerplate notice, with the fields enclosed by brackets "[]"
replaced with your own identifying information. (Don't include the brackets!) The text should be enclosed in the appropriate
comment syntax for the file format. We also recommend that a file or class name and description of purpose be included on the
same "printed page" as the copyright notice for easier identification within third-party archives.
Copyright ? 2011 Apple Inc. All rights reserved.
Licensed under the Apache License, Version 2.0 (the "License");
you may not use this file except in compliance with the License.
You may obtain a copy of the License at
http://www.apache.org/licenses/LICENSE-2.0
Unless required by applicable law or agreed to in writing, software distributed under the License is distributed on an "AS IS"
BASIS, WITHOUT WARRANTIES OR CONDITIONS OF ANY KIND, either express or implied.
See the License for the specific language governing permissions and limitations under
the License.
(16) Boost
http://www.boost.org/
Boost Software License - Version 1.0 - August 17th, 2003
Permission is hereby granted, free of charge, to any person or organization obtaining a copy of the software and accompanying
documentation covered by this license (the "Software") to use, reproduce, display, distribute, execute, and transmit the Software,
and to prepare derivative works of the Software, and to permit third-parties to whom the Software is furnished to do so, all subject
to the following:
The copyright notices in the Software and this entire statement, including the above license grant, this restriction and the
following disclaimer, must be included in all copies of the Software, in whole or in part, and all derivative works of the Software,
unless such copies or derivative works are solely in the form of machine-executable object code generated by a source language
processor.
THE SOFTWARE IS PROVIDED "AS IS", WITHOUT WARRANTY OF ANY KIND, EXPRESS OR IMPLIED, INCLUDING BUT
NOT LIMITED TO THE WARRANTIES OF MERCHANTABILITY, FITNESS FOR A PARTICULAR PURPOSE, TITLE AND NONINFRINGEMENT. IN NO EVENT SHALL THE COPYRIGHT HOLDERS OR ANYONE DISTRIBUTING THE SOFTWARE BE
LIABLE FOR ANY DAMAGES OR OTHER LIABILITY, WHETHER IN CONTRACT, TORT OR OTHERWISE, ARISING FROM,
OUT OF OR IN CONNECTION WITH THE SOFTWARE OR THE USE OR OTHER DEALINGS IN THE SOFTWARE.
(17) Expat
http://www.jclark.com/xml/expat.html
Expat License. Copyright (c) 1998, 1999, 2000 Thai Open Source Software Center Ltd
Permission is hereby granted, free of charge, to any person obtaining a copy of this software and associated documentation files
(the "Software"), to deal in the Software without restriction, including without limitation the rights to use, copy, modify, merge,
publish, distribute, sublicense, and/or sell copies of the Software, and to permit persons to whom the Software is furnished to do
so, subject to the following conditions:
The above copyright notice and this permission notice shall be included in all copies or substantial portions of the Software.
THE SOFTWARE IS PROVIDED "AS IS", WITHOUT WARRANTY OF ANY KIND, EXPRESS OR IMPLIED, INCLUDING
BUT NOT LIMITED TO THE WARRANTIES OF MERCHANTABILITY, FITNESS FOR A PARTICULAR PURPOSE AND
NONINFRINGEMENT. IN NO EVENT SHALL THE AUTHORS OR COPYRIGHT HOLDERS BE LIABLE FOR ANY CLAIM,
DAMAGES OR OTHER LIABILITY, WHETHER IN AN ACTION OF CONTRACT, TORT OR OTHERWISE, ARISING FROM, OUT
OF OR IN CONNECTION WITH THE SOFTWARE OR THE USE OR OTHER DEALINGS IN THE SOFTWARE.
(18) FastDelegate
http://www.codeproject.com/KB/cpp/FastDelegate.aspx
THE WORK (AS DEFINED BELOW) IS PROVIDED UNDER THE TERMS OF THIS CODE PROJECT OPEN LICENSE
("LICENSE"). THE WORK IS PROTECTED BY COPYRIGHT AND/OR OTHER APPLICABLE LAW. ANY USE OF THE WORK
OTHER THAN AS AUTHORIZED UNDER THIS LICENSE OR COPYRIGHT LAW IS PROHIBITED.
BY EXERCISING ANY RIGHTS TO THE WORK PROVIDED HEREIN, YOU ACCEPT AND AGREE TO BE BOUND BY THE
TERMS OF THIS LICENSE. THE AUTHOR GRANTS YOU THE RIGHTS CONTAINED HEREIN IN CONSIDERATION OF
YOUR ACCEPTANCE OF SUCH TERMS AND CONDITIONS. IF YOU DO NOT AGREE TO ACCEPT AND BE BOUND BY THE
TERMS OF THIS LICENSE, YOU CANNOT MAKE ANY USE OF THE WORK.
Definitions.
a.
"Articles" means, collectively, all articles written by Author which describes how the Source Code and
Executable Files for the Work may be used by a user.
b.
"Author" means the individual or entity that offers the Work under the terms of this License.
c.
"Derivative Work" means a work based upon the Work or upon the Work and other pre-existing works.
d.
"Executable Files" refer to the executables, binary files, configuration and any required data files included
in the Work.
e.
"Publisher" means the provider of the website, magazine, CD-ROM, DVD or other medium from or by
which the Work is obtained by You.
f.
"Source Code" refers to the collection of source code and configuration files used to create the Executable
Files.
g.
"Standard Version" refers to such a Work if it has not been modified, or has been modified in accordance
with the consent of the Author, such consent being in the full discretion of the Author.
h.
"Work" refers to the collection of files distributed by the Publisher, including the Source Code, Executable
Files, binaries, data files, documentation, whitepapers and the Articles.
i.
"You" is you, an individual or entity wishing to use the Work and exercise your rights under this License.
Fair Use/Fair Use Rights. Nothing in this License is intended to reduce, limit, or restrict any rights arising from fair use, fair
dealing, first sale or other limitations on the exclusive rights of the copyright owner under copyright law or other applicable laws.
License Grant. Subject to the terms and conditions of this License, the Author hereby grants You a worldwide, royalty-free, nonexclusive, perpetual (for the duration of the applicable copyright) license to exercise the rights in the Work as stated below:
a.
You may use the standard version of the Source Code or Executable Files in Your own applications.
b.
You may apply bug fixes, portability fixes and other modifications obtained from the Public Domain or from
the Author. A Work modified in such a way shall still be considered the standard version and will be subject to this License.
c.
You may otherwise modify Your copy of this Work (excluding the Articles) in any way to create a Derivative
Work, provided that You insert a prominent notice in each changed file stating how, when and where You changed that file.
d.
You may distribute the standard version of the Executable Files and Source Code or Derivative Work in
aggregate with other (possibly commercial) programs as part of a larger (possibly commercial) software distribution.
e.
The Articles discussing the Work published in any form by the author may not be distributed or republished
without the Author's consent. The author retains copyright to any such Articles. You may use the Executable Files and Source
Code pursuant to this License but you may not repost or republish or otherwise distribute or make available the Articles, without
the prior written consent of the Author.
Any subroutines or modules supplied by You and linked into the Source Code or Executable Files this Work shall not be
considered part of this Work and will not be subject to the terms of this License.
Patent License. Subject to the terms and conditions of this License, each Author hereby grants to You a perpetual, worldwide,
non-exclusive, no-charge, royalty-free, irrevocable (except as stated in this section) patent license to make, have made, use,
import, and otherwise transfer the Work.
Restrictions. The license granted in Section 3 above is expressly made subject to and limited by the following restrictions:
a.
You agree not to remove any of the original copyright, patent, trademark, and attribution notices and
associated disclaimers that may appear in the Source Code or Executable Files.
b.
You agree not to advertise or in any way imply that this Work is a product of Your own.
c.
The name of the Author may not be used to endorse or promote products derived from the Work without
the prior written consent of the Author.
d.
You agree not to sell, lease, or rent any part of the Work. This does not restrict you from including the Work
or any part of the Work inside a larger software distribution that itself is being sold. The Work by itself, though, cannot be sold,
leased or rented.
e.
You may distribute the Executable Files and Source Code only under the terms of this License, and You
must include a copy of, or the Uniform Resource Identifier for, this License with every copy of the Executable Files or Source
Code You distribute and ensure that anyone receiving such Executable Files and Source Code agrees that the terms of this
License apply to such Executable Files and/or Source Code. You may not offer or impose any terms on the Work that alter
or restrict the terms of this License or the recipients' exercise of the rights granted hereunder. You may not sublicense the
Work. You must keep intact all notices that refer to this License and to the disclaimer of warranties. You may not distribute
the Executable Files or Source Code with any technological measures that control access or use of the Work in a manner
inconsistent with the terms of this License.
f.
You agree not to use the Work for illegal, immoral or improper purposes, or on pages containing illegal,
immoral or improper material. The Work is subject to applicable export laws. You agree to comply with all such laws and
regulations that may apply to the Work after Your receipt of the Work.
Representations, Warranties and Disclaimer. THIS WORK IS PROVIDED "AS IS", "WHERE IS" AND "AS AVAILABLE",
WITHOUT ANY EXPRESS OR IMPLIED WARRANTIES OR CONDITIONS OR GUARANTEES. YOU, THE USER, ASSUME
ALL RISK IN ITS USE, INCLUDING COPYRIGHT INFRINGEMENT, PATENT INFRINGEMENT, SUITABILITY, ETC. AUTHOR
EXPRESSLY DISCLAIMS ALL EXPRESS, IMPLIED OR STATUTORY WARRANTIES OR CONDITIONS, INCLUDING
WITHOUT LIMITATION, WARRANTIES OR CONDITIONS OF MERCHANTABILITY, MERCHANTABLE QUALITY OR FITNESS
FOR A PARTICULAR PURPOSE, OR ANY WARRANTY OF TITLE OR NON-INFRINGEMENT, OR THAT THE WORK (OR ANY
PORTION THEREOF) IS CORRECT, USEFUL, BUG-FREE OR FREE OF VIRUSES. YOU MUST PASS THIS DISCLAIMER ON
WHENEVER YOU DISTRIBUTE THE WORK OR DERIVATIVE WORKS.
Indemnity. You agree to defend, indemnify and hold harmless the Author and the Publisher from and against any claims, suits,
losses, damages, liabilities, costs, and expenses (including reasonable legal or attorneys' fees) resulting from or relating to any
use of the Work by You.
Limitation on Liability. EXCEPT TO THE EXTENT REQUIRED BY APPLICABLE LAW, IN NO EVENT WILL THE AUTHOR OR
THE PUBLISHER BE LIABLE TO YOU ON ANY LEGAL THEORY FOR ANY SPECIAL, INCIDENTAL, CONSEQUENTIAL,
PUNITIVE OR EXEMPLARY DAMAGES ARISING OUT OF THIS LICENSE OR THE USE OF THE WORK OR OTHERWISE,
EVEN IF THE AUTHOR OR THE PUBLISHER HAS BEEN ADVISED OF THE POSSIBILITY OF SUCH DAMAGES.
Termination.
a.
This License and the rights granted hereunder will terminate automatically upon any breach by You of any
term of this License. Individuals or entities who have received Derivative Works from You under this License, however, will not
have their licenses terminated provided such individuals or entities remain in full compliance with those licenses. Sections 1, 2, 6,
7, 8, 9, 10 and 11 will survive any termination of this License.
b.
If You bring a copyright, trademark, patent or any other infringement claim against any contributor over
infringements You claim are made by the Work, your License from such contributor to the Work ends automatically.
c.
Subject to the above terms and conditions, this License is perpetual (for the duration of the applicable
copyright in the Work). Notwithstanding the above, the Author reserves the right to release the Work under different license terms
or to stop distributing the Work at any time; provided, however that any such election will not serve to withdraw this License (or
any other license that has been, or is required to be, granted under the terms of this License), and this License will continue in
full force and effect unless terminated as stated above.
Publisher. The parties hereby confirm that the Publisher shall not, under any circumstances, be responsible for and shall not
have any liability in respect of the subject matter of this License. The Publisher makes no warranty whatsoever in connection with
the Work and shall not be liable to You or any party on any legal theory for any damages whatsoever, including without limitation
any general, special, incidental or consequential damages arising in connection to this license. The Publisher reserves the right
to cease making the Work available to You at any time without notice.
Miscellaneous
a.
This License shall be governed by the laws of the location of the head office of the Author or if the Author is
an individual, the laws of location of the principal place of residence of the Author.
b.
If any provision of this License is invalid or unenforceable under applicable law, it shall not affect the
validity or enforceability of the remainder of the terms of this License, and without further action by the parties to this License,
such provision shall be reformed to the minimum extent necessary to make such provision valid and enforceable.
c.
No term or provision of this License shall be deemed waived and no breach consented to unless such
waiver or consent shall be in writing and signed by the party to be charged with such waiver or consent.
d.
This License constitutes the entire agreement between the parties with respect to the Work licensed
herein. There are no understandings, agreements or representations with respect to the Work not specified herein. The Author
shall not be bound by any additional provisions that may appear in any communication from You. This License may not be
modified without the mutual written agreement of the Author and You.
(19) Tremolo
http://wss.co.uk/pinknoise/tremolo
Copyright (C) 2002-2009 Xiph.org Foundation Changes Copyright (C) 2009-2010 Robin Watts for Pinknoise Productions Ltd
Redistribution and use in source and binary forms, with or without modification, are permitted provided that the following
conditions are met:
-
Redistributions of source code must retain the above copyright notice, this list of conditions and the
following disclaimer.
-
Redistributions in binary form must reproduce the above copyright notice, this list of conditions and the
following disclaimer in the documentation and/or other materials provided with the distribution.
-
Neither the name of the Xiph.org Foundation nor the names of its contributors may be used to endorse or
promote products derived from this software without specific prior written permission.
THIS SOFTWARE IS PROVIDED BY THE COPYRIGHT HOLDERS AND CONTRIBUTORS "AS IS" AND ANY EXPRESS
OR IMPLIED WARRANTIES, INCLUDING, BUT NOT LIMITED TO, THE IMPLIED WARRANTIES OF MERCHANTABILITY
AND FITNESS FOR A PARTICULAR PURPOSE ARE DISCLAIMED. IN NO EVENT SHALL THE FOUNDATION OR
CONTRIBUTORS BE LIABLE FOR ANY DIRECT, INDIRECT, INCIDENTAL, SPECIAL, EXEMPLARY, OR CONSEQUENTIAL
DAMAGES (INCLUDING, BUT NOT LIMITED TO, PROCUREMENT OF SUBSTITUTE GOODS OR SERVICES; LOSS OF
USE, DATA, OR PROFITS; OR BUSINESS INTERRUPTION) HOWEVER CAUSED AND ON ANY THEORY OF LIABILITY,
WHETHER IN CONTRACT, STRICT LIABILITY, OR TORT (INCLUDING NEGLIGENCE OR OTHERWISE) ARISING IN ANY
WAY OUT OF THE USE OF THIS SOFTWARE, EVEN IF ADVISED OF THE POSSIBILITY OF SUCH DAMAGE.
(20) Tremor
http://wiki.xiph.org/index.php/Tremor
Copyright (c) 2002, Xiph.org Foundation
Redistribution and use in source and binary forms, with or without modification, are permitted provided that the following
conditions are met:
-
Redistributions of source code must retain the above copyright notice, this list of conditions and the
following disclaimer.
-
Redistributions in binary form must reproduce the above copyright notice, this list of conditions and the
following disclaimer in the documentation and/or other materials provided with the distribution.
-
Neither the name of the Xiph.org Foundation nor the names of its contributors may be used to endorse or
promote products derived from this software without specific prior written permission.
THIS SOFTWARE IS PROVIDED BY THE COPYRIGHT HOLDERS AND CONTRIBUTORS "AS IS" AND ANY EXPRESS
OR IMPLIED WARRANTIES, INCLUDING, BUT NOT LIMITED TO, THE IMPLIED WARRANTIES OF MERCHANTABILITY
AND FITNESS FOR A PARTICULAR PURPOSE ARE DISCLAIMED. IN NO EVENT SHALL THE FOUNDATION OR
CONTRIBUTORS BE LIABLE FOR ANY DIRECT, INDIRECT, INCIDENTAL, SPECIAL, EXEMPLARY, OR CONSEQUENTIAL
DAMAGES (INCLUDING, BUT NOT LIMITED TO, PROCUREMENT OF SUBSTITUTE GOODS OR SERVICES; LOSS OF
USE, DATA, OR PROFITS; OR BUSINESS INTERRUPTION) HOWEVER CAUSED AND ON ANY THEORY OF LIABILITY,
WHETHER IN CONTRACT, STRICT LIABILITY, OR TORT (INCLUDING NEGLIGENCE OR OTHERWISE) ARISING IN ANY
WAY OUT OF THE USE OF THIS SOFTWARE, EVEN IF ADVISED OF THE POSSIBILITY OF SUCH DAMAGE.
(21) Mersenne Twister
http://www.math.sci.hiroshima-u.ac.jp/~m-mat/MT/MT2002/CODES/mt19937ar.c
Copyright (C) 1997 - 2002, Makoto Matsumoto and Takuji Nishimura,
All rights reserved.
Redistribution and use in source and binary forms, with or without modification, are permitted provided that the following
conditions are met:
Redistributions of source code must retain the above copyright notice, this list of conditions and the following disclaimer.
Redistributions in binary form must reproduce the above copyright notice, this list of conditions and the following disclaimer in the
documentation and/or other materials provided with the distribution.
The names of its contributors may not be used to endorse or promote products derived from this software without specific prior
written permission.
THIS SOFTWARE IS PROVIDED BY THE COPYRIGHT HOLDERS AND CONTRIBUTORS "AS IS" AND ANY EXPRESS
OR IMPLIED WARRANTIES, INCLUDING, BUT NOT LIMITED TO, THE IMPLIED WARRANTIES OF MERCHANTABILITY
AND FITNESS FOR A PARTICULAR PURPOSE ARE DISCLAIMED. IN NO EVENT SHALL THE COPYRIGHT OWNER OR
CONTRIBUTORS BE LIABLE FOR ANY DIRECT, INDIRECT, INCIDENTAL, SPECIAL, EXEMPLARY, OR CONSEQUENTIAL
DAMAGES (INCLUDING, BUT NOT LIMITED TO, PROCUREMENT OF SUBSTITUTE GOODS OR SERVICES; LOSS OF
USE, DATA, OR PROFITS; OR BUSINESS INTERRUPTION) HOWEVER CAUSED AND ON ANY THEORY OF LIABILITY,
WHETHER IN CONTRACT, STRICT LIABILITY, OR TORT (INCLUDING NEGLIGENCE OR OTHERWISE) ARISING IN ANY
WAY OUT OF THE USE OF THIS SOFTWARE, EVEN IF ADVISED OF THE POSSIBILITY OF SUCH DAMAGE.
(22) cURL
http://curl.haxx.se
COPYRIGHT AND PERMISSION NOTICE
Copyright (c) 1996 - 2011, Daniel Stenberg, <[email protected]>. All rights reserved.
Permission to use, copy, modify, and distribute this software for any purpose with or without fee is hereby granted, provided that
the above copyright notice and this permission notice appear in all copies.
THE SOFTWARE IS PROVIDED "AS IS", WITHOUT WARRANTY OF ANY KIND, EXPRESS OR IMPLIED, INCLUDING
BUT NOT LIMITED TO THE WARRANTIES OF MERCHANTABILITY, FITNESS FOR A PARTICULAR PURPOSE AND
NONINFRINGEMENT OF THIRD PARTY RIGHTS. IN NO EVENT SHALL THE AUTHORS OR COPYRIGHT HOLDERS
BE LIABLE FOR ANY CLAIM, DAMAGES OR OTHER LIABILITY, WHETHER IN AN ACTION OF CONTRACT, TORT OR
OTHERWISE, ARISING FROM, OUT OF OR IN CONNECTION WITH THE SOFTWARE OR THE USE OR OTHER DEALINGS
IN THE SOFTWARE.
Except as contained in this notice, the name of a copyright holder shall not be used in advertising or otherwise to promote the
sale, use or other dealings in this Software without prior written authorization of the copyright holder.
(23) c-ares
http://c-ares.haxx.se
Copyright 1998 by the Massachusetts Institute of Technology.
Permission to use, copy, modify, and distribute this software and its documentation for any purpose and without fee is hereby
granted, provided that the above copyright notice appear in all copies and that both that copyright notice and this permission
notice appear in supporting documentation, and that the name of M.I.T. not be used in advertising or publicity pertaining to
distribution of the software without specific, written prior permission. M.I.T. makes no representations about the suitability of this
software for any purpose. It is provided "as is" without express or implied warranty.
(24)LZ4
Copyright (c) 2011-2014, Yann Collet All rights reserved.
Redistribution and use in source and binary forms, with or without modification,are permitted provided that the following
conditions are met:
* Redistributions of source code must retain the above copyright notice, this list of conditions and the following disclaimer.
* Redistributions in binary form must reproduce the above copyright notice, this list of conditions and the following disclaimer in
the documentation and/or other materials provided with the distribution.
THIS SOFTWARE IS PROVIDED BY THE COPYRIGHT HOLDERS AND CONTRIBUTORS "AS IS" AND ANY EXPRESS
OR IMPLIED WARRANTIES, INCLUDING, BUT NOT LIMITED TO, THE IMPLIED WARRANTIES OF MERCHANTABILITY
AND FITNESS FOR A PARTICULAR PURPOSE ARE DISCLAIMED. IN NO EVENT SHALL THE COPYRIGHT HOLDER OR
CONTRIBUTORS BE LIABLE FOR ANY DIRECT, INDIRECT, INCIDENTAL, SPECIAL, EXEMPLARY, OR CONSEQUENTIAL
DAMAGES (INCLUDING, BUT NOT LIMITED TO, PROCUREMENT OF SUBSTITUTE GOODS OR SERVICES;
LOSS OF USE, DATA, OR PROFITS; OR BUSINESS INTERRUPTION) HOWEVER CAUSED AND ON
ANY THEORY OF LIABILITY, WHETHER IN CONTRACT, STRICT LIABILITY, OR TORT(INCLUDING NEGLIGENCE OR
OTHERWISE) ARISING IN ANY WAY OUT OF THE USE OF THISSOFTWARE, EVEN IF ADVISED OF THE POSSIBILITY OF
SUCH DAMAGE.
En-31
Supplied Accessories
How to use the remote controller
Indoor FM antenna --- (1)
Remote control sensor
AV Receiver
AM loop antenna --- (1)
Remote controller (RC-899M) --- (1)
Batteries (AA/R6) --- (2)
Power cord --- (1)
Speaker setup microphone --- (1)
Batteries (AA/R6)
Approx.
16 ft. (5 m)
¼¼
If you do not use the remote controller for a long time, remove the
batteries to prevent leakage.
¼¼
Note that keeping consumed batteries inside may cause corrosion
resulting in damage of the remote controller.
¼¼
The number in parenthesis indicates the quantity. On packaging, the
letter at the end of the product name indicates the color.
Integra Division of
18 park Way, Upper Saddle River, N.J. 07458, U.S.A.
Tel: 800-225-1946, 201-818-9200 Fax: 201-785-2650
http://www.integrahometheater.com
Integra Division of
Liegnitzerstrasse 6, 82194 Groebenzell, GERMANY
Tel: +49-8142-4401-0 Fax: +49-8142-4208-213
http://www.integra.eu
Integra Division of
302, Building 1, 20 North Chaling Rd., Xuhui District, Shanghai,
China 200032, Tel: 86-21-52131366 Fax: 86-21-52130396
http://www.integra.com.cn
Integra Division of
Kitahama Chuo Bldg, 2-2-22 Kitahama, Chuo-ku, OSAKA 541-0041, JAPAN
Tel: 072-831-8023 Fax: 072-831-8163
http://www.integraworldwide.com
F1505-0
SN 29401993
(C) Copyright 2015 Onkyo Corporation Japan. All rights reserved. Onkyo has the Privacy Policy. You can review it at [http://www.onkyo.com/privacy/].
* 2 9 4 0 1 9 9 3 *
DTR-30.7
Advanced Manual
The Basic Manual includes information needed
when starting up and also instructions for
frequently used operations. The Advanced
Manual has more detailed information and
advanced settings.
CONTENTS
Details on AM/FM reception
2
Tuning into a Radio Station
2
Presetting an AM/FM Radio Station
2
Using RDS (Australian models)
3
Playing Music Files on a USB Storage Device
4
Listening to Internet Radio
5
About Internet Radio
5
TuneIn Radio
5
PandoraR–Getting Started (U.S., Australia and
New Zealand only)
6
Spotify7
SiriusXM Internet Radio (North American only)
7
Slacker Personal Radio (North American only)
8
Registering Other Internet Radios
9
Playing Music with DLNA
11
About DLNA
11
Configuring the Windows MediaR Player
11
DLNA Playback
11
Controlling Remote Playback from a PC
12
Playing Music Files in a Shared Folder
13
About Shared Folder
13
Setting PC
13
Playing from a Shared Folder
13
Operating Music Files with the Remote Controller 15
About the Remote Controller
15
Remote Controller Buttons
15
Icons Displayed during Playback
15
Using the Listening Modes
16
Selecting Listening Mode
16
Listening Mode Types
16
Selectable Listening Modes
19
Checking the Input Format
28
Advanced Settings (Setup Menu)
29
How to Set
29
1. Input/Output Assign
30
2. Speaker
32
3. Audio Adjust
36
4. Source
37
5. Listening Mode Preset
39
6. Hardware
39
7. Remote Controller
51
8. Miscellaneous
51
Operating Other Components with the Remote
Controller52
Functions of Remote Mode Buttons
52
Programming Remote Control Codes
52
TV operation
54
Blu-ray Disc player/DVD player/DVD recorder
operation54
VCR/PVR operation
55
Satellite receiver / Cable receiver operation
55
CD player operation
56
Cassette tape deck operation
56
To operate CEC-compatible components
56
Advanced speaker connections
57
Connecting Bi-amp Speakers
57
Connecting a Power Amplifier
57
Connecting and Operating Onkyo RI Components 58
About RI Function
58
RI Connection and Setting
58
R
R
iPod /iPhone Operation
59
Control Function between the Unit and External
Component60
Firmware Update
61
About Firmware Update
61
Updating the Firmware via Network
61
Updating the Firmware via USB
62
Troubleshooting64
Reference Information
69
En
Details on AM/FM reception
Tuning manually
Details on AM/FM reception
Tuning into a Radio Station
Tuning automatically
1. Press Tuner on the main unit several times to select
either "AM" or "FM".
2. Press Tuning Mode so that the "AUTO" indicator on the
display goes off.
1. Press Tuner on the main unit several times to select
either "AM" or "FM".
2. Press Tuning Mode so that the "AUTO" indicator on the
display lights.
3. Press Tuning
to start automatic tuning.
●● Searching automatically stops when a station is
found. When tuned into a radio station, the "
TUNED " indicator on the display lights. When
tuned into an FM radio station, the "FM STEREO"
indicator lights.
●● No sound is output while the " TUNED " indicator
is off.
3. Using the number buttons, enter the frequency of the
radio station within 8 seconds.
●● To enter 87.5 (FM), for example, press 8, 7, 5, or
8, 7, 5, 0. If you entered the wrong number, press
D.TUN and enter the correct one.
3. Press Tuning
to select the desired radio station.
●● The frequency changes by 1 step each time
you press the button. The frequency changes
continuously if the button is held down and stops
when the button is released. Tune by looking at the
display.
Presetting an AM/FM Radio Station
To return to automatic tuning: Press Tuning Mode on the
main unit again. The unit automatically tunes into a radio
station. Normally "AUTO" should be displayed.
Tuning to the frequency directly
It allows you to directly enter the frequency of the radio
station you want to listen to.
It allows you to register up to 40 of your favorite AM/FM
radio stations. Registering radio stations in advance allows
you to tune into your radio station of choice directly.
Registration Procedure
1. Tune into the AM/FM radio station you want to register.
2. Press Memory on the unit so that the preset number on
the display flashes.
1. Press Tuner on the remote controller several times to
select either "AM" or "FM".
3. Press Preset
several times to select a number
between 1 and 40 while the preset number is flashing
(about 8 seconds).
When the signal from an FM radio station is weak:
Radio wave may be weak depending on the building
structure and environmental conditions. In that case,
perform the manual tuning procedure as explained in the
next section, "Tuning manually", to manually select the
desired station.
2. Press D.TUN.
En-2
Details on AM/FM reception
4. Press Memory again to register the station.
●● When the station is registered, the preset number
stops flashing.
●● Repeat this procedure for all of your favorite AM/FM
radio stations.
Selecting a Preset Radio Station
1. Press CH +/- on the remote controller to select a preset
number.
●● Alternatively you can press Preset
on the
main unit. You can also select by directly entering
the preset number with the number buttons on the
remote controller.
Using RDS (Australian models)
RDS stands for Radio Data System and is a method of
transmitting data in FM radio signals.
●● RDS works only in areas where RDS broadcasts are
available.
●● In some cases, the text information appeared on the
display is not identical to the content transmitted by
the RDS station. Furthermore, unexpected characters
may be displayed when the unit receives unsupported
characters. However, this is not a malfunction.
●● If the signal from an RDS station is weak, the RDS data
may be displayed continuously or not at all.
PS (Program Service): Tuning into a radio station
distributing Program Service information displays the
radio station name. Pressing Display displays the
frequency for 3 seconds.
RT (Radio Text): Tuning into a radio station transmitting
Radio Text information displays text on the display of the
unit.
Deleting a Preset Radio Station
1. Press CH +/- on the remote controller to select the
preset number to delete.
PTY (Program Type): Allows you to search for RDS
stations by program type.
TP (Traffic Program): Allows you to search for radio
stations transmitting traffic information.
Displaying Radio Text (RT)
1. Press RT/PTY/TP on the main unit once.
●● The Radio Text (RT) is displayed scrolling across
the display. "No Text Data" is displayed when no text
information is available.
2. Press and hold Memory on the main unit and press
Tuning Mode to delete the preset number.
●● When deleted, the number on the display goes off.
Searching by Type (PTY)
2. Press Preset
for.
to select the type of program to search
●● The following RDS station types are displayed:
None
News (News reports)
Affairs (Current affairs)
Info (Information)
Sport
Educate (Education)
Drama
Culture
Science (Science and technology)
Varied
Pop M (Pop music)
Rock M (Rock music)
Easy M (Middle of the road music)
Light M (Light classics)
Classics (Serious classics)
Other M (Other music)
Weather
Finance
Children (Children's programmes)
Social (Social affairs)
Religion
Phone In
Travel
Leisure
Jazz (Jazz music)
Country (Country music)
Nation M (National music)
Oldies (Oldies music)
Folk M (Folk music)
Document (Documentary)
1. Press RT/PTY/TP on the main unit twice.
●● The current program type appears on the display.
En-3
Details on AM/FM reception / Playing Music Files on a USB Storage Device
3. Press Enter to search the radio stations of the selected
type.
4. When such a radio station is found, the indication on the
display flashes. Then, press Enter again.
●● If no stations are found, the message "Not Found" is
displayed.
Listening to Traffic Information (TP)
1. Press RT/PTY/TP on the main unit three times.
●● "[TP]" will be displayed if traffic information is
transmitted by the radio station you are tuned in.
"TP" only is displayed if no traffic information is
available.
Playing Music Files on a USB
Storage Device
● Operation: You can set up by viewing the guidance
displayed on the TV screen (OSD). Select the item with the
cursor buttons of the remote controller and press Enter to
confirm your selection. To return to the previous screen,
press Return.
●● If the OSD language is set to Chinese, the operations
in this section are not displayed on the TV. Operate by
looking at the display on the main unit. Note that the
display on the main unit does not support the display
of Chinese characters. Characters that cannot be
displayed are replaced with asterisks ( ).
2. Press NET on the remote controller to display the NET
TOP screen.
Network
TuneIn Radio
Pandora
Spotify
SiriusXM Internet Radio
Slacker Personal Radio
Deezer
AirPlay
2. Press Enter to search a radio station distributing traffic
information.
3. Select "USB" with the cursors and press Enter.
●● If the "USB" indicator on the display flashes, check
whether the USB storage device is plugged in
properly.
●● Do not unplug the USB storage device while
"Connecting..." is on the display. This may cause
data corruption or malfunction.
3. When a radio station is found, searching stops and
traffic information is received.
●● "Not Found" is displayed if no radio station
distributing traffic information is found.
Playing Back
1. Plug your USB storage device with the music files into
the USB port on the rear of the unit.
En-4
4� Press Enter again in the next screen� The list of
folders and music files on the USB storage device are
displayed. Select the folder with the cursors and press
Enter to confirm your selection.
5. With the cursors, select the music file to play, and then
to start playback.
press Enter or
Listening to Internet Radio
Listening to Internet Radio
About Internet Radio
●● The USB port of this unit conforms with the USB 1.1
standard. The transfer speed may be insufficient
for some content you play, which may cause some
interruption in sound.
The unit comes preset with Internet radio stations such
as TuneIn Radio for you to enjoy these services, just by
connecting the unit to the Internet.
●● Network services or contents may become unavailable if
the service provider terminates its service.
Network
TuneIn Radio
Pandora
Spotify
SiriusXM Internet Radio
Slacker Personal Radio
Deezer
AirPlay
Playing Back
1. Press NET on the remote controller to display the NET
TOP screen.
TuneIn Radio
With more than 70,000 radio stations and 2 million ondemand programs registered, TuneIn Radio is a service
where you can enjoy music, sports and news from all over
the world.
● Operation: You can set up by viewing the guidance
displayed on the TV screen (OSD). Select the item with the
cursor buttons of the remote controller and press Enter to
confirm your selection. To return to the previous screen,
press Return.
●● If the OSD language is set to Chinese, the operations
in this section are not displayed on the TV. Operate by
looking at the display on the main unit. Note that the
display on the main unit does not support the display
of Chinese characters. Characters that cannot be
displayed are replaced with asterisks ( ).
Network
TuneIn Radio
Pandora
Spotify
SiriusXM Internet Radio
Slacker Personal Radio
Deezer
AirPlay
2. Select "TuneIn Radio" with the cursors and press Enter
to display the TuneIn Radio top screen.
3. With the cursors, select a radio station or program and
press Enter to start playing.
En-5
Listening to Internet Radio
Regarding the TuneIn Radio Menu
To display the TuneIn menu, press Menu or Enter while
playing a radio station. Selecting the corresponding menu
item with the cursors and pressing Enter allows you to
perform the following operations:
Add to My Presets: Registers the radio station or
program being broadcast in "My Presets". Once
registered, "My Presets" is displayed in the level under
TuneIn Radio. To play, select the program from "My
Presets".
Remove from My Presets: Deletes a radio station or
program from your "My Presets" within TuneIn Radio.
Report a problem: Reports a problem or interactively
solves a problem related to TuneIn Radio.
View Schedule: Displays the radio station or program
schedule.
Pandora –Getting Started (U.S., Australia and
New Zealand only)
R
Pandora is a free, personalized Internet radio service that
plays the music you know and helps you discover music
you’ll love.
● Operation: You can set up by viewing the guidance
displayed on the TV screen (OSD). Select the item with the
cursor buttons of the remote controller and press Enter to
confirm your selection. To return to the previous screen,
press Return.
●● If the OSD language is set to Chinese, the operations
in this section are not displayed on the TV. Operate by
looking at the display on the main unit. Note that the
display on the main unit does not support the display
of Chinese characters. Characters that cannot be
displayed are replaced with asterisks ( ).
Clear recents: Clears all radio stations and programs
from the "Recents" within TuneIn Radio. (This menu is
displayed only when a radio station or program inside
the "Recents" is being played.)
Add to My Favorites: Registers the radio station
or program being broadcast in "My Favorites". "My
Favorites" are displayed in the level under the one
displayed when you press NET. To play, select the
program from "My Favorites".
Regarding the TuneIn Radio Account
Creating an account on the TuneIn Radio website
(tunein.com) and logging in it from the unit allows you to
automatically add radio stations and programs to your "My
Presets" on the unit as you follow them on the website. "My
Presets" are displayed in the level under TuneIn Radio.
To display a radio station registered in "My Presets", you
must log into TuneIn Radio from the unit. To log in, select
"Login" - "I have a TuneIn account" in the "TuneIn Radio"
top list on the unit, and then enter your user name and
password.
●● If you associate the device on My Page within the
TuneIn Radio website using the registration code
obtained by selecting "Login" - "Login with a registration
code" on the unit, you can log in without entering the
user name and password.
Playing Back
1. Press NET on the remote controller to display NET TOP
screen.
Network
TuneIn Radio
Pandora
Spotify
SiriusXM Internet Radio
Slacker Personal Radio
Deezer
AirPlay
2. With the cursors on the remote controller, select
"Pandora", and then press Enter.
3. Use / to select "I have a Pandora Account" or "I’m
new to Pandora" and then press Enter.
If you are new to Pandora select "I’m new to Pandora".
You will see an activation code on your TV screen.
Please write down this code. Go to an Internet
connected computer and point your browser to www.
pandora.com/onkyo. Enter your activation code and then
follow the instructions to create your Pandora account
and your personalized Pandora stations. You can create
your stations by entering your favorite tracks and artists
when prompted. After you have created your account
and stations you can return to your Integra/Onkyo
receiver and press Enter to begin listening to your
personalized Pandora.
If you have an existing Pandora account, you can add
your Pandora account to your Integra/Onkyo receiver by
selecting "I have a Pandora Account" and logging in with
your email and password.
●● If you want to use multiple user accounts, see "Using
Multiple Accounts". Login can be made from the
"Users" screen.
4. To play a station, use / to select the station from your
station list, and then press Enter. Playback starts and
the playback screen appears.
Create a New Station
Enter the name of a track, artist, or genre and Pandora will
create a unique radio station for you based on the musical
qualities of that track, artist, or genre.
I like this track: Give a track "thumbs-up" and Pandora
will play more music like it.
I don’t like this track: Give a track "thumbs-down" and
Pandora will ban that track from the current station.
En-6
Listening to Internet Radio
Why is this track playing?: Discover some of the
musical attributes that Pandora uses to create your
personal radio stations.
I’m tired of this track: If you are tired of a track, you
can put the track to sleep and Pandora will not play it for
one month.
Create station from this artist: Creates a radio station
from this artist.
Create station from this track: Creates a radio station
from this track.
Delete this station: This will permanently delete a
station from your Pandora account. All of your thumbs
feedback will be lost should you choose to re-create the
station with the same track or artist.
Rename this station: Lets you rename the current
radio station.
Bookmark this artist: Pandora will bookmark your
favorite artist for your profile on www.pandora.com.
Bookmark this track: Pandora will bookmark the
current track and allow you to buy them all from Amazon
or iTunes in one step!
Add to My Favorites: Adds a station to My Favorites
list.
PANDORA, the PANDORA logo, and the Pandora trade
dress are trademarks or registered trademarks of Pandora
Media, Inc. Used with permission.
Spotify
SiriusXM Internet Radio (North American only)
This unit is compatible with Spotify Connect. To enable
Spotify Connect, install the Spotify application on your
smartphone or tablet and create a Spotify premium
account.
●● Refer to the following for the procedures for configuring
Spotify:
www.spotify.com/connect/
●● The Spotify software is subject to third party licenses
found here:
www.spotify.com/connect/third-party-licenses
If you want to listen to the service, you must subscribe. To
subscribe go to www.siriusxm.com/internetradio with your
computer. When you subscribe, you will be provided with
a username and password which has to be entered into
the AV receiver. To use SiriusXM Internet Radio, you must
have your AV receiver connected to the Internet. Using the
remote control, follow these steps:
Playing Back
Just by clicking the Connect icon in the playback screen
of the Spotify application and selecting this unit, you can
automatically turn this unit on (auto power on function),
switch input to the NET position, and start playback of highquality streaming from Spotify. To enable the auto power on
function, make sure the "Network Standby" setting item in
this unit's Setup is "On".
● Operation: You can set up by viewing the guidance
displayed on the TV screen (OSD). Select the item with the
cursor buttons of the remote controller and press Enter to
confirm your selection. To return to the previous screen,
press Return.
●● If the OSD language is set to Chinese, the operations
in this section are not displayed on the TV. Operate by
looking at the display on the main unit. Note that the
display on the main unit does not support the display
of Chinese characters. Characters that cannot be
displayed are replaced with asterisks ( ).
Notes for using the multi-zone function
●● To enjoy Spotify music in a separate room, select
Zone 2, and manually select "NET" as the input of
the separate room. Also select this unit in the Spotify
application.
●● Volume adjustment with the Spotify application is
possible only for the equipment connected to the
ZONE2 speaker terminals. If any other terminal is
used for connection, adjust the volume on the audio
equipment placed in a separate room.
●● To enjoy Spotify music in the main room after playing
it in a separate room, select "NET" as the input of the
main room.
En-7
Listening to Internet Radio
Playing Back
1. Press NET on the remote controller to display NET TOP
screen.
control the tracks with the buttons on the remote control.
Enabled buttons:
, ,
,
Add to My Favorites: Adds a channel to My Favorites
list.
Add to Presets: Adds the currently playing station to
presets list.
Delete from Presets: Deletes the currently playing
station from presets list.
Network
TuneIn Radio
Pandora
Spotify
SiriusXM Internet Radio
Slacker Personal Radio
Deezer
AirPlay
2. With the cursors on the remote controller, select
"SiriusXM Internet Radio", and then press Enter.
3. Select "Sign In", and then press Enter. If you have an
existing SIRIUS account, you can sign in by selecting
"Sign In". Enter your user name and password in the
next keyboard screen, or in Web Setup. If you do not
know your username or password, call Sirius XM at
(888) 539-7474 for assistance.
●● If you want to use multiple user accounts, see "Using
Multiple Accounts". Login can be made from the
"Users" screen.
Using the keyboard screen
1Use / / / and Enter to enter your user name and
password.
2Select "OK".
3Press Enter. The "Confirm your entries" screen
appears.
4Press Enter. "Please wait..." appears and then
"SiriusXM Internet Radio" screen appears which
displays the category available for selection.
4. Use / to select the category and then press Enter. The
channel list screen for the selected category appears.
5. Use / to select the desired channel and then press
Enter.
The playback screen for the selected channel appears
and you can listen to SiriusXM Internet Radio. You can
En-8
SiriusXM Internet Radio subscriptions are sold separately
and are governed by the Sirius Terms and Conditions (see
www.sirius.com). Be sure to read this agreement before
you purchase your subscription.
Sirius, XM and all related marks and logos are trademarks
of Sirius XM Radio Inc. and its subsidiaries. All rights
reserved.
Slacker Personal Radio (North American only)
● Operation: You can set up by viewing the guidance
displayed on the TV screen (OSD). Select the item with the
cursor buttons of the remote controller and press Enter to
confirm your selection. To return to the previous screen,
press Return.
●● If the OSD language is set to Chinese, the operations
in this section are not displayed on the TV. Operate by
looking at the display on the main unit. Note that the
display on the main unit does not support the display
of Chinese characters. Characters that cannot be
displayed are replaced with asterisks ( ).
Playing Back
1. Press NET on the remote controller to display NET TOP
screen.
Network
TuneIn Radio
Pandora
Spotify
SiriusXM Internet Radio
Slacker Personal Radio
Deezer
AirPlay
2. With the cursors on the remote controller, select
"Slacker Personal Radio", and then press Enter.
3. If you do not have an account, create one on the Slacker
website (www.slacker.com) with your computer. If you
already have a Slacker account, select "Sign in to your
account" and then press Enter. The keyboard screen
appears. You can enter information from the remote
control or the keys on the main unit.
Listening to Internet Radio
4. If there are no mistakes in the information you have
entered, use / / / to select "OK" then press Enter.
An account information confirmation screen appears.
5. If you do not have an account, select "Access without
Sign In" and press Enter to use a restricted version of
the service. Note that use will be restricted.
●● If you want to use multiple user accounts, see "Using
Multiple Accounts". Login can be made from the
"Users" screen.
6. Use / to select a menu item and then press Enter. To
sign out, use / to select "Sign out" from this screen
and then press Enter.
7. Use / to select a station and then press Enter or
to start playback from the station. The playback screen
appears.
8. You can control the tracks with the buttons on the
remote control.
, , ,
Enabled buttons:
Rate Song as Favorite: Stores information to server,
making it more likely that the song will be played again.
Ban Song: Stores information to server, making it less
likely that the song will be played again.
Ban Artist: Stores information to server, making it less
likely that the songs from this artist will be played again.
Mark Favorite: Adds the currently playing station to
your favorites.
Unmark Favorite: Deletes the currently playing station
from your favorites.
●● You can store up to 10 user accounts.
●● To switch between accounts you must first log out from
the current account, and log in again on the "Users"
screen.
Registering Other Internet Radios
To listen to other Internet radio program, register the
program in the "My Favorites" list as described in the next
section. "My Favorites" are displayed in the level under the
one displayed when you press NET.
●● You can register up to 40 Internet radio stations.
●● The unit supports Internet radio stations stored in the
following formats: PLS (URL ending in .pls), M3U (URL
ending in .m3u) and RSS (URL ending in rss/rdf/xml).
Depending on the data type and playback format, there
may be some you cannot play.
●● Available services may vary depending on your area of
residence.
● Operation: You can set up by viewing the guidance
displayed on the TV screen (OSD). Select the item with the
cursor buttons of the remote controller and press Enter to
confirm your selection. To return to the previous screen,
press Return.
●● If the OSD language is set to Chinese, the operations
in this section are not displayed on the TV. Operate by
looking at the display on the main unit. Note that the
display on the main unit does not support the display
of Chinese characters. Characters that cannot be
displayed are replaced with asterisks ( ).
Registration Procedure
Before Performing any Operation: The name and URL
of the radio station that you want to add are required for
registration. Check the specifications before use.
1. Press NET on the remote controller to display the NET
TOP screen.
Add song to Library: Adds the currently playing track
to your library.
Delete song from Library: Deletes the currently
playing track from your library.
Add to My Favorites: Adds a station or song to My
Favorites list.
Network
TuneIn Radio
Pandora
Spotify
SiriusXM Internet Radio
Slacker Personal Radio
Deezer
AirPlay
Using Multiple Accounts: The AV receiver supports
multiple user accounts, which means you can freely switch
between several logins. After registering user accounts,
login is performed from the "Users" screen.
Press Menu while the Users screen is displayed. "Add new
user", "Remove this user" menu appear. You can either
store a new user account, or delete an existing one.
●● Some of the services do not allow the use of multiple
user accounts.
2. Select "My Favorites" with the cursors and press Enter
to display the "My Favorites" list screen.
3. With the cursors, select a blank area of "My Favorites"
and press Menu to display the menu screen.
En-9
Listening to Internet Radio
4. Open the Internet browser on your PC or smartphone
and enter the IP address of the unit in the URL field.
●● When using Internet Explorer, you can alternatively
select "Open" in the "File" menu to enter the IP
address.
●● Information of the unit is displayed on the browser.
("WEB Setup")
4. Select "Create new station" with the cursors and press
Enter to display the keyboard screen.
5. Enter the name and URL of the radio station to add.
●● Select "A/a" and press Enter to toggle between
upper and lower case. Select "←" or "→" and press
Enter to move the cursor to the selected direction.
Select " " and press Enter to delete one character
to the left of the cursor position.
5. Click " " tab, then enter the name and URL of the
Internet radio station.
6. Click "Save" to register the entered Internet radio station
in "My Favorites".
Registering a Station with PC
To rename the registered radio station: Select the radio
station in the "My Favorites" list and press Menu to display
the menu screen. Select "Rename this station" with the
cursors and press Enter to display the keyboard screen.
Rename the station as desired.
●● Radio stations can be renamed also from "WEB Setup".
Before Performing any Operation: The name and URL
of the radio station that you want to add are required for
registration. Check the specifications before use. Also,
make sure this unit and a computer are connected to the
same router.
1. Press NET on the remote controller to display the NET
TOP screen.
Playing a Registered Radio Station
1. Press Receiver on the remote controller.
●● Always press Receiver first to change the remote
controller to RECEIVER mode (the mode to operate
this unit) since its mode may be changed to operate
another component.
2. Select "My Favorites" with the cursors and press Enter
to display the registered Internet radio stations.
3. With the cursors, select a radio station and press Enter
to start playing.
2. Press Setup to display the Setup menu.
Deleting a Registered Radio Station
1. Press NET on the remote controller to display the NET
TOP screen.
3. With the cursors, select "6. Hardware" - "Network" -"IP
Address" to display the IP address.
●● Take note of the IP address since you will need it
later.
En-10
2. Select "My Favorites" with the cursors and press Enter
to display the registered Internet radio stations.
3. With the cursors, select the radio station to delete and
press Menu to display the menu screen.
4. With the cursors, select "Delete from My Favorites", and
then press Enter. A confirmation screen will appear.
5. With the cursors, select "OK", and then press Enter to
delete the radio station.
●● Select "Back" to return to the previous screen.
●● Radio stations can be deleted also from "WEB
Setup".
Playing Music with DLNA
Configuring the Windows Media Player
DLNA Playback
Windows MediaR Player 11
● Operation: You can set up by viewing the guidance
displayed on the TV screen (OSD). Select the item with the
cursor buttons of the remote controller and press Enter to
confirm your selection. To return to the previous screen,
press Return.
●● If the OSD language is set to Chinese, the operations
in this section are not displayed on the TV. Operate by
looking at the display on the main unit. Note that the
display on the main unit does not support the display
of Chinese characters. Characters that cannot be
displayed are replaced with asterisks ( ).
R
Playing Music with DLNA
About DLNA
Digital Living Network Alliance (DLNA) can be referred
to as a technology standard or the industry group to
develop the technology standard to interconnect and use
AV components, computers and other devices in a home
network. This unit allows you to use DLNA to play music
files stored on a computer or a hard disk connected to your
home network (NAS device). Make sure this unit and a
computer or NAS device are connected to the same router.
1. Turn on your PC and start Windows MediaR Player 11.
2. In the "Library" menu, select "Media Sharing" to display
a dialog box.
3. Select the "Share my media" check box, and then click
"OK" to display the compatible devices.
4. Select this unit, and then click "Allow".
●● When it is clicked, the corresponding icon is
checked.
5. Click "OK" to close the dialog.
●● Depending on the version of Windows MediaR Player,
the names of the items you need to select may differ
from the explanation here.
Windows MediaR Player 12
Internet radio
Router
PC
NAS
●● To stream a music file, you need a NAS device with
DLNA server functions or a PC where a player (e.g.,
Windows MediaR Player 11 or Windows MediaR Player
12) with DLNA server functions is installed. To enable
streaming with Windows MediaR Player 11 or Windows
MediaR Player 12, you must first configure the settings.
1. Turn on your PC and start Windows MediaR Player 12.
2. In the "Stream" menu, select "Turn on media streaming"
to display a dialog box.
●● If media streaming is already turned on, select "More
streaming options..." in the "Stream" menu to list
players in the network, and then go to step 4.
3. Click "Turn on media streaming" to list players in the
network.
4. Select this unit in "Media streaming options" and check
that it is set to "Allow".
5. Click "OK" to close the dialog.
●● Depending on the version of Windows MediaR Player,
the names of the items you need to select may differ
from the explanation here.
Playing Back
1. Start the server (Windows MediaR Player 11, Windows
MediaR Player 12, or NAS device) containing the music
files to play.
2. Press NET on the remote controller to display the NET
TOP screen.
●● If the "NET" indicator on the display flashes, the unit
is not properly connected to the network. Check the
connection.
En-11
Playing Music with DLNA
Controlling Remote Playback from a PC
Network
TuneIn Radio
Pandora
Spotify
SiriusXM Internet Radio
Slacker Personal Radio
Deezer
AirPlay
3. Select "DLNA" with the cursors and press Enter.
4. Select the target server with the cursors and press Enter
to display the items list screen.
●● Searching does not work in servers that do not
support search functions.
●● The unit cannot access pictures and videos stored
on servers.
●● Contents stored on the server may not be displayed
depending on the server sharing settings.
5. With the cursors, select the music file to play, and then
to start playback.
press Enter or
●● If "No Item" is displayed, check whether the network
is properly connected.
You can use this unit to play music files stored on your PC
by operating the PC inside your home network. The unit
supports remote playback with Windows MediaR Player 12.
To use the remote playback function with Windows MediaR
Player 12, Windows MediaR Player 12 must be configured
in advance.
●● Using a DLNA-compatible controller (such as an
Android application), you can select a music file stored
on Windows MediaR Player 12 and stream to this unit
by operating the controller. For information on how to
remotely play using the controller, refer to the controller's
instruction manual.
Setting PC
1. Turn on your PC and start Windows MediaR Player 12.
2. In the "Stream" menu, select "Turn on media streaming"
to display a dialog box.
●● If media streaming is already turned on, select "More
streaming options..." in the "Stream" menu to list
players in the network, and then go to step 4.
3. Click "Turn on media streaming" to list players in the
network.
4. Select this unit in "Media streaming options" and check
that it is set to "Allow".
5. Click "OK" to close the dialog box.
6. Open the "Stream" menu and check that "Allow remote
control of my Player..." is checked.
●● Depending on the version of Windows MediaR Player,
the names of the items you need to select may differ
from the explanation here.
Remote playback
1. Turn on the power of the unit.
2. Turn on your PC and start Windows MediaR Player 12.
3. Select and right-click the music file to play with Windows
MediaR Player 12.
●● To remotely play a music file on another server, open
the target server from "Other Libraries" and select
the music file to play.
4. Select this unit in "Play to" to open the "Play to" window
of Windows MediaR Player 12 and start playback on the
unit.
En-12
●● Operations during remote playback are possible
from the "Play to" window on the PC. The playback
screen is displayed on the TV connected to the
HDMI output of the unit. If your PC is running on
Windows 8R, click "Play to", and then select this unit.
5. Adjust the volume using the volume bar on the "Play to"
window.
●● Sometimes, the volume displayed on the remote
playback window may differ from that appeared on
the display of the unit.
●● When the volume is adjusted from the unit, the value
is not reflected in the "Play to" window.
●● This unit cannot play music files remotely in the
following conditions.
−− It is using a network service.
−− It is playing a music file on a USB storage
device.
●● Depending on the version of Windows MediaR Player,
the names of the items you need to select may differ
from the explanation here.
Playing Music Files in a Shared Folder
Playing Music Files in a Shared
Folder
About Shared Folder
A shared folder is configured in a network device such as a
PC or NAS (hard disk connected to your home network) for
access from other users.
You can play music files in a shared folder on your PC or
NAS connected to the same home network as that of the
unit. To play music files in a shared folder, you must first
configure WindowsR 8 or WindowsR 7, Make sure the unit
and PC or NAS device are connected to the same router.
Setting PC
Playing from a Shared Folder
Configuring the Sharing Options
● Operation: You can set up by viewing the guidance
displayed on the TV screen (OSD). Select the item with the
cursor buttons of the remote controller and press Enter to
confirm your selection. To return to the previous screen,
press Return.
●● If the OSD language is set to Chinese, the operations
in this section are not displayed on the TV. Operate by
looking at the display on the main unit. Note that the
display on the main unit does not support the display
of Chinese characters. Characters that cannot be
displayed are replaced with asterisks ( ).
1. Select "Choose home group and sharing options" on the
"Control Panel".
●● If the menu is not displayed, check whether "View
by" is set to "Category".
2. Select "Change advanced sharing settings".
3. Check whether the following radio buttons are selected
in "Home or Work":
"Enable network discovery"
"Turn on file and printer sharing"
"Turn on sharing so anyone with network access can
read and write files in the Public folders."
"Turn off password protected sharing"
4. Select "Save Changes" and click "OK" on the dialog box.
Creating a Shared Folder
Internet radio
Router
PC
NAS
1. Select and right-click the folder to share.
2. Select "Properties".
3. Select "Advanced Sharing" on the "Sharing" tab.
4. Select the "Share this folder" check box and click "OK".
5. Select "Share" for "Network File and Folder Sharing".
6. Select "Everyone" from the pull-down menu. Click "Add",
and then "Share".
●● To set user name and password to a shared folder,
set "Permissions" in "Advanced Sharing" on the
"Sharing" tab.
●● Check whether a workgroup is set.
Playing Back
1. Press NET on the remote controller to display the NET
TOP screen.
●● If the "NET" indicator on the display flashes, the unit
is not properly connected to the network. Check the
connection.
●● The sharing options must be configured and a shared
folder created on the PC in advance.
●● For information on how to configure the NAS device
and create a shared folder, refer to the NAS device's
instruction manual.
En-13
Playing Music Files in a Shared Folder
Network
TuneIn Radio
Pandora
Spotify
SiriusXM Internet Radio
Slacker Personal Radio
Deezer
AirPlay
2. With the cursors, select "Home Media", and then press
Enter.
3. With the cursors, select the target server, and then press
Enter.
●● You can check the server name of your PC from the
PC properties.
4. With the cursors, select the target shared folder, and
then press Enter.
5. If a username and password is required, enter the
necessary login information.
●● The login information is the account information set
at the time of creating the shared folder.
●● Once entered, the login information will be
remembered from the next time onward.
6. With the cursors, select the music file to play, and then
to start playback.
press Enter or
En-14
Operating Music Files with the Remote Controller
JMode: This button displays the video from the input
Operating Music Files with the
Remote Controller
5
1
6
2
7
About the Remote Controller
The remote controller of this unit allows you to play music
files stored on USB storage devices, Internet radio, PCs
and NAS devices on your home network, as well as on
Bluetooth-enabled devices. It also allows you to view
information of the music file being played and perform
various other operations.
●● Available buttons may vary depending on the service
and device to play.
●● Some buttons cannot be used with Bluetooth-enabled
devices. Furthermore, the Bluetooth-enabled devices
must support the AVRCP profile. Some devices may not
be operated, even when they support AVRCP profile.
Remote Controller Buttons
1. Press Input Selector (NET, or Bluetooth) appropriate for
the input source on the remote controller.
3
4
8
9
1Top Menu: This button displays the top menu for
each media or server.
2 / , Enter: These buttons navigate through items
and activate the selected item.
/ : These buttons allow you to navigate to other
pages when the list continues on other pages.
3
: This button fast-reverses the current track. This
button is not operable from 10 seconds before the
playback ends.
4
: This button plays the current track from the
beginning. Pressing this button twice plays the
previous track.
5+/– button: Moves the cursor up or down on the
Internet radio stations list in "My Favorites".
6Menu: This button displays the menu of each Internet
radio service.
7Return: This button returns to the previous screen.
8
: This button fast-forwards the current track. This
button is not operable from 10 seconds before the
playback ends.
9
: This button plays the next track.
F
G
H
2. Operate the remote controller by referring to the name
and function of each of the buttons.
I
J
K
L
M
selected in "Video Select". Each press of the button
displays or turns off the video. You can change the
display position of the OSD by pressing Enter while
the video is displayed on the screen.
●● These buttons are disabled when the OSD
language is set to Chinese.
KRandom: This button performs random playback.
LRepeat: This button replays the track(or tracks).
Pressing this button repeatedly cycles through the
repeat modes.
MDisplay: This button changes the displayed track
information during playback. Pressing this button
when the list screen is displayed toggles the screen
to playback.
●● Bluetooth-enabled devices: Usable buttons are
,
,
, ,
,
, and .
Icons Displayed during Playback
Icons are displayed on the display during music file
playback. The meaning of each icon is as follows:
: Folder
: Track
: Play
: Pause
: Fast-forward
: Fast-reverse
: Artist
: Album
: Repeat one track
: Repeat within a folder
: Repeat
F : This button starts the playback.
G : This button pauses the playback.
HSearch: This button toggles between the playback
: Shuffle
screen and list screen during playback.
I : This button stops the playback.
En-15
Using the Listening Modes
Using the Listening Modes
Selecting Listening Mode
The listening modes allow you to select the best sound
effect for your input source.
1. After pressing Receiver on the remote controller, press
one of the following four buttons.
Listening Mode Types
Dolby D (Dolby Digital)
The unit allows you to enjoy audio in a variety of listening
modes. This section lists the types of listening modes
available on the unit and describes their functions.
Mode suitable for playing sources recorded in Dolby Digital.
●● This listening mode can be selected only if your Blu-ray
Disc/DVD player is digitally connected to the unit or the
player's output setting is bitstream.
Future listening mode update
A future firmware update is planned to enable the unit to
support playback in DTS:X audio format. For this reason,
the available listening modes will vary depending on the
firmware version.
Versions before the release of an update with support for
the DTS:X audio format
●● Neo:6 Cinema and Neo:6 Music are available.
Versions that support the DTS:X audio format
●● DTS:X and DTS Neural:X are available. (Neo:6 Cinema
and Neo:6 Music become unavailable after the update.)
2. Press the selected button repeatedly to switch the
modes displayed on the display of the unit.
●● Set the listening mode of your choice by listening to
the actual sound.
In alphabetical order
All Ch Stereo
Ideal for background music, this mode fills the entire
listening area with stereo sound.
Direct
For details on the listening modes see "Listening Mode
Types". For listening modes selectable with each button,
refer to "Selectable Listening Modes".
In this mode, audio from the input source is output as-is.
For example, if a 2 ch source from a music CD is input, the
output will be stereo, or if Dolby Digital signal is input, the
sound field will be controlled in accordance with the number
of channels present.
Dolby Atmos
Introduced first in the cinema, Dolby Atmos brings a
revolutionary sense of dimension and immersion to the
Home Theater experience. Dolby Atmos is an adaptable
and scalable object based format that reproduces
audio as independent sounds (or objects) that can be
accurately positioned and move dynamically throughout
the 3 dimensional listening space during playback. A key
ingredient of Dolby Atmos is the introduction of a height
plane of sound above the listener.
En-16
Dolby D+ (Dolby Digital Plus)
Mode suitable for playing sources recorded in Dolby Digital
Plus.
●● This listening mode can be selected only if your Blu-ray
Disc/DVD player is digitally connected to the unit or the
player's output setting is bitstream.
Dolby Surround
Dolby surround is a next generation surround technology
that intelligently up mixes stereo; 5.1 and 7.1 content for
playback through your surround speaker system. Dolby
surround is compatible with traditional speaker layouts,
as well as Dolby Atmos enabled playback systems that
employ inceiling speakers or products with Dolby speaker
technology.
Dolby TrueHD
Mode suitable for playing sources recorded in Dolby
TrueHD.
●● This listening mode can be selected only if your Blu-ray
Disc/DVD player is digitally connected to the unit or the
player's output setting is bitstream.
DTS
Mode suitable for playing sources recorded in DTS.
●● This listening mode can be selected only if your Blu-ray
Disc/DVD player is digitally connected to the unit or the
player's output setting is bitstream.
DTS 96/24
Mode suitable for playing sources recorded in DTS 96/24.
With 96 kHz sampling rate and 24-bit resolution, it provides
superior fidelity.
●● Depending on the settings, this listening mode becomes
DTS.
●● This listening mode can be selected only if your Blu-ray
Disc/DVD player is digitally connected to the unit or the
player's output setting is bitstream.
Using the Listening Modes
DTS Express
ES Discrete (DTS-ES Discrete)
Game-Sports
Mode suitable for playing sources recorded in DTS
Express.
●● This listening mode can be selected only if your Blu-ray
Disc/DVD player is digitally connected to the unit or the
player's output setting is bitstream.
This mode is for use with DTS-ES Discrete sources and
enables 6.1 ch or 7.1 ch playback using back channel.
Completely discrete seven channels will improve spatial
imaging and enable 360-degree sound localization
producing a sound crossing between the surround
channels.
●● This listening mode can be selected only if your Blu-ray
Disc/DVD player is digitally connected to the unit or the
player's output setting is bitstream.
●● Use on the DVD with DTS ES logo, particularly on the
software containing DTS-ES Matrix soundtrack.
Suitable for audio source with much reverberation.
DTS-HD HR (DTS-HD High Resolution Audio)
Mode suitable for playing sources recorded in DTS-HD
High Resolution Audio.
●● This listening mode can be selected only if your Blu-ray
Disc/DVD player is digitally connected to the unit or the
player's output setting is bitstream.
DTS-HD MSTR (DTS-HD Master Audio)
Mode suitable for playing sources recorded in DTS-HD
Master Audio.
●● This listening mode can be selected only if your Blu-ray
Disc/DVD player is digitally connected to the unit or the
player's output setting is bitstream.
DTS Neo:6
This mode expands any 2 ch source for 5.1 ch multichannel
surround playback. It offers full-bandwidth on all channels,
with great independence between the channels. There
are two variants for this mode: one ideal for movies and
another ideal for music.
– Neo:6 Cinema: Use this mode with any 2 ch movie.
– Neo:6 Music: Use this mode with any 2 ch music
source.
DTS Neural:X
Neural:X enables upmixing of legacy content such as
mono, stereo, 5.1 or 7.1ch to many higher speaker count
including the layout using elevated channels set for DTS:X
playback.
DTS:X
This mode is for use with DTS sources. DTS:X is DTS's
next-generation object-based surround sound technology
that includes height to deliver a fully-immersive listening
experience to your living room.
ES Matrix (DTS-ES Matrix)
This mode is for use with DTS-ES Matrix soundtrack and
enables 6.1 ch or 7.1 ch playback using matrix-encoded
back channel.
●● This listening mode can be selected only if your Blu-ray
Disc/DVD player is digitally connected to the unit or the
player's output setting is bitstream.
●● Use on the CD, DVD or LD with DTS ES logo,
particularly on the software containing DTS-ES Matrix
soundtrack.
Full Mono
In this mode, all speakers output the same sound in mono,
so the sound you hear is the same regardless of where you
are within the listening room.
Game-Action
In this mode, sound localization is distinct with emphasis
on bass.
Game-Rock
In this mode, sound pressure is emphasized to heighten
live feel.
Game-RPG
In this mode, the sound has a dramatic feel with a similar
atmosphere to Orchestra mode.
Mono
Use this mode when watching an old movie with a mono
soundtrack, or use it to separately reproduce soundtracks
in two different languages recorded in the left and right
channels of some movies. It is also suitable for DVDs or
other sources containing multiplexed audio.
Multich (Multichannel)
Mode suitable for playing sources recorded in PCM
multichannel.
Orchestra
Suitable for classical or operatic music. This mode
emphasizes the surround channels in order to widen the
stereo image, and simulates the natural reverberation of a
large hall.
Stereo
In this mode, sound is output from the front left and right
speakers and subwoofer.
Studio-Mix
Suitable for rock or pop music, Listening to music in this
mode creates a lively sound field with a powerful acoustic
image, like being at a club or rock concert.
T-D (Theater-Dimensional)
In this mode, you can enjoy a virtual playback of
multichannel surround sound even with only two or three
speakers. This works by controlling how sounds reach the
listener’s left and right ears.
TV Logic
Suitable for TV shows produced in a TV studio. This mode
enhances the surround effects to the entire sound to give
clarity to voices and create a realistic acoustic image.
En-17
Using the Listening Modes
Unplugged
Suitable for acoustic instruments, vocals and jazz. This
mode emphasizes the front stereo image, giving the
impression of being right in front of the stage.
En-18
Using the Listening Modes
Selectable Listening Modes
Input Format
Listening Mode
Input Format
Listening Mode
Listening modes that can be selected with the listening
mode buttons will differ depending on the input signal
format and actual speaker configuration. Also note that
depending on the player settings and content, some
listening modes may not be available for selecting.
●● Listening modes available when headphones are
connected are: Mono, Direct, and Stereo.
PCM
Direct
DSD
Direct
Versions before the release of an update with support for
the DTS:X audio format
●● Neo:6 Cinema and Neo:6 Music are available.
Versions that support the DTS:X audio format
●● DTS:X and DTS Neural:X are available. (Neo:6 Cinema
and Neo:6 Music become unavailable after the update.)
Mono
Dolby Surround
Dolby Surround
Neo:6 Cinema1
Neo:6 Cinema1
DTS Neural:X
DTS Neural:X
TV Logic2
TV Logic2
All Ch Stereo
Future listening mode update
A future firmware update is planned to enable the unit to
support playback in DTS:X audio format. For this reason,
the available listening modes will vary depending on the
firmware version.
Mono
Full Mono
T-D
T-D
enter speaker or surround speakers need to be installed.
C
2
Surround speakers or height speakers need to be installed.
3
Center speaker, surround speakers or height speakers need to be
installed.
1
Input Format
Listening Mode
Multich PCM
Direct
Mono
Multich1
Movie/TV button
DTS Neural:X
You can select a mode suitable for movies and TV
programs.
Listening Mode
Analog
Direct
Mono
Dolby Surround
Neo:6 Cinema1
Full Mono3
3
Dolby Surround
Input Format
All Ch Stereo3
3
TV Logic2
All Ch Stereo3
Full Mono
3
an only be selected when the input format is 2 ch and a center speaker
C
or surround speakers are installed.
2
Surround speakers or height speakers need to be installed.
3
Center speaker, surround speakers or height speakers need to be
installed.
1
Input Format
Listening Mode
Dolby Atmos
●● The listening mode
of Dolby Digital Plus
or Dolby TrueHD can
be selected if back
speakers or height
speakers are not
connected.
Direct
Mono
Dolby Atmos
TV Logic
All Ch Stereo
Full Mono
T-D
T-D
enter speaker or surround speakers need to be installed.
C
2
Surround speakers or height speakers need to be installed.
3
Center speaker, surround speakers or height speakers need to be
installed.
1
DTS Neural:X
TV Logic2
All Ch Stereo3
Full Mono3
T-D
enter speaker or surround speakers need to be installed.
C
2
Surround speakers or height speakers need to be installed.
3
Center speaker, surround speakers or height speakers need to be
installed.
1
En-19
Using the Listening Modes
Input Format
Listening Mode
Input Format
Listening Mode
Input Format
Listening Mode
Dolby D
Direct
Dolby TrueHD
Direct
DTS 96/24
Direct
Mono
Mono
Mono
Dolby D1 2
Dolby TrueHD1 2
DTS 96/241 2
Dolby Surround
Dolby Surround
Dolby Surround
Neo:6 Cinema3
Neo:6 Cinema3
Neo:6 Cinema3
DTS Neural:X
DTS Neural:X
DTS Neural:X
TV Logic
TV Logic
TV Logic4
4
All Ch Stereo
Full Mono
4
All Ch Stereo
5
Full Mono
5
T-D
All Ch Stereo5
5
Full Mono5
5
T-D
T-D
annot be selected when the input format is monaural or 2 ch.
C
2
Center speaker or surround speakers need to be installed.
3
Can only be selected when the input format is 2 ch and a center speaker
or surround speakers are installed.
4
Surround speakers or height speakers need to be installed.
5
Center speaker, surround speakers or height speakers need to be
installed.
1
Input Format
Listening Mode
Input Format
Listening Mode
Input Format
Listening Mode
Dolby D+
Direct
DTS
Direct
DTS Express
Direct
1
Mono
Mono
Mono
Dolby D+1 2
DTS1 2
DTS Express1 2
Dolby Surround
Dolby Surround
Dolby Surround
Neo:6 Cinema3
Neo:6 Cinema3
Neo:6 Cinema3
DTS Neural:X
DTS Neural:X
DTS Neural:X
TV Logic4
TV Logic4
TV Logic4
All Ch Stereo5
All Ch Stereo5
All Ch Stereo5
Full Mono
Full Mono
Full Mono5
5
T-D
annot be selected when the input format is monaural or 2 ch.
C
2
Center speaker or surround speakers need to be installed.
3
Can only be selected when the input format is 2 ch and a center speaker
or surround speakers are installed.
4
Surround speakers or height speakers need to be installed.
5
Center speaker, surround speakers or height speakers need to be
installed.
1
En-20
annot be selected when the input format is monaural or 2 ch.
C
2
Center speaker or surround speakers need to be installed.
3
Can only be selected when the input format is 2 ch and a center speaker
or surround speakers are installed.
4
Surround speakers or height speakers need to be installed.
5
Center speaker, surround speakers or height speakers need to be
installed.
5
T-D
annot be selected when the input format is monaural or 2 ch.
C
2
Center speaker or surround speakers need to be installed.
3
Can only be selected when the input format is 2 ch and a center speaker
or surround speakers are installed.
4
Surround speakers or height speakers need to be installed.
5
Center speaker, surround speakers or height speakers need to be
installed.
1
Using the Listening Modes
Input Format
Listening Mode
Input Format
Listening Mode
DTS-HD HR
Direct
DTS-ES
Direct
Mono
Mono
DTS-HD HR1 2
DTS1
Dolby Surround
ES Matrix2
Neo:6 Cinema3
ES Discrete2
DTS Neural:X
Dolby Surround3
TV Logic
DTS Neural:X
4
All Ch Stereo5
TV Logic4
Full Mono
All Ch Stereo5
5
T-D
annot be selected when the input format is monaural or 2 ch.
C
Center speaker or surround speakers need to be installed.
Can only be selected when the input format is 2 ch and a center speaker
or surround speakers are installed.
4
Surround speakers or height speakers need to be installed.
5
Center speaker, surround speakers or height speakers need to be
installed.
Full Mono5
T-D
1
2
3
Input Format
Listening Mode
DTS-HD MSTR
Direct
Mono
an only be selected when the back speakers are not installed.
C
2
Back speakers need to be installed.
3
Height speakers need to be installed.
4
Surround speakers or height speakers need to be installed.
5
Center speaker, surround speakers or height speakers need to be
installed.
1
Input Format
Listening Mode
DTS:X
Direct
Mono
DTS-HD MSTR1 2
DTS:X
Dolby Surround
TV Logic1
Neo:6 Cinema3
All Ch Stereo2
DTS Neural:X
Full Mono2
TV Logic4
All Ch Stereo5
Full Mono5
T-D
T-D
urround speakers or height speakers need to be installed.
S
2
Center speaker, surround speakers or height speakers need to be
installed.
1
annot be selected when the input format is monaural or 2 ch.
C
2
Center speaker or surround speakers need to be installed.
3
Can only be selected when the input format is 2 ch and a center speaker
or surround speakers are installed.
4
Surround speakers or height speakers need to be installed.
5
Center speaker, surround speakers or height speakers need to be
installed.
1
En-21
Using the Listening Modes
Music button
You can select a mode suitable for music.
Input Format
Listening Mode
Analog
Direct
Input Format
Listening Mode
Input Format
Listening Mode
Multich PCM
Direct
Dolby Atmos
●● The listening mode
of Dolby Digital Plus
or Dolby TrueHD can
be selected if back
speakers or height
speakers are not
connected.
Direct
Stereo
Multich1
Dolby Surround
Stereo
DTS Neural:X
Dolby Surround
Neo:6 Music
Orchestra2
1
Studio-Mix
Orchestra2
Studio-Mix2
All Ch Stereo3
Full Mono3
enter speaker or surround speakers need to be installed.
C
Surround speakers or height speakers need to be installed.
3
Center speaker, surround speakers or height speakers need to be
installed.
1
2
Input Format
Listening Mode
PCM
Direct
enter speaker or surround speakers need to be installed.
C
Surround speakers or height speakers need to be installed.
3
Center speaker, surround speakers or height speakers need to be
installed.
Input Format
Listening Mode
DSD
Direct
Stereo
Dolby D1 2
Dolby Surround
Neo:6 Music3
DTS Neural:X
Dolby Surround
Orchestra4
Full Mono3
enter speaker or surround speakers need to be installed.
C
2
Surround speakers or height speakers need to be installed.
3
Center speaker, surround speakers or height speakers need to be
installed.
All Ch Stereo5
Unplugged2
Studio-Mix2
All Ch Stereo3
Full Mono3
2
All Ch Stereo3
Studio-Mix4
Orchestra2
2
Studio-Mix
Unplugged4
DTS Neural:X
Unplugged2
En-22
Direct
Stereo
DTS Neural:X
1
Listening Mode
Dolby D
Neo:6 Music1
Neo:6 Music
Orchestra
Input Format
2
1
an only be selected when the input format is 2 ch and a center speaker
C
or surround speakers are installed.
2
Surround speakers or height speakers need to be installed.
3
Center speaker, surround speakers or height speakers need to be
installed.
1
Studio-Mix
Full Mono
Full Mono3
Dolby Surround
Unplugged
All Ch Stereo
1
Stereo
Orchestra
2
All Ch Stereo3
Unplugged2
Dolby Atmos
2
Unplugged
DTS Neural:X
Stereo
Full Mono5
annot be selected when the input format is monaural or 2 ch.
C
2
Center speaker or surround speakers need to be installed.
3
Can only be selected when the input format is 2 ch and a center speaker
or surround speakers are installed.
4
Surround speakers or height speakers need to be installed.
5
Center speaker, surround speakers or height speakers need to be
installed.
1
Using the Listening Modes
Input Format
Listening Mode
Input Format
Listening Mode
Input Format
Listening Mode
Dolby D+
Direct
DTS
Direct
DTS Express
Direct
Stereo
Stereo
Stereo
Dolby D+1 2
DTS1 2
DTS Express1 2
Dolby Surround
Dolby Surround
Dolby Surround
Neo:6 Music3
Neo:6 Music3
Neo:6 Music3
DTS Neural:X
DTS Neural:X
DTS Neural:X
Orchestra
Orchestra
Orchestra4
4
Unplugged
Studio-Mix
4
Unplugged
4
Studio-Mix
All Ch Stereo
Full Mono
4
Full Mono
5
Studio-Mix4
4
All Ch Stereo
5
Unplugged4
4
All Ch Stereo5
5
Full Mono5
5
1
annot be selected when the input format is monaural or 2 ch.
C
Center speaker or surround speakers need to be installed.
Can only be selected when the input format is 2 ch and a center speaker
or surround speakers are installed.
4
Surround speakers or height speakers need to be installed.
5
Center speaker, surround speakers or height speakers need to be
installed.
1
2
2
2
3
annot be selected when the input format is monaural or 2 ch.
C
Center speaker or surround speakers need to be installed.
Can only be selected when the input format is 2 ch and a center speaker
or surround speakers are installed.
4
Surround speakers or height speakers need to be installed.
5
Center speaker, surround speakers or height speakers need to be
installed.
1
3
3
annot be selected when the input format is monaural or 2 ch.
C
Center speaker or surround speakers need to be installed.
Can only be selected when the input format is 2 ch and a center speaker
or surround speakers are installed.
4
Surround speakers or height speakers need to be installed.
5
Center speaker, surround speakers or height speakers need to be
installed.
Input Format
Listening Mode
Input Format
Listening Mode
Input Format
Listening Mode
Dolby TrueHD
Direct
DTS 96/24
Direct
DTS-HD HR
Direct
Stereo
Stereo
Stereo
Dolby TrueHD1 2
DTS 96/241 2
DTS-HD HR1 2
Dolby Surround
Dolby Surround
Dolby Surround
Neo:6 Music3
Neo:6 Music3
Neo:6 Music3
DTS Neural:X
DTS Neural:X
DTS Neural:X
Orchestra4
Orchestra4
Orchestra4
Unplugged
4
Unplugged
Unplugged4
4
Studio-Mix
Studio-Mix
All Ch Stereo
Full Mono
Full Mono
5
Studio-Mix4
4
All Ch Stereo
5
annot be selected when the input format is monaural or 2 ch.
C
Center speaker or surround speakers need to be installed.
Can only be selected when the input format is 2 ch and a center speaker
or surround speakers are installed.
4
Surround speakers or height speakers need to be installed.
5
Center speaker, surround speakers or height speakers need to be
installed.
4
All Ch Stereo5
5
Full Mono5
5
annot be selected when the input format is monaural or 2 ch.
C
Center speaker or surround speakers need to be installed.
Can only be selected when the input format is 2 ch and a center speaker
or surround speakers are installed.
4
Surround speakers or height speakers need to be installed.
5
Center speaker, surround speakers or height speakers need to be
installed.
1
1
1
2
2
2
3
3
3
En-23
Using the Listening Modes
Input Format
Listening Mode
Input Format
Listening Mode
Input Format
Listening Mode
DTS-HD MSTR
Direct
DTS-ES
Direct
DTS:X
Direct
Stereo
Stereo
Stereo
DTS-HD MSTR1 2
DTS1
DTS:X
Dolby Surround
ES Matrix2
Orchestra1
Neo:6 Music3
ES Discrete2
Unplugged1
DTS Neural:X
Dolby Surround3
Studio-Mix1
Orchestra
DTS Neural:X
All Ch Stereo2
4
4
Orchestra
4
Unplugged
Unplugged
Studio-Mix
Studio-Mix4
Full Mono
All Ch Stereo5
annot be selected when the input format is monaural or 2 ch.
C
Center speaker or surround speakers need to be installed.
Can only be selected when the input format is 2 ch and a center speaker
or surround speakers are installed.
4
Surround speakers or height speakers need to be installed.
5
Center speaker, surround speakers or height speakers need to be
installed.
Full Mono5
1
2
3
En-24
4
All Ch Stereo5
5
an only be selected when the back speakers are not installed.
C
2
Back speakers need to be installed.
3
Height speakers need to be installed.
4
Surround speakers or height speakers need to be installed.
5
Center speaker, surround speakers or height speakers need to be
installed.
1
Full Mono2
4
urround speakers or height speakers need to be installed.
S
2
Center speaker, surround speakers or height speakers need to be
installed.
1
Using the Listening Modes
Game button
You can select a mode suitable for games.
Input Format
Listening Mode
Analog
Direct
Input Format
Listening Mode
Input Format
Listening Mode
Multich PCM
Direct
Dolby Atmos
●● The listening mode
of Dolby Digital Plus
or Dolby TrueHD can
be selected if back
speakers or height
speakers are not
connected.
Direct
Multich1
Dolby Surround
DTS Neural:X
Dolby Surround
Game-RPG2
DTS Neural:X
Game-Action2
Game-RPG1
Game-Rock
Game-Action1
T-D
2
Full Mono3
urround speakers or height speakers need to be installed.
S
Center speaker, surround speakers or height speakers need to be
installed.
Input Format
Listening Mode
PCM
Direct
T-D
enter speaker or surround speakers need to be installed.
C
2
Surround speakers or height speakers need to be installed.
3
Center speaker, surround speakers or height speakers need to be
installed.
1
Input Format
Listening Mode
DSD
Direct
Direct
Dolby D1 2
Dolby Surround
DTS Neural:X
Game-RPG3
Game-Action3
Game-Rock3
Game-RPG1
Game-RPG1
Game-Sports3
Game-Action1
Game-Action1
All Ch Stereo4
Game-Rock1
Game-Rock1
Full Mono4
Game-Sports1
Game-Sports1
All Ch Stereo2
All Ch Stereo2
Full Mono2
Full Mono2
urround speakers or height speakers need to be installed.
S
Center speaker, surround speakers or height speakers need to be
installed.
Listening Mode
Dolby D
DTS Neural:X
DTS Neural:X
T-D
Input Format
Dolby Surround
Dolby Surround
2
Game-Sports
All Ch Stereo
2
Full Mono
T-D
1
Game-Rock
All Ch Stereo3
Full Mono2
2
Game-Action
1
Game-Sports
1
Game-RPG
Game-Sports2
Game-Rock1
All Ch Stereo
Dolby Atmos
T-D
urround speakers or height speakers need to be installed.
S
2
Center speaker, surround speakers or height speakers need to be
installed.
1
T-D
annot be selected when the input format is monaural or 2 ch.
C
2
Center speaker or surround speakers need to be installed.
3
Surround speakers or height speakers need to be installed.
4
Center speaker, surround speakers or height speakers need to be
installed.
1
En-25
Using the Listening Modes
Input Format
Listening Mode
Input Format
Listening Mode
Input Format
Listening Mode
Dolby D+
Direct
DTS
Direct
DTS Express
Direct
Dolby D+1 2
DTS1 2
DTS Express1 2
Dolby Surround
Dolby Surround
Dolby Surround
DTS Neural:X
DTS Neural:X
DTS Neural:X
Game-RPG3
Game-RPG3
Game-RPG3
Game-Action3
Game-Action3
Game-Action3
Game-Rock
Game-Rock
Game-Rock3
3
Game-Sports
All Ch Stereo
Full Mono
3
3
Game-Sports
4
All Ch Stereo
Full Mono
4
T-D
3
Game-Sports3
4
All Ch Stereo4
Full Mono4
4
T-D
T-D
annot be selected when the input format is monaural or 2 ch.
C
2
Center speaker or surround speakers need to be installed.
3
Surround speakers or height speakers need to be installed.
4
Center speaker, surround speakers or height speakers need to be
installed.
1
annot be selected when the input format is monaural or 2 ch.
C
2
Center speaker or surround speakers need to be installed.
3
Surround speakers or height speakers need to be installed.
4
Center speaker, surround speakers or height speakers need to be
installed.
1
Input Format
Listening Mode
Input Format
Listening Mode
Input Format
Listening Mode
Dolby TrueHD
Direct
DTS 96/24
Direct
DTS-HD HR
Direct
1
annot be selected when the input format is monaural or 2 ch.
C
2
Center speaker or surround speakers need to be installed.
3
Surround speakers or height speakers need to be installed.
4
Center speaker, surround speakers or height speakers need to be
installed.
Dolby TrueHD1 2
DTS 96/241 2
DTS-HD HR1 2
Dolby Surround
Dolby Surround
Dolby Surround
DTS Neural:X
DTS Neural:X
DTS Neural:X
Game-RPG3
Game-RPG3
Game-RPG3
Game-Action
Game-Action
Game-Action3
Game-Rock
3
Game-Rock
3
Game-Sports
3
Game-Rock3
3
3
Game-Sports
Game-Sports3
All Ch Stereo4
All Ch Stereo4
All Ch Stereo4
Full Mono4
Full Mono4
Full Mono4
3
T-D
annot be selected when the input format is monaural or 2 ch.
C
Center speaker or surround speakers need to be installed.
3
Surround speakers or height speakers need to be installed.
4
Center speaker, surround speakers or height speakers need to be
installed.
T-D
annot be selected when the input format is monaural or 2 ch.
C
Center speaker or surround speakers need to be installed.
3
Surround speakers or height speakers need to be installed.
4
Center speaker, surround speakers or height speakers need to be
installed.
T-D
annot be selected when the input format is monaural or 2 ch.
C
Center speaker or surround speakers need to be installed.
3
Surround speakers or height speakers need to be installed.
4
Center speaker, surround speakers or height speakers need to be
installed.
1
1
1
2
2
2
En-26
Using the Listening Modes
Input Format
Listening Mode
Input Format
Listening Mode
DTS-HD MSTR
Direct
DTS:X
Direct
DTS-HD MSTR1 2
DTS:X
Dolby Surround
Game-RPG1
DTS Neural:X
Game-Action1
Game-RPG3
Game-Rock1
Game-Action3
Game-Sports1
Game-Rock
All Ch Stereo2
3
Game-Sports
All Ch Stereo
Full Mono2
3
T-D
4
Full Mono4
T-D
urround speakers or height speakers need to be installed.
S
2
Center speaker, surround speakers or height speakers need to be
installed.
1
annot be selected when the input format is monaural or 2 ch.
C
2
Center speaker or surround speakers need to be installed.
3
Surround speakers or height speakers need to be installed.
4
Center speaker, surround speakers or height speakers need to be
installed.
1
Input Format
Listening Mode
DTS-ES
Direct
DTS1
ES Matrix2
ES Discrete
(DTS-ES Discrete)2
Dolby Surround3
DTS Neural:X
Game-RPG4
Game-Action4
Game-Rock4
Game-Sports4
All Ch Stereo5
Full Mono5
T-D
an only be selected when the back speakers are not installed.
C
2
Back speakers need to be installed.
3
Height speakers need to be installed.
4
Surround speakers or height speakers need to be installed.
5
Center speaker, surround speakers or height speakers need to be
installed.
1
En-27
Using the Listening Modes
Stereo button
Checking the Input Format
You can select a listening mode for stereo and all channel
stereo sources.
Input Format
Listening Mode
All format
Stereo
All Ch Stereo1
1
enter speaker, surround speakers or height speakers need to be
C
installed.
En-28
While audio from the player is being input, press Display on
the remote controller several times to switch the information
shown on the main unit display. For example, if "Dolby D
5.1" is displayed, the Dolby Digital 5.1 ch signals are being
input.
●● The number of channels is not displayed when the input
signal is "Dolby Atmos" format.
Advanced Settings (Setup Menu)
Operation
Advanced Settings (Setup Menu)
1. Press Receiver on the remote controller.
●● Always press Receiver first to change the remote
controller to RECEIVER mode (the mode to operate
this unit) since its mode may be changed to operate
another component.
5. With the / / /
the settings.
cursors, select the item to configure
1-1. TV Out
HDMI Ou t
OSD L a n g u a g e
How to Set
Imp o se OS D
Scre e n Sa ve r
MAIN
En g l i sh
On
3 mi n u te s
The unit allows you to configure advanced settings in order
to provide even better experience.
● Operation: You can set up by viewing the guidance
displayed on the TV screen (OSD). Select the item with the
cursor buttons of the remote controller and press Enter to
confirm your selection. To return to the previous screen,
press Return.
2. Press Setup to display the Setup menu.
To exit the setup menu, press Setup.
Overview of the Setup menu:
3. Press / to select the desired menu, and then press
Enter.
Setup
1. Input/Output Assign
1. TV Out
2. Speaker
2.HDMI Input
3. Audio Adjust
3. Video Input
4. Source
4. Digital Audio Input
5. Listening Mode Preset
6. Hardware
7. Remote Controller
8. Miscellaneous
4. Press / to select the item, and then press Enter.
1. Input/Output Assign
Make settings to assign the various jacks and for the onscreen display function on the TV when you use the setting
menu, for example.
2. Speaker
Make advanced settings for the speakers.
3. Audio Adjust
Make a variety of settings related to sound.
4. Source
Make settings for input sources, such as volume difference
adjustments for each input selector for the connected
equipment.
5. Listening Mode Preset
You can preset your favorite listening mode.
6. Hardware
Make a variety of settings such as for linked operation
with connected HDMI equipment, the standby mode and
network connection for this unit.
7. Remote Controller
Make settings related to the remote controller.
8. Miscellaneous
Update the firmware and perform initial settings, etc.
En-29
Advanced Settings (Setup Menu)
1. Input/Output Assign
HDMI Input
You can change input assignment between the input selectors and HDMI IN jacks.
TV Out
Select the HDMI jack to be connected with the TV. Make settings for the on-screen display
function on the TV when you use the setting menu, for example.
Setting Item
Default Value
Setting Details
HDMI Out
MAIN
Select the HDMI jack to be connected with the
TV.
"MAIN": When connecting the TV to the HDMI
OUT MAIN jack
"SUB": When connecting the TV to the HDMI
OUT SUB jack
"MAIN+SUB": When connecting to both the
MAIN and SUB jacks
OSD Language
English
Select the on-screen display language.
Select from English, German, French, Spanish,
Italian, Dutch, Swedish, Russian (Australian
models), or Chinese.
Impose OSD
On
Set whether or not to display the information on
the TV when the volume is adjusted or input is
changed, for example.
"On": OSD will be displayed on the TV.
"Off": OSD will not be displayed on the TV.
●● The OSD may not be displayed depending
on the input signal even if "On" is selected. If
the operation screen is not displayed, change
the resolution of the connected device.
Screen Saver
En-30
3 minutes
Set the time to start the screen saver. Select
a value from "3 minutes", "5 minutes", "10
minutes" and "Off".
Setting Item
Default Value
BD/DVD
HDMI 1 (HDCP "HDMI 1 (HDCP 2.2)" to "HDMI 7": Assign a
2.2)
desired HDMI IN jack to the BD/DVD button. If
you do not assign a jack, select "-----". To select
an HDMI IN jack already assigned to another
input selector, change its setting to "-----" first.
Setting Details
CBL/SAT
HDMI 2 (HDCP "HDMI 1 (HDCP 2.2)" to "HDMI 7": Assign a
2.2)
desired HDMI IN jack to the CBL/SAT button. If
you do not assign a jack, select "-----". To select
an HDMI IN jack already assigned to another
input selector, change its setting to "-----" first.
STRM BOX
HDMI 3 (HDCP "HDMI 1 (HDCP 2.2)" to "HDMI 7": Assign a
2.2)
desired HDMI IN jack to the STRM Box button. If
you do not assign a jack, select "-----". To select
an HDMI IN jack already assigned to another
input selector, change its setting to "-----" first.
PC
HDMI 4
"HDMI 1 (HDCP 2.2)" to "HDMI 7": Assign a
desired HDMI IN jack to the PC button. If you
do not assign a jack, select "-----". To select an
HDMI IN jack already assigned to another input
selector, change its setting to "-----" first.
GAME
HDMI 5
"HDMI 1 (HDCP 2.2)" to "HDMI 7": Assign a
desired HDMI IN jack to the Game button. If you
do not assign a jack, select "-----". To select an
HDMI IN jack already assigned to another input
selector, change its setting to "-----" first.
AUX
(Front)
The setting cannot be changed.
CD
-----
"HDMI 1 (HDCP 2.2)" to "HDMI 7": Assign a
desired HDMI IN jack to the CD button. If you
do not assign a jack, select "-----". To select an
HDMI IN jack already assigned to another input
selector, change its setting to "-----" first.
PHONO
-----
"HDMI 1 (HDCP 2.2)" to "HDMI 7": Assign a
desired HDMI IN jack to the Phono button. If you
do not assign a jack, select "-----". To select an
HDMI IN jack already assigned to another input
selector, change its setting to "-----" first.
Advanced Settings (Setup Menu)
Setting Item
Default Value
Setting Details
Setting Item
Default Value
Setting Details
TV
-----
"HDMI 1 (HDCP 2.2)" to "HDMI 7": Assign a
desired HDMI IN jack to the TV button. If you
do not assign a jack, select "-----". To select an
HDMI IN jack already assigned to another input
selector, change its setting to "-----" first.
PHONO
-----
"COMPONENT 1", "COMPONENT 2": Assign
the COMPONENT VIDEO IN jacks to the Phono
button.
"VIDEO 1" to "VIDEO 3": Assign a desired
VIDEO IN jack to the Phono button.
TV
-----
"COMPONENT 1", "COMPONENT 2": Assign the
COMPONENT VIDEO IN jacks to the TV button.
"VIDEO 1" to "VIDEO 3": Assign a desired
VIDEO IN jack to the TV button.
Video Input
You can change assignment of the COMPONENT VIDEO IN 1 and 2 jacks and the VIDEO
IN 1 to 3 jacks between the input selectors. If you do not assign a jack, select "-----".
Setting Item
Default Value
Setting Details
BD/DVD
COMPONENT
1
"COMPONENT 1", "COMPONENT 2": Assign the
COMPONENT VIDEO IN jacks to the BD/DVD
button.
"VIDEO 1" to "VIDEO 3": Assign a desired
VIDEO IN jack to the BD/DVD button.
CBL/SAT
VIDEO 1
"COMPONENT 1", "COMPONENT 2": Assign the
COMPONENT VIDEO IN jacks to the CBL/SAT
button.
"VIDEO 1" to "VIDEO 3": Assign a desired
VIDEO IN jack to the CBL/SAT button.
STRM BOX
VIDEO 2
"COMPONENT 1", "COMPONENT 2": Assign the
COMPONENT VIDEO IN jacks to the STRM Box
button.
"VIDEO 1" to "VIDEO 3": Assign a desired
VIDEO IN jack to the STRM Box button.
PC
VIDEO 3
"COMPONENT 1", "COMPONENT 2": Assign the
COMPONENT VIDEO IN jacks to the PC button.
"VIDEO 1" to "VIDEO 3": Assign a desired
VIDEO IN jack to the PC button.
GAME
COMPONENT
2
"COMPONENT 1", "COMPONENT 2": Assign
the COMPONENT VIDEO IN jacks to the Game
button.
"VIDEO 1" to "VIDEO 3": Assign a desired
VIDEO IN jack to the Game button.
AUX
-----
The setting cannot be changed.
CD
-----
"COMPONENT 1", "COMPONENT 2": Assign the
COMPONENT VIDEO IN jacks to the CD button.
"VIDEO 1" to "VIDEO 3": Assign a desired
VIDEO IN jack to the CD button.
●● When you convert video signals input to the COMPONENT VIDEO IN jacks and output them from the
HDMI OUT jack, set the output resolution of the player to 480i or 576i. If the input has 480p/576p or
higher resolution, an error message will appear.
En-31
Advanced Settings (Setup Menu)
2. Speaker
Digital Audio Input
You can change input assignment between the input selectors and DIGITAL IN COAXIAL/
OPTICAL 1 to 2 jacks. If you do not assign a jack, select "-----".
Setting Item
Default Value
Setting Details
BD/DVD
COAXIAL
"COAXIAL", "OPTICAL 1", "OPTICAL 2": Assign a
desired DIGITAL IN jack to the BD/DVD button.
CBL/SAT
-----
"COAXIAL", "OPTICAL 1", "OPTICAL 2": Assign a
desired DIGITAL IN jack to the CBL/SAT button.
STRM BOX
-----
"COAXIAL", "OPTICAL 1", "OPTICAL 2": Assign a
desired DIGITAL IN jack to the STRM Box button.
PC
-----
"COAXIAL", "OPTICAL 1", "OPTICAL 2": Assign a
desired DIGITAL IN jack to the PC button.
GAME
-----
"COAXIAL", "OPTICAL 1", "OPTICAL 2": Assign a
desired DIGITAL IN jack to the Game button.
AUX
-----
The setting cannot be changed.
CD
OPTICAL 1
"COAXIAL", "OPTICAL 1", "OPTICAL 2": Assign a
desired DIGITAL IN jack to the CD button.
PHONO
-----
"COAXIAL", "OPTICAL 1", "OPTICAL 2": Assign a
desired DIGITAL IN jack to the Phono button.
TV
OPTICAL 2
"COAXIAL", "OPTICAL 1", "OPTICAL 2": Assign a
desired DIGITAL IN jack to the TV button.
Allows you to change the speaker configuration such as presence or not of subwoofer,
crossover frequency, and so on. Settings are automatically configured if you use the
Automatic Speaker Setup.
This setting cannot be selected if headphones are connected or audio is output from the
speakers of the TV.
Configuration
You can change the number of speaker channels connected, the type of front speaker
connection, the height speaker type, and other speaker settings.
Setting Item
Default Value
Select "2.1 ch", "3.1 ch", "4.1 ch", "5.1 ch", "6.1 ch",
"7.1 ch", "2.1.2 ch", "3.1.2 ch", "4.1.2 ch", or
"5.1.2 ch" to suit the number of speaker channels
connected.
Subwoofer
Yes
Set whether a subwoofer is connected or not.
"Yes": When subwoofer is connected
"No": When subwoofer is not connected
Height Speaker
Front High
Set the speaker type if height speakers are
connected to the BACK or HEIGHT terminals.
Select "Front High", "Top Front", "Top Middle", "Top
Rear", "Rear High", "Dolby Speaker (Front)", or
"Dolby Speaker (Surr)" according to the connected
speaker type and location.
●● If an item cannot be selected even though
connection is correct, check that the settings
in "Speaker Channels" matches the number of
connected channels.
Bi-Amp
No
Set whether your front speaker connection is biamp.
"No": When front speakers are connected in a
normal manner
"Yes": When front speakers are bi-amp connected
●● If an item cannot be selected even though
connection is correct, check that the settings
in "Speaker Channels" matches the number of
connected channels.
●● Sampling rates for PCM signals (stereo, mono) from a digital input are 32 kHz, 44.1 kHz, 48 kHz,
88.2 kHz, 96 kHz/16 bit, 20 bit, and 24 bit.
En-32
Setting Details
Speaker Channels 7.1 ch
Advanced Settings (Setup Menu)
Setting Item
Default Value
Setting Details
Setting Item
Default Value
Setting Details
Powered Zone 2
No
Set the connection of speakers to Zone 2 speaker
terminals.
"Yes": When speakers are connected to ZONE2
speaker terminals
"No": When speakers are not connected to ZONE2
speaker terminals
●● This item will be set to "No" when "Bi-Amp" is set
to "Yes".
Height
100 Hz
Speaker
Impedance
(Australian
models)
6ohms
Set the impedance of the connected speakers.
"4ohms": When any of the connected speakers have
4 Ω or more to less than 6 Ω impedance
"6ohms": When the connected speakers all have
6 Ω or more impedance
●● For impedance, check the indications on the back
of the speakers or their instruction manual.
Select the crossover frequency from "40Hz" to
"200Hz" to start outputting frequencies for each
channel.
"Full Band": Full band will be output.
●● "Full Band" can be selected only when "Front" is
set to "Full Band".
●● If an item cannot be selected even though
connection is correct, check that the settings in
"Configuration" - "Speaker Channels" matches
the number of connected channels.
Surround
100 Hz
Select the crossover frequency from "40Hz" to
"200Hz" to start outputting frequencies for each
channel.
"Full Band": Full band will be output.
●● "Full Band" can be selected only when "Front" is
set to "Full Band".
●● If an item cannot be selected even though
connection is correct, check that the settings in
"Configuration" - "Speaker Channels" matches
the number of connected channels.
Back
100 Hz
Select the crossover frequency from "40Hz" to
"200Hz" to start outputting frequencies for each
channel.
"Full Band": Full band will be output.
●● This cannot be selected in the following
conditions.
– The setting for "Configuration" - "Bi-Amp" is
"Yes"
– "Configuration" - "Powered Zone 2" is set to
"Yes" and ZONE 2 is on
●● "Full Band" can be selected only when
"Surround" is set to "Full Band".
●● If an item cannot be selected even though
connection is correct, check that the settings in
"Configuration" - "Speaker Channels" matches
the number of connected channels.
LPF of LFE
120Hz
Set the low-pass filter for LFE (low-frequency effect)
signals in order to pass lower frequency signals than
the set value and thus cancel unwanted noises. The
low-pass filter will be effective only on sources with
LFE channel.
The value from "80Hz" to "120Hz" can be set.
"Off": Do not use this function
Crossover
Allows you to change speaker configurations, such as crossover frequency. Settings are
automatically configured if you use the Automatic Speaker Setup. Audio will not be output
while you are making this setting.
Setting Item
Default Value
Setting Details
Front
100 Hz
Select the crossover frequency from "40Hz" to
"200Hz" to start outputting frequencies for each
channel.
"Full Band": Full band will be output.
●● If "Configuration" - "Subwoofer" is set to "No",
"Front" will be fixed to "Full Band" and the low
pitched range of the other channels will be output
from the front speakers. Refer to the instruction
manual of your speakers to make the setting.
Center
100 Hz
Select the crossover frequency from "40Hz" to
"200Hz" to start outputting frequencies for each
channel.
"Full Band": Full band will be output.
●● "Full Band" can be selected only when "Front" is
set to "Full Band".
●● If an item cannot be selected even though
connection is correct, check that the settings in
"Configuration" - "Speaker Channels" matches
the number of connected channels.
En-33
Advanced Settings (Setup Menu)
Setting Item
Default Value
Setting Details
Setting Item
Default Value
Setting Details
Double Bass
On
This can only be selected when "Configuration" "Subwoofer" is set to "Yes" and "Front" is set to "Full
Band".
Boost bass output by feeding bass sounds from
the front left and right, and center speakers to the
subwoofer.
"On": Bass output will be boosted.
"Off": Bass output will not be boosted.
●● The setting will not automatically be configured
even if you performed the automatic speaker
setup.
Back Right
7.0ft/2.10m
Specify the distance between each speaker and
the listening position.
●● This setting cannot be changed if
"Configuration" - "Powered Zone 2" is set to
"Yes" and Zone2 is set to on.
Back Left
7.0ft/2.10m
Specify the distance between each speaker and
the listening position.
●● This setting cannot be changed if
"Configuration" - "Powered Zone 2" is set to
"Yes" and Zone2 is set to on.
Surround Left
7.0ft/2.10m
Specify the distance between each speaker and
the listening position.
Subwoofer
12.0ft/3.60m
Specify the distance between each speaker and
the listening position.
Distance
Set the distance from each speaker to the listening position. Settings are automatically
configured if you use the automatic speaker setup.
Setting Item
Default Value
Setting Details
Unit
feet/meters
Specify the unit of distance for configuring
settings.
"feet": When setting in feet (0.1 ft to 30.0 ft, in
increments of 0.1 ft)
"meters": When setting in meters (0.03 m to
9.00 m, in increments of 0.03 m)
Front Left
12.0ft/3.60m
Specify the distance between each speaker and
the listening position.
Center
12.0ft/3.60m
Specify the distance between each speaker and
the listening position.
Front Right
12.0ft/3.60m
Specify the distance between each speaker and
the listening position.
Height Left
9.0ft/2.70m
Specify the distance between each speaker and
the listening position.
●● This setting cannot be changed if
"Configuration" - "Powered Zone 2" is set to
"Yes" and Zone2 is set to on.
Height Right
9.0ft/2.70m
Specify the distance between each speaker and
the listening position.
●● This setting cannot be changed if
"Configuration" - "Powered Zone 2" is set to
"Yes" and Zone2 is set to on.
Surround Right
7.0ft/2.10m
Specify the distance between each speaker and
the listening position.
En-34
●● Default values vary depending on the regions.
●● The speaker "Distance" may be unable to be changed depending on the settings in "Configuration" "Speaker Channels" / "Subwoofer".
Level Calibration
Adjust the level of each speaker with the built-in test tone. Settings are automatically
configured if you use the Automatic Speaker Setup.
Setting Item
Default Value
Setting Details
Front Left
0 dB
Select a value between "-12 dB" and "+12 dB".
A test tone will be output each time you change
the value. Select the desired level.
Center
0 dB
Select a value between "-12 dB" and "+12 dB".
A test tone will be output each time you change
the value. Select the desired level.
Front Right
0 dB
Select a value between "-12 dB" and "+12 dB".
A test tone will be output each time you change
the value. Select the desired level.
Height Left
0 dB
Select a value between "-12 dB" and "+12 dB".
A test tone will be output each time you change
the value. Select the desired level.
●● This setting cannot be changed if
"Configuration" - "Powered Zone 2" is set to
"Yes" and Zone2 is set to on.
Advanced Settings (Setup Menu)
Setting Item
Default Value
Setting Details
Setting Item
Default Value
Setting Details
Height Right
0 dB
Select a value between "-12 dB" and "+12 dB".
A test tone will be output each time you change
the value. Select the desired level.
●● This setting cannot be changed if
"Configuration" - "Powered Zone 2" is set to
"Yes" and Zone2 is set to on.
Front
0 dB
First select the frequency of the speaker from
"25 Hz" to "16 kHz" with the / cursors, then
use / to adjust the volume of the frequency
between "−6dB" to "+6dB".
Center
0 dB
First select the frequency of the speaker from
"25 Hz" to "16 kHz" with the / cursors, then
use / to adjust the volume of the frequency
between "−6dB" to "+6dB".
Height
0 dB
First select the frequency of the speaker from
"25 Hz" to "16 kHz" with the / cursors, then
use / to adjust the volume of the frequency
between "−6dB" to "+6dB".
●● This cannot be selected if "Configuration" "Powered Zone 2" is set to "Yes" and Zone2
is set to on.
Surround
0 dB
First select the frequency of the speaker from
"25 Hz" to "16 kHz" with the / cursors, then
use / to adjust the volume of the frequency
between "−6dB" to "+6dB".
Back
0 dB
First select the frequency of the speaker from
"25 Hz" to "16 kHz" with the / cursors, then
use / to adjust the volume of the frequency
between "−6dB" to "+6dB".
●● This cannot be selected if "Configuration" "Powered Zone 2" is set to "Yes" and Zone2
is set to on.
Subwoofer
0 dB
First select the frequency of the speaker from
"25 Hz" to "160Hz" with the / cursors, then
use / to adjust the volume of the frequency
between "−6dB" to "+6dB".
●● This cannot be selected if "Configuration" "Subwoofer" is set to "No".
Surround Right
0 dB
Select a value between "-12 dB" and "+12 dB".
A test tone will be output each time you change
the value. Select the desired level.
Back Right
0 dB
Select a value between "-12 dB" and "+12 dB".
A test tone will be output each time you change
the value. Select the desired level.
●● This setting cannot be changed if
"Configuration" - "Powered Zone 2" is set to
"Yes" and Zone2 is set to on.
Back Left
0 dB
Select a value between "-12 dB" and "+12 dB".
A test tone will be output each time you change
the value. Select the desired level.
●● This setting cannot be changed if
"Configuration" - "Powered Zone 2" is set to
"Yes" and Zone2 is set to on.
Surround Left
0 dB
Select a value between "-12 dB" and "+12 dB".
A test tone will be output each time you change
the value. Select the desired level.
Subwoofer
0 dB
Select a value between "-15 dB" and "+12 dB".
A test tone will be output each time you change
the value. Select the desired level.
●● The speaker "Level Calibration" may be unable to be changed depending on the settings in
"Configuration" - "Speaker Channels" / "Subwoofer".
●● "Level Calibration" cannot be changed while muting is on.
Equalizer Settings
Adjust the output volume of each range of each connected speaker. You can adjust the
volume of each range of each speaker. You can set three types of equalizer settings in the
Presets 1, 2, and 3.
●● You can adjust the bass in the low range frequencies (63 Hz, etc.), and the treble in the high range
frequencies (16 kHz, etc.).
●● You can select up to five frequency bands for each speaker.
●● The Speaker "Equalizer Settings" may be unable to be changed depending on the settings in
"Configuration" - "Speaker Channels" / "Subwoofer".
●● Adjust the volume of each speaker in "Level Calibration".
●● Adjust the volume in 1 dB steps.
●● This is not effective if the listening mode is Direct.
●● The result may not be as expected depending on the input source and listening mode setting.
En-35
Advanced Settings (Setup Menu)
3. Audio Adjust
Theater-Dimensional
Configure various settings related to sound, such as settings for listening to multiplex audio
or multilingual TV broadcasts and sound field settings for listening modes.
Make the settings for Theater-Dimensional listening mode.
Multiplex/Mono
Setting Item
Default Value
Setting Details
Multiplex
Input Channel
Main
Set the audio channel or language to be output
when playing multiplex audio or multilingual TV
broadcasts etc.
"Main": Main channel only
"Sub": Sub channel only
"Main/Sub": Main and sub channels will be
output at the same time.
●● If multiplex audio is being played, "1+1" will
be displayed when Display is pressed.
Mono
Input Channel
Left+Right
Set the input channel to use for playing any 2
ch digital source such as Dolby Digital, or 2-ch
analog/PCM source in the Mono listening mode.
"Left": Left channel only
"Right": Right channel only
"Left + Right" : Left and right channels
Setting Item
Default Value
Setting Details
Listening Angle
Wide
To enhance the effect of Theater-Dimensional,
select the actual angle of the left and right
front speakers as it appears from the listening
position.
"Narrow": Less than 30°
"Wide": Greater than 30°
●● Position the front speakers 20° to the listening position if you have selected "Narrow" in "Listening
Angle" and 40° if you have selected "Wide".
Volume
Make the detailed volume setting of the unit.
Setting Item
Default Value
Setting Details
Maximum Volume
Off
Set the maximum value to avoid too high volume.
Select a value from "Off", "30" to "79".
Power On Volume
Last
Set the volume level of when the power is turned
on. Select a value from "Last" (Volume level
before entering standby mode), "Min", "1" to "79"
and "Max".
●● You cannot set a higher value than that of
"Maximum Volume".
Headphone Level
0 dB
Adjust the output level of the headphones.
Select a value between "-12 dB" and "+12 dB".
Dolby
Make the settings for Dolby listening mode.
Setting Item
Default Value
Setting Details
Loudness
Management
On
Enable the Late Night function that allows
you to enjoy surround sound of Dolby TrueHD
playback even in low volume.
"On": Use this function
"Off": Do not use this function
En-36
Advanced Settings (Setup Menu)
4. Source
Multi Zone
Setting Item
Default Value
Setting Details
Zone 2 Out
Fixed
Select which of the integrated amplifier in a
separate room or this unit should be used to
adjust the volume when Zone 2 is active.
"Fixed": Adjust on the Integrated amplifier in a
separate room
"Variable": Adjust on the unit
Zone 2 Maximum
Volume
Off
Set the maximum value for Zone 2 to avoid too
high volume.
Select a value from "Off", "30" to "79".
Zone 2 Power On
Volume
Last
Set the Zone 2 volume level of when Zone2 is
set to on. Select a value from "Last" (Volume
level when the unit was turned off), "Min", "1" to
"79" and "Max".
●● You cannot set a higher value than that of
"Zone 2 Maximum Volume".
Make settings for input sources, such as volume difference adjustments for each input
selector for the connected equipment. Select the input selector to configure.
IntelliVolume
Setting Item
Default Value
Setting Details
IntelliVolume
0 dB
Adjust the volume level difference between the
devices connected to the unit. Select a value
between "-12 dB" and "+12 dB". Set a negative
value if the volume of the target device is larger
than the others and a positive value if smaller.
When you select a desired input to check the
audio, start playback of the connected device.
●● This function is not effective in Zone 2.
Name Edit
Set an easy name to each input. The set name will be shown on the main unit display.
Select the input selector to configure.
Setting Item
Default Value
Setting Details
Name
Input name
1. Select a character or symbol with the
cursors and press Enter.
Repeat it to input 10 or less characters.
"A/a": Switches between upper and lower
cases. (Pressing +10 on the remote
controller also toggles between upper and
lower cases.)
"←" "→": Moves the cursor to the arrow
direction.
" ": Removes a character on the left of the
cursor.
"Space": Puts a space.
●● Pressing CLR on the remote controller
will remove all the input characters.
2. After inputting, select "OK" with the cursors
and press Enter.
The input name will be saved.
●● To name a preset radio station, press Tuner on the remote controller, select AM/FM and select the
preset number.
●● It cannot be set if the "NET" or "BLUETOOTH" input is selected.
En-37
Advanced Settings (Setup Menu)
Audio Select
●● The setting cannot be changed when "TUNER", "NET", or "BLUETOOTH" input is selected.
Make the audio input setting. The setting can be separately set to each input selector
button. Select the input selector to configure.
Setting Item
Default Value
Setting Details
Audio Select
BD/DVD:
HDMI
CBL/SAT:
HDMI
STRM BOX:
HDMI
PC:
HDMI
GAME:
HDMI
AUX:
HDMI
CD:
OPTICAL
TV:
OPTICAL
PHONO:
Analog
Select the priority for input selection when
multiple audio sources are connected to one
input selector, such as connections to both the
"BD/DVD" of HDMI IN jack and "BD/DVD" of
AUDIO IN jack. You cannot select a jack that is
not associated with the currently selected input.
●● The priority is HDMI → COAXIAL/OPTICAL →
Analog if this setting is not changed.
ARC: When giving priority to input signal from
ARC compatible TV.
●● The setting can be selected only when "HDMI"
- "Audio Return Channel" is set to "Auto" and
also the "TV" input is selected.
HDMI: When giving priority to input signal from
HDMI jacks
●● The setting can be selected only when the
input is assigned to the HDMI IN jack in the
"HDMI Input" setting.
"COAXIAL (Coaxial input)": When giving priority
to input signal from DIGITAL IN COAXIAL jacks.
●● The setting can be selected only when the
input is assigned to the COAXIAL jack in the
"Digital Audio Input" setting.
"OPTICAL (Optical input)": When giving priority
to input signal from DIGITAL IN OPTICAL jacks.
●● The setting can be selected only when the
input is assigned to the OPTICAL jack in the
"Digital Audio Input" setting.
"Analog": To always output analog audio
independently of the input signal
Off
Select whether to fix input signals to PCM
(except multi-channel PCM) when you have
selected "HDMI", "COAXIAL", or "OPTICAL" in
the "Audio Select" setting. Set this item to "On"
if noise is produced or truncation occurs at the
beginning of a track when playing PCM sources.
Select "Off" normally.
●● Changing "Audio Select" changes the setting
to "Off".
PCM Fixed Mode
En-38
Video Select
Setting Item
Default Value
Setting Details
Video Select
Last
Select the video input played along with
audio output when either "TUNER", "NET" or
"BLUETOOTH" is selected.
●● This setting is effective only for an input
selector which is assigned in "HDMI Input" or
"Video Input".
"Last": Select the video input played immediately
prior.
"BD/DVD", "CBL/SAT", "STRM BOX", "PC",
"GAME", "AUX", "CD", "PHONO", "TV": Play the
video from the selected input.
●● The setting cannot be changed when input other than "TUNER", "NET" or "BLUETOOTH" is selected.
●● When input is "NET" or "BLUETOOTH", switch between displaying and not displaying video by
pressing Mode on the remote controller.
Advanced Settings (Setup Menu)
5. Listening Mode Preset
6. Hardware
You can preset your favorite listening mode to each input. (For example, you can always
apply straight decode to the Dolby TrueHD source of Blu-ray Disc to play it in unchanged
sound field.)
When the list of input sources is displayed, set the signal type and listening mode.
Although it is possible to select the listening mode during playback, the selected mode will
be reset when the unit enters standby mode.
Tuner
Setting Item
Default Value
Setting Details
Analog/PCM
All Ch Stereo
Set the listening mode for playing PCM signals
of CD and analog signals of record and cassette
tape.
Mono/Multiplex
Full Mono
Set the listening mode for playing Dolby Digital
and other digital signals recorded in monaural or
multiplex audio.
2 ch Source
Dolby Surround Set the listening mode for playing Dolby Digital
and other digital signals recorded in 2 channels.
Dolby D/Dolby D+/
TrueHD
Dolby Surround Set the listening mode for playing Dolby Digital,
Dolby Digital Plus and Dolby TrueHD signals.
●● Input signals are played as they are input if
you select "Straight Decode".
DTS/DTS-ES/
DTS-HD
DTS Neural:X
(before
updating to a
version that
supports DTS:X
audio: Straight
Decode)
Setting Item
Default Value
Setting Details
AM/FM Frequency
10kHz/0.2MHz
Step (North American
models)
Select a frequency step depending on your
area of residence.
Select "10kHz/0.2MHz" or "9kHz/0.05MHz".
●● When this setting is changed, all radio
presets are deleted.
AM Frequency Step
(Australian models)
Select a frequency step depending on your
area of residence.
Select "10kHz" or "9kHz".
●● When this setting is changed, all radio
presets are deleted.
9kHz
Set the listening mode for playing digital audio
signals in DTS and DTS-HD High Resolution
formats. Select the listening mode specified for
Blu-ray or such other DTS-HD Master Audio
source.
●● Input signals are played as they are input if
you select "Straight Decode".
Other Multich Source Dolby Surround Set the listening mode for playing DVD-Audio
that are input from HDMI IN jack.
●● Input signals are played as they are input if
you select "Straight Decode".
●●
●●
●●
●●
●●
Available listening modes vary depending on speaker configuration and the input signal.
Setting "Last Valid" will always select the last selected mode.
Only "Analog" can be set to the "TUNER" input.
"Digital" and "TrueHD" can be set to the "NET" input.
Only "Digital" can be set to the "BLUETOOTH" input.
En-39
Advanced Settings (Setup Menu)
HDMI
Setting Item
Default Value
Setting Details
HDMI CEC (RIHD)
Off
Setting to "On" enables the input selection link
and other link functions with HDMI connected
CEC compliant device.
"On": Use this function
"Off": Do not use this function
When changing this setting, turn off and then on
again the power of all connected components.
●● Depending on the TV set, a link may need to
be configured on the TV.
●● This function is effective only when the
device is connected to the HDMI OUT MAIN
terminal.
●● When this setting is "On", the names of the
CEC-compatible components and "CEC On"
are displayed after this operation screen is
closed.
●● Power consumption in standby mode may
increase if this setting is "On". (Depending on
the TV status, the unit will enter the normal
standby mode.)
●● If you operate the MASTER VOLUME
control on the unit when this setting is "On"
and audio is output from the TV speakers,
audio will be output also from the speakers
connected to the unit. If you want to output
from only either of them, change the unit or
TV settings, or reduce the volume of the unit.
●● If abnormal operation occurs when you set
the setting to "On", set it to "Off".
●● When connecting a non-CEC compatible
component, or when you are not sure
whether it is compatible, set the setting to
"Off".
En-40
Setting Item
Default Value
Setting Details
HDMI Standby
Through
Off
When this is set to anything other than "Off",
you can play the video and audio of an HDMI
connected player on the TV even if the unit is in
standby mode. Only "Auto" and "Auto(Eco)" can
be selected if "HDMI CEC (RIHD)" is set to "On".
If you select anything else, set "HDMI CEC
(RIHD)" to "Off."
●● Power consumption in standby mode
increases if set to anything other than "Off".
"BD/DVD", "CBL/SAT", "STRM BOX", "PC",
"GAME", "AUX", "CD", "PHONO", "TV": For
example, if you select "BD/DVD", you can play
the equipment connected to the "BD/DVD"
terminal on the TV even if the unit is in standby
mode. Select this setting if you have decided
which player to use with this function.
"Last": You can play the video and audio of the
input selected immediately prior to the unit being
switched to standby on the TV.
"Auto", "Auto (Eco)": Select one of these
settings when you have connected equipment
that conforms to the CEC standard. You can
play the video and audio of the input selected on
the TV, irrespective of what input was selected
immediately prior to the unit being switched to
standby, using the CEC link function.
●● To play players on the TV that do not conform
to the CEC standard, you will need to turn the
unit on and switch to the relevant input.
●● When using a TV that conforms to the
CEC standard, you can reduce the power
consumption in standby mode by selecting
"Auto (Eco)".
Advanced Settings (Setup Menu)
Setting Item
Default Value
Audio TV Out (MAIN) Off
Setting Details
Setting Item
Default Value
Setting Details
You can enjoy audio through the speakers of the
HDMI connected TV while this unit is on.
"On": Use this function
"Off": Do not use this function
●● To select "On", set "HDMI CEC (RIHD)" to
"Off".
●● The setting is fixed to "Auto" if "HDMI CEC"
is set to "On".
●● Listening mode cannot be changed while
"Audio TV Out (MAIN)" is set to "On" and
audio is being output through the speakers
of the TV.
●● Depending on your TV set or input signal of
the component, audio may not output through
the speakers of the TV even if this setting
is set to "On". In such case, audio is output
from the speakers of the unit.
●● If you operate the MASTER VOLUME control
on the unit when "Audio TV Out (MAIN)" or
"HDMI CEC (RIHD)" is "On" and audio is
output from the TV speakers, audio will be
output from the unit. If you do not want to
output audio from the unit, change the unit or
TV settings, or reduce the volume of the unit.
●● This setting is fixed to "Off" if "TV Out" "HDMI Out" is set to "SUB".
Audio TV Out (SUB)
Off
You can enjoy audio through the speakers of the
HDMI connected TV while this unit is on.
"On": Use this function
"Off": Do not use this function
●● Listening mode cannot be changed while
"Audio TV Out (SUB)" is set to "On" and
audio is being output through the speakers
of the TV.
●● Depending on your TV set or input signal of
the component, audio may not output through
the speakers of the TV even if this setting
is set to "On". In such case, audio is output
from the speakers of the unit.
●● If you operate the MASTER VOLUME control
on the unit when "Audio TV Out (SUB)" or
"HDMI CEC (RIHD)" is "On" and audio is
output from the TV speakers, audio will be
output from the unit. If you do not want to
output audio from the unit, change the unit or
TV settings, or reduce the volume of the unit.
●● This setting is fixed to "Off" if "TV Out" "HDMI Out" is set to "MAIN".
Audio Return
Channel
Auto
You can enjoy sound of the HDMI connected
ARC compatible TV through the speakers
connected to the unit. To use this function, set
"HDMI CEC (RIHD)" to "On" in advance.
"Auto": When enjoying the TV sound through the
speakers connected to the unit
"Off": When not using the ARC function
Auto LipSync
On
This setting automatically corrects any
desynchronization between the video and audio
signals based on data from the HDMI LipSync
compatible TV.
"On": Automatic correction will be enabled.
"Off": Automatic correction will be disabled.
En-41
Advanced Settings (Setup Menu)
Power Management
Setting Item
Default Value
Setting Details
Sleep Timer
Off
Select to turn the unit into standby mode
automatically when the specified time elapses.
Select a value between "10 minutes" to "90
minutes".
"Off": Select if you do not want the unit to
automatically switch to standby.
Auto Standby
On/Off
This setting places the unit on standby
automatically after 20 minutes of inactivity
without any video or audio input.
"On": The unit will automatically enter standby
mode ("ASb" will light.)
"Off": The unit will not automatically enter
standby mode.
●● "Auto Standby" is appeared on the display
and TV screen 30 seconds before the Auto
Standby comes on.
●● "Auto Standby" does not work when Zone 2
is active.
●● Default values vary depending on the
regions.
Auto Standby in
HDMI Standby
Through
Off
USB Power Out at
Standby
Off
En-42
Enable or disable "Auto Standby" while "HDMI
Standby Through" is on.
"On": The setting will be enabled.
"Off": The setting will be disabled.
●● This setting cannot be set to "On" if "Auto
Standby" is set to "Off".
When this function is "On", you can still have
equipment connected to the USB port supplied
with power even when this unit is in standby.
●● When this function is being used, the power
consumption increases even when the unit
is on standby. However, the increase in
power consumption is kept to a minimum
by automatically entering the HYBRID
STANDBY mode, where only the essential
circuit is operating.
Setting Item
Default Value
Setting Details
Network Standby
Off
When this function is "On", you can turn on
the power of the unit via network using an
application such as Integra Remote.
●● When "Network Standby" is used, the power
consumption increases even when the unit
is on standby. However, the increase in
power consumption is kept to a minimum
by automatically entering the HYBRID
STANDBY mode, where only the essential
circuit is operating.
Bluetooth Wakeup
Off
This function wakes up the unit on standby by
connecting a Bluetooth-enabled device.
"On": Use this function
"Off": Do not use this function
●● Setting to "On" increases the power
consumption even when the unit is on
standby. However, the increase in power
consumption is kept to a minimum by
automatically entering the HYBRID
STANDBY mode, where only the essential
circuit is operating.
●● This setting is fixed to "Off" if "Bluetooth" "Auto Input Change" is set to "Off".
●● Wait for a while if "Network Standby" or "Bluetooth Wakeup" cannot be selected. It will appear when
the network function is started up.
Advanced Settings (Setup Menu)
Network
Setting Item
Default Value
Setting Details
Make the network setting.
●● When LAN is configured with a DHCP, set "DHCP" to "Enable" to configure the
setting automatically. ("Enable" is set by default) To assign fixed IP addresses to each
components, you must set "DHCP" to "Disable" and assign an address to this unit in
"IP Address" as well as set information related to your LAN, such as Subnet Mask and
Gateway.
Friendly Name
DTR-30.7
Change the name for this unit to a simple one for
display on the equipment connected by network.
1. Press Enter to display the Edit screen.
2. Select a character or symbol with the cursors
and press Enter.
Repeat it to input 31 or less characters.
"A/a": Switches between upper and lower
cases. (Pressing +10 on the remote
controller also toggles between upper and
lower cases.)
"←" "→": Moves the cursor to the arrow
direction.
" ": Removes a character on the left of the
cursor.
"Space": Puts a space.
●● Pressing CLR on the remote controller will
remove all the input characters.
3. After inputting, select "OK" with the cursors
and press Enter.
The input name will be saved.
AirPlay Password
-----
You can enter a password (maximum of 31
places) so that only the entered user can use
AirPlay.
1. Press Enter to display the Edit screen.
2. Select a character or symbol with the cursors
and press Enter.
Repeat it to input 31 or less characters.
"A/a": Switches between upper and lower
cases. (Pressing +10 on the remote
controller also toggles between upper and
lower cases.)
"←" "→": Moves the cursor to the arrow
direction.
" ": Removes a character on the left of the
cursor.
"Space": Puts a space.
●● Pressing D on the remote controller will
switch whether to mask the password with
" " or display in the plain text.
●● Pressing CLR on the remote controller will
remove all the input characters.
3. After inputting, select "OK" with the cursors
and press Enter.
The input password will be saved.
Setting Item
Default Value
Setting Details
Wi-Fi
Off (Wired)
Connect the unit to network via wireless LAN
router.
"On": Wireless LAN connection
"Off (Wired)": Wired LAN connection
Wi-Fi Setup
–
You can configure wireless LAN settings by
pressing Enter when "Start" is displayed.
Wi-Fi Status
–
The information of the connected access point
will be displayed.
"SSID": SSID of the connected access point.
"Signal": Signal strength of the connected access
point.
"Status": Status of the connected access point.
MAC Address
–
This is the MAC address of the AV receiver.
This value is specific to the component and
cannot be changed.
DHCP
Enable
"Enable": Auto configuration by DHCP
"Disable": Manual configuration without DHCP
●● If selecting "Disable", you must set "IP
Address", "Subnet Mask", "Gateway", and
"DNS Server" manually.
IP Address
–
Displays/Sets the IP address.
Subnet Mask
–
Displays/Sets the subnet mask.
Gateway
–
Displays/Sets the gateway.
DNS Server
–
Displays/Sets the primary DNS server.
Proxy URL
–
Displays/Sets the proxy server URL.
Proxy Port
–
Displays/Sets the proxy server port number when
you enter "Proxy URL".
En-43
Advanced Settings (Setup Menu)
Setting Item
Default Value
Setting Details
Usage Data
No
As a means of improving the quality of our
products and services, Onkyo may collect
information about your usage over the network.
Select "Yes" if you agree to our collecting this
information. Select "No" if you do not want us to
collect this information.
●● You can set this after confirming the Privacy
Policy. When you select "Usage Data" and
press Enter, the Privacy Policy is displayed.
(The same screen is displayed once also
when setting up the network connection.) If
you agree to the collection of the information,
this setting also becomes "Yes". Note that
if you agree to the Privacy Policy but select
"No" for this setting, the information will not be
collected.
Network Check
–
Bluetooth
Setting Item
Default Value
Setting Details
Bluetooth
On
Select whether or not to use the Bluetooth
function.
"On": Enables connection with a Bluetoothenabled device by using the Bluetooth function.
Select "On" also when making various Bluetooth
settings.
"Off": When not using the Bluetooth function
Auto Input Change
On
The input of the unit will automatically be
switched to "BLUETOOTH" when connection is
made from a Bluetooth-enabled device to the
unit.
"On": The input will automatically become
"BLUETOOTH" when a Bluetooth-enabled
device is connected.
"Off": The function is disabled.
●● If the input is not switched automatically, set
to "Off" and change the input manually.
Auto Reconnect
On
This function automatically reconnects to the
Bluetooth-enabled device connected last when
you change the input selector to "BLUETOOTH".
"On": Use this function
"Off": Do not use this function
●● This may not work with some Bluetoothenabled devices.
Pairing Information
–
The information of the previous pairing stored in
this unit will be initialized.
Pressing Enter when "Clear" is displayed
initializes the pairing information stored in this
unit.
●● This function does not initialize the pairing
information on the Bluetooth-enabled device.
When pairing the unit again with the device,
be sure to clear the pairing information on
the Bluetooth-enabled device in advance.
For information on how to clear the pairing
information, refer to the Bluetooth-enabled
device's instruction manual.
Device
–
Displays the name of the Bluetooth-enabled
device connected to the unit.
●● The name is not displayed when "Status" is
"Ready" or "Pairing".
You can check the network connection.
Press Enter when "Start" is displayed.
●● Wait for a while if "Network" cannot be selected. It will appear when the network function is started up.
En-44
Advanced Settings (Setup Menu)
Setting Item
Status
Default Value
–
Setting Details
Setting Item
Default Value
Setting Details
Displays the status of the Bluetooth-enabled
device connected to the unit.
"Ready": Not paired
"Pairing": Pairing
"Connected": Successfully connected
CBL/SAT
Main
Set the 12V trigger output setting to each
input.
"Off": No output
"Main": Output when "CBL/SAT" is selected
as input for main room.
"Zone2": Output when "CBL/SAT" is selected
as input for ZONE2.
"Main/Zone2": Output when "CBL/SAT" is
selected as input for main room or ZONE2.
STRM BOX
Main
Set the 12V trigger output setting to each
input.
"Off": No output
"Main": Output when "STRM BOX" is selected
as input for main room.
"Zone2": Output when "STRM BOX" is
selected as input for ZONE2.
"Main/Zone2": Output when "STRM BOX" is
selected as input for main room or ZONE2.
PC
Main
Set the 12V trigger output setting to each
input.
"Off": No output
"Main": Output when "PC" is selected as input
for main room.
"Zone2": Output when "PC" is selected as
input for ZONE2.
"Main/Zone2": Output when "PC" is selected
as input for main room or ZONE2.
GAME
Main
Set the 12V trigger output setting to each
input.
"Off": No output
"Main": Output when "GAME" is selected as
input for main room.
"Zone2": Output when "GAME" is selected as
input for ZONE2.
"Main/Zone2": Output when "GAME" is
selected as input for main room or ZONE2.
●● Wait for a while if "Bluetooth" cannot be selected. It will appear when the Bluetooth function is started
up.
12V Trigger A
Set when outputting the control signal (maximum 12 V/100 mA) through the 12V TRIGGER
OUT A jack. Different settings can be set for each input selector. You can enable power link
operation when you connect the unit and the external devices equipped with 12V trigger
input jack.
Setting Item
Default Value
Setting Details
Delay
0 sec
Set after how many seconds the 12V trigger
output will occur in response to the unit's
operation. As some devices cause a large
current when they turn on, delay the output if
such devices are connected. Select a value
between "0 sec" to "3 sec".
BD/DVD
Main
Set the 12V trigger output setting to each
input.
"Off": No output
"Main": Output when "BD/DVD" is selected as
input for main room.
"Zone2": Output when "BD/DVD" is selected
as input for ZONE2.
"Main/Zone2": Output when "BD/DVD" is
selected as input for main room or ZONE2.
En-45
Advanced Settings (Setup Menu)
Setting Item
Default Value
Setting Details
Setting Item
Default Value
Setting Details
AUX
Main
Set the 12V trigger output setting to each
input.
"Off": No output
"Main": Output when "AUX" is selected as
input for main room.
TUNER
Main
CD
Main
Set the 12V trigger output setting to each
input.
"Off": No output
"Main": Output when "CD" is selected as input
for main room.
"Zone2": Output when "CD" is selected as
input for ZONE2.
"Main/Zone2": Output when "CD" is selected
as input for main room or ZONE2.
Set the 12V trigger output setting to each
input.
"Off": No output
"Main": Output when "TUNER" is selected as
input for main room.
"Zone2": Output when "TUNER" is selected
as input for ZONE2.
"Main/Zone2": Output when "TUNER" is
selected as input for main room or ZONE2.
NET
Main
Set the 12V trigger output setting to each
input.
"Off": No output
"Main": Output when "PHONO" is selected as
input for main room.
"Zone2": Output when "PHONO" is selected
as input for ZONE2.
"Main/Zone2": Output when "PHONO" is
selected as input for main room or ZONE2.
Set the 12V trigger output setting to each
input.
"Off": No output
"Main": Output when "NET" is selected as
input for main room.
"Zone2": Output when "NET" is selected as
input for ZONE2.
"Main/Zone2": Output when "NET" is selected
as input for main room or ZONE2.
BLUETOOTH
Main
Set the 12V trigger output setting to each
input.
"Off": No output
"Main": Output when "BLUETOOTH" is
selected as input for main room.
"Zone2": Output when "BLUETOOTH" is
selected as input for ZONE2.
"Main/Zone2": Output when "BLUETOOTH" is
selected as input for main room or ZONE2.
PHONO
TV
En-46
Main
Main
Set the 12V trigger output setting to each
input.
"Off": No output
"Main": Output when "TV" is selected as input
for main room.
"Zone2": Output when "TV" is selected as
input for ZONE2.
"Main/Zone2": Output when "TV" is selected
as input for main room or ZONE2.
Advanced Settings (Setup Menu)
12V Trigger B
Setting Item
Default Value
Setting Details
Set when outputting the control signal (maximum 12 V/25 mA) through the 12V TRIGGER
OUT B jack. Different settings can be set for each input selector. You can enable power link
operation when you connect the unit and the external devices equipped with 12V trigger
input jack.
PC
Zone2
Set the 12V trigger output setting to each
input.
"Off": No output
"Main": Output when "PC" is selected as input
for main room.
"Zone2": Output when "PC" is selected as
input for ZONE2.
"Main/Zone2": Output when "PC" is selected
as input for main room or ZONE2.
Setting Item
Default Value
Setting Details
Delay
1 sec
Set after how many seconds the 12V trigger
output will occur in response to the unit's
operation. As some devices cause a large
current when they turn on, delay the output if
such devices are connected. Select a value
between "0 sec" to "3 sec".
GAME
Zone2
Set the 12V trigger output setting to each
input.
"Off": No output
"Main": Output when "BD/DVD" is selected as
input for main room.
"Zone2": Output when "BD/DVD" is selected
as input for ZONE2.
"Main/Zone2": Output when "BD/DVD" is
selected as input for main room or ZONE2.
Set the 12V trigger output setting to each
input.
"Off": No output
"Main": Output when "GAME" is selected as
input for main room.
"Zone2": Output when "GAME" is selected as
input for ZONE2.
"Main/Zone2": Output when "GAME" is
selected as input for main room or ZONE2.
AUX
Off
Set the 12V trigger output setting to each
input.
"Off": No output
"Main": Output when "AUX" is selected as
input for main room.
CD
Zone2
Set the 12V trigger output setting to each
input.
"Off": No output
"Main": Output when "CD" is selected as input
for main room.
"Zone2": Output when "CD" is selected as
input for ZONE2.
"Main/Zone2": Output when "CD" is selected
as input for main room or ZONE2.
BD/DVD
CBL/SAT
STRM BOX
Zone2
Zone2
Zone2
Set the 12V trigger output setting to each
input.
"Off": No output
"Main": Output when "CBL/SAT" is selected
as input for main room.
"Zone2": Output when "CBL/SAT" is selected
as input for ZONE2.
"Main/Zone2": Output when "CBL/SAT" is
selected as input for main room or ZONE2.
Set the 12V trigger output setting to each
input.
"Off": No output
"Main": Output when "STRM BOX" is selected
as input for main room.
"Zone2": Output when "STRM BOX" is
selected as input for ZONE2.
"Main/Zone2": Output when "STRM BOX" is
selected as input for main room or ZONE2.
En-47
Advanced Settings (Setup Menu)
Setting Item
Default Value
Setting Details
Setting Item
Default Value
Setting Details
PHONO
Zone2
Set the 12V trigger output setting to each
input.
"Off": No output
"Main": Output when "PHONO" is selected as
input for main room.
"Zone2": Output when "PHONO" is selected
as input for ZONE2.
"Main/Zone2": Output when "PHONO" is
selected as input for main room or ZONE2.
BLUETOOTH
Zone2
Set the 12V trigger output setting to each
input.
"Off": No output
"Main": Output when "BLUETOOTH" is
selected as input for main room.
"Zone2": Output when "BLUETOOTH" is
selected as input for ZONE2.
"Main/Zone2": Output when "BLUETOOTH" is
selected as input for main room or ZONE2.
TV
Zone2
Set the 12V trigger output setting to each
input.
"Off": No output
"Main": Output when "TV" is selected as input
for main room.
"Zone2": Output when "TV" is selected as
input for ZONE2.
"Main/Zone2": Output when "TV" is selected
as input for main room or ZONE2.
TUNER
Zone2
Set the 12V trigger output setting to each
input.
"Off": No output
"Main": Output when "TUNER" is selected as
input for main room.
"Zone2": Output when "TUNER" is selected
as input for ZONE2.
"Main/Zone2": Output when "TUNER" is
selected as input for main room or ZONE2.
NET
Zone2
Set the 12V trigger output setting to each
input.
"Off": No output
"Main": Output when "NET" is selected as
input for main room.
"Zone2": Output when "NET" is selected as
input for ZONE2.
"Main/Zone2": Output when "NET" is selected
as input for main room or ZONE2.
En-48
Advanced Settings (Setup Menu)
12V Trigger C
Setting Item
Default Value
Setting Details
Set when outputting the control signal (maximum 12 V/25 mA) through the 12V TRIGGER
OUT C jack. Different settings can be set for each input selector. You can enable power link
operation when you connect the unit and the external devices equipped with 12V trigger
input jack.
PC
Main/Zone2
Set the 12V trigger output setting to each
input.
"Off": No output
"Main": Output when "PC" is selected as input
for main room.
"Zone2": Output when "PC" is selected as
input for ZONE2.
"Main/Zone2": Output when "PC" is selected
as input for main room or ZONE2.
Setting Item
Default Value
Setting Details
Delay
2 sec
Set after how many seconds the 12V trigger
output will occur in response to the unit's
operation. As some devices cause a large
current when they turn on, delay the output if
such devices are connected. Select a value
between "0 sec" to "3 sec".
GAME
Main/Zone2
Set the 12V trigger output setting to each
input.
"Off": No output
"Main": Output when "BD/DVD" is selected as
input for main room.
"Zone2": Output when "BD/DVD" is selected
as input for ZONE2.
"Main/Zone2": Output when "BD/DVD" is
selected as input for main room or ZONE2.
Set the 12V trigger output setting to each
input.
"Off": No output
"Main": Output when "GAME" is selected as
input for main room.
"Zone2": Output when "GAME" is selected as
input for ZONE2.
"Main/Zone2": Output when "GAME" is
selected as input for main room or ZONE2.
AUX
Main
Set the 12V trigger output setting to each
input.
"Off": No output
"Main": Output when "AUX" is selected as
input for main room.
CD
Main/Zone2
Set the 12V trigger output setting to each
input.
"Off": No output
"Main": Output when "CD" is selected as input
for main room.
"Zone2": Output when "CD" is selected as
input for ZONE2.
"Main/Zone2": Output when "CD" is selected
as input for main room or ZONE2.
BD/DVD
CBL/SAT
STRM BOX
Main/Zone2
Main/Zone2
Main/Zone2
Set the 12V trigger output setting to each
input.
"Off": No output
"Main": Output when "CBL/SAT" is selected
as input for main room.
"Zone2": Output when "CBL/SAT" is selected
as input for ZONE2.
"Main/Zone2": Output when "CBL/SAT" is
selected as input for main room or ZONE2.
Set the 12V trigger output setting to each
input.
"Off": No output
"Main": Output when "STRM BOX" is selected
as input for main room.
"Zone2": Output when "STRM BOX" is
selected as input for ZONE2.
"Main/Zone2": Output when "STRM BOX" is
selected as input for main room or ZONE2.
En-49
Advanced Settings (Setup Menu)
Setting Item
Default Value
Setting Details
Setting Item
Default Value
Setting Details
PHONO
Main/Zone2
Set the 12V trigger output setting to each
input.
"Off": No output
"Main": Output when "PHONO" is selected as
input for main room.
"Zone2": Output when "PHONO" is selected
as input for ZONE2.
"Main/Zone2": Output when "PHONO" is
selected as input for main room or ZONE2.
BLUETOOTH
Main/Zone2
Set the 12V trigger output setting to each
input.
"Off": No output
"Main": Output when "BLUETOOTH" is
selected as input for main room.
"Zone2": Output when "BLUETOOTH" is
selected as input for ZONE2.
"Main/Zone2": Output when "BLUETOOTH" is
selected as input for main room or ZONE2.
TV
Main/Zone2
Set the 12V trigger output setting to each
input.
"Off": No output
"Main": Output when "TV" is selected as input
for main room.
"Zone2": Output when "TV" is selected as
input for ZONE2.
"Main/Zone2": Output when "TV" is selected
as input for main room or ZONE2.
TUNER
Main/Zone2
Set the 12V trigger output setting to each
input.
"Off": No output
"Main": Output when "TUNER" is selected as
input for main room.
"Zone2": Output when "TUNER" is selected
as input for ZONE2.
"Main/Zone2": Output when "TUNER" is
selected as input for main room or ZONE2.
NET
Main/Zone2
Set the 12V trigger output setting to each
input.
"Off": No output
"Main": Output when "NET" is selected as
input for main room.
"Zone2": Output when "NET" is selected as
input for ZONE2.
"Main/Zone2": Output when "NET" is selected
as input for main room or ZONE2.
En-50
Advanced Settings (Setup Menu)
7. Remote Controller
8. Miscellaneous
Setting Item
Default Value
Setting Details
Remote ID
1
Select an ID for the unit's remote controller from
"1", "2", and "3" to prevent interference between
the unit and other Integra/Onkyo components
that are installed in the same room. After
changing the ID on the main unit, change the
ID on the remote controller accordingly with the
following procedure.
1. While holding down Receiver, press and
hold Setup for about 3 seconds until the
remote indicator lights.
2. With the number buttons, press one of 1, 2,
and 3. The remote indicator flashes twice.
Remote Mode
–
Input and register the remote controller code of
other devices.
●● For registration of the remote control code,
refer to the next section, "Operating Other
Components with the Remote Controller".
Firmware Update
Setting Item
Default Value
Setting Details
Update Notice
Enable
Availability of a firmware update will be notified
via network.
"Enable": Notify updates
"Disable": Do not notify updates
Version
–
The current firmware version will be displayed.
Update via NET
–
Press Enter to select when you want to update
the firmware via network.
●● You will not be able to select this setting if
you do not have Internet access or there is
nothing to update.
Update via USB
–
Press Enter to select when you want to update
the firmware via USB.
●● You will not be able to select this setting if
a USB storage device is not connected or
there is nothing to update in the USB storage
device.
●● Wait for a while if "Firmware Update" cannot be selected. It will appear when the network function is
started up.
Initial Setup
You can make the initial setup from the setup menu.
●● Wait for a while if "Initial Setup" cannot be selected. It will appear when the network
function is started up.
Lock
Setting Item
Default Value
Setting Details
Setup Parameter
Unlocked
Lock the Setup menu to protect the settings.
"Locked": The menu is locked.
"Unlocked": The menu is unlocked.
En-51
Operating Other Components with the Remote Controller
Programming Remote Control Codes
Operating Other Components with
the Remote Controller
Searching in the Setup Menu
You can search a remote control code and register it to a
desired Remote Mode button in the unit's Setup menu.
1. After pressing Receiver on the remote controller, press
Setup.
Functions of Remote Mode Buttons
You can control any other device than this unit by
programming a specified remote control code to a Remote
Mode button of the remote controller. Register a remote
control code to a desired Remote Mode button and press
it to enter the remote mode that allows you to operate the
corresponding device.
½½
The Receiver and Zone2 buttons cannot be programmed.
2. With the cursors, select "7. Remote Controller" "Remote Mode" and press Enter.
3. With the cursors, select the Remote Mode button for
which you want to register a remote control code and
press Enter to display the subcategory selection screen.
4. With the cursors, select the target subcategory, and then
press Enter to display the brand name input screen.
5. Select a character with the cursors and press Enter.
Repeat it to enter the first three characters of the brand
name.
6. Select "Search" with the cursors and press Enter.
●● After a search is done, the list of possible brand
names is displayed. If the brand name list is not
displayed, select "Not Listed" with the cursors and
press Enter to return to the brand name input screen
in step 5.
7. With the cursors, select the target brand name, and then
press Enter.
●● When the brand name is specified, the remote
control code of the brand and how to register it will be
displayed on the TV screen.
8. Follow the guidance displayed on the TV screen.
9. If the component can successfully be operated with its
registered remote control code, select "OK" with the
cursors and press Enter.
●● Only TV remote control codes can be entered for TV.
●● Program a remote control code in accordance
En-52
with the input since each button also works as the
input selector. (For example, when the CD player
is connected to the CD jack, program the remote
control code for the CD player to CD)
●● If the component cannot be operated, select "Try
Next Code" with the cursors and press Enter to
display another code.
Operating Other Components with the Remote Controller
Consulting the Remote Control Code List
Remapping the Colored Buttons
Resetting the Remote Mode Buttons
Find the remote control code in the remote control code list.
The colored button assignment on the AV receiver's remote
controller can be remapped to match that on the remote
controller of the component whose remote control code you
programmed to Remote Mode. However, you will not be
able to remap the colored buttons if Zone 2 is selected.
You can reset the remote control code registered in the
Remote Mode button to its default status. This operation
can be executed on a single Remote Mode button.
1. Refer to the Remote Control Codes at the back of the
manual for the corresponding remote control code.
●● The codes in the Remote Control Code List are those
known as of the date of publication and may be
changed.
●● The following Remote Mode buttons are
preprogrammed with remote control codes.
BD/DVD: Integra/Onkyo Blu-ray Disc/DVD player
CD: Integra/Onkyo CD player
STRM Box: Apple TV
●● Only TV remote control codes can be entered for TV.
●● Program a remote control code in accordance
with the input since each button also works as the
input selector. (For example, when the CD player
is connected to the CD jack, program the remote
control code for the CD player to CD)
2. Press and hold Display for 3 or more seconds while
holding down the Remote Mode button to which you
want to program the remote control code.
●● The remote indicator lights in the input mode.
3. With the number buttons, enter the 5-digit remote control
code within 30 seconds.
●● Programming is complete when the remote indicator
flashes twice. The remote indicator flashes once
slowly when programming the remote control code
fails. Try programming again.
1. Hold down the Remote Mode button to map and A (Red)
simultaneously until the remote indicator lights (about 3
seconds).
●● Remapping is possible only for codes included in the
categories of the Remote Control Code List (DVD
player, TV, etc.)
1. Press and hold Q for 3 or more seconds while holding
down the Remote Mode button you want to reset.
●● The remote indicator will light.
2. Within 30 seconds, press the Remote Mode button
again.
●● Resetting is complete when the remote indicator
flashes twice.
2. Within 30 seconds, press the colored buttons from left to
right, in the order you want to remap.
●● For example, if the colored buttons on the remote
controller of the other component are yellow, green,
blue, and red from left to right, press the buttons on
the AV receiver's remote controller in that order.
●● Programming is complete when the remote indicator
flashes twice. The remote indicator flashes once
slowly when programming the remote control code
fails. Try programming again.
●● Pressing any other button than a colored button
cancels the remap operation.
To reset all the remote controller settings: While holding
down Receiver, press and hold Q for 3 or more seconds
until the remote indicator stays lit. Within 30 seconds, press
Receiver again. Resetting is complete when the remote
indicator flashes twice.
En-53
Operating Other Components with the Remote Controller
TV operation
F
Press the Remote Mode button programmed with the
remote control code for the relevant AV component to
switch the remote controller mode to that for the AV
component. Then, operate by using the corresponding
buttons. Available buttons vary depending on the product
category of the component. Operation may be incorrect or
impossible depending on the product.
3
4
1 Remote Mode
2 , Input, VOL /
3 Muting
4 CH +/–
5
8
9
7
H
I
½½
Not CEC-compatible.
5 Top Menu
6 / / / , Enter
7 Home
8 Menu
9 Return
F
G
Blu-ray Disc player/DVD player/DVD recorder
operation
Press the Remote Mode button programmed with the
remote control code for the relevant AV component to
switch the remote controller mode to that for the AV
component. Then, operate by using the corresponding
buttons. Available buttons vary depending on the product
category of the component. Operation may be incorrect or
impossible depending on the product.
H
I
F , , ,
,
,
,
G A (Red), B (Green), C (Yellow), D (Blue)
H Number 1 to 9, 0, +10 ()
I CLR, Display
½½
Not CEC-compatible.
6
9
2
7
1
5 Guide
6 / / / , Enter
7 Home
8 PREV CH
9 Return
3
4
1 Remote Mode
2 Source
3 Muting
4 CH +/–, Disc +/–
En-54
8
6
F , , ,
,
,
,
()
G A (Red), B (Green), C (Yellow), D (Blue)
H Number 1 to 9, 0, +10
I CLR, Display
1
2
5
G
Operating Other Components with the Remote Controller
VCR/PVR operation
F
Press the Remote Mode button programmed with the
remote control code for the relevant AV component to
switch the remote controller mode to that for the AV
component. Then, operate by using the corresponding
buttons. Available buttons vary depending on the product
category of the component. Operation may be incorrect or
impossible depending on the product.
9
G
H
3
Satellite receiver / Cable receiver operation
1 Remote Mode
2 Source
3 Muting
4 CH +/–
9
,
Press the Remote Mode button programmed with the
remote control code for the relevant AV component to
switch the remote controller mode to that for the AV
component. Then, operate by using the corresponding
buttons. Available buttons vary depending on the product
category of the component. Operation may be incorrect or
impossible depending on the product.
2
8
6
5 Guide
6 / / / , Enter
7 Home
8 PREV CH
9 Return
F
G
H
I
F , , ,
,
,
,
G A (Red), B (Green), C (Yellow), D (Blue)
H Number 1 to 9, 0, +10
I CLR, Display
1
3
7
5 Guide
6 / / / , Enter
7 Home
8 PREV CH
9 Return
7
F , , ,
,
,
G Number 1 to 9, 0, +10
H CLR, Display
4
8
6
2
1
5
5
4
1 Remote Mode
2 Source
3 Muting
4 CH +/–
En-55
Operating Other Components with the Remote Controller
CD player operation
To operate CEC-compatible components
7
Press the Remote Mode button programmed with the
remote control code for the relevant AV component to
switch the remote controller mode to that for the AV
component. Then, operate by using the corresponding
buttons. Available buttons vary depending on the product
category of the component. Operation may be incorrect or
impossible depending on the product.
If this unit is connected via HDMI to a TV or BD/DVD
player, you may be able to control the devices using
the remote controller of this unit with CEC (Consumer
Electronics Control) linked operation.
TV: The TV button on the remote controller is
preprogrammed with remote control codes for linked
operation of some CEC(Consumer Electronics Control)compatible TV sets.
●● If you cannot operate your CEC-compatible TV,
program one of the following remote control codes
(11807/13100/13500) to the TV button.
8
9
F
3
4
1 Remote Mode
2 Source
3 Muting
4 Disc +/–
7 , , ,
,
,
,
8 Search, Repeat, Random, Mode
9 Number 1 to 9, 0, +10
F CLR, Display
BD/DVD player: By registering a remote control code
(32910/33101/33501/31612) in the BD/DVD button, your
remote controller will be able to take advantage of linked
operation with CEC-compatible BD/DVD players.
Cassette tape deck operation
Press the Remote Mode button programmed with the
remote control code for the relevant AV component to
switch the remote controller mode to that for the AV
component. Then, operate by using the corresponding
buttons. Available buttons vary depending on the product
category of the component. Operation may be incorrect or
impossible depending on the product.
2
5
1
6
3
5 / / / , Enter
6 Home
1 Remote Mode
2 Source
3 Muting
4
4 En-56
,
(Reverse Playback),
,
,
,
,
Advanced speaker connections
Advanced speaker connections
●● Before bi-amping, be sure to remove the shortcircuit connector that connects the tweeter (treble)
jack and the subwoofer (bass) jack.
●● Use speakers supporting bi-amping only. For
details, refer to the speakers' instruction manual.
Connecting Bi-amp Speakers
Connecting a Power Amplifier
It is possible to connect speakers supporting bi-amping to
improve quality of the bass and treble. Up to 5.1 ch will be
played in bi-amping.
You can connect a power amplifier to the unit and use the
unit as a pre-amplifier in order to produce a large volume
that cannot be output with the unit only. Connect the
speakers to the power amplifier. For details, refer to the
power amplifier's instruction manual.
Connections
1. Connect as below using the FRONT terminals and
BACK or HEIGHT terminals.
Connections
1. Connect as below using the PRE OUT terminals.
Tweeter
(high pitched tone)
Woofer
(low pitched tone)
Power amplifier
Front R
Front L
2. Turn the unit on and make the bi-amping setting.
1After pressing Receiver on the remote controller,
press Setup.
2With the cursors, select "2. Speaker" "Configuration" - "Bi-Amp".
3Select "Yes" with the cursors.
●● Set to suit the number of speaker channels connected.
– After pressing the Receiver button, press the Setup
button on the remote controller. Select "2. Speaker"
- "Configuration" - "Speaker Channels" in order with
the cursors, and set the number of speaker channels.
En-57
Connecting and Operating Onkyo RI Components
Connecting and Operating
Onkyo RI Components
RI Connection and Setting
About RI Function
L
Connecting an Onkyo component with RI jack such as
the separately sold RI Dock to the unit by using an RI
cable and an analog audio cable enables the following RI
functions:
R
System On / Auto Power On: Starting playback on a
component connected via RI when the unit is on standby
mode, automatically turns on the unit to select the relevant
component as its input source.
Direct Change: When playback is started on a component
connected via RI, the unit selects that component as the
input source.
Remote Controller Operation: Allows you to operate
RI-compatible Onkyo components using the AV receiver's
remote controller. Point the remote controller at remote
control sensor of the unit. This operation is possible only
when the RI remote control code is programmed.
●● Some components may not support all RI functions.
●● These functions do not work when Zone 2 is turned on.
●● For information on the RI functions, also refer to each
component's instruction manual.
Connect an Onkyo component with RI jack to this unit using
an RI cable and an analog audio cable. For details, refer
to the instruction manual of the component with RI jack.
The RI cable can be connected in any order. When there
are two RI jacks, both jacks work in the same way and are
interchangeable.
To connect the RI Dock or cassette tape deck via RI, the
following settings are required.
Rename the input selector
To make the RI functions work, you must rename the input
selectors on the unit. Press CD or Game to display "CD"
or "GAME" on the main unit display. Then press and hold
CD or Game 3 seconds or more to switch the display to
"DOCK" or "TAPE".
To program the RI remote control code
Program the remote control code to any Remote Mode
button on the remote controller. This will allow you to
operate the component by pointing the remote controller at
the unit instead of the component.
1. Press and hold Display for 3 or more seconds while
holding down the Remote Mode button to which you
want to program the remote control code.
●● The remote indicator will light.
●● The Receiver and Zone2 buttons cannot be
programmed.
En-58
2. With the number buttons, enter the following 5-digit
remote control code within 30 seconds.
RI Dock: 81993
Cassette tape deck with RI jack: 42157
●● Programming is complete when the remote indicator
flashes twice. The remote indicator flashes once
slowly when programming the remote control code
fails. Try programming again.
Input selector on the RI Dock: Switch to "DOCK" or
"TAPE". For details, refer to the RI Dock's instruction
manual.
To operate Onkyo components directly or Onkyo
components that are not connected via RI, use the
following remote control codes:
Onkyo DVD player: 30627
Onkyo CD player: 71817
RI Dock: 82990
●● With some models, operation may be not possible in
part or not possible at all.
Connecting and Operating Onkyo RI Components
iPod /iPhone Operation
R
R
The RI Dock allows you to use the AV receiver's remote
controller to operate and play music on your iPod/iPhone.
Moreover, it also allows you to view videos on your iPod/
iPhone on the screen of your TV, as well as perform RI
operations if connected via RI. This operation is possible
only when the RI remote control code is programmed.
Before performing any operation: Make sure the OS for
your iPod/iPhone is updated to the latest version. Certain
buttons may not work for some iPod/iPhone models and
generations, or RI Dock. For details on the operation, refer
to the RI Dock's instruction manual.
Switch the remote controller mode by pressing the Remote
Mode button programmed with the remote control code for
the iPod/iPhone, and operate by using the corresponding
buttons. Point the remote controller at the unit.
9
G
F
H
9 , , ,
,
F Repeat, Random
G Mode
H Display
,
,
●● Pressing Display turns on the backlight for a few
seconds.
●● Mode allows you to use the Resume function.
2
1
3
4
5
1 Remote Mode
2 Source
3 Muting
4 VOL /
5 Album +/–
6
8
7
6 Top Menu
7 / / / , Enter, Playlist /
8 Menu
En-59
Control Function between the Unit and External Component
Control Function between the Unit
and External Component
You can enable the control functions between the unit
and external devices using the terminals below. Special
devices or cable connections are necessary to enable the
functions. For more information about preparation, contact
the specialized stores.
IR jack
If you use a multiroom remote control kit with this jack, you
can operate the unit with the remote controller even when
you are in a separate room, or operate the unit with the
remote controller even if its remote control sensor is difficult
to see. You can also connect a device with the unit and
operate it with the remote controller. For more information
about adopting a multiroom remote control kit, contact the
specialized stores.
RS232 port
Use the port for connection with a commercially available
integrated control system that can enable home
automation. Some integrated control systems provide a
centralized operation with a single touch panel controller
in order to control audio and video home appliances
and security devices together. For more information
about adopting an integrated control system, contact the
specialized stores.
IR
receiver
Connecting
block
Remote controller
Main room
Zone
Signal flow
12V trigger output jack
You can enable power link operation when you connect
the unit and an external device such as power amplifier
equipped with 12V input jack. When the desired input is
selected on the unit, power link operation will be activated
with a control signal of maximum 12 V/100 mA from the
12V TRIGGER OUT A jack (maximum 12 V/25 mA for the
12V TRIGGER OUT B or C jack). Each input can be set to
output a control signal in any case of "Main", "Zone2" or
"Main/Zone2". For connection, use a monaural mini plug
cable.
En-60
Firmware Update
Updating the Firmware via Network
Firmware Update
About Firmware Update
There are two methods for updating the firmware; via
network and via USB.
Use the one that best suits your environment.
●● For the latest information on updates, visit the Onkyo
website.
●● Before updating, make sure that the speaker setup
microphone is not connected.
●● During an update, do not
– Disconnect and reconnect any cable, USB storage
device, speaker setup microphone or headphones,
or perform any operation on the component such as
turn off its power
– Access to this unit from a PC or smartphone using
Android application
●● The update may take about 30 minutes to complete for
either method: via network or via USB.
Furthermore, existing settings are guaranteed
regardless of the method used for update.
Disclaimer: The program and accompanying online
documentation are furnished to you for use at your own
risk.
Onkyo will not be liable and you will have no remedy for
damages for any claim of any kind whatsoever concerning
your use of the program or the accompanying online
documentation, regardless of legal theory, and whether
arising in tort or contract.
In no event will Onkyo be liable to you or any third party for
any special, indirect, incidental, or consequential damages
of any kind, including, but not limited to, compensation,
reimbursement or damages on account of the loss of
present or prospective profits, loss of data, or for any other
reason whatsoever.
Before Starting
●● Check that the unit is turned on, and the connection to
the Internet is secured.
●● Turn off the controller component (PC etc.) connected to
the network.
●● Stop any playing Internet radio, USB storage device, or
server content.
●● If the multi-zone function is active, press Off on the main
unit to turn it off.
●● If "HDMI CEC (RIHD)" is set to "On", set it to "Off"
(default value).
– After pressing Receiver on the remote controller,
press Setup. Then, after selecting "6. Hardware"
- "HDMI" and pressing Enter, select "HDMI CEC
(RIHD)" to select "Off".
½½
The description may differ from the on-screen display but that will not
change the way to operate or the function.
The Setup menu is displayed on the TV screen.
Setup
1. Input/Output Assign
1. TV Out
2. Speaker
2.HDMI Input
3. Audio Adjust
3. Video Input
4. Source
4. Digital Audio Input
5. Listening Mode Preset
6. Hardware
7. Remote Controller
8. Miscellaneous
2. With the cursors, select "8. Miscellaneous" - "Firmware
Update" - "Update via NET", and then press Enter.
Setup
1. Input/Output Assign
1. Firmware Update
2. Speaker
2. Initial Setup
3. Audio Adjust
3. Lock
4. Source
Update
5. Listening Mode Preset
1. After pressing Receiver on the remote controller, press
Setup.
7. Remote Controller
6. Hardware
8. Miscellaneous
●● If "Firmware Update" is grayed out and cannot be
selected, wait for a while until it starts up.
●● You will not be able to select "Update via NET" if
there is nothing to update.
3. Press Enter with "Update" selected to start update.
●● During the update, the TV screen may go black
depending on the updated program. In that case,
check the progress on the display of the unit. The TV
screen will remain black until the update is complete
and the power is turned on again.
●● "Completed!" is displayed when the update is
complete.
4. Press On/Standby on the main unit to turn the unit
into standby mode. The process is completed and your
firmware is updated to the latest version.
●● Do not use Receiver on the remote controller.
En-61
Firmware Update
Updating the Firmware via USB
If an Error Message is Displayed
When an error occurs, "*-** Error!" is displayed on the unit.
("*" represents an alphanumeric character.) Check the
following:
Error Code
●● *-01, *-10:
Ethernet cable not found. Connect the Ethernet cable
properly.
●● *-02, *-03, *-04, *-05, *-06, *-11, *-13, *-14, *-16, *-17,
*-18, *-20, *-21:
Internet connection error. Check the following:
– Whether the router is turned on
– Whether this unit and router are connected to the
network
Try to disconnect and then connect again the power
to the unit and router. This may solve the problem. If
you are still unable to connect to the Internet, the DNS
server or proxy server may be temporarily down. Check
the service status with your ISP provider.
●● Others
First disconnect then reconnect the AC power cord, and
then retry from the beginning.
Before Starting
●● Prepare a 64MB or larger USB storage device.
– Media inserted in a USB card reader may not be
used for this function.
– USB storage devices with security function are not
supported.
– USB hubs and USB devices with hub function are not
supported. Do not connect these devices to the unit.
●● Delete any data stored on the USB storage device.
●● Turn off the controller component (PC etc.) connected to
the network.
●● Stop any playing Internet radio, USB storage device, or
server content.
●● If the multi-zone function is active, press Off on the main
unit to turn it off.
●● If "HDMI CEC (RIHD)" is set to "On", set it to "Off"
(default value).
– After pressing Receiver on the remote controller,
press Setup. Then, after selecting "6. Hardware"
- "HDMI" and pressing Enter, select "HDMI CEC
(RIHD)" to select "Off".
½½
Some USB storage devices may take long to load, may not be loaded
correctly, or may not be correctly fed depending on the device or their
content.
½½
Onkyo will not be liable whatsoever for any loss or damage of data, or
storage failure arising from the use of the USB storage device with this
AV receiver. Thank you for your understanding.
½½
The description may differ from the on-screen display but that will not
change the way to operate or the function.
Update
1. Connect the USB storage device to your PC.
2. Download the firmware file from the Onkyo website to
your PC and unzip.
Firmware files are named in the following way:
ONKAVR****_************.zip
Unzip the file on your PC. The number of unzipped files
and folders varies depending on the model.
3. Copy all unzipped files and folders to the root folder of
the USB storage device.
●● Make sure to copy the unzipped files.
4. Connect the USB storage device to the USB port of the
unit.
●● If you connect a USB hard disk drive to the USB
port of the unit, we recommend that you use its AC
adapter to power it.
En-62
●● If the USB storage device has been partitioned, each
section will be treated as an independent device.
5. After pressing Receiver on the remote controller, press
Setup.
Firmware Update
The Setup menu is displayed on the TV screen.
Setup
1. Input/Output Assign
1. TV Out
2. Speaker
2.HDMI Input
3. Audio Adjust
3. Video Input
4. Source
4. Digital Audio Input
5. Listening Mode Preset
6. Hardware
7. Remote Controller
8. Miscellaneous
If an Error Message is Displayed
6. With the cursors, select "8. Miscellaneous" - "Firmware
Update" - "Update via USB", and then press Enter.
Setup
1. Input/Output Assign
1. Firmware Update
2. Speaker
2. Initial Setup
3. Audio Adjust
3. Lock
4. Source
5. Listening Mode Preset
6. Hardware
7. Remote Controller
8. Miscellaneous
●● If "Firmware Update" is grayed out and cannot be
selected, wait for a while until it starts up.
●● You will not be able to select "Update via USB" if
there is nothing to update.
When an error occurs, "*-** Error!" is displayed on the unit.
("*" represents an alphanumeric character.) Check the
following:
Error Code
●● *-01, *-10:
USB storage device not found. Check whether the USB
storage device or USB cable is correctly inserted to the
USB port of the unit.
Connect the USB storage device to an external power
source if it has its own power supply.
●● *-05, *-13, *-20, *-21:
The firmware file is not present in the root folder of the
USB storage device, or the firmware file is for another
model. Retry from the download of the firmware file.
●● Others
First disconnect then reconnect the AC power cord, and
then retry from the beginning.
7. Press Enter with "Update" selected to start update.
●● During the update, the TV screen may go black
depending on the updated program. In that case,
check the progress on the display of the unit. The TV
screen will remain black until the update is complete
and the power is turned on again.
●● During the update, do not turn off, or disconnect and
reconnect the USB storage device.
●● "Completed!" is displayed when the update is
complete.
8. Disconnect the USB storage device from the unit.
9. Press On/Standby on the main unit to turn the unit
into standby mode. The process is completed and your
firmware is updated to the latest version.
●● Do not use Receiver on the remote controller.
En-63
Troubleshooting
mode.
Troubleshooting
Clear
2
Before starting the procedure
Problems may be solved by simply turning the power on/off
or disconnecting/connecting the power cord, which is easier
than working on the connection, setting and operating
procedure. Try the simple measures on both the unit and
the connected device. If the problem is that the video or
audio is not output or the HDMI linked operation does not
work, disconnecting/connecting the HDMI cable may solve
it. When reconnecting, be careful not to wind the HDMI
cable since if wound the HDMI cable may not fit well. After
reconnecting, turn off and on the unit and the connected
device.
●● The AV receiver contains a microPC for signal
processing and control functions. In very rare situations,
severe interference, noise from an external source, or
static electricity may cause it to lockup. In the unlikely
event that this happens, unplug the power cord from the
wall outlet, wait at least 5 seconds, and then plug it back
in.
●● Onkyo is not responsible for damages (such as CD
rental fees) due to unsuccessful recordings caused by
the unit’s malfunction. Before you record important data,
make sure that the material will be recorded correctly.
If no problems are detected, "AMP Diag Mode" will
disappear and the unit will return to a normal state. If
"CHECK SP WIRE" appears on the display, the speaker
cables may be short-circuited. Turn the unit off, and
check to see if the cable core of any of the speaker
cables is in contact with that of another speaker cable or
with the rear panel. After that, turn the unit on again. If
"NG" appears, unplug the power cord immediately and
contact your dealer.
1
How to reset the remote controller
1. While holding down 1 Receiver on the remote
controller (note that step 2 must be performed with this
button pressed down)
2. Press and hold 2 Q for 3 or more seconds until the 3
remote indicator stays lit. Within 30 seconds, press 1
Receiver again.
3
1
Resetting the unit to the status at the time of shipment
may solve the problem. If the measures mentioned in the
troubleshooting do not solve the problem, reset the unit
with the following procedure. If you reset the unit status,
your preferences will be reset to the defaults. Note them
down before starting reset.
How to reset
1. While holding down CBL/SAT on the main unit (note
that step 2 must be performed with this button pressed
down)
2. Press On/Standby on the main unit. "Clear" is
appeared on the display and the unit will enter standby
En-64
Audio
●● Make sure that the speaker setup microphone is not still
connected.
●● Check that the output jack of the connected equipment
and the input jack of this unit are connected correctly.
●● Make sure that none of the connecting cables are bent,
twisted, or damaged.
●● If the MUTING indicator on the display flashes, press
Muting on the remote controller to unmute the unit.
●● While headphones are connected to the Phones jack, no
sound is output from the speakers.
●● If "Audio Select" - "PCM Fixed Mode" is set to "On", set
it to "Off".
If the above does not solve the problem, check the
following.
2
Resetting the unit
WARNING: If smoke, smell or abnormal noise is produced
by the unit, unplug the power cord from the wall outlet
immediately and contact the dealer or our support.
Power
Cannot turn on the unit
●● Make sure that the power cord is properly plugged into
the wall outlet.
●● Unplug the power cord from the wall outlet, wait 5
seconds or more, then plug it in again.
The unit turns off unexpectedly
●● The AV receiver will automatically enter standby mode
when Auto Standby or Sleep Timer is set and launched.
●● The protection circuit may have been activated. If this is
the case, when you turn the unit on again, "AMP Diag
Mode" will appear on the main unit’s display. The unit
will then enter a mode that detects abnormal conditions.
There is no sound from the television
●● The input selector of this unit needs to be in the position
that corresponds to the jack where the television is
connected.
●● If your TV does not support ARC, you need, in addition
to the HDMI OUT MAIN jack connection, a digital optical
cable connection between the digital audio out optical
jack of the TV and the DIGITAL IN OPTICAL jack of the
unit or an analog audio cable connection between the
audio output jack of the TV and the AUDIO IN TV jack of
the unit.
There is no sound from the connected player
●● The input selector of this unit needs to be in the
position that corresponds to the jack where the player is
connected.
●● Check the digital audio output setting on the connected
component. On some game consoles, such as those
Troubleshooting
that support DVD, the default setting is off.
●● With some DVD-Video discs, you need to select an
audio output format from a menu.
One of the speakers produces no sound
●● Make sure that the polarity of the speaker cables is
correct, and that no bare wires are in contact with the
metal part of speaker terminals.
●● Make sure that the speaker cables are not shorting.
●● Make sure the speakers are configured correctly.
Only the front speakers produce sound
●● When the Stereo or Mono listening mode is selected,
only the front speakers and subwoofer produce sound.
Only the center speaker produces sound
●● If you use the Dolby Surround listening mode with a
mono source, such as an AM radio station or mono
TV program, the sound is concentrated in the center
speaker.
The surround speakers produce no sound
●● When the T-D (Theater-Dimensional), Stereo or Mono
listening mode is selected, the surround speakers
produce no sound.
●● Depending on the source and current listening mode,
not much sound may be produced by the surround
speakers. Try selecting another listening mode.
The center speaker produces no sound
●● When the Stereo or Mono listening mode is selected,
the center speaker produces no sound.
No sound from the back speakers and height
speakers
●● Depending on the source and current listening mode,
not much sound may be produced by the speakers. Try
selecting another listening mode.
The subwoofer produces no sound
●● When the input signal does not include a subwoofer
audio element (LFE), the subwoofer may not produce
sound.
Volume is low
●● Check the volume. The volume level is adjustable
between Min, 1 to 79, Max (80). A level of around 40 is
normal in a domestic environment.
There is no sound from a connected turntable
●● If your turntable uses an MC cartridge, you must
connect an audio equalizer and either an MC head amp
or an MC transformer.
Noise can be heard
●● Using cable ties to bundle audio cables with power
cords, speaker cables, etc. may degrade the audio
performance, so refrain from doing it.
●● An audio cable may be picking up interference. Try
repositioning your cables.
The sound changes when I connect my headphones
●● When a listening mode other than Direct, or Mono is
selected, connecting a headphone automatically selects
Stereo.
About DTS signals
●● When DTS program material ends and the DTS
bitstream stops, the unit remains in DTS listening mode
and the dts indicator remains on. This is to prevent noise
when you use the pause, fast forward, or fast reverse
function on your player. If you switch your player from
DTS to PCM, you may not hear any sound because the
unit does not switch formats immediately. In such case,
you should stop your player for about 3 or more seconds
and then resume playback.
●● With some CD and LD players, you will not be able
to playback DTS material properly even though your
player is connected to a digital input on the unit. This is
usually because the DTS bitstream has been processed
(e.g., output level, sampling rate, or frequency response
changed) and the unit does not recognize it as a
genuine DTS signal. In such cases, you may hear noise.
●● When playing DTS program material, using the pause,
fast forward, or fast reverse function on your player may
produce a short audible noise. This is not a malfunction.
The beginning of audio received by an HDMI IN
cannot be heard
●● Since it takes longer to identify the format of an HDMI
signal than it does for other digital audio signals, audio
output may not start immediately.
Cannot increase volume when playing AirPlay,
Spotify, or DLNA
●● You can set the upper limit for the volume in "WEB
Setup". After pressing the Receiver button on the remote
controller, press the Setup button, select "6. Hardware"
- "Network" - "IP Address" to display the IP address.
After connecting the unit and your PC or smartphone to
the same router, open the browser, enter the IP address
of the unit in the URL field to display the "WEB Setup"
screen. Change the value for "Max Volume" in " WEB
Setup" and click "Save".
Listening Mode
●● When listening to Dolby Digital and/or DTS sound,
digital connection is necessary.
●● Check the digital audio output setting on the connected
component. On some game consoles, such as those
that support DVD, the default setting is off.
●● After pressing Receiver on the remote controller,
repeatedly press Display to switch the display on the
main unit. You can see the input format.
If the above does not solve the problem, check the
following.
Cannot select a desired listening mode
●● Depending on the connecting status of the speaker,
some listening modes may not be selected. Check the
details in "Selectable Listening Modes" section.
There is no sound with Dolby Atmos
●● You need to have either back speakers or height
speakers connected. After connecting each of the
speakers, make sure the connection settings in
"Configuration" - "Speaker Channels" are correct. Dolby
●● Atmos play is only possible when the input signal is
Dolby Atmos.
Video
●● Check that the output jack of the connected equipment
and the input jack of this unit are connected correctly.
●● Make sure that none of the connecting cables are bent,
twisted, or damaged.
●● Make sure the switching of input screens is proper at the
monitor side such as a TV.
If the above does not solve the problem, check the
following.
There is no picture from a source connected to an
HDMI IN
●● The input selector of this unit needs to be in the
position that corresponds to the jack where the player is
connected.
●● Check if "Resolution Error" is displayed on the main
unit display when video input via HDMI IN jack is not
displayed. In this case, the TV does not support the
resolution of the video input from the player. Change the
setting on the player.
●● Reliable operation with an HDMI-to-DVI adapter is not
En-65
Troubleshooting
guaranteed. In addition, video signals from a PC are not
supported.
●● Try switching off the DeepColor function. To turn off
the DeepColor function, simultaneously press the
STRM Box and On/Standby buttons on the main unit.
While holding down STRM Box, press On/Standby
repeatedly until "Deep Color:Off" appears on the display.
To reactivate the DeepColor function, repeat the above
described step until "Deep Color:On" is appeared on the
display.
There is no picture from a source connected to the
component video input jack
●● If multiple video inputs are put into one input, the output
will be made in the order of HDMI, COMPONENT
VIDEO/composite video. In this case, to output
composite video, set "HDMI Input" to "-----".
Images flicker
●● It is possible that the resolution of the player is not
compatible with the TV's resolution. If you have
connected the player to this unit with an HDMI cable, try
changing the output resolution on the player. There also
may be an improvement if you change the screen mode
on the TV.
Linked operation
There is no HDMI linked operation with CECcompliant equipment such as a television
●● Set the HDMI CEC (RIHD) setting of the unit to "On".
Press Receiver and then Setup on the remote controller,
select "Setup" - "6. Hardware" - "HDMI" - "HDMI CEC
(RIHD)" and set to "Yes".
●● It is also necessary to make the HDMI linked system
settings on the CEC-compliant equipment. Check the
operating instructions.
The RI functions do not work
●● To use RI, you must make an RI connection and an
analog audio connection (RCA) between the component
and AV receiver.
●● While Zone 2 is selected, the RI functions do not work.
En-66
Tuner
Reception is noisy, FM stereo reception is noisy, or
the "FM STEREO" indicator does not stay lit
●● Re-check the antenna connection.
●● Relocate your antenna.
●● Move the unit away from your TV or PC.
●● Passing cars and airplanes can cause interference.
●● Concrete walls weaken radio signals.
●● Listen to the station in mono.
●● When listening to an AM station, operating the remote
controller may cause noise.
Music playback is unavailable on the unit even after
successful Bluetooth connection
●● When the audio volume of your Bluetooth-enabled
device is set low, the playback of audio may be
unavailable. Increase the volume of the Bluetoothenabled device.
●● Depending on the Bluetooth-enabled device, Send/
Receive selector switch may be provided. Select Send
mode.
●● Depending on the characteristics or specifications of
your Bluetooth-enabled device, playback on the unit is
not guaranteed.
Bluetooth
Sound is interrupted
●● Problem may be occurring at the Bluetooth-enabled
device. Check the information on a web page.
●● Try plugging/unplugging the power of the unit and try
turning on/off the Bluetooth-enabled device. Re-startup
of the Bluetooth-enabled device may be effective.
●● The Bluetooth-enabled devices must support the A2DP
profile.
●● Near components such as microwave oven or cordless
phone, which use the radio wave in the 2.4 GHz range,
a radio wave interference may occur, which disables the
use of this unit.
●● If there is a metallic object near the unit, Bluetooth
connection may not be possible as the metal can effect
on the radio wave.
The audio quality is poor after connection with a
Bluetooth-enabled device
●● The Bluetooth reception is poor. Move the Bluetoothenabled device closer to the unit or remove any obstacle
between the Bluetooth-enabled device and this unit.
If the above does not solve the problem, check the
following.
Network function
Cannot connect with this unit
●● The Bluetooth function of the Bluetooth-enabled
device is not enabled. Refer to the user manual of
the Bluetooth-enabled device for how to enable the
Bluetooth function.
●● When building a Bluetooth connection between this unit
and your Bluetooth-enabled device for the first time, if
the connection fails, select "6.Hardware" - "Bluetooth",
execute "Clear" in "Pairing Information", turn off and
then on again your Bluetooth-enabled device to clear the
device name, and build the Bluetooth connection again.
●● If the wireless LAN and Bluetooth connections are
used at the same time, try connecting the ETHERNET
port and router with the Ethernet cable after selecting
"6. Hardware" - "Network" and changing "Wi-Fi" to
"Off(Wired)" for a better connection.
"Bluetooth" - "Auto Reconnect" does not work
●● This may not work with some Bluetooth-enabled
devices.
In that case, pair the unit and the Bluetooth-enabled
device and then play again.
●● "Network Setup" becomes selectable after the network
starts up even if it cannot be selected first. It may take
about a minute to start up.
●● When NET is blinking, the AV receiver is not properly
connected to the home network.
●● Try unplugging the power supply of this unit and the
router, and then plugging in again. Try rebooting the
router.
If the above does not solve the problem, check the
following.
Cannot access the Internet radio
●● Certain network service or contents available through
the unit may not be accessible in case the service
provider terminates its service.
●● Make sure that your modem and router are properly
connected, and make sure they are both turned on.
●● Make sure that the router LAN side port is properly
Troubleshooting
connected to the AV receiver.
●● Make sure that connecting to Internet from other
components is possible. If connecting is not possible,
turn off all components connected to the network, wait
for a while, and then turn on the components again.
●● If a specific radio station is unavailable for listening,
make sure the registered URL is correct, or whether the
format distributed from the radio station is supported by
this unit.
●● Depending on ISP, setting the proxy server is necessary.
●● Make sure that the used router and/or modem is
supported by your ISP.
Cannot access the network server
●● This unit needs to be connected to the same router as
the network server.
●● Make sure your network server has been started up.
●● Make sure your network server is properly connected to
the home network.
●● Make sure your network server is correctly set.
●● Make sure that the router LAN side port is properly
connected to the AV receiver.
Playback stops while listening to music files on the
network server
●● Make sure the network server is compatible with this
unit.
●● When the PC is serving as the network server, try
quitting any application software other than the server
software (Windows MediaR Player 12 etc.).
●● If the PC is downloading or copying large files, the
playback may be interrupted.
USB storage device
USB storage device is not displayed
●● Check whether the USB storage device or USB cable is
correctly inserted to the USB port of the unit.
●● Remove the USB storage device from the AV receiver
once, and then try re-connecting.
●● Performance of the hard disk that receive power from
the USB port of the unit is not guaranteed.
●● Depending on the type of format, the playback may
not be performed normally. Check the type of the file
formats that is supported.
●● USB storage devices with security functions may not be
played.
Wi-Fi (Wireless LAN) Network
Multi-zone Function
●● Try plugging/unplugging the power supply of wireless
LAN router and the unit, check the wireless LAN router
power-on status, and try reboot of the wireless LAN
router.
There is no zone output from the connected player
●● With multi-zone function, sound is output only when the
signal input source is an external component connected
to the digital audio input jacks or analog audio input
jacks, "NET", "BLUETOOTH", "AM" or "FM". Multi-zone
output is not possible if the player and the unit are
connected via HDMI cable.
Connect the player using a digital optical cable
(OPTICAL), digital coaxial cable (COAXIAL), or RCA
cable. Also, some players require audio output setting.
●● Only analog and 2ch PCM audio signals can be output
from an external component to Zone 2.
●● When the "NET" input source is selected, DSD and
Dolby TrueHD audio signals cannot be output to Zone 2.
If the above does not solve the problem, check the
following.
Cannot access to Wi-Fi (Wireless LAN) network
●● The wireless LAN router setting may be switched to
Manual. Return the setting to Auto.
●● Try the manual set-up. The connection may succeed.
●● When the wireless LAN router setting is at stealth mode
(mode to hide the SSID key) or when ANY connection
is off, the SSID is not displayed. Change the setting and
try again.
●● Check if SSID and encryption settings (WEP, etc.) are
correct. Make sure the network settings of the unit is
properly set.
●● Connection to an SSID that includes multi-byte
characters is not supported. Name the SSID of the
wireless LAN router using single-byte alphanumeric
characters only and try again.
Playback is interrupted and communication does
not work
●● Cannot receive signals due to a bad connection.
Shorten the distance from wireless LAN access point
or remove obstacles for a good visibility, and try again.
Place the unit away from microwave ovens or other
access points. It is recommended to place the Wi-Fi
router (access point) and the unit in the same room.
●● If there is a metallic object near the unit, wireless LAN
connection may not be possible as the metal can effect
on the radio wave.
●● 2.4 GHz band for wireless LAN may not be enough.
Connect ETHERNET port of the unit and the router
via an Ethernet cable after selecting "6. Hardware" "Network" and changing "Wi-Fi" to "Off(Wired)".
●● When other wireless LAN devices are used near the
unit, several issues such as interrupted playback and
communication may occur. You can avoid these issues
by changing the channel of your Wi-Fi router. For
instructions on changing channels, see the instruction
manual provided with your Wi-Fi router.
Remote Controller
●● Make sure that the batteries are installed with the
correct polarity.
●● Install new batteries. Do not mix different types of
batteries, or old and new batteries.
●● Make sure that the remote controller is not too far away
from the unit, and that there is no obstruction between
the remote controller and the remote control sensor of
the unit.
●● Make sure that the unit is not subjected to direct
sunshine or inverter-type fluorescent lights. Relocate if
necessary.
●● If the unit is installed in a rack or cabinet with coloredglass doors or if the doors are closed, the remote
controller may not work reliably.
If the above does not solve the problem, check the
following.
The remote controller does not work
●● Before operating this unit with the remote controller, be
sure to press Receiver.
Operating other Onkyo component by using a RI
remote control code is not available
●● Make sure that the Onkyo component is properly
connected with RI cable. When RI cable is used for
connection, make sure to connect analog audio cable as
well. (Connecting only an RI cable will not be enough.)
●● Make sure you have selected the correct remote
controller mode.
En-67
Troubleshooting
●● When the RI remote control code is input, point the
remote controller at remote control sensor of the unit.
●● Make sure that the input display is correctly set.
●● Input the RI remote control code again.
connect properly to the Dock. Always remove your iPod/
iPhone from the case before inserting it into the Dock.
Try reconnecting your iPod/iPhone.
●● Make sure your iPod/iPhone is actually playing.
measurement fails and the message "Ambient noise is
too high." is displayed.
●● This can be caused by a malfunction in your speaker
unit. Check if the unit produces normal sounds.
Cannot operate Onkyo components (ones without RI
connection) and components of other makers
●● Operate the remote controller by setting toward the light
receiving section of each component.
●● When using the remote controller to control other
manufacturers' AV components, some buttons may not
work as expected. Also, some components may not
operate at all.
●● Make sure you have selected the correct remote
controller mode.
●● Make sure you have entered the correct remote control
code.
●● Make sure to set the same ID on both the unit and
remote controller.
●● Input a correct remote control code again. If there are
several codes, try each code.
If the above does not solve the problem, check the
following.
The Late Night function does not work
●● Make sure the source material is Dolby Digital, Dolby
Digital Plus, Dolby TrueHD, or DTS.
Display and OSD
The display does not light
●● Make sure that Dimmer function is not working. Press
Dimmer button and change the brightness level of the
display.
The on-screen menus do not appear
●● On your TV, make sure that the video input to which this
unit is connected is selected.
●● Set "TV Out" - "Impose OSD" to "On".
●● The guidance displayed on the TV screen (OSD) are not
displayed when the OSD language is set to Chinese if
the input selector is "NET" or "BLUETOOTH". Operate
by confirming the display on the main unit. Note that the
display on the main unit does not support the display
of Chinese characters. Characters that cannot be
displayed are replaced with asterisks ( ).
RI Dock
●● Make sure the unit is turned on, the correct input source
is selected, and the volume is turned up.
●● Make sure cord and cable plugs are properly plugged in.
●● Make sure your iPod/iPhone is properly inserted in
the Dock. If your iPod/iPhone is in a case, it may not
En-68
There is no sound
●● Try resetting your iPod/iPhone.
There is no video
●● Make sure the correct input is selected on your TV or
the unit.
●● Make sure that your iPod/iPhone model's TV OUT
setting is set to On.
●● Some versions of the iPod/iPhone do not output video.
The AV receiver's remote controller does not control
your iPod/iPhone
●● The iPod/iPhone cannot be operated while it is
displaying the Apple logo.
●● Make sure you have selected the correct remote
controller mode.
●● When you use the AV receiver's remote controller, point
it toward this unit.
●● Before operating with the remote controller, you may
need to play on your iPod/iPhone to make the input
selector be recognized.
●● Depending on your iPod/iPhone model and generation,
some buttons may not work as expected.
●● Try resetting your iPod/iPhone.
The unit unexpectedly selects your iPod/iPhone as
the input source
●● Always pause iPod/iPhone playback before selecting
a different input source. If playback is not paused, the
Direct Change function may select your iPod/iPhone
as the input source by mistake during the transition
between tracks.
Others
Strange noises can be heard from the unit
●● If you have connected another unit to the same wall
outlet as this unit, this noise may be an effect from the
other unit. If the symptoms improve by unplugging the
power cord of the other unit, use different wall outlets for
this unit and the other unit.
When performing Automatic Speaker Setup, the
The Cinema Filter function does not work
●● This function can be used in the following listening
modes: Dolby Digital, Dolby Digital Plus, Dolby TrueHD,
Multichannel, DTS, DTS-ES, DTS 96/24, DTS-HD High
Resolution Audio, DTS-HD Master Audio, DTS Express.
How do I change the language of a multiplex source
●● Select "Main" or "Sub" for "3. Audio Adjust" - "Multiplex/
Mono" - "Multiplex Input Channel".
Cannot connect to the AV receiver from a Web
browser
●● Make sure that the IP address of the AV receiver is
correctly input to the Internet browser.
●● When DHCP is used for allocating the IP address, the IP
address of this AV receiver may have been changed.
●● Make sure that both AV receiver and PC are properly
connected to the network.
Power consumption in standby mode
●● In the following cases, the power consumption in
standby mode may reach up to a maximum of 4.4 W:
– When "Network Standby" in "6. Hardware" - "Power
Management" - "Network" is set to "On".
– When "HDMI CEC (RIHD)" is set to "On". (Depending
on the TV status, this unit will enter normal standby
mode.)
– The "HDMI Standby Through" setting is set to other
than "Off".
– When "Bluetooth Wakeup" in "6. Hardware" - "Power
Management" is set to "On".
– When "USB Power Out at Standby" is set to "On"
Reference Information
Reference Information
Linked Operation with CEC-compatible
Components
Link operation with a product conforming to the CEC of the
HDMI standard.
Note that linked operation is not always guaranteed with all
CEC devices.
Operation has been confirmed on the following devices (as of
February 2015).
TV (Random order):
●● Toshiba TV sets
●● Sharp TV sets
Players/Recorders (Random order):
●● Onkyo and Integra RIHD-compatible players
●● Toshiba players and recorders
●● Sharp players and recorders (only when used together with
Sharp TV sets)
Caution: For linking functions to work properly, do not connect more
RIHD-compatible components than the quantities specified below,
to the HDMI jacks. Linking functions are not guaranteed when more
RIHD-compatible components than the below mentioned quantities
are connected. Furthermore, do not connect the AV receiver to
another AV receiver/AV amplifier via HDMI.
●● Blu-ray Disc/DVD players: up to 3.
●● Blu-ray Disc/DVD recorders: up to 3.
●● Cable TV tuner, terrestrial digital tuner, and satellite broadcasting
tuner: up to 4 units.
Checking whether the HDMI Linked Operation
Settings Are Enabled
1. Turn on the power of all connected components.
2. Turn off the power of the TV, and confirm that the power
of the connected components is turned off automatically
with the link operation.
3. Turn on the power of the Blu-ray Disc/DVD player/
recorder.
4. Start playback on the Blu-ray Disc/DVD player/recorder,
and verify the following:
●● The AV receiver automatically turns on, and selects
the input to which the Blu-ray Disc/DVD player/
recorder is connected.
●● The TV automatically turns on, and selects the input
to which the AV receiver is connected.
5. Following the instruction manual of the TV, select "Use
the TV speakers" from the menu screen of the TV, and
confirm that the audio is output from the speakers of
the TV, and not from the speakers connected to the AV
receiver.
6. Select "Use the speakers connected from the AV
receiver" from the menu screen of the TV, and confirm
that the audio is output from the speakers connected to
the AV receiver, and not from the TV speakers.
interface standard for connecting TVs, projectors, Bluray Disc/DVD players, set-top boxes, and other video
components. Until now, several separate video and audio
cables have been required to connect AV components.
With HDMI, a single cable can carry control signals, digital
video and digital audio (2-channel PCM, multichannel
digital audio, and multichannel PCM).
The HDMI video stream (i.e., video signal) is compatible
with DVI (Digital Visual Interface) (*1), so TVs and displays
with a DVI input can be connected by using an HDMI-toDVI adapter cable. (This may not work with some TVs and
displays, resulting in no picture.)
This unit supports HDCP (High-bandwidth Digital Content
Protection) (*2), so it can display picture only on HDCPcompatible components.
HDMI of the unit supports the following functions.
Audio Return Channel, 3D, x.v.Color, Deep Color, LipSync,
4K (Passthrough)
Caution:
●● Even if you set to output audio on the TV speakers, audio will
be output from the speakers connected to the AV receiver when
you adjust the volume or switch the input on the AV receiver.
To output audio from the TV speakers, redo the corresponding
operations on the TV.
●● In case of an RIHD connection with RI and RI EX audio control
compatible components, do not connect the RI cable at the
same time.
●● On the TV, when you select anything other than the HDMI
jack to which the AV receiver is connected, the input on the AV
receiver will be switched to "TV".
●● The AV receiver will automatically power on in conjunction
when it determines it to be necessary. Even if the AV receiver
is connected to an RIHD compatible TV or player/recorder, it
will not power on if it is not necessary. It may not power on in
conjunction when the TV is set to output audio from the TV.
●● Linked system functions with the AV receiver may not work
depending on the component model connected. In such cases,
operate the AV receiver directly.
●● When the player/recorder cannot be operated with the remote
controller of the AV receiver, the corresponding component may
not be programmed to support the remote controller operation of
CEC. Program the remote control code of the component maker
to the remote controller for using.
Audio Formats Supported by The Unit:
●● 2-channel linear PCM (32 - 192 kHz, 16/20/24 bit)
●● Multichannel linear PCM (up to 7.1 ch, 32 - 192 kHz,
16/20/24 bit)
●● Bitstream (Dolby Atmos, Dolby Digital, Dolby Digital
Plus, Dolby TrueHD, DTS, DTS-HD High Resolution
Audio, DTS-HD Master Audio)
●● DSD (2 channels)
Your Blu-ray Disc/DVD player must also support HDMI
output of the above audio formats.
About HDMI
About Copyright Protection:
The unit supports Revision 1.4 and Revision 2.2 (HDMI
OUT MAIN/SUB and HDMI IN1 to 3 only) of the HDCP
(High-bandwidth Digital Content Protection) (*2), a copyprotection system for digital video signals. Other devices
connected to the unit must also support HDCP.
*1
*2
*3
DVI (Digital Visual Interface): The digital display interface standard set
by the DDWG (*3) in 1999.
HDCP (High-bandwidth Digital Content Protection): The video
encryption technology developed by Intel for HDMI/DVI. It is designed
to protect video content and requires a HDCP-compatible HDMI/DVI
receiver to display the encrypted video.
DDWG (Digital Display Working Group): Lead by Intel, Compaq, Fujitsu,
Hewlett Packard, IBM, NEC, and Silicon Image, this open industry
group's objective is to address the industry's requirements for a digital
connectivity specification for high-performance PC and digital displays.
HDMI (High-Definition Multimedia Interface) is a digital
En-69
Reference Information
Caution:
●● There are some content that can be played only with HDCP Rev.
2.2 compatible devices. To play such content, connect an HDCP
Rev.2.2 compatible TV or player to the HDMI OUT MAIN/SUB
jack or HDMI IN1 to 3 jacks of the unit.
●● The HDMI video stream (i.e., video signal) is compatible with
DVI (Digital Visual Interface), so TVs and displays with a DVI
input can be connected by using an HDMI-to-DVI adapter cable.
(Note that DVI connections only carry video, so you will need
to make a separate connection for audio.) However, reliable
operation with such an adapter is not guaranteed. In addition,
video signals from a PC are not supported.
●● The HDMI audio signal (sampling rate, bit length, etc.) may be
restricted by the connected source component. If the picture
is poor or there is no sound from a component connected via
HDMI, check its setup. Refer to the connected component’s
instruction manual for details.
Home network (LAN)
The connection of several components via cables enabling
the mutual communication is called a network.
At households, many families create (generally, the term
"build" is used) a network to connect PC and gaming
machines to the Internet and to exchange data between
PC.
The network established in a relatively narrow area such as
one household is called a LAN (Local Area Network).
In this manual, a term "home network" (network for a
family) is used instead of "LAN", so this LAN becomes
more familiar.
By connecting this unit with the network server such as a
PC, playing music files in the network server (in the PC) is
possible. Moreover, by connecting to the Internet, listening
to the Internet radio is also possible.
This unit, PC, and Internet are not directly connected.
When connecting with a PC and/or Internet, several
components (network components) are necessary.
Components necessary for establishing a home
network (LAN):
Components necessary for the home network (LAN) for
using the NET function of this unit are as follows.
Router
A router is a device that controls information (data) flow
between the unit, PC, and the Internet.
As a network term, the flow of information (data) is called
En-70
"traffic". The router has a role to control the information flow
as the traffic control, between connected components.
●● A router with a built-in 100Base-TX switch is
recommended.
●● In addition, if your router has the DHCP function,
facilitating the network setting becomes possible.
●● Some routers have a built-in modem, and some Internet
Service Providers (ISP) require you to use specific
routers.
Please consult your ISP or PC dealer if you are unsure.
CAT5 Ethernet cable
The Ethernet cable is a cable that actually connects
components that comprise the network. There are straight
type and cross type Ethernet cables.
●● Use a shielded CAT5 Ethernet cable (straight-type) to
connect the unit to your home network.
Consult your cable store for details of Ethernet cable.
Network server (When PC etc./network server is
used)
Component that stores music files and provides the unit
with those files at the time of playback.
●● Requirements for use with this unit depend on the
component that is used as a network server.
●● Conditions for pleasant playback of music files on
the unit depend on the using network server (PC
performance). See instruction manuals of using
components.
Modem (when Internet radio is used)
Device that connects home network (LAN) and Internet
There are many kinds of modems depending on the forms
of Internet connection.
In addition, when connecting to the Internet, it is required
to conclude an agreement with a company that provides
Internet connection service, called ISP (Internet Service
Provider).
Use a modem that is recommended by your ISP company
for the Internet connection.
There are some devices that have both router and modem
functions.
Within above network components, prepare a router,
Ethernet cable, and network server when the NET function
"network server" is used.
For enjoying the NET function "Internet radio", it is
necessary to use the router, Ethernet cable, and modem
(and agreement with ISP).
Server Requirements
Server playback
This unit can play digital music files stored on a PC or
media server and supports the following technologies:
●● Windows MediaR Player 11
●● Windows MediaR Player 12
●● DLNA-certified media server
The network server must be connected to the same
network as this unit.
Up to 20,000 folders can be displayed, and folders may be
nested up to 16 levels deep.
Caution: Depending on the media server, the unit may not
recognize it, or may not be able to play its music files.
Remote playback
Remote playback is the function that enables this unit to
play music files saved in different components by operating
the DLNA-compliant controller component and PC in the
home network.
●● Windows MediaR Player 12
●● DLNA-certified (within DLNA Interoperability Guidelines
version 1.5) media server or controller component.
½½
The setting varies depending on the media server or controller
components. Refer to your components’ instruction manual for details.
If the operating system of your personal PC is WindowsR
8/WindowsR 7, Windows MediaR Player 12 is already
installed. For more information, see the Microsoft web site.
USB Storage Device Requirements
●● USB Mass Storage device class (but not always
guaranteed).
●● FAT16 or FAT32 file system format.
●● If the USB storage device has been partitioned, each
section will be treated as an independent device.
●● Up to 20,000 folders can be displayed, and folders may
be nested up to 16 levels deep.
●● USB hubs and USB storage devices with hub functions
are not supported. Do not connect these devices to the
unit.
Caution:
●● If the media you connect is not supported, the message "No
Storage" will be displayed.
●● Sound files that are protected by copyright cannot be played.
●● When the USB audio player and this unit are connected, the
Reference Information
●●
●●
●●
●●
●●
●●
●●
●●
●●
audio player screen and the screen of the unit may be different.
In addition, control functions of the audio player (classifying and
sorting music files and adding information, etc.) are not available
on this unit.
Do not connect a PC to the USB port of the unit. Inputting sound
to the USB port of the unit from a PC is not possible.
Media inserted to the USB card reader may not be available in
this function.
Some USB storage devices and its contents may require some
time to be read.
Depending on the USB storage device, proper reading of the
contents and proper supply of the power supply may not be
possible.
Onkyo accepts no responsibility whatsoever for the loss or
damage to data stored on a USB storage device when that
device is used with this unit. We recommend that you back up
your important music files beforehand.
Performance of the hard disk that receive power from the USB
port of the unit is not guaranteed.
If you connect a USB hard disk drive to the USB port of the unit,
we recommend that you use its AC adapter to power it.
When an audio player that are operated with batteries is used,
make sure that the batteries have enough remaining power.
This unit does not support USB storage devices with security
functions.
Supported Audio Formats
●● For server playback and playback from a USB storage
device, this unit supports the following music file
formats.
●● Music files of the following formats that can be played
depend on the network server. For example, when using
Windows MediaR Player 12, not all music files in the PC
can be played. The music files that can be played are
the ones registered to the Windows MediaR Player 12
library.
●● Variable bit-rate (VBR) files are supported. However,
playback times may not be displayed correctly.
●● This unit supports the gapless playback of the USB
storage device in the following conditions.
When WAV, FLAC and Apple Lossless files are
continuously played back with the same format,
sampling frequency, channels and quantization bit rate.
●● Remote playback does not support the gapless
playback.
●● For playback via wireless LAN, the sampling rate of
88.2 kHz or higher, DSD and Dolby TrueHD are not
supported.
Caution:
●● With remote playback on this unit the following formats are not
supported:
−− FLAC, Ogg Vorbis, DSD and Dolby TrueHD.
MP3 (.mp3/.MP3)
●● Supported formats: MPEG-1/MPEG-2 Audio Layer 3
●● Supported sampling rates: 8 kHz, 11.025 kHz, 12 kHz,
16 kHz, 22.05 kHz, 24 kHz, 32 kHz, 44.1 kHz, 48 kHz
●● Supported bitrates: Between 8 kbps and 320 kbps.
Incompatible files cannot be played.
WMA (.wma/.WMA)
WMA stands for Windows Media Audio and is an audio
compression technology developed by Microsoft
Corporation. Audio can be encoded in WMA format by
using Windows MediaR Player.
●● Supported sampling rates: 8 kHz, 11.025 kHz, 16 kHz,
22.05 kHz, 32 kHz, 44.1 kHz, 48 kHz
●● Supported bitrates: Between 5 kbps and 320 kbps.
Incompatible files cannot be played.
●● WMA Pro/Voice formats are not supported.
WMA Lossless (.wma/.WMA)
●● Supported sampling rates: 44.1 kHz, 48 kHz, 88.2 kHz,
96 kHz
●● Quantization bit: 16 bit, 24 bit
WAV (.wav/.WAV)
WAV files contain uncompressed PCM digital audio.
●● Supported sampling rates: 8 kHz, 11.025 kHz, 12 kHz,
16 kHz, 22.05 kHz, 24 kHz, 32 kHz, 44.1 kHz, 48 kHz,
64 kHz, 88.2 kHz, 96 kHz, 176.4 kHz, 192 kHz
●● Quantization bit: 8 bit, 16 bit, 24 bit
½½
For playback from a USB storage device, sampling rates of 176.4 kHz
and 192 kHz are not supported.
½½
For playback from a USB storage device, 5.1 ch is not supported.
AAC
(.aac/.m4a/.mp4/.3gp/.3g2/.AAC/.M4A/.MP4/.3GP/.3G2)
●● Supported formats: MPEG-2/MPEG-4 Audio
●● Supported sampling rates: 8 kHz, 11.025 kHz, 12 kHz,
16 kHz, 22.05 kHz, 24 kHz, 32 kHz, 44.1 kHz, 48 kHz,
64 kHz, 88.2 kHz, 96 kHz
●● Supported bitrates: Between 8 kbps and 320 kbps.
Incompatible files cannot be played.
FLAC (.flac/.FLAC)
FLAC is a file format for lossless audio data
compression.
●● Supported sampling rates: 8 kHz, 11.025 kHz, 12 kHz,
16 kHz, 22.05 kHz, 24 kHz, 32 kHz, 44.1 kHz, 48 kHz,
64 kHz, 88.2 kHz, 96 kHz, 176.4 kHz, 192 kHz
●● Quantization bit: 8 bit, 16 bit, 24 bit
½½
For playback from a USB storage device, sampling rates of 176.4 kHz
and 192 kHz are not supported.
½½
For playback from a USB storage device, 5.1 ch is not supported.
Ogg Vorbis (.ogg/.OGG)
●● Supported sampling rates: 8 kHz, 11.025 kHz, 16 kHz,
22.05 kHz, 32 kHz, 44.1 kHz, 48 kHz
●● Supported bitrates: Between 32 kbps and 500 kbps.
●● Incompatible files cannot be played.
LPCM (Linear PCM)
●● Supported sampling rates: 44.1 kHz, 48 kHz
●● Quantization bit: 16 bit
½½
Only for playback via DLNA.
Apple Lossless (.m4a/.mp4/.M4A/.MP4)
●● Supported sampling rates: 8 kHz, 11.025 kHz, 12 kHz,
16 kHz, 22.05 kHz, 24 kHz, 32 kHz, 44.1 kHz, 48 kHz,
64 kHz, 88.2 kHz, 96 kHz
●● Quantization bit: 16 bit, 24 bit
DSD (.dsf/.DSF)
●● Supported sampling rates: 2.8224 MHz, 5.6448 MHz
½½
For playback from a USB storage device, 5.6448 MHz is not supported.
Dolby TrueHD (.vr/.mlp/.VR/.MLP)
●● Supported sampling rates: 48 kHz, 64 kHz, 88.2 kHz,
96 kHz, 176.4 kHz, 192 kHz
½½
Only sampling rates of 48 kHz is supported for playback from USB.
½½
Playback via DLNA is not supported.
½½
For playback from a USB storage device, 7.1 ch is not supported.
Radio Wave Caution
The AV receiver uses a 2.4 GHz radio wave
frequency, which is a band used by other wireless
systems as 1 and 2 described below.
1. Devices which use a 2.4 GHz radio wave frequency
●● Cordless phones
●● Cordless facsimiles
●● Microwave ovens
●● Wireless LAN devices (IEEE802.11b/g/n)
●● Wireless AV equipment
●● Wireless controllers for game systems
●● Microwave oven-based health aids
●● Video transmitter
●● Specific type of external monitor and LCD display
En-71
Reference Information
2. Less common devices which use a 2.4 GHz radio wave
frequency
●● Anti-theft systems
●● Amateur radio stations (HAM)
●● Warehouse logistic management systems
●● Discrimination systems for train or emergency
vehicles
If these devices and the AV receiver are used at the same
time, the audio may be undesirably stopped or disturbed
due to a radio wave interference.
Suggestions for improvement
●● Switch off the devices which emit the radio wave.
●● Place the interfering devices away from the AV
receiver.
●● The AV receiver uses radio wave, and a third person can
receive the wave on purpose or accidentally. Do not use
the communication for important or fatal matters.
●● We assume no responsibility whatsoever for any error
or damage of network environment or access device
resulting from the use of this apparatus.
Confirm with the provider or access device maker for
more information.
Scope of Operation
Use of the AV receiver is limited to home use.
(Transmission distances may be reduced depending on
communication environment.)
In the following locations, poor condition or inability to
receive radio waves may cause the audio to be interrupted
or stopped:
●● In reinforced concrete buildings or steel framed or iron
framed buildings.
●● Near large metallic furniture.
●● In a crowd of people or near a building or obstacle.
●● In a location exposed to the magnetic field, static
electricity or radio wave interference from radio
communication equipment using the same frequency
band (2.4 GHz) as the AV receiver, such as a 2.4 GHz
wireless LAN device (IEEE802.11b/g/n) or microwave
oven.
●● If you live in a heavily populated residential area
(apartment, townhouse, etc.) and if your neighbor’s
microwave oven is placed near your AV receiver, you
may experience radio wave interference. If this occurs,
move your AV receiver to a different place.
When the microwave oven is not in use, there will be no
radio wave interference.
En-72
Radio Wave Reflections
The radio waves received by the AV receiver include the
radio wave coming directly from the devices and waves
coming from various directions due to reflections by walls,
furniture and building (reflected waves). The reflected
waves (due to obstacles and reflecting objects) further
produce a variety of reflected waves as well as variation
in reception condition depending on locations. If the audio
cannot be received properly due to this phenomenon, try
moving the location of the wireless LAN device a little.
Also note that audio may be interrupted due to the reflected
waves when a person crosses or approaches the space
between the AV receiver and the wireless LAN device.
●● We assume no responsibility whatsoever for any
damages resulting from the use of this apparatus except
in the cases deemed acceptable under the applicable
laws and regulations.
●● Operation in all environment is not guaranteed for
wireless LAN. The communication may not be possible
or have desirable communication speed.
Precautions
●● Do not use this apparatus near an electronic device
handling high-accuracy controls or weak signals. Doing
so may cause an accident due to a malfunction of the
device.
●● Do not use this apparatus in use prohibited location
such as an aircraft equipment or a hospital. Doing so
may cause an accident due to a malfunction of an
electronic device or an electro-medical apparatus.
Follow the instructions of the medical facilities.
Electronic device which requires cautions
Hearing aid, pace maker, other medical electronic devices,
fire alarm, automatic door, and other automatic control
device.
When using a pace maker or other medical electronic
devices, confirm with the medical electronic device maker
or dealer for the effect of the radio wave.
Reference Information
Remote Control Codes
Amstrad
Television (A to E)
A.R. Systems
ACCENT
Acoustic Solutions
Anam
Andersson
Anitech
Ansonic
AOC
Action
Adcom
Addison
Admiral
AEG
Affinity
Aftron
Aiko
Aim
Akai
Akiba
Akito
Akura
Alba
Alfide
Alien
Allstar
10037, 10556
10037
11667, 11585,
11523, 11037
10650
10625
10653, 11150
10093
12197, 11037,
12239
13717, 13870,
13577
13478
10037
10037
12676, 10812,
10037, 10672,
10208, 10714,
11523, 13067,
12414, 13183,
10178, 10556,
12197
10037
10037
12289, 10037,
11667, 10714,
10668, 11585,
10171, 11037,
11498, 11687,
11983, 12239
12676, 11037,
10037, 10668,
10714, 11585,
13005, 13067,
13790, 11667,
12104, 12561
10672
11037
10037
Apex Digital
Apollo
Ardem
Arena
Ario
Aristona
ART
Art Mito
AS
Asberg
Astra
ATD
Atlantic
Atvio
Audiosonic
Audio-Technica
Audiovox
Audioworld
Auria
Autovox
Aventura
Axxon
Azuki
B&O
Baier
Baird
10037, 10171,
11037
10037, 10650
12676, 11585
10037
10668, 10037
11589, 12769,
11365, 13720,
12014, 12087,
13790, 10093,
10178, 10625,
11150
12397
12239
10714, 10037
10037
12397
10556, 10037
11037
11585, 11667
11667, 11585,
11523, 11037
10037
10037
10698
10037
13636
10714, 12104,
10037, 13067,
11983
10000, 10093,
10150, 11150
11769
10698
12087, 12014
12676
10171
10714
12239
10620
12239
10208
Bang & Olufsen
Barco
Base
Basic Line
Bauer
Baur
BBK
Beaumark
Beijing
Beko
Bell & Howell
Belson
Belstar
BenQ
Beon
Berthen
Bestar
Bexa
BGH
Black Diamond
Blaupunkt
Blue Sky
BlueDiamond
Bluetech
bogo
BPL
Brandt
Brinkmann
Brionvega
Britania
BuBuGao
10620
10556
10698
10037, 10668,
11037, 10556
12197
10037, 10512,
10195
12098, 11523
10178
10208, 10812
10714, 12125,
10037, 12239
10017
10698, 11667
11037
12563, 11562,
11523
10037
10556, 10668
10037
12493
14070, 14029,
10898, 12414,
12098
11037
10195, 12426
10714, 10037,
11037, 10668,
10556, 10625
12426
12561
12561
10208, 10037
10625, 11585,
10714
10037, 10668
10037
12414
12098, 11523
Bush
Byd:sign
Cameron
Camper
Carad
Carena
Carrefour
Cascade
Casio
Cathay
CCE
Celcus
Celebrity
cello
Centrum
Centurion
Changhong
Chiawin
Chimei
CHL
Chung Hsin
Chunyun
Cinema
Clarivox
Clatronic
Clayton
CME
CMX
11037, 10037,
12676, 10668,
10714, 13790,
13005, 11667,
11687, 11983,
10556, 12125,
10208, 11585,
12104, 10698,
11589, 12673,
12964
12209
11523
10037
11037, 10668
10037
10037
10037
10037
10037
13782, 14091,
10037
12676, 11585
10000
12673
11037
10037
13434, 12769,
11498, 10508,
10208
10810
12769
13067
11150
10000, 11150,
11687
10672
10037
10037, 10714
11037
10037, 10512
13332, 13067
En-73
Reference Information
Coby
Commercial Solutions
Condor
Conia
Conrowa
Contec
Cosmel
CPTEC
Crosley
Crown
Crown Mustang
Crypton
Currys Essentials
Curtis
Curtis Mathes
Cyberpix
Daenyx
Daewoo
Dansai
Dantax
Datsura
DAWA
Daytek
Daytron
De Graaf
Decca
Dell
Denver
Desmet
En-74
13478, 12315,
13627
11447
10037
11498, 11523,
11687
10698
10037
10037
10625
10000
10037, 10714,
10208, 10672,
11037, 10668
10672, 10898
11667
12486
12855, 13577,
12466, 12352,
13895, 12397,
13636, 13382,
14035
10093
11667
10672
10634, 10037,
10672, 10556,
12098, 10178,
11150, 12125
10037, 10208
11037, 12676,
10714, 11667
10208
10037
10672
10037
10208
10037
11863
12197, 13067,
10037, 12239
10037
Devant
DGM
12098
12239
Diamant
Diamond
Dick Smith
Electronics
Digatron
Digihome
Digiline
Digimate
Digisonic
Digitor
Digitrex
Dikom
diVision
Dixi
DNS
Domeos
Donghai
10037
10698, 10672
10698
Drean
DSE
Dual
Dumont
Durabrand
Dux
D-Vision
DX Antenna
Dynatron
Dynex
E.S.C.
Easy Living
ECE
ECG
Eiki
10037
12676, 11667
10037, 10668
12239
11826
10698, 10037
13067
12561
12197, 12239
10037
13434
10668
10037, 10668,
11037
10037
10698
12197, 11037,
12676, 11667,
10037, 11585,
10714
10017
10171, 10178,
10714, 11037
10037
12197, 10037,
10556
13817
10037
12049
10037
12104
10037
12197, 12125
10735
Elbe
Electroband
Electrograph
Electrohome
Electrolux
Electron
Elektra
Element
10037, 10556
10000
11755
11670
11585
12466, 12855
10017
13559, 11687,
12183, 12964,
13907, 11886,
12256
Elfunk
11037
ELG
10037
Elin
10037
Elite
13867, 10037
Emerson
11864, 11394,
10171, 11886,
10178, 10037,
13623, 12183,
10668, 10714,
13559
e-motion
12426
Enox.
12673
Envision
11589, 11365,
12087, 12014,
11506
Epson
11379
EQD
12014, 12087
EQD Auria
12014, 12087
Erisson
13183
Erres
10037
ESA
10812, 10171
Essentials
12486
Euroman
10037
Europa
10037
Europhon
10037
Evesham Technology 11667
Evotel
12561
Excello
11037
Exquisit
10037
Television (F to J)
F&U
FairTec
Favi
Fedders Lloyd
Ferguson
Fidelity
Finlandia
Finlux
Firstline
Fisher
Flint
Fluid
Formenti
Fortress
Fraba
Friac
Frigidaire
Fujimaro
Fujimaru
Fujitsu
Fujitsu Siemens
Funai
Funai United
Furrion
Gaba
Galaxi
Galaxis
Gateway
12676
11585
13382
13639
10625, 11037,
13005, 10037,
12426, 10195,
11585, 12676
10037, 10512,
10171
10208
11667, 12676,
10714, 10037,
10556
10714, 10037,
10668, 11037,
10208, 10556
11585, 10208
10037
12964, 13907
10037
10093
10037
10037
11826
11498, 11687
11687
10809
10809
13817, 10171,
11394, 10000,
11037, 10714,
10668, 11864
12676
13332
11037
10037
10037
11755
Reference Information
GE
GEC
General Electric
Genesis
Genexxa
GFM
Gibralter
Gibson
Gintai
Godrej
GoGen
Goldfunk
GoldStar
Goodmans
Gorenje
Gradiente
Graetz
Gran Prix
Granada
Grandin
Grundig
Grunkel
11447, 10178,
10735, 10625,
10093, 11454
10037
11447, 10178,
10735, 10625,
10093, 11454
10037
10037
10171, 11864,
11886
10017
11826
11150
11585
12676, 11585
10668
10178, 10037,
10714, 13183,
11150
10037, 11037,
10634, 11667,
10668, 11523,
11585, 11687,
11983, 10714,
10556, 10625,
12426, 12676
11585, 12676
10037
10714
12197
10037, 10208
10037, 10714,
10668, 11037,
10556, 12125
10195, 11223,
12125, 12239,
10556, 10037,
11523, 11667,
13067, 10672,
12561, 12676
11523
GVA
Haier
Hallmark
Handic
Hankook
Hannspree
Hanseatic
Hantarex
Hantor
Harwood
Hauppauge
Havermy
HB
HB Ingelen
H-Buster
HCM
Heran
Herosonic
Highline
Hikona
Hinari
HiPlus
Hisawa
Hisense
12098, 13067
12876, 11749,
12309, 13382,
11753, 13620,
13613, 13429,
10698, 11983,
12293, 13790,
13987, 10037,
10508
10178
12676
10178
11826
10037, 10634,
10714, 10625,
10556
12197, 10037
10037
10037
10037
10093
10714
10714
13620, 13419
10037
11826
11826
10037
11983
10037, 10208
11826
10714
12846, 12098,
13519, 12183,
10556, 13123,
10508, 14029,
10208, 13382
Hitachi
Hitachi Fujian
Hitec
Hiteker
Hoher
Hongmei
Hornyphon
Hua Tun
Hypson
Hyundai
Iberia
ICE
iLo
Imperial
Indiana
Ingelen
Ingo Devices
Inno Hit
Innova
Insignia
Integra
Inteq
Interbuy
Interfunk
Internal
Intervision
Irradio
11643, 12676,
11576, 11585,
11037, 11691,
13317, 11667,
10634, 13639,
10037, 10679,
12170, 12846,
10150, 10178,
10508, 11150
10150
10698
13118
10714, 13434
10093
10037
11150
10037, 10714,
10556, 10668,
11037
10698, 12414,
12676, 11037,
11523
10037
10037
11394
10037
10037
10714
12239
11585, 11037
10037
12049, 11423,
10171
11807, 13100,
13500
10017
10037
10037, 10512
10556
10037
10037
IRT
Isis
Isukai
iSymphony
ITS
ITT
ITT Nokia
ITV
James
Jay-tech
JC Penney
JCB
JCM
Jinfeng
Jinxing
JMB
JTC
Jubilee
JVC
10698
12676
10037
13429, 13382,
13118
10037
12675, 12125,
12676, 10208,
11523
10208
10037
13183
13067
10178
10000
12256
10208
10556, 10037,
10698
12676, 10634,
10556, 12426
13067
10556
11774, 11653,
11601, 11818,
10653, 12321,
12271, 11428,
13650, 11670,
12676, 14070,
10650, 10093,
10508
Television (K to N)
Kaisui
Karcher
Kathrein
KDS
Kendo
Kennex
10037
12125, 10714
10556
11498, 11687
11037, 11585,
12676, 10037
11037
En-75
Reference Information
Kioto
Kiton
KLL
Kneissel
Kolin
Kolster
Konig
Konka
Korpel
Kosmos
Kunlun
Kuppersbusch
L&S Electronic
Lavis
Leader
Lecson
Legend
Lenco
Leyco
LG
Liberton
Liesenkotter
Lifetec
Linetech
Linsar
Lloyd
Lodos
En-76
10556
10037, 10668
10037
10037, 10556
11610, 10150,
11755, 10037,
11150
10037
10037, 10512
12881, 13419,
10037, 10714
10037
10037
10208
12676
10714
11037
12876
10037
12397, 12309
12676, 11983,
10037, 11037
10037
11840, 11860,
11423, 12731,
12182, 12358,
10178, 12362,
13941, 12424,
10037, 10714,
10017, 10556,
10698, 11753
13183
10037
10668, 10037,
11037, 10714
12676
12676, 11667,
11585
13639
11037
Loewe
Logic
Logik
Logix
Luma
Lumatron
Lumenio
Lux May
Luxor
LXI
Madison
MAG
Magnavox
Magnum
Manesth
Manhattan
Marantz
Mark
Marks & Spencer
Mascom
Masters
Mastro
Masuda
Matsui
Matsushita
Maxent
10512, 10633,
10037
11585
13432, 13005,
12486, 11037,
10698, 11585,
11687
10668
10037, 11037
10037, 10668
10037
10037
12676, 11037,
10208
10178, 10017
10037
11687, 11498
13623, 11866,
12372, 11454,
11506, 10171,
11365, 11755,
11867
10714, 10037
10037
10037, 11037,
10668
10037, 10556,
11454
10037, 10714
12673
12197, 12125
10037
10698
10037
10037, 10195,
10208, 12486,
11037, 10714,
11667, 12676,
10556, 12561
10650
11755
Maxess
Meck
Mediator
Medion
Megatron
MEI
Melectronic
Memorex
Memory
Mercury
Mermaid
Metronic
Metz
MGA
Micromaxx
Microsonic
Midland
Mikomi
Minato
Minerva
Ministry Of Sound
Minoka
Miray
Misakai
12493
10698
10037, 10556
12676, 10714,
10037, 10668,
11037, 11585,
11667, 10512,
12239, 13067,
10556, 10698,
12563
10178
11037
10037, 10195,
10634, 10512,
10714
11687, 11037,
11670, 10178,
10150
11983
10037
10037
10625
11037, 10668,
10195
10150, 10178
10037, 10668,
10714, 11037
13419
10017
11585, 11667
10037
10195
11667
10037
12414, 13183,
10898
10171
Mitsubishi Electric
Mivar
Moree
Morgan's
Moserbaer
Motorola
MTC
MTlogic
Mudan
Multitec
Multitech
Murphy
Mx Onda
Myryad
Mystery
NAD
Naiko
Nakimura
National
Naxa
NEC
Neckermann
NEI
Neoka
Neon
Netsat
NetTV
Neufunk
Nevir
11250, 12313,
10150, 10178,
10512, 11797,
10093, 10556,
10037, 11150,
11037, 11171
10609
10037
10037
11585
10093
10512
10714, 12104
10208
11037, 10037,
10668
10037
12673
11983, 11498,
11687
10556
13047
10037, 10178
10037
10037
10208, 10508
12104, 13382
11797, 13257,
12293, 12461,
11585, 10037,
10178, 10508,
10653, 11150
10037, 10556
10037, 11037
11826
12673
10037
11755
10037, 10556,
10714
12676
Reference Information
New Acoustic
Dimension
New Sonic
New Tech
Newave
NEX
Nexus Electronics
Nikkai
Nikkei
Nikko
Nimbro
Noblex
Nokia
Norcent
Nordmende
Normerel
Nortek
Novatronic
Novex
Novita
NPG
10037, 10178
11826
10037, 10556
10093, 10178,
11150
13861
12183
10037
12197, 10714
10178, 10017
12104
14029
10208
11365, 11589
13419, 13861,
10037, 10195,
11585, 13835,
10714, 11667
10037
10668
10037
11523
11585
13434
Okano
OKI
Olevia
Omni
Onei
Onida
Onn
Opera
Optimus
Optoma
Optonica
Orava
Orbit
Orion
Orline
Ormond
Osaki
Osio
Osume
Otic
Otto Versand
Pacific
Television (O to S)
O.K.Line
Oceanic
OK Line
OK.
Onimax
Onix
Onkyo
11037
10208
11037
13434, 12676,
13047
10037
11667, 12676,
12125, 13434,
11585
11610
10698
11667
10653, 12414
Palladium
Palsonic
Panama
Panasonic
Panavideo
10714
10698
11807, 13100,
13500
12125, 11667
10037, 10714
10650, 10679
12796
10093
11037
10037
12108, 10037,
12676, 10556,
10714, 11037,
11667, 13540,
13650
10037
10668, 11037
10037, 10556
10037
10037
11983, 11498,
11687
10037, 10512,
10093, 10556,
10195
10714, 11037,
10556
10037, 10714,
10556
12461, 10698,
13067, 10037
10037
11636, 11480,
11291, 10650,
11650, 13825,
12170, 10037,
10093, 10150,
10178, 10208,
10508
13825
Panavision
Panavox
Panda
PARK
Penney
Peony
Perdio
Perfekt
Philco
Philips
Phocus
Phoenix
PHOENIX Apollo
Phonola
Pioneer
PJ
Planar
Plantron
Playsonic
10037
13835
10698, 10208,
10508
12104
10178
10208
10037
10037
10171, 13426,
12414, 11394,
10037, 10178,
13639
11887, 11867,
10037, 12372,
12800, 10556,
13614, 11506,
11744, 12768,
12680, 11454,
10639, 11866,
10017, 10512,
13623, 10171,
12769, 11365,
11394, 10000,
10178, 11589
10714
10037
12239
10037, 10556
10679, 11457,
10037, 10698,
11636, 10512,
12171
11506
10679, 14247,
11589
10037
10714, 10037
Polaroid
Powerpoint
Premier
Prestiz
Prima
Prinston
Pro Vision
Profitronic
ProLine
Proscan
Prosonic
Protech
Proton
Proview
Proxima
Pulsar
Pye
Q.Bell
Quadro
QuantumFX
Quasar
11523, 11769,
11498, 11687,
11767, 12676,
14035, 12125,
11826
10037, 10698
13419, 13183,
13793
13419
11753, 10037,
11749, 12461,
10698
11037
10037, 10556,
10714, 12197
10037
10625, 10634,
10037, 11037,
12676
11447, 12183,
12256, 13577,
13382, 13332,
13717, 13895,
12746, 13636,
14035
10714, 12676,
12125, 10668,
12197, 10037,
11523, 11585,
11667
10037, 10668,
11037
10178
11687, 11498
10735
10017
10037, 10556
12561
11667
12337
11291, 13899,
10650
En-77
Reference Information
Quelle
Radiola
Radiomarelli
Radionette
RadioShack
Radiotone
RCA
Realistic
Recco
Reconnect
Recor
Rectiligne
Red Star
Reflex
RefleXion
Relisys
Relon
Remotec
Reoc
Revox
RFT
R-Line
Roadstar
En-78
10037, 10512,
11037, 10195,
10668
10037, 10556
10037
10714
10178, 10037
10037, 10668,
11037
12746, 12434,
12932, 11447,
12247, 13577,
11781, 10625,
12187, 13382,
10679, 13332,
13717, 10093,
13793, 12183,
12855, 13419,
10000, 10178,
10618, 11454,
13426, 13636
10178
10898, 13183
13183
10037
10037
10037
10037, 10668,
11037
12239
11585
11826
10037, 10093,
10171, 11150
10714, 12197
10037
10037
10037
11037, 10037,
10714, 10668
Rolsen
Rowa
RTF
Runco
Saba
Saga
Sagem
Saivod
Salora
Sampo
Samsung
Sandstrom
Sansui
Sanyo
Sanyuan
12098, 13067,
13434
10898, 13047,
10698, 11038,
13001, 10037
10037
10017
10625, 12676,
10714
12197
10618
10668, 11037,
10037, 11667
12197, 12676,
12239, 12125,
13067, 10208
11755, 10898,
13419, 10093,
10171, 10178,
10650
12051, 10812,
11632, 10618,
11458, 11630,
12953, 10037,
10556, 10650,
10178, 10208,
11150
12197, 13047
13540, 11670,
13564, 10037,
10898, 10171,
10714, 13559
11142, 10208,
11585, 12676,
12461, 12994,
10735, 11974,
12881, 12769,
13488, 11498,
11365, 10508,
11037, 11150,
11667, 13861
10093
Save
SBR
Sceptre
Schaub Lorenz
Schneider
Schontech
Scotch
Scott
Sears
Seaway
Seelver
SEG
SEI
Seiki
Seiko Epson
Sei-Sinudyne
Semp
Semp Toshiba
Sencor
Senzu
Serie Dorada
Serino
Shanghai
Sharp
Sheng Chia
10037
10037, 10556
13899, 12528,
12337
10714, 12676,
12125, 12197,
11667, 12289
10037, 10714,
10556, 11037,
10668, 11585,
12676
11037
10178
10178, 11983
10171, 10178
10634
10556, 11037
12673, 11037,
10037, 10668,
12125, 11523,
10634, 13434
10037
13953, 12964,
13559, 10178
11379
10037
11743, 13793
11743, 13793
13067, 12197,
10714
12493
10178
10093
10208
12360, 11659,
10818, 10093,
12951, 11393,
12676, 13867,
10650, 11165,
11423
10093, 11150
Shinelco
Shintoshi
Shivaki
Siam
Siemens
Siera
Silva
Silva Schneider
SilverCrest
Sinudyne
SKY
Sky Brasil
Skyworth
SLX
Sogo
Solavox
Soniko
Soniq
Sonitron
Sonneclair
Sonoko
Sonolor
Sontec
Sontech
Sony
Soundesign
Soundwave
SOVOS
Sowa
Soyea
12104
10037
12197, 10178,
10037
10037
10195, 10037
10556, 10037
10037
12197, 10037,
12125
12676, 11037
10037
10037
10037
12899, 12963,
12889, 12769,
10037, 10698
10668
13067
10037
10037
12493, 13005
10208
10037
10037
10208
10037
11983
12778, 10810,
11825, 10000,
11651, 11551,
11625, 11505,
11317, 10150,
11150, 10093,
11167
10178
10037, 11037,
12673
12239
10178, 11150
10698, 11743
Reference Information
Soyo
Spectroniq
Squareview
SR Standard
Starion
Starlite
STI
Strato
SunBriteTV
Sunic Line
Sunkai
Sunny
Sunstar
Sunstech
Sunwood
Superior
Superscan
Supersonic
SuperTech
Supra
Supreme
SVA
Svasa
Swisstec
Sylvania
Symphonic
Synco
Syntax
Sysline
11826
11498, 11687
10171
10037, 11037
11037
10037
13793
10037
12337, 12528,
11610
10037
10037, 11523
10037
10037
12676
10037
11585
10093, 10171
10208, 11753,
12104
10037, 10556
10178
10000
11498
10208
12106, 12104
10171, 11864,
11886, 11394
10171, 11394
11755, 11826,
10000, 10093,
10178
11610
10037
Television (T to Z)
Tacico
Tai Yi
Talent
10178, 11150
11150
10178
Tandy
Tashiko
Tatung
Tauras
TCL
TCM
Teac
Tec
Tech Line
Technica
Technical
Technics
Technika
TechniSat
Technisson
Techno
Technosonic
Techwood
Tecnimagen
Teco
Tedelex
Teknika
10093
10650, 11150
10037, 11150,
11687
12197
13047, 13183,
12434, 13001,
10898, 11038,
12414, 13426,
12675, 10698
10714
10037, 11037,
10698, 10714,
11755, 10898,
10178, 10668,
10171, 10512,
11983, 13005
10037
10037, 10668,
11585
11037, 12106,
12426
12676, 11667
10017, 10556,
10650
12426, 12106,
12197, 11667,
11983, 12676,
13005, 12125,
13067
10556
10714
11585
10556, 10625
12676, 11667,
11037
10556
10093, 10178,
10653, 11523,
11687
10208
10150
TELE System
Telecor
Telefunken
Telefusion
Telegazi
Telemagic
Telemeister
Telesonic
Telestar
Teletech
Teleview
Tennessee
Tensai
Terris
Tesco
Tesla
Tevion
ThemeScene
Thomas
Thomas America
Thomson
Thorn
Tiane
TMK
TNCi
Tokai
11585, 12125
10037
10625, 12676,
12414, 10698,
12239, 11585,
11667, 10037,
10714
10037
10037
10735
10037
10037
10037, 10556
10037, 10668,
11037
10037
10037
10037, 11037
11667
12426
11037, 10037,
10556, 10714
10714, 12426,
10668, 11037,
12125, 10037,
10556, 11498,
11585, 11667,
11687, 12197,
12289
12796
10625
10625
10625, 13047,
12675, 11447,
10037
10037, 10512
10093
10178
10017
10037, 10668,
11037
Tokaido
Tophouse
Topline
Toshiba
Tosonic
TRANS-continents
Transonic
Triad
Trio
Triumph
Tucson
TVE
TVTEXT 95
Uher
Ultravox
UMC
Unic Line
Uniden
United
Universal
Universum
Univox
V7 Videoseven
Vanguard
VD-Tech
11037
10672, 10698
10668, 11037
11508, 11524,
11656, 13323,
12676, 12598,
10508, 12724,
13570, 11743,
10650, 10618,
12108, 11037,
10093, 10195,
11150, 11169
11508
10037, 10556,
10668, 11037
10037, 10698,
10512
10556
11498, 11687
10037, 10556
12676
12239
10556
10037
10037
12106, 12426
10037
12122, 12676,
11667
10714, 11037,
10037, 10556,
11523, 11983,
12125, 13434
10037, 10714
10037, 11037,
10512, 10668,
10618, 10195
10037
11755
10037
13067, 13332
En-79
Reference Information
Venturer
Vestel
Vexa
Victor
Videocon
Videoseven
VideoSystem
Vidikron
Vidtech
Viewsonic
Viore
Visa
Vision
VisionPlus
Visual Innovations
VIZIO
Vortec
Voxson
VU
Walker
Waltham
Wansa
Wards
En-80
13005
11037, 11585,
10037, 12676,
10668, 11667
10037
11428, 10000,
10093, 10150,
11150, 10650,
10653
10508, 10037
11755
10037
10735
10178
12014, 12745,
12087, 13706,
11755, 11627,
12049, 11365
12352, 13382,
13118, 13429,
12104
10037
11826, 10037
12426, 12106
12106
11758, 13758,
12707, 12757,
13415, 12512,
13174, 12209
10037
12197, 10178,
10037, 11667
12098, 11365
12676, 11667,
11585
10037, 11037,
10668
12098
10178, 10017,
10000
Watson
WeCube
Wega
Welltech
Weltstar
Westinghouse
Westwood
Wharfedale
White Westinghouse
Wilson
Windsor
Windy Sam
Wintel
Wyse
Xenius
Xiahua
Xiron
XLogic
Xoceco
Xogego
Xoro
Xpeer
XRYPTON
Yamaha
Yamishi
Yokan
Yoko
YU-MA-TU
11037, 10037,
10668, 10714
11860
10037
10714
11037
11712, 13579,
13382, 13949,
11826, 12293,
11755, 12397
11585
11983, 11667,
10037, 10556
10037
10556
11037, 10668
10556
10714
11365
11667, 10634,
11585, 12676
11753, 10037,
11749, 12461,
10698
11983, 11037
10698
11753, 10037,
11749, 12461,
10698
11753, 10037,
11749, 12461,
10698
13067
12051
10037
11576, 10650
10037
10037
10037
10037
Zenith
Zepto
Ziggo
Zonda
10017, 10178,
11423, 10000,
12731, 11365,
12358, 12362
11585
11818
10698
TV DVD Combination
Akai
32966
Alba
32966
Black Diamond
30713
Blue Sky
30713
Bush
30713, 32966
Celcus
32966
Centrum
30713
Crown
30713
Dantax
32966
Digihome
32966
Dual
32966, 30713
Elfunk
30713
Emerson
30675
Ferguson
30713, 32966
Finlux
32966
Funai
30675
Goodmans
30713, 32966
Grandin
30713
Grundig
30539, 32966
Hitachi
32966, 30713
Hyundai
32966
Insignia
32095
JMB
32966
JVC
32966
Kuppersbusch
32966
Linetech
32966
Linsar
32966
Logik
30713
Luxor
32966, 30713
Matsui
30713, 32966
Medion
32966
Mitsubishi Electric
OK.
OKI
Orava
Orion
Panasonic
Philips
Polaroid
ProLine
Prosonic
Saba
Salora
Sanyo
SEG
Sharp
Sony
Soundwave
Sylvania
Symphonic
Technica
Technical
Techwood
Telefunken
Teletech
Thomson
34004
32966
32966
30713
30713
32859
30539
32966
32966
32966
32966
32966
32966
30713
32966, 30630
30864
30713
30675, 30630
30675
30713
32966
32966
32966
30713
30551
Toshiba
United
Universum
Walker
Waltham
Weltstar
Xiron
32966
30713
30713
32966
30713
30713
30713
DVD
3D LAB
Accurian
Acoustic Solutions
AEG
Aitro
30539
30675
30730, 30713
30675, 31643,
30770, 31233
32095
Reference Information
Aiwa
Akai
Akura
Alba
Amitech
Amphion MediaWorks
Amstrad
AMW
Ansonic
Anthem
Anthem Statement
Aristona
Arrgo
AS
ASDA
Audio Authority
Audix
Autovox
Awa
Axion
Basic Line
Beko
Bel Canto Design
Belson
Berthen
Best Buy
Black Diamond
Blu:sens
Blue Parade
Blue Sky
Brainwave
Brandt
Bush
Byd:sign
California Audio Labs
Cambridge Audio
CCE
30533
32966, 30770,
31233, 30675
31233
32966, 30713,
30539, 30730
30770
30872
30713, 30770,
32139
30872
30831
32820
32820
30539, 30646
31023
30730, 30713
32213
32555
30713
30713
30730, 30872
30730
30713
30831
31571
32139
31643
32139
30713
31233
30571
30713
30770
30551, 30503
30713, 30730,
30831, 32966
30872
30490
32808
30730
Celcus
Centrum
Changhong
Cinea
Cineral
Cinetec
CJ Digital
Classic
Clatronic
Clayton
CMX
Coby
Codex
Continental Edison
Craig
Crown
Cybercom
CyberHome
Daenyx
Daewoo
Dansai
Dantax
Datsun
Daytek
Dayton Audio
DCE
Decca
Denon
Denver
Dewo
Dick Smith Electronics
Digihome
DigiLogic
DiK
Dikom
Disney
32966
30713, 30675
30627
30831
30730
30713, 30872
31643
30730
30675, 31233
30713
31643
32494, 30730
31233
30831, 30872
30831
30713, 30770
30831
31023
30872
30770, 30872,
30490
30770
30713, 30539,
32966
31233
30872
30872
30831
30770
31634, 32258,
30490, 32748,
33851
31643
31634
32095, 30675
32966, 30713
30713
30831
32494
30675, 30831
DK Digital
Donghai
Dragon
DSE
Dual
Durabrand
Dynex
E:max
ECC
Electrocompaniet
Elfunk
Elin
Elite
Elta
Eltax
Emerson
Enterprise
Epworth
EuroLine
Ferguson
Finlux
Firstline
Funai
GE
General Electric
GFM
G-Hanz
G-HanzS
Go Video
GoGen
GoldStar
Goodmans
30831, 32095,
31643
31233
30831
32095, 30675
30831, 30730,
30713, 32966,
31023
30713, 30675,
31023, 30831
32596
30770, 31233,
31643
30730
32545
30713
30770
32854
30770, 31643,
31233
31233
30675, 30591,
32213
30591
30533
30675, 31233,
31643
30713, 32966
32966, 30770,
30591, 30741
30713
30675
30522
30522
30675
32213
32213
31044, 30741
32139
30741, 30591
30713, 30730,
32966
GoWell
GPX
Gran Prix
Grandin
Grundig
Grunkel
GVG
H&B
Hanseatic
Harman/Kardon
HE
Hello Kitty
Hen°
Hitachi
Hoher
Home Electronics
Home Tech Industries
Humax
HYD
Hyundai
Ingersoll
Inno Hit
Insignia
Integra
Irradio
ITT
Jamo
JDB
JMB
JVC
31643
30741
30831
30713, 31233
30539, 30551,
30713, 31643,
32966
30770, 30831
30770
30713, 31233
30741
30582, 33228,
32927
30730
30831
30713
30573, 32966,
30713, 31664
30713, 30831,
31643
30770, 30730
31643
30646
31233
32966
31023
30713
32095, 32596,
32428, 30675,
30741
30627, 32147,
31769, 31634,
30571, 30503,
31612
31233, 30646
31233
32358
30730
32966
30623, 31602,
32365, 32612,
32855, 32966
En-81
Reference Information
Kansas Technologies
Kendo
Kennex
Kenwood
KeyPlug
Kiiro
KingVision
Kuppersbusch
Leiker
Lenco
Lenoxx
Lexicon
LG
Lifetec
Linetech
Linsar
LM
Lodos
Loewe
Logik
Lumatron
Lunatron
Luxman
Luxor
Magnavox
Manhattan
Marantz
Mark
Marquant
Matsui
Maxim
MBO
McIntosh
MDS
Mecotek
En-82
31233
30713, 30831
30713, 30770
30534, 30490
31643
30770
31643
32966
30872
30713, 30770
32213
32545
30741, 32811,
31602, 30591,
31233
30831
32966
32966
31643
30713
30741, 30539
30713
30713, 30741
30741
30573
32966, 30713
30675, 31354,
30503, 30539,
30646, 31506,
33488, 30713
30713
30539, 32481,
32414, 33444
30713
30770
30713, 32966
30713, 30872
30730
31273
30713
30770
Medion
Memorex
Metz
Micromedia
Micromega
Microsoft
Microstar
Minax
Minoka
Mitsubishi Electric
Mizuda
Mustek
Muvid
Mystral
NAD
Naiko
NEC
Neom
Nevir
New Acoustic
Dimension
Nisato
Noblex
Norcent
Nordmende
Nortek
OK.
OKI
Omni
One For All
Onkyo
Oppo
Optimus
Orava
Orbit
30831, 32966,
30741, 30630
30831, 32213,
33153
30713, 30571
30503, 30539
30539
31708, 32083,
32202, 30522
30831
30713
30770
31521, 34004,
30713
30770
30730
31643
30831
30741
30770
30741, 31602
31643
30831, 30770
30741
31233
31233
30872
30831
31643
32966
32966
32139
32555
30627, 32147,
30503, 31769,
31612, 30571,
31634
32545, 30575
30571
30713
31643, 30872
Orion
Ormond
Pacific
Packard Bell
Palladium
Panasonic
Philco
Philips
Pioneer
Play It
Polaroid
Polk Audio
Portland
Powerpoint
Presidian
Prinz
Prism
Pro Vision
ProLine
Proscan
Proson
Prosonic
Pye
Radionette
Radiotone
RCA
30713, 31233
30713
30831, 30713
30831
30713
31641, 30490,
33641, 31579,
33580, 33862,
32710, 32859,
32523, 30503
30675
32056, 30539,
31354, 32789,
30646, 32434,
31506, 32334,
31340, 30503,
33488, 30675,
32084, 30713
31571, 30571,
30631, 31531,
32442, 32847,
30142, 32854
31643
32966
30539
30770
30872
30675
30831
30831
30730
31643, 32966
30522
30713
32966
30539, 30646,
30675
30741
30713
30522, 32213,
30571, 31769,
32532
RE-BL
REC
Red
Red Star
Richmond
Roadstar
Ronin
Rotel
Rowa
Saba
Saivod
Salora
Samsung
Sanyo
ScanMagic
Schaub Lorenz
Schneider
Schontech
Scott
Seeltech
SEG
Semp
Semp Toshiba
Sharp
Sherwood
Shinsonic
Sigmatek
Silva Schneider
SilverCrest
Skantic
Skymaster
32555
30490
32213
30770
31233
30713, 30730
30872
30623
30872
30551, 31643,
32966
30831
32966, 30741
30199, 30573,
33195, 32069,
31635, 32942,
32369, 32329,
32489, 31044,
30490, 32107
32966, 30713,
31233
30730
30770, 31643
30539, 30646,
30831, 30713
30713
31233
31643
30713, 30872
30503
30503
32250, 30630,
32966, 30675,
33313, 30713
30741, 30770,
32820, 33837
30533
32139
30831, 30741
31643
30713, 30539
30730
Reference Information
SM Electronic
Smart
Sonashi
Soniq
Sony
Sound Color
Soundwave
Spectra
SR Standard
Sunkai
Sunstech
Superior
Supratech
SV2000
Sylvania
Symphonic
Sytech
Tandberg
Targa
Tascam
Tatung
TBoston
Tchibo
TCM
Teac
Technica
Technical
Technics
Technika
Technosonic
TechnoStar
Techwood
Telefunken
30730
30713
30831
30831
31516, 31633,
30533, 31033,
30864, 31070,
31548, 32861,
31536, 32839,
32180, 30772
31233
30713
30872
30831
30770
30831, 32139,
32966
31643
32139
30675
30675, 30630
30675
30831
30713
30741
31818
30770
32139
30741
30741
30571, 30675,
30741, 31818,
32139, 34004
30713
32966
30490
30770, 30831
30730
31643
30713, 32966
30551, 32966
Teletech
Tensai
Theta Digital
Thomson
Thule Audio
Tokai
Tosaki
Toshiba
TRANS-continents
Transonic
Trent
Trevi
TruTech
TVE
United
Universum
Urban Concepts
Venturer
Vestel
Vitek
VIZIO
Voxson
Waitec
Walker
Waltham
WB Electronics
Welkin
Wellington
Weltstar
Wharfedale
Wilson
30713
30770
30571
30551, 30522,
30831
30551
31233
32006
30503, 33157,
33857, 32006,
32277, 32705,
31769, 32966,
32551
30831, 30872,
31233
30730
31643
30831
30675
30713
30713, 30675,
30730, 31233,
31643
30713, 30741,
30591
30503
31769
30713
30831
32563
30730, 30831
30730, 31233
32966
30713
32555
30831
30713
30713
30713
31233, 30831
Windsor
Windy Sam
Woxter
Xbox
Xiron
XMS
X-View
Yamada
Yamaha
Yamakawa
YBA
Yukai
Zenith
Blu-ray Disc
Anthem
Anthem Statement
Cambridge Audio
Denon
Electrocompaniet
Elite
Funai
Harman/Kardon
Insignia
Integra
JVC
Lexicon
LG
30713
30573
32139
32083, 31708,
32202, 30522
30713
30770
31233
30872, 32139
30497, 32298,
30539, 30817,
30490, 31354,
33871, 30646,
33837
30872
30872
30730
30741, 30591,
30503
Magnavox
Marantz
Mitsubishi Electric
Onkyo
32820
32820
32808
32258, 32748,
33851
32545
32854
30675
33228, 32927
32596, 32428,
30675
32147, 32900,
32910, 33100,
33101, 33500,
33501
32365, 32612,
32855
32545
31602, 32811,
30741
Sylvania
Tascam
Toshiba
Oppo
Panasonic
Philips
Pioneer
RCA
Samsung
Sharp
Sherwood
Sony
VIZIO
Yamaha
DVD-R
Accurian
AEG
Akai
Aristona
CyberHome
Denon
Dick Smith Electronics
DSE
Emerson
Funai
30675
32414, 33444
34004
32147, 32900,
33101, 33501,
32910, 33100,
33500
32545
31641, 33862,
33580, 33641,
32859, 32523,
32710
32789, 32434,
32084
32442, 32847,
32854, 30142
32532
30199, 33195
32250, 33313
32820, 33837
31516, 32180,
30772
30675
34004
32705, 33157,
33857, 32551
32563
32298, 33871,
33837
30675
30675
30675
30646
31023
30490
30675
30675
30675
30675
En-83
Reference Information
Go Video
GPX
Hitachi
Humax
Insignia
Irradio
JVC
LG
Loewe
Magnavox
Medion
NEC
Panasonic
Philips
Pioneer
Pye
RCA
Samsung
Schneider
Sharp
Silva Schneider
Sony
Sylvania
Targa
Tchibo
TCM
Thomson
Toshiba
Universum
En-84
30741
30741
31664
30646
32095
30646
30623, 32612
30741
30741
30675, 30646,
31506
30741
30741
30490, 31579,
33580, 32710,
32859, 32523
30646, 31340,
31506, 32334,
30539, 32056
30631
30646, 30675
30522
31635, 32942,
33195, 32107,
30490, 32069,
32489
30646
33313, 30630,
30675, 30713
30741
31070, 31033,
32861, 31516,
31536, 32839,
32180, 31633
30675
30741
30741
30741
30551
32277, 32551,
30503
30741
Yamaha
Zenith
30646
30741
VCR
DirecTV
20739
Humax
Loewe
Metz
Optimus
Panasonic
Philips
Quasar
RCN
ReplayTV
Sonic Blue
Sony
TiVo
20739
21062
21062
21062
21062, 20616
20739
21062
20739
20616
20616
20636
20739, 20636
Cable Set Top Box (A to E)
ABN
03322, 02897,
02979, 03340,
03407, 03849
Access
01376, 00476
Communications
ACT
02950
Adams Cable TV
01376
ADB
02586, 01920,
01585, 01927,
01481, 01998,
02254, 02302,
02437, 03028
Akado
02043
Aland
02030, 02437
Alands
02030, 02437
Datakommunikation
Alcom
02030, 02437
Alice
01585
Allegiance
00476, 01376
Communications
Allen TV Cable
00476
Altibox
02437, 02030
Amino
Anguang Network
Anhui Network
Arcadyan
Arion
Armstrong
Arris
Arvig Communication
Systems
Astound Broadband
AT&T
AT&T U-verse
Atlantic Broadband
ATMC
Austar
B tv
Baja Broadband
BBTV
Beijing
Belgacom TV
Bell
Bell Aliant
Bell ExpressVu
Bell Fibe TV
Bend Broadband
BesTV
Bevcomm
BGCTV
BIG.BOX
Blue Ridge
Communications
Bluewin
Bouygues Telecom
Boxer
Bright ClouDigital
01615, 01898,
01481, 02482,
01998, 02302,
03028
03936
03936
02952
03336
01376, 00476
02187, 01982,
01998, 02378
01376, 01982,
01998, 02345
01376, 01877,
00476, 02479,
04079
00858
00858
01877, 01376
01376, 01982,
03028
00276
02681, 03442
00476, 01376
02980
04010
02047, 02132
01998
01998
01998
01998
01376, 00476,
02187
04196
01898, 00476
03278, 00476
03465
01877
02271
03007
03607
03961
Bright House
British Telecom
Broadstripe
BSI
BT
BT Vision
Buckeye Cable
System
C&M
Cable America
Cable Axion Digitel
Cable HK
Cable One
Cablecom
Cablecom Mexico
Cablemas
Cablevision
Cabovisao
Caiway
Caiyun Digital
CalTel Connections
Canal Digital
Canby Telcom
Cass Cable
CC9
CCAP
CCS
Celrun
CenturyLink
Channel Master
Charter
Chengde Guangtong
Chengdu Cable
Chengdu Telecom
01877, 01376,
00476
02294
00476, 01376
02979
02294
02294
01376, 00476,
01877, 02187
03407, 03319,
02962, 02979
01376, 01877
01376, 00476
01374
01376, 00476,
01877
01582
00476, 01376
01376, 01877
01877, 01376,
03336, 00476
02436, 02493
02015, 03607,
02762, 00660,
02447
03961
02254, 02586
02030
01481, 02302
00476, 01376
02703, 02752,
03474
01877
03322
03442, 02682
01998
03118
01877, 01376,
00476, 02187,
03560
03936
03953
04196
Reference Information
China Telecom
China Unicom
Chongqing Cable
Chongqing Cable
Networks
CHT
Chunghwa
Cincinnati Bell
Cisco
Citycable
CJ
CJ Digital
CJ HelloVision
Claro
ClubInternet
CMA Communications
CMB
CMBTV
CNS
Cogeco
Com Hem
Comcast
04196, 02913,
03937
04366, 04196
03954
03954
03647, 01917
03647, 01917
01877, 01376
01877, 00858,
03028, 01982,
02132, 02345,
02589, 01883,
01998, 01582,
02047, 02378,
02563, 02401,
02742, 03265,
02271, 02947,
03452
03451, 03477
03322, 02897,
02979, 03340,
03407, 03849
02979, 02897,
03322, 03340,
03407, 03849
03322, 02897,
02979, 03340,
03407, 03849
01376, 00476
02132
01376
03389, 02979,
03498
03498
02980, 02350
01376, 01982,
00476
00660, 02447,
02832, 02015
01982, 01376,
00476, 01877,
03560, 02187
Comporium
01877, 03560,
02187
Consolidated
01877, 01376,
Communications
01998, 02302,
03048
Coship
01991, 02950,
03278, 04162,
04408, 04196
Cosmic
02897
Cox
01877, 01376,
00476
CTS
02703, 03474
Daeryung
01877
Darty Box
02436
DASAN
02683
Delta
03607, 02015,
00660, 02447,
02762
DEN
02726
Deutsche Telekom
02132
Digeo
02187
Digi
02762, 03479
Digicable
03382, 02479
DigitAlb
02493
Director
00476
Dmg
03835
DNA
02832, 00660,
02030
Dom.ru TV
02493
Dream Satellite TV
02493
DSD
03340
DST
03389
Du
02401
DV
02979
Eagle Communications 01376, 02187
EastLink
01376, 00476
Echostar
02955, 03452
Elion
03916
Entertain
02132
Entone
02302, 03048
ER Telecom
02493
eTb
04281
Evolution
02479, 02746,
04079
Extra TV
02132
Cable Set Top Box (F to J)
Fastway
03382
FCTV
01782, 02703
Fidelity
01376
Communications
Finnet
02030, 02832
First Media
03783
Freebox
01976
Frontier
02378
Communications
Fujian Broadcast & TV 04195
Network Group
Fujian Broadcast and
04195
TV
Gangwon
03407
Broadcasting Network
Gansu Cable
04236
GCI
01376
GCS
03322
GDCATV
02980, 03131,
03132
Gehua
03278, 00476
General
01376
Communications
General Instrument
00276, 00476
Google
03666
Gospell
04205
Grande
01877, 03560,
Communications
01376
Great Plains
01376
Communications
Guangdong Cable
02980, 03131,
03132
Guangxi Broadcasting 02897, 03407,
03961
Guangxi Broadcasting 02897, 03407,
Network
03961
Guangzhou Cable
02945
Guizhou Broadcasting 03946
Network
Hana TV
02681, 03442
Hathw@y
Hawaiian Telcom
HBC
HCN
HD+
HDT
Hebei Broadcasting
Hebei Broadcasting
Network
Hebei Digital TV
Hello TV
HelloD
Henan Cable
HickoryTech
Hikari TV
Himawari TV
Homecast
Hong Kong Cable
Hrvatski Telekom
HSHONG
Huashu
Huawei
Humax
Hunan Cable Net
HYA
Hyroad
02043, 02726
03028
01376, 01877,
01982, 02979,
03322, 03340,
03849
02979, 03340
03607
03465
04026, 03967
04026, 03967
04205
03322
02979
04034
01898, 02302
03237
01760
02977, 02979,
03389
01374
02132
03965, 03937,
04026
04034
02994, 03278,
03937, 01991,
02913, 04281,
01982
03607, 02762,
02043, 02447,
00660, 01981,
01983, 02620,
02832, 03560,
02165, 02683,
02701, 02889,
02715, 02962,
03051, 03053,
03075, 03319,
03849
04205
02989
02979
En-85
Reference Information
HyTV
Hyundai Digital
Technology
HZRTV
I-Cable
i-CAN
I-Digital
IMBTVN
INESA
Innovative Systems
Inotel
Inter Mountain Cable
02979, 03340
03465
02960
01374
01585, 02437
03319, 02979
04106
03865
01898
02437
01877, 02479,
04079
Invitel
02437
InviTV
02437
iTSCOM
02703
ITV
02979, 03389,
04196, 03498
J:COM
01760, 02703,
03925, 01782,
02701, 02700,
02715, 02752,
03051, 03053
Jambox
02030
JBC
02979, 03322,
03340, 03849
JCN North
02703, 01760,
03474
Jerrold
00276, 00476
Jiangsu Cable Network 04022
Jilin Broadcasting
04009
Jilin Cable
04009
Jinan Radio and
04206
Television Network
Jishi Media
04009
Jiuzhou
01991
JP PTT
01615
JXCN
03948
Cable Set Top Box (K to N)
Kabel Deutschland
03514, 01981,
01983, 02165,
03607, 02620
En-86
KabelBW
KabelNoord
Kaon
kbro
KCN-TV
KCT
KCTV
KCTV JEJU
KCTV-KJ
KDMC
Kiryung
Kiss
KoolConnect
KPN
Kreatel
KT
Lattelecom
LG
LG U+
Linksys
Lishui Huashu
Longyan Broadcasting
Cable & Tv
Lumos Networks
Magio Sat
Magnet
Maige TV
Massillon Cable
Matanuska Telephone
Association
Mediacom
Mediastream
02889, 01981,
01983
02015
02493, 02889,
02746, 03407,
04409, 02682,
02979, 03389
02350, 03139
02703
01760, 02703,
02752, 03474
02979, 03340,
03389, 03849,
03322
02979, 03340,
03389, 03849
02979, 03340,
03389, 03849
03319, 02979
03498
02132, 02271
01481
02952, 02437
02030
02683, 03478
02030
03340, 02682,
03407, 02979,
03389, 03319
02682
02271
04034
04195
01998, 03028
02132
01615
03937
00476, 01376
01481, 02254,
02482, 02586
01376, 00476,
01982, 01877
01376, 00476
Mega
Mega TV
Megacable
Meo
MetroCast Cablevision
Mi-Connection
Midcontinent
Communications
Mid-Hudson Cable
Minerva Networks
MIO
mio TV
Mitsubishi Electric
MOD
Motorola
Movistar
Moxi
Moyo
MTS
MyLGTV
NET
NewWave
Communications
NIB
Ningde Cable TV
Noos
Northland
Communications
Novus
Now TV
NTL
NTT
NTV Plus
NU Telecom
02683
02683
01376, 00476
02401
01376, 01982,
00476
01877
01376, 00476,
01982
00476, 01376
03118
02275, 02802
02275, 02802
03274
03647, 01917
01376, 00476,
02378, 02437,
01998, 02030,
00858, 01982,
02952, 00276,
01562, 02275,
03916, 01585,
04034, 02401
01585, 03288
02187
03611
01998, 03611,
01615, 01481,
01898
02682
01883
00476, 01376,
02187
03322
04195
02436
01376
01376, 00476
02009, 02014
01060, 00276
03237, 03274
02762
01998, 03028
Numericable
02436
Cable Set Top Box (O to S)
O2
02586
OCN
03865
Oi TV
03452, 03454,
04165
Olleh TV
02683, 03478
Olleh-Skylife
02683, 03478
Ono
01562
Open IPTV
01615
Optimum
01877
Optimus Clix
02437
Optus
00276, 01060
Orange
02407
Oriental Cable
03865
Networks
Pace
01376, 01060,
02620, 01982,
01877, 01998,
00858, 01582,
01883, 03454,
02294, 02401
Panasonic
02703, 02752,
03474, 01760,
01782, 01982
Parasat
03479
Paul Bunyan
02254, 02586
Communications
PCCW
02009, 02057
Philips
01582, 02378,
03560, 02294
Pioneer
01782, 01877,
03925, 02700
Pioneer Telephone
02254, 02302
Portugal Telecom
02401
Premiere
02620
Primacom
02889
Primestar
02030
PrimeTel
03611, 02030,
02437
PrimeTV
02030
PT
02401
Reference Information
PTCI
PX
QooK TV
Qook-Skylife
Qrix
QuickLine
Qwerty
Qwerty.TV
RCN
Reach Broadband
Reliance
RIO Media
Rogers
Rostelecom
Sagem
Sagemcom
Samsung
SaskTel
SBN
Scientific Atlanta
SCTV
SCV
01376
03348
02683, 03478
02683, 03478
03465, 02979
02493
01898, 01481,
01615
01898
01376, 00476,
03560
01376, 01877,
01982
02556
02030
01877, 01376
03611
02407, 02436,
03288
03514, 02407,
02436, 03007,
03288
03322, 02979,
03319, 01877,
02407, 02015,
03340, 03407,
03451, 03442,
03477, 02610,
02955, 01060,
02683, 03514,
03783, 02589,
02889, 02962,
03265, 03849,
03928, 01982,
01987
01998
03965
01877, 00858,
01982, 02401,
02345, 01987,
02047, 02436,
03028, 02378
02493
02950
Seokyung
Service Electric
SetaBox
Shaanxi Broadcasting
Shanghai
Shanghai OCN
Shanxi Broadcasting
Network
Shaw
Shenzhen
Broadcasting
Shenzhen Digital TV
Shijiazhuang
Broadcasting
Shimanto CATV
Sichuan Broadcasting
SingTel
Siti Digital
SK Broadband
SK Btv
Sky Austria
Sky Deutschland
SkyCable
SkyLife
Skyworth
Smartlabs
Smile Content
SMT
SMtronics
Sogetel
Sonaecom
Sonera
Source Cable
Starcat
03340
01376, 00476,
01982
01917
03965
03865
03865
03965
01376, 01877,
00476, 02187,
01982
01991, 04162
01991, 04162
04026
02752
03953
02275, 01998,
02802
03664
03442, 02681
02681, 03442
02620, 02447,
02832
02620, 02447,
02832
02950, 03521,
03527, 04177
02683, 03478
03298, 02960,
03278, 01991,
03521, 04177,
03946, 04162
03611
02437
03527
03319
01998, 02482
02437
00660
01376, 00476
02703, 01782
StarHub
Stipte
Stofa
Suddenlink
01927, 00276
01898
02015
01877, 01376,
01982, 03560,
00476
Supercable
00276
Supercanal
01376, 00476
Suwon Cable
03319
Suzhou Cable Network 04022
SVA
03865
Swisscom
02271
SXBCTV
03965
Cable Set Top Box (T to Z)
TalkTalk
02994
Tbaytel
03028
Tbroad
03319
TCC
04409, 04408
TCN
03340, 02703
T-Com
02132
TDC
02271
TDS Telecom
03028
Technicolor
01982, 02994,
03288
TechniSat
03316
Tele2
00660, 02447
Telecentro
TeleColumbus
Telefonica
00476, 01376
02889
01585, 03028,
03288, 02586
Telekom Deutschland 02132
Telenet
01920, 03451,
03477
Telewest
01987
Telia
02030
Telmex
01376
TELUS
03028
TFN
03127, 03139
T-Home
02132
Thomson
T-Hrvatski Telekom
Tianjin Broadcast &
TV Network
Tianjin Broadcasting
Time Warner
TiVo
ToongTV
Top
TopTV
TP
Trans PX
True Visions
TVB
TVS Cable
U+
U+ tvG
UCATV
Unitymedia
UPC
UPC Cablecom
US Electronics
U-verse
Vector
VeeTV
Verizon
Viasat
Videotron
Viken Fibernett
Virgin Media
Visionetics
Vivo
01582, 01981,
01982, 01983,
03007, 02407
02132
04010
04010
01877, 01376,
00476, 02187
03560, 03265
03322
03766
01991
02407
00276
03075, 02762
01615
01376, 01877,
01982
02682
02682
02703, 01760
02955, 02610,
03451, 03477
01582, 03451,
03477, 00660,
01060
01582, 03451,
03477
00276
00858
02030
03231
02378
02030
01877, 02947
02030, 02437
01987, 02563,
01060, 03265,
00276
01374
03288
En-87
Reference Information
Vodafone
Volia
Volia Cable
Voo
VTR
wasu
Wave Broadband
02401
02493
02493
02742
01376
04034
01376, 00476,
02479, 04079
Wavevision
01376, 01877,
01982
Wbox
02832
WEHCO Video
01376
Welho
02832
WellAV
03479
01376, 00476,
Westman
Communications
02187
WideOpenWest
01376, 01877,
02187
Windjammer Cable
00476, 01376,
01877
WNC
03118
WOW!
01877, 01376,
00476, 02187,
02479
Xfinity
01376, 01982,
00476, 01877,
03560, 02187
Xuyi Radio & TV
02897
YBN
03322
YCV
02703, 01760
Youview
02994
Yunnan Broadcasting 03961
Yuxing
02014
Zhong Hua Dian Xin 01917
Ziggo
02589, 03607,
02015, 02762,
00660, 02401,
02447
Zinwell
03139
Zito Media
01376, 01982
ZTE
04196
En-88
Satellite Set top Box
@sat
@Sky
1.Sky
Acoustic Solutions
ADB
AEG
Agora
Airis
Airtel
Akai
Akira
Akta
Akura
Alba
Allvision
Altech UEC
Amiko
Amstrad
AMTC
Ansonic
Aonvision
Apro
Argos
Arion
Arnion
Arris
AS
ASA
ASCI
ASDA
AssCom
Astrell
Astro
01300
01334
03538
01284
02553, 00887,
01887
02738, 02813
01284
02813, 03012
02248
02938
02738
01986
01626
01284, 02034,
02568
01334
02059, 02097,
03517
04197
00847, 01662,
01175, 01693,
02467
02738, 02813
02418
02279
01672
02568
03374, 04348
01300
00869
01284
00740
01334
01284
00853
01986, 02418
00173, 01838,
02627, 00658,
03838, 01099,
01100, 02026
Atevio
Atlanta
Atom
Audiola
Audioline
Aurora
Austar
Austriasat
Auvisio
Avanit
Awa
Axil
Axitronic
AZ America
AZBox
B.net
B@ytronic
Beijing
Bell
Bell ExpressVu
Bell Fibe TV
Bell Satellite TV
Belson
BENsat
Best Buy
BIG TV
BIOSTEK
BiS Television
Black Diamond
Blaupunkt
Blu:sens
Boca
Boshmann
Botech
02928
02418, 03320
02289
03012, 02418
01672
00879
00879
01195, 01197,
02957, 03374,
01561, 01631,
02631
02932, 02738,
02813
00299, 01631
02418
02418, 01413,
01777, 02738,
03424
01626
01631
02719
01672
00740
03299
00775
00775
00775
00775
02418
02957, 02938
02728, 02842
04312
02738
01986
01284
00173
02938
02026, 02458,
02797, 02308,
02813
01413, 01631
02738, 03749
Boxer
Brainwave
BSkyB
Bulltech
Bush
Cablecom
Caiway
Canal Digitaal
Canal Digital
Canal+
CanalSat
Century
CGV
Chess
Cignal
CityCom
Clarke-Tech
Claro
Classic
Clatronic
Clayton
CME
CMX
Cobra
Com Hem
02443, 01692,
01957, 04024
00658, 01672
01175, 01662,
00847
02738
01935, 02376,
01284, 02813,
01672, 03346,
03439, 02034,
03652, 01291,
01626, 02418,
02568
01195, 01197
02443, 00253
02631, 00853,
02466, 02957
02553, 01780,
00853, 01334
00853, 02657,
01195, 01197,
01986
00853, 02657
03110, 00856
02034, 01413,
01986
02026, 01334,
01626
02289, 02835,
02836
00299, 00658,
02957
03320
03787, 03790
01291, 01284,
01672
01413, 02738
01626
00173
02205, 02932
02728, 03012
01176, 01915
Reference Information
Comag
Comsat
Comwell
Continent
Coship
Cosmos TV
Croner
Crown
Crypto
Crystal
Cyfra+
Cyfrowy Polsat
Dantax
Danystar
DASAN
D-box
DCR
Delta
Denver
Deutsche Telekabel
Dgtec
Dick Smith Electronics
Dicra
Digenius
Digi
Digi Raum Electronics
Digi Romania
Digiality
Digihome
DigiLogic
DigiQuest
Digital
DigitAlb
02797, 02026,
02458, 02813,
02308, 01413
01413
01956
01986
03787, 03790,
01672, 02525,
03574
01545
02813
01284
03012
03012, 01416
00853, 01409
02262, 02527,
00253, 00853
01626
02938
03321
01114
03517
02443
02418, 02738
01195, 01197
01631, 02418
02418, 02813
02738, 02842,
03012
00299, 00740
01416, 01195,
01197, 02026
02622
01416
01334, 02813
02034, 01284,
01935
01284, 02034
02278, 02738,
01300, 01631
02308
01195, 01197
DigitalBox
DigitSat-e
Digiturk
Digiwave
Dikom
Dilog
DiPro
DirecTV
Dish Mexico
Dish Network
DishHD
Dishpro
DishTV
Di-Way
DMT
DMTech
DNA
Donghai
Doro
DragonSat
DRE
Dream
Dream Multimedia
Dream Satellite TV
DSE
D-Smart
DSTV
DTI Electronics
DTK Deutsche
Telekabel
DTV
Dual
Durabrand
Dyon
Easy-One
02540, 01631,
02289, 01100,
03240
02842
03517, 02097
01631
02938, 02842
01957, 01780
02278
01377, 01442,
00099
00775
00775
04090
00775
01300, 02604,
01780
02289
03321
02738
01780, 01957,
01176, 02144
02938
01672
02928
02622
01237
01237, 01652,
01923
01416, 03374
02418, 02813
02231
00879, 02059,
02060
02938
01195, 01197
03572
02034
01284, 02034
02738, 02813
03240
Echostar
Eco-Star
Edision
Ekotech
Elap
Elbe
Electron
Elisa
Elless
Elta
Embratel
Energy Sistem
Engel
Etisalat
Europhon
Europsat
Eurosky
Eutra
Evesham Technology
Eycos
F&U
Fagor
FaVal
Ferguson
Finepass
Finlux
Finnet
FinnSat
FMD
Fortec Star
Foxtel
Freesat
00775, 02262,
02527, 00853,
01409
01413
01631
03422
01413
02418
01956
01322, 02455
00740
02738
02796, 03787
02418, 01631,
02289, 02813
03749, 01611,
01672
02443
00299, 01334
01611, 01413
00740, 00299
00740
02034
03374
03012
01611
03422
02638, 01291,
01803, 01935,
02034
01780
01626, 02034
01780, 01957
00740, 01195,
01197, 01351
01413
01631
01356, 00879,
01176
01692, 02928,
03266, 01986,
02376
Freesat+
freeview
Fte Maximal
Fuba
Fuji Onkyo
Funai United
Galaxis
Galaxy
Galaxy Innovations
General Instrument
General Satellite
Gi
GigaBlue
GigaTV
Globo
GMMZ
Go
GoGen
GOI
Gold Box
Gold Vision
Golden Media
GoldMaster
Goodmans
Gradiente
Gran Prix
Grandin
Grocos
02443, 03266
02982
02289
02750, 00173,
00299, 03726
02728, 01631
03012
00853, 00879
01956
02799, 04197
00869
03064, 02622
02799, 04197
03663
02738
02026, 01334,
00740, 01429,
02957, 01626
03538
01780
02738
00775
00853
01631
04197
01334, 02928
01284, 02376,
02034, 03652,
02568, 03346,
03439
00887, 03110,
00856
00740
01626
01409
En-89
Reference Information
Grundig
GVT
Haier
Hailo
Hallo
Handan
Hanseatic
Hauppauge
HD Box
HD+
HDT
Hirschmann
Hitachi
Homecast
Hornet
HTS
Huawei
Huaxian Radio and
Television Network
Hubei Chutian
Hubei Radio &
Television Network
Hughes Network
Systems
En-90
00173, 00847,
02376, 01291,
02034, 00853,
02813, 01284,
01780, 02738,
03424, 00879,
01672, 02568,
03346
03789
02418
02289
01626
01780, 01957
01099, 01100
01672
02928
02797, 02443,
01429, 02569,
03095
01416, 01255,
03321
00173, 00299,
02026, 00740
02034, 01284
02525
01300
00775
03787
04041
04041
04041
01442, 01377
Humax
Hyundai
Hyundai Digital
Technology
ibox
IceCrypt
ID Digital
ID Sat
i-Joy
Illusion
Imagin
Imperial
InDigital
Indovision
iNETBOX
Inno Hit
Innova
Intv
Inverto
inVion
iotronic
IP Vision
IPM
IQ
IQ Prism
ISkyB
ITT
01176, 02443,
01427, 01808,
02736, 01882,
01915, 03140,
02231, 02408,
02144, 02616,
02754, 01377,
03517, 01989,
02289, 03321,
01255
01416
01416, 01255,
03321
01652
04197, 02838,
02928
01176
02289, 01334,
01631
02938
01631
01195, 01197
01195, 01197,
01334, 01429,
01672
01416
01989, 00856,
01887, 02108,
00887, 01255
01652, 01237
01626, 02728
00099
04348
03095
02418
01413
02455
03567
02813
02813
00887
02418
Jaeger
Jameson
Jerrold
Jiuzhou
JVC
Kabel Deutschland
KabelBW
KabelNoord
Kamosonic
Kaon
Kathrein
Kenwood
Konig
Koscom
KPN
Kreiling
Kreiselmeyer
KT
L&S Electronic
Labgear
LaSAT
Lava
Lazer
Leiker
Leiko
Lemon
Lenoxx
LG
Lifesat
LinkBox
Linsar
Listo
Lodos
02797, 01334
02813
00869
03140
00775, 01284
01195, 01197,
01672, 01882,
01915
01882, 01915,
01195, 01197,
01429
00253, 02443
02738
01300, 02231
01561, 02569,
00658, 00173,
03658, 01416,
02263
00853
02289, 01631,
00173
01956
01986
00658, 01626
00173
03321
01334
03424
00740, 00299
01631
02738
02728
01626
01334
01611
03321
00299
02957
01284, 02842
01626, 02813
01284
Logik
LogiSat
Lorenzen
Lowry
Luxor
M vision
M7
Macab
Magic TV
Majestic
Manhattan
Maplin
Marusys
Mascom
Maspro
Matsui
Maximum
Mediabox
MediaSat
Mediascape
Mediaset
Medion
Mega TV
MegaSat
Melita
Meo
Mercury
02034, 01284,
01906, 02842,
01803, 03652
02797, 02026,
02813, 02458
00299
02938
01935, 02034
03562
02631
00853
02982
03012, 02738,
02842
01300
02034
02799, 03543
02738
00173, 03099
01284, 00173,
01626
01334, 02813,
01672, 01986
00853
00853
02289, 02835,
02836
02750, 02278,
01427, 02736,
02739
00299, 00740,
01626, 01334,
02026, 02797
03321
01631, 02034,
02813, 02289,
00740, 02738
01416
02466
03422
Reference Information
Metronic
Metz
Micro
Micro electronic
Micromaxx
Microstar
Miraclebox
Mitsai
Morgan's
Motorola
Movistar
MTEX
Multichoice
Murphy
Mx Onda
myfreeviewHD
Mysat
MySky Italia
MySky New Zealand
Nagra
NanoXX
NC+
NEOTION
NET
Netgem
Netsat
Neuf TV
Neuling
Nevir
Next
Next Level
Nextvision
NextWave
01986, 02418,
02738, 01334,
01631, 01413,
01672, 01935,
02278
00173
02797, 02813
02308, 02813
00299
00299
02928
02738
02026
00869, 03110,
00856, 03469
02527, 02262,
02263
03539
00879, 02059,
02060
02034
02938
02982
02738
02467
01356, 02211
02262
01631
00853, 01409
01334
02262
01322, 02455
00099, 00887
01322
02458, 02026
02938, 02728
02231
00869
01956
01956
Nilox
Nokia
Nordmende
Noru
Nova
NPG
NTV Plus
Octagon
Olleh TV
Olleh-Skylife
Onn
Openbox
Opensat
Opentech
Opentel
Optex
Opticum
Optus
Orbis
Orbitech
Orchid
Orion Express
Orton
P&T Luxembourg
02278
00853
01611
02938
02475, 00879
02289, 01413,
01631
01307, 01692,
02443
02928
03321
03321
02034, 01284
01956, 02928
02957, 01956,
02719
02525
02525
01626, 01413,
01611, 03012
02957, 02797,
02932
01356, 00879
01334
01195, 01100,
01197, 01099,
01351
02289
01986
02957
01322, 02455
Pace
Pacific
Palcom
Palsonic
Panasat
Panasonic
Panda
peeKTon
Philips
Phoenix
Phonotrend
Pino
Pioneer
Pixel Magic
PLDT
PMB
Polsat
Portugal Telecom
Premiere
00847, 00887,
01356, 02754,
01682, 01175,
01693, 02475,
00853, 02231,
02467, 02631,
02657, 03469,
03790, 01377,
01662, 02097,
02211, 02059,
02060, 02466,
02796, 02160
01284
01611, 00299,
01409
02813
00879
03494, 00847,
03099
00173
02418
00099, 00853,
02561, 01499,
01442, 02466,
01114, 01672,
02619, 02211,
03110, 03469,
00173, 00856,
00887, 02631
01956, 02418
01780
01334
00853
02982
02835, 02836,
02289
01611
02262, 02527,
00253, 00853
02466
01429, 01114,
01195, 01197
PremiumX
Primacom
Pro Basic
ProLine
PSI
PT
QooK TV
Qook-Skylife
Quelle
Qwest
RadioShack
Radix
Raduga TV
RCA
RCS
Rebox
RiksTV
Rimax
RIO Media
Roadstar
Rollmaster
Ross
SAB
Saba
Sagem
Sagemcom
Saivod
Samart DTH
03374
01176, 01195,
01197
00853
01284
03539
02466
03321
03321
00299
01377
00869
01255
01986, 02957
01291, 01442,
02108
01416
02928
01692
02938
01780
00853
01413
02540
01956, 01631,
04197, 01300
00740, 02205
01692, 01690,
01114, 02553,
01307
01692, 04024,
03789
02418
03576, 03574
En-91
Reference Information
Samsung
Sansui
Sanyo
Sat Control
Sat Industrie
SAT+
SatCatcher
Satforce
Satplus
SatyCon
Schaub Lorenz
Schneider
Schwaiger
Schwaiger CS
Scott
SCS
Sedea
Sedea Electronique
SEG
Sencor
Servimat
Set-One
Shark
Sharp
Shaw Direct
Sherwood
Shinelco
En-92
03063, 00253,
01442, 01377,
02467, 01682,
01989, 03266,
00853, 01662,
02525, 03321,
03784, 03834,
03838, 01255,
01693
01545
01626
01300
01611
01409
01956
03374
01100
01631
02034, 02418
02842
01672, 01429,
02308, 02458,
01631, 02797,
02813, 00740,
01334, 02957
01631
02738
00299, 00740
01626
01626
01626, 01284,
02034
02813
01611
03240, 02728
01631
01935, 02034
00869
01409
02738, 02278,
02938
SHOI
Siemens
Sigmatek
SignalMAX
Silva
Silva Schneider
SilverCrest
SKY
Sky Austria
Sky Brasil
Sky Deutschland
Sky Ireland
Sky Italia
Sky Mexico
Sky New Zealand
SKY PerfecTV!
Sky UK
SkyCable
SkyLife
02938
00173, 01657,
01429, 02418,
01626, 01334,
01672
02418, 02813,
02738
01956
00299
00740
02026, 02308,
02458, 02932
01662
02754, 02443,
01429, 01114,
01915, 01195,
01197
01377, 03110,
00887, 00856,
00099, 01499,
02619
02754, 02443,
01429, 01114,
01915, 01195,
01197
01175, 01662,
00847
01693, 02467,
00853
00856, 02619,
00887, 01377,
03469
02211, 00887,
00856, 01356
03099, 02616,
03049
01175, 01662,
00847
01631, 01957
03321, 01255
Skylink
Skymaster
Skymax
Skypex
Skyplus
SkySat
Skytec
Skyvision
SkyWay
Skyworth
SL
SM Electronic
Smart
Sogo
Sonera
Sony
Spiderbox
Star
Star Choice
Starmax
Steinner
Stream System
Strong
02957, 01545,
02443, 02928,
01195, 01197,
01986
01409, 02205,
01611, 02728,
02932, 01545,
01334
01413
00740
01334, 02026,
00740, 01175
01100
02928
02797, 01334
02928
01631, 02835,
02836
00740, 02026,
00299, 01672
01409
01631, 01413,
03095, 02289,
00740, 00299
02842
01780, 01957
01558, 00847,
00853, 03049
03562
00887
00869
02638
02738
01300
01409, 02235,
01626, 02278,
02418, 02813,
00879, 03424,
00853, 01300,
03374, 01284,
01682
Sun Box
Sun Direct
Sunny
Sunstech
Supernova
Supratech
Systec
Sytech
S-ZWO
TATA Sky
TBoston
TDS Telecom
Teac
Technical
Technicolor
Technika
TechniSat
Technoit
Technosonic
Technotrend
Techwood
Tecsat
TEKCOMM
Telasat
TELE System
Tele2
Telefonica
TeleSAT
03571
02525
01300
02738
00887
01413
01334
02418, 02842,
03012
03374
03575
02418
00775
01957, 01322,
02813
01626
03469, 03790
01284, 01672,
02034
01197, 01195,
01100, 01099,
01351, 03440,
02813, 01322
02278
01672
01429, 01672,
02263
01284, 02034,
01626, 01935
01986
02738
02466
02750, 01611,
01409, 02739,
03726, 02813
01195, 01197
01692, 02262,
02527, 02263
02631, 02466
Reference Information
Telestar
Televes
Televisa
TelkomVision
Telsey
TelSKY
Telstra
TELUS
Tesla
Tevion
Thai
Thomson
Tiny
Titan
Tividi
TiVo
TivuSat
T-Mobile
TNT SAT
Tokai
Tonna
Topfield
Toshiba
TPS
Transparent Video
Systems
01100, 01099,
01334, 01197,
02540, 01195,
01351, 01626,
01672
01300, 01334
00887
04310
02738
02540
01356
00775
01626
02205, 01409,
01672, 02026,
02813
03573, 03539
01291, 01935,
01662, 00847,
00853, 01175,
02278, 01307,
02160, 02619,
03110, 03469
01672
02205
01429
01377, 01442
02750
02631, 02443,
01545
01692, 01195,
01197, 01986
02938
01611, 02458
01545, 01986,
01208, 02838
01803, 01284,
01429
01307
01780, 01957
TrekStor
Triax
Tricolor TV
True Visions
TT-micro
TV Cabo
TV Star
TV Vlaanderen
TVA Digital
TVB
TVonics
Twinner
UEC
UfaNet
UNE
United
Unitymedia
Universum
Unixbox
UPC
UPC Cablecom
UPC Direct
Vantage
Variosat
VEA
Vectra
Vestel
VH Sat
Via Embratel
02738
01291, 01626,
00853, 01099,
01611, 01631
02622, 03064
03140, 01208,
02408, 03784
01429
02160
03012
02631, 00853,
02466
02895, 01692,
02262
01989
01906, 01803
01611
00879, 01356
01986
01692
02842, 02278,
03012, 01626,
02418
01429, 01882,
01915
00173, 00299,
00740, 01099
01652
01780, 02443
01195, 01197
02443
02797
00173
02418
01195, 01197
01626, 01284,
02231, 02034,
03517
00299
03787, 02796
Viasat
Videocon
Vietnam Television
Corporation
Viola Digital
Vision
VisionNet
Visiosat
Vistron
Vitecom
Viva
Vivax
Vivo
Volcasat
Voom
VTC
Vu+
Walker
Wavelength
Wharfedale
Winix
Wintel
Wisi
Woxter
Xoro
Xtreme
Xtrend
Yakumo
Yes
Youview
ZapMaster
01682, 01197,
01195, 02235,
00253
03077
03834
01672
01626
01631
01413
00740
01413
00856
02418
02262, 02895,
01692, 02527
02418
00869
03834
03458, 02799,
03543
02034
01413
01935, 02034,
01284, 01906
02278
00299
00740, 00173,
00299, 02957,
01986
02418, 02813
02813, 02738,
03012, 03422
01300
03320
01413
00887, 01887
03140
00740
Zehnder
Zenega
Zenith
Ziggo
Zircon
Zodiac
Zon
Zon Optimus
Video - Accessory
A.C.Ryan
ABS
Acer
Alienware
Apple
ASRock
Boxee
Ceton
Claritas
CyberPower
Daily Media
Dell
Digitech
D-Link
Elonex
Eminent
Emtec
Fantec
Fujitsu Siemens
Funai
Gateway
G-Box Midnight
Hewlett Packard
01777, 03422,
01334, 01413,
02289, 03424,
02034, 00740,
01631
02604
00856, 03110,
03469
02443, 01499,
01657, 00253
02957
03726
02160
02160
02709, 03350
01272
01272
01272
02615
01272
03693
01272
01272
01272
01272
01272
02260
03671, 03693,
02186
01272
03215, 02260
02709
03350, 02709
01272
03339
01272
04440
01272
En-93
Reference Information
hFX
Howard Computers
HP
Hush
iBUYPOWER
iconBIT
ICY Box
iNext
Iomega
ISTAR
JadooTV
Keedox
LG
Linksys
Magnavox
Mede8er
Media Center PC
Micca
Microsoft
Mind
Netgear
NiveusMedia
Northgate
Omniverse
Packard Bell
Panasonic
Philips
Pivos
PopBox
Popcorn Hour
RCA
Ricavision
Roku
Seagate
Sony
Stack 9
Sumvision
Systemax
En-94
01272
01272
01272
01272
01272
03350, 02709
03350
03350
02558
02260
02260
04442
03373
01272
03339
02709
01272
03669
01272, 01805,
04000
01272
03324, 04401,
03292
01272
01272
04421
01272
03760
01272
04339
02260
02260
03335
01272
03061, 02371
02698
02713, 01272
01272
04339
01272
Tagar Systems
Toshiba
Touch
TrekStor
Trust
VIA Technologies
Viewsonic
VIZIO
Voodoo
Western Digital
Woxter
Xbox
Xtreamer
ZT Group
CD
A.V.International
ADVANTAGE
AH!
Aiwa
Arcam
Atoll
Atoll Electronique
Audio Research
Audiolab
Audiomeca
Audioton
AVI
Balanced Audio
Technology
BAT
Cairn
California Audio Labs
Cambridge
Cambridge Audio
Carver
CCE
Curtis Mathes
01272
01272
01272
02723
01272
01272
01272
03670
01272
02558
02709
01805, 04000,
01272
02723
01272
70157
70032
70157
70157
70157
70157
70157
70157
70157
70157
70157
70157
70157
70157
70157
70029, 70303
70157
70157
70157
70157
70029
Cyrus
Denon
DKK
DMX Electronics
Dynaco
Epworth
Genexxa
Goldmund
Grundig
Harman/Kardon
HIFIAkademie
Hitachi
JVC
Integra
Kenwood
Krell
Linn
Loewe
Magnavox
Marantz
Matsui
MCS
Memorex
Meridian
Micromega
Miro
Mission
Myryad
NAD
Naim
New Acoustic
Dimension
NSM
Onkyo
Optimus
Panasonic
Philips
Pioneer
Polk Audio
70157
70766
70000
70157
70157
70157
70032, 70000
70157
70157
70157, 73044
70157
70032
70072
71817
70036, 70157
70157
70157
70157
70157
70157, 70029
70157
70029
70032
70157
70157
70000
70157
70157
70721, 70000
70157
70721, 70000
70157
71817
70032, 70000
70303, 70029
70157
70032
70157
Primare
Proton
QED
Quad
Quasar
Radiola
RCA
Restek
Revox
Rotel
SAE
Sansui
SAST
Siemens
Silsonic
Simaudio
Sonic Frontiers
Sony
Sylvania
TAG McLaren
TAG McLaren Audio
Tandy
Tascam
Teac
Technics
Thorens
Thule Audio
Universum
Victor
Wards
Yamaha
Zonda
Cassette Deck
Aiwa
70157
70157
70157
70157
70029
70157
70032
70157
70157
70157
70157
70157
70157
70157
70036
70157
70157
70000, 70490
70157
70157
70157
70032
73095, 73511,
73533
73095, 73531,
73532, 73551
70303, 70029,
70207
70157
70157
70157
70072
70032, 70000,
70157
70036, 70032,
70490
70157
40029
Reference Information
Arcam
Audiolab
Carver
Denon
Epworth
Grundig
Harman/Kardon
Inkel
JVC
Kenwood
Magnavox
Marantz
Myryad
Onkyo
Optimus
Panasonic
Philips
Pioneer
Polk Audio
Radiola
RCA
Revox
Sansui
Sony
Tascam
Technics
Thorens
Universum
Victor
Wards
Yamaha
Receiver
Integra
Onkyo
Audio - Accessory
Apple
Jamo
40076
40029, 40229
40029
40076
40029
40029
40029
40070
40244
40070
40029
40029
40029
42157
40027
40229
40029, 40229
40027
40029
40029
40027
40029
40029
40243, 40170
73095
40229
40029
40029
40244
40027, 40029
40097
52503
52503
81115
82228
Onkyo
Polk Audio
IPTV
ADB
Aland
Alands
Datakommunikation
Alcom
Altibox
Amino
81993, 82990,
82351, 82352,
82353
82228
02586, 01585,
01481, 01998,
02254, 02302,
02437, 03028
02030, 02437
02030, 02437
02030, 02437
02437, 02030
01615, 01898,
01481, 02482,
01998, 02302,
03028
Arcadyan
02952
Arkwest
02482, 01481,
01998, 02302
Arris
01998, 02378
Arvig Communication 01998, 02345
Systems
AT&T
00858
AT&T U-verse
00858
ATMC
03028
B tv
02681, 03442
BBTV
02980
BEK Communications 02254, 02302
Belgacom TV
02047, 02132
Bell
01998
Bell Aliant
01998
Bell ExpressVu
01998
Bell Fibe TV
01998
BesTV
04196
Bluewin
02271
Bouygues Telecom
03007
British Telecom
02294
BT
BT Vision
Cabovisao
CalTel Connections
Canal Digital
Canby Telcom
Celrun
CenturyLink
Channel Master
China Telecom
China Unicom
CHT
Chunghwa
Cisco
ClubInternet
CNS
Consolidated
Communications
Coship
Deutsche Telekom
DNA
Du
Echostar
Elion
Entertain
Entone
eTb
Evertek
Finnet
Freebox
Frontier
Communications
GDCATV
Google
Guangdong Cable
02294
02294
02436
02586
02030
01481, 02302
03442
01998
03118
04196, 02913,
03937
04366, 04196
03647, 01917
03647, 01917
00858, 03028,
02132, 02345,
02047, 02378,
01998, 02271,
03452
02132
02980
01998, 02302,
03048
04196
02132
02030
02401
03452
03916
02132
02302, 03048
04281
02302
02030
01976
02378
02980
03666
02980
Guangxi
Broadcasting
Guangxi
Broadcasting
Network
Hana TV
Hathw@y
Hikari TV
HSHONG
Huawei
i-CAN
Innovative Systems
Inotel
Invitel
InviTV
ITV
Jambox
JP PTT
Kaon
kbro
Kiss
KoolConnect
KPN
Kreatel
KT
LG
LG U+
Linksys
Lumos Networks
Magio Sat
Magnet
Maige TV
Matanuska
Telephone
Association
Mega TV
Meo
02897
02897
02681
02043
03237
03937
02994, 03937,
02913, 04281
02437
01898
02437
02437
02437
04196
02030
01615
04409, 02682
03139
02132, 02271
01481
02952, 02437
02030
02683
02682
02682
02271
01998, 03028
02132
01615
03937
01481, 02254,
02482, 02586
02683
02401
En-95
Reference Information
MHTC
Minerva Networks
MIO
mio TV
Mitsubishi Electric
MM&G Enterprises
MOD
Motorola
Movistar
Moyo
MTS
MyLGTV
Now TV
NTT
NU Telecom
Numericable
Oi TV
Open IPTV
Optimus Clix
Orange
Pace
PCCW
Philips
Pioneer Telephone
Portugal Telecom
Primestar
PrimeTel
PrimeTV
En-96
01481, 01998,
02254, 02302,
02482
03118
02275, 02802
02275, 02802
03274
01481, 01998,
02302, 02482
03647, 01917
02378, 02437,
01998, 02030,
00858, 02952,
02275, 03916,
01585, 02401
01585, 03288
03611
01998, 03611,
01615, 01481,
01898
02682
02009, 02014
03237, 03274
01998, 03028
02436
03452, 03454,
04165
01615
02437
02407
01998, 00858,
03454, 02294,
02401
02009, 02057
02378
02254, 02302
02401
02030
02030, 02437,
03611
02030
PT
Qwerty
02401
01898, 01481,
01615
Qwerty.TV
01898
Reliance
02556
RIO Media
02030
Rostelecom
03611
Sagem
02407, 03288
Sagemcom
02436, 02407,
03007
Samsung
02407
SaskTel
01998
Scientific Atlanta
00858, 02345,
02047, 02401,
03028, 02378
SetaBox
01917
SingTel
02275, 01998,
02802
SK Broadband
03442, 02681
SK Btv
02681, 03442
Sky Austria
02620
Sky Deutschland
02620
Smartlabs
03611
Smile Content
02437
Sogetel
01998
Sonaecom
02437
SureWest
01998, 01481,
02254, 02482,
02586
Swisscom
02271
TalkTalk
02994
TCC
04409
TDC
02271
Technicolor
02994
Telefonica
01585, 03028,
03288
Telekom Deutschland 02132
Telia
02030
TELUS
03028
TeNeT
01898
T-Home
Thomson
TVB
U+ tvG
U-verse
Verizon
Viasat
Viken Fibernett
Vivo
Vodafone
WNC
Youview
Yuxing
Zinwell
ZTE
02132
03007, 02407
01615
02682
00858
02378
02030
02030, 02437
03288
02401
03118
02994
02014
03139
04196
IPTV PVR Combination
ADB
01585, 02254,
02437
Altibox
Amino
Arcadyan
Arris
AT&T
AT&T U-verse
ATMC
BBTV
Belgacom TV
Bell
Bell Aliant
Bell ExpressVu
Bell Fibe TV
Bluewin
Bouygues Telecom
British Telecom
BT
BT Vision
Cabovisao
Canal Digital
02437
01615, 01898
02952
01998, 02378
00858
00858
03028
02980
02047, 02132
01998
01998
01998
01998
02271
03007
02294
02294
02294
02436
02030
CenturyLink
CHT
Chunghwa
Cisco
ClubInternet
CNS
Consolidated
Communications
Deutsche Telekom
Du
Echostar
Elion
Entertain
Entone
Freebox
Frontier
Communications
GDCATV
Glashart Media
Google
Guangdong Cable
Hikari TV
Huawei
i-CAN
Innovative Systems
Invitel
InviTV
Kaon
kbro
Kiss
KPN
Linksys
Lumos Networks
Magio Sat
Magnet
Meo
MetroNet
01998
03647
03647
03028, 02132,
00858, 02047,
02345, 02271,
02378, 03452
02132
02980
01998
02132
02401
03452
03916
02132
03048
01976
02378
02980
01615, 01898
03666
02980
03237
02994
02437
01898
02437
02437
04409
03139
02132, 02271
02952, 02437
02271
01998
02132
01615
02401
01998
Reference Information
Minerva Networks
Mitsubishi Electric
MOD
Motorola
Movistar
MTS
NTT
Numericable
Oi TV
Orange
Pace
Philips
Portugal Telecom
PrimeTel
PT
Qwerty
Sagem
Sagemcom
Samsung
SaskTel
Scientific Atlanta
Sky Austria
Sky Deutschland
SureWest
Swisscom
TalkTalk
TCC
TDC
Telefonica
03118
03274
03647
01998, 02437,
02378, 02952,
00858, 03916,
01585, 02030,
02401
01585
01998, 01615,
01481, 01898
03237, 03274
02436
03452, 03454,
04165
02407
00858, 01998,
03454, 02294,
02401
02378
02401
02437
02401
01898
02407, 03288
02436, 03007,
02407
02407
01998
00858, 02047,
02401, 02345,
03028, 02378
02620
02620
01998
02271
02994
04409
02271
01585, 03028,
03288
Telekom Deutschland
TELUS
T-Home
Thomson
U-verse
Verizon
Vodafone
WNC
Youview
Zinwell
02132
03028
02132
03007
00858
02378
02401
03118
02994
03139
SAT_PVR Combination
@sat
01300
ADB
02553
AEG
02738, 02813
Airtel
02248
Altech UEC
02097, 03517
Amiko
04197
Amstrad
01662, 01175,
02467, 01693
Arion
04348
Astro
03838
Atevio
02928
Atlanta
Austriasat
Auvisio
Avanit
Axil
AZ America
AZBox
B@ytronic
Bell
Bell ExpressVu
Bell Fibe TV
Bell Satellite TV
BENsat
Boca
03320
01195, 01197,
02957, 02631
02932, 02738,
02813
00299
03424
01631
02719
00740
00775
00775
00775
00775
02957
02797, 02308,
02813
Botech
Boxer
BSkyB
Bush
Canal Digitaal
Canal Digital
Canal+
CanalSat
CityCom
Clarke-Tech
Claro
CMX
Comag
Coship
Cyfrowy Polsat
DCR
Deutsche Telekabel
Digenius
Digi
Digihome
DigiQuest
Digital
DigitAlb
DigitalBox
Digiturk
Dilog
DirecTV
Dish Mexico
Dish Network
DishHD
Dishpro
DNA
DragonSat
Dream Multimedia
D-Smart
DSTV
02738, 03749
01957
01175, 01662
02034
02631, 02466,
02957
02553
02657
02657
02957
03320
03790
02932
02797, 02813,
02308
03790
02527
03517
01195, 01197
00740
01195, 01197
02034
01300
02308
01195, 01197
02540, 03240
03517, 02097
01957
01377, 01442,
00099
00775
00775
04090
00775
01957
02928
01237, 01923
02231
02059, 02060
DTK Deutsche
Telekabel
Dyon
Easy-One
Echostar
Edision
Elta
Engel
Etisalat
Eurosky
FaVal
Ferguson
Finnet
Foxtel
Freesat
Freesat+
Fuji Onkyo
Galaxy Innovations
General Satellite
Gi
GigaBlue
Globo
Golden Media
GoldMaster
Goodmans
Grundig
GVT
Handan
HD Box
HD+
Hirschmann
Hitachi
Hughes Network
Systems
Humax
01195, 01197
02738, 02813
03240
00775, 02527
01631
02738
03749
02443
00740
03422
02638
01957
01356
01692, 02928,
03266
02443, 03266
01631
02799, 04197
03064
02799, 04197
03663
02957
04197
02928
02034
02738, 03424
03789
01957
02928
02797, 03095
00740
02034
01442
02443, 01176,
01377, 03517,
01427, 01808,
02231, 02408,
02754
En-97
Reference Information
IceCrypt
ID Sat
Indovision
iNETBOX
Intv
Inverto
Jaeger
JVC
Kamosonic
Kaon
Kathrein
Labgear
LaSAT
LinkBox
LogiSat
Luxor
M vision
M7
Marusys
Maspro
Maximum
Medion
MegaSat
Meo
Mercury
Micro
Micro electronic
Miraclebox
Motorola
Movistar
Multichoice
Mysat
MySky Italia
MySky New Zealand
NEOTION
Nova
NTV Plus
En-98
04197, 02928
01334
01989
01237
04348
03095
02797
00775
02738
01300
02569, 01561,
03658, 00658
03424
00740
02957
02797, 02813
01935
03562
02631
02799, 03543
03099
01334, 02813
02797, 00740
01631, 02813,
02034, 02738
02466
03422
02797, 02813
02308
02928
00869
02527
02059, 02060
02738
02467
01356, 02211
01334
02475
01307, 01692,
02443
Octagon
Openbox
Opensat
Opticum
Orbitech
Orton
Pace
Panasonic
Philips
Polsat
Portugal Telecom
PT
Qwest
Raduga TV
RCA
Rebox
Ross
SAB
Sagem
Sagemcom
Samsung
Sansui
Sat Control
Schwaiger
02928
02928
02957, 02719
02957, 02797,
02932
01195, 01197
02957
01682, 01175,
02754, 02475,
02231, 01356,
02467, 02631,
02657, 03790,
01662, 02097,
02211, 02059,
02060, 02466,
02895
03099
01442, 02466,
00099, 02631
02527
02466
02466
01377
02957
01442
02928
02540
04197
01692, 02553,
01307
03789, 01692
03063, 01442,
01682, 01989,
02467, 01377,
03266, 01662,
03784, 03838,
01693
01545
01300
02308, 00740,
02957
SEG
Set-One
Sharp
Shaw Direct
Siemens
SilverCrest
Sky Austria
Sky Brasil
Sky Deutschland
Sky Ireland
Sky Italia
Sky New Zealand
SKY PerfecTV!
Sky UK
SkyCable
Skylink
Skymaster
Skypex
Skyplus
Skytec
Skyvision
SkyWay
Skyworth
SL
Smart
Spiderbox
Star Choice
Starmax
Stream System
Strong
Sunny
TDS Telecom
Teac
Technicolor
02034
03240
02034, 01935
00869
01657
02308, 02932
02754, 02443
01377
02754, 02443
01175, 01662
02467, 01693
02211, 01356
03099
01175, 01662
01631, 01957
02957, 01545,
02443, 02928,
01195, 01197
02932, 01545
00740
00740, 01175,
01334
02928
02797
02928
01631
00740
03095, 01631
03562
00869
02638
01300
03424, 01300,
02813, 01682,
02278
01300
00775
01957
03790
TechniSat
Technotrend
Techwood
Telasat
Telefonica
TeleSAT
Telestar
TelkomVision
TelSKY
Telstra
TELUS
Thomson
TiVo
T-Mobile
TNT SAT
Topfield
TPS
Tricolor TV
True Visions
TV Cabo
TV Vlaanderen
TVA Digital
TVonics
UPC
UPC Direct
Vantage
Vestel
Via Embratel
Viasat
Vivo
Vu+
Wisi
01197, 01195,
03440
01429
02034
02466
01692, 02527
02631, 02466
02540, 01195,
01197
04310
02540
01356
00775
01662, 01175,
01935, 01307,
02160
01377, 01442
02631, 02443,
01545
01692
01545, 02838
01307
03064
03784
02160
02631, 02466
02895
01906
02443
02443
02797
02231, 03517
02796
01682, 01197,
01195
02895, 01692,
02527
03458, 02799,
03543
00740, 02957
Reference Information
Xoro
Xtreme
Xtrend
Zehnder
Ziggo
Zircon
02738, 02813,
03422
01300
03320
03422, 03424,
01777, 02034,
00740
02443
02957
TV_DVD Combination
AEG
12197, 12239
Affinity
Akai
Akura
Alba
Apollo
Audiosonic
Audiovox
Azuki
Baier
Bauer
Beko
Black Diamond
Blaupunkt
Blue Sky
BlueDiamond
Bush
Celcus
cello
Centrum
Coby
Crown
Currys Essentials
13870, 13717
12676, 13067,
12197
12289, 11983,
12239
12676, 13005,
13067, 12104
12239
12104, 11983
11769
12239
12239
12197
12239
11037
12426
11037
12426
13005, 12676,
11983, 12104,
10698, 11037
12676
12673
11037
13627, 12315
11037
12486
Curtis
Dantax
Denver
DGM
Digihome
Digimate
Digitrex
diVision
Dual
Durabrand
D-Vision
Dynex
Easy Living
ECG
Electrohome
Element
Elfunk
Emerson
e-motion
Enox.
Essentials
Favi
Ferguson
Finlux
Funai
Goodmans
Gran Prix
Grundig
Haier
Hantarex
12855, 12466,
13895, 13636,
14035
12676
12197, 13067,
12239
12239
12676
12239
13067
12197, 12239
12197, 12676,
11037
10171
12197
12049
12104
12197, 12125
11670
12964
11037
11886, 11864,
11394, 10171
12426
12673
12486
13382
13005, 12426,
11037, 12676
12676
11394
11983, 11037,
11687, 12676,
12426
12197
12239, 12125,
12676
11753, 12309,
13429, 11749,
11983
12197
Hikona
Hisense
Hitachi
Hyundai
Ingo Devices
Insignia
iSymphony
Jay-tech
JMB
JTC
JVC
Kuppersbusch
Lenco
LG
Linetech
Linsar
Logik
Luxor
Magnavox
Marks & Spencer
Mascom
Matsui
Medion
Memorex
Memory
MTlogic
Murphy
Mx Onda
Naxa
Neon
Nikkei
Nimbro
11983
13519
12676, 11037,
11667
12676
12239
12049
13429
13067
12676
13067
12271, 11670,
11774, 12676,
11601
12676
12676, 11983
11860, 11423
12676
12676
13432, 13005,
12486, 11037,
11687
12676, 11037
12372, 11866,
11454
12673
12197
12486, 12676,
11037
12676, 12239,
13067
11670
11983
12104
12673
11983
12104, 13382
12673
12197
12104
Nordmende
OK.
OKI
Orava
Orion
Otic
Palsonic
Panasonic
Panavox
Philips
PHOENIX Apollo
Polaroid
Powerpoint
Prima
Pro Vision
ProLine
Proscan
Prosonic
QuantumFX
RCA
RefleXion
Reoc
Saba
Saga
Salora
Sandstrom
Sansui
Sanyo
Sceptre
Schaub Lorenz
Scott
SEG
13835
13434, 12676
12676
11037
11037, 12676
11983
13067
11291, 12170,
11636, 11480
13835
13614, 12800,
10556, 11454,
11394, 12372
12239
11769, 11523,
12676
10698
11753
12197
12676
12256, 13895,
13636
12676, 12197
12337
12187, 12746,
12932, 11447,
12247, 13382
12239
12197
12676
12197
12197, 12676,
12239
12197
11670, 13564
12676, 13488
12528, 12337
12197, 12289
11983
12673, 11037
En-99
Reference Information
Sencor
Sharp
Shinelco
Shivaki
Skyworth
Soniq
Sontech
Sony
Soundwave
SOVOS
Supersonic
Swisstec
Sylvania
Tauras
Teac
Technica
Technical
Technika
Techwood
Telefunken
Teletech
Tesco
Tevion
Thomson
Toshiba
TVE
UMC
United
VD-Tech
Venturer
Vestel
Viewsonic
En-100
12197
10818, 12676,
12360
12104
12197
12963
12493, 13005
11983
12778, 10000
11037, 12673
12239
11753, 12104
12106, 12104
11886, 11864,
11394, 10171
12197
10698, 11983,
13005
11037, 12426
12676
12426, 12197,
12106, 11983,
13005
12676
12239, 10698,
12676
11037
12426
12426
12675, 10625,
13047
13323, 12676,
11524, 11656
12239
12426, 12106
11037, 11983
13067
13005
11037
12049
Viore
VisionPlus
Walker
Waltham
Weltstar
Westinghouse
Wharfedale
Xiahua
Xiron
Xoceco
Xogego
Xoro
Zenith
Xogego
Xoro
Zenith
13429, 12352,
12104, 13382,
13118
12426
12676
11037
11037
11712
11983
11753
11983, 11037
11753
11753
13067
10000, 10178
11753
13067
10000, 10178
Integra Division of
18 park Way, Upper Saddle River, N.J. 07458, U.S.A.
Tel: 800-225-1946, 201-818-9200 Fax: 201-785-2650
http://www.integrahometheater.com
Integra Division of
Liegnitzerstrasse 6, 82194 Groebenzell, GERMANY
Tel: +49-8142-4401-0 Fax: +49-8142-4208-213
http://www.integra.eu
Integra Division of
302, Building 1, 20 North Chaling Rd., Xuhui District, Shanghai,
China 200032, Tel: 86-21-52131366 Fax: 86-21-52130396
http://www.integra.com.cn
Integra Division of
Kitahama Chuo Bldg, 2-2-22 Kitahama, Chuo-ku, OSAKA 541-0041, JAPAN
Tel: 072-831-8023 Fax: 072-831-8163
http://www.integraworldwide.com
F1506-0
SN 29402029PDF_EN
(C) Copyright 2015 Onkyo Corporation Japan. All rights reserved. Onkyo has the Privacy Policy. You can review it at [http://www.onkyo.com/privacy/].
* 2 9 4 0 2 0 2 9 *