1
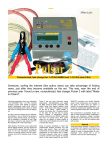
Storage
Warning! When not in use store your instruction manual and product in a
safe and dry place.
Before re-use after storage it is recommended that the product is checked by
a suitably qualified person to eliminate the risk of fire or electric shock
Examine the product frequently for signs of wear or damage.
24V HEAVY DUTY
JUMP STARTER/ POWER BANK
Specifications
Built-in battery capacity
25.9V/ 3300mAh(85.47Wh)
Starting outlet voltage
24V
Starting outlet maximum
400A
DC outlet output voltage
12V/3.5A
19V/3.5A
11
USB outlet output voltage
5V/2.1A(Max)
Charging input voltage
12V/2A
Charging time
~5-6 h
Torch power
3W
Working temperature
-20 C — 60 C
Storage temperature
-20 C — 60 C
MB3752
SAFETY & MAINTAINANCE
IMPORTANT SAFETY INSTRUCTIONS
1. SAVE THESE INSTRUCTIONS - This manual contains important safety
and operating instructions for this Jump Starter/ Power Bank.
2. Before using it, read all instructions and cautionary markings on the
product and in this instruction manual.
3. CAUTION - To reduce risk of injury, charge only with AC adaptor and
charging cord supplied. Other chargers may cause battery to burst causing
injury to persons and damage.
4. Do not expose product or chargers to rain, moisture, or snow.
5. Use of an attachment not recommended or sold by the manufacturer may
result in a risk of fire, electric shock, or injury to persons.
6. Make sure cord is located properly so that it will not be stepped on,
tripped over, or otherwise subjected to damage or stress.
7. Do not operate charger with damaged cord.
8. Do not operate the product or charger if it has received a sharp blow,
been dropped or otherwise damaged in any way; take it to a qualified
service person.
9. Do not disassemble product or charger; take it to a qualified service
person when service or repair is required. Incorrect reassembly may result in
a risk of electric shock or fire.
10. To reduce risk of electric shock, unplug charger before attempting any
maintenance or cleaning. Turning off controls will not reduce this risk.
11. The product is intended to be correctly orientated in a vertical or floor
position.
12. WARNING - RISK OF EXPLOSIVE GASES
a) BATTERIES GENERATE EXPLOSIVE GASES DURING NORMAL
BATTERY OPERATION. FOR THIS REASON, IT IS OF UTMOST
IMPORTANCE THAT EACH TIME BEFORE USING YOUR PRODUCT,
YOU READ THIS MANUAL AND FOLLOW THE INSTRUCTIONS
EXACTLY.
b) To reduce risk of battery explosion, follow these instructions and those
published by vehicle or battery manufacturer and manufacturer of any
equipment you intend to use in vicinity of battery. Review cautionary
1
How to Charge the Product
Charging on Vehicle:
Insert the DC adapter in the vehicle cigar lighter. Connect the DC head into
DC input port of the product. A scroll bar can be viewed on LCD display, i.e.
the product is being charged. After the charging is completed, the scroll bar
stops scrolling and display the battery is full.
Figure 8 Charging Diagrammatic Sketch
Charging at Home:
Select 12V 2A adapter to connect with the main supply socket. Connect the
DC output end into the DC socket of the product. A scroll bar can be viewed
on LCD display. After the charging is completed, the scroll bar stops scrolling
and display the battery is full.
10
Power Output Function with Multi-level Voltage Regulating
Figure 7 Multi-level Voltage Regulation Mobile Power Output
ON/OFF and Mode Switching: Press “ /DC SELECT” to start mobile
power function. After the equipment is started, press /DC SELECT key,
and DC output voltage can be switched between 12 V and 19V. After
pressing “DIM/ENTER” key to confirm, the voltage character stops flashing,
and DC outlet outputs corresponding voltage. Press /DC SELECT key for
at least 3 seconds to turn off the equipment.
DC Output Selection: Check external charging input parameters and
regulate the voltage output of the product. By using the cables and adapters,
it can achieve power supplying for the external equipments with different
voltage requirements such as laptop and other devices. If your equipment
does not work, please check whether the charging parameters of your
equipment are compliance with the output requirements of the product.
USB Output: USB output is standard 5V/2.1A current. USB output can
charge standard USB equipments. Please use the sold USB data wire to
charge your equipment.
Notes:
Connection sequences of adapter:
● Switch on the machine Switching voltage to external equipment
required level
● Insert DC adapter into the DC socket of the product
● Connect the adapter of corresponding product at the end of DC wire
● Insert the adapter into external equipment
● Check whether the charging is started on the external equipment
9
marking on these products and on engine.
c) DO NOT EXPOSE YOUR PRODUCT TO FIRE OR INTENSE HEAT
AS IT MAY EXPLODE.
13. PERSONAL PRECAUTIONS
a) Someone should be within range of your voice or close enough to
come to your aid when you work on your product
b) Have plenty of fresh water and soap nearby in case you need to clean
your skin, clothing, or eyes.
c) Wear complete eye protection and clothing protection. Avoid touching
eyes while working near battery.
d) If battery acid contacts skin or clothing, wash immediately with soap
and water. If acid enters eye, immediately flood eye with running cold
water for at least 10 minutes and get medical attention immediately.
e) NEVER smoke or allow a spark or flame in vicinity of battery or
engine.
f ) Be extra cautious to reduce risk of dropping a metal tool onto battery.
It might spark or short-circuit battery or other electrical part that may
cause explosion.
g) Remove personal metal items such as rings, bracelets, necklaces,
and watches when working with a lead-acid battery. A lead-acid battery
can produce a short-circuit current high enough to weld a ring or the like
to metal, causing a severe burn.
h) Use your product on a 24 volt battery only. Do not connect to any
other volt battery system.
i) NEVER boost a frozen battery
j) This system is not designed to be used as a replacement for a
vehicular battery. Do not attempt to operate a vehicle or boat that does
not have a battery installed.
14. WARNING - FOLLOW THESE STEPS WHEN BOOSTING A BATTERY.
A SPARK NEAR BATTERY MAY CAUSE BATTERY EXPLOSION. TO
REDUCE RISK OF A SPARK NEAR BATTERY OR INJURY, FOLLOW
PRECAUTIONS BELOW.
a) Boosting procedures should only be performed in a safe, dry,
well-ventilated area.
b) When using this unit in proximity to the vehicle's battery and engine,
2
stand the unit on a flat, stable surface, and be sure to keep all clamps,
cords, and clothing and body parts away from moving vehicle components.
c) Check polarity of battery posts. POSITIVE(POS, P,+) battery post
usually has larger diameter than NEGATIVE (NEG, N, -) post.
d) Determine which post of battery is grounded (connected) to the
chassis.
e) When disconnecting cables, disconnect clamp from vehicle chassis
first and then remove clip from battery terminal.
F) Store in a cool, dry place. Keep out of reach of children.
15. CAUTIONS a) Vehicles that have on-board computerized systems may be damaged
if vehicle battery is boosted. Before boosting a vehicle battery, read the
vehicle's owner’s manual to confirm that external-starting assistance is
advised.
b) Excessive engine cranking can damage a vehicle's starter motor. If the
engine fails to start after the recommended number of attempts,
discontinue jump-start procedures and look for other problems that may
need to be corrected.
FIRST AID:
SKIN: If battery acid comes in contact with skin, rinse immediately with
running water, then wash thoroughly with soap and water. If redness, pain or
irritation occurs, seek immediate medical attention.
EYES: If battery acid comes in contact with eyes, flush eyes immediately for minimum of 10 minutes - seek immediate medical attention.
Recharge every 3 months when not in use in order to extend the life of
lithium batteries.
When the product does not identify the ignition of a truck, it will be switched
off automatically within 60s, or you can long press “ /DC SELECT ” key to
switch off the product.
When the truck cannot activate the product automatically due to low voltage
of battery or other causes, the product has manual activation mode setting.
Press “ /DC SELECT” and side plate LED warning light switch key “
”
at the same time ( for at least 3 seconds), the product is activated manually.
The product can be used to start the truck directly.
Warning:
When manual mode is used, the product does not have
reverse protection connection function. Do NOT connect
reversely under this mode.
Precautions:
The product can only be used as an emergency power for 24V truck
starting, and cannot replace the truck battery.
Please connect the output line alligator clips with battery based on
corresponding color.
When the voltage of built-in battery of the product is lower than the truck
starting required min voltage, the product will not output current to the truck
to start the engine.
When the voltage of truck battery is lower than 18V, the product will not
enter into start status automatically.
After the output line of the equipment is disconnected with the truck battery,
do not contact the positive pole and negative pole. It may generate result in
potential safety hazard.
The product can only be operated in the range of -20℃ to 60℃.
Please match with your vehicle exhaust and select corresponding product
when buying this series of products.
3
8
Operation
This product has been carefully engineered and manufactured to give you
dependable operation. Please read this manual thoroughly before operating
your new product as it contains the information you need to become familiar
with its features and obtain the performance that will bring you continued
enjoyment for many years. Please keep this manual on file for future
reference.
Product Description
Figure 3 Starting Current Output Interface and truck Battery Wiring
1
Note: Positive pole of outlet line is connected with the positive pole of
truck battery (Red). Negative pole of outlet line is connected with the
negative pole of truck battery (Black).
MO D
E
/ C
DSEL
ECT
2
3
BA
CKL
I G
HT
D IM /E N T
ER
5
4
6
7
8
9 10
11
Figure 1 Product Front and Side Appearance Description
Figure 4 LCD Display Status of Normal Starting Interface Connection
After the connection is connected properly, you can start the truck within
60s. If the truck is not started beyond 60s, the equipment is switched off
automatically. It requires you to disconnect the product with the connector of
auto battery and connect again. The system will re-start ignition function and
maintain for 60s. After the truck is started, please release the alligator clip
connected with the truck battery, and draw the start connection line from the
rear socket of the product.
Note: The product can identify ignition start status automatically. Once
it is started successfully, if there is reverse current , the product will be
switched off automatically.
7
1. Torch ON/OFF
2. Torch
3. Display
4.ON/OFF/DC SELECT
9. LED Warning light
5. DIM/ENTER
10. EC5 Output(24V output)
6. USB Output
7. DC12/19V Output 11. LED Warning light ON/OFF
8. DC Input
Display Description
1
2
3
4
5
1. Battery power capacity
2. Jump starter indicator
3. Charge indicator
4. USB output indicator
5. Voltage indicator
Figure 2 Product Display Description
4
/DC SELECT: ON/OFF/DC Voltage Selection Key
/DC SELECT: Press to switch on the equipment and press the key to
select DC output voltage.
DC output voltage can be switched between DC 12 V and DC 19V. When
switching voltages, selected voltage is flashing. After pressing “DIM/ENTER”
key to confirm, the voltage character stops flashing, and DC outlet outputs
corresponding voltage.
To switch off the equipment, press“ /DC SELECT” key for at at least 3
seconds.
Note: There is no DC output under flashing status.
DIM /ENTER: LCD Backlight switch/DC voltage selection confirmation key In
ON mode, press “DIM/ENTER” key to switch on/off backlit. Under voltage
regulation status, press “DIM/ENTER” key to confirm currently selected
voltage.
Torch ON/ OFF
Press the Torch ON/ OFF button
for about 3 seconds to turn on the torch.
After the torch is on, press the torch switch key
to switch between “ON”,
“SOS” and “OFF” mode.
Under “ON” Status, press the torch switch key
for about 3 seconds in
order to turn off the torch.
LED Warning Light Switch
The LED Warning Light is to warn the other vehicles not to collide with the
accident vehicle when the truck has failure. It can also be used as a lighting
device when repairing the truck.
Press the LED warning light switch
for about 3 seconds to turn on the
LED warning light function.
The default setting is “traffic fault warning.
Press the key and choose the preferred model including traffic fault
warning”,“White lighting” and “OFF” mode.
Press the key
for about 3 seconds in order to turn off the LED warning
light
5
Mode Definition:
Traffic Fault Warning: The red LED flashes twice followed by twice flashing
of white LED and then the same cycle repeats.
SOS: The light flashes in the cycle of triple short flashing---triple long
flashing—triple short flashing and then the same cycle repeats.
Note: Turn off the LED warning light by pressing the switch
for at
least 3seconds when the it is not in use in order to extend the life of
battery.
To Jump Start a truck
Warning:
The product is for 24V vehicles. Do NOT connect it with 12V
vehicle to avoid any damage.
Warning:
Jump-starting a truck can cause serious injury. If you are
unsure how to operate the equipment, please do not attempt
to jump-start your vehicle. Pls contact a qualified person for
assistance.
The product is for you to jump start the truck when the 24V battery is in
insufficient voltage, low temperature status or the truck cannot be started.
To jump start the truck, insert the starting output line into the EC5 interface
(positive pole is red and negative pole is black). Clamp the red alligator clip,
which is the positive pole of output line, on the positive pole of 24V battery,
and black alligator clip, which is the negative pole of output line, on the
negative pole of truck battery. If the connection is correct, LCD display of the
product will display a sign meaning the battery of the product is connected
with the battery of the truck and everything is ready. The built-in buzzer will
alarm twice with long buzzing. Then two continuous short "beep" sounds are
alarmed every two seconds to inform user the status is ready, please start
the truck right away. If the connection is reverse or the contact is unreliable,
it may result the product cannot be started automatically.
6