Transcript
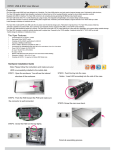
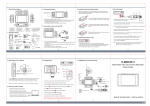
Step 5. Configure start up wizard
1
Select the screen resolution from the drop-down menu
based on your TV/monitor’s resolution.
2
If you reboot your system and want the wizard to start
again check this box.
1 DVR Power Adapter
What is in the box?
Resolution
1
4
4
1
1
1
System Resolution: 1024 * 768/60HZ
HD-TVI Digital Video Recorder
720p Analog Cameras
90ft. Siamese BNC Cables
1-to-4 Power Splitter
Mouse
Remote Control
1
1
1
1
2
Wizard
DVR Power Adapter
Camera Power Adapter
Quick Start Guide
Warranty Card
Security Stickers
1
2
3
5
Start wizard when device starts?
3
4
5
6
7
8
9
We strongly recommend that you change the default
Admin password ‘12345’ for better security protection.
Wizard
Admin Password
*****
New Admin Password
New Password
Confirm
4
Select the applicable time zone, date/time format, and time.
Wizard
Time Zone
Date Format
System Format
System Time
(GMT+08:00) Beijing, Urumqi, Singapore
MM-DD-YYYY
09-29-2014
18:14:37
We recommend checking ‘Enable DHCP’ even if your DVR is not
connected to the internet, this will automatically get the DVR
IP address.
5
6
7
8
9
10
11 12
1 Power LED
Indicates if the DVR is powered on
7 VGA Port
Connects to TV or computer monitor
2 Status LED
Indicates if the Hard Drive is working
8 Audio I/O
Connects an extra microphone/speaker
(not included)
3 Tx/Rx LED
Indicates if the Network is active
9
LAN
10 RS-485
Connects to your router
4 Video In
Connects cameras via BNC cables
5 USB Port
Connects to a USB mouse or flash drive
11 12V
Connection for additional PTZ camera
(not Included)
Connects the12V DC Power Supply
6 HDMI Port
Connects to HDTV or computer monitor
12 Power
Power Switch
Wizard
NIC Type
Enable DHCP
IPv4 Address
10M/100M Self-adaptive
Troubleshooting
192.0.0.64
The wizard will show additional network information,
click ‘Next’ to proceed.
Problem
No display/No •
signal/Invalid
•
format
•
Wizard
Server Port
HTTP Port
RTSP Port
8000
80
8554
To initialize the hard drive click the ‘Init’ box otherwise the
DVR will NOT record.
Wizard
Capacity
11 465.76GB
Status
Normal
Property Type
R/W
Local
Possible Solution(s)
Free Space
464GB
•
No picture/No •
video
Cannot log in
•
The default user name is: admin and the default password is: 12345. If you don’t
remember your old password, please submit a ticket to us at
www.laviewusa.com/contact/.
Camera
picture is not
clear
•
Make sure the camera is not placed behind a window, there is no interference or a strong
light source in front of the camera
In DVR Menu>Record>Parameter>Resolution, set the sub stream resolution to CIF for
all channels
Move the camera to a different location and/or direction
NOTE: The live view (sub stream) resolution is NOT the actual image quality recorded (Main
stream); Connection of excessive length (over 200ft) of BNC cable will drop the camera
image quality; Working at extreme weather condition (below -40F or above 140F) will drop
the image quality and damage the camera.
If you wish to add an IP camera click ‘Search’ otherwise,
click ‘Next’ to proceed.
•
•
Wizard
IP Address Amount
11 192.168.1.36
1
Model
CMIP3412
Choose continuous or motion detection recording from the listed
options. Check the ‘Start Recording’ box to initialize recording.
Click ‘Ok’ to finish
Wizard
the wizard.
Start Recording
Continuous
Motion Detetction
Make sure the VGA/HDMI cable is properly connected to both the DVR and TV/monitor
NOTE: A laptop cannot be used as a screen
Make sure your TV/monitor is on the correct video input (e.g. HDMI1, HDMI2, etc.)
Try switching to another 1080p TV/monitor and adjust the output resolution in the DVR
menu
On the front of the DVR check that the power LED light is on
Make sure the camera is completely connected to the power splitters well as the Video In
plug
Night vision is
not working
DVR is not
recording
•
•
•
The infrared activates automatically when the environment is dark enough. You can check
that the camera infrared bulbs are working properly as they turn light red in dark
environments
Check that the hard drive status is normal and is initialized under the Main
Menu>HDD>General
Enable the record mode (Normal or Motion Detection) under the Main
Menu>Record>Schedule>Edit for the selected camera
HD-TVI
QUICK START GUIDE
Remote Viewing
View footage on your mobile devices with our app. You can either
scan the provided QR code or search LaView Net in the app store.
LaView NET
SCAN ME
Content may vary by model, including the number of channels, cameras, configuration,
and hard drive capacity.
Questions?
Call us at: 626-898-4988 (M-F from 9am to 6pm PST)
Open support ticket at: www.laviewusa.com/contact
Tutorial videos & user manual at: www.laviewusa.com/support
Copyright © LaView Eagle-Eye Technology Inc. 2015