1
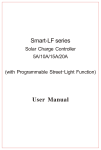
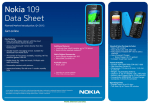
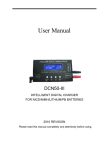
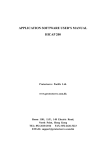
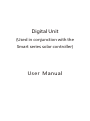
Digital Unit
(Used in conjunction with the
Smart series solar controller)
User Manual
Digital Unit User Manual
Digital Unit User Manual
Thanks for selecting the Digital Unit product for setting Smart series solar charge controller. Although the
Digital Unit is ver y simple to use, please take the time to read this user manual. This will help you to make full use
of many advantages the controller can provide your solar lighting system.
Mode 1.Single time and Dusk to Dawn
1.Description
Day/Night
Threshold
Batter y Type
Load current and Dimming
Day/night threshold
Day/night threshold
Sunrise
Sunset
Time 1+Time 2
Light on
Dusk to Dawn
Light off
Light off
Mode
Mode
SEND
TEST
DISP
Up
OK
OK
SET
Mode2.Double time mode (can set the dimming time)
Day/night threshold
Day/night threshold
Sunset
Sunrise
Down
Digital Unit
Light on
Send/Test
Set
Toggle Switch 2
Display
Toggle Switch 1
Time 1
Light off
Mode 3.Double time mode (can set the load off time)
Day/night threshold
Day/night threshold
2.Connection & Display
Sunrise
Sunset
Light on
Light off
Time 1
Light off
Light on
Time 2
Light off
Mode 4.Double time mode (can set the load off time,
Full Power + Dimming)
Mode
DISP
SEND
TEST
OK
Day/night threshold
Day/night threshold
SET
Sunrise
Sunset
Digital Unit
Light on
Smart
Light off
Connect to Smart with the cable attached.
Step 1:Plug in the communication cable to Digital Unit.
Time 1
Light off
Dimming
Time 2
Light off
Mode 5.Double time mode (can set the load on time
before morning coming)
Step 2:Plug the cable with Smart solar charge controller.
Day/night threshold
Day/night threshold
3.Operation
Sunrise
Sunset
3.1Setting status
First turn Toggle Switch 1
Time 2
Dimming
Light off
Time1
Light on
Output signal
SET
Light off
to "Set".
1.Load control mode selection
Mode
Turn Toggle switch 2 to "Mode"
,press "OK" to
change the setting of mode and time.
Time2
Light off
Mode 6.Double time mode (can set the load on time
before morning coming, Full power + Dimming)
Day/night threshold
The default setting is “100”, which means Dusk to
Light On
Day/night threshold
Sunrise
Sunset
Dawn mode.
Mode 2,4,6 which include dimming mode, only apply
to Smart-CC series constant current solar charge
controller.
Time1
Light
on
五、信号输出
Light off
Light off
Page 1 of 5 Pages
Time2
Dimming
Light off
Digital Unit User Manual
Display
Status
Setting
Display
a
Flash
a
Mode3
a
4
Mode4
a
5
Mode5
a
6
Mode6
Select the desired
setting option,
press the OK button
to confirm.
Flash
Timer1 setting, 0 to 9 optional,
Time1
t he default setting i s 0.
2
2hours
3
3hours
4
4hours
5hours
5
6
6hours
7
7hours
8
8hours
9
9hours
0
0
1
1hour
a
2
2hours
a
3
3hours
3.2Batter y type and Protection setting
a
4
4hours
"OK" to change the setting of batter y type and
Turn toggle switch 2 to "Batter y type"
,press
protection.
a
5
5hours
Display
Status
Flash
a
6
a
6hours
Batter y type
Press"OK"
Press Up/Down
a
8
8hours
Batter y type LVR LVD
Page 2 of 5 Pages
1
Liquid
a
a
7
7hours
a
Select the desired
setting option,
press the OK button
to enter the next set.
1hour
a
Up
Down
1
a
a OK
0
a
3
0
a
Up
Down
a
Select the desired
setting option,
press the OK button
to enter the next set.
a OK
a
Mode2
a
2
Time2
a
a
t he default setting i s 1.
Timer2 setting, 0 to 9 optional,
t he default setting i s 0.
a
Mode1
a
a
1
9hours
a
Press Up/Down
Setting
Flash
a
Press"OK"
Mode Time1 Time2
Mode setting, 1 to 6 optional,
9
Mode selection
Status
a
Mode
2
Gel
Setting
Digital Unit User Manual
Display
Status
Setting
Flash
Low voltage reconnect set,
t he default setting i s 12.5V/25.0V.
3.3 Day/Night threshold
The controller recognize day and night based on the
LVR-Low voltage
reconnect
solar array open circuit voltage. The range of this
threshold voltage is 3.0V~7.5V, 0.5V each step.
For 24V system, the adjustment range of this day/night
1
threshold is 6.0~15.0V, but the setting range is 3.0~7.5V,
12.0/24.0V
the actual day/night threshold voltage is the setting
a
value multiplied by two. For example, if the setting value
a
a
Select the desired
setting option,
press the OK button
to enter the next set.
of day/night threshold is 3.0V, the actual value is 6.0V in
2
12.5/25.0V
24V system.
Turn toggle switch 2 to "Day/Night threshold"
,
press "OK" to change the setting of day/night threshold
3
voltage.
12.8/ 25.6V
Display
Status
Setting
Flash
4
a
13.2/26.4V
SOC2
a
3
SOC3
a
4
SOC4
4
4V
5
5V
6
6V
a
2
3V
a
SOC1
a
7
Flash 7V
t he default setting i s 3.
Select the desired
setting option,
press the OK button
to enter the next set.
Decimal bit set, 0, 5 optional,
t he default setting i s 0.
6
SOC5
a OK
SOC6
Up
Down
a
a
SOC Option Description:
0
.0V
a
5
Decimal bit
a
Select the desired
setting option,
press the OK button
to confirm.
a
Up
Down
1
Integer bit set, 3 to 7 optional,
a
LVD-Low voltage
disconnect
3
a
Low voltage disconnect set,
t he default setting i s SOC5.
Press Up/Down
Integer Decimal
a
a
Flash
a OK
Integer bit
Press"OK"
5
.5V
After these settings, press "OK" to confirm.
1.SOC1----10.8/21.6V
3.4 Load current and Dimming value setting
2.SOC2----11.0/22.0V
3.SOC3----11.5/23.0V
3.4.1 Normal controller only applies to mode 1,3,5, it
4.SOC4----11.0/22.0V~11.7/23.4V
does not have load current and dimming function. This
5.SOC5----11.2/22.4V~11.8/23.6V
setting is invalid to the normal controller--the first and
6.SOC6----11.4/22.8V~11.9/23.8V
second bit of the LCD do not display, although the third
The Smart series controller has two different ways
to protect batter y from being deep discharged.
Choose the best setting for your system.
bit display but invalid.
3.4.2 The current setting range of constant current
controller is as following:
Model
SOC1-SOC3:Voltage controlled.
As SOC2:Disconnect at 11.0V/22.0V fixed voltage.
SM05-CC
SOC4-SOC6:State of charge(SOC)Controlled.
As SOC6:Disconnect at 11.4V/22.8V(at normal load
SM10-CC
current) up to 11.9V/23.8V(at no load current).
Page 3 of 5 Pages
Voltage
Setting range of load current
12V
0.1A~2.5A
24V
0.1A~4.0A
12V
0.1A~5.0A
24V
0.1A~8.0A
Digital Unit can limit
the current value
automatically
according to the
configuration of the
solar system.
Digital Unit User Manual
,Press "OK"
Integer bit
Press"OK"
0
0
a
1
1A
a
2
2A
a
3
3A
x.7A
8
x.8A
9
x.9A
Dimming value set, 30% to 70%
5A
a
6
6A
a
7
7A
8
8A
Up
Down
Select the desired
setting option,
press the OK button
to confirm.
3
30%
4
40%
5
50%
6
60%
a
a
5
a OK
a
4A
Dimming value
optional, t he default setting i s 50%.
a
a
4
Setting
Flash
a
Select the desired
setting option,
press the OK button
to enter the next set.
a
Load current integer bit set,
0 to 8 optional,
the default setting is 1.
Press Up/Down
Status
7
a
Load current Dimming Value
setting
(30%~70%)
Display
Setting
a
a
Status
a
Flash
Display
a
Turn toggle switch 2 to "Dimming"
to change the load current and dimming value.
7
70%
The dimming function only applies to mode 2,4,6,
default setting is 50%.
a
Flash
3.5 Send to the controller
After finish all the settings, press the (SEND/TEST)
Decimal bit
Load current decimal bit set,
0 to 9 optional, the default setting is 0.
0
settings, if another controller requires the same
settings, simply press the SEND/TEST button and
wait until the Digital Unit displays sent successfully.
1
x.1A
a
2
x.2A
a
3
x.3A
Status
LCD Display
Buzzer
Setting
Successful
Continuous ring
4 seconds
Setting
failure
Alarm
After setting, Press “Up”,,”Down” or “OK”
button to resend.
a
4
x.4A
a
5
x.5A
a
Select the desired
setting option,
press the OK button
to enter the next set.
The Digital Unit will automatically save the above
x.0A
a
Up
Down
a
a OK
button then wait for response.
6
x.6A
4.View Information and Test
4.1 Check the setting of controller
DISP
First turn toggle switch 1 to “Disp”.
Warning: Digital Unit will show "555" when the
connection is not good, Please reconnect the
cable and tr y again.
Page 4 of 5 Pages
Digital Unit User Manual
4.1.1Load Control Mode
4.3 Error information
To check the setting of mode and time,turn toggle
Turn the toggle switch 1 to "Disp", when the controller
switch 2 to "Mode".
fails the Digital Unit will display the type of fault.
AS.
Mode
Mode
Time1
1
Time2
0
0
4.1.2Batter y type and Protection
E
E
1
Over current protection
E
E
2
Short circuit protection
E
E
3
Low voltage protection
E
E
4
High voltage protection
E
E
5
Over temperature protection
To check the setting of batter y and protection, turn
toggle switch 2 to “Batter y Type”.
Batter y Type
AS.
1
LVR
LVD
2
5
4.1.3Day/Night threshold
To check the setting of Day/Night threshold voltage,
turn toggle switch 2 to “Day/Night threshold”.
Regardless 12V or 24V system, Digital Unit will show
If any malfunction with the system, the Digital Unit
will display it and the alarm also sounds at the same
time, the sound will stop after one minute or the "OK"
button is pressed, and the alarm will sound again and
again ever y five minutes till the malfunction is solved.
the actual voltage of Day/Night threshold.
AS.
Day/Night threshold
0
3
0
4.4 System Information
4.1.4 Load current and Dimming
Turn toggle switch 2 to “Load current and Dimming”,
this view only applies to Smart-CC series controller.
AS.
Load current
1
Dimming
0
5
Mode
Toggle switch 2 to “Mode”
a
4.2 Test Function
Press OK
Turn the toggle switch 1 to "Disp",
then press TEST/SEND button
To check the system information, turn toggle switch
1 to “Disp”, toggle switch 2 to “Mode”,then
press ”OK”. You can switch batter y voltage, load
current and ambient temperature by press
“Up”and “Down”.
DISP
SEND
TEST
13 0
Batter y Voltage 13.0V
05 0
Load Current 5.0A
on the Digital Unit.
Pressing TEST/SEND button on the Digital Unit will
switch on load terminal for 1 minute in daytime. T he
test ing function can help the user to verify correct
2 3
installation or for trouble shooting a system
problem. For nominal controller, the lights can be
turned off via pushing the test button again w ithin
this 1 minute.
For Smart-CC series controller, the user can press the
Ambient temperature 23℃
5. Technical Data
Self Consumption
< 8 mA
Dimensions
130mm x85 mm x24 mm
Weight
104g
Communication Cable
80cm
Case Protection
IP22
Ambient temperature
-20 ~ +40 ℃
test button again to make the controller works in
dimming mode, press the button thirdly to turn off
the load (Load and indicator status is shown in the
following table).
Number of
keystrokes
Load State
LED Status
1
Load open,full power Green LED flash
2
Load open,dimming
Green & Red LED flash
3
Load close
Green LED flash
Subject change without notice, Ver : DB16.
Page 5 of 5 Pages