1
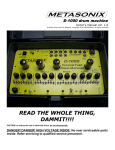
D-2000 drum machine
owner's manual ver. 1.0
copyright 2015-2020 METASONIX, all rights reserved
WARNING:
this is an extremely abnormal product.
If you purchased it expecting to get
“TR606-like” or “vintage-like” drum
sounds, you will be sorely
disappointed.
CAUTION: to reduce the risk of electrical shock, do not disassemble.
DANGER! DANGER! HIGH VOLTAGE INSIDE. No user serviceable parts
inside. Refer servicing to qualified service personnel.
DETAILED SAFETY INSTRUCTIONS:
All the safety and operation instructions must be read before the D-2000 is operated. If you don't read and HEED
them, you are a MORON and you deserve to be fed to carnivorous hamsters.
RETAIN INSTRUCTIONS: The safety and operating instructions should be retained for future reference.
HEED WARNINGS: All warnings on the D-2000 and in the operating instructions should be adhered to.
FOLLOW INSTRUCTIONS: All operating instructions should be followed.
WATER AND MOISTURE: The D-2000 should not be used near water (e.g. near a bathtub, washbowl, kitchen sink,
laundry tub, in a wet basement, near a swimming pool etc., ya stupid bastard). Care should be taken so that
liquids are not spilled onto or near the enclosure.
VENTILATION AND COOLING: The D-2000 normally operates VERY warm to the touch. It MUST be situated so
that its location or position does not interfere with convective cooling.
The D-2000 MUST NOT be used on a bed, sofa rug or similar surface which may prevent proper cooling. It is NOT
a toy, AND IT IS NOT A DILDO. If the D-2000 is mounted in a rack or other built-in installation, space must be left
around it to allow convection from the case.
HEAT: The D-2000 MUST be situated away from heat sources such as
radiators, heat registers, stoves, or other devices (including power
amps) that produce heat. We DO NOT recommend leaving the D-2000
powered up for long periods.
POWER SOURCE: The D-2000 should be connected to a 12-volt DC adapter power supply ONLY of the type
marked on the D-2000 panel. DO NOT try to feed it with AC power. 12 volts DC ONLY!! The power connector is a
2.1mm coaxial type, with CENTER POSITIVE.
POWER CORD PROTECTION: Power supply cords should be routed so that they are not likely to be walked on or
pinched by items placed upon or against them. Don't burn your house down, mommy fucker.
CLEANING: The D-2000 should only be cleaned with a soft cloth moistened with water. Unplug the power supply
before attempting to clean. Dickwad.
NON-USE PERIODS: The power adapter of the D-2000 should be unplugged from the outlet when left unused for a
long period of time. Don't burn your house down, cuntboy.
DAMAGE OR TUBE REPLACEMENT REQUIRING SERVICE:
The D-2000 should be serviced by qualified service personnel when:
-The D-2000 has been dropped, physically damaged, or subjected to force;
-Liquid has been spilled onto the D-2000 or it has been exposed to rain;
-The D-2000 does not appear to operate normally or exhibits a marked change in performance.
SERVICING: The user MUST NOT attempt to service the D-2000.
All servicing must be referred to qualified service personnel.
METASONIX LIMITED WARRANTY and standard legal disclaimer
Thank you for purchasing this Metasonix product. And for not whining about “problems”. The following terms and conditions apply:
1. Warranty period is for one year from date of purchase with proof of purchase submitted. Warranty covers electrical failure of vacuum tubes
and gas-filled tubes, except in cases explained in 3 below.
2. Operating instructions must be followed. This device was intended ONLY for use by AUDIO AND MUSIC PROFESSIONALS. IT IS NOT
INTENDED FOR USE BY ORDINARY CONSUMERS!!
Product must not have been damaged as a result of defacement, misuse, abuse, neglect, accident, destruction or alteration of the serial
number, improper electrical voltages or currents, repair, alteration or maintenance by any person or party other than our own service facility
or an authorized service center, use or installation of non-Metasonix replacement parts in the product, or the use of this product outside of
the U.S.A. or Canada, or modification of the product in any way, or incorporation of the product into any other products, or damage to the
product caused by accident, fire, floods, lightning, or acts of God, or any use violative of instructions furnished by Metasonix. It is also not
intended for use as a condom-warmer.
3. Obligations of Metasonix shall be limited to repair or replacement with same or similar unit, at our option. To obtain repairs under this
warranty, present the product and proof of purchase (e.g. bill or invoice) to the authorized Metasonix service center, transportation charges
prepaid. When returning the product for repair, please pack it very carefully, preferably using the original packaging materials. Please also
include an explanatory note.
IMPORTANT:
To save yourself unnecessary cost and inconvenience, please check carefully that you have fully read and followed the instructions in this
instruction manual.
This warranty is in lieu of all other expressed warranties, obligations or liabilities. ANY IMPLIED WARRANTIES, OBLIGATIONS, OR
LIABILITIES, INCLUDING BUT NOT LIMITED TO THE IMPLIED WARRANTIES OF MERCHANTABILITY AND FITNESS FOR A PARTICULAR
PURPOSE, SHALL BE LIMITED IN DURATION TO THE DURATION OF THIS WRITTEN LIMITED WARRANTY. Some states do not allow
limitations on how long an implied warranty lasts, so the above limitations may not apply to you. IN NO EVENT SHALL WE BE LIABLE FOR
ANY SPECIAL, INCIDENTAL OR CONSEQUENTIAL DAMAGES FOR BREACH OF THIS OR ANY OTHER WARRANTY EXPRESS OR IMPLIED,
WHATSOEVER. Some states do not allow the exclusion or limitation of special, incidental or consequential damages, so the above limitation
may not apply to you. This warranty gives you specific legal rights, and you may also have other rights which vary from state to state.
METASONIX shall not be held liable for any incidental, consequential, or direct damages or expenses associated with the use or misuse of the
D-2000. The audio output of the D-2000 is capable of damaging some types of solid-state audio equipment; such use is entirely at the risk of
the user. METASONIX does not guarantee that any of its products are designed for any particular use or purpose. The entire risk of suitability
and performance of this product lies with the user. Products manufactured and/or sold by METASONIX are not authorized for use as critical
components in devices used in life support and other systems whose failure or performance could result in compromised safety or danger to
life or property. Don't perform anal surgery with a D-2000, unless you like to torture bronies.
Did we mention the DANGEROUS HIGH VOLTAGES inside the D-2000?
DO NOT OPEN THE D-2000 unless you're a service technician.
NOTE: All sales are FINAL, especially custom designs. Only a Metasonix authorized dealer is permitted to return products to Metasonix for a
refund or exchange.
WHAT IT DOES
WARNING: The D-2000 is NOT a “Linndrum” or a “TR606 simulation” or a sample
playback device! Do not expect it to sound or behave like a classic drum
machine or a real drummer! Do not expect it to sound or behave like a machine
trying to sound like a drummer! It is ABNORMAL. It does NOT behave like other
music products.
Also, please do not power it up, experiment for a few minutes, and then quickly
contact us, claiming it is “broken” or “bad”. Each new D-2000 was tested at the
factory very carefully. Many of our past products were often returned with a
warranty claim that they were “broken”. And most such “broken” units turned
out to be working perfectly. We will publicly mock anyone who returns a working
D-2000 claiming it is “broken”.
The D-2000 contains five drum “voices”, which use vacuum tubes, plus a
monophonic mixer also using a tube. Pushbuttons are provided to trigger each
of the drum sounds. The mixer also has a CV input that can be used to
completely mute the output if desired. At the far right of the panel is an 8hp
space for a Eurorack synthesizer module.
It is set up to install a trigger sequencer which produces the correct pulses
needed for the D-2000 voices. A 16-pin Euro power cable behind the panel can
provide +12v power to the module from the D-2000's supply. If you want the D2000 to produce automatic rhythms, you will need a trigger sequencer.
Metasonix recommends the Delptronics “Triggerman” or the ALM “Pamela's
Workout”. Either one will fit in the panel space and work with the D-2000 power
and trigger inputs. The EMW “8 Step Trigger Sequencer” should also work,
although it has not yet been tested.
Other trigger sequencers capable of producing short pulses for the “Pitched
Drum” voices, such as the Tiptop Trigger Riot or the Doepfer A-157, should also
work with the D-2000, although they will have to be mounted in an external Euro
cabinet with its own power supply. Clock generators or dividers will work with
the “Gated Noise” voices but NOT with the “Pitched Drum” voices, which need
short pulses (long pulses will give “double triggering”, which may or may not be
desirable). The D-2000 works best with SHORT pulses of 0 to +5v or more;
consult with the module manufacturer to see if a given module is compatible
with the D-2000. If a pulse source you want to use doesn't produce the needed
short pulses, a pulse-length device such as the Doepfer A-162 must be used for
each trigger that needs processing.
Again, everything about the D-2000 is abnormal. It is not perfectly “clean” and
perfectly “distortionless”, and it cannot be made so. Because it uses vacuum
tubes. It is most similar to our previous D-1000 drum machine, and completely
different from any drum machine ever made before. So comparisons are
specious.
GATED NOISE SECTIONS
These sections use a noise generator and a pentode apiece to
produce a “cymbal-like” sound, by turning the white noise on
and off. Each section has its own attack-decay envelope generator
and a tone control that cuts high frequencies. The trigger signal for
these sections can either be a short pulse (in which case the “attack”
control has little effect), or a longer pulse which will allow use of
both attack and decay. Note that the noise sections produce a louder
signal than the pitched voices, for the same “Out vol” setting.
IT IS NOT “BROKEN”. The CV input controls only the decay time via
a slow-responding ”vactrol”, and to use it, the “Decay” control must
be turned fully up (clockwise).
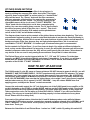
The diagram shows how to set the controls of the gated noise sections when beginning. This is the
recommended beginning setting. It must be noted that the knobs do not have the usual positioning in
their extreme settings, and that this is normal.
Set the controls for Gated Noise 1 and Gated Noise 2 as shown to begin. You might increase the Decay
time for one of them so they can be differentiated. If a long pulse is used, the Attack and Decay
controls can be adjusted to turn these voices into hi-hat, ride or crash cymbal sounds. No, they will not
sound exactly like real cymbals—this scheme is very similar to the one used in early analog drum
machines. Except that it is done with tubes.
The Gated Noise voices can be triggered with the “N1” and “N2” buttons. Note that they will sound as
long as the buttons are held down; this is normal. IT IS NOT “BROKEN”.
PITCHED DRUM SECTIONS
These sections each use a bandpass filter. A decaying tone is
made by striking the resonant filter with a short pulse. The trigger
signal for these sections MUST be a short pulse or a “double-strike”
effect will be heard. The “Reson” knob sets the filter resonance,
and is an extremely critical setting. You must set the resonance to
a point just before the filter “howls”. It is a finicky setting and an
unavoidable aspect of the circuit used. IT IS NOT “BROKEN”. The
“Pitch” knob sets the initial pitch, and is also a somewhat picky
setting. Use care when setting these controls. The CV input controls
the center frequency (pitch) of the filter via a “vactrol”. This circuit
is very similar to our previous R-54 module and the pitched-drum
voices in the D-1000, and will behave similarly.
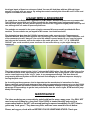
The diagram shows how to set the controls of the pitched drum sections when beginning. This is the
recommended beginning setting. It must be noted that the knobs do not have the usual positioning in
their extreme settings, and that this is normal. Also note that these circuits produce a small amount of
background noise all the time; because they are high-gain bandpass filters, this is normal and
unavoidable. IT IS NOT “BROKEN”. If it bothers you, an external noise-gate is recommended.
Set the controls for Pitched Drum 1, 2 and 3 as shown to begin. You might set different pitches for
each, so they can be differentiated. If a long pulse is used, you will know it, because you will hear two
sounds in sequence rather than one. No, they will not sound exactly like real drums—this scheme is
very similar to the one used in early analog drum machines. Except that it is done with tubes.
The Pitched Drum voices can be triggered with the “P1”, “P2” and “P3” buttons. To strike them
properly, you MUST hit each button quickly and release it immediately; if you don't, you will hear a
sound when the button is pressed AND when it is released. This is normal, and inherent to the
operation of the D-2000. IT IS NOT “BROKEN”.
HOW TO SET UP AND USE
The D-2000 needs 12 volts DC power at 2 amps minimum. DO NOT attempt to power it with AC, you will
DAMAGE IT AND THE POWER SUPPLY. DO NOT experiment with random AC-DC adapters. The power
connector is a 2.1mm coaxial type, and can usually also accept 2.5mm connectors. (No, it DOES NOT
use the same power adapter as Metasonix's previous D-1000 drum machine. It is totally different from
the D-1000. BE WARNED.) Also note that the pitched-drum voices might “howl” when power is applied
and the tubes warm up; this is normal, it is NOT “BROKEN” – keep the volume DOWN when first
applying power, and adjust the “Reson” controls as needed.
Connect the main audio output (the 1/4" jack that pokes out of the D-2000 panel) to an amplifier or PA,
set ALL the knobs on the D-2000 as shown ABOVE, and turn on the D-2000 power switch. You should
see the red LED next to the rightmost tube glowing. (The tubes might glow visibly, or they might not.
Tube construction varies. Do not whine at us that the D-2000 is "broken" if you can't see the tubes
glowing. The only way to know the D-2000 is working properly is to hear sound out of every drum
circuit. Please don't be a whiny dick.)
Press each of the yellow buttons. Note that the N1 and N2 buttons produce noise while held down.
Note that the P1-P3 buttons produce a sound when pressed and when released; this is NORMAL and it
is NOT “BROKEN”. To sound these voices properly, strike the buttons very briefly and do not hold
them down. Thank you.
Between the Gated Noise 2 and Pitched Drum 1 voices is a “LINK” switch. By setting this switch UP,
the trigger inputs of these two voices are linked. You can still feed them with two different trigger
sources, or simply with one source. By setting the controls carefully this allows N2 and P1 to be used
together to simulate a snare drum.
USAGE WITH A SEQUENCER
As noted above, the Delptronics Triggerman or ALM Pamela's Workout sequencers are recommended.
The D-2000 was tested with each of them installed in the front-panel space and powered from the
internal power supply, and they worked properly. We found the Triggerman slightly easier to set up and
use, although this is a matter of personal preference.
The modules are mounted in the space using the common M3 screws usually provided with Euro
modules. The screw holes are pre-tapped for M3 screws. Just install as shown.
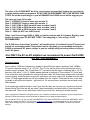
The photos below show how the D-2000's internal power cable connects to the Triggerman and
Pamela's Workout. Both of these modules use 10-pin plugs, and the cable has a 16-pin connector, so 6
of the connector pins will “hang off” the end of the module's power header. Be very sure the bottom
two holes on the connector, next to the stripe on the cable, go to the “-12v”, “-V” or “RED HERE
PLEASE” pins on the module's power connector. Ðo not screw this up, or you might damage the
sequencer!
The trigger outputs connect to the “trig in” jacks on the D-2000 voices. You will need either four or five
3.5mm mono patch cords, depending on use of the LINK switch. Any of the outputs on the sequencer
can be connected to any of the “trig in” jacks, in any arrangement desired. This also allows for
programming different rhythms on all the channels and changing to a different sequence simply by
moving the patch cord.
As for setting up the sequencers, that is dependent on the manufacturer's instructions for them.
Please read them carefully and understand them before programming the sequencer to run the D-2000.
Both the Triggerman and Pamela's Workout have programmable settings for pulse output length; take
advantage of these settings to get the best performance from the voices. Again, RTFM and don't jump
blindly into anything.
MAINTENANCE
The tubes are being run conservatively, and should last for many, many years. You WILL NOT
need a new set of tubes for a long time, if the D-2000 is treated carefully and used in a
conservative fashion. Do NOT rush around looking for spares immediately. Do NOT listen to
guitar amp “tech gurus”. They know very little, and have never seen this circuit before.
Please, we beg you, check with us BEFORE YOU DO SOMETHING STUPID. Thank you.
The tubes in the D-2000 MUST be of the correct types, because their heaters are connected in
a certain series-parallel arrangement. DO NOT MIX OR EXPERIMENT WITH THE WRONG TUBE
TYPES. Do not do stupid things, or you will DAMAGE the D-2000 and we will be angry at you.
The types are, from left to right:
Tube 1 - 6CB6/6CF6 (must be same type as tube 2)
Tube 2 - 6CB6/6CF6 (must be same type as tube 1)
Tube 3 - 5U8, 5CQ8 or 5GH8 (must be same as tubes 4 and 5)
Tube 4 - 5U8, 5CQ8 or 5GH8 (must be same as tubes 3 and 5)
Tube 5 - 5U8, 5CQ8 or 5GH8 (must be same as tubes 3 and 4)
Tube 6 – 3AU6 (do NOT use a 6AU6 here!)
Tubes 1 and 2 can be type 6AK5 or 6AU6, or similar pentodes with 6.3v heaters. But they must
both be the same type. DO NOT MIX TYPES. Tube swapping or “tube rolling” is NOT
RECOMMENDED.
The D-2000 use a low-voltage "polyfuse" self-resetting fuse. It is soldered to the PC board, and
should not need replacement. If the polyfuse opens repeatedly, you are probably feeding the
D-2000 an excessive DC power voltage, or you are stupidly using the wrong tubes or trying to
feed it AC power.
Use ONLY the AC-to-DC adapters we recommend to power the D-2000.
DO NOT EXPERIMENT!!
Technical specs
Audio outputs: 1000 ohm unbalanced, suitable to drive 600-ohm inputs, maximum level +20dBm.
CV inputs: maximum range -5v to +10v DC. The CVs for the five drum voices will respond only to
positive control voltages. The “Output Mute CV” input will mute the output completely with a -5v CV,
and open fully with a +10v CV. Usable sweep depends on settings of Tune controls. CV Level and
Tune controls for each pitched voice interact with each other. All controls may interact with unrelated
controls slightly. Individual audio outputs for each drum voice may not be fully isolated from the other
voices. CV and trigger pulses are not fully isolated from the outputs. There may be hum, noise and
crosstalk on all inputs and outputs -- get used to it. It's vacuum tubes, and tubes are evil and unruly
little bastards.
It's an extremely primitive drumbox, and if you don't like that, we can only say: why did you buy the
damned thing? And then we will say, send it back immediately, we have plenty of other customers
who want one. Then you are welcome to return to your first love: eating your mother's pussy.
(text is copyright 2010 Metasonix. All rights reserved. It is a violation of federal law to reproduce, reuse or duplicate this
publication without the express written permission of Metasonix or its assigned representative.)
(Oh, you want to FIX it? You say you want a SCHEMATIC?? Oh, that's PRICELESS. Contact us at METASONIX. 495 N.
Main #109, Lakeport CA 95453, (707) 263-5343, [email protected] or [email protected]. We'll arrange for
repair, while refusing to give you a schematic. The circuit of this bastard thing is so INSANE, we didn't write it down
anyway.)