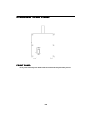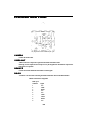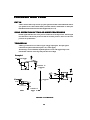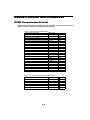
1
User’s Manual
FASTCAM ultima1024
FASTCAM
ultima1024
PHOTR
PHO
TRON
ON LTD
TD..
Notes
Table of Contents
Chapter 1
INTRODUCTION
Introduction ...........................................................................................................................
...........................................................................................................................1.1
1.1
Warranty ................................................................................................................................
................................................................................................................................1.2
1.2
How to Use This Manual ..................................................................................................... 1.3
Precautions
Chapter 2
...................................................................................................................... 1.5
CONTROLES AND CONNECTORS
PHOTRON FASTCAM-ultima 1024 ..................................................................................
..................................................................................2.1
2.1
Camera ..................................................................................................................................
..................................................................................................................................2.2
2.2
Processor Front Panel ...........................................................................................................
...........................................................................................................2.3
2.3
Processor Rear Panel ............................................................................................................ 2.4
Chapter 3
REMOTE CONTROL KEYPAD
Introduction ...........................................................................................................................
...........................................................................................................................3.1
3.1
Live .......................................................................................................................................
.......................................................................................................................................3.2
3.2
Frame Rate, Resolution, Shutter Speed ................................................................................
................................................................................3.3
3.3
Recording Operation .............................................................................................................
.............................................................................................................3.4
3.4
Playback Control ..................................................................................................................
..................................................................................................................3.8
3.8
Display Rate .........................................................................................................................
.........................................................................................................................3.10
3.10
Display Mode ......................................................................................................................
......................................................................................................................3.11
3.11
RS422 Protocol and Commands ...........................................................................................
...........................................................................................3.16
3.16
Chapter 4
START
System Connection ................................................................................................................
................................................................................................................4.1
4.1
Turning the System on ..........................................................................................................
..........................................................................................................4.4
4.4
First Recording ......................................................................................................................
......................................................................................................................4.5
4.5
Chapter 5
1394 INTERFACE
Downloading the image data to computer .............................................................................
.............................................................................5.1
5.1
Camera Control Utility ..........................................................................................................
..........................................................................................................5.2
5.2
Chapter 6
BASICS OF RECORDING
Introduction ...........................................................................................................................
...........................................................................................................................6.1
6.1
Principle of Image Recording ................................................................................................
................................................................................................6.2
6.2
START Mode ........................................................................................................................
........................................................................................................................6.3
6.3
CENTER Mode .....................................................................................................................
.....................................................................................................................6.4
6.4
END Mode ............................................................................................................................
............................................................................................................................6.5
6.5
RANDOM Mode ..................................................................................................................
..................................................................................................................6.6
6.6
Choosing a Record Mode ......................................................................................................
......................................................................................................6.7
6.7
Chapter 7
DAILY MAINTENANCE
Care of Lenses ...................................................................................................................... 7.1
Specifications ........................................................................................................................ 7.2
CHAPTER 1
INTRODUCTION
Introduction
Warranty
How To Use This Manual
Precautions
Notes
Introduction
The FASTCAM-ultima 1024 High-Speed Video Camera System has been developed to offer a powerfull
engineering solution in R and D, engineering, manufacturing, quality control in general industries and special
applications in scientific, medical, biological, aerospace studies. Its extra-high-speed recording capability and
easy-to-use remote control key pad provide a motion analysis environment that has been hard to obtain so far.
The live image setup function ensures that the image of the object on the screen is captured and recorded in
the memory at a simple press on the recording button. You do not have to set the exposure and image layout
on the screen by guessing: all you see on the monitor screen is what you get recorded at a press on the recording
button. Use this cutting-edge recording technology to observe your fast moving object as a slow-motion
playback image or to input the moving image data into your motion analysis system for processing.
This manual has been prepared for you to use the system in the most effective way for slow-motion observation and motion analysis of fast moving objects.
Remarks:
1. For the best use of the system, please read through this manual.
2. The content of this manual is based on the best knowledge of the manufacturer. However, in case any error
or missed information is found in this manual, please inform the manufacturer of such shortcomings.
Nothwithstanding the above, the manufacturer is not resposible for any results of the use of this equipment.
3. Copying all or any part of this manual without permission is prohibited.
4. The content of this manual may be changed any time without prior notice.
5. The manufacturer assumes no resposibility for any direct or indirect damage or loss of profit resulting from
the use of this equipment
6. The manufacturer assumes no responsibility for any result of the use of this equipment.
7. Copying all or any part of the software included in this system without prior written permission by
the author is an infringement of copyright.
1-1
Warranty
NEW EQUIPMENT WARRANTY
PHOTR
PHO
TRON
ON FAST
FASTCAM-UL
CAM-ULTIMA
TIMA 1024
PHOTRON LIMITED warrants this PHOTRON FASTCAM-ultima 1024 series and accessories manufactured by PHOTRON LIMITED, to function properly for one year from the date of shipment, if the warranty
registration card was filled out and returned to PHOTRON USA, INC. or PHOTRON EUROPE LIMITED
within thirty days of shipment.
PHOTRON LIMITED, in conjunction with PHOTRON USA,INC. or PHOTRON EUROPE LIMITED,
agrees to perform the following equipment warranty services:
1. Repair service: If shipped to PHOTRON at any of the addresses shown below, repairs will be made at no
charge.
2. Parts replacement: Replacement parts installed under warranty will be provided at no charge.
THIS WARRANTY DOES NOT APPLY UNDER THE FOLLOWING CONDITIONS:
Failure to operate the PHOTRON FASTCAM-ultima 1024 series in accordance with PHOTRON’s written
instructions, including environmental specifications listed in the User’s Manual.
If there is evidence of the PHOTRON FASTCAM-ultima 1024 series being subjected to accidental damage,
misuse or abuse.
If the PHOTRON FASTCAM-ultima 1024 series has been repaired or tampered with by persons other than
PHOTRON personnel, customer personnel trained by PHOTRON or without permission of PHOTRON.
Shipping damage is not covered by this warranty. The purchaser has the responsibility to place a claim of
damage in shipment with the carrier.
PHOTRON LIMITED makes no other warranties, express or implied, including the implied warranties of
merchantability and fitness for a particular purpose. If this PHOTRON FASTCAM-ultima 1024 series does
not function properly during the warranty period, PHOTRON LIMITED will repair it without charge
according to the terms stated above. Repair without charge is PHOTRON LIMITED’s only obligation under
this warranty. PHOTRON LIMITED, PHOTRON USA, INC.or PHOTRON EUROPE LIMITED will not
be responsible for any consequential or incidental damages resulting from the sale, use or improper functioning
of this equipment even if loss or damage is caused by the negligence or other fault of PHOTRON LIMITED,
PHOTRON USA, INC.or PHOTRON EUROPE LIMITED.
Return the equipment that needs warranty service to:
1-2
How to Use This Manual
DEFINITION OF TERMS
You will notice as you read this manual that some of the information is presented as a NOTE, CAUTION
or WARNING. It is important that you understand the significance of these three terms.
NOTE
A note contains information that we wish to emphasize regarding the operation of your FASTCAMultima 1024 series.
CAUTION
A caution is intended to warn you that a certain operation or condition may cause harm to
your FASTCAM-ultima 1024 series.
WARNING
A warning is important to the safety of everyone operating the FASTCAM-ultima 1024
series and should not be disregarded under any circumstances.
CHAPTER 1, INTRODUCTION
Contains the Warranty, precautions, introduction and how to use this manual.
CHAPTER 2, CONTR
CONTROLS
OLS AND CONNECTORS
CONNECTORS
An introduction to the components of your FASTCAM-ultima 1024 series. Explains the use of each
connector and control on the Camera and the Processor.
CHAPTER 3, REMO
REMOTE
TE CONTROL
CONTROL KEYPAD
KEYPAD
Explains how to make and playback a recording by the remote control keypad.
CHAPTER 4, GETTING STAR
STARTED
TED
This chapter provides explanation on how to connect and operate the system. The step-by-step explanation given here will make you used to the basics of system connection, recording and plyaback.
CHAPTER 5, 1394 INTERFA
INTERFACE
This chapter explains how to control the FASTCAM-ultima 1024 from the PC via the 1394 interface.
The details will be given in another manual.
1-3
How to Use This Manual
CHAPTER 6, RECORDING STRATEGIES
STRATEGIES
Provides a model for understanding how a solid state recorder works and also provides the background
information for selecting an appropriate record mode.
CHAPTER 7, D
DAIL
AILY
Y MAINTENANCE
MAINTENANCE
Shows how to take care of lenses, how to get in contact with a service engineer when you need service.
Also shows specifications of the FASTCAM-ultima 1024 series.
1-4
Precautions
AMBIENT TEMPERA
TEMPERATURE
TURE
Photron FASTCAM-ultima 1024 has been designed to work properly in an ambient temperature range
of 0 to 35 degrees Celsius (32 to 95 degrees Fahrenheit), no condensation.
STORA
ST
ORAGE
GE TEMPERA
TEMPERATURE
TURE
FASTCAM-ultima 1024 must be stored in a place with an ambient temperature range of -20 to +70
degrees Celsius (-4 to +158 degrees Fahrenheit), no condensation.
TRANSPORT
TRANSPOR
TATION
Save the original carton the unit came in for future transportation. Or, if you tranport the unit frequently,
the use of a special carrying case is recommended. Please check with your dealer, Photron USA or
Photron Europ. Do not send the unit to a place where the temperature can go below -20 degrees Celsius
(-4 degrees Fahrenfeit) or above 70 degrees Celsius (+158 degrees Fahrenheit).
OTHER
You may find on the monitor screen some pixels that are always bright and/or some others that are always
dark. Please note they do not mean the system is faulty.
HOW
HO
W TO INSTALL
INSTALL FERRITE CORE
When using a Y/C cable, be sure to install the ferrite core as shown below to avoid interference.
プロセッサ側
To Processor
モニタ側
To
Monitor
1-5
Precautions
FEDERAL COMMUNICATIONS
COMMUNICATIONS COMMISSION STA
STATEMENTS
WARNING: This equipment generates, uses and can radiate radio frequency energy and if not
installed and used in accordance with the instruction manual, may cause interference to radio communications. It has been tested and found to comply with the limits for a Class “A” computing device
pursuant to Subpart B of Part 15 of the FCC Rules and VDE 0871 Class “B” which are designed to
provide reasonable protection against such interference when operated in a commercial environment.
Operation of this equipment in a residential area is likely to cause interference in which case the user
at his own expense will be required to take whatever measures may be required to correct the interference.
This device complies with Part 15 of the FCC Rules and VDE 0871. Operation is subject to the
following two conditions: (1) this device may not cause harmful interference, and (2) this device must
accept any interference received including interference that may cause undesired operation.
WARNING
This product is grounded through the power cord. This protective ground connection is essential for
safe operation of the equipment. Avoid electrical shock by plugging the power cord into a properly
wired receptacle. A loss of the protective ground, for any reason, could result in electrical shock. Use
the proper power cord and isure that it is in good condition.
CAUTION
1-6
CHAPTER 2 CONTROLS AND CONNECTORS
PHOTRON FASTCAM-ultima 1024
Camera
Processor Front Panel
Processor Rear Panel
Notes
PHOTRON FASTCAM ultima 1024
2-1
Camera
TRIPOD
There is a 1/4-inch screw hole in the center part of the camera base. Install the camera tightly onto
a tripod using this screw hole.
1/4-inch screw
CAMERA CABLE CONNECTOR
CONNECTOR
There is a cable connector on the rear panel of the camera. Connect the camera cable to this connector.
2-2
Processor Front Panel
FRONT
FR
ONT PANEL
PANEL
An AC power switch and power indicator LED are located on the front panel of the processor.
2-3
Processor Rear Panel
CAMERA
Connects the camera cable.
VIDEO OUT
A BNC connector to output video signal from the FASTCAM-ultima 1024.
Switching of video output and VGA output is set by the keypad menu. Simultaneous output of the
both signals is not possible.
REMOTE
Connects the FASTCAM-ultima 1024 remote control keypad.
RS422
A connector to be used when controlling the FASTCAM-ultima 1024 via the RS422 interface.
RS422 Connector Pin Assignment
Dsub 9-pin
Connector
1
2
3
4
5
6
7
8
9
Signal
N.C.
TXDRXDN.C.
N.C.
GND
TXD+
RXD+
N.C.
2-4
Processor Rear Panel
VIDEO OUT
A BNC connector that outputs video signal from the FASTCAM-ultima 1024.
VIDEO OUT(Y/C) and VGA output are switched by the menu on the remote keypad.
VIDEO OUT(Y/C) and VGA cannot be output simultaneously.
VIDEO OUT and Y/C are simultaneously output.
Y/C
An S-terminal connector to output Y/C signal from the FASTCAM-ultima 1024.
VIDEO OUT(Y/C) and VGA output are switched by the menu on the remote keypad.
VIDEO OUT(Y/C) and VGA cannot be output simultaneously.
VIDEO OUT and Y/C are simultaneously output.
VGA
A D-sub 15 type connector that outputs SXGA signal from the FASTCAM-ultima 1024.
VIDEO OUT and VGA are switched by the menu on the remote keypad.
VIDEO OUT and VGA cannot be output simultaneously.
AC IN CONNECTOR
CONNECTOR
A standard IEC/CEE power connector.
MCDL
Connects MCDL
2-5
Processor Rear Panel
EXT IN
A BNC connector that accepts vertical sync pulse signal from another FASTCAM-ultima 1024 for
sysc operation of two or more cameras. When you use this connector, set EXT SYNC to “ON” by the
EXTERNAL SYNC function on the remote keypad menu (see 3-14).
SYNC OPERATION
OPERATION OF TW
TWO
O OR MORE PROCESSORS
PROCESSORS
Feed the signal from EXT OUT of one processor to EXT IN of a second processor, then the signal
from EXT OUT of the second processor to EXT IN of a third processor, and so on to drive the
processors in synchronization.
TRIGGER IN
A BNC type connector for one of the two types of trigger input signals. The input signal is
connected to an optical isolator that requires 5 volt, 10 mA suppuly.
The following is our recommended, simplified input-driver circuit. The trigger timing as seen
from the BNC connector is the rising of the pulse from Low to High.
Example1
+5V
Hi to Low Trigger
330
Connect to
Trigger In
+5V
220
Trigger In
Example2
Low to Hi Trigger
CMOS LEVEL
Connect to
Buffer
Trigger In
TRIGGER IN SCHEMATIC
2-6
+5V
10K
Processor Rear Panel
TRIGGER SW IN
One of the two BNC connectors to input trigger signal that requires a contact switch between the
center conductor and the shield to generate triggers.
The following is a simplified circuit to show the concept.
CIRCUIT DIAGRAM OF TRIGGER SW IN
+ 5V
10K
TRIGGER
TRIGGERSWITCH
SWITCH ININ
220
0.1µf
EXT OUT
A BNC connector, set by the remote control keypad menu, outputs recording gate signals and vertical
sync pulse signals.
The recording gate is a signal that indicates the processor is in recording duty. The polarity is set by the
remoto control keypad menu.
Also, the polarity of vertical sync pulse is set by the remote control keypad menu.
The output circuit is as shown below and must be grounded by a 50 ohms resistor.
Use SW2 to select
Record Gate or
Record Gate
Vertical Sync.
Vertical Sync.
74ACT541 Doubled
Buffer CMOS Output
IEEE1394
Use this connector when controlling the FASTCAM-ultima 1024 with the attached 1394 control
software.
Two IEEE1394 connectors are provided.
OPTICAL LINK
Use this connector when controlling the FASTCAM-ultima 1024 with the attached 1394 control
software via an optical cable.
2-7
2-8
CHAPTER 3 REMOTE CONTROL KEYPAD
Introduction
Live
Frame Rate, Resolution, Shutter Speed
Recording Operation
Playback Control
Display Rate
Display Mode
RS422 Protocol and Commands
Notes
Introduction
FRAME RATE,
RATE, RESOL
RESOLUTION/SHUTTER-SPEED
UTION/SHUTTER-SPEED BUTT
B UTTONS
ONS,, LIVE BUTT
B UTTONS
ONS
The control panel of the FASTCAM-ultima 1024 remote keypad is divided into seven sections by the
functions related recording and playback of images of objects that are moving at a high speed. This
chapter describes the functions of all the control buttons on the keypad.
Some of the buttons are for on-and-off operation of functions. For example, one press on Live button
turns the FASTCAM-ultima 1024 into Live mode (on) and another press on it turns the Live mode off.
The green LED on the button lights up to indicate that the processor has turned into Live mode.
On the other hand, FRAMERATE ↑↓ and RESOLUTION/SHUTTERSPEED ↑↓ buttons select
one of several different frame rates, resolutions or shutter speeds offered to choose from. Press the ↑
button to select a one-step higher frame rate, resolution or shutter speed, and press the ↓ button to
go to a lower number. The selected value is shown on the keypad LCD display.
3-1
Live
A press on the Live button turns the FASTCAM-ultima 1024 into Live mode. As soon as the system
has turned into Live mode, the LED indicator on the Live button lights up. At another press on the Live
button the system exits from Live mode with the last image recorded being displayed frozen on the
screen.
In Live mode, the image being shot by the camera is directly displayed on the monitor. While watching
the live image, you can adjust the lens, tripod, lighting for the best condition. The image shown on the
monitor in Live mode gives you an exact idea of how the settings of object layout, focus and exposure are
made. With the FASATCAM-ultims 1024 system, WYSIWYG (What you see is what you get) is
always guaranteed.
Note:
When the system is in Live mode, playback function does not work. To playback previously recorded
images, make sure the system is not in Live mode (i.e., the LED indicator is off).
3-2
Frame Rate, Resolution, Shutter Speed
By the FRAME RATE↑↓
RATE↑↓and
and RESOLUTION/SHUTTERSPEED↑↓
RESOLUTION/SHUTTERSPEED ↑↓ buttons on the keypad, you
can select any frame rate, resolution and shutter speed that are best suited to a particular application.
The camera operates at the selected frame rate, resolution and shutter speed even in Live mode.
FRAME RATE
RATE ↑↓ BUTT
BUTTONS
ONS
Sets the frame rate for recording. At every press on the up-oriented arrow, the frame rate steps
upward in the order of 60, 125, 250, 500, 1000, 2000, 4000, 8000 and 16000, and press on the down
arrow the other way. The selected frame rate is displayed on the LCD display unit on the keypad.
RESOLUTION/SHUTTERSPEED SWITCH BUTTON
Same arrow buttons are used to set resolution and shutter speed. Press the resolution/shutter speed
switch button to select one of the two settings. The upper LED lights up when resolution is selected,
and the lower LED lights up for shutter speed selection.
RESOLUTION/SHUTTERSPEED ↑↓ BUTTONS
When resolution selection is on, the resolution setting changes up or down as you press the arrow
button, up or down. The selected resolution is displayed on the LCD display unit on the keypad.
When shutter speed selection is on, the shutter speed setting changes up or down as you press the
arrow button, up or down. The selected shutter speed is displayed on the LCD display unit on the
keypad.
Note: Shutter speed (exposure duration)
The exposure duration is defined by the reciprocal of frame rate. For example, at the frame rate of 500 fps,
the exposure duration is 1/500 (2 milliseconds). With a given lighting condition, the lens iris must be set
wider as the frame rate gets higher.
3-3
Recording Operation
Using the RECORDING OPERATION part of the remote keypad, you can select a recording mode and make
a recording.
Press MODE SEL (Mode Select) button to select your desired mode of recording. The LED lights up
underneath the selected mode to indicate the selection. Press the button as many times as needed until
your desired mode is selected.
AUX MEM (AUXILIARY MEMOR Y)
AUX MEM is a recording mode that is specifically provided to calibrate the FASTCAM-ultima 1024
system before recording the object of your interest. By running the Aux Mem mode before actual
recording, the fixed pattern noise (FPN) inherent to the imaging sensor is compensated for.
Calibration by the Aux Mem function is automatically performed when the system is switched on.
3-4
Recording Operation
S T ART M O D E
Press the MODE SELECT button several times until the START LED lights up. Press the READY
button to turn the system into READY mode. Then press the RECORD button to make a recording. The
system will continue to record images until the memory is full to the maximum number of frames it can
hold, and the system automatically stops recording.
The trigger signal input via TRIGGER IN or TRIGGER SW IN connector on the processor rear panel has
the same function as the RECORD button. When you wish to record images in START mode using an
external trigger, first press the START button and then the READY button as described in the above, then
send a trigger signal to the TRIGGER IN or TRIGGER SW IN. Please note that TRIGGER IN requires
a positive going TTL level signal of 10 milliamps and a contact switch of zero voltage (see 2-6).
FRAME COUNT IN STAR
START
T MODE
Memory
512 megabytes / 512
1 gigabyte / 1024
1.5 gigabytes / 1536
First Frame
Trigger Point
1
1
1
3-5
1
1
1
Last Frame
512
1024
1536
Recording Operation
CENTER MODE
Press the MODE SELECT button several times until the LED below “CENTER” lights up. Press the
READY button then the RECORD button to start a recording. The system will continue to record until
a trigger is given by the second press on the RECORD button or a trigger signal from TRIGGER IN or
TRIGGER SW IN. The system stops recording as soon as it has recorded the image data to one half of
the available memory after the trigger signal was received. Thus, the CENTER mode records the same
number of frames before and after the trigger signal.
FRAME COUNT IN CENTER MODE
Memory
512 megabytes / 512
1 gigabyte / 1024
1.5 gigabytes / 1536
First Frame
Trigger Point Last Frame
-256
1
256
-512
1
512
-768
1
768
Note:
Please be sure to have ample time before a trigger is sent so that a sufficient number of frames are recorded
prior to the trigger.
END MODE
Press the MODE SELECT button several times until the LED below “END” lights up. Press the
READY button, then the RECORD button to start a recording. The system will continue to record
until a trigger is given by a second press on the RECORD button, or via TRIGGER IN or TRIGGER
SW IN. At the moment the trigger is given, the system stops recording. The recorded video covers a
series of frames to the last moment the system was triggered to stop.
FRAME COUNT IN END MODE
Memory
512 megabytes / 512
1 gigabyte / 1024
1.5 gigabytes / 1536
First Frame
Trigger Point Last Frame
-512
1
1
-1024
1
1
-1536
1
1
Note:
Please be sure to have ample time before you send a trigger so that a sufficient number of new frames are
recorded to fill the memory.
3-6
Recording Operation
RANDOM MODE
Press the MODE SELECT button until the LED below “RANODM” lights up. To begin a recording,
first press the READY button, then the RECORD button. The system records the number of frames
you preset at every press on the RECORD button or at every trigger from TRIGGER IN or TRIGGER SW IN. The number of frames to record is set on the keypad menu. See the discussion given in
page 3-13 and thereafter for details of setting. The method of frame count in RANDOM mode is the
same as that for START mode.
NOTE:
If you wish to exit RANDOM mode before you have fully recorded in memory, just press the MODE
SELECT button.
3-7
Playback Control
Use the playback control panel on the keypad to view the recorded images.
Note:
When the system is in Live mode, that is, when the “LIVE” LED is on, the playback controls are
disabled. Press the LIVE button once to exit Live mode enabling the playback controls.
P L AY
AY
As soon as the PLAY button is pressed, all the recorded frames in memory are played back following
the frame that is currently displayed on the monitor. The playback takes place at ther display rate
selected in the DISPLAY RATE section on the keypad. When the system is in PAUSE or STOP (P/
S) mode, the playback proceeds one frame at each press on the PLAY button.
Note:
If you have not recorded new frames to fill the memory at the last recording, you may see playback of
residual frames recorded during previous recording sessions.
REV MODE (REVERSE)
When the REV button is pressed, a revers playback starts beginning with the frame currently displayed on the monitor. The playback takes place at a playback rate preset in the DISPLAY RATE
section on the keypad. When P/S mode is selected, the reverse playback proceeds one frame each at
every press on the REV button.
3-8
Playback Control
FF MODE (FAST FOR W ARD)
FAST FORWARD mode plays back images at ten (10) times the currently selected playback rate.
FR MODE (FA S T R E V E R S E )
FAST REVERSE mode plays back images in the reverse direction at ten (10) times the currently
selected playback rate.
P / S M O D E ( P A U S E / S TO
TO P )
As soon as the P/S button is pressed the playback stops at the current frame. Another press on the P/
S button let the system go back to the previous playback. The P/S button works in all the playback
modes--forward, reverse, FF, FR.
STOP MODE
When the STOP button is pressed, the playback stops at the frame that was triggered during recording.
To return to playback, press any of the playback buttons.
3-9
Display Rate
DISPLAY RATE selects the display rate (frames per second) of the recorded images while playback.
Five different display rates are available to choose from, each indicated by lighting up of the corresponding LED when selected. Press the “left”
“left” arrow
arrow to decrease the display rate, the “right” arrow to
increase.
The numbers shown underneath the LEDs indicate the display rates for NTSC playback operation
and those above the LEDs for PAL operation.
In FF (FAST FORWARD) and FR (FAST REVERSE), the playback takes place at ten (10) times the
rate that is currently indicated by an LED.
3-10
Display Mode
REPORT
Press the REPORT button to light up the corresponding LED. This enables the REPORT mode that
displays text information overlayed in the upper and lower portions of the monitor screen. The
REPORT button toggles between on and off. The display on the screen looks as shown below:
Display mode
ID number
Trigger mode
Frame number
time
Display rate
Resolution
Frame rate
3-11
Display Mode
ID
A two-digit number is displayed in the upper left corner of the monitor. This number can be used as an
ID of the recordings when you store them on tape. Any number can be set manually. The number
increments by one at ever press on the ID button.
T R I G P T.
T. ( T R I G G E R P O I N T )
At a press on the TRIG PT button, the playback jumps to the frame that was marked as the trigger
point in memory. The system displays the marked frame immediately and sets itself into PAUSE/
STOP mode. To exit the trigger point, press the P/S button.
This buttong also make the system memorize the current setting status. Press this button while the
system is in Live mode, and the current settings are memorized. All the memorized settings are recalled
when the system is turned on for the next recording session.
BL OCK (BL O C K P L AYBAC K )
The BLOCK playback mode plays back a pre-selected portion of a recording in which you are interested.
Press the START button to mark a start frame during playback and then press the END button to mark
the end of a block of frames after the interesting scene has just passed. Press the BLOCK button to
playback the selected portion of the recording, repeatedly. All the playback controls work in this mode.
3-12
Display Mode
MENU
The menu has a hierarchical configuration as shown below.
random frame
1
2
・
・
256
ext sync
off
on pog
on neg
MCDL
off
on
monitor out
SXGA
VIDEO
time set
year , month , day , hour , min, sec
system rev
on screen
date/time
time
d ate
ext out
vsync pos
vsync neg
rec pos
rec neg
camera gain
×1
×2
×4
×8
color temp
5100k
3100k
user
set
edit
3-13
R,B
Display Mode
MENU SETTING
Press MENU button and the menu will show on the Keypad display, as shown below.
Select a menu item with the up-down button on the right of the ENTER button.
Press the down button to select COLOR TEMPERATURE, the Keypad LCD will display “color
temp”.
Press the down or up button as many times as necessary until you get the menu item you want comes up
on the LCD screen, then press ENTER button.
HOW
HO
W TO SET MENU
The following items can be selected on the menu:
RANDOM FRAME
You can select the number of frames to record at each trigger in the RANDOM mode from 1, 2, 3, 4, 16,
64, 128 or 256 frames.
EXT SYNC
Select this item when you use two FASTCAM-ultima 1024 systems in an external sync operation.
This item, when selected, will set the polarity of the signal at the same time.
MCDL
Switches on and off the MCDL function.
MONITOR OUT
Switches video output between Y/C and VGA.
TIME SET
Sets the system clock.
SYSTEM
SY
STEM REV
Displays the system revision number of the FASTCAM-ultima 1024 on video or VGA monitor screen.
DATE/TIME
Switches between date or time of the day to display on the video or VGA monitor screen.
3-14
Display Mode
EXT OUT
Selects the signal to be output from the EXT OUT connector.
vsync pos:
Vertical sync for recording, positive
vsync neg:
Vertical sync for recording, negative
rec pos:
Recording signal, positive
rec neg:
Recording signal, negative
CAMERA GAIN ( F O R M O N O C H R O M E M O D E L )
Selects the camera gain from: x1, x2, x4, x8
Note: The higher the gain, the more noise in the picture.
COLOR TEMP ( F O R C O L O R M O D E L )
Selects the color temperture from: 5100K, 3100K, user
The “user” allows you to customize the color temperature to your specific lighting conditions.
3-15
RS422 Protocol and Commands
RS422 Communication Protocol
The processor is of the UART type asynchronous system with NRZ (Non-Return-to-Zero) format (8
data bits, 2 stop bits, no parity). The baud rate default is 4800 bps.
Table1. Transmission Command Codes
Transmission Command
Operation
Code
1.Frame Rate
UP
61h
DOWN
62h
2.Resolution and ShutterSpeed
UP
76h
DOWN
77h
3.Resolution and ShutterSpeed SelectionSlection
60h
4.Playback Control
FR
63h
REV
64h
PLAY
65h
FF
66h
P/S
67h
STOP
68h
5.Playback Frame Rate
SLOW
69h
FAST
6Ah
6.Display Mode
BLOCk
6Bh
START
6Ch
END
6Dh
REPORT
6Fh
TRIG.PT
70h
ID
75h
7.Live Mode
on/off
71h
8.Recording Operation
Selection of
72h
Recording Mode
RECORD
74h
READY
73h
Table2. Transmission Command Code (Menu Mode)
Transmission Command
Operation
9.Men
on/off
↑
↓
→
←
Decision
3-16
Code
6Eh
6Bh
6Dh
70h
75h
6Ch
o
RS422 Protocol and Commands
Table3. Response Command Codes
Response Command
Current State
1.Frame Rate
60FPS
125FPS
250FPS
500FPS
1000FPS
2000FPS
4000FPS
8000FPS
16000FPS
2.Resolution(horizontal)
1024
512
256
128
64
3.Resolution(vertical)
1024
512
256
128
64
32
4.Shutter Speed
1/60s
1/125s
1/250s
1/500s
1/1000s
1/2000s
1/4000s
1/8000s
1/16000s
1/32000s
1/64000s
1/128000s
5.Resolution and Shutter Speed Change Resolution
Selection
Change Shutter Speed
6.Playback Control
FR
REV
PLAY
FF
P/S on
P/S off
STOP
7.Playback Frame Rate
2FPS
5FPS
10FPS
15FPS
30FPS
8.Display Mode
BLOCK on
BLOCK off
REPORT on
REPORT of
f
TRIG.PT on
TRIG.PT of
f
9.Live Mode
LIVE on
LIVE off
10.Recording Operation
START
CENTER
END
RANDOM
3-17
Code
28h
29h
2Ah
20h
21h
22h
23h
24h
25h
78h
79h
7Ah
7Bh
7Ch
7Dh
7Eh
7Fh
80h
81h
82h
54h
55h
56h
57h
58h
59h
5Ah
5Bh
5Ch
5Dh
5Eh
5Fh
40h
41h
31h
32h
33h
34h
35h
36h
37h
38h
39h
3Ah
3Bh
3Ch
3Eh
3Fh
44h
45h
46h
47h
48h
49h
4Ah
4Bh
4Ch
4Dh
RS422 Protocol and Commands
11.Menu Mode
AUXMEM
RECORD on
RECORD of
f
READY on
READY of
f
MENU on
MENU of
f
4Eh
50h
51h
52h
53h
42h
43h
30h
02h
04h
06h
08h
0Ah
0Ch
1Ah
1Dh
84h
85h
B1h
18h
random frame
color temp
camera gai
n
ext out
date/time
system rev
t
i
me set
monitor out
mcdl
ext sync
1
2
3
4
16
64
128
256
5100k
3100k
user
set
edit
Display Monitor
R Selection
B Selection
Code of"0"of 10s
Code of"1"of 10s
Code of"2"of 10s
Code of"3"of 10s
Code of"4"of 10s
Code of"5"of 10s
Code of"6"of 10s
Code of"7"of 10s
Code of"8"of 10s
01h
83h
B0h
0Ch
19h
09h
0Bh
07h
05h
03h
F6h
F7h
F8h
F9h
FAh
FBh
F4h
F5h
86h
87h
88h
89h
8Ah
17h
B6h
B7h
A0h
A1h
A2h
A3h
A4h
A5h
A6h
A7h
A8h
12.Photron Remote Keypad Code
13.Menu Selection item
14、random frame
15、color temp
3-18
position
position
position
position
position
position
position
position
position
RS422 Protocol and Commands
16、camera gai
n
17、ext out
18、date/time
19、syst
e
m rev
20、time set
21、monitor out
22、mcdl
23、ext sync
Code of"9"of 10s position
Code of"0"of unit
Code of"1"of unit
Code of"2"of unit
Code of"3"of unit
Code of"4"of unit
Code of"5"of unit
Code of"6"of unit
Code of"7"of unit
Code of"8"of unit
Code of"9"of unit
0db
6db
12db
18db
vsync pos
vsync neg
rec pos
rec neg
date
time
Display Monitor
year
month
day
hour
min
sec
Code of"0"of 10s position
Code of"1"of 10s position
Code of"2"of 10s position
Code of"3"of 10s position
Code of"4"of 10s position
Code of"5"of 10s position
Code of"6"of 10s position
Code of"7"of 10s position
Code of"8"of 10s position
Code of"9"of 10s position
Code of"0"of unit
Code of"1"of unit
Code of"2"of unit
Code of"3"of unit
Code of"4"of unit
Code of"5"of unit
Code of"6"of unit
Code of"7"of unit
Code of"8"of unit
Code of"9"of unit
SXGA
VIDEO
off
on
off
on pog
on neg
3-19
A9h
90h
91h
92h
93h
94h
95h
96h
97h
98h
99h
B2h
B3h
B4h
B5h
26h
2Bh
2Ch
2Dh
1Bh
1Ch
17h
0Dh
0Eh
0Fh
10h
11h
12h
A0h
A1h
A2h
A3h
A4h
A5h
A6h
A7h
A8h
A9h
90h
91h
92h
93h
94h
95h
96h
97h
98h
99h
15h
16h
14h
13h
14h
1eh
1f
h
RS422 Protocol and Commands
Transmission Command Codes and Response Command
Codes
The first digit shows the number given in the Transmission Command Code Table.
1. Frame Rate
When a code is sent to the processor, the frame rate is changed. The processor sends back a code that
denotes the new setting (status). The response commands are as follows (the first digit shows the number
given in Response Command Code Table):
1. Frame Rate: Code after the change
2. Resolution (horizontal): Code after the change
3. Resolution (vertical): Code after the change
4. Shutter speed: Code after the change
Note: For resolution and shutter speed, the codes that are selected by [Resolution and Shutter Speed
Selectin] are sent back.
2. Resolution and Shutter Speed
When a code is sent to the processor, the setting that is selected by [Resolution and Shutter Speed
Selection] is changed. The processor sends back a code that shows the new setting (status). The response
commands are as follows (the first digit shows the number given in Response Command Code Table):
When resolution is selected by [Resolution and Shutter Speed Selection]:
2. Resolution (horizontal): Code after the change
3. Resolution (vertical): Code after the change
When shutter speed is selected by [Resolution and Shutter Speed Selection]:
4. Shutter Speed: Code after the change
3. Resolution and Shutter Speed Selection
To change resolution and shutter speed, the same switching code is used. This Resolution/Shutter Speed
switching code decides which is to be changed, Resolution or Shutter Speed. Every time this code is sent,
the processor alternately selects Resolution or Shutter Speed to be changed.
The processor sends back a code that shows the new setting (status), or the current status. The response
commands are as follows (the first digit shows the number given in Response Command Code Table):
1. Frame rate: Current code
2. Resolution (horizontal): Current code
3. Resolution (vertical): Current code
4. Shutter speed: Current code
5. Resolution and Shutter Speed Selection: Code after the change
12. Photron remote control keypad code (30h)
Note:
For resolution and shutter speed, the code that is selected by [Resolution and Shutter Speed Selection] is
sent back.
4. Playback Control
When a code is sent to the processor, the processor sends back a code that shows the new setting (status)
or a special code.
3-20
RS422 Protocol and Commands
The response codes are as follows. The kind of response command varies by the status (the first digit shows
the number given in Responce Command Code Table):
When in FR, REV, PLAY, FF, or P/S mode:
6. Playback control: Code after the change
8. Display mode: Code of TRIG.PT off
When in STOP mode:
6. Playback control: Code of STOP
6. Playback control: Code of P/S off
8. Display mode: Code of BLOCK off
8. Display mode: Code of TRIG.PT off
5. Playback Frame Rate
When a code is sent to the processor, the processor sends back a code that shows the new setting (status).
The response commands are as follows (the first digit shows the number given in Response Command
Code Table):
7. Playback frame rate: Code after the change
6. Display Mode
When a code is sent to the processor, a code that shows the new setting (status) is sent back from the
processor.
The response command codes are as follows. The kind of response command varies by the status. (the
first digit shows the number given in Response Command Code Table)
When BLOCK is selected(BLOCK playback is switched on or off)
8. Display mode: Code after BLOCK on/off switched
When START or END is selected (marks the start or end frame of a block playback)
No response command
When REPORT is selected (REPORT is switched on or off)
When set to on:
8. Display mode: Code of REPORT on
When set to off:
1. Frame rate: Current status code
2. Resolution (horizontal): Current status code
3. Resolution (vertical): Current status code
4. Shutter speed: Current status code
8. Display mode: Code of REPORT off
12. Photron Remote Keypad code (30h)
Note:
For resolution and shutter speed, the code that is selected by [Resolution and Shutter Speed Selection]
is sent back.
When TRIG.PT is selected: (Image of trigger frame is displayed)
6. Playback control: Code of P/S on
8. Display mode: Code of TRIG.PT on
When ID is selected(ID number is incremented)
No response command
3-21
RS422 Protocol and Commands
7. LIVE Mode
When the processor receives a code, it switches LIVE on or off. The processor then sends back a code
that shows the new setting (status) or a special code.
The response commands are as follows. The kind of command varies by the status (the first digit
shows the number given in Response Command Code Table).
When switched to on:
1. Frame rate: Code of current status
2. Resolution (horizontal): Current status code
3. Resolution (vertical): Current status code
4. Shutter speed: Current status code
6. Playback control: Code of P/S off
6. Playback control: Code of STOP
8. Display mode: Code of TRIG.PT off
8. Display mode: Code of BOCK off
9. LIVE mode: Code of LIVE on
12. Photron Remote Control Keypad code (30h)
Note:
For resolution and shutter speed, the code that is selected by [Resolution and Shutter
Speed Selection] is sent back.
When switched to off:
9. LIVE mode: Code of LIVE off
10. Recording operation: Code of READY off
Note:
If the setting of frame rate, resolution, shutter speed or recording mode, when LIVE is
on, is different from what each of them is set when LIVE is off, the kind of response
code will be different.
The response commands are as follows:
1. Frame rate: Code fo current status
2. Resolution (horizontal): Code of current status
3. Resolution (vertical): Code of current status
4. Shutter speed : Code of current status
9. LIVE mode: Code of LIVE off
10. Recording operation: Code of READY off
10. Recording operation: Code of current status
12. Photron Remote Control Keypad (30h)
Note:
For resolution and shutte speed, the code that is selected by [Resolution and Shutter
Speed Selection] will be sent back.
3-22
RS422 Protocol and Commands
8. Recording Operation
When the processor receives a code, it sends back a code that shows the new setting (status) or a special
code.
The response commands are as follows. The kind of response command varies by the status (the first
digit shows the number given in Response Command Code Table).
When MODE is selected (selection of recording mode)
10. Recording operation: Code after change of recording mode
When RECORD is on
10. Recording operation: Code after RECORD is switched on or off
10. Recording operation: Code of READY off
When READY is selected:
9. LIVE mode: Code of LIVE on
10. Recording operation: Code after READY is switched on or off
Note:
The “LIVE on” code is sent back only when LIVE mode is switched from off to on.
3-23
RS422 Protocol and Commands
9. Memu Mode
The menu mode is of hierarchical configuration. When setting any mode, you need to make selections
along the hierarchical levels.
Level 1
Menu off
random frame
Level 2
Level 3
off
on pos
on neg
mcdl
off
on
time set
year 0∼99
Display Monitor
date/time
time
date
camera gain
color temp
Level 6
Level 7
Menu off
SXGA
VIDEO
system rev
ext out
Level 5
1
2
3
4
16
64
128
256
ext sync
monitor out
Level 4
month 1∼12
day 1∼31 hour 0∼23 min 0∼59 sec 0∼59
vsync pos
vsync neg
rec pos
rec neg
0db
6db
12db
18db
5100k
3100k
user
"camera gain"is good for Monochrome models only.
"color temp"does not exist in the map.
"color temp"is good for Color models only.
"camera gain"does not exist in the map.
set
user R/B Selection
fig1:Hierarchy Map
The following explains the menu modes along the hierarchy map of Fig. 1.
In menu mode, use the codes in Transmission Command Code Table 3.
When a code of menu mode on/off (6Eh) is sent, the processor switches the menu mode on or off.
When menu mode is on, you get in level 1. To move from one level to another, use (6Bh) or (6Dh) to move
through items in the same level (vertical direction in the chart), and use “decision” (6Ch) to move to the next.
level (horizontal direction in the chart).
NOTE:
Use the (6Bh) code to move downward in the chart, and the (6Dh) code upward.
3-24
RS422 Protocol and Commands
Note 2: In each level, any group of related items are “looped”. For example, when Random Frame is selected,
every time (6Bh) code is sent, the selection proceeds from 1, 2, 3, 4, 16, 32, 64, 128, through 256. Then the
next (6Bh) code will bring the selection back to 1.
random frame
Sets the number of frames for random recording. Setting procedures and response codes are as follows:
Procedure 1
Transmission code:
9. Menu mode: Code of on or off
Response codes:
11. Menu mode: Code of MENU on
12. Photron Remote Control Keypad code (18h)
13. Menu selection item: Code of random frame
Procedure 2
Transmission code:
9. Menu mode: Code of “decision”
Response codes:
12. Photron Remote Control Keypad code (02h)
14. random frame: Code of current status
At this point, the number of random frame setting is sent back (for example, if the number of
random frame setting is 2, the code F7h is sent back, and the “2” in the chart denotes the current
position.
When there is no change:
Procedure 3 Transmission code:
9. Menu mode: Code of “decision”
Response codes:
1. Frame rate: Code of current status
2. Resolution (horizontal): Current status code
3. Resolution (vertical): Current status code
4. Shutter speed: Current status code
11. Menu mode: Code of MENU off
12. Photron Remote Control Keypad code(30h)
This lets you exit the menu.
Note: For resolution and shutter speed, the code that is selected by [Resolution and Shutter Speed
Selection] is sent back.
When there is a change, send the code of decision using the ↑ or ↓ code.
Procedure 3
Transmission code:
9. Menu mode: ↑ or ↓ code (three ↑ codes are needed to
change from 2 to 16, for example)
Response codes:
12. Photron Remote Control Keypad code (02h)
14. random frame: Code after change
Procedure 4 Transmission code:
9. Menu mode: Code of “decision”
Response codes:
1. Frame rate: Current status code
2. Resolution (horizontal):Current status code
3. Resolution (vertical): Current status code
4. Shutter speed: Current status code
11. Menu mode: Code of MENU off
12. Photro Remote Control Keypad code (30h)
This lets you exit the menu.
Note: For resolution and shutter speed, the code that is selected by [Resolution and Shutter Speed
Selection] is returned.
3-25
RS422 Protocol and Commands
ext sync
Sets on or off of external sync and the polarity. Setting procedures and response codes are as follows:
Procedure 1 Transmission code:
9. Menu mode: Code of on/off
Response codes:
11. Menu mode: Code of MENU on
12. Photron Remote Control Keypad code (18h)
13. Menu selection items: Code of random frame
Procedure 2 Transmission code:
9. Menu mode: ↑ code
Response codes:
12. Photron Remote Control Keypad code (18h)
13. Menu selection items: Code of ext sync
Procedure 3 Transmission code:
9. Menu mode: Code of “decision”
Response codes:
12. Photron Reomote Control Keypad code (04h)
23. ext sync: Current status code
At this point, the current status is sent back (for example, if it is currently “off”, a 14h is sent back
and the “off” in the chart shows the current position).
When there is no change:
Procedure 4 Transmission code:
9. Menu mode: Code of “decision”
Response codes:
1. Frame rate: Current status code
2. Resolution (horizontal): Current status code
3. Resolution (vertical): Current status code
4. Shutter speed: Current status code
11. Menu mode: Code of MENU off
12. Photron Remote Control Keypad code (30h)
This lets you exit the menu.
Note: For resolution and shutter speed, the code that is selected by [Resolution and Shutter Speed
Selection] is sent back.
When there is a change, send a code of “decision” using the ↑ or ↓ code.
Procedure 4 Transmission code
9. Menu mode: ↑ or ↓ code (for exaple, going from “off” to
“on pos” requires one ↑ code or two ↓ codes)
Response codes:
12. Photron Remote Control Keypad code (04h)
23. ext sync: Code after change
Procedure 5 Transmission code
9. Menu mode: Code of “decision”
Response codes:
1. Frame rate: Current status code
2. Resolution (horizontal): Current status code
3. Resolution (vertical): Current status code
4. Shutter speed: Current status code
11. Menu mode: Code of MENU off
12. Photron Remote Control Keypad code (30h)
This lets you exit the menu.
Note: For resolution and shutter speed, the code that is selected by [Resolution and Shutter Speed
Selection] is returned.
3-26
RS422 Protocol and Commands
mcdl
Sets on or off of mcdl. Setting procedures and response codes are as follows:
Procedure 1
Transmission code:
9. Menu mode: Code of on/off
Response codes:
11. Menu mode: Code of MENU on
12. Photron Remote Control Keypad code (18h)
13. Menu selection items: Code of random frame
Procedure 2
Transmission code:
9. Menu mode: ↑ or ↓ code to set mcdl (find the number of
codes needed in the chart)
Response codes:
12. Photron Remote Control code (18h)
13. Menu mode: Code after change
Procedure 3 Transmission code:
9. Menu mode: Code of “decision”
Response codes:
12. Photron Remote Control Keypad code (06h)
22. mcdl: Current status code
At this point, the current status is sent back.
When there is no change:
Procedure 4
Transmission code:
9. Menu mode: Code of “decision”
Response codes:
1. Frame rate: Current status code
2. Resolution (horizontal): Current status code
3. Resolution (vertical): Current status code
4. Shutte speed: Current status code
11. Memu mode: Code of MENU off
12. Photron Remote Control Keypad code (30h)
This lets you exit the menu.
Note:
For resolution and shutter speed, the code that is selected by [Resolution and Shutter Speed
Selection] is returned.
When there is a change, use↑
use ↑ or ↓ code for selection and send the code of “decishion”
Procudure 4 Transmission code:
9. Menu mode: ↑ or ↓ code
Response codes:
12. Photron Remote Control Keypad code (06h)
2. mcdl: Code after change
Procedure 5
Transmission code
9. Menu mode: Code of “decision”
Response codes:
1. Frame rate: Current status code
2. Resolution (horizontal): Current status code
3. Resolution (vertical): Current status code
4. Shutter speed: Current status code
11. Menu mode: Code of MENU off
12. Photron Remote Control Keypand code (30h)
This lets you exit the menu.
Note: For resolution and shutter speed, the code that is selected by [Resolution and Shutter Speed
Selection] is returned.
3-27
RS422 Protocol and Commands
monitor out
Sets SXGA or VIDEO of monitor display. Setting procedures and response codes are as follows:
Procedure 1 Transmission code:
9. Menu mode: Code of on/off
Response codes:
11. Menu mode: Code of MENU on
12. Photron Remote Control Keypad code (18h)
13. Menu selection items:Code of random frame
Procedure 2 Transmission code:
9. Menu mode: ↑ or ↓ code to select monitor out
(see the chart for the number of codes needed)
Response codes:
12. Photron Remote Control Keypad code (18h)
13. Menu selection items: Code after change
Procedure 3 Transmission code:
9. Menu mode: Code of “decision”
Response codes:
12. Photron Remote Control Keypad code (08)
21. monitor out: Current status code
At this point, the current status is sent back.
When there is no change:
Procedure 4 Transmission code:
9. Menu mode: Code of “decision”
Response codes:
1. Frame rate: Current status code
2. Resolutions (horizontal): Current status code
3. Resolution (vertical): Current status code
4. Shutter speed: Current status code
11. Menu mode: Code of MENU off
12. Photron Remote Control Keypad code (30h)
This lets you exit the menu.
Note: For resolution and shutter speed, the code that is selected by [Resolution and Shutter Speed
Selection] is returned.
When there is a change, use the ↑ or ↓ code for selection and send the “decision” code.
Procedure 4 Transmission code:
9. Menu mode: ↑ or ↓ code
Response codes:
12. Photron Remote Control Keypad code (08h)
21. monitor out: Code after change
Procedure 5 Transmissin code
9. Menu mode: Code of “decision”
Response codes:
1. Frame rate: Current status code
2. Resolution (horizontal): Current status code
3. Resolution (vertical): Current status code
4. Shutter speed: Current status code
11. Menu mode: Code of MENU off
12. Photron Remote Control Keypad code (30h)
This lets you exit the menu.
Note: For resolution and shutter speed, the code that is selected by [Resolution and Shutter Speed
Selection] is returned.
3-28
RS422 Protocol and Commands
time set
Sets the time on clock. Setting procedures and response codes are as follows:
Procedure 1
Transmission code:
9. Menu mode: Code of on/off
Response codes:
11. Menu mode: Code of MENU on
12. Photron Remote Control Keypad code (18h)
13. Menu selection items: Code of random frame
Procedure 2
Transmission code:
9. Menu mode: ↑ or ↓ code to select time set
(see the chart for the number of codes needed)
Response codes:
12. Photron Remote Control Keypad code (18h)
13. Menu selection items: Code after change
Procedure 3
Transmission code:
9. Menu mode: Code of “decision”
Response codes:
20. time set: Code of the year
20. time set: Code of “0”(zero) of 10s position
20. time set: Code of “0”(zero) of unit
Procedure 4
Transmission code:
9. Menu mode: ↑ or ↓ code (where code is for increment
and code is for decrement)
Response codes:
20. time set: Code of the year
20. time set: Code after change in 10s position
20. time set: Code after change in unit
Procedure 5
Transmission code:
9. Menu mode: Code of “decision”
Response codes:
20. time set: Code of the month
20. time set: Code of “1” of 10s position
20. time set: Code of “1” of unit
Procedure 6
Repeat Procedures 3 to 5 until the numbers in “seconds” have been set.
Procedure 7
Transmission code:
9. Menu mode: Code of “decision”
Response codes:
1. Frame rate: Current status code
2. Resolution (horizontal): Current status code
3. Resolution (vertical): Current status code
4. Shutter speed: Current status code
11. Menu mode: Code of MENU off
12. Photron Remote Control Keypad code (30h)
This lets you exit the menu.
Note: For resolution and shutter speed, the code that is selected by [Resolution and Shutter Speed
Selection] is returned.
3-29
RS422 Protocol and Commands
system rev
Displays the system revision on the monitor screen. Setting procedures and response codes are as
follows:
Procedure 1
Transmission code:
9. Menu mode: Code of on/off
Response codes:
11. Menu mode: Code of MENU on
12. Photron Remote Control Keypad code (18h)
13. Menu selection items: Code of random frame
Procedure 2
Transmission code:
9. Menu mode: ↑ or ↓ code to select system rev
(see the chart for the number of codes needed)
Response codes:
12. Photron Remote Control Keypad code (18h)
13. Menu selection items: Code after change
Procedure 3
Transmission code:
9. Menu mode: Code of “decision”
Response codes:
12. Photron Remote Control Keypad code (0Ah)
19. system rev: Code of monitor display
8. Display mode: Code of REPORT on
Note: The code of “REPORT on” is returned only when “REPORT off”
At this point, the revision number of the system is displayed on the monitor.
Procedure 4
Transmission code:
9. Menu mode: Code of “decision”
Response codes:
1. Frame rate: Current status code
2. Resolution (horizontal): Current status code
3. Resolution (vertical): Current status code
4. Shutter speed: Current status code
11. Menu mode: Code of MENU off
12. Photron Remote Control Keypad code (30h)
This lets you exit the menu.
Note: For resolution and shutter speed, the code that is selected by [Resolution and Shutter Speed
Selection] is returned.
3-30
RS422 Protocol and Commands
date/time
Switches the clock display between date and time. Setting procedures and response codes are as follows:
Procedure 1
Transmission code:
9. Menu mode: Code of on/off
Response codes:
11. Menu mode: Code of MENU on
12. Photron Remote Control Keypad code (18h)
13. Menu selection items: Code of random frame
Procedure 2
Transmission code:
9. Menu mode: ↑ or ↓ code to select date or time
(see the chart for the number of codes needed)
Response codes:
12. Photron Remote Control Keypad code (18h)
13. Menu selection items: Code after change
Procedure 3
Transmission code:
9. Menu mode: Code of “decision”
Response codes:
12. Photron Remote Control Keypad code (1Ah)
18. date/time: Current status code
At this point, the current status is returned.
When there is no change:
Procedure 4
Transmission code:
9. Menu mode: Code of “decision”
Response codes:
1. Frame rate: Current status code
2. Resolution (horozontal): Current status code
3. Resolution (vertical): Current statsu code
4. Shutter speed: Current status code
11. Menu mode: Code of MENU off
12. Photron Remote Control Keypad code (30h)
This lets you exit the menu.
Note: For resolution and shutter speed, the code that is selected by [Resolution and Shutter Speed
Selection] is returned.
When there is a change, use↑
use ↑ or ↓ code to select items for decision.
Procedure 4
Transmission code:
9. Menu mode: ↑ or ↓ code
Response codes:
12. Photron Remote Control Keypad code (1Ah)
18. data/time: Code after change
Procedure 5 Transmission code:
9. Menu mode: Code of “decision”
Response codes:
1. Frame rate: Current status code
2. Resolution (horizontal): Current status code
3. Resolution (vertical): Current status code
4. Shutter speed: Current status code
11. Menu mode: Code of MENU off
12. Photron Remote Control Keypad code (30h)
This lets you exit the menu.
Note: For resolution and shutter speed, the code that is selected by [Resolution and Shutter Speed
Selection] is returned.
3-31
RS422 Protocol and Commands
ext out
Selects the type and polarity of output signals. Setting procedures and response codes are as follows:
Procedure 1
Transmission code:
9. Menu mode: Code of on/off
Response codes:
11. Menu mode: Code of MENU on
12. Photron Remote Control Keypad code (18h)
13. Menu selection items: Code of random frame
Procedure 2 Transmission code:
9. Menu mode: use↑
use ↑ or ↓ code to select ext out
(see the chart for the number of codes needed)
Response codes:
12. Photron Remote Control Keypad cose (18h)
13. Menu selection items: Code after change
Procedure 3
Transmission code:
9. Menu mode: Code of “decision”
Response codes:
12. Photron Remote Control Keypad code (1Dh)
17. ext out: Current status code
At this point, the current status is returned.
When there is no change:
Procedure 4
Transmission code:
9. Menu mode: Code of “decision”
Response codes:
1. Frame rate: Current status code
2. Resolution (horizontal): Current status code
3. Resolution (vertical): Current status code
4. Shutte speed: Current status code
11. Menu mode: Code of MENU off
12. Photron Remote Control Keypad code (30h)
This lets you exit the menu.
Note: For resolution and shutter speed, the code that is selected by [Resolution and Shutter Speed
Selection] is returned.
When there is a change, use↑
use ↑ or ↓ code for selection.
Procedure 4
Transmission code:
9. Menu mode: ↑ or ↓ code
Response codes:
12. Photron Remote Control Keypad code (1Dh)
17. ext out: Code after change
Procedure 5
Transmission code:
9. Menu mode: Code of “decision”
Response codes:
1. Frame rate: Current status code
2. Resolution (horizontal): Current status code
3. Resolution (vertical): Current status code
4. Shutter speed: Current status code
11. Menu mode: Code of MENU off
12. Photron Remote Control Keypad code (30h)
This lets you exit the menu.
Note: For resolution and shutter speed, the code that is selected by [Resolution and Shutter Speed
Selection] is returned.
3-32
RS422 Protocol and Commands
camera gain
Sets the camera gain. Setting procedures and response codes are as follows:
Procedure 1 Transmission code:
9. Menu mode: Code of on/off
Response codes:
11. Menu mode: Code of MENU on
12. Photron Remote Control Keypad code (18h)
13. Menu selection items: Code of random frame
Procedure 2
Transmission code:
9. Menu mode: ↑ or ↓ code for selection
(see the chart for the number of codes neede)
Response codes:
12. Photron Remote Control Keypad code (18h)
13. Menu selection items: Code after change
Procedure 3
Transmission code:
9. Menu mode: Code of “decision”
Response codes:
12. Photron Remote Control Keypad code (B1h)
16. camera gain: Current status code
At this point, the current status is returned.
When there is no change:
Procedure 4
Transmission code:
9. Menu mode: Code of “decision”
Response codes:
1. Frame rate: Current status code
2. Resolution (horizontal): Current status code
3. Resolution (vertical): Current status code
4. Shutter speed: Current status code
11. Menu mode: Code of MENU off
12. Photron Remote Control Keypad code (30h)
This lets you exit the menu.
Note: For resolution and shutter speed, the code that is selected by [Resolution and Shutter Speed
Selection] is returned.
When there is a change, use↑
use ↑ or ↓ code for selection.
Procedure 4
Transmission code:
9. Menu mode: ↑ or ↓ code
Response codes:
12. Photron Remote Control Keypad code (B1h)
16. camera gain: Code after change
Procedure 5
Transmission code:
9. Menu mode: Code of “decision”
Response codes:
1. Frame rate: Current status code
2. Resolution (horizontal): Current status code
3. Resolution (vertical): Current status code
4. Shutter speed: Current status code
11. Menu mode: Code of MENU off
12. Photron Remote Control Keypad code (30h)
This lets you exit the menu.
Note: For resolution and shutter speed, the code that is selected by [Resolution and Shutter Speed
Selection] is returned.
3-33
RS422 Protocol and Commands
color temp
Sets color temperature. Setting procedures and response codes are as follows:
Procedure 1 Transmission:
9. Menu mode: Code of on/off
Response codes:
11. Menu mode: Code of MENU on
12. Photron Remote Control Keypad code (18h)
13. Menu selection items: Code of random frame
Procedure 2 Transmission code:
9. Menu mode: ↑ or ↓ code for color temperature selection
(see the chart for the number of codes needed)
Response codes:
12. Photron Remote Control Keypad code (18h)
13. Memu selection items: Code after change
Procedure 3 Transmission code:
9. Menu mode: Code of “decision”
Response codes:
12. Photron Remote Control Keypad code (84h)
15. color temp: Current status code
At this point, the current status is returned.
When there is no change:
Procudure 4 Transmission code:
9. Menu mode: Code of “decision”
Response codes:
1. Frame rate: Current status code
2. Resolution (horizontal): Current status code
3. Resolution (vertical): Current code
4. Shutter speed: Current status code
11. Menu mode: Code of MENU off
12. Photron Remote Control Keypad code (30h)
This lets you exit the menu.
Note: For resolution and shutter speed, the code that is selected by [Resolution and Shutter Speed
Selection] is returned.
When there is a change, use↑
use ↑ or ↓ code for selection.
Procedure 4 Transmission code:
9. Menu mode: ↑ or ↓ code
Response codes
12. Photron Remote Control Keypad code (84h)
15. camera gain: Code after change
Procedure 5 Transmission code:
9. Menu mode: Code of “decision”
When items other than user-defined items are selected :
Response codes:
1. Frame rate: Current status code
2. Resolution (horizontal): Current status code
3. Resolution (vertical): Current status code
4. Shutter speed: Current status code
11. Menu mode: Code of MENU off
12. Photron Remote Control Keypad code (30h)
This lets you exit the menu.
Note: For resolution and shutter speed, the code that is selected by [Resolution and Shutter Speed
Selection] is sent back.
3-34
RS422 Protocol and Commands
When useer-defined items are selected:
Response codes:
12. Photron Remote Control Keypad code (84h)
12. Photron Remote Control Keypad code (85h)
15. camera gain: Current codes of set & edit
Use ↑ or ↓ code to select and send set/edit. “set” sets the color temperature to the
preselected value.
When “set” is selected:
Procedure 6
Tarnsmission code:
9. Menu mode: Code of “decision”
Response codes:
1. Frame rate: Current status code
2. Resolution (horizontal): Current status code
3. Resolution (vertical): Current status code
4. Shutter speed: Current status code
11. Menu mode: Code of MENU off
12. Photron Remote Control Keypad code (30h)
This lets you exit the menu.
Note: For resolution and shutter speed, the code that is selected by [Resolution and Shutter Speed
Selection] is returned.
When “edit” is selected:
Procedure 6 Transmission code:
9. Menu mode: Code of “decision”
Response codes:
8. Display mode: Code of REPORT on
12. Photron Remote Control Keypad code (84h)
12. Photron Remote Control Keypad code (85h)
12. Photron Remote Control Keypad code (85h)
(Note: 85h is returned twice.)
15. camera gain: Code of R selection
15. camera gain: Current status code (10s position)
15. camera gain: Current status code (unit)
Note: The code of REPORT on is returned only when REPORT is off.
At this point, the current value of R is returned.
To change the value of R and B, the same code is used. The → or
or←
← code is used to select R or B
to change.
Procedure 7
Transmission code:
9. Menu mode: → or ← code
Response codes:
12. Photron Remote Control Keypad code (84h)
12. Photron Remote Control Keypad code (85h)
12. Photron Remote Control Keypad code (85h)
(Note: 85h is returned twice.)
15. camera gain: Code after change (R or B)
15. camera gain: Current status code (10s position)
15. camera gain: Current status code (unit)
After selecting R or B, use↑
use ↑ or ↓ code to set the required value.
Procedure 8
Transmission code:
9. Menu mode: ↑ or ↓ code ( ↑ code for increment and ↓
code for decrement. Value is decided by the number of codes
sent.)
3-35
RS422 Protocol and Commands
Response codes:
12. Photron Remote Control Keypad code (84h)
12. Photron Remote Control Keypad code (85h)
12. Photron Remote Control Keypad code (85h)
(Note: 85h is returned twice.)
15. camera gain: Current status code (R or B)
15. camera gain: Code after change (10s position)
15. camera gain: Code after change (unit)
After setting R and B color temperature, send the “decidion” codes
Procedure 9 Transmission code:
9. Menu mode: Code of “dicision”
Response codes:
1. Frame rate: Current status code
2. Resolution (horizontal): Current status code
3. Resolution (vertical): Current status code
4. Shutter speed: Current status code
11. Menu mode: Code of MENU off
12. Photron Remote Control Keypad code (30h)
This lets you exit the menu.
Note: For resolution and shutter speed, the code that is selected by [Resolution and Shutter Speed
Selection] is returned.
3-36
CHAPTER 4 GETTING STARTED
System Cnnection
Turning the System on
First Recording
Notes
System Connection
This section shows you how to connect the FASTCAM-ultima 1024 components, video monitor and
Video Cassette Recorder (VCR).
CAMERA INSTALLA
INSTALLATION
TION
As shown in page 2-2, the camera has a 1/4-inch screw hole in its base plate. Install the camera firmly
on a tripod using this screw hole.
INSTALLING
INST
ALLING A LENS
The camera has a type C lens mounting adapter on the front panel. Screw, clockwise, a taking lens into
this mounting adapter until the lens firmly sits in the adapter. Do not force too much. Keep the cap on
the lens.
FLANGEBACK ADJUSTMENT
The flangeback is factory-set before shipping. In case the flangeback is not in order, readjust in the
following manner:
1)Set the lens firmly on the C-mount and loosen the three retaining screws around the mounting
adapter.
2)Set the focus ring of the lens to infinity, with the iris wide open, and aim at an object in the infinite
distance.
3)When you have sharply focused on the object, fasten the three retaining screws.
Screw
Screw
4-1
System Connection
Connecting the processor
Caution:
Please unplug the processor power cord from the mains outlet before connecting FASTCAM-ultima
1024 system components to the processor. See the schematics on page 4-3.
Connect between the camera and the processor with the camera cable.
Connect the remote control keypad cable to the remote control connector on the rear panel.
Connect the video output on the processor rear panel to the video input connector of the VCR with a
75-ohm coaxial cable.
Connect the video output connector on the back of the VCR to the input connector on the rear panel
of the video monitor with a coaxial cable.
To use a VGA monitor, connect the VGA output connector on the rear panel of the processor to the
VGA monitor.
Note: Please always use an SXGA monitor to view the high-resolution VGA image output from the
FASTCAM-ultima 1024.
CONNECTING THE AC POWER CORD
First make sure the power switch on the processor rear panel is in the OFF position, then connect the
power cord to the receptacle on the processor rear panel.
Caution:
Make sure the voltage from the power outlet agrees with the voltage requirement of the system.
4-2
System Connection
Cammera Cable
FASTCAM-ultima 1024 System Connection
4-3
Turning the System on
SWITCH
SWIT
CH ON THE PROCESSOR
PROCESSOR
Press the power switch on the front panel to turn the system on. As soon as power is on, the system
is automatically set up as follows (factory setting):
1. Live: ON
2. REC RATE: 500
3. REC MODE: START
4. ID No.: 01
5. REPORT: ON
6. Playback rate: 30FPS
The video monitor screen looks as follows:
Note:
When settings of framing rate, mode, etc. from the previous session are retained in memory at the time
of shut down, the system will start up, when it is switched on again, with those settings preserved
effective.
ID number
Display mode
time
01 LIVE 10:10:00
START 1024×1024 500FPS PHOTRON
Trigger mode
Resolution
Frame rate
4-4
First Recording
MAKE A FIRST RECORDING
Adjust the camera position aiming at an object that you wish to capture. Set the FASTCAM-ultima
1024 in Live mode, select a framing rate using the REC RATE button. Repeat adjustment of the lens iris
and lighting as necessary until you have a satisfactory image on the monitor screen. Select START
recording mode by the MODE SELECT button. Press the READY button followed by the REC
button. The FASTCAM-ultima 1024 will continue to record the image data of the object until the
memory is full. Press the LIVE button to exit Live mode, enabling the playback controls. Press the
PLAY button, and you will see the fresh image played back on the monitor screen, begining with the
first frame of the entire recorded iamges.
4-5
First Recording
REVIEW OF THE PROCEDURE
The following wraps up the procedure of recording images of the target object.
1. Select Live mode.
2. Select a recording frame rate.
3. Optimize the image on the monitor screen by readjusting the iris and lighting.
4. Select a recording mode: START, CENTER, END or RANDOM.
5. Press the READY button.
6. Press the RECORD button to start recording.
7. Exit Live mode by pressing the LIVE button.
8. View the recorded image using the playback controls.
4-6
CHAPTER 5 1394 INTERFACE
Downloading the image data to computer
Camera Control Utility
Notes
Downloading the image data to computer
INTRODUCTION
The processor has on its rear panel a group of IEEE1394 interface connectors--two 6-pin connectors
and one optical connector.
Usually, one of the two 6-pin connectors is connected to the 1394 connector on the PC back panel.
Using the camera control utility that comes with the sysem, you can remotely control the functions of
FASTCAM-ultima 1024 and download the image data from the processor memory to a harddisk drive
of the PC.
SYSTEM
SY
STEM REQUIREMENT
REQUIREMENT
OPERATING
OPERA
TING SYSTEM
SYSTEM
Windows 2000
SOFTWARE
Camera Control Utility (standard equipment)
HARDWARE
PC compatible or portable computer equipped with 1394 interface.
1394 Cable(6-pin)
5-1
Camera Control Utility
Please see the separate Utility Manual.
5-2
CHAPTER 6
BASICS OF RECORDING
Introduction
Principle of Image Recording
START Mode
CENTER Mode
END Mode
RANDOM Mode
Choosing a Record Mode
Notes
Introduction
The first section of this chapter describes how the PHOTRON FASTCAM-ultima 1024 series moves
images in and out of memory. This is intended to help you decide which record mode is best suited for
a particular application.
The Processor stores its images in random access memory (RAM) rather than on film or magnetic tape.
The major advantage of storing pictures in RAM is speed. There are no moving mechanical parts
involved in the recording process. A mechanical part takes time to stabilize at a particular speed.
A mechanical tape or film transport is the major source of delay between pressing the record key and
when recording begins. How then, does the Processor manage the picture storage process?
6-1
Principle of Image Recording
An analogy for the recording and playback process would be Carousel slide projector and a Carousel slide
tray. Think of the Processor as a Carousel slide projector and the Random Access Memory (RAM) as
the Carousel slide tray. For our discussion the RAM is divided into small sections or frames that are just
large enough to hold a single video image. These frames can be thought of as the pockets in a slide tray
that hold the slides or images. In this analogy the slide tray holds 546 slides or the processor memory
has 546 frames.
A slide tray is usually loaded with slides starting at location number one and continuing on around the
tray in sequence until the last location is loaded. When the slide tray is full, a slide must be removed
before another slide can be put in. The processor memory is loaded with images in a similar way. The
first image is placed in the first frame of processor memory. The second image is placed in the next frame
and so on until last image is placed in the last location. When the memory of the processor is full, the
processor erases the first frame and place another frame in place. This process continues for a period of
one round of the whole frames. As a result, the processor memory alwary holds the latest images.
Empty
Full
New frame
6-2
START Mode
The START mode fills memory only once and then stops recording. Use the START mode when you
wish to start a recording session manually. This mode is used when the experiment has an observable
start and you are interested in the action immediately after the recording is started.
STOPS at
End of Memory
First Recording
Empty
Full
Memory is full
No more frames allowed
6-3
Last Frame
CENTER Mode
The CENTER record mode causes the Processor to use memory as a circular buffer. Pictures are stored
in sequence with the current picture replacing the oldest picture so that you always have the 512 most
recent pictures in memory. A trigger signal input at this time marks the next frame as frame number 1.
After a trigger occurs the Processor records an additional 256 frames, or half of the total number of frames
available, and then stops recording.
The CENTER record mode is best suited for recording an event that is electrically controlled, or an event
that transmits an elctrical signal, because the electrical signal can be used as the trigger to control the
recording by the system.
STOPS at
End of Memory
First Frame
Trigger
Frame “1”
Empty
Full
6-4
Last Frame
END mode
The Processor treats memory as a circular buffer when using the END mode. Pictures are stored in
sequence with the current picture replacing the oldest picture in memory until you press the TRIGGER
button again or a trigger signal is received through TRIGGER IN or TRIGGER SW IN on the rear panel
of the Processor. This approach to recording gives you an infinite amount of record time while you wait
for something to happen. After the recording is stopped you will have the last 512 frames of action
stored in memory.
The END mode is used when the experiment has an observable end and you are interested in the action
immediately before the recording was stopped.
Removed
Oldest frame
Newest Frame
Only frames viewed during playback
Stop
Empty
Full
Removed
Newest Frame
Oldest frame
6-5
RANDOM mode
The RANDOM mode records one, ten or fifty frames for each trigger signal received by the Processor.
The Processor continues to record until the memory has been filled.
STOPS at
End of Memory
Depicts 10 frames
First Recording
Last Frame
Memory is full
Empty
Full
No more frames allowed
6-6
YES
Does the event have images
before it that need to be captured?
▼
YES
Does the event have images
after it that need to be captured?
▼
YES
▼
YES
Choose the START mode.
NO
Does the event have an
observable start?
▼
Choose the CENTER mode.
Does the event have an
observable end?
▼
YES
Choose the END mode.
6-7
NO
▼
YES
Find a way to create a trigger
signal using light, sound or
motion.
NO
Is there an external terigger
that relates to the event?
Consider using the START
mode.
NO
▼ ▼ ▼
▼
NO
Is the event controlled or
predictable?
▼
Choosing a Record Mode
Consider using END mode.
Notes
CHAPTER 7 DAILY MAINTENANCE
Care of Lenses
Specifications
Notes
Care of Lenses
The surface of photographic lenses have thin coatings that reduce chromatic aberration, unwanted reflections, and other distortions. Extra care should be taken to protect this fragile coating.
Protect the lens by installing a lens cap when you are not using the camera. Brush the lens gently with
a camel hair brush or loosely folded piece of lens paper to remove dust particles. For stubborn dirt use
photographic lens cleaning solution and lens wipes. Never rub the lens with direct pressure or drop
cleaning solution directly on the lens surface.
7-1
Specifications
PHOTRON FASTCAM-ultima 1024
Remote keypad:
Controls all the functions of the processor. Has a 5-meter cable to connect to
the processor.
Recording method:
Digital recording in DRAM
Record modes:
START:
END:
CENTER:
RANDOM:
AUXMEM:
Framing rates:
Records frames until the available memory is full, and stops recording.
Records frames continuously and stops when the RECORD button is pressed
or a trigger is given.
Records frames continuously until a trigger is given. Records the same number
of frames before and after the trigger signal.
Records 1, 2 or up to 256 frames at each trigger until the memory is full. The
number of frames to be recorded at a trigger is set on the keypad.
Calibrates the system for optimum picture quality.
Full frame: 60; 125; 250; 500 FPS, Partial frams: 1000; 2000; 4000; 8000;
16000 FPS
FASTCAM-ultima1024 Available Frame Rates & Resolutions
Frame Rate
Resoluitons 60 fps 125fps 250fps 500fps 1,000fps 2,000fps 4,000fps 8,000fps 16,000fps
1024X1024
*
*
*
*
1024X512
*
*
*
*
*
512X512
*
*
*
*
*
512X256
*
*
*
*
*
*
256X256
*
*
*
*
*
*
512X128
*
*
*
*
*
*
*
256X128
*
*
*
*
*
*
*
128X128
*
*
*
*
*
*
*
512X64
*
*
*
*
*
*
*
*
256X64
*
*
*
*
*
*
*
*
128X64
*
*
*
*
*
*
*
*
64X64
*
*
*
*
*
*
*
*
256X32
*
*
*
*
*
*
*
*
*
128X32
*
*
*
*
*
*
*
*
*
7-2
Specifications
Shutter Speed:
FASTCAM-ultima1024 Available Frame Rates & Shutter speeds
Frame Rate
Shutter
60f
p
s
125fps
250fps
500fps
1,000fps 2,000fps
1/60
*
1/125
*
*
1/250
*
*
*
1/500
*
*
*
*
1/1,000
*
*
*
*
*
1/2,000
*
*
*
*
*
*
1/4,000
*
*
*
*
*
*
1/8,000
*
*
*
*
*
*
1/16,000
*
*
*
*
*
*
1/32,000
*
*
*
*
*
*
1/64,000
*
*
*
*
*
*
1/128,000
*
*
*
*
*
*
Frame storage:
4,000fps
*
*
*
*
*
*
-1 model: 512 frames, 512 MB memory
-2 model: 1,024 frames, 1 GB memory
-3 model: 1,536 frames, 1.5 GB memory
FASTCAM-ultima1024 Available Memory & Frame stotrage.
Memory
512MB
1GB
1.5GB
Resolution
Number of Frame storage
1024X1024
512
1,024
1,536
1024X512
1,024
2,048
3,072
512X512
2,048
4,096
6,144
512X256
4,096
8,192
12,288
256X256
8,192
16,384
24,576
512X128
8,192
16,384
24,576
256X128
16,384
32,768
49,152
128X128
32,768
65,536
98,304
512X64
16,384
32,768
49,152
256X64
32,768
65,536
98,304
128X64
65,536 131,072 196,608
64X64 131,072 262,144 393,216
256X32
65,536 131,072 196,608
128X32 131,072 262,144 393,216
Resolution
Maximum Fps
1024X1024
500
1024X512
1,000
512X512
1,000
Memory
512MB
1GB
1.5GB
Number of Frame storage
Recording time (sec.)
512
1,024
1,536
1.0
2.0
3.1
1,024
1.0
2,048
2.0
7-3
2,048
2.0
4,096
4.1
3,072
3.1
6,144
6.1
8,000fps 16,000fps
*
*
*
*
*
*
*
*
*
Specifications
Playback rates:
512X256
2,000
256X256
2,000
4,096
2.0
8,192
4.1
8,192
4.1
16,384
8.2
12,288
6.1
24,576
12.3
512X128
4,000
256X128
4,000
128X128
4,000
8,192
2.0
16,384
4.1
32,768
8.2
16,384
4.1
32,768
8.2
65,536
16.4
24,576
6.1
49,152
12.3
98,304
24.6
512X64
8,000
256X64
8,000
128X64
8,000
64X64
8,000
16,384
2.0
32,768
4.1
65,536
8.2
131,072
16.4
32,768
4.1
65,536
8.2
131,072
16.4
262,144
32.8
49,152
6.1
98,304
12.3
196,608
24.6
393,216
49.2
256X32
16,000
128X32
16,000
65,536
4.1
131,072
8.2
131,072
8.2
262,144
16.4
196,608
12.3
393,216
24.6
NTSC: 2; 5; 10; 15; 30 FPS
PAL: 2; 4; 8; 12; 25 FPS
Single frame; freeze; forward; reverse
7-4
Specifications
PHOTRON FASTCAM-ultima 1024 PROCESSOR
Video output:
NTSC or PAL (factory set)
Sync signal output:
Vertical sync or RECORD gate signal output by EXT OUT BNC connector
Report display:
Record rate; ID No.; Date/Time (switchable); Record status (while recording);
Shutter speed; Trigger mode; Elapsed time; Frame number
Signal input:
TRIGGER IN:BNC connector, CMOS level opto isolator input
5V, 10mA
BNC connector, switch contact for trigger
155.5 (W)x 151 (H)x 302 (D)millimeters
6.2 (W) x 6.0 (H) x 11.9 (D) inches
7.0kg (approx. 15.5 lbs)
110/220 VAC, 50/60 Hz, 1.5A
TRIGGER SW IN:
Dimensions:
Weight:
Power:
PHOTRON FASTCAM-ultima 1024 CAMERA
Sensor:
Greyscale:
Lens mount:
Tripod screw hole:
Camera cable:
Dimensions:
Weight:
Power:
1024 x 1024 pixels
256 levels
C mount
1/4-20 UNB-2B
5 meters (approx. 16.5 feet)
85 (W)x 85 (H)x 46 (D)millimeters
3.4 (W) x 3.4 (H) x 1.9 (D) inches
0.55kg (approx. 1.2 lbs)
Fed by the processor
Ambient temperature: 0 to 35 degrees Celsius (no condensation)
Storage temperature: -20 to 70 degrees Celsius (no condensation)
PHOTRON FASTCAM-ultima 1024 CONTROL KEYPAD
Dimensions:
Weight:
Power:
166 (W) x 82 (H) x 34 (D) millimeters
6.5 (W) x 3.5 (H) x 1.4 (D) inches
0.53kg (approx. 1.2 lbs)
Fed by the processor
7-5
Notes
PHOTRON LIMITED
Copyright PHOTRON LIMITED,
LIMITED , 2001
2001/05/08 Rev. 2.2
Printed in Japan
7-4