1
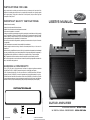
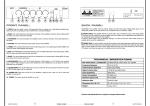
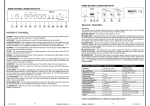
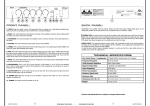
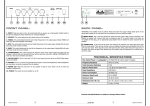
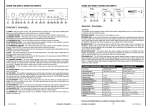
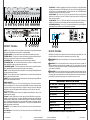
6
7
60 GA DSP
8
9
5
4
10
11
3
13) EFX SEND - This amplifier is equipped with an effects loop which allows you to plug effects between
the preamp and the power amp. The EFX SEND jack is a line level 1/4” (Ø 6,3 mm) output jack into which
you may connect one or several outboard effects, eg Flanger, Delay, Chorus etc. The EFX SEND should be
connected to the input jack of the first effect in your chain.
14) EFX RETURN - This is a line level 1/4” (Ø 6,3 mm) input jack into which you should connect the
output jack of the last effect in your chain. The effects loop may also be used with a multi-effects rack
system, or with a single effect.
15) FOOTSWITCH - This is a 1/4” (Ø 6,3 mm) input jack into which you may connect a footswitch (not
included) which will enable you to switch between the Clean and Overdrive channels while playing.
16) PHONES (60 GA R only) - This is a 1/4” (Ø 6.3 mm) stereo jack output to connect the headphones.
When headphones are connected, no sound is produced from the speaker.
12
2
INPUT
CLEAN
OVERDRIVE
EQ
1
MASTER
0
1
10
Volume
Channel
Select
2
3
10
0
Gain
4
5
10
0
10
0
Master
6
10
0
Bass
Mid
7
8
10
0
Treble
9
0
10
Reverb
0
13
16
60 GA R
10
INPUT
CD/MP3
EFX
SEND
EFX
RETURN
FOOT
SWITCH
PHONES
Master
10 11
12 13 14 15 16
~110V/60Hz
15
14
T1.6AH/250V
POWER CONSUMPTION: 185W
DATE:
10
FRONT PANEL:
11 12 13 14 15
1) INPUT - Plug your guitar in here. We recommend that you always use a high-quality shielded guitar
cable to prevent any background noise interference or unwanted feedback.
2) (CLEAN) VOLUME - This control determines the output volume of the amplifier’s clean channel.
3) CHANNEL SELECT - This button can be used to switch between the Clean and Overdrive channels.
Alternatively, you may also select the channel via a footswitch (see FOOTSWITCH).
4) (OVERDRIVE) LED - This red LED lights up when the Overdrive channel is activated.
5) (OVERDRIVE) GAIN - This control determines the distortion intensity of the amplifier’s overdrive
setting. Adding GAIN will make your guitar sound more distorted.
6) (OVERDRIVE) MASTER - This control determines the output volume of the amplifier’s Overdrive
channel. Adding MASTER will make your guitar sound louder and more percussive.
7) BASS - This control determines the level of low frequencies in the output signal. Adding BASS will make
your guitar sound warmer and heavier.
8) MID - This control determines the level of middle frequencies in the output signal. Adding MID will
make your guitar sound rounder and fuller.
9) TREBLE - This control determines the level of high frequencies in the output signal. Adding TREBLE will
make your guitar sound brighter and sharper.
10) BUILT-IN EFFECT:
•SPRING REVERB (60 GA R only): This is the reverb intensity control. This controls the amount of
reverb that is added back to the original dry signal. Adding REVERB will produce a reverberation effect
in your guitar sound, as though you were playing in a large hall. A little can go a long way in adding that
special depth to your sound. If engaged, the reverb is always active in either overdrive or clean mode.
•DSP (60 GA DSP only):
- Volume: This control determines the mix level of the amplifier’s internal DSP effects in relation to the
dry signal when DSP is engaged.
- Program: This selector enables the user to choose among 16 internal DSP effects: 1-Long dry Delay •
2-Flanger + short Reverb • 3-Flanger + long Reverb • 4-Short Delay w/ multiple repeat + medium Reverb
• 5-Medium Delay w/ multiple repeat + long Reverb • 6-Short Reverb 2 • 7-Medium Reverb 2 • 8-Deep
Chorus + medium Reverb • 9-Normal Chorus + short Reverb • 10-Short Delay w/ short repeat • 11-Slapback Delay • 12-Cathedral • 13-Large Hall • 14-Short Reverb 1 + very light Chorus • 15-Medium Reverb 1
• 16-Medium wet Delay w/ multiple repeat.
11) MASTER - This is the master volume control. It allows you to control the overall listening level of
both channels.
12) CD/MP3 INPUT - This is a line level 1/4” (Ø 6.3 mm) stereo jack into which an MP3/CD/Tape player
may be connected.
USER’S MANUAL
2
60 GA R - 60 GA DSP USA
1
2
3
BACK PANEL:
WARNING: This amplifier must be earthed. Please check that the supply voltage details given on the
rating label (located on the rear panel) are in accordance with your electricity supply.
1 POWER SWITCH: This switch turns the amplifier on or off. The switch is illuminated when the amplifier
is powered on.
2 MAINS INPUT: This is the input socket into which the mains power cable must be connected. This
amplifier is supplied with a power cable with a moulded-on plug. If the socket outlets in the home are
not suitable for the plug supplied with this amplifier, use an appropriate plug adapter that can handle the
power required for this amplifier.
3 POWER FUSE: In the event of the power fuse having to be replaced, first unplug the power cable from
the mains outlet. Then remove the fuse cover and replace the power fuse with one of the same type and
value. Never plug the power cable back into the mains outlet without the fuse cover. When powering on
the amplifier, if the power fuse blows up again, go to a suitable service centre for repair.
TECHNICAL SPECIFICATIONS
Max. Rated Power / Loudspeaker
50 Watts RMS @ 4 Ohms load / 12” Twin Cone Speaker
Frequency Response
Total Harmonic Distortion
Signal to Noise Ratio
Input Impedance
80 Hz to 15 kHz
0.8% (Clean Mode)
- 55 dB @ max Rated Power
220k Ohms
Power Consumption
100 Watts max
Maximum Input Level
40 mV (RMS)
Maximum Gain
42 dB (@ 1kHz)
Dimensions (H x W x D)
47 x 50 x 26 cm / 18.5 x 19.7 x 10.2 in
Weight
17.3 kg / 38.1 lb
Features and Specifications are subject to change without notice.
60 GA R - 60 GA DSP USA
3
USER’S MANUAL
INSTRUCTIONS FOR USE:
Plug the mains lead into a suitable power socket and connect your instrument to the input socket of the
amplifier with a suitable guitar lead (this lead is not supplied with the amplifier, but is normally supplied
with the electric guitar). Finally, press the Power Switch to the ON position, the power LED will glow and
your amplifier is ready for use.
USER’S MANUAL
IMPORTANT SAFETY INSTRUCTIONS:
1• Read all instructions carefully
2• Keep this instruction manual for future reference
3• Please follow all instructions and heed all precautions as stated
4• Do not use this apparatus on or near water
5• Always use a polarized, grounded plug as supplied. A grounded plug has two blades and a third grounding
prong. The wide blade, or third prong, is provided for your safety. Do not compromise the integrity of its safety
purpose by altering or modify this plug in any way. If the provided plug does not fit into your mains outlet,
consult a qualified electrician for replacement of the obsolete outlet.
6• Protect the power cable from being walked on, particularly at the mains socket or at the point of connection
to the apparatus.
7• Only use attachments or accessories that are specified by the manufacturer.
8• Always unplug the device when leaving it unused for an extended period of time, or in the event of a
thunderstorm.
9• Refer all servicing to qualified service personnel. Servicing is required when the apparatus has been damaged
in any way, particularly the plug or power cable, liquids spilled or foreign objects dropped into the apparatus, or
if the apparatus has been exposed to rain or moisture, does not operate normally, or has been dropped.
10• The apparatus should be connected to a mains socket outlet with a protective earthing connection.
11• The mains plug is used to connect or disconnect the device. By maintaining the apparatus connected to the
mains, it shall remain readily operational.
MARKING & CONFORMITY:
1. The «C (ETL) US» mark on this product means it conforms to the safety and performance standards
(UL 60065 and CSA C22.2 n°60065:03) accepted throughout the United States and Canada.
2. The «Crossed-out Wheeled Bin» is to draw your attention to the WEEE (Waste Electric & Electronic
Equipment) Directive (2002/96/EC). It means this apparatus should be collected separately for recycling.
3. «RoHS compliant» means this device conforms to the Directive (2002/95EC) on the restriction of the use
of certain hazardous substances in electrical and electronic equipments, such as: Mercury, Lead, Cadmium,
Hexavalent Chromium, Polybrominated Buphenyl (PBB) and Polybrominated Diphenyl Esthers (PBDE).
RoHS
compliant
USER’S MANUAL
4
EMD Music 01-2008-USA
DISTRIBUTOR/DEALER
60 GA R - 60 GA DSP USA
Guitar Amplifier
w/ Spring Reverb - 60 GA R USA
w/ Digital Signal Processor - 60 GA DSP USA