1
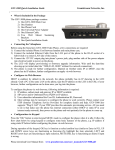
GXV3140 IP Multimedia Phone
Quick Start Guide
EN
The GXV3140 is not pre-configured to support or
carry emergency calls to any type of hospital, law
enforcement agency, medical care unit (“Emergency
Service(s)”) or any other kind of Emergency Service.
You must make additional arrangements to access
Emerge ncy Services. It is Your responsibility to
purchase SIP-compliant Internet telephone service,
properly configure the GXV3140 to use that service,
and periodically test your configuration to confirm
that it works as You expect. If You do not do so, it is
Your responsibility to purchase traditional wireless
or landline telephone services to access Emergency
Services.
GRANDSTREAM DOES NOT PROVIDE
CONNECTIONS TO EMERGENCY SERVICES VIA
THE GXV3140. NEITHER GRANDSTREAM NOR
ITS OFFICERS, EMPLOYEES OR AFFILIATES MAY
BE HELD LIABLE FOR ANY CLAIM, DAMAGE, OR
LOSS, AND YOU HEREBY WAIVE ANY AND ALL
SUCH CLAIMS OR CAUSES OF ACTION ARISING
FROM OR RELATING TO YOUR INABILITY TO USE
THE GXV3140 TO CONTACT EMERGENCY
SERVICES, AND YOUR FAILURE TO MAKE
ADDITIONAL ARRANGEMENTS TO ACCESS
EMERGENCY SERVICES IN ACCORDANCE WITH
THE IMMEDIATELY PRECEDING PARAGRAPH.
1
PACKAGE CONTENTS:
GXV3140 IP
Video Phone
Quick Start Guide
12V
PRECAUTIONS:
WARNING:
Please DO NOT power cycle the GXV3140 when the LED light
is flashing during system boot up or firmware upgrade. Doing so may corrupt
firmware images and cause the unit to malfunction.
WARNING: Only use the power adapter included with the GXV3140. Using
an alternative non-qualified power adapter may damage the unit.
PHONE SETUP:
Installing the phone stand:
Wall mount holes are available.
Push phone stand upwards.
2
CONNECTING THE PHONE:
1. Connect the handset
with the phone cord
provided.
2. Connect the LAN port to a
hub / switch / router using the
Ethernet cable.
3. Connect the power adapter
to the 12V DC output jack on
the back of the phone.
The GXV3140 supports configuration-free Plug-and-Call through Grandstream’s
peer-to-peer SIP technology. After the phone obtains an IP address through
DHCP, it will attempt to register to the IPVideoTalk network.
If the registration is successful, the IPVideoTalk text on the LCD will turn green
and an assigned IPVideoTalk number specific to this phone will be displayed.
At this point, the phone is ready for making video calls over the IPVideoTalk
network.
3
Tips For Using the Keypad:
Line
Message
Phone Book
Soft Keys
Navigation Keys
Menu/OK key
Camera loopback
Transfer
Hold
Conference
Send
Speaker
Standard Keypad
1. Press F1 or the round OK button when the phone is idle to access the MENU.
2. Use the navigation arrow keys to navigate the menu. Press the round OK
button to confirm a menu selection.
3. The soft keys (F1-F4) can be used for various functions on the GXV3140. The
functions are displayed on the LCD screen. Press the soft key corresponding to
the text on the LCD screen for the desired function.
PHONE CONFIGURATION:
Configure the GXV3140 using a Web Browser:
1. Type the phone’s IP address (from the LCD display) in your PC web
browser. The phone and the PC must be on the same network.
2. The default administrator user name is “admin’ with password “admin”; the
default end-user name is “user” with password “123”.
4
Configure the GXV3140 using the Keypad:
1. Press the “OK” button to access the keypad MENU to configure the phone.
2. Follow the MENU options to configure the various features of the GXV3140.
Note: Please download the GXV3140 User Manual from :
www.grandstream.com/user_manuals/GXV3140_User_Manual.pdf
5