1
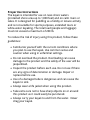
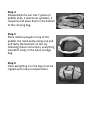
Sea Rebel™ Kayak Owner’s Manual ! WARNING 1. This is not a lifesaving device. Not for use by children except under mature, adult supervision. Keep children in sight while in the water. 2. To avoid serious injury, do not stand on product. 3. The product was designed for leisurely activity in relatively calm water. Do not take kayak in any rapids, rough water or in the ocean. Avoid strong currents & high winds/waves. 4. Do not use in severe weather or when chance of lightning is present. 5. Always wear a U.S. Coast Guard approved Type III life jacket (PFD). 6. Never tow from a boat or other motorized vehicle. 7. Never use the product while under the influence of alcohol or drugs, which may impair balance and proper judgment. 8. Do not use air compressors or compressed air to inflate. Excessive pressure can cause the product to rupture, with potentially damaging force to eyes, ears, skin and limbs. 9. Use only hand pump provided to inflate. 10. Understand and follow local water regulations. 11. Allow only ONE person on kayak at a time (200 lb max). 12. DO NOT paddle further from shore than you can swim. 13. Avoid sharp objects while using kayak. 14. Deflate and securely store when not in use. Read instructions completely before inflating/using this product. Sea Rebel Kayak™ includes: 1 Inflatable kayak 1 Collapsible kayak paddle 1 Carrying bag 1 Hand pump 1 Backrest w/ bottle holder and dry bag 1 Accessory bag (owner’s manual, valve body and vinyl repair patches) Inflating and Set Up Instructions CAUTION: DO NOT OVER-INFLATE. • Do not use air compressors or compressed air to inflate. Use of an air compressor or over-inflation can rupture the product beyond repair, voiding the warranty. Step 1 Lay the kayak face up on a flat surface. Make sure there are no sharp objects under the product which might puncture the tarpaulin cover or vinyl bladder. Step 2 Screw the valve body into the valve base (located under the flap at the rear of the kayak) and tighten firmly. Unscrew the top cap. Step 3 Use only the hand pump provided to inflate kayak. Inflate until the cover is tight and product feels firm. Do not use an air compressor to inflate your kayak. Use of a compressor can quickly over-inflate and rupture the kayak bladder. Step 4 Zip on the backrest and clip both support straps to the rings located on the outer edges of the kayak cover. Step 5 Connect the three pieces of aluminum together using the two couplers. Tighten the collets on the ends of the couplers until snug and the aluminum shafts can’t be pulled out. To avoid cracking the plastic pieces, do not over tighten. Orient the paddles to the desired position on the ends of the aluminum shaft and tighten the collets until the paddles are snug and cannot be slipped off. Step 6 Carry, DO NOT DRAG, your kayak to the water and enjoy. Proper Use Instructions The kayak is intended for use on near-shore waters (protected shore area up to 1,000 feet) and on calm rivers or lakes. It is designed for paddling as a hobby or leisure activity and is not suitable for sports purposes, extended tours or white-water kayaking. The total load (people and luggage) must not exceed a maximum of 200 lb. To reduce the risk of injury using this product, follow these guidelines: • Familiarize yourself with the current conditions where you plan to use the kayak. Use common sense and caution when using in unfamiliar settings. • Do not overload the product. Overloading can cause damage to the product and the safety of the user will be jeopardized. • Inspect the product before each use. Do not use if there are any signs of deterioration or damage. Repair or replace before use. • Use of a damaged tube is dangerous and can cause the kayak to sink. • Always wear a life jacket when using this product. • Take extra care not to have sharp objects on or around this product as it could easily be punctured. • Always carry your kayak to and from the water. Never drag your kayak. Using the Dry Storage Compartment IMPORTANT: Roll the top edge of the dry bag over a couple times before fastening the buckles. This compartment will stay reasonably dry under normal circumstances. However, please note that water may leak into this storage bag if the kayak is tipped upside down or is left out in strong rain. Do not store valuable articles in this bag if they must stay dry. Deflating and Storing your Kayak IMPORTANT: Let the kayak dry completely before deflating and storing. Step 1 Remove the backrest from kayak by unzipping it at the bottom and unclip support straps from rings. Step 2 Lay the kayak face up on a flat surface. Make sure there are no sharp objects under the product which might puncture the tarpaulin cover or vinyl. Remove the Boston valve in the back and allow it to completely deflate. Step 3: Fold the kayak into thirds as shown and role kayak starting at the front, working your way towards the valve in the back. Completely remove the valve to let any remaining air escape. Step 4 Disassemble the oar into 7 pieces (2 paddle ends, 3 aluminum cylinders, 2 couplers) and place them in the bottom of the carrying bag. Step 5 Place rolled up kayak on top of the paddle, the hand pump along one end and lastly the backrest on top. By following these instructions, everything should fit nicely in the nylon storage bag. Step 6 Once everything is in the bag it can be zipped up for easy transportation. Cleaning and Storage When the kayak is not being used, it is recommended that you store it in its carrying bag. Clean the kayak completely with a mild soap and fresh water. NEVER USE PETROLEUM BASED PRODUCTS OR SOLVENTS FOR CLEANING. Kayak should be completely dry and remain dry while stored. Roll the kayak loosely and place in the vented storage bag. Store in a cool, dry location. Do not store kayak directly on concrete surface. Place mothballs around stored inflatable to keep mice and insects away. NEVER use high pressure washing equipment such as a “pressure washer” to clean the kayak. This will damage the product beyond repair and void its warranty. When storing it in a cold area, allow kayak to warm up to room temperature before inflating. Troubleshooting Air chamber(s) won’t hold air: • Check Boston valve body and cap to make sure they are threaded squarely and the seals are properly seated. • Check for holes in bladder following the procedures in the “Repair” section. Repairs For Minor Holes or Tears: Deflate bladder and remove it from the kayak cover. Inflate the product and locate the leak by spraying or wiping with mild soapy water or by dunking it under water. Air bubbles will form and grow at the position of air leakage. Mark location of leakage. Cut a patch larger than the diameter of the hole. Make sure all corners of the patch are rounded. Deflate the product and clean the area around the hole. Wipe area with rubbing alcohol to remove any residue. Let dry. Peel backer from patch. Lay the product on a flat, hard surface and apply the patch using a dull, hard tool like a wooden spoon or roller. Working from the center to the outer edge, rub out any air bubbles between the patch and the product. Place a weight on the patch and let sit for an hour. Place bladder back into kayak cover and re-inflate. RAVE Sports Raft Water Sports