1
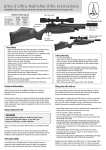
OWNER’S MANUAL READ ALL INSTRUCTIONS AND WARNINGS IN THIS MANUAL BEFORE USING THIS AIRGUN. Congratulations and thank you for purchasing your new STOEGER pellet airgun. 4 Please read this owner’s manual com pletely. Always treat your airgun as you would a real firearm. USA WARNING WARNING This airgun is not a toy. This airgun is to be used by adults only. Follow this owner’s manual safety instructions CAREFULLY and keep this manual safely for future use. Do not sell your airgun without this owner manual. Owner and user MUST KNOW AND OBEY ALL LOCAL LAWS ABOUT THE OWNERSHIP AND THE USE OF THIS AIRGUN. CONTENTS 1 2 3 4 5 6 7 8 USA Airgun parts ...................................................................................... Safety handling................................................................................. Adjusting the trigger ...................................................................... Cocking .............................................................................................. Loading .............................................................................................. Shooting: aiming and firing . ........................................................ Airgun maintenance........................................................................ Service and Repairs........................................................................ 9 10 10 10 11 11 11 12 Manual subject to modification without prior notice. USA 5 1. NEVER POINT AN AIRGUN AT SOMETHING THAT IS NOT SAFE TO SHOOT. Never let the muzzle of an airgun point at any part of your body or at another person. This is especially important when loading or unloading the airgun. When you are shooting at a target, know what is behind it. If you miss your target or if the pellet penetrates the target, it is your responsibility to ensure that the shot does not cause unintended injury or damage. 2. AN AIRGUN CAN CAUSE PERMA NENT INJURY OR DEATH. ALWAYS TREAT AN AIRGUN AS A REAL FIRE ARM AND AS IF IT WAS LOADED. Never assume that an airgun is unloaded. The only certain way to ensure that an airgun is not loaded is to open the chamber and visually examine the inside to see if a pel let is present. Airguns can be checked by opening the chamber so that a visual inspection of the chamber for any remaining pellet can be made. 3. STORE YOUR AIRGUN SO THAT CHILDREN CANNOT GAIN ACCESS TO IT. It is your responsibility to ensure that children under the lawful age of possession of an airgun or other unauthorized persons do not gain unsupervised access to your airgun. To reduce the risk of accidents involving children, unload your airgun, lock it and store the pellets in a separate locked location. 6 USA Please note that devices intended to prevent accidents - for example, cable locks, chamber plugs, etc, - may not prevent use or misuse of your airgun by a determined person. Steel gun safes may be more appropriate to reduce the likelihood of intentional misuse of an airgun by an unauthorized child or person. ������� AIRGUN SAFETY 4. NEVER SHOOT AT WATER OR AT A HARD SURFACE. Shooting at the surface of water or at a rock or other hard surface increases the chance of ricochets or fragmentation of the pellet, which can result in the projectile striking an unintended or peripheral target. 5.KNOW THE SAFETY FEATURES OF THE AIRGUN YOU ARE USING, BUT REMEMBER: SAFETY DEVICES ARE NOT A SUBSTITUTE FOR SAFE HAN DLING PROCEDURES. Keep your airgun on “safe” until ready to fire, but never rely solely on a safety device to prevent an accident. It is imperative that you know and use the safety features of the particular airgun you are handling, but accidents can best be prevented by following the safe handling procedures described in these safety rules and elsewhere in the product manual. To further familiarize yourself with the proper use of airguns, take an airgun Safety Course taught by an expert in airgun use and safety procedures. 6. P R O P E R LY AIRGUN. M A I N TA I N YOUR 7. USE PROPER PELLETS. Be certain that each pellet you use is in the proper caliber for the airgun. The caliber of the airgun is clearly marked on the barrel of the airgun. The use of low quality pellets may affect the accuracy or obstruct the barrel by accumulation of pellets inside the barrel. Store and carry your airgun so that dirt or lint does not accumulate in the working parts. Clean and oil your airgun, following the instructions pro vide d your user’s manual, after each use to prevent corrosion, damage to the barrel or accumulation of impurities. Always check the barrel prior to loading to ensure that it is clean and free from obstructions. Firing against an obstruc tion can cause a dangerous build up of pressure and might injure yourself or others nearby. If you hear an unusual noise when shooting, stop firing immediately, engage the manual safety and unload the airgun. Make sure the chamber and barrel are free from any obstruction. USA 7 USA 8. ALWAYS WEAR PROTECTIVE GLAS SES WHEN SHOOTING. 10.AVOID ALCOHOLIC BEVERA GES AND JUDGMENT OR REFLEX IMPAIR ING MEDICATION WHEN SHOOTING. A pellet or pellet fragments can blow back or ricochet and cause serious injury including the possible loss of eyesight. The shooter and bystanders must always wear impact resistant shooting glasses when firing any airgun. Do not drink and shoot. If you take medication that can impair motor reactions or judgment, do not handle an airgun while you are under the influence of the medication. 9. NEVER CLIMB A TREE, FENCE OR OBS TRUCTION WITH A LOADED AIRGUN. 11.NEVER TRANSPORT A LOADE D AIRGUN. Open barrel before climbing or descend ing a tree or before climbing a fence or jumping over a ditch or obstruction. Never pull or push a loaded airgun toward yourself or another person. 8 USA Unload an airgun before putting it in a vehicle. Hunters and target shooters sho uld lo ad th ei r airgun only at their destination. 12.NEVER FIRE YOUR AIRGUNS WITH OUT PELLETS IN THE CHAMBER. This may permanently damage your rifle. SAFE USA FIRE C F A B G D E H ������� M I P O 1 AIRGUN PARTS A B C D Butt pad Stock Safety Rail for scope mount N E F G H I Compression cylinder Windage adjustment screw Elevation adjustment screw Barrel Muzzle L L M N O P Front sight with fiber optic Grip Trigger adjustment screw Trigger guard Pistol grip USA 9 2 SAFETY HANDLING Your airgun has an automatic locking safety which engages automatically when you cock your gun. The safety slide is situated at the end of the compression tube (fig. C): ● Back = safe Safety button fully rearward - white dot visible - the safety is in the “ON” or “Safe” position ● Forward = fire Push the safety button fully forward white dot not visible - to put the safety in the “OFF” or “Fire” position. SAFE This feature is for experienced shooters on models X10 and X20. ● To reduce second stage length, turn screw clockwise. ● To increase second stage length, turn screw counter clockwise. �� ���� N COCKING Point the airgun in safe direction while keeping your finger off the trigger (fig. Q). Grasp barrel behind the front sight and pull downward until it stops. You will hear an audible click of the trigger mechanism lock when the pressure is released. You must control, and not release, the barrel under strong resistance until the audible click is heard. Be careful not to pinch your hand or fingers in the hinge area (fig. S). C 3 ADJUSTING THE TRIGGER Trigger pull is adjusted in the factory, and does not need adjustment for most shooters. This two stage trigger has an adjusting screw for second stage length adjustment (fig. N). 10 USA � R 4 FIRE With one hand grasp stock at the pistol grip. Holding the rifle firmly, tap barrel behind front sight in order to break locked position (fig. R). � �� � ��� � �� ���� Q S 5 LOADING 6 Check pellet to ensure it matches the caliber of the airgun. Insert pellet into the breech until skirt is flush with breech face (fig. T). SHOOTING: AIMING AND FIRING Keep finger outside trigger guard until on target, push safety button fully forward, squeeze trigger. Safety can be put back to “On” or “Safe” positions at any time by pulling fully rewarded (white dot visible). A) Wrong (fig. V) Left or Right windage settings are marked on the sliding scale and controlled by turn ing windage screw 2. ● Turn clockwise to make the pellet hit to the right ● Turn counter clockwise to make the pellet hit to the left The scale and numbers are for reference only, and do not represent a specific distance at the target. T Move barrel back to its original locked position. Again, be careful not to pinch your hand or fingers in the hinge area (fig. U). Your airgun is equipped with an adjustable USA rear sight for both elevation (1) (up-down) and windage (left-right) (2). Elevation settings are marked on the elevation knob and controlled by turning elevation screw 1. ● Turn clockwise to make the airgun shoot lower ● Turn counter clockwise to make the airgun shoot higher V 7 B) Right (fig. Z) AIRGUN MAINTENANCE Airgun care requires very little cleaning and maintenance. Mechanicals parts: 1 � �� ���� 2 U Z Barrel should be cleaned before storage or at least after 500 shots with a cleaning rod (avoid brass brushes for rifling preservation), or cleaning pellets to be fired as a real pellet. You can apply a drop of gun oil into the breach. USA 11 Every 1000 shots, apply a drop of gun lubricant into the compression chamber (fig. W). Storage: ● Do not leave the rifle in the cocked position, as this weakens the mainspring. ● Decock your airgun by firing in a safe direction and always strictly respect all safety rules. ● Do not leave the rifle in humid environment. Blued parts as barrel and compression cylinder should be protected from rusting. Maintain protection by wiping these parts with a lightly oiled pad. All visible mechanicals parts, breach, trigger, safety may be lightly oiled as needed to maintain a proper function. WARNING W Do not attempt to disassemble your airgun. Take or send it to an authorized service station. ● Do not modify your airgun, han dling it in a different manner as described in this manual, as this could make your gun unsafe and you will void the warranty. ● Any modification may make the gun unsafe to use, and cause serious injury or death. ● Do not fire the airgun without pellet in the chamber (dry fire) as this may damage you airgun per manently. ● Stock care: Synthetic stocks require no maintenance except wiping clean and drying with a soft cloth or towel. Wooden stocks should only be stored at room temperature because excessive heat can crack them. A wooden stock can be polished with oil and a soft cloth. 12 USA 8 SERVICE AND REPAIRS Call STOEGER INDUSTRIES (301) 283 6300 and ask for the Service Department. It is possible that our Service personnel and gunsmiths will be able to help you over the phone. In the event this is not possible, authorized service and repairs will be issued a RA (Return Authorization) Number. Write this number boldly on the box. Include a note in the box stating the defect or problem along with your name, address and phone number. Return prepaid to: STOEGER INDUSTRIES Airgun division 801 Broad Street Pocomoke, MD 21851 Warranty Claims All Stoeger Airguns carry a limited 2 year warranty. Stoeger Industries to You - This new Stoeger Airgun is warranted only to the original retail purchaser, for two years from the date of purchase. This warranty applies only if the product was purchased from an authorized Stoeger reseller in United States. Stoeger will at its option, repair or replace without charge any product fails due to a defect in workmanship or materials. Parts and labor are included. Repairs are warrant ed for the duration of the original warranty. If Stoeger replaces an airgun under its original warranty, you will receive a new two year warranty. Stoeger will return replacement airgun to you freight prepaid. To Obtain Warranty Service - You must send your airgun freight prepaid to Stoeger Industries at the address listed above. No C.O.D. shipments will be accepted. Only the Stoeger reap facility in Maryland is authorize d to make warranty repairs. D O N O T PA C K O R S H I P L O A D E D AIRGUNS. Return the complete unloaded airgun with a detailed description of the problem. You must provide Stoeger satisfactory proof of the date of original purchase if the warranty registration is not on file. Only a sales receipt or properly completed warranty registration card for a new Stoeger airgun will establish eligibility for warranty repairs when a product is returned. You must provide proof of the date you purchased a new Stoeger product at the time you send a product for warranty repair. What is Not Covered - The warranty does not cover defects or damage caused by: 1) Misuse or accident 2) Failure to provide proper care and maintenance 3) Failure to comply with instructions in the owner’s manual 4) Normal wear and tear 5) Rust or corrosion 6) Obstruction in the barrel. All wooden parts are excluded from warranty repairs. This warranty does not cover claims made by the subsequent owner of any Stoeger product. Stoeger Industries authorizes no dealer or USA any other person to vary the terms of this warranty or make any other express warranties. Where to get Further Help - If you have any questions concerning this warranty, please contact: - Stoeger Industries (301) 283-6300 or - Stoeger Industries 17603 Indian Head Highway, Accockeek, MD 20607-2501. Any unauthorized alteration or modification of the airgun will void the warranty. Stoeger shall not be responsible for any claims involving airgun that result from the use of non standard or reused pellets. In no event shall Stoeger Indu stries be liable for consequen tial damages. Some states do not allow the exclusion or limitation of incidental or consequential damages, so the above limitation or exclusion may not apply to you. The warranty gives specific legal rights, and so you may also have other rights which vary from state to state. USA 13