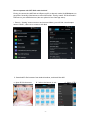
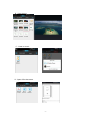
1
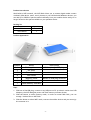
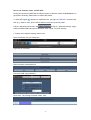
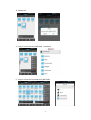
USER MANUAL
-1-
Product Introduction
With build-in WiFi network, the WiFi Disk allows you to stream digital media content
wirelessly (like Movie, music, word, photos) to your IOS/Android/Windows devices, you
can add up to 256GB of space accessed wirelessly from your mobile device easily, so no
longer limited to the space available on your portable device.
Packing list
Components
Quantity
WiFi Disk
1
User Manual
1
Product Appearance
Symbol
Name
Description
1
Slide appliance
Slide up to get USB plug
2
Air vents
3
Reset button
4
WiFi mode
5
Memory mode
6
WiFi indicator
7
Flash memory indicator
Button to USB plug direction
Step:
1. Slide out of the USB plug, connect to any USB port on PC (or electric outlet via a USB
Adapter), the WiFi Disk gets power with flash memory indicator shines.
2. Slide the button to select memory mode, it works as normal flash Disk, you can
storage / delete files on WiFi Disk.
3. Slide the button to select WiFi mode, connect the mobile devices and you can enjoy
the contents in it.
-2-
How to operate with WiFi Disk under IOS
Firstly, pls connect the WiFi Disk to USB port on PC (or electric outlet Via USB Adapter) to
get power. Secondly, Slide button to select WiFi mode. Thirdly, install TIOD software on
your mobile devices (You can upload it free from App store).
There are details:
a. Choose Build-in WiFi network. Pls open the WiFi-setting on your mobile devices,
choose the default name “SDISK” network. WiFi Disk will start to emit WiFi signal in 15
seconds. Pls make sure the WiFi signal
next step
b.Open TIOD, Select
button
appears on the devices and then go on with
, and type default IP 192.168.169.1, Press “go”
.
c. Type default ID:Admin and Password:Admin to login
d. Enjoy the content on WiFi Disk freely
-3-
How to set wireless router via WiFi Disk:
Firstly, pls connect the WiFi Disk to USB port on PC (or electric outlet Via USB Adapter) to
get power. Secondly, Slide button to select WiFi mode.
a. Once WiFi signal
appears on mobile device, pls type 192.168.169.1 in the brower
tool (e.g. Safari in IOS), press confirm button to access to control panel.
b.Press “Network connections” bar,
and go to “Network settings” page,
select available SSID and type its password, click “Done” to finish setting..
c. System will complete setting within 1min .
Some screenshot for your reference:
Type local IP in brower.
Select network connections bar
Scan local SSID, type password
Once done, The setting complete within 1min.
-4-
How to operate with WiFi Disk under Android
Firstly, pls connect the WiFi Disk to USB port on PC (or electric outlet Via USB Adapter) to
get power. Secondly, slide button to select WiFi mode. Thirdly, install “ES file browsers”
software on your mobile devices (You can upload it free from App store).
1. Enter in “Setting” button interface and connect WLAN, you will find a new hotspot
named “SDISK”, select it to access to Wifi Disk
2. Download ES file browsers from Android market, and install the APP
A. Open ES file browsers
B. Select the button in red
-5-
C. Select “FTP”
D.Need setup a new ftp, pls select the ‘new’ button and then select “FTP”,
Enter“192.168.169.1”into “Server”,Use name is “admin”,Password is “admin”
•
, Press confirm once done
•
3)You will see FTP file “192.168.169.1”,enter into this file .
A、Play video.
-6-
B、View picture
C、Listen to music
D、Open office document
-7-
E、Delete file.
4)Copy or move file from WIFI DISK to Android
5)Copy or move file from Android to WIFI DISK
-8-