1
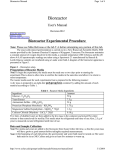
Bioreactor
User’s Manual
Revision 06.1
Using the Autoclave
Making media
Bioreactor Experimental Procedure
The experiment is carried out in a New Brunswick Scientific Bioflo 3000 bioreactor. The bioreactor
maintains a constant stirring speed (350 RPM), a constant temperature (30 Celsius), and maintains the pH
above 4. Yeast concentration is measured from spectroscopic readings taken using a Spectronic 20
manufactured by Bausch & Lomb. Glucose concentration is measured with a YSI 2700 Select
biochemistry analyzer. Sterilization is accomplished using a New Brunswick Scientific AC-48 autoclave.
Please see Figure 1 for a diagram of the bioreactor apparatus.
Figure 1: Bioreactor Setup
Preparation of the Reactor Media
Note: To begin the experiment, the media must be made one or two days prior to starting the experiment.
This is done to allow time to sterilize the media in the autoclave and allow it to return to room temperature.
The reactor media used for each experimental run is prepared in the following manner:
Add the amount of each material according to Table 1 to five liters of deionized water in the provided
polypropylene container and shake until well mixed. Autoclave the media then place in the refrigerator
with the cap still loose.
Table 1 - Reactor Media Ingredients
Ingredient
Glucose - C6H12O6
Yeast Extract
Ammonium Sulfate - (NH4)2SO4
Potassium Phosphate Monobasic - KH2PO4
Magnesium Sulfate Heptahydrate - MgSO4 * 7H2O
Calcium Chloride Dihydrate - CaCl2 * 2H2O
Amount
50 g
7.5 g
24 g
3.75 g
1.2 g
0.18 g
Data and Sample collection
Note: The media and yeast are added to the bioreactor three hours before lab time, so that the yeast mass
will have grown a good amount before taking the required measurements. You should find the start time
recorded on the clip board above the bioreactor.
The Bailey distributed control system is used to record the dissolved oxygen concentration and to control
the nitrogen purge. After the bioreactor has operated for approximately three hours, dissolved oxygen
concentrations and samples for yeast and glucose measurement are collected. First, the oxygen (air) supply
is cut off and nitrogen gas is purged into the reactor head space. This will prevent the oxygen from
entering the media sample. The Dissolved Oxygen concentration is then recorded every ten seconds until it
falls just below 35%. A media sample is now taken and the airflow is turned back on. The Dissolved
Oxygen concentration continues to be recorded until it reaches its original, steady-state value.
Sampling Media
Samples are taken as follows:
1A collection bottle should be attached to the reactor before starting the data collection (Dissolved
Oxygen concentration).
2Once the Dissolved Oxygen concentration is below 35%, the collection bottle valve is opened.
3The attached pipette bulb is squeezed and released to obtain a 20 ml sample.
4The collection bottle valve is then closed.
5This can be repeated if more media is needed.
Yeast Analysis
When the bioreactor is filled with media, a small sample of media is retained for later use as a
spectroscopic blank. This media sample is placed in the refrigerator. A yeast blank is prepared by filling a
cuvette with the original media without yeast. When filling cuvettes, the liquid level must be high enough
(about two-thirds full) for light to pass through it when inserted into the spectrophometer. Clean the optical
window of the cuvette with Kim wipes. Cuvettes must be inserted so that light from the spectrophotometer
passes through the sample with the line on the cuvette facing forward. Yeast concentration measurements
are taken as follows:
12345-
Set the spectrophotometer wave length to 600 nm.
The spectrophotometer is zeroed by inserting the opaque blank and setting the transmittance to
zero by turning the left dial on the front of the spectrophometer.
The yeast blank is then inserted and the span is set to 100% transmittance using the right dial on
the front of the spectrophometer.
Another cuvette is filled with unfiltered sample from the bioreactor and placed in the
spectrophotometer (this is done for each sample taken throughout the experiment).
The transmittance is measured and a calibration curve is used to convert to concentration.
Note:
If the transmittance is less than 20%, the sample should be diluted with an equal part of the blank media
sample and reanalyzed. Remember to correct concentration for the dilution factor.
Glucose Analysis
123456-
Draw some of the media sample into a 3 ml syringe.
Place filter on syringe and force clear media into a 10x75 mm test tube, filling at least 20% but not
more than 50%.
Insert test tube into holder at port #2 on glucose analyzer.
Press ‘Sample’ button on glucose analyzer.
Record glucose concentration which will appear on screen in about 2 minutes.
Remove test tube and clean for next sample.
Bioreactor Setup Procedure
The bioreactor should be running before you arrive in class. These startup directions are
intended for the lab TA and to give you a sense of the procedures involved. The steps for
the setup of the bioreactor are as follows:
1Carefully remove the bioreactor from the autoclave and remove the mixer shaft cover from the top
2345678910111213141516-
of the reactor.
Properly align the reactor on the apparatus, add the media and a few drops of anti-foam agent.
Place the top cover on the reactor vessel so that the media collection device is pointed forward and
there is open space to insert the DO and pH probes.
Once the top cover is in place, lightly tighten the four cover bolts.
Attach the two water jacket fittings and the two condenser water fittings in their appropriate
positions on the reactor.
Place the mixer motor and coupling on the mixer shaft, aligning the pin on the shaft with the hole
on the motor.
Carefully remove the pH probe from the KCl solution and place it into the reactor.
Carefully remove the dissolved oxygen probe from the deionized water and place it into the
reactor.
Add 10 cc of water into the temperature well and then place the temperature sensor into the well.
Carefully attach the NaOH feed into the proper port.
Attach the Nitrogen purge into the proper port.
Attach the Air sparger into the proper port.
Attach the bulb onto the media collection device.
Turn on the cooling water with the valve located by the sink.
Turn on the power to the apparatus.
Turn on the air with the valve located on the side of the apparatus.
The following steps deal with the turning on the controls of the experiment through the
use of the electronic screen located on the front of the apparatus:
17Turn on the temperature control to prime.
18Turn on the pH control to PID control. The set point should be 4.0.
19Turn on the agitation control to PID control. The set point should be 350 rpm.
20After a few minutes, turn the temperature control to PID control. The set point should be 30 °C.
21Leave the control to the dissolved Oxygen off.
22Withdraw a small sample of the media to be used later as a blank.
23After the reactor temperature is steady (about one hour later), re-span the DO meter to 100%.
24Inoculate reactor with 2.5 g of yeast and record the start time.
Bioreactor Shutdown Procedure
The steps for the clean up of the bioreactor are as follows:
12345678910111213141516171819-
Turn the agitator off.
Turn the temperature control off.
Turn the pH control off.
Close the Air sparger valve.
Turn off the main power.
Close the cooling water valve.
Remove the mixer motor from the top of the reactor and place on top of the apparatus.
Carefully remove the pH probe and place in the KCl solution.
Carefully remove the Dissolved Oxygen probe and place in the deionized water.
Remove the temperature and pressure sensors.
Remove the nitrogen purge and air sparge tubing from their ports.
Carefully remove the NaOH tubing from its port and position it such that it doesn’t drip.
Warning: The NaOH must be handled with caution.
Remove the water feeds starting with the bottom while placing a beaker to catch the excess water.
Place the reactor vessel on a cart and take to the wet lab
Remove the cover and wash thoroughly with soap and water and rinse with deionized water.
Place the cover on the table so that it will not roll off.
Pour the reactor media into the sink and wash thoroughly. Rinse the vessel with deionized water.
Place back on the cart and attach cover. Insert cover bolts but do not tighten.
Place mixer shaft cover on reactor vessel and Autoclave