1
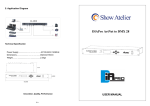
Blizzard Lighting, LLC
www.blizzardlighting.com
Waukesha, WI USA
Copyright (c) 2014
TABLE OF CONTENTS
AutoBahn™ 8 DMX/ArtNet 19” Rackmount Interface
1
1. Getting Started
3
3
3
3
3
What’s In The Box?
Getting It Out Of The Box
Caution!
Getting A Hold Of Us
2. Meet The AutoBahn™ 8
4
Main Features
Overview
4
4
3. Operating Instructions 5
Startup View
Renaming the Device
Setting the IP Address Setting the Netmask DMX Port Settings
Setting the ID#
LCD Backlight
User Presets
Firmware Version
5
6
6
7
7
9
9
10
10
4. Appendix 11
11
12
12
12
13
13
13
A Quick Lesson on ArtNet
Keeping Your AutoBahn™ 8 As Good As New
Returns (Gasp!) Shipping Issues
Application Diagram
Dimensional Diagram Tech Specs
Page 2
AutoBahn™ 8 User Manual - Rev. A (c) 2014 Blizzard Lighting, LLC
1. GETTING STARTED
What’s In The Box?
• 1 x AutoBahn™ 8: DMX/ArtNet Interface
• An Ever-So-Handy Power Cord
• This Lovely User Manual
Getting It Out Of The Box
Glückwünsche! You’re on the road to blazing fast bilateral ArtNet/DMX signal
conversion and more with the AutoBahn™ 8!
With usage of multiple LED fixtures and video mapping, many occasions
require thousands of DMX channels. It’s important to have fast DMX response
and proper network load management, and the AutoBahn™ 8 will do just
that. It not only provides instant response, but also a lower network load. The
AutoBahn™ 8 will allow you to increase the number of DMX universes and easily
place DMX universes remotely on any TCP/IP Ethernet network. It can also be
used as a DMX merger, DMX splitter, or backup device!
Now that you’ve got your AutoBahn™ 8 (or hopefully, AutoBahn™ 8’s!), you
should carefully unpack the box and check the contents to ensure that all parts
are present and in good condition. If anything looks as if it has been damaged
in transit, notify the shipper immediately and keep the packing material for
inspection. Again, please save the carton and all packing materials. If a fixture
must be returned to the factory, it is important that the fixture be returned in
the original factory box and packing.
Caution!
There are no user serviceable parts inside this unit. Do not open the housing or
attempt any repairs yourself; doing so will void your manufactures warranty. In
the unlikely event your unit may require service, please contact Blizzard Lighting
at [email protected].
Getting A Hold Of Us
If something is wrong, just give us a call or send an email. We’ll be
happy to help, honest.
Blizzard Lighting
N16 W23390 Stoneridge Dr. Ste E
Waukesha, WI 53188 USA
www.blizzardlighting.com
414-395-8365
Email: [email protected]
Disclaimer: The information and specifications contained in this document are subject to change without
notice. Blizzard Lighting™ assumes no responsibility or liability for any errors or omissions that may
appear in this user manual. Blizzard Lighting™ reserves the right to update the existing document or
to create a new document to correct any errors or omissions at any time. You can download the latest
version of this document from www.blizzardlighting.com.
Author:
Date:
Last Edited:
Date:
J. Thomas
1/15/2014
J. Thomas
1/16/2014
Page 3
AutoBahn™ 8 User Manual - Rev. A (c) 2014 Blizzard Lighting, LLC
2. MEET THE AutoBahn™ 8
MAIN FEATURES:
•
•
•
•
•
•
•
•
•
•
•
•
•
ArtNet/DMX bilateral signal conversion
1x RJ45 Neutrik™ EtherCON® Ethernet LAN port, 10/100M,
supports TCP/IP protocol
2x DMX inputs and 8x DMX outputs, each photoelectrically isolated
Auto MDI/MDI-X ethernet connector
Supports standard DMX-512 and ArtNet protocol
DMX input/outputs can be set to enabled or disabled
Each DMX output can be set to single, zero, HTP, or LTP mode
Each DMX input can be set to normal or backup mode
DMX splitter/merger functionality
Manual IP address settings
LCD display indicates each DMX input/output status
Ethernet LED status indicator
Quick and easy to set user presets
Overview:
Front Side
1.) Power LED
Shows unit on/off status
2.) Link LED
Shows network connect status
3.) Activity LED
Flashes when data transmits
4.) LCD Display
Shows status & available options
5.) Menu Button
Return to main or previous menu
6.) Up/Down Buttons
To scroll through menu selections
7.) Enter Button
To confirm a menu selection
8.) Power Switch
To power ON/OFF the unit
Page 4
AutoBahn™ 8 User Manual - Rev. A (c) 2014 Blizzard Lighting, LLC
Rear Side
9.) Power Input
AC power cable input
10.) Neutrik™ EtherCON® Ethernet Port
To connect the ethernet cable
11.) DMX IN A/B
DMX signal intput
12.) DMX Out (1-8)
DMX signal output
3. Operating instructions
Startup View:
There are 4 initial “top-tier” menu status screens (shown above) that
you’ll see when you power on the unit. You can scroll through them by
using the <UP/DOWN> buttons. The Device Name, Device ID, and
IP Address can all be edited later within the menu settings.
In the first row of the port status screen; A/B refers to the DMX IN
A/B, and 1-8 refers to DMX outputs 1-8. In the second row of port
status screen; “x” means the port is inactive, “√” means the port is
active, and “—” means the port has been set as disabled.
Page 5
AutoBahn™ 8 User Manual - Rev. A (c) 2014 Blizzard Lighting, LLC
Renaming the device:
Enter the main menu by pressing the <MENU> button, then use
the <UP/DOWN> buttons to highlight “1. Rename Device”. Press
the <ENTER> button. Then use the <UP/DOWN> buttons to scroll
through the characters, and push the <ENTER> button when the
character you’d like to change is highlighted. Use the <UP/DOWN>
buttons to scroll through your choices, and push the <ENTER> button
to confirm the change. Repeat this process for each character as
necessary to rename the device.
To finish renaming your device, you must save your changes by
using the <UP/DOWN> buttons to scroll to “Enter”, and then push
the <ENTER> button.
Setting the IP Address:
Enter the main menu by pressing the <MENU> button, then use
the <UP/DOWN> buttons to highlight “2. Set IP Address”. Press
the <ENTER> button. Then use the <UP/DOWN> buttons to scroll
through the IP address character groups. Push the <ENTER> button
when the set of characters you’d like to change is highlighted. Then
use the <UP/DOWN> buttons to scroll through your choices, and
push the <ENTER> button to confirm the change. Repeat this process
for each character group as necessary.
To finish setting the IP address, you must save your changes by
using the <UP/DOWN> buttons to scroll to “Enter”, and then push
the <ENTER> button.
*Please Note: The IP address must be unique!
Page 6
AutoBahn™ 8 User Manual - Rev. A (c) 2014 Blizzard Lighting, LLC
Setting the netmask:
This allows you to choose from the 3 commonly used network mask
configurations that you can change per your system requirements.
Enter the main menu by pressing the <MENU> button, then use
the <UP/DOWN> buttons to highlight “3. Set Netmask”. Press
the <ENTER> button. Then use the <UP/DOWN> buttons to scroll
through the 3 choices and push the <ENTER> button when your
selection is highlighted.
To finish setting the netmask, you must save your changes by using
the <UP/DOWN> buttons to scroll to “Enter”, and then push the
<ENTER> button.
DMX Port settings:
Enter the main menu by pressing the <MENU> button, then use
the <UP/DOWN> buttons to highlight “4. Set DMX Port”. Press
the <ENTER> button. Then use the <UP/DOWN> buttons to scroll
through the DMX in/out port selections and push the <ENTER> button
when highlighted.
1.) DMXIN Port A/B
DMX IN Port A/B can be set as “input” or “disabled” status. “Univ”
(Universe), can be set within the range 0.0 - F.F. When the DMX Port is
set as “input”, the Port Mode can be set as “normal” or “Backup”.
For all of the DMX Port Settings on page 8, use the <UP/DOWN>
buttons to scroll through your choices, and push the <ENTER> button
to confirm. Repeat this process for each group as necessary.
Page 7
AutoBahn™ 8 User Manual - Rev. A (c) 2014 Blizzard Lighting, LLC
DMX Port settings: (continued)
Port Mode = Normal
Device will send data received from the DMX IN port to the network
universe regardless of other data being received.
Port Mode = Backup
Device will NOT automatically send any data from this port. This input
port will only transmit data to the network universe when the network
universe is receiving no other active data input.
2.) DMXOUT Port 1-8
You can set the Port Status of any the DMX Ports 1-8 as “output” or
“disabled”. When the Port Status is set to “output”, the Port Mode
can be set to one of the following (4) modes:
Zero = The port sends a DMX test signal only with all channels at 0%.
Single = The port sends the DMX values of the selected universe.
LTP = (Latest Takes Precedence) Port will output the latest channel
activity between 2 selected universes. It compares the principal and
secondary universes and sends the latest one to the network.
HTP = (Highest Takes Precedence) Like Single, but will merge two
DMX universes (principal and secondary). It will compare and output
the one with higher value to the network. And like Single and LTP, the
universes can be set within the range of 0.0-F.F.
DMX
IN
DMX
OUT
IP
IN
DMX
IN
Merger
LTP
HTP
DMX
OUT
DMX
IN
Merger
LTP
HTP
Page 8
AutoBahn™ 8 User Manual - Rev. A (c) 2014 Blizzard Lighting, LLC
Setting the ID#:
Enter the main menu by pressing the <MENU> button, then use
the <UP/DOWN> buttons to highlight “5. Set ID NO”. Press the
<ENTER> button. Then use the <UP/DOWN> buttons to scroll
through your choice of ID# within the range of 000 to 255. The ID# is
only used to easily identify each AutoBahn™ 8 unit.
To finish setting the ID, you must save your changes by using
the <UP/DOWN> buttons to scroll to “Enter”, and then push the
<ENTER> button.
LCD BACKLIGHT:
Enter the main menu by pressing the <MENU> button, then use the
<UP/DOWN> buttons to highlight “6. Set LCD Backlight”. Press
the <ENTER> button. Then use the <UP/DOWN> buttons to scroll
through your choice of either “1. ON” or “2. OFF”. ON means the LCD
backlight will stay on all the time. OFF means the LCD backlight will
turn off automatically after 30 seconds of idle.
To finish setting your backlight preference, you must save your
changes by using the <UP/DOWN> buttons to scroll to “Enter”,
and then push the <ENTER> button.
Page 9
AutoBahn™ 8 User Manual - Rev. A (c) 2014 Blizzard Lighting, LLC
User presets:
Enter the main menu by pressing the <MENU> button, then use
the <UP/DOWN> buttons to highlight “7. User Preset”. Press the
<ENTER> button.
The built-in user presets will help you to use the device easily and
avoid complicated setup procedures. You can simply choose the
presets by using the <UP/DOWN> buttons to scroll through your
choices, then pushing the <ENTER> button to confirm. Presets 1, 2,
and 3 settings are the inherited DMX Port Settings. (See p. 7-8)
There are 5 different user presets + factory settings restore:
1.) 2 In 1 Backup Mode = When one DMX input port is not sending a
signal, it will use the DMX signal from the other input.
2.) 2 In 1 HTP Mode = Compares your designated input signals and
outputs the one with higher value to the network.
3.) 2 In 1 LTP Mode = Compares your designated input signals and
outputs the latest to the network.
4.) DMX Splitter 1-4 Mode = DMX IN A signal outputs to DMX out
ports 1-4; DMX IN B signal outputs to DMX out ports 5-8.
5.) Isolated Mode = Isolates the DMX Input and Output ports. No
signals from Input ports are passed to the Output ports. The Output
ports receive DMX signals directly from the network individually.
6.) Factory Setting = All settings including the Device Name, Device
ID, and Device IP will be restored to the original factory settings.
Page 10
AutoBahn™ 8 User Manual - Rev. A (c) 2014 Blizzard Lighting, LLC
Firmware Version:
You can check the firmware version from this option.
Enter the main menu by pressing the <MENU> button, then use
the <UP/DOWN> buttons to highlight “8. Version”. Press the
<ENTER> button.
5. APPENDIX
A quick lesson on ArtNet
ArtNet is a protocol, like http, ftp, telnet and so on. A protocol is a set of
rules that have to be followed if you want you stuff to work with other
machines.
ArtNet is basically DMX over Ethernet (DOE) and was developed by
Wayne Howell and his company, Artistic Licence Engineering Ltd.
USITT DMX512 is well known in the entertainment industry because it
is the industry standard for controlling dimmers and automated lighting
fixtures (moving lights). The electrical standard of DMX512 is RS485
which is as superset of RS422 which almost the same as RS232, well
known as serial port on a PC.
Ethernet is the electrical standard that transports data based on TCP/IP,
well known as a standard in todays internet. ArtNet is based on TCP/IP
and uses UDP Packets.
So what is the big deal with ArtNet? Well ArtNet supports up to 256
universes over one piece of CAT-5 cable compared to one universe over
a DMX cable!
Page 11
AutoBahn™ 8 User Manual - Rev. A (c) 2014 Blizzard Lighting, LLC
Keeping Your AutoBahn™ 8 As Good As New
The fixture you’ve received is a rugged, tough piece of pro lighting equipment, and as long as you take care of it, it will take care of you. That said, like
anything, you’ll need to take care of it if you want it to operate as designed.
You should absolutely keep the unit clean, especially if you are using it in an
environment with a lot of dust, fog, haze, wild animals, wild teenagers or spilled
drinks.
In transit, keep the unit in cases. You wouldn’t throw a prized guitar, drumset,
or other piece of expensive gear into a gear trailer without a case, and similarly,
you shouldn’t even think about doing it with your shiny DMX/ArtNet Interface.
Common sense and taking care of it will be the single biggest thing you can do
to keep it running at peak performance and let you worry about designing a
great light show, putting on a great concert, or maximizing your client’s satisfaction and “wow factor.” That’s what it’s all about, after all!
Returns (Gasp!)
We’ve taken a lot of precautions to make sure you never even have to worry
about sending a defective unit back, or sending a unit in for service. But, like
any complex piece of equipment designed and built by humans, once in a while,
something doesn’t go as planned. If you find yourself with a unit that isn’t behaving like a good little electronic device should, you’ll need to obtain a Return
Authorization (RA).
Don’t worry, this is easy. Just send an email to [email protected],
and we’ll issue you an RA. Then, you’ll need to send the unit to us using a
trackable, pre-paid freight method. We suggest using USPS Priority or UPS.
Make sure you carefully pack the fixture for transit, and whenever possible, use
the original box & packing for shipping.
When returning your device for service, be sure to include the following:
1.) Your contact information (Name, Address, Phone Number, Email address).
2.) The RA# issued to you
3.) A brief description of the problem/symptoms.
We will, at our discretion, repair or replace the unit. Please remember that any
shipping damage which occurs in transit to us is the customer’s responsibility,
so pack it well!
Shipping Issues
Damage incurred in shipping is the responsibility of the shipper, and
must be reported to the carrier immediately upon receipt of the items.
Claims must be made within seven (7) days of receipt.
Page 12
AutoBahn™ 8 User Manual - Rev. A (c) 2014 Blizzard Lighting, LLC
Application Diagram
1.75 inches
(44mm)
6.1 inches
(155mm)
Dimensional Drawings
19 inches (482mm)
Tech Specs!
Weight & Dimensions
Length
19 inches (482 mm)
Height
1.75 inches (44 mm)
Depth
6.1 inches (155 mm)
Weight
5.1 lbs (2.3 kg)
Other Information
When you step on the brakes your life is in your foot’s hands.
Warranty
2-year limited warranty.
Page 13
AutoBahn™ 8 User Manual - Rev. A (c) 2014 Blizzard Lighting, LLC
This page intentionally left blank.
Page 14
AutoBahn™ 8 User Manual - Rev. A (c) 2014 Blizzard Lighting, LLC
This page intentionally left blank.
Page 15
AutoBahn™ 8 User Manual - Rev. A (c) 2014 Blizzard Lighting, LLC
Enjoy your product!
Our sincerest thanks for your purchase!
--The team @ Blizzard Lighting