1
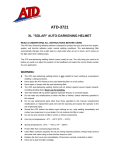
Auto-Darkening Welding Helmet User’s Manual YC-03-C frame to make sure that they are secure. WARNING Check all operating parts before use for signs of wear or damage. This Auto-Darkening Welding Helmet is not suitable for: Any scratched, cracked or pitted parts should be replaced Laser welding & immediately before using to avoid severe personal injury. Oxyacetylene welding. Adjust the headband so that the helmet is seated as low as Never place this helmet and auto-darkening filter on a hot surface. possible on the head and close to your face. The angle of helmet is Never open or tamper with the auto-darkening filter. adjusted on the buckles, fastened This Auto-darkening welding helmet will not protect against severe at the different settings. impact hazards, including grinding discs. DARK SHADE NUMBER SELECTION This helmet will not protect against explosive devices or corrosive The fixed shade has been pre-set at DIN11. liquids. Don’t make any modifications to either the filter or helmet, unless PRODUCT FEATURES specified in this manual. This model is designed & equipped with a special turn over (up & Don’t use replacement parts other than those specified in this down) headband mechanism. When the welder tilts the helmet manual. upwards ,the headband mechanism lowers the helmet’s centre of Unauthorized modification and replacement parts will void the gravity. warranty and expose the operator to the risk of personal injury. The design of the welding helmet greatly reduces the fatigue of welder’s head & neck. Should this helmet not darken upon striking an arc, stop welding Warning: For your own protection, please read these instructions The moment the welding electrode arcs with the surface, the filter immediately and contact your supervisor or the dealer. carefully before using this auto-darkening welding helmet. screen will automatically darken in about 0.0003 sec. Don’t immerse the filter in water. The delay time from dark to light is set about 0.3 s. Don’t use any solvents on filter’s screen or helmet components. Auto-darkening welding helmets are designed to protect the eyes he helmet utilizes high performance solar cells as power supply Use only at temperature:-5℃~+55℃ and faces from spark, spatter, and harmful radiation under normal with a built-in 3V lithium battery as a power back-up. Under normal Storing temperature:-20℃~+70℃ welding conditions. Auto-darkening filter automatically changes conditional the battery has a life span will be in excess of 3 years. Keep filter away from liquid and dirt. from light state to dark state when the arc is struck, and returns to The product is in full conformity with related DIN, ISO, EN safety Clean filter’s surfaces regularly, do not use strong cleaning the light state when standards and ANSI Z87.1-2010 standards. solutions. Always keep sensors and solar cells clean using a clean Auto-darkening welding helmets comes ready to use. The only The ultra high performance of UV/IR auto-darkening filters provide lint-free tissue/cloth. thing you need to do before welding is to adjust the position of full protection for the user’s eyes & face against UV/IR radiation Regularly replace the cracked/scratched/pitted front cover lens. headband. during the entire welding process, even in the light state. The you stop welding. UV/IR protection level is up to Shade 15 (DIN) at all times.. BEFORE WELDING Severe personal injury could occur if the user Check the front cover lens and make sure that it is clean and no fails to follow the aforementioned warnings, dirt covering the two sensors on the front of filter cartridge. Also and/or falls to follow the operating instruction. check the front/inside cover lens and the back cover retaining COMMON PROBLEMS AND REMIDIES Step 3: Place the new cover lens into the right position. *Irregular Darkening Dimming Step 4: Replace the front cover back into the original position. Headband has been set unevenly and there is an THCHNICAL SPECIFICATIONS uneven distance from the eyes to the filter’s lens. Viewing Area: 92×42mm Reset headband to reduce the difference to filter. Size of Cartridge: 110×90×9mm *Auto-darkening filter does not darken or flickers Darken state: DIN11 lens) Switching Time: <0.0003s (clean the sensors’ surface) Sensors are soiled Welding current is too low. UV/IR protection: Up to DIN15 Operating Temperature: -5℃~+55℃ 1. NUT 2. SPRING Storing Temperature: -20℃~+70℃ 3. LOCATING PIECE-1 4. ADJUSTABLE BUCKLE Operating temperature is too low (do not use at Helmet Material: High-impact resistant plastic/Polyamide Nylon. 5. SCREW 6. EQUATION temperatures below –5℃) Total Weight: 440g 7. LOCATING PIECE-2 THE PARTS LIST OF THE HELMET SHADE GUIDE TABLE *Slow Response Light state: DIN 3 Front cover lens is soiled or damaged (change cover THE PARTS LIST OF THE HEADBAND When the battery power in the filter screen is inadequate, please stop using and change a new filter cartridge. *Poor Vision Front/inside cover lens and/or filter lens are soiled change lens) There is insufficient ambient light. The protective film of the front/back cover lens is not peeled off. *Welding Helmet Slips Headband is not adjusted properly (readjust headband) Warning! Operator must stop using the auto-darkening welding helmet immediately if the above mentioned problems cannot be corrected. Contact the dealer. LENS & HELMET MAINTENANCE NOTE: Replacing the front cover lens if it is damaged (cracked, PLEASE USE THIS GUIDE TO ENSURE YOU ARE USING THE scratched, soiled or pitted) CORRECT WELDING HELMET FOR THE TYPE OF WELDING Step 1: Lift the front cover. CARRIED OUT. Step 2: Remove the worn front cover lens.