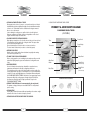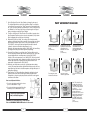
1
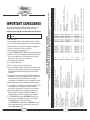
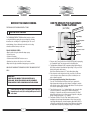
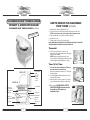
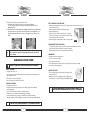
Thane International, Inc.,
La Quinta, CA 92253
www.thane.com
Thane Direct Canada, Inc.,
Toronto, ON
www.thane.ca
Thane Direct UK Ltd.,
Admail ADM3996, London,
W1T 1ZU
www.thanedirect.co.uk
MADE IN CHINA, THANE HOUSEWARES is a registered trademark of Thane International, Inc.
Copyright, ©2007 by THANE INTERNATIONAL, INC
FWOT-ENG
01/12/08
Thank You...
On behalf of the entire team at Thane
Housewares, we appreciate your recent purchase
of the FLAVORWAVE OVEN® TURBO.
This cooking system will provide you with healthy
and tasty meals for many years to come.
We worked long and hard to make this the best
cooking appliance available and, only after
extensive testing, added it to our family of quality
products for the home.
Enjoy your FLAVORWAVE OVEN® TURBO.
... and, once again, thank you.
NOTE:
TROUBLE SHOOTING GUIDE
SYMPTOM & PROCEDURES
• Check to see that the power cord
is plugged into AC outlet.
• Check to see that the AC outlet is
operational.
• Turn the timer knob clockwise to
60 min and then turn back to the
desired time.
• Check that the thermostat is set to
desired temperature.
• Push the carry handle all the way
down.
NOTE:This handle acts as a safety
switch and will not allow the oven
to work when in the up-right
position.
• Check if the power switch is in ON
position. (For AX797DH-Platinum only)
• Check the thermostat to see that it
is set for a high enough
temperature.
• Order replacement part from the
service department.
OVEN WILL NOT TURN ON
OVEN WILL NOT HEAT UP
LID OR GLASS BOWL IS
CRACKED
TABLE OF CONTENTS
I.
Introduction .......................................................….....................…....... 6
Important Safeguards ..............................................…..................... 4 - 5
II.
Using Your Oven .................................................................................. 7
Product and Accesory Diagrams (AX-767MH) ................................. 7 - 8
Part Assembly Diagram ......................................................................... 9
Before You Begin Cooking .........................................…....................... 10
How to Operate the FLAVORWAVE Turbo (AX-767MH) ............... 11 - 12
Cleaning Your Oven ...................................................…................ 12 - 13
Product Diagrams FLAVORWAVE Turbo Platinum (AX-797DH) .......... 14
How to Operate the FLAVORWAVE Turbo Platinum (AX-797DH) ..15 - 16
III.
Helpful Hints ....................................................................................... 17
A Healthier Lifestyle ............................................................................. 17
Cooking Tips ................................................................................. 17 - 18
FEATURES
Selecting Your Food ............................................….............................. 19
Food Preparation and Presentation ..................................................... 20
℃ TECHNICAL SPECIFICATIONS
Weight :
Bowl Diameter :
Bowl Capacity :
Bowl Depth :
Cook Temp. Range :
Voltage/Cycles :
21 lbs.(9.5 kg)
12 in.(305 mm)
12 qrts.(11.0 liters)
6.6 in. (167 mm)
65ºC-260ºC (150ºF-500ºF)
110V/120V, 60Hz
220V - 240V, 50/60Hz
1300W
Wattage :
22
V.
Quick Reference Guide ....................................….............................. 21
Trouble Shooting Guide ......................................…............................. 22
Read all instructions.
Do not place appliance where it can fall or be pulled into water or other liquid.
Do not reach for an appliance that has fallen into water. Unplug immediately!
Always pull handle up to “off” position before plugging or unplugging oven.
Place oven securely in center of counter or work space.
Always unplug oven before attempting to move it.
Secure the FLAVORWAVE OVEN® TURBO lid on the oven before turning on power.
Always turn oven off before removing lid and always place lid on the lid rack.
Never set it down directly on the counter. Always leave at least 2 inches
between the oven lid and counter top or other surfaces.
9. Use two hands when moving the oven.
10. Do not allow the lid to get wet.
11. The oven can not be placed near the wall (while using)
12. Do not touch the glass bowl and lid or any surfaces on the heater assembly
during operation. The air inside the cooking dome reaches a temperature of
approximately 260ºC/500ºF which makes the surface very hot and may
cause burns.
13. This appliance is not intended for use by persons (including children) with
reduced physical, sensory or mental capabilities, or lack of experience and
knowledge, unless they have been given supervision or instruction
concerning the use of the appliance by a person responsible for their safety.
14. Children should be supervised to ensure that they do not play with the appliance.
15. Use this appliance for its intended use as described in this brochure. Do not
use any other accessories or attachments not recommended by the
manufacturer. They may result in fire, electrical shock, or personal injury.
16. Never operate this appliance if it is not working properly, if it has been
dropped or damaged, or dropped into water. Return the appliance to an
authorized customer service center for inspection, repair, or adjustment.
17. • For FLAVORWAVE Oven Turbo model AX767MH: If the supply cord is
damaged, it must be replaced by the manufacturer, its service agent or
similarly qualified persons in order to avoid a hazard.
• For FLAVORWAVE Oven Turbo Platinum model AX797DH: If the supply
cord is damaged, please order cord replacement from customer service
where you purchased the product.
1.
2.
3.
4.
5.
6.
7.
8.
4
21
65ºC (149ºF)
11-13
15-18
11 to 13 minutes less than package directs
12-16 minutes
31 minutes
41 minutes
21 minutes per pound
26 to 31 minutes
26 to 31 minutes per pound
45 to 60 minutes
26 minutes per pound
Breaded Fish (Frozen)
Bacon (1 pound)
CHICKEN (31/2 pound)
Quarter
Half
Whole
Chicken Breasts
Turkey (Un-stuffed)
Turkey Breast (Half-3 pounds)
Cornish Hens
VEGETABLES
Baked Potato (6 to 8 ounces)
Corn on the Cob
(4 ears) Unshucked
French Fries
Lamb Chops
18-20
16 minutes or until crisp
(spray lightly with oil to make fries browner)
30
41 minutes
26 minutes
85ºC (185ºF)
85ºC (185ºF)
60ºC (140ºF)
82ºC (180ºF)
82ºC (180ºF)
82ºC (180ºF)
82ºC (180ºF)
82ºC (180ºF)
82ºC (180ºF)
82ºC (180ºF)
65ºC (149ºF)
73ºC (163ºF)
73ºC (163ºF)
73ºC (163ºF)
65ºC (149ºF)
70ºC (158ºF)
75ºC (167ºF)
71ºC (160ºF)
21
34
15-18
20
29
34
39
25
18 minutes
29 minutes per pound
10 to 16 minutes
16 minutes
Rare-26 minutes per pound
Medium-31 minutes per pound
Well-36 minutes per pound
21 minutes (medium)
Lobster Tails
Pork Loin Roast
Pork Chops (1/2 inch thick)
Sausage Patties (1 pound)
Leg of Lamb
35
45
25
31-35
31-35
60-70
29
65ºC (149ºF)
70ºC (158ºF)
65ºC (149ºF)
65ºC (149ºF)
65ºC (149ºF)
Hot Dogs (11/2 to 2 ounces
each)
Rib Eye or Strip Steak
(1 inch thick)
Snapper (Whole)
Salmon Steak
Grilled Shrimp
Meat Loaf (2 pound)
Hamburgers - 4 Burgers
(1/4 pound each)
30
35
40
35
15-17
63ºC (145ºF)
71ºC (160ºF)
73ºC (163ºF)
65ºC (149ºF)
70ºC (158ºF)
75ºC (167ºF)
FOOD INTERNAL TEMP.
Frozen Food
26 minutes (10 min per side) - (rare)
31 minutes (12 min per side) - (medium)
31 minutes
26 minutes
12 to 14 minutes
COOKING TIME
38
41
60-70
20
22
24
13
Fresh Food
28 minutes per pound (medium-rare)
31 minutes per pound (medium)
50 to 60 minutes
16 minutes (rare)
18 minutes (medium)
20 minutes (well done)
10 minutes
MEATS AND FISH
Beef Rib Roast
ITEMS
To reduce the risk of burns, electrocution, fire, or injury to
persons.
QUICK REFERENCE GUIDE
When using electrical products, especially when children are present, basic
safety precautions should always be followed, including the following:
Read all instructions, safeguards, and warnings before using the appliance.
230ºC (450ºF)
205ºC (400ºF)
205ºC (400ºF)
240ºC (460ºF)
240ºC (460ºF)
240ºC (460ºF)
240ºC (460ºF)
240ºC (460ºF)
240ºC (460ºF)
240ºC (460ºF)
175ºC (350ºF)
175ºC (350ºF)
205ºC (400ºF)
185ºC (360ºF)
240ºC (460ºF)
200ºC (390ºF)
200ºC (390ºF)
200ºC (390ºF)
200ºC (390ºF)
205ºC (400ºF)
205ºC (400ºF)
205ºC (400ºF)
205ºC (400ºF)
205ºC (400ºF)
205ºC (400ºF)
205ºC (400ºF)
205ºC (400ºF)
175ºC (350ºF)
205ºC (400ºF)
205ºC (400ºF)
205ºC (400ºF)
205ºC (400ºF)
COOKING & SERVING TIPS
Lower rack. Spray rack with non-stick coating
Lower rack. Unshucked and soak in water
Lower rack. Spray rack with non-stick coating
Lower rack. Brush with sauce,
if desired, in last 10 minutes
Lower rack
Lower rack
Season before Roasting
Season before Roasting
Grill on upper rack
Grill on lower rack
Peel and place 6 to 8 shrimp on each
skewer
Split and discard undershell. Upper rack Bottom rack
Upper rack
Upper rack
Cook at 240ºC for first 20 minutes
Upper rack
Upper rack
Grill on upper rack
Grill on lower rack, top with tomato paste
Grill on lower rack, top with tomato paste
OVEN TEMP. SETTING
• Listed cooking time is for reference only • Depending on recipe and food type, food should be flipped during the cooking cycle.
• Cooking time may vary depending on food type, weight, volume and texture
IMPORTANT SAFEGUARDS
FOOD PREPARATION & PRESENTATION
PREPARATION
Careful preparation pays off in an appetizing, healthy and tasty meal(s).
Always remove excess fat. Clean and trim vegetables and garnishes, removing all
bruises and blemishes. Use only the freshest meats and vegetables.
Always ensure that all items of the meal are cooked at the right time. This usually
requires different starting times that must be planned ahead.
PRESENTATION
Try a few of these interesting ways to perk up your table and make any meal a
festive occasion:
• Slice a freshly baked loaf of bread or dinner rolls into a basket lined with
colorful napkins. Serve with butter or margarine, softened and mixed with
grated cheese, garlic salt or your favorite seasoning.
• Main course meats are more attractive when displayed on a large platter
surrounded by fresh parsley sprigs, carrot curls (made with a potato peeler)
and radish roses.
• Serve sauces in a pretty piece of china or glassware. Drop in a ladle and bring
to the table on a plate for easier passing between guests.
• Flowers on the table are always effective, but in a pinch use a grouping of your
favorite figurines or house plants.
• Candles make dinners cozy, so turn down the lights and turn up the charm.
Float small, flat candles in a large, clear bowl filled with water. The effect is
magical.
18. Do not use outdoors or operate where aerosol (spray) products are being
used or where oxygen is being administered.
19. Do not let the cord hang over the edge of the table or counter, or touch hot
surfaces.
20. Do not place on or near a hot gas or electric burner or in a heated oven.
21. Do not move the appliance while it contains hot food. Use extreme caution
when removing hot lid, glass bowl and cooking racks.
22. This appliance is for household use only; it is designed to process normal
household quantities. It is not suitable for continuous or commercial operation.
23. Do not disassemble the product. There are no user serviceable parts.
24. Do not leave the appliance unattended while in use.
25. Use the handle when lifting the lid from the base.
26. Do not touch hot surfaces. Use the handles provided.
27. Turn the unit “off” before removing the lid to check or turn food. The lid and
heater/control assembly should be placed on the lid holder.
28. Use caution when disposing of hot grease.
29. This appliance is not intended to be operated by means of an external timer
or separate remote-control system.
30. To protect against electrical shock do not immerse cord, plugs, or lid in water
or other liquid.
31. Always attach plug to appliance first, then plug cord into the wall outlet.
To disconnect, turn any control to “off”, then remove plug from wall outlet.
32. Unplug from outlet when not in use and before cleaning. Allow to cool before
putting on or taking off parts.
33. Do not operate any appliance with a damaged cord or plug or after the
appliance malfunctions or has been damaged in any manner. Return appliance
to the nearest authorized service facility for examination, repair, or adjustment.
34. The use of accessory attachments not recommended by the appliance
manufacturer may cause injuries.
35. Extreme caution must be used when moving an appliance containing hot oil or
other hot liquids.
36. Do not use appliance for other than intended use.
37. FOR 120V Unit Only: This appliance has a polarized plug (one blade is wide
than the other). As a safety feature, this plug will fit in a polarized outlet only
one way. If the plug dose not fit fully in the outlet, reverse the plug. If it still dose
not fit, contact a qualified electrician. Do not attempt to defeat this safety
feature.
HOUSEHOLD USE ONLY
SAVE THESE INSTRUCTIONS
20
5
SELECTING YOUR FOOD
I. INTRODUCTION
THE FLAVORWAVE OVEN® TURBO STORY
THE NEXT GENERATION IN COOKING™
With the FLAVORWAVE OVEN® TURBO you can prepare delicious, healthful
meals in less than half the time of traditional methods. What makes these
superior results possible is our revolutionary approach to certain time-honored
cooking methods.
Professional cooks have long known that they could improve upon traditional
oven cooking by using a fan to accelerate the circulation of the oven’s hot air. This
traditional convection oven consists of a fan mounted on one side of a metal box.
The FLAVORWAVE OVEN® TURBO improves upon traditional convection ovens
in the following ways:
• The FLAVORWAVE OVEN® TURBO bowl is made of glass, not metal, so that
you can clearly see what you are cooking from all sides.
• The FLAVORWAVE OVEN® TURBO combines a circular bowl with a fan
mounted in the lid so that hot air currents move down over the food, around
the bowl’s sides, and then back up to the fan. This creates a tornado-like flow
of constantly moving, super-heated air that cooks and browns food quickly
and thoroughly.
• The FLAVORWAVE OVEN® TURBO uses cooking racks that allow you to cook
two levels of food at once. In addition, when meat, poultry, or fish is cooked
on the lower rack, fats and oils are blown away through the grating. You will
cook lighter, more nutritious meals.
6
MEAT
Beef : Select rich, red, fine-textured meat with a light covering of fat (having a
marbled appearance). Buy whole pieces and cut to suit – you can really save a lot.
Lamb: Select lean meat. Meat should be soft, pinkish-red and fine textured.
Pork : Select lean meat. Meat should be very light pink in color, fine textured and
fresh smelling.
FISH
Whole: Select only fresh fish with full, clear eyes and bright gills - a sure sign of
freshness. Also, scales should be bright and clean – not slimy. Fish should
look and smell fresh from the sea. Flesh should be firm and spring back when
touched.
Fillets: Select only firm fillets without discoloration that have a pleasant sea
smell. Fillets must not be dull, soft or ooze water when touched.
POULTRY
Select only fresh meat or birds. Poultry should look and smell fresh.
VEGETABLES / FRUIT
Select firm, almost ripe fruit; check for bruises and blemishes – color should be
clear and bright. Vegetables should be crisp and of good color. Try to avoid
vegetables sold tightly packed in plastic wrap - they will spoil quickly.
Never use vegetables that are soft or limp.
19
• COOKING A COMPLETE MEAL AT ONCE
By using two levels of racks, it is easy to cook an entire meal at once. Keep in
mind that different foods and different weights of foods take different amounts
of time to cook. Think ahead. Put the food that takes the longest amount of
time to cook on the low rack.
Later on during the cooking process, put the other food on the high rack.
Now your complete meal of meat, potatoes and vegetables are all cooked
together and will be ready at the same time.
• PLACING FOODS FOR OPTIMUM COOKING
When placing several pieces of food on the wire rack, be sure to leave at least
1/2-inch between the food and the side of the glass bowl. This space allows
the air to flow freely through the oven.
Also avoid stacking food on food in order to cook more at one time.
The hot air must circulate freely in order to cook the food properly.
• KEEPING FOOD CRISP
After the food is cooked, turn the thermostat down, keeping the fan running.
Your food will stay hot and crisp.
• TO MAKE YOUR CLEAN-UP EVEN EASIER
Before cooking, spray the oven, including the racks and pans, with a non-stick
product first. Wiping away the grease and residue after cooking will be even
easier.
• ADAPTING RECIPES
As a rule of thumb, when using recipes intended for conventional ovens,
temperatures will remain the same but cooking times will be less.
The cooking times in the recipes in this book should be used as a guide. You
need to judge whether your piece of meat weighs less or more than that which
is used in the recipe and slightly adjust your cooking time. When working with
the FLAVOR WAVE OVEN® TURBO for the first time, we suggest using a meat
thermometer. Watch the cooking progress through the glass bowl. After a
short time you will easily be able to adapt your favorite recipes for the
FLAVOR WAVE OVEN® TURBO.
II. USING YOUR FLAVORWAVE OVEN® TURBO
PRODUCT & ACCESSORY DIAGRAM
FLAVORWAVE OVEN® TURBO
(AX-767MH)
Power Cord
Timer
Power Safety
Handle
Thermostat
Low Rack
Glass Bowl
Glass Bowl
Holder
Safety Block
Base Plate
Safety Block
Screw
(for 220-240V only)
(for 220-240V only)
STANDARD ACCESSORIES
• PREHEAT YOUR OVEN (when it is recommended by the recipe book)
For optimum cooking, preheat your oven at 260ºC/500ºF for six (6) minutes
prior to cooking.
• COOKING TIME
Cooking times shown in this manual will vary depending on the volume, weight
and mass of the food or the desired crispness you want.
Tongs
Low Rack
High Rack
• CORN SHOULD NOT BE SHUCKED PRIOR TO COOKING.
18
7
Lid Holder(Patented)
OPTIONAL ACCESSORIES
Grilling Plate
Coated with non-stick material,
is designed for grilling.
Position the grilling plate on the
high rack and heat at max
temperature for about 5 min
then put pieces of cooked meat
on it and you will sear the lines
just like on your outdoor BBQ.
Steam Basket Can be used for steaming
vegetables… for baking French
fries without grease…
for steaming fish wrapped with
aluminum foil etc.
Breakfast Tray
Browning Tray
Is a special accessory for your
Flavorwave Turbo Oven.
It serves the purpose of
browning, or making food crisp
by oxidizing.
Extender Ring The Flavorwave Turbo
Extender Ring makes it
possible to cook larger
turkeys, chickens, hams etc.
Insert the Extender Ring
between the glass bowl and
the lid and increase the
height of the Flavorwave
Turbo bowl by an additional
3” (9 cm)
Is ideal for preparing your
favorite breakfast, just place
pieces of toast bread, bacon and
eggs on the rack and cook at the
same time.
Quick Skillet with Place the Quick Skillet onto the
non-stick coating metal skillet holder, put the
FlavorWave Oven Turbo lid with
halogen heater on top and you
are ready to prepare your quick
skillet dishes. Please refer to the
“How to operate the FlavorWave
Oven Turbo Instructions” to set
temperature and time.
Roast Rack
When roasting a whole turkey/chicken you may use the Roast Rack.
Place the Roast Rack on the High Rack and then position a whole turkey/chicken.
Note: Must be used with the Extender Ring.
Roasting Rack - How to Assemble
• The Roasting Rack is two separate pieces of metal (Fig. 1).
• At top, metal piece has a hole (left).
• At top, piece curves up (right).
• Take the right piece and thread an end through hole of left piece.
The curved top section should be stationed in hole of left piece.
• To position the Roasting Rack onto the High Rack, attach the ends of the
Assembled Roasting Rack to the designated
Fig. 2
curves on the High
Fig. 1
Rack (Fig. 2).
Chicken, roasting hens,
etc... are placed over
joined metal pieces
(Roasting Rack).
III. HELPFUL HINTS
A HEALTHIER LIFESTYLE
With the FLAVORWAVE OVEN® TURBO, you are always cooking with
hot air (dry roasting) and with the food suspended on a wire rack.
As a result, retention of fat is minimized, leading to fewer calories, lower
fat and cholesterol consumption and a healthier lifestyle.
You will find that, with the FLAVORWAVE OVEN® TURBO, it is not
necessary to add fat, oil, butter or margarine to most recipes.
However, you can do so if you wish.
We recommend the following steps to further improve your health:
1. Eat a variety of foods including items from all food groups daily.
2. Eat less butter, fat and sauces.
3. Eat less sugar and sweets.
4. Eat plenty of fruits and vegetables (preferably steamed).
5. Drink only moderate amounts of alcohol.
6. Drink plenty of water every day.
7. Use less processed foods-eat more fresh food instead.
8. Eat less at a time, but eat regularly.
9. Use fat, oil, butter and margarine sparingly.
10. Use salt sparingly.
11. Dry roast your food as often as possible.
COOKING TIPS
TO USE YOUR FLAVORWAVE OVEN® TURBO TO ITS FULLEST
POTENTIAL, HERE ARE A FEW COOKING TIPS TO REMEMBER...
• DEPENDING ON RECIPE AND FOOD TYPE, WEIGHT, VOLUME AND
TEXTURE, FOOD SHOULD BE FLIPPED DURING THE COOKING CYCLE.
• WHENEVER POSSIBLE PLACE FOOD DIRECTLY ON THE WIRE RACK
Cooking on a wire rack allows the hot air to circulate freely around the food,
cooking it quickly and evenly, even without turning.
8
17
7. Select Fan Speed: Press the “Speed” button to change the fan speed.
The indicator light will move from left to right. Once “High” is reached the
cycle will start over again at “Low”. “High” fan speed (recommended) helps
the food cook faster, and improves browning. For slower cooking you may
use “Medium” or “Low” fan speed. (Note: you may change the fan speed
during cooking by pressing the “Speed” button).
8. To begin cooking, press the “Start” button. The unit will not operate unless
time, temperature and fan speed are set and safety handle (or lid) is down.
(Note: Unplugging the oven will erase all settings).
9. When the timer reaches “00:00”, the cooking cycle is finished and the
appliances will beep 6 times. At the same time, the power light goes off but
the temperature indicator light is still on. If the oven temperature is over
150ºC (300ºF), the fan speed indicator light will flash and the fan will
continue to operate to allow the heating element to cool.
When the oven temperature drops down to 150ºC (300ºF), the fan will stop
operating and the fan speed indicator light will stop flashing.
10. Press the “Clear” button to reset all functions. The timer will be reset to
“00:00”, temperature indicator light shut off and timer will stop. The fan will
stop operating while the oven temperature is below 150ºC (300ºF).
However, if the oven temperature is over 180ºC (350ºF), the fan speed will
switch to low speed and start to dissipate heat. At the same time, the speed
indicator light stays at the original position and flashes until the oven
temperature is dropped down to 150ºC (300ºF).
11. When the oven temperature reaches the selected temperature during
cooking. The temperature indicator light will flash. However, when the oven
temperature drops below the selected temperature, the light will stay at “on”
again without flashing.
12. Thaw Function: The Thaw setting allows thawing for delicate foods and
particularly those items which require gentle defrosting. Rather than
leaving them on a benchtop they may be defrosted in the closed hygienic
environment of the Oven.
PART ASSEMBLY DIAGRAM
1
Remove the glass bowl and
base plate from the bowl
holder.
(for 220-240V only)
2
3
Put the glass bowl holder
upside-down and screw the
safety block to the
underside of the bowl
holder.
Put the glass bowl holder on
a firm surface such as
kitchen countertop and
place the base plate on the
bowl holder.
(for 220-240V only)
4
Place the glass bowl
inside the bowl holder.
5
6
Place wire rack(s)
inside the glass bowl.
Place the lid on the glass
bowl.
8
Note: The safety block is
designed to assure that
the FWOT doesn’t get too
close to the adjacent wall
or objects.
When using the FWOT
please make sure to
position the oven in such a
way that the safety block is
always placed between
the FWOT and the wall
behind it as illustrated in
Fig. 8.
How to use Expansion Device:
7
1. Press the safety button and hold at its release
position as illustrated in 1, fig.6.
2. Press the push button upward and lift the lid to
extended position as illustrated in 2, fig.6.
Do not press the safety button when
moving or holding the appliance.
Fig.6
¡
CLEANING Your Flavorwave Oven® Turbo Platinum:
Refer to CLEANING YOUR OVEN section in this manual.
16
Assembly is now
complete.
(for 220-240V only)
9
BEFORE YOU BEGIN COOKING
HOW TO OPERATE THE FLAVORWAVE
OVEN® TURBO PLATINUM
PREPARING YOUR FLAVORWAVE OVEN® TURBO
(AX-797DH)
FOR THE FIRST TIME ONLY
¡
The FLAVORWAVE OVEN® TURBO should be heated once before
cooking with it. While preparing the oven according to the following
instructions, the oven will give off a slight burning odor. The oven is
actually burning off excess lubricants found in the oven’s heating
elements and will not harm you or the oven.
FOLLOW THESE EASY STEPS...
• Wipe the inside of the glass bowl with a damp sponge
• Secure lid on oven
• Set timer for 5 minutes
• Set thermostat to 260ºC/500ºF and turn oven on
• After timer has shut oven off, allow to cool for 5 minutes
• Wipe inside of the glass bowl with a damp sponge a second time
NOW YOUR FLAVORWAVE TURBO OVEN IS READY TO COOK YOUR FIRST
MEAL!
IMPORTANT:
DO NOT WASH OR IMMERSE THE LID IN WATER OR IN
DISHWASHER. THE OUTER SURFACE CAN BE CLEANED BY
WIPING CAREFULLY WITH A DAMP DISH-CLOTH OR SPONGE.
For Model AX767MH. If the supply cord is damaged, it must be replaced by
the manufacturer, its service agent or similarly qualified persons in order to
avoid a hazard.
10
EM
NAL IT
O
I
T
P
O
Digital Display
Electric Temperature
Indicator
Electric Fan
Control
Pre-Heat button
Speed Control
button
Clear button
Temperature Control
button
Start button
1. Plug one end of Power Cord into back of lid (AX-797DH) and the power plug
in a standard AC outlet. Turn the power switch to the ON position.
2. The digital timer will display “00:00”, temperature indicator light will stay at
65ºC (wash) and the fan speed indicator light at “High”. If not, press “Clear”
button to bring out the above status.
Note: Please allow time tolerance of 5-7 min for 60 min timer setting.
3. Place lower wire rack in the glass bowl of the oven. (Note: Use the lower
rack for all recipes unless otherwise noted). Place food directly on rack
unless otherwise specified.
4. If the recipe required preheating, follow this procedure:
Press the “Pre-Heat” button. this will cause the oven to operate at its
highest temperature and fan speed for 6 minutes. Preheating is complete
when the timer reaches “00:00” and the fan light flashes. Press the up arrow
to increase the preheating time, if needed.
5. Time Selection: press the “+” or “-“ buttons lightly to raise or lower the time
selected in increments of 1 minute up to 23 hours and 59 minutes.
Holding the “-“ button will cause the increment more quickly. The “Clear”
button will reset the timer to zero. (Note: you may change the cooking time
during cooking by pressing the “+” or “-“ buttons).
6. Temperature Selection: Press the “Temp” button gently to move the
temperature selector through the temperatures one at a time from left to
right. A light will indicate the selected temperature. Once 260ºC (500ºF) is
reached the cycle will start all over again at “wash” (Note: you may change
the temperature setting during cooking by pressing the “Temp” button).
15
FLAVORWAVE OVEN® TURBO PLATINUM
PRODUCT & ACCESSORY DIAGRAM
FLAVORWAVE OVEN® TURBO PLATINUM (AX-797DH)
EM
NAL IT
OPTIO
HOW TO OPERATE THE FLAVORWAVE
OVEN® TURBO (AX-767MH)
1. Attach the Lid Holder as illustrated in fig. 1.
2. Place either the low or the high rack inside the glass bowl of the oven.
NOTE : Use the lower rack for all recipes unless otherwise noted.
3. Place food directly on rack, unless otherwise specified.
4. Secure lid on oven.
5. Plug the power cord in to an electrical outlet
NOTE: HANDLE MUST BE PUSHED TO THE HORIZONTAL POSITION TO TURN OVEN
ON. WHEN HANDLE IS IN VERTICAL POSITION, OVEN IS OFF.
Thermostat
6. Turn the thermostat knob clockwise to set
thermostat to the desired temperature referring to
“Quick reference Guide”.
NOTE: During cooking time, when the oven
reaches the preset temperature, it will shut off then
it will start again automatically (this is normal).
Timer
Thermostat
Timer: To Set Timer
POWER OFF
Power Safety
Handle
Time, Fan
Speed &
Cooking
Control
POWER ON
Power Switch
90mm (3.5”)
Extender Ring
(Optional item)
High Rack
Safety Lock
7. Turn the timer knob clockwise to 60 min and
then turn back to the desired time.
Note: Please allow time tolerance of 5-7 min for 60
min timer setting.
8. Push safety handle down (until you hear a click
sound) to “ON” position.
9. When the timer reaches the end of the cooking
cycle it will stop and you will hear a bell sound.
10. Remove the lid CAUTION-ALWAYS PLACE THE
LID ON THE LID HOLDER and make sure that
the handle is in OFF position, as
illustrated in fig. 3.
OFF
Position
ON
Position
Fig. 3
Push Button
Glass Bowl
Expansion
Device
Anti-Tip over
Plate
Bowl Stand & Handle
Base Plate
14
Lid Holder
11
Oven Lid
11. Now you can remove your food from the oven.
Remember, the food is hot inside the oven, pay extra attention.
Use the Tongs provided to remove the rack and food from the oven as
illustrated in fig. 2.
12. Thaw Function: The Thaw setting allows thawing for delicate foods and particularly
those items which require gentle defrosting. Rather than leaving them on a
benchtop they may be defrosted in the closed hygienic environment of the
Oven.
Fig.1
Fig.2
SELF CLEANING OF GLASS BOWL
• Add tap water, approximately 3.8cm (1.5”), until the water reaches the mark level on
the bowl holder in fig.4.
• Add one squeeze of mild dish washing detergent.
• Replace lid and plug in.
• Set heat control to “wash” and set timer for 10 minutes.
(The hot air circulation creates the turbo action that helps
release stubborn residue from bowl.)
• After cleaning rinse in warm water to remove all soap residue.
Fig.4
DISHWASHER-SAFE GLASS BOWL
All glass surfaces of the oven get very hot. Touching these surfaces before
oven cools will cause a burn. Do not touch any glass part of the oven until it
has cooled down.
¡
CLEANING YOUR OVEN
ALWAYS UNPLUG THE OVEN BEFORE CLEANING
LIGHT CLEANING
• Unplug oven and let cool.
• Use a sponge or dishcloth with a mild dish washing detergent and warm water to
wipe glass bowl clean.
• Rinse well to remove all detergent.
• Note : Never immerse the lid in any liquid.
The glass bowl and wire racks may also be washed in the dishwasher. However,
never wash the lid in a dishwasher or immerse it in liquid.
Remove the glass bowl from its stand before dish washing.
REMEMBER...
• Unplug oven before cleaning the lid
• Let oven cool before washing
• Never immerse lid in water
• Do not add water above the line marked on the glass bowl when self cleaning
• Do not let fan assembly get wet
DRYING THE OVEN
• The oven must always be kept dry after cleaning to avoid
moisture in the lid.
• Make sure the oven is unplugged, leave lid slightly open
and allow the oven to dry thoroughly as illustrated in fig.5.
Fig.5
NORMAL CLEANING
¡
• Unplug oven and let cool.
• Wipe lid and fan housing using a dishcloth or damp sponge with a mild dish
washing detergent.
• Do not clean with steel wool pads or abrasive materials.
• Wash wire racks in mild dish washing detergent and water.
• Clean metal parts using a sponge or dishcloth with a mild dish washing
detergent, then wipe clean. If scrubbing is necessary, use a nylon or polyester mesh pad.
TO AVOID BREAKAGE ALLOW THE GLASS BOWL TO
COOL BEFORE POURING WATER OR SELF CLEANING
DO NOT USE THE OVEN UNTIL IT’S COMPLETELY DRY
12
13
¡