1
Blue Cat's Protector User Manual
"A brick wall for your master buss."
1
Blue Cat's Protector User Manual
Copyright (c) 2008-2014 Blue Cat Audio
Table Of Content
Introduction
Description
Features
System Requirements
Installation
Using Blue Cat's Protector
The User Interface
Operation
Blue Cat Audio Plugins Basics
User Interface Basics
Controls
Keyboard
Mouse
Presets Management
MIDI & Automation Control
More
Blue Cat's Protector Parameters
Input
Output
Plug- in Settings
The Global Settings Window
The Preset Settings Window
About Skins
Changing the Skin
Create a Custom Skin
Frequently Asked Questions
More
Extra Skins
Tutorials
Updates
Versions History
Note: An online version of this user manual is available here.
2
Blue Cat's Protector User Manual
Copyright (c) 2008-2014 Blue Cat Audio
Note: An online version of this user manual is available here.
Introduction
Description
Blue Cat's Protector is a 0 dB stereo brickwall limiter with adjustable dynamics response. It will typically find its place on the master
bus of your DAW to protect your audio output from overshoot, limit the general volume and improve the perceived loudness, thanks
to a very transparent frequency response.
Despite its very simple set of controls, it offers a wide range of sounds and it is also suitable as a track limiter for more creative
effects such as distortion, pumping or heavy limiting.
Its large colorful meters and its custom dynamics histogram provide premium visual feedback and make it the perfect tool to
monitor and control the dynamics on your master buss. You can also check in real time the loudness boost obtained with the
limiter.
Beyond its powerful dynamics processing features, and like most of our plug- ins, Blue Cat's Protector also offers a powerful side
chain capability thanks to its MIDI CC output. This unique technique not only lets you do side chain limiting but also parameters
modulation: control any parameter of any plugin to create powerful side chain effects in real time.
If you are looking for a complete dynamics processing solution, you might be interested in Blue Cat's Dynamics plugin.
Typical applications: master output protection, master buss limiting, loudness maximizing, peak overshoot monitoring, distortion,
clipping.
Features
Main Features:
Blue Cat Audio Standards:
0 dB brickwall peak limiter and waveshaper.
Continuous control of the dynamics response from transparent
limiting to colorful distortion.
Stereo link control.
Available as: Mac- AAX, Mac- AU, Mac- RTAS, Mac- VST, WinAAX, Win- DX, Win- RTAS, Win- VST, Win x64- AAX, Win x64DX, Win x64- VST.
Native DSP code for optimal performance.
DC Filter to get rid of DC offset.
Large zoomable peak and RMS audio levels and gain reduction
meters for optimal monitoring.
Loudness boost monitoring.
Full MIDI control and automation support with silent, zipper- free
parameters update, advanced response control and MIDI Learn.
No CPU load on idle: when the plug- in is fed with silence, the
processing smoothly shuts down, to optimize the CPU usage of
Fully configurable dynamics response histogram.
Side chaining capability: a unique way to perform side chain
compression and much more.
No latency.
your Digital Audio Workstation.
Skinnable and customizable user interface with transparency
management.
Automation and MIDI output: record output parameters as
automation curves or send MIDI CC messages to other plug- ins
for powerful side chain effects.
Smooth Bypass: activate/ deactivate the plug- in with absolutely
no noise.
Undo/ Redo.
Full featured integrated presets manager.
Copy/ paste the plug- in's state between instances using the
system clipboard.
Any sample rate supported.
System Requirements
Windows
Mac OS X
An SSE2- enabled processor (Pentium 4 or later).
Microsoft Windows XP, Vista, Windows 7 or 8.
Any DirectX / VST / RTAS / AAX compatible host software (32 or
64 bit).
An Intel processor.
Mac OS X Mavericks(10.9), Moutain Lion (10.8), Lion (10.7),
Snow Leopard (10.6), or Leopard (10.5).
Any VST / Audio Unit (32/64- bit) / RTAS / AAX compatible
application.
For more information about supported platforms, see our FAQ.
3
Blue Cat's Protector User Manual
Copyright (c) 2008-2014 Blue Cat Audio
Installation
Blue Cat Audio plug- ins cannot be run standalone, they require a host application (see the System Requirements chapter for more
information). Depending on which host application you use, you might need to install the plug- ins in different locations.
Windows
Install
All versions of the plug- in provide an installation program. Follow the steps of the wizard to install the plug- in on your machine.
During the installation you will be asked where you want the plug- in(s) to be installed. For the VST version you should install the
plug- in inside the VST plug- ins folder used by your host application(s). The default path set in the installer should work for most
applications, but you should check your host software documentation to know where it looks for VST plug- ins.
Some applications will not automatically rescan the new plug- ins, so you might have to force a refresh of the plug- ins list.
Upgrade
When a new version of the plug- in is released, just launch the new installer: it will update the current installation.
Uninstall
To uninstall the plug- in, simply launch the "Uninstall" program that is available in the start menu or in the configuration panel. It will
take care of removing all files from your computer.
Mac
Install
On Mac the plug- ins are available as drive images. After download, double click on the file to open it. You can then drag and drop
the plug- in file(s) to the shortcut that is provided within the image. It will install the plug- in(s) for all users on the machine.
In case you do not have admin rights on your Mac or if you want to install the plug- in(s) to another directory, just copy the files to
the appropriate location. If required, more information is available in the README.txt file that is included in the package.
Upgrade
When a new version of the plug- in is released, open the new image and copy the files over the previous ones. The new version will
replace the older one.
Uninstall
To uninstall the plug- in, simply remove the plug- in components from the folder where you have copied them during install (move
them to the trash).
If you want to completely remove all settings and configuration files, you can also remove these additional directories that may
have been created on your computer:
~/ Library/ Preferences/ Blue Cat Audio/ [Plug- in name and TYPE], where TYPE is VST, AU, RTAS or AAX: global
preferences.
~/ Library/ Preferences/ Blue Cat Audio/ [Plug- in name]: license information
~/ Documents/ Blue Cat Audio/ [Plug- in name]: user data, such as presets, additional skins and user- created plug- in data.
Just beware that these directories may contain user data that you have created. Remove these directories only if you wo not want
to reuse this data later.
4
Blue Cat's Protector User Manual
Copyright (c) 2008-2014 Blue Cat Audio
to reuse this data later.
Using Blue Cat's Protector
The User Interface
Note: The main toolbar, menus and basic features available with all our plug- ins are detailed in the Blue Cat Audio Plug- ins
Basics section.
Blue Cat's Protector is bundled with a single skin, but you may create your own and download other ones on our web site: Blue
Cat's Protector skins.
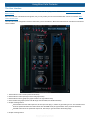
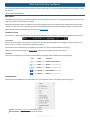
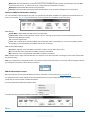
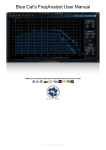
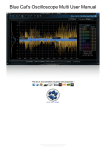
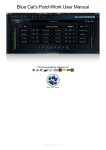
The main skin can be configured to show the information you are interested in. Below is decribed the full view with all controls and
meters enabled:
1. Show/ hide the main controls (central knobs area).
2. Show/ hide the meters (left/ right meters and graph areas).
3. Show/ hide the history graph (the graph located in the right meters area).
4. Zoom meters and graphs (shows a 30 dB range when activated, and 60 dB otherwise).
5. Output metering section:
the IN meters show the audio input level, at the input of the plug- in, before any processing occurs. The outside meters
show the peak levels while the inside meters show the RMS levels (an approximation of the perceived loudness).
the PRE meters show the peak audio input level, after the pre- gain and before the limiting stage.
6. Output metering section:
5
Blue Cat's Protector User Manual
Copyright (c) 2008-2014 Blue Cat Audio
6. Output metering section:
Attenuation (blue meters): these meters show the instant and max attenuation ratios (dB) applied to the signal by the
limiting stage for the left and right channels.
History graph (blue curves): these curves show an histogram of the gain reduction that has been applied. You can
adjust the duration of the history with (12). It represents the distribution of gain reduction values over time. It gives a
good idea of the dynamics of the track that is being processed.
Output levels: these meters show the audio levels (peak outside, RMS inside) after the post gain stage, at the output
of the plug- in.
7. Max attenuation display: shows the maximum gain reduction that was applied to the signal for the left and right channels.
Click to reset.
8. Pre- gain: gain applied at the input of the plug- in, before the limiting stage.
9. Link: link left and right channels gain reduction (0 for no link and 100% for identical left and right attenuation).
10. Release: release time for the limiter.
11. Knee: controls how soft the limiting is, starting to compress before the 0dB threshold. As soon as the input signal is above
the arrows the plug- in progressively starts limiting.
12. History: control the duration of the history displayed by the history graph. The larger the value, the longer the memory of the
history graph, and the slower the graph will update. Click on the button on the right to reset the history display.
13. Post- gain: gain applied at the output of the plug- in, after the limiting stage.
14. DC Filter: activate the DC- offset filter. This filter is placed at the input of the plug- in and can be used to get rid of any DCoffset that may be present in the signal. This can be necessary to achieve transparent and clean limiting.
15. Rms Boost display: shows the average boost for the RMS level between the input and output of the plug- in. This level s a
good approxiaion of the loudness boost (or reduction) produced by the plug- in. Click on the value to reset the average.
The various elements of the user interface (knobs, sliders, buttons...) are simple and intuitive to operate, but more information
about how to interact with them is available in the "Plug- ins Basics" chapter of this manual.
Operation
The limiter has very few parameters but they let you precisely control the dynamics response if you understand them well. Short
descriptions of these parameters are available in the parameters section. We will give you here more details about their influence
on the sound and the way it is processed.
Controlling the Limiter
By default, the limiter has a fixed input threshold of 0dB. You can control the input level with the Pre- Gain knob to adjust the input if
it is too loud or quiet. Every peak above 0dB will trigger a gain reduction to reach the 0 dB peak level. You can then adjust the
output gain to the desired level: the the output peak level is guaranteed to be maintained below the chosen output level.
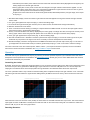
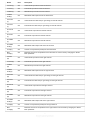
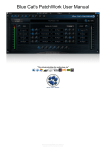
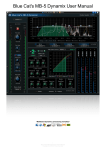
The “knee” parameter offers a way to obtain a smoother limiting effect: it adjusts the shape of the gain reduction curve. The limiter
will start its gain reduction before the signal reaches 0dB (precisely at 0dB minus the knee value), with a smooth and continuous
curve:
Default response (no knee)
Response with large knee value
(the graphs above show the output level as a function of the input level, both in dB scales)
When the knee is set to its maximum value (30 dB), the limiter offers an extra 6dB overhead to the input level. This means that the
input signal can reach +6dB before it actually hits the final brick wall. On the other hand, limiting will occur before the audio level
reaches 0 dB, as you can see on the graph above.
Reaching Distortion
6
Blue Cat's Protector User Manual
Copyright (c) 2008-2014 Blue Cat Audio
When the release time reaches very low values (less than 10 ms), a great amount of distortion will occur. At 0 ms Blue Cat's
Protector acts as a wave shaper and clips the audio signal.
Again, with the knee parameter you can adjust the shape of the wave shaper from digital hard - clipping (knee=0 dB) to soft analoglike saturation (knee=30 dB).
True distortion can be achieved by increasing the input level to force continuous clipping of the audio signal over time (instead of
only clipping the peaks). The larger the input gain, the larger the distortion. It is possible to cascade several instances of the plugin
in order to achieve a very large amount of distortion. In this case, you will probably want to add a lowpass filter after the protector
plug- in in order to reduce the higher harmonics that will appear with great amounts of distortion.
Level Maximizing
A common task for a brickwall limiter is level maximizing: you can increase the perceived loudness of an audio recording without
changing its peak level.
Depending on the type of media your recording is targeted to (mp3, CD, ...) and your host application, you might need to adjust the
output level to less than 0 dB (typically -0.1 dB) in order to avoid peak distortion.
Once the output level has been set, start with a 0 dB knee value. Increase the input gain until you can hear artifacts on the output
(typically a few clicks on heavy transients). Increase the knee value until you cannot hear the artifacts anymore: you have reached
the optimum settings!
Another important setting for this task is the release time: you will typically keep it quite high to avoid too fast volume variations.
Note that you can also cascade several instances of the plugin in order to increase further the perceived loudness.
Peak Level Overshoot Monitoring
With a 0 dB knee value, the plug- in will strictly limit all peaks above 0 dB only. It means that the maximum gain reduction value
displayed by the plug- in tells by how much the audio signal exceeds 0 dB. This can be used to check audio levels in an effect
chain, while protecting the input of software/ hardware that may not support loud signals. Once you have read the peak overshoot
value, you can adjust your levels to avoid the signal to be clipped or compressed.
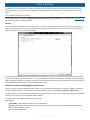
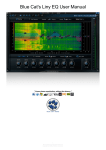
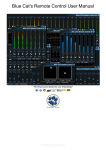
When mixing or processing recordings, since your can record the gain reduction values as automation curves, it is also possible to
check within your DAW when the signal exceeds the 0 dBFS value as shown below:
Side Chain Capabilities
Thanks to its MIDI CC output, Blue Cat's Protector will let you perform side chain limiting and create your own volume controlled
effects in a few mouse clicks. For side chain limiting, you will also need to download Blue Cat's freeware gain plug- ins.
In order to use the real time side chaining functionality of Blue Cat's Protector, do the following:
1. Create a new bus in your project and send the audio source track (the audio track used as control signal for the side
chain)on it.
2. Insert Blue Cat's Protector on this bus.
3. Insert Blue Cat's Gain on the destination track (mono or stereo).
4. Assign the Comp (Comp(L) and/ or Comp(R)) output parameter to a given MIDI channel and CC number.
5. Assign the Gain parameter of the Gain plug- in to the same MIDI channel & CC number as the Total Gain.
7
Blue Cat's Protector User Manual
Copyright (c) 2008-2014 Blue Cat Audio
5. Assign the Gain parameter of the Gain plug- in to the same MIDI channel & CC number as the Total Gain.
6. Route Blue Cat's Protector MIDI output to Blue Cat's Gain MIDI Input.
Blue Cat's Protector will now control the Blue Cat's Gain plugin depending on the audio source input level.
If you have issues performing the above tasks in your host application, please visit our website and check our step by step tutorials
that explain how to use the MIDI CC i/ o features in various host applications.
8
Blue Cat's Protector User Manual
Copyright (c) 2008-2014 Blue Cat Audio
Blue Cat Audio Plug- ins Basics
This chapter describes the basic features that are common to all our plug- ins. If you are already familiar with our products, you can
skip this part.
User Interface Basics
About Skins
Like all Blue Cat Audio plug- ins, Blue Cat's Protector uses a skinnable user interface. It means that the appearance and behavior
of the user interface can be entirely customized.
Especially with third party skins, the experience may be quite different from the one offered by the default skins that we provide.
However, our plug- ins and our skinning engine have several standard features that will be available whatever your favorite skin.
More information about custom skins can be found in the skins section.
The Main Toolbar
In most skins, an optional toolbar at the top of the user interface gives you access to the main options and settings of the plug- in:
Presets Area
At the center of the toolbar, you can see the current preset area (the "Default Settings" box). It displays the name of the current
preset, with a "*" at the end if it has been modified since loaded.
The arrows on the left and right let you navigate thru the (factory and user) presets available for the plug- in.
Clicking on the preset name opens the presets menu which lets you manage the presets of the plug- in.
Commands
The icons in the toolbar give you access the to the following commands that are detailed in the next paragraph:
Icon
Name
Function
Menu
Open the main menu
Undo
Undo
Redo
Redo
Manual
User Manual
About
About
The Main Menu
The main menu is available from the main toolbar, or if you right click anywhere on the background of the plug- in:
Presets: opens the presets menu to manage presets.
Set Preset Skin: change the skin for the current preset.
9
Blue Cat's Protector User Manual
Copyright (c) 2008-2014 Blue Cat Audio
Set Preset Skin: change the skin for the current preset.
Use Global Skin: use the skin defined in the global settings for the current preset. This item is enabled only if a skin has
been defined for the current preset.
Undo/ Redo: undo or redo the latest modifications. This includes all changes made to the current preset settings such as
MIDI or automation preferences.
Presets Settings: open the presets settings window. It lets you change the skin, MIDI and automation settings for the
current preset.
Global Settings: open the global settingswindow. It lets you change the skin, MIDI and automation settings that are used by
default in all instances of the plug- in (if not overriden by the current preset).
User Manual: open this user manual.
Check for Updates: opens up our website to let you check if any update for this software is available.
Get More Skins: get more skins for this software.
Legal Information: browse licensing and misc legal documents.
About: displays the “about” dialog box.
The Title Bar
In most skins, an icon bar is located below the main toolbar. The first commands are the same for all plug- ins:
From left to right:
Smooth Bypass: smoothly bypass the plug- in (just like a power button).
Window Opacity: reduce the opacity value by turning the knob, and make the the plug- in window transparent. (the result
may depend on the host application).
Show/ Hide MIDI and Automation Control Settings: show/ hide the buttons that give access to direct MIDI/ Automation
setup for each parameter in the user interface. This button will show or hide dropdown menu buttons that popup a MIDI/
Automation setup menu described here.
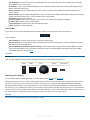
Controls
Examples
Here are a few examples of typical controls you will encounter in the user interface of our plug- ins:
slider
slider
knob
button
Text control
Interacting with Controls
You can interact with the controls of the plug- in interface either with the mouse or the keyboard.
Setting the keyboard focus on a control (so that it responds to key strokes) may be automatic (when you pass the mouse over it it
gets focus) or manual (you have to click on the control to set the focus on it). Note that all host applications behave differently
regarding keyboard handling. In some applications you may not be able to use all keys described later in this manual to interact
with our plug- ins. It is usually made obvious to you to know the active surfaces of the skin (the places where you can click with the
mouse): the mouse cursor usually changes when you can do something on a control. In the default skins delivered with the plug- in,
the cursor changes to a small hand or an arrow to tell you when your mouse is over an active control.
Mouse
Various mouse movements will let you interact with the controls:
10
Blue Cat's Protector User Manual
Copyright (c) 2008-2014 Blue Cat Audio
Mouse Interaction
Action
Left Click
Acquire focus and start dragging or push (button)
Left Click + Alt Key
Set the value to default
Acquire focus and launch the “fine tuning” edit box (except button):
Left Double Click
Right Click
Set the value to default
Mouse Wheel
Increment or decrement the position (focus required)
Mouse Drag
Change the control position depending on mouse movement (except button)
Keyboard
All control widgets support the following keys (note that some of them are caught by the host and thus never forwarded to the
control. For example in Steinberg Cubase SX you cannot use the arrow keys to control the plug- in):
Keys Common to All Controls
Key
Action
Up Arrow
Small increment of the position (up or right)
Down Arrow
Small increment of the position (down or left)
Left Arrow
Same as Down Arrow
Right Arrow
Same as Up Arrow
Page Up
Large increment of the position (up or right)
Page Down
Large decrement of the position (down or left)
+
Small increment of the value of the control
-
Small decrement of the value of the control
d
Set to default value (same as mouse right click)
Opens the 'fine tuning' window to precisely set the parameter:
e
SHIFT
When the key is down, the fine tuning mode is on, and you can modify the value with
better precision when moving the mouse, the mouse wheel or using the keyboard.
Just release the key to get back to the normal mode.
Keys Specific to Buttons
Key
Action
Enter
Pushes the button
Presets
To get started with the plug- in and discover its capabilities, a couple of factory presets are provided. You can also save your own
presets and recall them later for other projects. Our plug- ins propose a full- featured preset manager to let you save, browse,
organize and recall its presets.
The Presets Menu
The presets menu can be opened from the main menu or the main toolbar. It displays the list of presets available for the plug- in as
well as commands to load, save or organize presets:
11
Blue Cat's Protector User Manual
Copyright (c) 2008-2014 Blue Cat Audio
Factory Presets: shows the list of factory presets delivered with the plug- in.
"Folder A" to "User Preset Z": user presets and categories.
Load: load preset from file.
Save As: save current preset to a file.
Copy copy preset to the system clipboard.
Paste paste preset from the system clipboard, if available.
Save As Default: save the current state as the default preset. This preset is used every time a new instance of the plug- in is
created.
Reset Default: reset the default preset to its factory state: this makes the plug- in forgets the custom settings you might have
saved as a default preset.
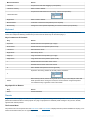
More about Presets
There are two types of presets: factory presets (read only) that are provided with the plug- in, and user presets that can be created
and stored by the user.
The user presets are stored in a subdirectory of the documents folders of your profile ("Documents" on Mac, and "My Documents"
on Windows): Blue Cat Audio/ [Plug- in Name]/ Presets. Each preset is stored as an individual file. You can create folders and
subfolders in the Presets directory to classify your presets, as shown in the example below:
If you save a preset named "Default" in the root Presets directory, it will override the factory default preset (that's what "Save As
Default" does). To restore the factory default preset, you can just remove this file or use the "Reset Default" command.
MIDI and Automation Control
Blue Cat's Protector can also be remotely controlled via MIDI using MIDI CC ("Control Change") messages or automation curves, if
your host application supports it. It is possible to customize the channel, control numbers, range and response curve used for each
parameter in the settings panel available from the main menu (see the Plug- in Settings chapter for more details).
MIDI and Automation Settings Menu
Most skins also provide the ability to change MIDI and automation settings for each parameter directly in the main user interface.
When this feature is activated using the corresponding title bar button, dropdown menu buttons appears next to main controls:
Clicking on this button shows the MIDI/ Automation settings menu:
12
Blue Cat's Protector User Manual
Copyright (c) 2008-2014 Blue Cat Audio
MIDI Learn: launches MIDI learn mode for the control: touch your MIDI controller and the control will learn from it the MIDI
channel and CC number. To end the learn mode, reopen this menu and deselect the option.
MIDI Unlearn: deactivates MIDI control for this parameter.
Settings: launches the advanced settings panel described below. This controls the settings for the current preset.
Andvanced MIDI and Automation Settings
You can completely customize the way the plug- in is controlled by automation and MIDI. For a global view of all parameters at a
time, you can use the Plug- in Settings window for the current preset which is available from the main menu.
MIDI Settings:
Enable MIDI: enable/ disable the MIDI control of the parameter.
Channel: MIDI Channel for the parameter control. If set to 0, the plug- ins will accept Control Change Messages from all
MIDI Channels (MIDI Omni mode).
CC: Control Change Number.
Learn: click on this button to activate the MIDI learn functionality. When it is activated, you can move your MIDI controller,
and the plug- in will automatically set the MIDI Channel and CC Number.
MIDI and automation settings:
Response: response curve of the MIDI or automation control: from very fast to slow control.
Min: minimal value of the parameter when MIDI controlled or automated.
Max: Maximum value of the parameter when MIDI controlled or automated.
Note: if the Min value is higher than the Max value, the response curve will be reversed: increasing the control value will decrease
the parameter value.
Note: if you double click on the parameter text control boxes for the max and min values, a “fine tuning” edit box will appear and let
you change the min and max values with more precision:
MIDI and Automation Output
Blue Cat's Protector can also generate MIDI CC Events or automation curves thanks to its output parameters.
You have access to the same settings for the output parameters as you have for input parameters using the dropdown menu,
except that you can also enable or disable automation.
The output parameters MIDI and Automation Menu:
The advanced output parameters MIDI and Automation settings window:
More
13
Blue Cat's Protector User Manual
Copyright (c) 2008-2014 Blue Cat Audio
Check our online tutorial for more screenshots and more examples of our plug- ins user interfaces.
14
Blue Cat's Protector User Manual
Copyright (c) 2008-2014 Blue Cat Audio
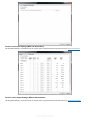
Blue Cat's Protector Parameters
All parameters described below can be automated and controlled via MIDI if your host application supports it. You can precisely
define this behavior in the settings panels described later in this manual.
The plugin exposes both input and output parameters to let you both control and monitor the behavior of the plugin:
Input
Name
Unit
Bypass
Pre
Gain
Description
Bypass the effect.
dB
Release
ms
Knee
dB
Link
%
Input gain, before the limiting stage.
Release time for the limiter. Controls how fast the limiter reacts to volume drops. Set the
release parameter to 0 for distortion.
Controls the softness of the limiting: the higher the value, the softer the limiting. Limiting starts
at 0dB minus the knee value. See the usage section for more details.
Link the left and right channels gain. At 0% both channels work independently, and a 100% the
same gain reduction is applied to both channels. This lets you control how the stereo balance
is affected by the limiter.
Max
Reset
Reset the max compression values (see output parameters).
Post
Gain
Output gain, after the limiting stage
DC
Activate the DC Offset Filter to remove potential DC Offset.
Filter
Enable
Activate the computation of limiter gain values history.
History
History
Length
History
Reset
Rms
Boost
seconds
length of the gain values history.
Value changes will trigger a complete reset of the limiter gain values history.
Value changes will reset the value for the RMS boost output parameter.
Reset
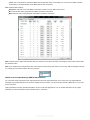
Output
15
Blue Cat's Protector User Manual
Copyright (c) 2008-2014 Blue Cat Audio
Name
Unit
Description
In Peak (L)
dB
Instant audio input level for the left channel.
In Hold (L)
dB
Peak audio input level for the left channel.
In RMS (L)
dB
RMS Audio input level for the left channel.
dB
RMS Peak audio input level for the left channel.
dB
Instant audio level after the pre- gain stage, for the left channel.
dB
Peak audio level after the pre- gain stage, for the left channel.
dB
Instant audio output level for the left channel.
dB
Peak audio output level for the left channel.
dB
RMS Audio output level for the left channel.
dB
RMS Peak audio output level for the left channel.
dB
Amount of compression (instant) for the left channel.
In RMS
Hold (L)
Pre Peak
(L)
Pre Hold
(L)
Out Peak
(L)
Out Hold
(L)
Out RMS
(L)
Out RMS
Hold (L)
Comp(L)
Max
Comp(L)
dB
Maximum amount of compression for the left channel. Can be reset by changing the “Reset
Max” parameter.
In Peak
(R)
dB
Instant audio input level for the right channel.
In Hold (R)
dB
Peak audio input level for the right channel.
In RMS
(R)
dB
RMS Audio input level for the right channel.
In RMS
Hold (R)
dB
RMS Peak audio input level for the right channel.
dB
Instant audio level after the pre- gain stage, for the right channel.
dB
Peak audio level after the pre- gain stage, for the right channel.
dB
Instant audio output level for the right channel.
Out Hold
(R)
dB
Peak audio output level for the right channel.
Out RMS
(R)
dB
RMS Audio output level for the right channel.
dB
RMS Peak audio output level for the right channel.
dB
Amount of compression (instant) for the right channel.
Pre Peak
(R)
Pre Hold
(R)
Out Peak
(R)
Out RMS
Hold (R)
Comp(R)
Max
Comp(R)
dB
Maximum amount of compression for the right channel. Can be reset by changing the “Reset
Max” parameter.
16
Blue Cat's Protector User Manual
Copyright (c) 2008-2014 Blue Cat Audio
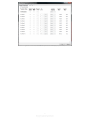
Rms Boost
dB
Average boost of the RMS level between the input and the output of the plug- in. Can be reset
by changing the “Reset Rms Boost” parameter.
17
Blue Cat's Protector User Manual
Copyright (c) 2008-2014 Blue Cat Audio
Plug- in Settings
In addition to the controls offered in the main user interface, Blue Cat's Protector has various settings that let you fine tune the
behavior of the plug- in. You can choose to change these settings either for the current preset or globally for all instances of the
plug- in.
The Global Settings Window
The settings available in this window apply to all instances of the plug- in, for all presets, if not overriden in the presets settings.
Consider these settings as “default” settings.
General
You can change the default skin for all instances of the plug- in: write the skin file path in the text edit box or click on the button to
open a file chooser dialog. If you have several instances of the plug- in opened in your session, you will have to re- open the user
interfaces of these plug- ins to see the skin change.
The output data refresh rate can also be customized for all instances of the plug- in. It controls the refresh rate of non- audio data
produced by the plug- in (parameters, curves...). It also controls the refresh rate of output MIDI CC messages or output automation
data. The higher the refresh rate, the better precision, but also the higher cpu usage (some host applications may also have trouble
recording MIDI data at high refresh rates). The default value is 50 Hz.
Global Control Input Settings (MIDI and Automation)
The plug- in offers a couple of settings that affect the way it is controlled by MIDI messages or automation. While the first settings
only apply to MIDI control, the "Control Response", "Min" and "Max" settings apply to both automation and MIDI control.
For each parameter you can define a default MIDI channel and CC number. You can then control the plug- in with an external MIDI
controller or one of our plug- ins that generate MIDI messages.
The settings below are available for each plug- in parameter.
MIDI Settings:
Enable MIDI: enable/ disable the MIDI control of the parameter.
Channel: MIDI Channel for the parameter control. If set to 0, the plug- ins will accept Control Change Messages from all
MIDI Channels (MIDI Omni mode).
CC: Control Change Number.
18
Blue Cat's Protector User Manual
Copyright (c) 2008-2014 Blue Cat Audio
CC: Control Change Number.
Learn: click on this button to activate the MIDI learn functionality. When it is activated, you can move your MIDI controller,
and the plug- in will automatically set the MIDI Channel and CC Number.
MIDI and automation settings:
Response: response curve of the MIDI or automation control: from very fast to slow control.
Min: minimal value of the parameter when MIDI controlled or automated.
Max: Maximum value of the parameter when MIDI controlled or automated.
(generic screen shot, does not correspond to the actual plug- in parameters)
Note: if the Min value is higher than the Max value, the response curve will be reversed: increasing the control value will decrease
the parameter value.
Note: if you double click on the parameter text control boxes for the max and min values, a “fine tuning” edit box will appear and let
you change the min and max values with more precision:
Global Control Output Settings (MIDI and Automation)
You can set the same properties for the output parameters as for the input parameters: in this case, they may trigger MIDI CC
messages or generate automation curves when modified. Since it's output, you cannot set the channel to MIDI Omni, so you must
choose a channel.
Output parameters can also generate automation curves in most host applications. You can enable automation for any output
parameters you are interested in (see the "Enable Autom." checkbox).
19
Blue Cat's Protector User Manual
Copyright (c) 2008-2014 Blue Cat Audio
(generic screen shot, does not correspond to the actual plug- in parameters)
Note: if the Min value is higher than the Max value, the response curve will be reversed: increasing the control value will decrease
the parameter value.
Note: if you double click on the parameter text control boxes for the max and min values, a “fine tuning” edit box will appear and let
you change the min and max values with more precision:
The Current Preset Settings Window
In this window you can change the settings for the current preset of the current instance of the plug- in only.
Preset Skin
You can choose to use the global skin setting or to change the skin for the current preset. This way you can have different skins for
different instances of the plug- in in the same session in order to differentiate them.
20
Blue Cat's Protector User Manual
Copyright (c) 2008-2014 Blue Cat Audio
Preset Control Input Settings (MIDI and Automation)
Use the global settings or override them for the current preset. The parameters are the same as for the global input settings.
(generic screen shot, does not correspond to the actual plug- in parameters)
Preset Control Output Settings (MIDI and Automation)
Use the global settings or override them for the current preset. The parameters are the same as for the global output settings.
21
Blue Cat's Protector User Manual
Copyright (c) 2008-2014 Blue Cat Audio
(generic screen shot, does not correspond to the actual plug- in parameters)
22
Blue Cat's Protector User Manual
Copyright (c) 2008-2014 Blue Cat Audio
(generic screen shot, does not correspond to the actual plug- in parameters)
About Skins
Blue Cat's Protector integrates Blue Cat's skinning engine that allows you to customize the user interface. You can download new
skins for your plug- in at the following address:
http:// www.bluecataudio.com/ Skins/ Product_Protector
If you don't find a skin that fits your need or if you want a really custom one, you can choose to create your own skin.
Changing the Skin
You have two ways to change the skin of your plug- in: you can change the default (or 'global') skin in the global settings, or change
the skin for the current preset only (either in the preset settings page or from the main menu). The global skin applies to all plug- in
instances, whereas the current preset skin only applies to the current preset of the current plug- in instance.
See the main menu for more information about how to access these options.
On some hosts the plug- in window won't resize automatically when you choose a skin with a different size. In this case, just close
the window and re- open it: it will be displayed with the right size.
Create a Custom Skin
You can create custom skins for your plug- in in order to adapt it to your exact needs. You can change its look and feel and make it
completely integrated in your virtual studio!
Just read the Blue Cat's Skinning Language manual and download the samples for the tutorial on http:// www.bluecataudio.com/
Skins. You can get ready to create your own skins in a few minutes.
You can then share your skins on our website.
23
Blue Cat's Protector User Manual
Copyright (c) 2008-2014 Blue Cat Audio
FAQ
Automation Output
When I use the plug- in, my host application is slowed down and I get audio drop- outs. How can I solve this problem?
If your host application does not let you select the parameters for which you want to record automation, it might be doing some
extra work for handling the output parameters generated by the plug- in. A solution is to disable the output parameters you do not
use in the Preset or Global settings/ Automation Output pane.
When I use the plug- in, my host application draws many automation curves on the current track and yet I have not
touched any control on the plug- in. How can I avoid that?
If your host application does not let you select the parameters for which you want to record automation, it will record automation for
all the output parameters generated by the plug- in. You can disable the output parameters you do not use in the Preset or Global
settings/ Automation Output pane.
I am trying to record automation curves as shown in the tutorials but it does not work. What do I have to do?
If your host application lets you select the parameters for which you want to record automation, check that the parameters you want
to record are enabled. You also need to check that the plug- in automation output is enabled for these parameters. Check the
Preset or Global settings/ Automation Output pane and select the parameters you want to record.
When I use the plug- in in a project, every time I save the project, my application shows it as unsaved right away. How can
I solve this issue?
This plug- in produces automation output, and some host applications consider that any change to one of the output parameters is
a change for the project. In order to solve this problem, and if you do not use the automation output capability of this plug- in, you
can disable automation output from the plug- in settings panel (Global or Preset Settings/ Automation Output pane: uncheck all
parameters).
MIDI Output
How can I enable the MIDI output of the plug- in?
If your host application supports it, you can choose to send MIDI CC messages based on the output parameters computed by the
plug- in. The feature is not enabled by default, so you need to go to the current preset settings (of the global settings if you want to
enable this for all instances - not recommended) and open the "MIDI output" pane. For each parameter you are interested in,
enable MIDI output and select the appropriate channel and CC number. The plug- in will then send MIDI messages to the host
application. Check our tutorials for a detailed explanation of MIDI output routing in your favorite host.
Plug- ins Formats
What are DirectX (DX), Audio Unit (AU), RTAS, AAX and VST plug- ins?
VST, Audio Unit, RTAS, AAX and DirectX plug- ins are software components than can be used in "Host" Software (such as
Cakewalk Sonar, Steinberg Cubase or Wavelab, Sony Vegas, Logic Pro, Garage Band, Ableton Live, Pro Tools...) in order to
perform some MIDI and/ Or Audio real- time Processing tasks. To be more precise what we usually call directX plug- ins is actually
a "DirectShow Filter". VST is owned by Steinberg, DirectX by Microsoft while Audio Units is the property of Apple Computers and
RTAS and AAX are owned by AVID.
How can I use your plug- ins?
Download and install a host software, then download and install the plug- ins from our page. They will appear in the host "effects"
menu. If you are using a DirectX host with our MIDI controllable plug- ins and they do not show up in you host list, you might need
to use our freeware DXi Manager. Note that our plug- ins are sometimes shown in the "MIDI controllable audio effects" or "soft
synths" sections in some host applications.
Where can I find a host?
There are many commercial or freeware hosts that will suit your needs. You can find a long list of applications here. You can also
use demos of Cubase, Wavelab, Ableton Live, Tracktion, or Sonar software, which are usually available on the companies
websites. On the Mac, Garage Band is part of the system and can be also used to host our Audio Unit plug- ins.
What are the main differences between DX, VST, RTAS, AAX and Audio Units?
VST is a protocol that works on several platforms (Mainly Windows, MacOS, BeOS, and some Linux platforms use it as well)
whereas DirectX is Microsoft Windows only, and Audio Units are available only on the Mac. RTAS and AAX are available on Mac
24compatible with Pro Tools 10 and higher, whereas RTAS
and PC, but only for Pro Tools products (AVID). AAX plug- ins are
Blue Cat's Protector User Manual
Copyright (c) 2008-2014 Blue Cat Audio
whereas DirectX is Microsoft Windows only, and Audio Units are available only on the Mac. RTAS and AAX are available on Mac
and PC, but only for Pro Tools products (AVID). AAX plug- ins are compatible with Pro Tools 10 and higher, whereas RTAS
versions are compatible for Pro Tools 10 and lower versions.
What is the difference between DXi and DX effects?
DXi effects are MIDI controllable DirectX plug- ins. It's the same as DX effects plus MIDI control.
Which version (VST, Audio Unit, RTAS or DX) should I use in my host application?
Here is a list of host software and the version we recommend you to use. Many other applications are supported, check your
application user manual to choose the best version (AU stands for "Audio Unit" and DX for "DirectX"):
Host Application
Plug- in Version
Cakewalk Products (Sonar, Project5...)
DX
Sony Products (Vegas, ACID, Soundforge)
DX for old versions, VST for new
Steinberg Products (Cubase, Nuendo, Wavelab)
VST (Mac or PC)
Ableton Live
VST (Mac or PC)
Adobe Audition
any
EnergyXT
VST
Magix Samplitude
VST
Avid (Digidesign) Pro Tools
RTAS
Apple applications (Logic Pro, Logic Express, Garage Band...)
AU
Cockos Reaper
VST (Mac or PC)
...
In general, we recommend using VST over Audio Unit on Mac (when both are supported), particularly for the plug- ins that can
output automation or MIDI CC messages.
Where can I find more information about this topic?
www.steinberg.net
www.microsoft.com
www.kvraudio.com
www.apple.com
www.digidesign.com
Installation
I have installed my software and it is not listed as an application. Why? What can I do? How can I launch it?
Most software you can purchase on this website is plug- ins for host applications. It means you need another application to use it.
See the "Plug- ins Formats" section in this FAQ for more information.
I have installed my plug- in and it does not show up in my host application. What can I do?
First check that you application supports DirectX, Audio Unit or VST plug- ins.
If you are using the DirectX version, check that your host application supports DXi plug- ins (MIDI enabled DirectX plug- ins). If it
does not, it may remove it from the DirectX plug- ins list (some applications such as Sony Vegas 5 and Cool Edit Pro are known to
do this). In this case, use our DXi Manager free utility and disable the MIDI capabilities of the plug- in. You may need to reinstall the
software again before it shows up into your host application. For more information about this topic please read our DXi in Sony
Vegas tutorial (it is applicable to other applications than Sony Vegas).
25
Blue Cat's Protector User Manual
Copyright (c) 2008-2014 Blue Cat Audio
If you are using the Direct X version and your host application supports DXi, check that the plug- in does not appear in the 'virtual
synth' or 'synthesizers' category. If you wish not to use the MIDI capabilities of the plug- in and use it as a regular Direct X plug- in,
you can download the freeware DXi Manager and disable the MIDI capabilities of the plug- in.
I have installed my plug- in on windows 64- bit, checked the items above, and it still does not show up in my host
application. What can I do?
You are probably running a 32- bit application. If that's the case, you need to install the 32- bit version of the plug- in: the choice for
32 or 64- bit is not determined by the operating system (64- bit windows can run both 32 and 64- bit applications), but by the host
application that you are using.
Why are there two plug- ins called xxxx(Mono) and xxxx(Stereo) installed ?
"Mono effects" (which are effects that do not make any difference between left and right channels) are bundled this way for
performance reasons. Some developers just deliver a stereo Version which also processes (twice) mono streams. The "(Mono)"
plug- in is to be used with mono streams, and the (Stereo) one with stereo streams. The effect itself is the same in both cases but
the number of processed channels is different: this may drastically improve performance for CPU intensive plug- ins.
How do I uninstall my plug- ins?
Open the Windows configuration panel/ Add Remove Programs, and choose 'Remove' on the corresponding plug- in. If you have
installed the VST plug- in zip file version, just delete the corresponding dlls.
Why do your plug- ins need an installer on Windows? Do they modify the registry or system settings? Why not providing
just a dll?
Our plug- ins require several additional files for default settings, skins and miscellaneous data. We provide an installer for our
customers' convenience. Our installers do not modify the system settings or the Windows registry, except for the DirectX versions
registration. Our installers won't harm your system.
Software Version
How do I know the version of the plug- in I am using?
You can see the version information in the about box: right click on the background of the plug- in user interface and select "About".
The product version is also available in the Windows Add/ Remove Programs Window.
Why do newer versions of a plug- in override older ones (they have exact same name and IDs)?
Because newer versions improve previous ones. When a new version is released, older versions are not supported anymore. In
some cases the new versions may be installed as new products (compatibility reasons, major changes...), but it is explicitly
documented on the product page.
A new minor version of a product I purchased some time ago is available. Where can I download the update?
The new version can be downloaded from the same place where you downloaded the original version. All information is contained
in the email you received when you purchased the product. Your registration number has not changed either.
Upgrade
A new minor version of my plug- in has been released. Where can I download it?
When you purchased the plug- in, an email containing the information to download and register your software has been sent to
you. You can download the new version from the exact same location as the first time.
I have downloaded a new version, do I need to uninstall the previous version?
No, you don't, except if it's specified on the product page, in the "history" section. Just run the installer and it will upgrade your
software.
Automation
What is "Parameters Automation"?
The parameters of an effect can be automated in most host software. It means that you can record the changes you do during
playback or recording so that it's replayed when playing back again. It's a way of sequencing parameters changes the same way
you do with Audio or MIDI data.
What is "Smooth Update"?
26
Blue Cat's Protector User Manual
Copyright (c) 2008-2014 Blue Cat Audio
When changing parameter values in real time or replaying a song where parameters have been automated, our plug- ins compute
intermediate values between parameter changes in order to avoid "clicks" and "pops" that may occur otherwise. It results in a non
audible smooth parameters update and lets you freely use automation or MIDI control to change the effects in a song.
Do your plug- ins support MIDI Control?
Yes they do. They offer precise control over the mapping of MIDI Control Change (CC) messages to parameter values: you can
adjust both the channel and CC number as well as the response curve of the control. Since some of our plug- ins are also capable
of creating MIDI CC from the audio signal, they can all be connected for real time signal- dependent audio effects. See our MIDI
Control in Sonar tutorial for an example.
27
Blue Cat's Protector User Manual
Copyright (c) 2008-2014 Blue Cat Audio
More...
This manual only covers the basics of Blue Cat's Protector. Our website offers many additional resources for your Blue Cat's
Protector plug- in and is constantly updated, so keep an eye on it! You will find below a few examples of available resources.
Extra Skins
We encourage our customers to propose their own skins for our products and we often propose alternative skins to let you choose
the one that best suits your needs. You can check Blue Cat's Protector skins page to get the latest skins.
Landscape
Product: Protector
Description: A landscape layout skin for those who prefer horizontals to verticals.
Author: Blue Cat Audio
Download: Skin_Landscape.zip
Bronze
Product: Protector
Description: An alternative design with a layout close to the original skin.
Author: Limeflavour (www.flavoursoflime.blogspot.com)
Download: Skin_LimeFlavourBronze.zip
Tutorials
Many Tutorials are available on our website. They cover a wide range of topics and host applications. You will find below a list of
tutorials that are related to the Blue Cat's Protector plug- in. An updated list is also available online.
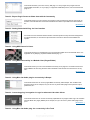
Tutorial - Automation Envelopes Generation in MOTU's Digital Performer 7
This tutorial shows how to reuse the envelopes generated by our plugins with output parameters in
MOTU's Digital Performer 7 host software. As of today Digital Performer does not receive MIDI
events f...
[Read More...]
Tutorial - Connecting Plug- ins with Groups in Cakewalk Sonar
This tutorial shows how to reuse the envelopes generated by our plugins with output parameters in
Cakewalk Sonar using groups. Other techniques exist (using MIDI or Automation curves), but this
one ha...
[Read More...]
Tutorial - Using DXi plug- ins in Sony Vegas
28
Blue Cat's Protector User Manual
Copyright (c) 2008-2014 Blue Cat Audio
This tutorial will teach you how to use any DXi plug- in in Sony Vegas: Sony Vegas does not
support MIDI automation, so if your plug- in supports the MIDI Dxi protocol, it is removed from the
plug- ins l...
[Read More...]
Tutorial - Export Plugin Presets to Share them with the Community
This tutorial shows you how to export your presets in order to share them with the community on
the Blue Cat Audio website. This tutorial uses Blue Cat's Stereo Triple EQ for the demonstration
bu...
[Read More...]
Tutorial - Getting Started with Plug- ins User Interface
Get used to the user interface features of Blue Cat Audio products! They have been designed for
an optimal workflow, so here are the tips and tricks to save time. All these functionalities are
explain...
[Read More...]
Tutorial - Using MIDI Control in Sonar
This tutorial will help you understand how to use parameters MIDI control in Cakewalk Sonar. It is
applicable to any DXi plug- in (MIDI enabled DirectX plug- in)....
[Read More...]
Tutorial - Using MIDI Connectivity in a Modular Host (Plogue Bidule)
This tutorial shows you how to use the MIDI connectivity of our plugins in a modular host such as
Plogue Bidule. We are using the Mac version of Bidule in this tutorial. The scenario here is very
sim...
[Read More...]
Tutorial - Using Blue Cat Audio plugins connectivity in Reaper
This tutorial shows how to use our plugins MIDI connectivity within Reaper. We use Blue Cat's
Dynamics plugin as an example, but you can use any other audio plugin which provides output
parameters, su...
[Read More...]
Tutorial - Connecting plug- ins together in Logic for advanced side chain effects
This tutorial shows how to use the connectivity capabilities of our plugins within Logic. We use Blue
Cat's DP Meter Pro plugin (DPMP) as an example, but you can use any other audio plugin which
provi...
[Read More...]
Tutorial - Using Blue Cat Audio plug- ins connectivity in Pro Tools
29
Blue Cat's Protector User Manual
Copyright (c) 2008-2014 Blue Cat Audio
This tutorial shows how to use the MIDI connectivity of our plugins within Pro Tools. We use Blue
Cat's DP Meter Pro plugin as an example, but you can use any other audio plugin which provides
output ...
[Read More...]
Tutorial - How to Use the Free Presets Available on this Website
This tutorial shows you how to get and load free presets for your favorite Blue Cat Audio plugin.
This tutorial uses Blue Cat's Dynamics for the demonstration but is applicable to all our plugins...
[Read More...]
Updates
As you can see in the history log below, we care about constantly updating our products in order to give you the latest technology
available. Please visit our website often to check if Blue Cat's Protector has been updated, or subscribe to our Newsletter to be
informed of the latest news about our products.
You can also follow us on twitter and facebook for almost real time updates notification, and subscribe to our YouTube channel to
see the latest videos about our software.
Versions History
V2.03 (2014/01/09)
New Features:
Copy/ paste the plug- in's current state from the presets menu using the system clipboard.
Improvements:
Reduced the plug- in's memory usage.
Windows VST Installer now remembers where the plug- in was initially installed to simplify upgrades.
(Mac) plug- in version number is now available when using "Get Info" in the Finder.
(Mac) Improved display of Audio Unit parameters in most host applications.
Bug Fixes:
Fixed window frame not showing with Cubase 7.5 (32- bit) on Mac.
(Mac) About window does not show up first in the corner of the screen anymore.
(Win) Alt- Click on a control now resets the value to default in Pro Tools, as expected.
Fixed version number reported to host application for VST and Audio Unit versions.
V2.02 (2013/06/21)
64- bit AAX support for Pro Tools 11.
Audio Suite support for offline processing in Pro Tools (AAX).
V2.01 (2013/05/14)
Bug fixes:
Fixed AAX version not showing up in Pro Tools 10.3.5 on Windows.
(RTAS) Fixed parameters control with EUCON control surfaces in Pro Tools.
Fixed user interface issues in Final Cut Pro X.
Fixed compare button issues in Pro Tools.
AAX: Fixed initialization issues on some Pro Tools HD configurations.
Mac- VST: Fixed window resize issues on Cubase and Nuendo (Mac).
Mac: Fixed user interface display issues when first opened in Ableton Live 9.
Mac: Control MIDI settings dialog now brought back to front when already opened in the background.
Mac: fixed copy/ paste keyboard shortcuts for plug- in registration that did not work in some hosts.
V2.0 (2012/05/14)
30
Blue Cat's Protector User Manual
Copyright (c) 2008-2014 Blue Cat Audio
New Features:
Brand new fully customizable user interface.
New gain reduction history display.
New input and output RMS meters.
The meters can now be zoomed to improve their precision.
New average loudness boost meter.
New DC Filter to kill DC offset.
New integrated presets manager:
Load/ save presets from the plug- in's user interface.
Organize presets with folders.
Customize the default preset.
Exchange presets easily.
Automation range and response curve can now be customized for each parameter.
Automation and MIDI settings (channel, MIDI learn etc.) are now accessible from the main user interface.
AAX plug- in format is now also supported on Windows.
Improved the algorithms for increased precision of the limiter.
Side chaining made easy: the MIDI and automation side chaining capabilities can now be fully configured within the main
user interface.
Improvements:
Plug- in name has been shortened for a clearer display in mixer view for most host applications.
The plug- in now appears in the "Dynamics" category in Pro Tools.
Changed the default VST install path on Windows.
License is now shared between plug- ins type (register only once for all formats).
Added new presets.
Improved value display in fine edit window.
Optimizations and Performance Improvements:
Reduced VST plug- in loading time.
Improved parameters precision (now stored as 64- bit).
More compact presets format (uses less space and loads faster).
Smaller binaries on Mac (dropped PowerPC support).
Bug Fixes:
Fixed presets- related crashes in Cubase on Mac.
Fixed user interface display issues in Wavelab on Mac.
Fixed MIDI output for 64- bit VST version.
Note: this new version can be installed side by side with the previous version for backward compatibility reasons. Installing this
new version won't break your previous projects.
V1.21 (2011/02/10)
Fixed keyboard focus stealing issue in Pro Tools and several other host applications.
64- bit Mac VST support.
V1.2 (2010/04/13)
RTAS plugin format support for Pro Tools (Mac and Windows).
64- bit applications support for Windows DX and VST under Windows x64.
Mac AU 64- bit format support (compatible with 64- bit Logic 9.1 on Snow Leopard)
Space bar does not trigger plug- in buttons anymore (avoids conflict with transport control in most applications).
Demo version now displays a nag screen only once per session, and only when opening the user interface of the plug- in.
Fixed MIDI learn issues.
Mac: fixed user interface crashes in some hosts under Snow Leopard.
Mac: fixed keyboard/ mouse focus issues in some hosts.
Mac: fixed multiple screens issue.
Mac- AU: fixed user interface resizing issue when changing skin in some hosts (Logic).
Mac- AU: fixed settings lost issue when doing offline rendering in some applications.
Mac AU: output parameters routing now works for more than one instance in Logic Pro's Environment.
Mac AU: fixed output parameters that could exceed defined range and not record properly as automation curves.
V1.11 (2009/05/05)
Mac VST update: fixed incompatibility issues with Cubase 5 on Mac.
V1.1 (2009/01/26)
Mac Audio Unit and VST support.
PC DirectX and VST improvements:
New installer (much faster install, improved upgrades).
Automation output can now be disabled for hosts that do not propose automated parameters choice.
(Bug Fix): fixed MIDI learn issues.
(Bug Fix): window opacity is now properly reset when selecting factory presets.
V1.0 (2008/06/30)
First version.
31
Blue Cat's Protector User Manual
Copyright (c) 2008-2014 Blue Cat Audio
Thanks again for choosing our solutions!
See you soon on www.bluecataudio.com!
32
Blue Cat's Protector User Manual
Copyright (c) 2008-2014 Blue Cat Audio