1
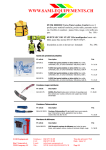
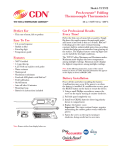
Model: WT2
Wireless Probe
Thermometer/Timer
32 to 212°F/0 to 100°C
Counts 100 minutes by seconds
Perfect For
• All types of roasts, meat and poultry
• Oven and barbecue
Easy To Use
• Remote monitoring up to 100' away or direct
• Pre-programmed & programmable settings
• Big digit
• Distinct alerts
• Audio or vibration alerts
Features
• 6"/15.2 cm probe
• 39"/1 m high heat sensor cable (heat resistant up to 700°F/371°C)
• Dual function
• Memory
• Dual progress display
• Target range indication
• Pre-alert
• Overcooked alert
• Counts up/down
• Stop & restart
• Loud & long alarm
• Last count recall
• Counts up after zero
• ABS plastic cases
• Stainless steel probe
• On/off switch
• 4-way mounting: Base: belt clip/stand/loop; Remote: pocket clip/magnet/stand/loop
• Batteries and instructions included
Get Professional Results
Every Time!
Perfect for mobility during roasting or grilling.
Choose the type of meat or poultry and the doneness
desired. The WT2 has been pre-programmed with
16 meat/poultry choices and various doneness
temperatures. The pre-programmed temperatures
are based on USDA safe cooking temperatures.
Meat Mode
The Meat Mode includes settings for: beef, pork,
chicken, turkey, veal, lamb, ham, duck, hamburger,
fish, ground beef, ground pork, ground chicken,
ground turkey, ground veal, and ground lamb.
Taste Mode
The Taste Mode includes settings for: rare, medium
rare, medium, and well done.
Memory Mode
Program any alert temperature from 32 to 212°F/
0 to 100°C using the Memory Mode. The actual
cooking temperature is continuously displayed along
with the target alert temperature, type of meat and
taste preference. Press a button and choose between
Fahrenheit and Celsius. Slide a switch and choose
audio/vibration alerts. Distinct alerts sound when
food is approaching the target temperature, done and overcooked.
Timer Mode
At any time, switch to the timer mode for counting
up or down on the base station. The distinct timer
alarm sounds for 60 seconds when the set time is
reached while the timer counts up the overtime in seconds.
Note: Remove sticker from display before use.
Note: In the following instructions, names of the control
buttons are shown in CAPS. Function information that appears
on the display is shown in BOLD CAPS.
POWER
ON
OFF
Component Design Northwest, Inc.
Portland, OR
Model WT2
Made in China
RF
DIRECT
MEAT
MIN
MEMORY
START / STOP
TASTE
32 to 482°F/0 to 250°C
Counts 100 hours by minutes
TEMP
SEC
TIMER
CLEAR
ALERT
STOP
32 to 482°F/0 to 250°C
Counts 100 hours by minutes
Component Design Northwest, Inc.
Portland, OR
Model WT2
Made in China
ALERT
BEEP
VIB
ON
OFF
POWER
RESYNC
Battery Installation
Batteries are installed. Remove plastic tab to allow
power. Replace battery when LCD becomes dim and
weak or alert level declines.
Note: Do not mix new batteries with old batteries.
A.Base Station
1.Slide the POWER switch on the right side to the
OFF position.
2.Remove battery cover on the back by sliding tab
in the direction of the arrow.
3.Install two 1.5V AAA batteries observing
polarity shown in compartment. A brief alarm
sounds and the display flashes all segments.
4.Replace the battery cover until it clicks shut.
B.Remote
1.Slide the POWER switch on the back to the OFF position.
2.Lift the pocket clip on the back to access the battery cover.
3.Remove battery cover on the back by sliding it
in the direction of the arrow.
4.Install two 1.5V AAA batteries observing
polarity shown in compartment.
5.Replace the battery cover until it clicks shut.
Mounting
A.Base Station
1.Stand
a. On the back of the base station, place the
round end of the stand/clip/loop in the
cavity at the bottom with the flat side of
the length of the stand/clip/loop facing the
bottom.
2.Belt Clip
a. On the back of the base station, insert the
round end of the stand/clip/loop in the
larger portion of the clip depression and pull
up to secure. The length of the stand/clip/
loop is positioned downward.
3.Loop
a. On the back of the base station, insert the
round end of the stand/clip/loop in the
larger portion of the clip depression and pull
up to secure. The length of the stand/clip/
loop is positioned upward.
B.Remote
1.Pocket Clip
a. Press top of the clip to expand pocket clip.
2.Magnet
a. Attract magnet on clip to any metal surface
3.Stand
a. Press top of the clip to expand bottom gap
enough to allow hinged wire to fall into stops
on inside of clip.
4.Loop
a. Hang remote on any protrusion through loop
Operating Instructions
A.On/Off
1.Base Station Slide the POWER switch on the right side of the
base station to turn it on or off.
2.Remote
Slide the POWER switch on the back of the
remote to turn it on or off.
B.Temperature Scale
Press the °C/°F button inside the battery
compartment of the base station to select
temperature reading in Fahrenheit or Celsius.
A beep sounds and °F or °C appears in both the
ALERT TEMP and PROBE TEMP portions of
the display on the base station.
C.Timer Mode
1.Slide the TEMP/TIMER switch on the right
side of the base station to TIMER. The timer
appears in the lower portion of the display.
Note: The timer is only available on the base station.
2.Count Down
a. Press the MIN and/or SEC buttons to enter
the desired time. Press and hold button for
fast advance. The COUNT DOWN icon (t)
appears in the top of the HOURGLASS icon.
b.Press the START/STOP button to start
counting down.
c. Press the START/STOP button to interrupt
the count. Press the START/STOP button
again to resume the count.
d.When the count reaches 00:00, the alarm
sounds 3 beeps per second for 60 seconds
or until the START/STOP button is pressed.
The timer counts up the overtime since
reaching 00:00, the COUNT UP icon (s)
appears in the bottom of the HOURGLASS
icon, and TIME’S UP appears at the bottom
of the display. The maximum overtime is
99:59 minutes.
e. The alarm stops automatically after 60 seconds while the count up continues.
f. Press START/STOP to stop the count up.
g. Press START/STOP again to recall the last
count set.
h.When timer is stopped, press both MIN
and SEC buttons simultaneously to reset to
00:00.
3.Count Up
a. When timer is stopped, press both MIN
and SEC buttons simultaneously to reset to
00:00.
b.Press the START/STOP button to begin the
count up. The COUNT UP icon (s) appears
in the bottom of the HOURGLASS icon.
c. Press the START/STOP button to interrupt
the count. Press the START/STOP button
again to resume the count.
d.When timer is stopped, press both MIN
and SEC buttons simultaneously to reset to
00:00.
D.Remote Feature
1.Slide switch on the left side of the base station
to RF to use the remote feature.
2.If necessary, synchronize the remote by
pressing the re-sync button inside the battery
compartment of the base station and/or on the
back of the remote.
3.Insert the probe at least 1" (2.5 cm) into the
meat or poultry; making sure that it is not
inserted into a fatty deposit.
4.Gently close the oven door (or grill cover) on
the sensor cable.
5.Insert the plug into the jack on the left side
of the base station. Allow approximately 10 to
15 seconds for the probe tip to get accurate
temperature reading. The probe temperature is
displayed beneath PROBE TEMP.
E.Direct Mode
1.Slide switch on the left side of the base station
to DIRECT.
2.Insert the probe at least 1" (2.5 cm) into the
meat or poultry; making sure that it is not
inserted into a fatty deposit.
3.Gently close the oven door (or grill cover) on
the sensor cable.
4.Insert the plug into the jack on the left side
of the base station. Allow approximately 10 to
15 seconds for the probe tip to get accurate
temperature reading. The probe temperature is
displayed beneath PROBE TEMP.
F.Meat/Taste Settings
1.Slide the TEMP/TIMER switch on the right
side of the base station to the TEMP position.
2.Press the –/MEAT button to select the desired
type of meat. The display cycles through BEEF,
PORK, CHICK, TUREY, VEAL, LAMB,
HAM, DUCK, HAMBR, FISH, G.BEEF,
G.PORK, G.CHICK, G.TUREY, G.VEAL,
G.LAMB, or PGM (appearing in the upper
portion of the display) each time the MEAT
button is pressed. The pre-programmed target temperature is displayed beneath ALERT TEMP.
3.Press the +/TASTE button to select the desired
level of doneness. The DOT (•) moves under
the selected level: RARE, M.RARE, MED or
W.DONE along the top of the display. The pre-programmed target temperature is
displayed beneath ALERT TEMP. Where
applicable, as the food cooks, black bars will
progress through each level indicating the
current level of doneness.
Note: Only safe choices are available for each type of
meat. Therefore, it is locked in at DONE for chicken,
turkey, ham, duck, hamburger, fish and ground meats.
IMPORTANT: Slide the TEMP/TIMER switch on the
right side of the base station to the TIMER position to
avoid accidental reprogramming.
G.Custom Meat/Taste Settings
The pre-programmed Meat/Taste settings can also
be adjusted to your personal preferences.
1.While in the desired Meat/Taste settings,
press and hold the MEMORY button until the
ALERT TEMP digits flash.
2.Press the –/MEAT or +/TASTE button to
display the desired temperature. Press and hold
for rapid advance.
3.Press the MEMORY button again to store the
new pre-programmed temperature. The digits
stop flashing.
H.PGM Mode
The WT2 can be programmed manually to
sound an alert from 32 to 212°F/0 to 100°C
when the cooking temperature reaches the target
temperature.
1.Slide the TEMP/TIMER switch on the right
side of the base station to the TEMP position.
2.Press the –/MEAT button until PGM appears in
the top portion of the display.
3.Press and hold the MEMORY button until the
ALERT TEMP digits flash.
4.Press the –/MEAT or +/TASTE button to
display the desired temperature. Press and hold
for rapid advance.
5.Press the MEMORY button again to store the
desired temperature into memory. The digits
stop flashing.
IMPORTANT: Slide the TEMP/TIMER switch on the
right side of the base station to the TIMER position to
avoid accidental reprogramming.
I. Temperature Alerts
1.Slide the ALERT switch on the back of
the remote to select BEEP (audio) or VIB
(vibration) alert.
2.Pre-alert sounds 5°F/3°C before the target alert
temperature is reached. The pre-alert beeps 1 beep every second and PRE-ALERT flashes
on the base station display. On the remote, the
pre-alert beeps or vibrates 1 beep/vibration
every second and PRE-ALERT flashes on the
display while the red LED light flashes.
3.Target alert sounds when the target alert
temperature is reached. The target alert beeps
4 consecutive beeps every second and the digits
flash on the base station display. On the remote,
the target alert beeps or vibrates 4 consecutive
beeps/vibrations every second and the meat
selection flashes on the display while the red
LED light flashes.
4.Overcooked alert sounds 5°F/3°C after the
target alert temperature is reached. The
overcooked alert beeps 8 consecutive beeps
every second while OVERCOOKED and the
digits flash on the base station display. On the
remote, the overcooked alert beeps or vibrates 8 consecutive beeps/vibrations every second
and OVERCOOK flash on the display while the red LED light flashes.
5.Press the ALERT STOP bar on the top of the
base station or the ALERT STOP button on the
top of the remote to turn the alerts off.
6.Turn the base station and the remote off to
conserve battery life or before using again.
J. Error Messages
The WT2 incorporates visual diagnostic messages
as follows:
1.LO indicates that:
a. the probe temperature is lower than
32°F/0°C,
b.the sensor cable is disconnected, or
c. the probe is malfunctioning.
2.If the remote is out range or does not
synchronize with the base station within 3
minutes, the remote displays --- in the right
portion of the display. When in sync the remote
displays ))) in the right portion of the display.
3.Should the display appear incorrectly, press the
RESET button inside the battery compartments
in the base station to reset.
Note: Clean the thermometer probe before each use.
Important: DO NOT LEAVE THERMOMETER CASE IN
HOT OVEN. IT IS NOT HEAT RESISTANT. DO NOT
ATTACH TO HOT BARBEQUE. DO NOT USE PROBE IN
MICROWAVE OVENS.
Important: ONLY THE PROBE CAN BE SUBMERGED IN
LIQUID. THE PROBE/SENSOR CABLE CONNECTION IS
NOT WATERPROOF.
Note on Induction Cooktops: The induction cooktop’s
magnetic field may interfere with digital thermometers. If this
happens, briefly turn off the induction cooktop to get a digital
thermometer reading or use a dial thermometer.
Tip: Meat should be allowed to “rest” for 10 to 15 minutes after
it is removed from oven. This allows time for the meat’s internal
temperature to stabilize and the juices to redistribute. This will
result in a roast that is both juicier and easier to carve.
USDA Meat Temperature Guide
To ensure food safety the USDA specifies guidelines
for internal cooking temperature of different types
of meat as indicated in the guide below. Please note
that some pre-programmed settings differ from these
temperature requirements.
PRE-PROGRAMMED TEMPERATURE SETTINGS
W. DONE
MED
M. RARE
RARE
HAM &
CHICKEN,
HAMBR
TURKEY,
G. BEEF, BEEF,
DUCK, G. PORK, VEAL G. CHICK & G. VEAL &
& LAMB
PORK
G. TURKEY G. LAMB
FISH
PGM
170°F/77°C 170°F/77°C 165°F/74°C 160°F/71°C 145°F/63°C 158°F/70°C
160°F/71°C 160°F/71°C
----145°F/63°C
-----140°F/60°C
------
Note: Pre-programmed temperatures may be too well done
for some recipes or personal tastes. Use the custom program
feature (Section H) if a lower temperature is desired. Meats will
continue to cook (internal temperature will continue to rise)
after being removed from the oven. To avoid overcooking and
depending on the personal taste, you may wish to remove meat
from the oven when the PRE-ALERT sounds.
USDA SAFE FOOD TEMPERATURES
*Beef, Veal, Lamb – well . . . . . . 160°F . . 71°C
*Beef, Veal, Lamb – medium . . . 145°F . . 63°C
*Beef, Veal, Lamb – rare . . . . . . 140°F . . 60°C
Poultry . . . . . . . . . . . . . . . . . . . . 165°F . . 74°C
*Pork/Ham – pre-cooked . . . . . . 145°F . . 63°C
Ground Meat . . . . . . . . . . . . . . . 160°F . . 71°C
*3 minutes rest time
Note: Use the custom program feature (Section H) to adjust the
pre-programmed temperatures.
Precautions
Specifications
• Always wear a heat resistant glove to touch the
stainless steel probe or sensor cable during or just
after cooking. Do not touch with bare hands.
• Keep the batteries, stainless steel probe and sensor
cable away from children.
• Clean the probe and dry thoroughly after use.
• Do not clean the case with abrasive or corrosive
compound, which may scratch the plastic and
corrode the electronic circuits.
• Do not subject the unit to excessive force shock,
dust, temperature or humidity, which may result in
malfunction, shorter electronic life span, damaged
battery and distorted parts.
• Do not tamper with the unit’s internal components.
Doing so will invalidated the warranty on the unit
and may cause unnecessary battery damage and
distorted parts.
• Do not subject the unit to excessive exposure to
direct sunlight. The unit is not waterproof — do
not immerse it into water or expose to heavy rain.
Only the probe can be submerged in liquid.
The probe/cable connection is not waterproof.
• Do not expose the sensor cable plug or the jack on
the case to water or any liquid, which will result in
a bad connection and faulty readings.
• Do not place the unit in extreme temperatures.
Never burn the probe directly over the fire. Do
not use the probe when the temperature is above
482°F/250°C. Doing so will deteriorate the interior
element. The high-heat sensor cable is safe up to
700°F/371°C.
• Do not use the probe in a microwave oven.
• Always read the user manual thoroughly before
operating.
Temperature Alert: 32 to 212°F/0 to 1000°C
°F/°C selectable
Timer: Counts down 100 minutes by seconds;
counts up 100 minutes by seconds
Power: Base: 2 DC 1.5V size AAA
Remote: 2 DC 1.5V size AAA
This device complies with Part 15 of the FCC Rules.
Operation is subject to the following two conditions:
1. this device may not cause harmful interference, and
2. this device must accept any interference received,
including interference that may cause undesired
operation.
CAUTION: Avoid keeping the thermometer too close to objects
that continuously generate high heat for long periods (i.e., hot
plate). This can cause the thermometer to overheat.
CE Note: This device could be sensitive to electrostatic
discharge. If electrostatic discharge or malfunctioning occurs,
please re-install the battery to reset this unit.
USDA SAFE FOOD TEMPERATURES
*Beef, Veal, Lamb – well . . . . . . 160°F . . 71°C
*Beef, Veal, Lamb – medium . . . 145°F . . 63°C
*Beef, Veal, Lamb – rare . . . . . . 140°F . . 60°C
Poultry . . . . . . . . . . . . . . . . . . . . 165°F . . 74°C
*Pork/Ham – pre-cooked . . . . . . 145°F . . 63°C
Ground Meat . . . . . . . . . . . . . . . 160°F . . 71°C
*3 minutes rest time
CANDY TEMPERATURE GUIDE
Jelly . . . . . . . . . . . . . . 220°F . . . . . . . 104°C
Thread . . . . . . . 230–234°F . . . 110–112°C
Soft Ball . . . . . . 234–240°F . . . 112–115°C
Firm Ball . . . . . 244–248°F . . . 118–120°C
Hard Ball . . . . . 250–266°F . . . 121–130°C
Soft Crack . . . . . 270–290°F . . . 132–143°C
Hard Crack . . . . 300–310°F . . . 149–154°C
Caramelize . . . . 316–338°F . . . 158–170°C
HIGH ALTITUDE ADJUSTMENT
FOR CANDY-MAKING
STAGE
Soft Ball
Firm Ball
Hard Ball
Soft Crack
Hard Crack
2,000 feet
230–236°F
238–244°F
246–264°F
266–286°F
296–306°F
5,000 feet
224–230°F
232–238°F
240–258°F
260–286°F
290–300°F
The information in this document has been reviewed and is
believed to be accurate. However, neither the manufacturer nor
its affiliates assume any responsibility for inaccuracies, errors
or omissions that may be contained herein. In no event will
the manufacturer or its affiliates be liable for direct, indirect,
special, incidental or consequential damages arisen by using
this product or resulting from any defect/omission in this
document, even if advised of the possibility of such damages.
The manufacturer and its affiliates reserve the right to
make improvements or changes to this document and the
products and services described at any time, without notice
or obligation.
7,500 feet
219–225°F
227–233°F
235–253°F
255–275°F
285–295°F
OIL TEMPERATURE GUIDE
325–375°F/163-190°C is the normal desired
temperature for deep fry cooking.
Note: When food is added to hot oil, the temperature of the oil
immediately drops at least 50°F/28°C. You will need to bring
the oil temperature back to the desired cooking temperature.
Frying at lower temperatures results in lighter color, less
flavor development and increased oil absorption.
5-Year Limited Warranty: Any instrument that
proves to be defective in material or workmanship
within five years of original purchase will be
repaired or replaced without charge upon receipt of
the unit prepaid at: CDN, PO Box 10947, Portland,
OR 97296-0947. This warranty does not cover
damage in shipment or failure caused by tampering,
obvious carelessness or abuse.
DEEP FRY TEMPERATURE GUIDE
Deep Fry Lo . . . . 325-340°F . . . 163-170°C
Deep Fry Hi . . . 340-365°F . . . 170-185°C
Shrimp . . . . . . . . . . . 350°F . . . . . . . 177°C
Chicken . . . . . . . . . . 355°F . . . . . . . 180°C
Onions . . . . . . . . . . . 370°F . . . . . . . 188°C
Fish . . . . . . . . . . . . . . 375°F . . . . . . . 191°C
Doughnuts/Fritters . 375°F . . . . . . . 191°C
French Fries . . . . . . . 380°F . . . . . . . 193°C
*USDA does not endorse any product, service or organization.
© 06-2013 Component Design Northwest, Inc.
Made in China
CD9999245en - 6/13 PROFORMA 614 760-5800