1
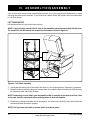
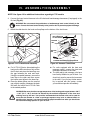
LIFT CHAIR
active
forever
I M P R O V I N G O U T C O M E S. I M P R O V I N G L I V E S.
www.ActiveForever.com
800-377-8033
www.ActiveForever.com
LIFT CHAIR SERIES
SAFETY GUIDELINES
The symbols below are used throughout this owner's manual and on the product to identify warnings and
important information. It is very important for you to read them and understand them completely.
WARNING! Indicates a potentially hazardous condition/situation. Failure to follow
designated procedures can cause either personal injury, component damage, or
malfunction. On the product, this icon is represented as a black symbol on a yellow
triangle with a black border.
MANDATORY! These actions should be performed as specified. Failure to perform
mandatory actions can cause personal injury and/or equipment damage. On the
product, this icon is represented as a white symbol on a blue dot with a white
border.
PROHIBITED! These actions are prohibited. These actions should not be performed
at any time or in any circumstances. Performing a prohibited action can cause
personal injury and/or equipment damage. On the product, this icon is represented
as a black symbol with a red circle and red slash.
Please fill out the following information for quick reference:
Pride Provider:
Address:
Telephone:
Purchase Date:
NOTE: This owner’s manual is compiled from the latest specifications and product information
available at the time of publication. We reserve the right to make changes as they become
necessary. Any changes to our products may cause slight variations between the illustrations
and explanations in this manual and the product you have purchased. The latest/current version
of this manual is available on our website.
Copyright © 2011
Pride Mobility Products Corp.
INFMANU3446/Rev M/October 2011
www.ActiveForever.com
CONTENTS
I.
INTRODUCTION ..............................................................................................................4
II.
SAFETY ...........................................................................................................................5
III.
YOUR LIFT CHAIR ............................................................................................................8
IV.
ASSEMBLY/DISASSEMBLY ......................................................................................... 10
V.
OPERATION .................................................................................................................. 13
VI.
BASIC TROUBLESHOOTING ....................................................................................... 15
VII. CARE AND MAINTENANCE ......................................................................................... 17
Lift Chair Series
www.ActiveForever.com
3
I. INTRODUCTION
SAFETY
The product you have purchased combines state-of-the-art components with safety, comfort, and styling
in mind. Read and follow all instructions, warnings, and notes in this manual and all other accompanying
literature before attempting to operate this product for the first time. If there is any information in this
manual which you do not understand, or if you require additional assistance for setup or operation, please
contact your authorized provider. Failure to follow the instructions, warnings, and notes in this manual and those located on your product can result in personal injury or product damage and will
void the product warranty.
NOTE: If you ever lose or misplace your product registration card or your copy of this manual,
contact us and we will be glad to send you a new one immediately.
PURCHASER’S AGREEMENT
By accepting delivery of this product, you promise that you will not change, alter, or modify this product
or remove or render inoperable or unsafe any guards, shields, or other safety features of this product; fail,
refuse, or neglect to install any retrofit kits from time to time provided to enhance or preserve the safe use
of this product.
SHIPPING AND DELIVERY
Before using your lift chair, make sure your delivery is complete as some components may be individually
packaged. If you do not receive a complete delivery, please contact your authorized provider immediately.
Where damage has occurred during transport, either to the packaging or content, please contact the
delivery company responsible.
MOTOR VEHICLE TRANSPORT
If you will be transporting your lift chair in a motor vehicle, individual components (external transformer,
etc.) should be secured against slipping. The lift chair itself must also be secured against slipping (a
possible hazard during vehicle braking).
4
www.ActiveForever.com
Lift Chair Series
II. SAFETY
PRODUCT SAFETY SYMBOLS
The symbols below represent labels used on the product to identify warnings, mandatory actions, and
prohibited actions. It is very important for you to read and understand these symbols completely. Do not
remove these labels from your product. Please note that not all of the symbols may be used on your lift
chair model.
Pinch/Crush Points Hazard! Do not place objects or appendages in the path of moving
parts.
Electrical Hazard
This product has been tested and complies to IEC 60601-1-2.
Read and follow the information in the owner’s manual.
Maximum weight capacity
Do not connect an extension cord to the AC/DC converter or the battery charger.
Removal of grounding prong can create electrical hazard. If necessary, properly install
an approved 3-pronged adapter to an electrical outlet having 2-pronged plug access.
Do not connect the heat and massage hand control directly to the motor. Connect the
hand control directly to the junction box to prevent equipment damage.
Do not place objects under lift chair. Make sure area is clear of obstructions, including
pets and small children during operation.
Do not place objects under the footrest when lift chair is in fully reclined position. Make
sure area is clear of obstructions, including pets and small children during operation.
Do not cover or place the external transformer under the chair. Keep in an open, wellventilated area free from foreign material and away from possible pinch points.
Class II Equipment
Indoor Use Only. Avoid exposure to rain, snow, ice, salt, or standing water. Maintain and
store in a clean and dry environment.
Lift Chair Series
www.ActiveForever.com
5
II. SAFETY
Battery Door Location
Degree of protection against electric shock.
Properly dispose of all electronic components, including the external transformer, hand
control, batteries, actuator motors, and wiring. Contact your authorized provider for
more information.
Green LED indicates power to the unit is on. Not applicable to all models.
Your lift chair is a state-of-the-art life-enhancement device designed to increase comfort. An extensive
variety of products are provided to best fit your individual needs. Please be aware that the final selection
and purchasing decision regarding the type of lift chair to be used is the responsibility of you, the lift chair
user, if capable of making such a decision, and/or your healthcare professional (i.e., medical doctor,
physical therapist, etc.).
MANDATORY! Read and follow the information provided in this owner’s manual before
attempting to operate your lift chair for the first time.
There are certain situations, including some medical conditions, where you will need to practice operating
the lift chair in the presence of a trained attendant. A trained attendant can be defined as a family member
or healthcare professional specially trained in assisting you with performing various daily living activities
while safely operating a lift chair.
Below are some precautions, tips, and other safety considerations that will help you become accustomed
to operating the lift chair in a safe manner.
Modifications
You should not modify, add, remove, or disable any feature, part, or function of your lift chair.
Unauthorized modifications may lead to personal injury and/or product damage and may also void your
product’s warranty.
NOTE: Use manufacturer parts only for all repairs and replacements.
Weight Limitations
Your lift chair is rated for a maximum weight capacity. Please refer to the specifications table for this limit.
MANDATORY! Stay within the specified weight capacity of your lift chair. Your provider will
not be held responsible for injuries and/or product damage resulting from failure to observe
weight limitations.
6
www.ActiveForever.com
Lift Chair Series
II. SAFETY
The scissor and lift mechanisms are labeled as pinch/crush point hazards on your lift chair. Keep clear of
these areas and make sure the path of motion is unobstructed. See figure 3.1 for pinch/crush point
locations.
WARNING! Do not place objects or appendages in the path of moving parts.
Degree of Protection/Mode of Operation
Class II equipment/Type B protection against electric shock
Degree of protection against the ingress of solid/liquids—IPX0
Mode of operation—Maximum Duty Cycle: 2 min. ON/18 min. OFF
Storage and Operation Temperatures
Transportation or storage: -104°F/-75°C to 158°F/70°C
Operation: 50°F/10°C to 104°F/40°C
Electromagnetic and Radio Frequency Interference (EMI/RFI)
WARNING! Laboratory tests have shown that electromagnetic and radio frequency waves can
have an adverse affect on the performance of electrically-powered devices, such as lift chairs.
Electromagnetic and Radio Frequency Interference can come from sources such as cellular phones,
mobile two-way radios (such as walkie-talkies), radio stations, TV stations, amateur radio (HAM) transmitters, wireless computer links, microwave signals, paging transmitters, and medium-range mobile
transceivers used by emergency vehicles. In some cases, these waves can cause unintended movement
or damage to the control system of electrically-powered devices. The lift chair user can help prevent
electromagnetic interference by maintaining a minimum distance between portable and mobile RF communications equipment. It is recommended that at least 9 feet (3 meters) of distance be maintained
between the lift chair and any handheld equipment emitting 10 W or more of output power. Refer to the
manufacturer’s literature for the handheld device to determine the maximum output of that device.
Every electrically-powered device has an immunity (or resistance) to EMI. The higher the immunity level,
the greater the protection against EMI. Per EMC standards, this product has passed immunity testing and
is rated as a Group 1, Class B product, meaning the lift chair uses RF energy only for its internal function.
Therefore, its RF emissions are very low and are not likely to cause any interference in nearby electronic
equipment, making the lift chair suitable for use in all establishments, including domestic establishments
and hospitals.
WARNING! Be aware that cell phones, two-way radios, laptops, and other types of radio
transmitters may cause unintended movement of your electrically-powered device due to
EMI. Exercise caution when using any of these items while operating your lift chair.
WARNING! The addition of accessories or components to the lift chair can increase the
susceptibility of the chair to EMI. Do not modify your lift chair in any way not authorized by
your provider.
WARNING! Your lift chair itself can disturb the performance of other electrical devices
located nearby, such as alarm systems.
NOTE: If unintended motion occurs, discontinue use of the lift chair. Contact your provider to
report the incident.
Lift Chair Series
www.ActiveForever.com
7
III. YOUR LIFT CHAIR
BODY COMPONENTS
Lift chairs are equipped with several frame and electrical components. Typically, frame (or body) components include a removable back pad*, removable chaise pad*, footrest, leg levelers, a lift mechanism, and
scissor mechanisms. The electrical components include the external transformer, hand control, and batteries‡(not included). Refer to figure 3.1 and note that the illustrations and options listed may not reflect
the type of lift chair that you own.
HAND CONTROL: Contains the controls
needed to operate the various functions
of the lift chair. Refer to the Hand Control
Quick Reference Guide for more
information on hand control options.
SCISSOR MECHANISMS (PINCH POINT):
Extend or retract to take the chair through
the various stages of recline. See pinch
point warning for more information.
QUICK-RELEASE CONNECTOR:
Enables the user to detach the
hand control from the lift chair.
EXTERNAL TRANSFORMER, POWER
CORD: Connects to a standard electrical
outlet to provide power to the lift chair; may
be equipped with an LED which will show
green to indicate power to the transformer.
Refer to the optional wall mounting diagram.
BATTERIES (NOT INCLUDED):
Provide the power needed to
return the lift chair to an upright
or semi-upright position in the
event of a power failure. Must be
installed in the external transformer
if equipped with battery backup.
LIFT MECHANISM
(PINCH POINT):
Responds to the hand control
commands to position the
chair in the sit and stand
positions. See pinch point
warning for more information.
FOOTREST EXTENSION:
Provides 3 in. (8 cm) of extension
and folds up neatly when lift chair
is in the seated or lift positions;
specific to the LL575 and optional
on some other models.
LEG LEVELERS (4): Manually
rotate up or down to stabilize
the chair before use.
Figure 3.1 Lift Chair Main Components
8
www.ActiveForever.com
Lift Chair Series
III. YOUR LIFT CHAIR
Removable Back Pad: Attaches to the lift chair with reusable fasteners to enable the use of the bed
option on some models and to make servicing the chair more convenient.
Removable Chaise Pad: Attaches to the lift chair with reusable fasteners to make servicing the chair
more convenient.
*NOTE: The lift chair must be in the recline position in order to remove or attach the back pad, chaise
pad, or bed option mattress (LL670 only). If the lift chair is equipped with heat and massage options,
you must also disconnect the heat and massage connections before removing the back pad and/or
chaise pad.
*NOTE: The LL770L bed option consists of a mattress, bedsheet, strap, and storage bag. After
removing the mattress, it is recommended that you store it in the bag provided.
‡NOTE:
The batteries will provide power for only a short period of time after power is removed
from the system, so it is important to act quickly in the event of a power failure. Press and hold
the UP button (switch) on the hand control as soon as possible. Maintain a steady pressure on
the button (switch) to avoid excessive draw from the battery and achieve the most amount of lift.
Keep in mind that the amount of life the batteries will be able to provide is affected by user weight
and battery condition.
WARNING! Pinch/Crush Points Hazard! Be aware that the lift mechanism and scissor
mechanisms are a pinch point on the lift chair. Keep the following items and similar objects
clear of these points when operating the lift chair:
appendages
small children
pets
wires
oxygen tubes
loose items, including but not limited to clothing and blankets
electrical power cords
ELECTRICAL COMPONENTS
Your lift chair is equipped with a low voltage DC electrical system that reduces the standard household
alternating current of 100V AC - 240V AC to direct current (24/39V DC). The electrical components include
the external transformer, batteries (not included), and hand control. Keep these areas free from moisture at
all times.
WARNING! Keep all electrical components free from moisture at all times to prevent shock
and/or electrical hazard.
Batteries: Provide the power needed to return the lift chair to an upright or semi-upright position in the
event of a power failure. For those models equipped with a battery backup system, the batteries (not
included) must be installed into the external transformer. See IV. “Assembly/Disassembly.”
Lift Chair Series
www.ActiveForever.com
9
IV. ASSEMBLY/DISASSEMBLY
Your lift chair may require some assembly before initial use. It may also require disassembly to make
servicing the chair more convenient. If your lift chair is a Knock-Down (KD) model, follow the instructions
in “Lift Chair Setup.”
LIFT CHAIR SETUP
KD models will arrive in the knock-down position.
NOTE: If your lift chair is model LC125, refer to the assembly instructions provided with the chair.
For model C20, the KD sleeves are located on the inside as shown in figure 4.1.
MODEL C20 ONLY
Figure 4.1 Lift Chair Assembly
1. Check that the locking clip on the back of the chair is in the vertical position. Reposition if necessary.
2. Drape the hand control and cable over the chair base, then slide the back onto the base. (KD clips may
be located on either side of the lift chair.)
NOTE: Depending on chair width, you may need to slide on one side of the back at a time. If this
is the case, level the chair-back before pressing down to lock into position.
3. Push firmly on the top of the back to lock into position. You must hear a click from each side of the chair
to ensure the back is locked in properly.
NOTE: Pull up on the chair-back to ensure that it is locked in place.
10
www.ActiveForever.com
Lift Chair Series
IV. ASSEMBLY/DISASSEMBLY
NOTE: See figure 4.2 for additional instructions regarding LC770 models.
4. Connect the hand control harness to the lift chair and heat/massage harnesses (if equipped) to the
lift chair (Fig 4.3).
WARNING! Do not connect the push-button or heat/massage hand control directly to the
motor. Connect the hand control directly to the junction box to prevent equipment damage.
5. Attach the chair-back to the hook and loop flaps on the bottom of the chair base.
HEAT CONNECTION
TO JUNCTION BOX
MASSAGE
UNIT
JUNCTION
BOX
MASSAGE
UNIT
*STANDARD HEAT/MASSAGE CONFIGURATION
Figure 4.2 LL770 Additional Assembly
For LL770 Lift Chairs, after attaching the
back per the KD instructions, fully recline
the lift chair and place the base flap over
the gap between the seat and back.
Using the reusable fasteners, secure the
base flap to the chair and then secure
the bottom-most pillow to the base flap.
Place the bolster pillow over the covered
gap, slightly wedging it between the back
and seat, and return the LL770 Lift Chair
to the seated position.
Figure 4.3 Harness Connections
For units equipped with the heat and
massage option, connect the heat and
massage harnesses to the chair.
The heat pad(s) and massage units have
been factory installed on your lift chair. You
should only need to connect the harnesses
to the chair. If you find any further assembly is required with this system, contact
your authorized provider immediately.
WARNING! Be aware that the average temperature of the heating pad ranges between 106°F
- 118°F (41°C - 48°C) and can be affected by the ambient temperature of the room and
clothing worn by the user. Your provider recommends that the heat units not be used for
more than 20 minutes at a time as prolonged exposure may have an adverse affect on
sensitive skin. However, you should consult the physician about how often you should use
the heat and massage options on your lift chair.
Lift Chair Series
www.ActiveForever.com
11
IV. ASSEMBLY/DISASSEMBLY
LIFT CHAIR PLACEMENT
Your lift chair should be placed near a standard electrical outlet on dry, level ground where there is ample
room to allow for proper operation. We recommend that you have the assistance of an attendant when
positioning the lift chair to avoid the possibility of injury when lifting.
Follow these steps to position the lift chair in a safe manner:
1. Place the back of the lift chair 30 in. (76 cm) from the nearest obstruction while the chair is in the
seated position. This measurement may vary depending on model.
2. Adjust the leg levelers to stabilize the lift chair (Fig. 3.1).
3. Install the batteries into the external transformer if applicable. Refer to “Battery Installation” for more
information.
4. Position the external transformer on the floor in an open, well-ventilated area where it will not be an
obstruction, or if equipped, utilize the optional wall mount.
5. Position the low voltage connection cable where it will not be pinched between the frame and the lift
mechanism.
6. Connect the low voltage connection cable to the external transformer if it is not already connected.
7. Plug the power cord directly into the electrical outlet. Do not use an extension cord!
NOTE: If you discover a problem at any point during the setup and positioning of your lift chair,
stop and contact your authorized provider immediately. To avoid personal injury and/or product
damage, do not plug the unit into the electrical outlet until the problem is corrected and do not
attempt to fix electrical problems by yourself.
BATTERY INSTALLATION
Your lift chair may be equipped with a battery
backup system that will activate during a power
failure. The backup system is powered by two 9V
batteries (not included) that need to be installed
into the external transformer.
Follow these steps to install the batteries:
1. Unplug the external transformer power cord
from the electrical outlet.
2. Open the marked battery door on the external
transformer.
3. Install two 9V batteries into the external transformer (Fig. 4.4).
4. Replace the battery door.
NOTE: Always make sure the external transformer is equipped with two fresh 9V batteries,
since the battery backup system does not
recharge itself. Fresh batteries are defined as
9V alkaline batteries that are replaced every
time the battery backup system is activated
during a power failure, or once a year if the
battery backup system has not been activated.
BATTERY DOOR
EXTERNAL TRANSFORMER
(TOP AND BOTTOM VIEW)
POWER CORD
Figure 4.4 Lift Chair Battery Backup Location
NOTE: If you unplug your lift chair for an extended period of time (more than one hour), remove
the batteries from the external transformer. The lift chair will draw power from the batteries even
when it is not in use.
12
www.ActiveForever.com
Lift Chair Series
V. OPERATION
OPERATION PRECAUTIONS
There are certain precautions that should be taken during the operation of your lift chair. Read and follow these
precautions carefully in order to ensure safe lift chair operation and to prevent injury and/or product damage.
Plug the power cord directly into the electrical outlet. Do not use an extension cord!
Do not place anything (for example, a drinking glass) on top of or near the external transformer.
If the external transformer box or hand control requires cleaning, unplug the power cord from the
electrical outlet and use a clean, dry cloth or lightly dampened cloth. Allow ample drying time before
plugging the power cord back into the electrical outlet.
Periodically check the hand control and all power cords for visible damage.
Keep the hand control away from all heated surfaces.
Ensure the hand control is out of the way before sitting in the chair.
Keep children and pets away from all moving parts while operating the lift chair.
Do not allow children to play on or operate the lift chair. Only the intended user should operate the lift
chair.
Keep the hand control locked or utilize the quick-disconnect feature on the standard hand control
when the lift chair is not in use to prevent unintended operation of the chair.
Avoid pinch points, such as the lift and scissor mechanisms. Keep hands and feet clear of these areas.
Always leave the lift chair in an upright and closed position when not in use.
Do not sit or stand on the footrest.
Do not “drop” into the lift chair when sitting if it is in a partially raised position.
PROHIBITED! Do not place objects under the lift chair. Make sure area is clear
of obstructions, including pets and small children during operation.
WARNING! Prevent the risk of electrical shock, fire, falls, and/or being pinched.
Follow all instructions and precautions provided.
WARNING! Prevent potential equipment damage! Do not place the external
transformer under the lift chair.
WARNING! Do not cover the external transformer. Keep the transformer in an
open, well-ventilated area free from foreign material/debris to ensure proper
operation.
HAND CONTROL OPERATION
Your lift chair hand control is equipped with switches/buttons that control the movement of the chair and/
or heat and massage options. Read the following instructions for basic hand control operation. Please
refer to the Hand Control Quick Reference Guide for more detailed information on your specific hand
control.
WARNING! Do not lean on or apply downward force to the chair-back when the
lift chair is in the fully reclined position. Doing so could cause the lift chair to
tip, resulting in personal injury and/or product damage.
WARNING! Do not use the footrest as a seat, or for purposes outside its intended
use. Doing so could cause instability in the lift chair and place undue stress on
lift chair components, resulting in personal injury and/or product damage.
WARNING! Be sure to lock or disconnect the hand control when the lift chair is
not in use.
Lift Chair Series
www.ActiveForever.com
13
V. OPERATION
Follow these steps to properly sit in your lift chair:
1. Make sure that the lift chair is in the standing position.
2. Back into the lift chair and sit in the center of the seat.
3. Activate the DOWN button (switch) to lower the lift chair to a comfortable seated position.
Follow these basic steps to operate your lift chair from the seated position:
1. Activate the UP button (switch) to raise your lift chair to the standing position.
2. Activate the DOWN button (switch) to lower the lift chair to a comfortable seated position.
Follow these steps to recline your lift chair from the seated position:
1. Activate and hold the DOWN button (switch) until comfortably reclined.
2. Activate and hold the UP button (switch) to return to an upright, seated position. Release the button
(switch) when the lift chair reaches a comfortable seated position.
Follow these steps to properly stand up from your lift chair:
1. Activate and hold the UP button (switch) to raise your lift chair.
2. Release the button (switch) when the lift chair reaches a height where you can stand up comfortably.
WARNING! Do not attempt to stand up until you can stand safely, are steady on
your feet, and can bear weight. Pride recommends the use of assistance aids
and/or an attendant for enhanced stability.
Trendelenburg Position (LL770)
Elevate the footrest, and then recline the seatback until your feet are elevated higher from the ground than
your head. Please refer to the Hand Control Quick Reference Guide for more detailed information on your
specific hand control.
"Zero Gravity" Position (LL770)
Elevate the footrest, and then recline the seatback until your thighs and lower legs are positioned slightly
higher than your torso (body in V-like position). Please refer to the Hand Control Quick Reference Guide
for more detailed information on your specific hand control.
14
www.ActiveForever.com
Lift Chair Series
VI. BASIC TROUBLESHOOTING
Your lift chair may require occasional troubleshooting. The following troubleshooting tips and FAQs
should summarize what you need to know about your lift chair. If at any time you do not feel comfortable
performing the troubleshooting steps listed in this manual, contact your authorized provider for service.
Please have the model number, serial number, and nature of the problem when calling.
DUAL MOTOR TIMING
NOTE: If your dual motor lift chair is equipped with a heat/massage option and/or was manufactured prior to May 17, 2011 and does not move when the hand control is pressed, the motors may
be out-of-sync.
Follow these steps to reset the motor timing:
1. Activate the hand control on the lift chair. If there is no movement in either direction, check if the
motors are out-of-sync and that the pressure-sensitive safety switch has been activated. Out-of-sync
motors will show one motor extended farther than the other and a pinched safety switch (Fig. 6.1).
2. If the motors are out-of-sync, disconnect one of the two red safety switch plugs from the motor control
box (Fig. 6.1).
3. Activate the UP position on the hand control until your chair reaches the full lift position. This will reset
the motor position and correct the timing (Fig. 6.1).
4. Reconnect the red safety switch plug into the motor control box (Fig. 6.1).
NOTE: In order to preserve the correct motor timing, it is recommended to extend the lift chair to
the full lift position when getting in and out of the chair.
MOTOR CONTROL BOX
MOTORS
SAFETY SWITCHES
Out-of-sync Motors
SAFETY
SWITCHES
MOTORS
In-sync Motors
Figure 6.1 Dual Motor Timing
Lift Chair Series
www.ActiveForever.com
15
VI. BASIC TROUBLESHOOTING
FREQUENTLY ASKED QUESTIONS
What if my lift chair does not operate at all?
Ensure the external transformer is plugged into a properly wired electrical outlet.
Check the circuit breaker box connected to the electrical outlet to ensure the outlet is receiving power.
Ensure the low voltage connection cable is plugged into the external transformer.
Ensure that all cables are connected properly.
What if my lift chair operates in one direction only?
Check the up and down buttons or toggle switch on the hand control to make sure they do not stick.
If the buttons or switch are sticking in either position, the hand control may need to be replaced.
Contact your authorized provider for further assistance.
What if my lift chair stops during a lifting cycle?
Your lift chair is equipped with an internal thermal shutoff switch located inside the external transformer
that prevents the motor control box from overheating. If the thermal shutoff activates, allow the lift chair
to remain in a stationary position for 10 minutes to allow the motor to cool, then resume normal operation.
If you notice the motors overheating frequently, contact your authorized provider.
There may have been a power failure and/or there are no batteries in the external transformer or the
batteries have no charge. Always make sure there are fresh 9V batteries in the external transformer
if equipped with battery backup.
Check the circuit breaker box connected to the electrical outlet to ensure the outlet is receiving power.
What if the heat and massage options on my lift chair do not function?
Ensure the junction box is connected properly to the external transformer and that there is power to
the transformer. A green LED will light on the transformer to indicate power.
Ensure the heat and massage units are connected properly at the rear of the lift chair.
Ensure the hand control is connected properly to the lift chair. If connected properly, any LEDs on the
hand control will be lit.
If any of the LEDs do not light, contact your authorized provider for further assistance.
What if my lift chair is rocking from corner to corner after I position the chair?
The floor may be uneven or the carpet may be affecting chair position. Adjust the leg levelers in the area
where the chair is rocking. See III. “Your Lift Chair” for instructions on leveling your chair.
Where can I place the external transformer box?
On the floor away from heat sources in an open, well-ventilated area where it will not be an obstruction.
On the wall away from heat sources utilizing the optional external transformer wall mount. Refer to the
Wall Mount Diagram Product Insert provided with your lift chair.
Where do I find the serial number on my lift chair?
You can find the serial number in two locations—one is near the rear of the motor on the steel lift mechanism, the second is attached to the frame below the scissor mechanisms. The model number for your
lift chair is printed below the serial number bar code.
Who do I call for service?
Contact your authorized provider for service.
16
www.ActiveForever.com
Lift Chair Series
VII. CARE AND MAINTENANCE
Your lift chair will require routine maintenance checks. You can perform some of these checks, but others
may require assistance from an authorized provider. By following the maintenance checks in this section
as scheduled, you can help ensure your lift chair gives you years of trouble-free operation. If you have
any questions regarding your lift chair’s care, contact your authorized provider.
FABRIC CARE
Inspect the fabric on a regular basis for any pulls, tears, or gaps.
Choose the right methods to clean the fabric on your lift chair. Before cleaning your lift chair, consult
your authorized provider for cleaning codes.
WARNING! Fabric should not be allowed to come in direct contact with any type
of heat source (e.g., a space heater or cigarette). Personal injury or fire damage
may occur.
WARNING! Your provider strongly recommends that you do not smoke
cigarettes while seated in or using your lift chair, although the lift chair has
passed the necessary testing requirements for cigarette smoking. You must
adhere to the following safety guidelines if you decide to smoke cigarettes
while seated in or using your lift chair.
Do not leave lit cigarettes unattended.
Keep ashtrays a safe distance from the lift chair.
Always make sure cigarettes are completely extinguished before disposal.
NOTE: Do not use solvent-type cleaners to spot clean. Do not saturate the fabric. Prevent damage
to the fabric; do not expose the lift chair to direct sunlight.
ELECTRONICS CARE
Inspect all wiring harnesses to make sure they are not damaged or frayed.
If damage is present, unplug the lift chair and contact your authorized provider for service.
Keep all electronics free from moisture and temperature extremes. Lift chairs are intended for
indoor use only!
WARNING! Even though the lift chair has passed the necessary testing
requirements for ingress of liquids, you should keep electrical connections
away from sources of dampness, including direct exposure to water or bodily
fluids and incontinence. Check electrical components frequently for signs of
corrosion and replace as necessary.
DISPOSAL AND RECYCLING
Your lift chair must be disposed of according to applicable local and national statutory regulations. Contact your local waste disposal agency or authorized provider for information on proper disposal of lift chair
packaging, metal frame components, fabric, electronic components, and batteries.
WARNING! Plastic bags are a suffocation hazard. Dispose of plastic bags
properly and do not allow children to play with them.
Lift Chair Series
www.ActiveForever.com
17