1
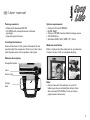
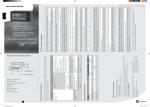
d Hinweis zum Umweltschutz:
Ab dem Zeitpunkt der Umsetzung der europäischen Richtlinien 2002/96/EG und 2006/66/EG in nationales Recht gilt
folgendes:
Elektrische und elektronische Geräte sowie Batterien dürfen nicht mit dem Hausmüll entsorgt werden. Der
Verbraucher ist gesetzlich verpflichtet, elektrische und elektronische Geräte sowie Batterien am Ende ihrer
Lebensdauer an den dafür eingerichteten, öffentlichen Sammelstellen oder an die Verkaufsstelle zurückzugeben.
Einzelheiten dazu regelt das jeweilige Landesrecht. Das Symbol auf dem Produkt, der Gebrauchsanleitung oder der
Verpackung weist auf diese Bestimmungen hin. Mit der Wiederverwertung, der stofflichen Verwertung oder anderen
Formen der Verwertung von Altgeräten/Batterien leisten Sie einen wichtigen Beitrag zum Schutz unserer Umwelt.
g Note on environmental protection:
After the implementation of the European Directive 2002/96/EU and 2006/66/EU in the national legal system, the
following applies:
Electric and electronic devices as well as batteries must not be disposed of with household waste. Consumers are
obliged by law to return electrical and electronic devices as well as batteries at the end of their service lives to the
public collecting points set up for this purpose or point of sale. Details to this are defined by the national law of the
respective country.
This symbol on the product, the instruction manual or the package indicates that a product is subject to these
regulations.
By recycling, reusing the materials or other forms of utilising old devices/Batteries, you are making an important
contribution to protecting our environment.
All listed brands are trademarks of the corresponding companies. Errors and omissions excepted,
and subject to technical changes. Our general terms of delivery and payment are applied.
22
PAP
2W198460/11.09
Easyline
by Hama,
D-86651 Monheim/Germany
2W198460
Webcam & Headset
»RW-100«
d Bedienungsanleitung
Packungsinhalt:
• Webcam & Headset RW100
• CD-ROM mit umfangreichem
Softwarepaket
• Bedienungsanleitung
Installation des Headsets
Verbinden Sie die beiden 3,5-mm-Klinkenstecker des
Headsets mit der Soundkarte des Computers. Stecken
Sie den rosafarbenen Stecker in die Mikro-Anschlussbuchse und den grünen in die Audio-Anschlussbuchse für Lautsprecher.
Systemvoraussetzung:
• CPU Pentium 300 Mhz
• 64 MB RAM oder höher
• mind. 100 MB freier Festplattenspeicherplatz
• CD-ROM Laufwerk
• Windows 98SE / ME / 2000 / XP / Vista
Installation der Webcam
Klemmen Sie sie die Webcam an Ihren TFT- oder
Notebookbildschirm.
Beschreibung der Webcam
Snapshot-Taste
Linse
Fokusring
Klemmfuß
Hinweis!
• Schließen Sie die Webcam nicht an Ihren PC an,
bevor Sie nicht den Treiber von der beiliegenden
CD-ROM oder unserer Homepage
(www.hama.com) installiert haben.
Installation
• Legen Sie die CD-ROM ein. Nach einigen Sekunden
erscheint automatisch der Startbildschirm
• Sollte der Startbildschirm nicht erscheinen dann
öffnen Sie den Windows Explorer und starten die
Anwendung „autorun.exe“ auf der CD-ROM
2
• Wählen Sie nun die gewünschte Sprache
und dann Treiberinstallation aus
• Befolgen Sie die Anweisungen auf dem
Bildschirm zur Treiberinstallation
• Wählen Sie nun im Menü des Softwarepaketes Hama Webcam Suite aus
• Befolgen Sie die Anweisungen auf dem
Bildschirm
• Verbinden Sie nach der Installation der
Webcam Suite den USB-Stecker der
Webcam einfach mit einem freien USBAnschluss Ihres Computers und warten
Sie einen kurzen Moment bis die Webcam
vom Betriebssystem erkannt wurde.
• Der Klinkenstecker ist für das in der Webcam
integrierte Mikrofon. Wenn Sie dieses anstatt des
Headsetmikrofons verwenden wollen, so verbinden
Sie diesen Stecker mit dem Mikrofoneingang an
Ihrer Soundkarte
Hinweis!
• Stecken Sie die Webcam direkt am Computer und
nicht an einem USB-Hub ein. Durch die Verwendung
eines Hubs oder auch durch aktive und passive
USB-Verlängerungskabel wird die Bildqualität
negativ beeinträchtigt. Unter Umständen kann auch
gar kein Bild mehr wiedergegeben werden.
Nachdem Sie Hardware und Software installiert
haben, öffnen Sie die ArcSoft Webcam Companion
2 und drehen Sie den Fokusring bis Sie ein scharfes
Bild erhalten.
Je nach Räumlichkeiten, Tageszeit und Beleuchtung
kann es sein das die Farben nicht ganz realitätsnah
wiedergegeben werden oder die Helligkeit angepasst
werden muss.
In diesem Fall verwenden Sie die „WebcamEinstellungen“ in der Webcam Companion 2 um die
Farbeinstellungen für Ihre Bedingungen zu optimieren.
ArcSoft Webcam Companion 2
• Aufnehmen: Erstellen Sie Bilder, Bildserien oder
Videos per Knopfdruck
• Überwachen: Startet automatisch die Videoaufnahme
wenn eine Bewegung registriert wird und beendet
die Aufnahme selbstständig wieder
• Durchsuchen: Bearbeiten Sie die Helligkeit und den
Kontrast Ihrer Videos und Bilder nach und
schneiden Sie Ihre Videos auf die gewünschte
Länge
• Chatten: Installieren und Starten Sie Ihre
Chatsoftware
ArcSoft Media Impression
• Importieren: Importieren Sie Mediadateien von
Ihrer Digitalkamera oder einem Speichergerät
• Media Player / Photo Viewer: Werfen Sie
einen Blick auf Ihre Videos und Bilder
• Einfaches Nachbessern: Bearbeiten Sie
Ihre Bilder in 6 einfachen Schritten nach
• Bildschirmpräsentation erstellen:
Erstellen Sie eine Bildschirmpräsentation aus Ihren
Bildern und unterlegen sie mit Ihrem Lieblingstitel
3
• Einfaches E-mailen: Versenden Sie Ihre Bilder
per e-mail
• Einfaches Drucken: Drucken Sie schnell und
einfach die erstellten Bilder
• Webcam: Erstellen Sie Bilder, Bildserien oder
Videos per Knopfdruck
• Einfaches Archivieren: Brennen Sie die
ausgewählten Mediadateien auf CD oder DVD
ArcSoft Magic-i Visual Effects
• Face Tracking
• digitaler Zoom: Vergrößern Sie einen
Bildschirmausschnitt um bis zu 200%
• Effekte / Rahmen / Themen / Avatare:
Peppen Sie Ihren Videochat mit diesen
originellen Plug-Ins auf.
• Videooptimierung: Stimmen Sie Helligkeit
und Kontrast manuell ab oder wählen Sie
einfach die automatische Verbesserung.
Sollten Sie Fragen oder Probleme mit den einzelnen
Funktionen haben, drücken Sie einfach im jeweiligen
Programm die F1-Taste. Dann erhalten Sie eine
detaillierte Anleitung über die Funktionen dieses
Programms und wie sie anzuwenden sind.
4
Technische Daten:
• Sensor: 300 Kilopixel
• Videoauflösung: max. 640 x 480
• Standbildauflösung: max. 1280 x 960
(interpoliert)
• Bildrate: 640 x 480 Pixels: 30 Bilder/Sek.
• Videoformat: WMA, MPG
• Bildformat: JPG, BMP
• Fokussierung: manuell
• Belichtungssteuerung: automatisch
• Weißabgleich: automatisch
• USB-1.1-Anschluss
Kontakt und Supportinformationen
Bei defekten Produkten:
Bitte wenden Sie sich bei Produktreklamationen an
Ihren Händler oder an die Hama Produktberatung.
Internet/World Wide Web
Produktunterstützung, neue Treiber oder Produktinformationen bekommen Sie unter www.hama.com
Support Hotline – Hama Produktberatung:
Tel. +49 (0) 9091 / 502-115
Fax +49 (0) 9091 / 502-272
e-mail: [email protected]
g User manual
Package contents:
System requirements:
• Webcam & Headset RW100
• CD-ROM with comprehensive software
package
• Operating instructions
•
•
•
•
•
Installing the Headset
Connect the two 3.5 mm jacks of headset to the
soundcard of the computer. Pink wire in the micro
jack & green wire in the speaker audio jack.
Pentium CPU with 300 Mhz
64 MB RAM
At least 100 MB free hard disk storage space
CD-ROM drive
Windows 98SE / ME / 2000 / XP / Vista
Webcam installation
Either simply place the webcam on your desk or
clamp it to your LCD or notebook display.
Webcam description
Snapshot button
Lens
Focus ring
Clamp
foot
Note:
• Do not connect the webcam to your PC
before you have installed the drivers from
the enclosed CD-ROM or from our home
page (www.hama.com).
5
Installation
• Insert the CD-ROM. The start screen appears
automatically after a few seconds.
• If the start screen does not appear, open Windows
Explorer and run the “autorun.exe” application from
the CD-ROM.
• Now select the desired language and then driver
installation.
• Follow the instructions on the screen for
installing the driver.
• Select the Hama Webcam Suite software
package from the menu.
• Follow the instructions on the screen.
• After installing the Webcam Suite, simply insert the
USB plug of the webcam into a free USB port on
your computer and wait a moment until the
operating system detects the webcam.
• The jack plug is for microphone which is integrated
into the webcam. If you want to use this one
instead of the headset microphone, you have to
connect this plug with the microphone input on
your sound card.
Note:
• Plug the webcam directly into your computer and
not into a USB hub. The use of a hub or active or
passive USB extension cables has a negative
impact on the image quality. In some
circumstances, it may not be possible to display a
picture at all.
6
After installing the hardware and software, open
ArcSoft Webcam Companion 2 and turn the focus
ring until you have a sharp image. Depending on the
location, time of day and lighting, the colours may not
be reflected realistically or the brightness may need
to be adjusted. If this is the case, use the webcam
settings in Webcam Companion 2 to adjust the colour
settings for your conditions.
ArcSoft Webcam Companion 2
• Record: create photos, photo series or
videos at the touch of a button
• Monitor: video recording starts and ends
automatically when a movement is
registered
• Browse: modify the brightness and
contrast of your videos and photos and
cut your videos to the desired length
• Chat: install and start your chat software
ArcSoft Media Impression
• Import: import media files from your digital
camera or a storage device
• Media player/photo viewer: take a look at
your videos and photos
• Easy touch-ups: edit your photos in 6 simple steps
• Create a screen slide show: create an
on-screen slide show with your photos
and play it along with your favourite track
• Simple e-mail: send your photos by e-mail
• Simple printing: print the photos that you
have created quickly and easily
• Webcam: create photos, photo series or
videos at the touch of a button
• Simple archiving: burn selected media files to a CD
or DVD
ArcSoft Magic-i Visual Effects
• Face tracking
• Digital zoom: magnify an area of the
screen by up to 200%
• Effects/frames/themes/avatars: spice up your video
chat with these original plug-ins
• Video optimisation: adjust brightness and
contrast manually or select the automatic
improvement function
If you have questions or problems regarding the
individual functions, simply press the F1 key in the
respective program. You can then view detailed
instructions about the functions of the program and
how to apply them.
Specifications:
• Sensor: 300 kilopixels
• Video resolution: max. 640 x 480
• Still resolution: max. 1280 x 960
(interpolated)
• Frame rate: 640 x 480 pixels: 30 frames/sec.
• Video format: WMA, MPG
• Image format: JPG, BMP
• Focus: manual
• Exposure control: automatic
• White balance: automatic
• USB 1.1 connection
Support and contact information
in case products are defective:
Contact your retailer or Hama Product Consulting if
you have any product claims.
Internet/World Wide Web
Product support, new drivers or product information
can be found at
www.hama.com
Support hotline – Hama Product Consulting:
Tel. +49 (0) 9091 502 115
Fax +49 (0) 9091 / 502-272
E-mail: [email protected]
7