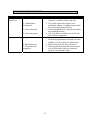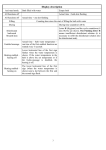
1
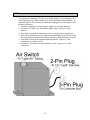
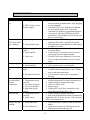
™
170-2
OWNER’S MANUAL
Table of Contents
INFORMATION
Important safety instructions
Warning Label Locations
Before you Begin
Choosing a Location
Setting Up
Operating the Smartub 170-2
Light
Maintenance and Spa Care
Trouble Shooting
Warranty
Specifications
PAGES
3-4
5
6
7-8
8
10
12
13-14
15-16
17
18
IMPORTANT SAFETY INSTRUCTIONS
This manual contains important safety instructions and we strongly encourage you to read
and follow them. Please read the information completely and thoroughly.
When installing and using this electrical equipment, basic safety precautions should be
followed, including the following:
1. WARNING – Risk of child drowning. Extreme caution must be exercised to
prevent unauthorized access by children. Lock the cover and place the keys in a
safe location when the spa is not in use.
2. DO NOT PERMIT CHILDREN TO USE THIS PRODUCT UNLESS THEY
ARE CLOSELY SUPERVISED AT ALL TIMES.
3. DANGER - RISK OF ELECTRICAL SHOCK. Install tub at least 5 feet (1.5 m)
from all metal surfaces. Do not permit any electrical appliance(s) such as a light,
telephone, radio or television within 5 feet of this spa.
4. A spa may be installed within 5 feet of metal surfaces if each metal surface is
permanently connected by a minimum of #8 (AWG 8.4 mm) solid copper
conductor attached to the wire connector on the pump motor. A pressure wire
connector is provided on the pump motor unit to permit connection of this solid
copper-bonding conductor. Connecting wire must be between this point (pump
motor) and any metal equipment, metal enclosures or electrical equipment, metal
water pipe, or conduit within 5 feet (1.5 m) of the unit as needed to comply with
local requirements.
5. Connect power cord to a grounded, grounding type receptacle only.
6. This appliance is provided with a ground-fault circuit interrupter (GFCI) located
at the end of the power cord. Before each use, with the plug connected to the
power supply and with the unit operating, push the test button (see page 9). The
unit should stop operating and the reset button should pop out slightly. Push the
reset button. The unit should now operate normally. If the interrupter fails to
operate in this manner, there is a ground current flowing, indicating the possibility
of an electrical shock. Disconnect the plug from the receptacle until the fault has
been identified and corrected.
7. To reduce the risk of injury:
A. The water in a spa or hot tub should never exceed 40°C (104°F). Water
temperatures between 38°C (100°F) and 40°C (104°F) are considered safe for a
healthy adult. Lower water temperatures are recommended for extended use
(exceeding 10 - 15 minutes) and for young children.
B. Since excessive water temperatures have a high potential for causing fetal
damage during the early months of pregnancy, pregnant or possibly pregnant
3
women should limit spa or hot water temperatures to 38°C (100°F).
C. CAUTION Before entering a spa or hot tub, the user should measure the water
temperature with an accurate thermometer since the tolerance of water
temperature-regulating devices may vary as much as +/-3°C (5°F).
D. WARNING!! The use of alcohol, drugs or medication before or during spa/hot
tub use can greatly increase the risk of fatal hyperthermia. Hyperthermia occurs
when the internal temperature of the body reaches a level several degrees above
the normal body temperature of 98.60° F. The symptoms of hypothermia include;
an increase in the internal temperature of the body, dizziness, lethargy,
drowsiness, and fainting. The effects of hypothermia include; (1) failure to
perceive heat, (2) failure to recognize the need to exit spa or hot tub, (3)
unawareness of impending hazard, (4) fetal damage in pregnant women, (5)
physical inability to exit spa or hot tub, and (6) unconsciousness resulting in the
danger of drowning.
E. Persons suffering from obesity or with a medical history of heart disease, low
or high blood pressure, circulatory system problems, or diabetes should consult a
physician before using a spa or hot tub.
F. Persons using medication should consult a physician before using a hot tub
since some medication may affect heart rate, blood pressure, and circulation.
8. Always operate spa with a sufficient water level. Water should be a minimum of
2” above all filters, intakes and jets. Insufficient water can cause pump failure.
9. Maintain proper water pH (7.4 – 7.6). Failure to do so may cause damage to
vinyl liner and pump seal.
10. WARNING - To reduce the risk of electrical shock, replace any damaged cord
immediately.
11. DO NOT BURY CORD.
12. Always operate the spa with the cord mounted GFCI in place and functional.
Failure to do so could result in a shock hazard. DO NOT USE EXTENSION
CORDS!
13. DANGER - To reduce the risk of injury, do not remove suction (intake) fittings.
14. SAVE THESE INSTRUCTIONS
4
WARNING LABEL LOCATIONS
The labels shown below have been affixed on all new Smartub 170-2’s. If the label is
missing or unreadable please call our customer service department at
1-888-901-SMART to obtain replacement labels.
-
5
BEFORE YOU BEGIN
Thank you for your purchase of the Smartub 170-2. The 170-2 offers the quality and
features of more expensive spas at a very economical price. Even more attractive
than the price is how Smartub has taken portability to a new level with its fully self
contained 170-2. The 170-2 requires absolutely no assembly and weighs less than 90
pounds. Just roll your Smartub into place, fill it and plug it in. You can enjoy the
warmth and comfort of hydrotherapy just about anywhere; inside, outside, ... you
decide!
Please read this manual thoroughly and carefully prior to using your Smartub
170-2. If you have additional questions regarding your Smartub feel free to visit our
website at www.smartub.com or contact your local authorized Smartub Dealership. If
you still have questions or comments, contact the customer service center at 888-901SMART. Please have your serial # available when you call, it can be found inside the
equipment housing on one of the vertical walls.
Please make note of the following major components of your Smartub 170-2 before
reading on.
6
MOVING YOUR SMARTUB
Vehicles
Care should be taken whenever transporting your spa. Strap Smartub securely into
the vehicle. Use a tarp or cargo net or padding to spread out the tension of the tiedowns and protect the exterior vinyl. Tension must be enough to prevent the spa
from floating out of the vehicle but not so much as to cause a permanent crease in
the vinyl or tub body.
Hand moving
Whenever possible, you should move your Smartub by carrying it and not
allowing it to come in contact with the ground. If needed, your Smartub has the
ability to be rolled into position over a short distance. Never roll your tub over a
surface that could damage or scratch the exterior vinyl or buckles such as asphalt,
concrete, dirt, etc. Always ensure the cover is on and locked and the entire tub is
protected by an additional layer of material to prevent damage.
CHOOSING A LOCATION
In order to help facilitate the proper placement of your Smartub 170-2 we have listed
some of the more important factors you need to consider before filling your new spa.
The Smartub 170-2 is only portable when empty, do not try to move it even after only
1 inch of water has been added. Water weighs approximately 8 pounds per gallon
and there are approximately 8 gallons per cubic foot. Adding two inches of water to
your Smartub will give it a total weight of almost 300 pounds and when your tub is
full it will weigh over 1500 pounds. Choosing the right location before you fill your
spa will save time and conserve water.
Indoor Locations
1. Check all your local building codes concerning the use of indoor spas.
2. The Smartub 170-2 will increase the level of humidity in your home. The location
you choose should be well ventilated. You may need to install a ventilation fan or use
a dehumidifier.
3. The location must be close to an electrical outlet. Do not use an extension cord.
4. The Smartub 170-2 should be relatively close to a source of water.
5. Do not use the Smartub 170-2 on carpet or other material that may be damaged by
moisture or chemicals. We recommend that you place the Smartub 170-2 on a waterand stain-resistant, non-slip surface with a floor drain for any water that may splash
from the Smartub 170-2.
6. Be sure that the location you choose is STABLE and LEVEL. It must be able to
support the weight of the spa when it is filled with water, plus the weight of the
occupants. The Smartub 170-2 weighs approximately 1500 pounds when filled with
water and occupies around 20 square feet.
7. Do not use the Smartub 170-2 above a finished living area, due to the risk of water
damage.
8. Be sure that there is room around the spa to permit servicing of the unit. The
diameter of the tub is 60”.
7
9. Follow all the safety precautions outlined in this manual.
Outdoor locations:
1. Check all your local building codes concerning the use of outdoor spas.
2. The location must be close to an electrical outlet. Do not use an extension cord.
3. The Smartub 170-2 should be relatively close to a source of water.
4. Do not use the Smartub 170-2 on decking or other material that may be damaged
by moisture or chemicals. We recommend that you place the Smartub 170-2 on a
water- and stain-resistant, non-slip surface.
5. Be sure that the location you choose is STABLE and LEVEL. It must be able to
support the weight of the spa when it is filled with water, plus the weight of the
occupants. The Smartub 170-2 weighs approximately 1500 pounds when filled with
water and occupies around 20 square feet.
6. Be sure that there is room around the spa to permit servicing of the unit. The
diameter of the tub is 60”.
7. Consider environmental factors, such as rain, wind, shade, sunlight, and so forth.
8. You should be able to monitor the use of the Smartub 170-2 from your home, to
prevent unauthorized use by children.
9. Follow all the safety precautions outlined in this manual.
8
SETTING UP YOUR SMARTUB 170-2
FILLING
1. Roll your Smartub 170-2 into place. Always make sure the locking cover is
properly installed when moving your Smartub 170-2; this will ensure proper
placement of the buckles and straps prior to filling.
2. Rotate and align the Smartub 170-2 so the equipment housing (see page 6) is
located in the best position for access, aesthetics, and safety.
3. Unlock and remove the cover. Do not move your Smartub 170-2 if the cover is
not completely buckled and in place.
4. Begin to fill. Put about 1 inch of water in the tub (warm is best) and STOP
FILLING. Using your hands, remove all wrinkles from the bottom of the liner.
Work towards the edges, keeping the liner centered. Add more water until the
lounge seat bottom is covered by 1 inch of water and remove wrinkles from seat.
5. Continue filling your Smartub 170-2 until the water level is approximately 4
inches from the top rim.
PLUGGING IN THE SMARTUB 170-2
Once the Smartub 170-2 is filled with enough water the power cord can be
plugged in and the spa controller unit will be turned on. Note: The first time the
power cord is plugged in, the controller unit will turn on automatically. When
connecting the power cord, plug the power cord directly into a grounded circuit
capable of carrying 15 or more amps. No other appliance should be on the same
circuit. Replace the power cord immediately if it becomes damaged. The power
cord is equipped with a Ground Fault Circuit Interrupter (GFCI), located at the
end of the power cord. You should always test the GFCI before using your
Smartub 170-2. The GFCI will need to be tested and reset in order to operate for
the first time. Simply push the Reset (top) button on the end of the cord after it is
plugged in.
9
OPERATING THE SMARTUB 170-2
ADJUSTING TEMPERATURE SETTINGS
Adjust your thermostat (found on the control unit inside equipment housing) to
the desired position. Rotate thermostat dial clockwise to the 3 o’clock position
for maximum temperature, 104° F or turn the knob counter-clockwise to the 6
o’clock position for a temperature range down to 70° F. The pump will come on
automatically and determine if heat is needed to achieve the desired temperature.
After a couple of minutes the motor will shut off if the tub is at temperature or
continue to run until the necessary temperature is achieved. The Smartub 170-2
will heat at 3-4 degrees per hour ONLY when the cover is secured and the
Air Control Valve is closed.
IMPORTANT: ALWAYS CHECK THE WATER TEMPERATURE WITH
A MEDICAL OR OTHER RELIABLE AND ACCURATE
THERMOMETER PRIOR TO USE.
10
HEATER / CONTROLLER UNIT FUNCTIONS
Your Smartub 170-2 is equipped with a 1000-Watt heater and 1.25 EQPP pump
and motor system. The functions of this heater and motor are controlled by an
internal computer that maintains and regulates the temperature, runs
preprogrammed filtration cycles and circulates for freeze protection when needed.
1. When you first plug in your Smartub 170-2 it will begin the 24-hour cycle.
You may want to plug in your Smartub 170-2 at a convenient time for the
cycle to begin its daily routine.
2. Every six hours the pump will run for ½ hour to filter the water.
3. If the temperature in the equipment housing drops below 60° F the pump will
cycle long enough to bring the temperature up in order to prevent freezing.
4. If the tub is at the desired temperature and you would like to enjoy the
hydrotherapeutic jets, just press the “PUMP” button on the topside ring and
the spa will run for ten minutes as an override function.
5. If the Smartub 170-2 is lower than the desired temperature you cannot turn the
pump off by simply depressing the “PUMP” button. When the temperature in
the spa drops below your selected temperature the pump will not shut off until
the selected temperature is reached again.
6. IMPORTANT: Your Smartub 170-2 needs to have the “AIR
CONTROL” (see page 5) knob completely closed and the insulated cover
installed correctly to heat properly.
LOCKING COVER
Your Smartub 170-2 is equipped with a locking cover as an added safety feature.
The spa cover can be secured by pulling the four corners with attached buckles
down toward the plastic latches on the bottom of the tub body. Secure the latches
into the buckles and lock with the provided keys. Always check the buckles after
locking to ensure they are properly locked. Keep the spa cover installed and
locked when not in use. Keep the keys in a safe place, out of the reach of
children.
Some models of Smartub covers have an optional inflation valve on the underside
of the cover. If needed you can inflate the cover for additional thermal value or to
better shed snow and rain.
HYDROTHERAPY JETS
Once your spa has reached the desired temperature it is ready for use. To operate
the jets press the “Pump” button (if the pump is not running) and adjust the air
control valve on the opposite side of the tub. To increase air flow to the jets
simply turn the valve counter-clockwise to the desired intensity. If your spa is at
maximum temperature the pump may run a ten-minute cycle then shut off. If this
happens just depress the button again for another ten-minute bypass. If the
temperature in the spa drops below your selected temperature the pump will not
shut off until temperature is reached again. Remember to always close the air
control valve when you have finished using your spa.
11
LIGHT
As an option, the Smartub 170-2 has an available light kit. Every Smartub 170-2
comes light kit ready with the button, lens, wiring and bulb already installed. To
install the light kit, first insure your Smartub is unplugged by removing the GFCI
from the wall outlet.
1. Open the equipment housing enclosure zippers to access the housing.
2. Locate the 12v light wire. It should be tagged “light” and have a 2-pin
harness.
3. Attach the 2-pin harness from the spa to the 2-pin plug on the transformer.
4. Place black transformer box over the two threaded studs on the left side of the
housing, tighten down included washers and nuts to hold transformer in place.
5. Attach the air hose in the equipment housing labeled “light-air” to the
transformer air switch receiver.
6. Attach the 3-pin harness on the transformer to the 3-pin receiver on the
control box
12
MAINTENANCE
1. Vinyl Care
Properly used and maintained the Smartub’s Leather-Plus™ and interior vinyl
will last for many years to come. The primary cause of vinyl failure is the
improper care or maintenance of water chemistry. A regular program of water
treatment is essential.
The inner liner material is constructed of a non-supported PVC.
Cleaning
You should empty the spa and refill with clean water every 2 months, or
whenever the water becomes cloudy and proper water chemistry does not
clear it up. While the spa is empty, use a mild soap solution to wipe away any
soil or stains on the inner liner. Rinse thoroughly with clean water, soaps and
water sanitizers can possibly react. NEVER use steel wool, bristle brushes,
brillo type pads or abrasive cleaners such as Comet or Soft Scrub.
Repair
The vinyl can be repaired using standard vinyl repair techniques. Samples of
the interior or exterior vinyl can be obtained through your dealer.
The exterior material is made of a marine grade vinyl called Leather-Plus™
that is UV stabilized and resists fading, mold and mildew.
Cleaning
Use a mild soap and water solution to wash the exterior vinyl, and then rinse
with clean water. You may also use a vinyl protectant, such as 303 Vinyl
Cleaner, for periodic cleaning. Do not use abrasive soaps or any solvents on
the exterior vinyl; you may void your warranty.
Repair
The vinyl can be repaired using standard vinyl repair techniques. Samples of
the interior or exterior vinyl can be obtained through your dealer.
2. Draining/Changing the water
As just mentioned, we recommend that you empty, clean and refill your Smartub
at least once every 2 months, depending on use. Always unplug the GFCI Cord
prior to draining the spa. The spa is easily drained by siphon or submersible
pump. Allow the water to drain until completely empty. After the water has been
drained from the spa, bail all remaining water from the body of the spa. Do not lift
the spa if it contains more than 1/4 inch of water. To drain the plumbing and
pump, after all water has been removed from tub floor, lift your Smartub into a
horizontal position with the equipment cavity positioned on the top. Bail with
sponge and bucket or dump water if outside. Roll the tub for one full revolution to
drain all plumbing. When refilling the spa, be sure to use a different hose than the
one used to drain the spa; reusing the same hose can transfer bacteria or algae into
the clean spa water.
Do not store an empty spa in direct sunlight, as any dampness in the system may
be likely to cause mildew. Additional care must be taken in freezing climates as
PVC becomes brittle and susceptible to breakage when very cold. We also
recommend disconnecting and removing pump and motor if the spa is to be
stored for a long duration in order to make certain that all water is drained.
13
3. Water Treatment
Water treatment and proper water maintenance are important and are essential
factors in the enjoyment and maintenance of your spa. Purchase a test kit from
your spa dealer. We recommend that you test your spa water after each use of the
spa, but no less than three times per week. The most common water chemistry
problems, which may result in damage to your Smartub are:
Improper pH maintenance
PH levels that are below 7.4 may cause wrinkles in your interior liner as well
as cause damage to the pump seal. Avoid low pH, as this can cause both
unsightly wrinkles to form in the liner and can cause damage to the pump seal,
which will void the warranty on these items.
Use of improper chemicals
Check with your dealer to determine the best chemical program for your
needs. We recommend using di-chlor and non-chlorine shock. The use of
biguanide products will void your warranty.
Over-chlorination
Over-chlorination can result in bleaching of your interior liner; which will
void your warranty. This type of situation can also be harmful to any users of
the spa by causing skin irritations, nasal or sinus irritation, loss of body hair,
etc. For this reason, trichlor chlorine tablets/sticks should not be used. It is the
responsibility of the owner to maintain proper water chemistry and sanitation.
The manufacturer and dealer are not responsible for any damages, which
result from improperly maintained water chemistry. If you have questions
regarding chemical use please contact your dealer or chemical manufacturer.
Adding of Chemicals
1. Always have the water circulating when adding chemicals. Add only one
chemical at a time.
2. Always pre-dissolve or pre-dilute the chemicals you add. Using a 5-gallon
bucket, dip a few gallons of water out of the spa. Add the chemicals to the
bucket and stir until they are fully dissolved or diluted. With the spa jets
turned on, slowly add the bucket of water back into the spa, pouring it into
a jet stream to ensure proper mixing. If you do not pre-mix the chemicals,
you may damage the vinyl surfaces and void the warranty.
3. Always leave cover off of the Smartub for ½ hour after adding chemicals;
gasses that will damage the vinyl cover need to be vented.
4. Do not use gas chlorinating, ionizers, scents, salts or soaps without
consulting with your dealer.
5. Do not use floating chlorine dispensers, automatic dispensers or place
chlorine sticks/tablets in the skimmer.
Recommended Water Chemistry Levels:
PH: 7.5 (+/- 0.1)
Total Alkalinity: 80-100 ppm
Calcium Hardness: 150-250 ppm
Free Chlorine: 2-3 ppm
Total Dissolved Solids: Below 1500 ppm
14
TROUBLESHOOTING
SYMPTOM
Spa will not turn
on
POSSIBLE CAUSE
SOLUTION
1. Not plugged into outlet
1. Check the power cord. Cord must be plugged
into an isolated, grounded outlet. (See plugging
2. GFCI Cord or circuit
in your Smartub)
breaker tripped
2. Check the GFCI cord. Push the test and then
the reset button on the cord. Look at the
controller box inside the equipment housing to
verify power. The Red LED light should be
illuminated. If LED light is not on, check your
house circuit breaker.
Circuit breaker or 1. Power surge
1. Reset breaker or GFCI. If the problem
GFCI trips while
continues check with a qualified electrician
spa is running
2. Non-isolated circuit
2. Plug unit into an outlet that has no other outlets
or appliances in line.
Pump hums
1. Dirty or plugged
1. Clean or replace the filter and check the intake
intake
screen for debris.
2. Stuck impeller
2. Contact dealer or customer service to remove
any foreign objects in pump impeller.
3. Loose wire
3. Check for loose wire connection. If no loose
wire is evident call customer service or local
dealer.
Noisy pump
1. Debris in pump
1. Call customer service or local dealer.
2. Worn bearings
2. Call customer service or local dealer.
Cannot turn pump 1. Spa in heat or filtration
1. During a heat or filtration cycle the pump will
off
cycle
run until selected temperature is met. Unplug
unit or turn thermostat down.
2. Disconnected air line
2. Check airline to control unit in equipment
housing.
Water not heating 1. Needs more time
1. Spa will heat 3-4 degrees/ hr. Monitor with
or not reaching
2. Temperature not set
medical thermometer or other accurate device.
desired
correctly
2. Adjust setting in equipment housing.
temperature
3. Air control left open
3. Close air control valve.
4. Cover not installed
4. Replace cover.
5. High limit switch
5. Unplug GFCI cord, allow controller to cool
tripped
down then plug in the GFCI cord.
Water too hot
1. Temperature not set
1. Adjust setting in equipment housing.
correctly
2. If an accurate thermometer shows a temperature
2. Faulty sensor
higher than 106° F, do not use spa. Call your local
dealer or customer service.
Therapy Jets not
1. Restricted intake
1. Check filter and / or intake screen for dirt and
working
debris.
2. No air induction
2. Open the air control valve during spa use for
higher pressure hydrotherapy jets.
15
TROUBLESHOOTING CONTINUED
SYMPTOM
Leaking water/
Water Loss
POSSIBLE CAUSE
1. Overfilled
2. Condensation /
Evaporation
3. Loose union nuts
4. Loose component
Light not working 1. Light kit not installed
2. Bulb burned out.
3. Transformer not
plugged in.
SOLUTION
1. Siphon off enough water from the spa so there
is about 4” clearance from the top ring.
2. Use caution when removing the cover,
particularly indoors. Condensed water on the
cover base can drip onto the floor.
3. Check and tighten the 4 Union nuts located in
the equipment housing.
4. Call your dealer or customer service for any
other leaking components.
1. Lights are not included on all models of
Smartub but light buttons and lenses do come
standard. Call your dealer for information.
2. Replace bulb from the outer wall access.
3. Open equipment housing and check to make
sure all wires and air lines are connected
properly. (See Smartub Light)
16
LIMITED WARRANTY
SMARTUB, LLC, WARRANTS THIS PRODUCT TO BE FREE FROM DEFECTS
IN WORKMANSHIP AND MATERIAL, UNDER NORMAL USE AND SERVICE
CONDITIONS, FOR THE PERIODS SPECIFIED BELOW:
1. Pump, Motor, Plumbing, Electrical- 1 YEAR from the purchase date.
2. Labor to replace or repair spa/components- 90 days from the purchase date.
Extent of warranty
This warranty applies to Smartub 170-2’s manufactured after December 1, 2004 and sold by an
authorized Smartub dealer within the United States. This warranty extends only to the original
purchaser and terminates upon any transfer of ownership. Smartub, LLC's obligation under this
warranty is limited to replacing or repairing, at Smartub, LLC's option, the product through one
of its authorized service centers or nearest factory location. All repairs for which warranty claims
are made must be pre-authorized by Smartub, LLC. After the first ninety (90) days from the date
of purchase, any shipping and/or replacement charges are the sole responsibility of the spa owner.
Warranty registration is required. Warranty registration can be either filled out online or mailed.
Registration must be completed within fourteen (14) days from purchase date.
Limitations
This warranty does not extend to any product or damage to a product caused by or attributable to
freight damage, abuse, misuse, improper or abnormal usage, or repairs not provided by Smartub,
LLC authorized service personnel, to products used for commercial or rental purposes, or to
products used as store display models. Specifically excluded are damages caused by or
attributable to the following incidents: any damage caused by the operation of the spa with water
temperatures outside the range of 33 degrees Fahrenheit and 120 degrees Fahrenheit, any damage
caused by clogged, dirty or calcified filters, any damaged caused by products not approved by
Smartub, LLC, any damages that are purely aesthetic and do not hinder the function of the spa,
any damage to the exterior resulting from improper maintenance, or any damage to the exterior
attributable to freight mishandling; damage resulting from improper winterization; damage to the
spa liner resulting from improper chemical treatment, damage to the spa resulting from exposure
to extreme temperatures, or damage to the spa resulting from exposure to direct sunlight and
ultraviolet rays while the spa is empty; damage to the pump, motor, plumbing, and components
due to improper maintenance, chemical treatment, or exposure; damage resulting from failure to
properly follow user’s manual installation, operating, or maintenance instructions. Also excluded
are consumable components, including but not restricted to headrests, filter cartridges, and light
bulbs. Any alterations to the spa will void this warranty. Alterations include but are not limited
to: any component or plumbing change, electrical conversion or addition of alternate sanitation
or heating systems. Smartub, LLC, authorizes no other warranty beyond that specifically set
forth above. Smartub, LLC is not responsible or liable for indirect, special or consequential
damages arising out of or in connection with the use or performance of the product or damages
with respect to any economic loss, loss of or damage to property including water damage, loss of
revenues or profits, loss of enjoyment or use, costs of removal, installation or other consequential
damages of whatsoever nature. The warranty extended hereunder is in lieu of any and all other
warranties and any implied warranties of merchantability or fitness for a particular purpose is
limited in its scope and duration to the terms set forth herein. No agent, dealer, distributor, service
company or other party is authorized to change or modify or extend the terms of this warranty.
Legal Rights
This warranty gives you specific legal rights and you may have other rights, which vary from
state to state.
17
SPECIFICATIONS
MODEL
170-2
SEATING
2 Adults
OUTER DIAMETER
60 Inches
INNER DIAMETER
52 Inches
HEIGHT
24 Inches
CAPACITY
170 Gallons
DRY WEIGHT
90 Lbs
FILLED WEIGHT
1450 Lbs
LIGHT
Available 12V Incandescent
PUMP
1.25 EQPP Brushless Magna
HEATER
1000 Watt, Stainless “T”
JETS
4 Multi-directional
FILTRATION
Available 17 SF and Skimmer
COVER
Insulated with 4, 2” Locking Buckles
INSULATION
Full Foam
OUTER MATERIAL
Leather-Plus™, Marine Grade Vinyl
INNER MATERIAL
50 mill PVC
18