1
IMC (Implementing Mobile Calculi):
a framework for distributed applications
and code mobility.
User’s manual
Lorenzo Bettini
Dipartimento di Sistemi e Informatica, Università di Firenze
Viale Morgagni 65, 50134 Firenze, Italy
http://www.lorenzobettini.it
January 23, 2006
Contents
1 Marshaling & UnMarshaling
3
2 Layers
2.1 Tunneling . . . . . . . . . . . . . . . . . . . . . . . . . . . . . . . . . . . . . . . . .
4
7
3 Sessions
9
4 Protocol States
17
5 Mobility
27
6 Nodes & Processes
6.1 Connections & Disconnections . . . . . . . . . . . . . . . . . . . . . . . . . . . . . .
29
31
7 Events
7.1 Session Events . . . . . . . . . . . . . . . . . . . . . . . . . . . . . . . . . . . . . .
35
37
2
1
Marshaling & UnMarshaling
The first abstractions provided by the framework are Marshaler and UnMarshaler. These are
basically specialized output and input streams respectively. Their interfaces are as follows:
public interface Marshaler extends DataOutput, Closeable, Flushable, MigratingCodeHandler {
/** Writes a string terminated with the sequence CR + LF */
void writeStringLine(String s) throws IOException;
/** Writes an object. */
void writeReference(Serializable o) throws IOException;
/** Writes a migrating code object. Such object is intended to be sent
* together with its code. */
void writeMigratingCode(MigratingCode code) throws IOException, MigrationUnsupported;
/** Writes a migrating packet (containing migrating code). Usually this
* method will not be called directly: it will be called implicitly by
* writeMigratingCode. */
void writeMigratingPacket(MigratingPacket packet) throws IOException;
}
public interface UnMarshaler extends DataInput, Closeable, MigratingCodeHandler {
/** Reads a string line, terminated by \n (or \r+\n). The terminating \n and \r
* should be removed. */
String readStringLine() throws IOException;
/** Reads an object. */
Object readReference() throws IOException;
/** Reads an object that has migrated. This object should contain
* all the code that it needs to execute on this site. */
MigratingCode readMigratingCode() throws IOException, MigrationUnsupported;
/**
* Reads a migrating packet. Typically this method will not be called
* directly, but implicitly by readMigratingCode. */
MigratingPacket readMigratingPacket() throws IOException;
/** Discards all the possibly remaining bytes from the input. */
void clear() throws IOException;
/** Returns the number of bytes that are available to read. */
int available() throws IOException;
}
Notice that these interfaces extends the standard Java java.io.DataOutput and java.io.DataInput interfaces, respectively, so they have also methods such as readInt(), readChar(), and
so on (we refer to Java documentation). These two specialized streams also provide means for
dealing with code mobility (see Section 5). Furthermore they provide methods to read an entire
line (terminated by \n or \r\n — the terminating symbols will be removed in the returned string)
and to write an entire line (terminated by \r\n — the terminating symbols will be included in the
output).
The framework provides implementations for such interfaces: IMCMarshaler and IMCUnMarshaler that must be initialized with an OutputStream and an InputStream, respectively.
Example 1.1 (examples.marshal.MarshalExample). This is a very simple example that uses a
marshaler attached to System.out and an unmarshaler attached to System.in, and reads a string
from the standard input, and writes that string to the standard output:
UnMarshaler unMarshaler = new IMCUnMarshaler(System.in);
Marshaler marshaler = new IMCMarshaler(System.out);
String readline;
do {
readline = unMarshaler.readStringLine();
3
marshaler.writeStringLine("input: " + readline);
} while (true);
2
The clear() method in UnMarshaler can be used to discard all the remaining bytes in the
input stream. This is useful, for instance, when implementing protocols: if you read a header that
is not compliant with the protocol you may want to discard all the remaining bytes and start a new
reading.
Example 1.2 (examples.marshal.UnMarshalClearExample). The following code reads a line
byte after byte and when it encounters a character that is different from 'a' it discards all the
remaining characters (so it will print only the first sequence of a’s):
UnMarshaler unMarshaler = new IMCUnMarshaler(System.in);
Marshaler marshaler = new IMCMarshaler(System.out);
do {
StringBuffer buffer = new StringBuffer();
byte b;
do {
b = unMarshaler.readByte();
if (b == '\n')
break;
if (b != 'a') {
unMarshaler.clear();
break;
}
buffer.append((char)b);
} while (true);
marshaler.writeStringLine("input: " + buffer.toString());
} while (true);
2
2
Layers
The data in the marshaler and unmarshaler can be “pre-processed” by some customized protocol
layers that can remove some information from the input and can add some information to the output: typically this information are protocol specific headers removed from the input and added to
the output. A protocol layer is an abstract representation of a communication channel which uses
a specific transmission protocol. It lets messages be sent and received through the communication
channel it stands for using that protocol. The base class ProtocolLayer deals with these functionalities, and can be specialized by the programmer to provide his own protocol layer. These layers
are then composed into a ProtocolStack object that ensures the order of preprocessing passing
through all the layers in the stack. The structure of a protocol instance can then be depicted as in
Figure 1.
A ProtocolLayer has the following structure:
public abstract class ProtocolLayer {
public UnMarshaler doCreateUnMarshaler(UnMarshaler unMarshaler)
throws ProtocolException {
return unMarshaler;
}
4
P
r
o
t
o
c
o
l
S
t
a
c
k
remove
header
Layer x
add
header
remove
header
Layer y
add
header
remove
header
Layer z
add
header
Figure 1: Protocol Layers and Protocol Stack Abstractions.
public void doReleaseUnMarshaler(UnMarshaler unMarshaler)
throws ProtocolException {
}
public Marshaler doCreateMarshaler(Marshaler marshaler)
throws ProtocolException {
return marshaler;
}
public void doReleaseMarshaler(Marshaler marshaler)
throws ProtocolException {
try {
marshaler.flush();
} catch (IOException e) {
throw new ProtocolException(e);
}
}
// other methods
}
As said above, protocol layers are thought to be composed in a ProtocolStack that provides
the same createUnMarshaler(), releaseUnMarshaler(), createMarshaler() and releaseUnMarshaler(). In particular the stack will call the corresponding methods in each layer, so that
each layer can remove headers (when reading) and add headers (when writing).
In particular, a specialized protocol layer can remove a header by implementing the method
doCreateUnMarshaler(): this method will receive an UnMarshaler as argument; the method can
use this unmarshaler to remove headers, and then must return an unmarshaler. Typically, the
returned unmarshaler will be the same as the one received, but this is not mandatory (later we
will show some examples where the returned unmarshaler is not the same). Similarly, a specialized
protocol layer can add a header by implementing the method doCreateMarshaler(): this method
will receive a Marshaler as argument; the method can use this marshaler to add a header, and
then must return a marshaler (again the returned marshaler is not required to be the same as the
one received).
An UnMarshaler can be obtained from a ProtocolStack by using the method createUnMarshaler(). A Marshaler can be obtained by using the method createMarshaler(). Once all the
information are read from the UnMarshaler one should call the method releaseUnMarshaler()
passing the UnMarshaler itself. Similarly, once all the information are written into the Marshaler
one should call the method releaseUnMarshaler() passing the Marshaler itself. Notice that, although the default implementation of doReleaseUnMarshaler() does nothing, a specialized layer
5
can perform important tasks in this method (e.g., release some resources), hence the method releaseUnMarshaler() should always be called.
Thus, this is the sequence of actions usually performed on a ProtocolStack:
ProtocolStack protocolStack = // initialized somehow
UnMarshaler unMarshaler = protocolStack.createUnMarshaler();
// read from the unMarshaler
protocolStack.releaseUnMarshaler();
Marshaler marshaler = protocolStack.createMarshaler();
// write into the marshaler
protocolStack.releaseMarshaler(marshaler); // flushes it
The last layer of a stack must be “attached” to the actual transmission channel: again this is
an abstraction similar to that of the streams, so the channel can be attached to any input/output stream pair, e.g., standard input and standard output, file, network, etc. In particular the
framework provides a specialized protocol layer that can be initialized with a Marshaler and an
UnMarshaler: ProtocolLayerEndPoint.
Example 2.1 (examples.layer.LayerStdIOExample). This is a very simple example that uses a
ProtocolLayerEndPoint attached to System.out and System.in, and reads a string from the
standard input, and writes that string to the standard output. It is basically a variant of Example 1.1
obtaining Marshaler and UnMarshaler through a ProtocolLayer:
ProtocolLayer protocolLayer =
new ProtocolLayerEndPoint(new IMCUnMarshaler(System.in), new IMCMarshaler(System.out));
String readline;
UnMarshaler unMarshaler;
Marshaler marshaler;
do {
unMarshaler = protocolLayer.doCreateUnMarshaler(null);
readline = unMarshaler.readStringLine();
protocolLayer.doReleaseUnMarshaler(unMarshaler);
marshaler = protocolLayer.doCreateMarshaler(null);
marshaler.writeStringLine("input: " + readline);
protocolLayer.doReleaseMarshaler(marshaler);
} while (true);
Similarly, Example 1.2 can be modified so to use a protocol layer.
2
The example 2.1 uses a layer directly; this works only because it is layer encapsulating a physical transmission channel (in this case streams attached to standard input and standard output).
However, typically, layers should not be used directly: they should be composed into a stack and
stack’s methods should be called.
Example 2.2 (examples.layer.OutInLayer). The following specialized protocol layer removes a
header from the input that consists of the line "IN"; it also adds a header to the output that consists
of the line "OUT":
public class OutInLayer extends ProtocolLayer {
protected Marshaler doCreateMarshaler(Marshaler marshaler) throws ProtocolException {
try {
marshaler.writeStringLine("OUT");
return marshaler;
} catch (IOException e) {
throw new ProtocolException(e);
}
6
}
protected UnMarshaler doCreateUnMarshaler(UnMarshaler unMarshaler) throws ProtocolException {
try {
String header = unMarshaler.readStringLine();
if (!header.equals("IN"))
throw new ProtocolException("wrong header: " + header);
} catch (IOException e) {
throw new ProtocolException(e);
}
return unMarshaler;
}
}
This code composes, into a ProtocolStack, this specialized layer with a ProtocolLayerEndPoint
and uses System.in and System.out (as seen in Example 2.1):
ProtocolStack protocolStack = new ProtocolStack();
protocolStack.insertLayer(new OutInLayer());
protocolStack.insertLayer(new ProtocolLayerEndPoint
(new IMCUnMarshaler(System.in), new IMCMarshaler(System.out)));
String readline;
UnMarshaler unMarshaler;
Marshaler marshaler;
do {
unMarshaler = protocolStack.createUnMarshaler();
readline = unMarshaler.readStringLine();
protocolStack.realeaseUnMarshaler();
marshaler = protocolStack.createMarshaler();
marshaler.writeStringLine("read:\n" + readline);
protocolStack.releaseMarshaler(marshaler);
} while (true);
If you run this example you’ll have to insert, before the actual contents of the message, a line
consisting of simply "IN", and as output you’ll receive the message preceded by the lines "OUT"
and "read:":
IN
HELLO
OUT
read:
HELLO
<--
input from keyboard
<--
output to the screen
2
2.1
Tunneling
The framework provides a specialized protocol layer base class, TunnelProtocolLayer, that permits implementing a tunneling layer, in order to envelop a protocol inside another one. A typical
example is the one of an http tunnel that wraps a protocol in HTTP requests and responses. Notice
that a tunnel layer does not simply remove a header when reading and add a header when writing:
typically it will need to read an entire message, strip the tunneling protocol information, and pass
to the upper layer the information that was wrapped; in the same way, it will need to intercept
7
the information written by the upper layer and wrap it into a message according to the tunneling
protocol. For this reason the framework provides this specialized base class with the features to
implement these more complex functionalities.
In particular, TunnelProtocolLayer provides two piped stream pairs to allow the tunnel layer
to communicate with the tunneled layer: the field tunneledMarshaler is piped with the field
newUnMarshaler (i.e., everything that is written into tunneledMarshaler can be read from newUnMarshaler). Similarly, the field tunneledUnMarshaler is piped with the field newMarshaler
(i.e., everything that is written into newMarshaler can be read from tunneledUnMarshaler).
Example 2.3 (protocols.HTTPTunnelProtocolLayer). The layer we show here embeds messages
in HTTP messages, so that it can tunnel basically any layer. Here we show only the relevant parts
(we refer to the complete code of the class).
public class HTTPTunnelProtocolLayer extends TunnelProtocolLayer {
/** The original marshaler returned by a prepare of a lower layer. */
protected Marshaler origMarshaler;
public UnMarshaler doCreateUnMarshaler(UnMarshaler unMarshaler)
throws ProtocolException {
try {
while (true) {
try {
String data = "";
if (!senderMode) {
data = stripRequest(readHTTPRequest(unMarshaler));
tunneledMarshaler.writeBytes(data + "\r\n");
} else {
data = stripResponse(readHTTPResponse(unMarshaler));
tunneledMarshaler.writeBytes(data);
}
break;
} catch (UnknownRequest e) {
// ...
}
}
} catch (IOException e) {
throw new ProtocolException(e);
}
return newUnMarshaler;
}
public Marshaler doCreateMarshaler(Marshaler marshaler)
throws ProtocolException {
origMarshaler = marshaler;
return newMarshaler;
}
public void doReleaseMarshaler(Marshaler marshaler) throws ProtocolException {
try {
String data = tunneledUnMarshaler.readStringLine();
String encapsulated_data = "";
if (!senderMode) {
encapsulated_data = encapsulateResponse(data);
} else {
encapsulated_data = encapsulateRequest(data);
8
}
origMarshaler.writeBytes(encapsulated_data);
origMarshaler.flush();
} catch (IOException e) {
throw new ProtocolException(e);
}
}
Being a ProtocolLayer it can be used in any stack, taking into account that it will tunnel all
the layers that precedes it in the stack. Thus, in the next code snippet the Layer1 will be tunneled
through HTTP.
ProtocolStack protocolStack = new ProtocolStack();
protocolStack.insertLayer(new Layer1());
protocolStack.insertLayer(new HTTPTunnelProtocolLayer());
protocolStack.insertLayer(new Layer2());
2
3
Sessions
The class Session represents a “connection” between two points; indeed such a connection is a
logical concept: a session does not necessarily represent a physical connection, and thus it can
be built upon connectionless protocols (such as, e.g., UDP). Thus this concept abstracts from the
actual connection and communication type.
public class Session {
public String toString();
public void close() throws ProtocolException;
public SessionId getLocalEnd();
public SessionId getRemoteEnd();
public ProtocolLayer getProtocolLayer();
}
A session can be addressed by using a SessionId object.
public class SessionId {
public boolean sameId(Object o)
public String getConnectionProtocolId()
public void setConnectionProtocolId(String connectionProtocolId)
}
Both Session and SessionId depend on the specific “low level” communication protocol (e.g.,
TCP, UDP, etc.).
A Session instance is created through a SessionStarter, whose interface is as follows:
public interface SessionStarter {
/** Accepts an incoming session. */
Session accept() throws ProtocolException;
/** Establishes a session. */
Session connect() throws ProtocolException;
/** Closes this starter, but not sessions created through this starter. */
9
void close() throws ProtocolException;
}
The method accept is used server-side and connect is used client-side. A session starter on the
server-side can be used to accept more than one session, while, on the client-side it can be used to
establish only one session.
The method close closes ONLY the session starter but NOT the session(s) created through the
session starter. Thus, close only makes the session starter not usable to create any new sessions.
In particular, the life time of sessions created through a specific session starter is thought to be
independent from the session starter itself.
Specific session starters should be provided for specific connection protocols. For instance, the
framework already provides one for TCP and one for UDP: TcpSessionStarter and UdpSessionStarter, respectively. Typically, these session starters are initialized with a specific SessionId that
will be used to create sessions. For these session starters the following rule holds: a given session
starter is used either to accept or to connect. If this is not respected, a ProtocolException will be
thrown.
Once a Session object is created, it includes a ProtocolLayer that can be used to communicate
to the remote end.
Example 3.1 (examples.tcp.TcpLayerServer). The following code waits for an incoming connection of a specific port and then reads lines received from the client that is connected. It uses a
TcpSessionStarter, to accept an incoming session, and then it uses the ProtocolLayer stored
in the created session (again, this is only a demonstrative example, typically you won’t use the
layer stored in a session directly). Notice that the session starter is closed right after a session is
established. This means that no more connection is accepted, but the established session is still
active.
int port = 9999;
System.out.println("accepting connections on port " + port);
SessionStarter sessionStarter = new TcpSessionStarter(new IpSessionId(port));
Session session = sessionStarter.accept();
System.out.println("established session " + session);
sessionStarter.close();
// no more accepting sessions, but the established session is still up.
ProtocolLayer protocolLayer = session.getProtocolLayer();
UnMarshaler unMarshaler = protocolLayer.doCreateUnMarshaler(null);
while (true) {
System.out.println("read line: " + unMarshaler.readStringLine());
}
One can test the server by connecting to the server with a telnet client (suppose both the server
and client run on the localhost):
$ telnet localhost 9999
Trying 127.0.0.1...
Connected to localhost.localdomain.
Escape character is '^]'.
Hello World!
How's it going?
Then, the output on the server will be something like the following one:
accepting connections on port 9999
established session tcp-127.0.0.1:9999->tcp-127.0.0.1:32802
read line: Hello World!
read line: How's it going?
10
Notice that a Session object stores information in the shape of a string
<session id> -> <session id>
about the local (on the left of the arrow) and the remote end (on the right of the arrow).
2
Example 3.2 (examples.tcp.TcpLayerClient). The following code opens a TCP connection to a
remote client. It uses a TcpSessionStarter, and then it uses the ProtocolLayer stored in the
created session.
String host = "localhost";
int port = 9999;
UnMarshaler console = new IMCUnMarshaler(System.in);
IpSessionId sessionId = new IpSessionId(host, port);
System.out.println("opening connection to " + sessionId);
SessionStarter sessionStarter = new TcpSessionStarter(sessionId);
Session session = sessionStarter.connect();
System.out.println("established session " + session);
ProtocolLayer protocolLayer = session.getProtocolLayer();
while (true) {
System.out.print("insert line: ");
String line = console.readStringLine();
Marshaler marshaler = protocolLayer.doCreateMarshaler(null);
marshaler.writeStringLine(line);
protocolLayer.doReleaseMarshaler(marshaler);
}
One can use this program to connect to the server of Example 3.1:
opening connection to tcp-127.0.0.1:9999
established session tcp-127.0.0.1:32837->tcp-127.0.0.1:9999
insert line: Hello World!
insert line: How's it going?
2
A session can be created and associated directly to a ProtocolStack, by using the following
methods:
class ProtocolStack {
public Session accept(SessionStarter sessionStarter) throws ProtocolException;
public Session connect(SessionStarter sessionStarter) throws ProtocolException;
public void close() throws ProtocolException;
}
The method accept is used server-side and connect is used client-side. The method close closes
the session underlying the stack. These methods will rely on methods of the passed SessionStarter.
Example 3.3 (examples.tcp.TcpServer). The following code does the same thing of Example 3.1,
but it uses a ProtocolStack.
int port = 9999;
ProtocolStack protocolStack = new ProtocolStack();
System.out.println("accepting connections on port " + port);
SessionStarter sessionStarter = new TcpSessionStarter(new IpSessionId(port));
11
Session session = protocolStack.accept(sessionStarter);
System.out.println("established session " + session);
sessionStarter.close();
// no more accepting sessions, but the established session is still up.
UnMarshaler unMarshaler = protocolStack.createUnMarshaler();
while (true) {
System.out.println("read line: " + unMarshaler.readStringLine());
}
One can test the server by connecting to the server with a telnet client just as in Example 3.1,
and the outcome will be exactly the same.
2
Example 3.4 (examples.tcp.TcpClient). The following code does the same thing of Example 3.2,
but it uses a ProtocolStack.
String host = "localhost";
int port = 9999;
UnMarshaler console = new IMCUnMarshaler(System.in);
IpSessionId sessionId = new IpSessionId(host, port);
System.out.println("opening connection to " + sessionId);
ProtocolStack protocolStack = new ProtocolStack();
Session session = protocolStack.connect(new TcpSessionStarter(sessionId));
System.out.println("established session " + session);
while (true) {
System.out.print("insert line: ");
String line = console.readStringLine();
Marshaler marshaler = protocolStack.createMarshaler();
marshaler.writeStringLine(line);
protocolStack.releaseMarshaler(marshaler);
}
One can use this program to connect to the server of Example 3.3:
opening connection to tcp-127.0.0.1:9999
established session tcp-127.0.0.1:32837->tcp-127.0.0.1:9999
insert line: Hello World!
insert line: How's it going?
2
Examples 3.1–3.4 show how to create a TCP server and a TCP client; they are not much more
than what one would write using directly a ServerSocket and a Socket from the Java library. The
advantage of using the IMC framework classes is that they provide abstractions from the underlying
network level. This way, one can write code that can be re-used smoothly independently from the
actual communication layer.
The framework provides the class SessionStarterTable that permits associating a connection
protocol to a SessionStarter:
public class SessionStarterTable {
/**
* Returns the SessionStarterFactory associated to the specified string or
* throws a ProtocolException if there’s no association.
*/
public SessionStarterFactory getSessionStarterFactory(String id);
12
/**
* Associates a SessionStarterFactory to the specified protocol id. If a
* previous layer was associated with the specified id it is returned.
*/
public SessionStarterFactory associateSessionStarterFactory(String id,
SessionStarterFactory sessionStarterFactory);
/**
* Creates a SessionStarter by using the SessionStarterFactory associated to
* the specified string or throws a ProtocolException if there’s no association.
*/
public SessionStarter createSessionStarter(SessionId sessionId) throws ProtocolException;
}
In a SessionStarterTable you have to associate a protocol string to a SessionStarterFactory:
public interface SessionStarterFactory {
SessionStarter createSessionStarter(SessionId sessionId) throws ProtocolException;
}
The framework already provides a SessionStarterTable with all the associations for the protocols already handled by the framework itself, IMCSessionStarterTable, implemented as follows:
public class IMCSessionStarterTable extends SessionStarterTable {
public IMCSessionStarterTable() {
associateSessionStarterFactory("tcp", new SessionStarterFactory() {
public SessionStarter createSessionStarter(SessionId sessionId)
throws ProtocolException {
return new TcpSessionStarter(IpSessionId
.parseSessionId(sessionId.toString()));
}
});
associateSessionStarterFactory("udp", new SessionStarterFactory() {
public SessionStarter createSessionStarter(SessionId sessionId)
throws ProtocolException {
return new UdpSessionStarter(IpSessionId
.parseSessionId(sessionId.toString()));
}
});
}
}
Thus, one can get an instance of a SessionStarter handling a specific communication protocol
as follows:
SessionStarterTable sessionStarterTable = new IMCSessionStarterTable();
SessionStarter sessionStarter =
sessionStarterTable.createSessionStarter(new IpSessionId("localhost", 9999));
A SessionId stores information about the connection protocol (by default it is "tcp"). In
particular, a SessionId has the (string) shape as follows:
<connection protocol identifier> - <protocol specific address>
Instead of using the separator "-" directly, one should use the constant SessionId.PROTO_SEPARATOR. The remaining part will probably always have the shape IP:port (unless you define your
13
own communication protocol and want another way of representing an address). In the previous
examples you can see the textual representations of these identifiers (in particular we used only
TCP so far).
One can access the connection protocol identifier of a SessionId by using the method getConnectionProtocolId(). Moreover, given a string, one can obtain a SessionId object by using
the static method parseSessionId(), which also throws a ProtocolException in case the passed
string is not a valid SessionId.
Example 3.5 (examples.net.GenericServer). The following class implements a generic server;
the server is called “generic” in the sense that it does not depend on the low level connection
protocol, which can then be TCP, UDP, or something else.
public class GenericServer {
public GenericServer(String host) throws ProtocolException, IOException {
SessionStarterTable sessionStarterTable = new IMCSessionStarterTable();
SessionId sessionId = SessionId.parseSessionId(host);
System.out.println("accepting session " + sessionId + " ...");
ProtocolStack protocolStack = new ProtocolStack();
Session session =
protocolStack.accept(sessionStarterTable.createSessionStarter(sessionId));
System.out.println("established session " + session);
while (true) {
UnMarshaler unMarshaler = protocolStack.createUnMarshaler();
System.out.println("read line: " + unMarshaler.readStringLine());
protocolStack.releaseUnMarshaler();
}
}
public static void main(String[] args) throws Exception {
String host = "tcp" + SessionId.PROTO_SEPARATOR + "localhost:9999";
if (args.length > 0)
host = args[0];
new GenericServer(host);
}
}
First, the passed string is converted to a SessionId; then a SessionStarter is created through
a IMCSessionStarterTable. Then, a ProtocolStack is used to accept a session (through the
session starter) and to read lines.
The main method accepts a session identifier at the command line, or, if none is specified, uses
the default one (meaning that it listens for incoming connections on the interface localhost on
port 9999):
tcp-localhost:9999
So, the server can also be started to accept communications by using UDP, instead of TCP, by simply
using a session identifier like the following:
udp-localhost:9999
2
Example 3.6 (examples.net.GenericClient). The following class implements a generic client that
it does not depend on the low level connection protocol, which can then be TCP, UDP, or something
else.
14
public class GenericClient {
public GenericClient(String host) throws ProtocolException, IOException {
SessionStarterTable sessionStarterTable = new IMCSessionStarterTable();
SessionId sessionId = SessionId.parseSessionId(host);
System.out.println("creating session " + sessionId + " ...");
ProtocolStack protocolStack = new ProtocolStack();
Session session =
protocolStack.connect(sessionStarterTable.createSessionStarter(sessionId));
System.out.println("established session " + session);
UnMarshaler console = new IMCUnMarshaler(System.in);
while (true) {
System.out.print("insert line: ");
String line = console.readStringLine();
Marshaler marshaler = protocolStack.createMarshaler();
marshaler.writeStringLine(line);
protocolStack.releaseMarshaler(marshaler);
}
}
public static void main(String[] args) throws Exception {
String host = "tcp" + SessionId.PROTO_SEPARATOR + "localhost:9999";
if (args.length > 0)
host = args[0];
new GenericClient(host);
}
}
The code is similar to Example 3.5, but it performs client-side operations.
2
As said above, the classes presented in Examples 3.5 and 3.6 can be used independently from
the low level communication protocol. For instance, this is a server session over UDP:
java examples.net.GenericServer udp-localhost:9999
accepting session udp-localhost:9999 ...
established session udp-127.0.0.1:9999->udp-127.0.0.1:1035
read line: Hello World!
read line: How's it going?
and this is the corresponding client session:
java examples.net.GenericClient udp-localhost:9999
creating session udp-localhost:9999 ...
established session udp-127.0.0.1:1035->udp-127.0.0.1:9999
insert line: Hello World!
insert line: How's it going?
Notice that in Example 3.3, the server performs only one createUnMarshaler() invocation and
then uses the same unmarshaler to read lines:
UnMarshaler unMarshaler = protocolStack.createUnMarshaler();
while (true) {
System.out.println("read line: " + unMarshaler.readStringLine());
}
This code basically assumes that a connection is always present, i.e., it implicitly relies on a
connection-oriented protocol. In fact, each time the method createUnMarshaler() is invoked a
15
new input “transmission” is started (just like each time the method createMarshaler() is invoked
a new output “transmission” is started).
For UDP a transmission corresponds to a UDP packet. So each time createUnMarshaler() is
called a new UnMarshaler is returned (correspondingly for createMarshaler() and Marshaler).
For TCP the same UnMarshaler (resp. Marshaler) is returned.
Thus, if a protocol relies on packets for communications can be easily abstracted as shown
in Examples 3.5 and 3.6 (the server requires that each line is sent with a separate transmission,
and the client respects this protocol); if it relies on an interactive session (e.g., telnet), it will be
probably too tied to TCP to be abstracted.
Finally, the examples of Section 2 can be smoothly adapted to sessions. For instance, the
customized layer of Example 2.2 can be composed into the stacks shown in this section.
As hinted at the beginning of this section, the same session starter can be used to perform
many accept’s; of course, each accept will return a different session (basically, it has the same role
of a ServerSocket). Thus a generic multi threaded server can be easily programmed as in the
following example.
Example 3.7 (examples.net.GenericMultiServer). The following server uses the same SessionStarter instance to accept sessions from multiple clients. For each session, a different thread is
spawned.
public class GenericMultiServer {
public class ClientHandler extends Thread {
private ProtocolStack protocolStack;
ClientHandler(ProtocolStack protocolStack) {
this.protocolStack = protocolStack;
}
public void run() {
try {
String session = protocolStack.getSession().toString();
while (true) {
UnMarshaler unMarshaler;
unMarshaler = protocolStack.createUnMarshaler();
System.out.println("(" + session + ")" +
" read line: " + unMarshaler.readStringLine());
protocolStack.releaseUnMarshaler();
}
} catch (Exception e) {
e.printStackTrace();
return;
}
}
}
public GenericMultiServer(String host) throws ProtocolException, IOException {
SessionStarterTable sessionStarterTable = new IMCSessionStarterTable();
SessionId sessionId = SessionId.parseSessionId(host);
System.out.println("accepting session " + sessionId + " ...");
SessionStarter sessionStarter = sessionStarterTable.createSessionStarter(sessionId);
while (true) {
ProtocolStack protocolStack = new ProtocolStack();
Session session = protocolStack.accept(sessionStarter);
System.out.println("established session " + session);
new ClientHandler(protocolStack).start();
}
16
State b
State e
State a
State d
State c
P
r
o
t
o
c
o
l
S
t
a
c
k
remove
header
Layer x
add
header
remove
header
Layer y
add
header
remove
header
Layer z
add
header
Figure 2: Protocol States and Protocol Stack Abstractions.
}
public static void main(String[] args) throws Exception {
String host = "tcp" + SessionId.PROTO_SEPARATOR + "localhost:9999";
if (args.length > 0)
host = args[0];
new GenericMultiServer(host);
}
}
Now, the same server can communicate with multiple clients:
accepting session tcp-localhost:9999 ...
established session tcp-127.0.0.1:9999->tcp-127.0.0.1:4148
established session tcp-127.0.0.1:9999->tcp-127.0.0.1:4149
(tcp-127.0.0.1:9999->tcp-127.0.0.1:4149) read line: Hi from me!
(tcp-127.0.0.1:9999->tcp-127.0.0.1:4148) read line: Hello from me too!
2
4
Protocol States
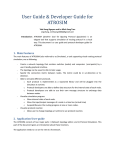
A protocol can be described as a state automaton, i.e., as an aggregation of states. These states
rely on a ProtocolStack for reading and writing (Figure 2). Thus, protocol states enjoy the
abstractions provided by the protocol stack.
The ProtocolState abstract class is summarized as follows:
public abstract class ProtocolState extends EventGeneratorAdapter {
abstract void enter(Object param, TransmissionChannel transmissionChannel)
throws ProtocolException;
17
void close() throws ProtocolException;
void setProtocolStack(ProtocolStack protocolStack);
String getNextState();
void setNextState(String state);
Marshaler createMarshaler() throws ProtocolException;
UnMarshaler createUnMarshaler() throws ProtocolException;
void releaseMarshaler(Marshaler marshaler) throws ProtocolException;
void releaseUnMarshaler(UnMarshaler unMarshaler) throws ProtocolException;
}
The abstract enter() method is used to enter the state; upon returning, this method should
return the identifier (a string) of the next state to enter. This method may receive a parameter
that is specific of the protocol that is being implemented, and a TransmissionChannel (which
basically includes a Marshaler object and an UnMarshaler object and delegates the methods of
their interfaces to them). Notice that this class also provides features for events (described in
Section 7). Moreover, this class allows to access the underlying ProtocolStack methods.
The protocol states are then aggregated into a Protocol object. The Protocol class is summarized as follows:
public class Protocol extends EventGeneratorAdapter {
/** The start state identifier. */
static public final String START = "START";
/** The end state identifier. */
static public final String END = "END";
/**
* Starts the execution of the protocol from the start state until it
* reaches the end state. In case an exception is raised during the
* execution of the protocol states, the protocol terminates with that
* exception. The passed parameter and the passed transmissionChannel are
* passed to the start state.
*
* @param param
*
The argument to pass to the start state.
* @param transmissionChannel
*
The transmissionChannel to pass to the start state.
*
* @throws ProtocolException
*/
public final void start(Object param,
TransmissionChannel transmissionChannel) throws ProtocolException;
public final void start() throws ProtocolException {
start(null, null);
}
public final void start(TransmissionChannel transmissionChannel)
throws ProtocolException {
start(null, transmissionChannel);
}
/**
* Closes the protocol by invoking close on the stack.
*
* @throws ProtocolException
*/
public final void close() throws ProtocolException
18
/**
* Sets the state for the specific state identifier.
*
* @param state_id
*
The state identifier.
* @param state
*
The state representing this identifier.
*
* @throws ProtocolException
*
If a state with this identifier is already registered.
*/
public void setState(String state_id, ProtocolState state)
throws ProtocolException
/**
* Removes the state associated to the specified id and returns it.
*
* @param state_id
*
The state id of the state to remove.
*
* @return The state associated to the specified id.
*/
public ProtocolState removeState(String state_id)
public final ProtocolStack getProtocolStack()
public final void setProtocolStack(ProtocolStack protocolStack)
public void insertLayer(ProtocolLayer layer)
public Session accept(SessionStarter sessionStarter) throws ProtocolException
public Session connect(SessionStarter sessionStarter) throws ProtocolException
}
After a Protocol object is created it must be assigned a ProtocolStack (with the corresponding set-method); alternatively, ProtocolLayer objects can be inserted with the insertLayer()
method.
A Protocol can be populated with ProtocolState objects by using the setState() method:
when inserting a state, one must also specify its identifier within the protocol. Two identifiers are
different from the others, i.e., Protocol.START and Protocol.END that designate the initial state
and the final state, respectively. In particular Protocol has two specific constructors: one that
takes one ProtocolState as argument that will be set as the start state, and another with two
ProtocolState arguments, where the second one is considered the end state.
When the Protocol object is set up, the protocol can be started by using the method start().
The passed parameters will be passed to the initial state of the protocol. The start() method
implements the execution of the state automaton, by relying on the next state identifier returned by
each state (getNextState() in ProtocolState). A ProtocolState can be specified its next state
either at the constructor or with the method setNextState(). After the final state is executed,
the method returns. Usually, before starting a protocol, one calls the accept (on the server side)
or the connect (on the client side) to ensure that the underlying ProtocolStack is ready. The
signatures of these methods are the same as in the ProtocolStack, and indeed, these methods in
the Protocol class simply rely on the methods of ProtocolStack class.
The states of the protocol can then implicitly use this ProtocolStack, through the methods createUnMarshaler(), releaseUnMarshaler(), createMarshaler() and releaseUnMarshaler() whose homonym versions we discussed in Session 2. Notice, however, that a state of a
19
protocol might not need to retrieve another marshaler/unmarshaler (for instance if it is used only
to deal with a specific part of a packet contents). For this reason the method enter() can be
passed a TransmissionChannel object, which is basically a structure containing a Marshaler and
an UnMarshaler. In order for a state to be reusable, it should always check whether the passed
TransmissionChannel already contains an unmarshaler (a marshaler, resp.); if it does it should
that one, without creating a brand new one by using the stack. For instance, for an UnMarshaler,
it should perform
UnMarshaler unMarshaler = null;
if (transmissionChannel == null || transmissionChannel.unMarshaler == null) {
unMarshaler = up();
} else {
unMarshaler = transmissionChannel.unMarshaler;
}
Since these operations are so recurrent, the ProtocolState already provides the methods to perform them: getUnMarshaler() and getMarshaler() that take a TransmissionChannel as argument and return an UnMarshaler and a Marshaler respectively.
Example 4.1 (protocols.EchoProtocolState). The following EchoProtocolState simply reads a
line and sends it back.
public class EchoProtocolState extends ProtocolStateSimple {
public EchoProtocolState(String next_state) {
super(next_state);
}
public void enter(Object param, TransmissionChannel transmissionChannel)
throws ProtocolException {
try {
UnMarshaler unMarshaler = getUnMarshaler(transmissionChannel);
String line = unMarshaler.readStringLine();
releaseUnMarshaler(unMarshaler);
Marshaler marshaler = getMarshaler(transmissionChannel);
marshaler.writeStringLine(line);
releaseMarshaler(marshaler);
} catch (IOException e) {
throw new ProtocolException(e);
}
}
}
Notice how the getUnMarshaler() and getMarshaler() are used.
2
Example 4.2 (examples.EchoClientState). Here we show a protocol state that can be used as
the client side of an echo protocol message exchange: this state reads a line from a given input
unmarshaler, puts it into the stack, waits for a line from the stack and writes it into a given output
marshaler.
public class EchoClientState extends ProtocolStateSimple {
private UnMarshaler input;
private Marshaler output;
public EchoClientState(UnMarshaler unMarshaler, Marshaler marshaler) {
this.input = unMarshaler;
this.output = marshaler;
}
20
public void enter(Object param, TransmissionChannel transmissionChannel)
throws ProtocolException {
try {
System.out.print("Reading a string to send ");
String toSend = input.readStringLine();
Marshaler marshaler = getMarshaler(transmissionChannel);
marshaler.writeStringLine(toSend);
releaseMarshaler(marshaler);
output.writeStringLine("sent: " + toSend);
UnMarshaler unMarshaler = getUnMarshaler(transmissionChannel);
String received = unMarshaler.readStringLine();
output.writeStringLine("received: " + received);
releaseUnMarshaler(unMarshaler);
} catch (IOException e) {
throw new ProtocolException(e);
}
}
}
Such a state can be initialized with an unmarshaler attached to System.in and a marshaler attached to System.out, so that the state will wait for an input string from the console, and once it
received a string it prints it on the screen:
EchoClientState echoClientState =
new EchoClientState(
new IMCUnMarshaler(System.in),
new IMCMarshaler(System.out));
2
For instance, this is used in Example 6.2.
In Example 3.5 we presented a generic server in the sense that it is independent from the
underlying transmission layer. Here we go a step further and abstract such a server also from the
executed protocol:
Example 4.3 (examples.protocol.GenericServer). The following class implements a generic server; the server is called “generic” in the sense that it does not depend on the low level connection
protocol, which can then be TCP, UDP, or something else. Moreover, it also abstracts from the
specific protocol executed.
public class GenericServer {
public GenericServer(String host, Protocol protocol) throws ProtocolException, IOException
{
SessionStarterTable sessionStarterTable = new IMCSessionStarterTable();
SessionId sessionId = SessionId.parseSessionId(host);
System.out.println("accepting session " + sessionId + " ...");
ProtocolStack protocolStack = new ProtocolStack();
Session session = protocolStack.accept(sessionStarterTable.createSessionStarter(sessionId));
System.out.println("established session " + session);
System.out.println("starting protocol... ");
protocol.setProtocolStack(protocolStack);
protocol.start();
protocol.close();
System.out.println("protocol terminated");
}
}
21
2
(Similarly, also the multi server of Example 3.7 can be abstracted from the executed protocol.)
We can now use the generic server of Example 4.3 together with the protocol state of Example 4.1
in order to build an echo server that is independent from the underlying transmission layer:
Example 4.4 (examples.protocol.EchoServer). Here we build a Protocol object with a EchoProtocolState of Example 4.1 (this is the only state of the protocol, in fact the next state is just
the end state) and pass it to the generic server of Example 4.3.
public class EchoServer {
public EchoServer(String host) throws ProtocolException, IOException {
Protocol protocol = new Protocol(new EchoProtocolState(Protocol.END));
new GenericServer(host, protocol);
}
public static void main(String[] args) throws Exception {
String host = "tcp" + SessionId.PROTO_SEPARATOR + "localhost:9999";
if (args.length > 0)
host = args[0];
new EchoServer(host);
}
}
2
The protocol automaton typically enters another state upon receiving a specific request. For
this reason one easily ends up in writing code such as the following:
String request = unmarshaler.readStringLine();
if (request == ...) {
// handle request
} else if (request == ...) {
// handle request
} else if (request == ...) {
// handle request
} else {
// ERROR: unknown request
}
In order to avoid such recurrent code, the framework provides a specialized protocol state, ProtocolSwitchState. The enter() is already specialized in order to read a line, containing the
request, and to read to the state associated to such request. One can then initialize this state with
the proper associations by using one of the following methods:
public class ProtocolSwitchState extends ProtocolStateAdapter {
public void addRequestState(String request, ProtocolState state)
public void addRequestState(String request, String next)
}
So one can associate a state to a request either by specifying a ProtocolState or its identifier.
The same state can be associated to different requests (see, e.g., Example 4.5); for this reason
the read request line is always passed to the corresponding state’s enter() as the first parameter.
22
In particular ProtocolSwitchState also handles unknown requests, by sending back the string
"FAIL: UNKNOWN REQUEST"; one can customize such string with method setUnknownRequest. We
will demonstrate the use of this class in the following examples, where we develop a slightly more
complex protocol.
Example 4.5 (examples.protocol.WriteReadServer). We want to develop a simple server that
accepts WRITE/ READ/REMOVE requests. In particular when it receives an input such
WRITE
<text to write>
it stores the text line into a list and answers with an OK line. When it receives a READ request line it
answers with the first string that’s in the list (or it says that there’s no string) and when it receives
a REMOVE request it acts like a READ but also removes the string from the list. Furthermore, when it
receives QUIT it terminates.
This is the state that handles a WRITE request:
public class WriteState extends ProtocolStateSimple {
public WriteState(String next_state) {
super(next_state);
}
public void enter(Object param, TransmissionChannel transmissionChannel)
throws ProtocolException {
String line = "";
try {
line = transmissionChannel.readStringLine();
strings.add(line);
realeaseUnMarshaler(transmissionChannel.unMarshaler);
Marshaler marshaler = createMarshaler();
marshaler.writeStringLine("OK");
releaseMarshaler(marshaler);
} catch (IOException e) {
throw new ProtocolException(e);
}
}
}
Notice that this state assumes that the passed TransmissionChannel is already set up for reading
(but not for writing). It simply reads the next line containing the text of the message (the WRITE
string has already been removed from the input) and stores it into the list.
This is the state that handles both READ and REMOVE requests:
public class ReadState extends ProtocolStateSimple {
public ReadState(String next_state) {
super(next_state);
}
public void enter(Object param, TransmissionChannel transmissionChannel)
throws ProtocolException {
String line = "";
try {
try {
if (param.equals("REMOVE"))
line = strings.remove(0);
else
line = strings.get(0);
23
} catch (IndexOutOfBoundsException ie) {
line = "ERROR: nothing to read or remove";
}
Marshaler marshaler = createMarshaler();
marshaler.writeStringLine(line);
releaseMarshaler(marshaler);
} catch (IOException e) {
throw new ProtocolException(e);
}
}
}
The state checks whether it has been entered due to a READ or REMOVE request (passed as the first
parameter), and acts according to it.
We can now put all things together:
public class WriteReadServer {
List<String> strings = Collections.synchronizedList(new LinkedList<String>());
public class ReadState extends ProtocolStateSimple { ... }
public class WriteState extends ProtocolStateSimple { ... }
public WriteReadServer(String host) throws ProtocolException, IOException {
ProtocolSwitchState protocolSwitchState = new ProtocolSwitchState(Protocol.START);
protocolSwitchState.addRequestState("WRITE", new WriteState(Protocol.START));
protocolSwitchState.addRequestState("READ", new ReadState(Protocol.START));
protocolSwitchState.addRequestState("REMOVE", new ReadState(Protocol.START));
protocolSwitchState.addRequestState("QUIT", Protocol.END);
Protocol protocol = new Protocol();
protocol.setState(Protocol.START, protocolSwitchState);
new GenericServer(host, protocol);
}
public static void main(String[] args) throws ProtocolException, IOException {
String host = "tcp" + SessionId.PROTO_SEPARATOR + "localhost:9999";
if (args.length > 0)
host = args[0];
new WriteReadServer(host);
}
}
The code relies on the generic server of Example 4.3. The protocol relies on an instance of ProtocolSwitchState that is properly initialized, by associating the right state to a request (in particular
each state is configured so that the next state to execute is again in the initial state, i.e., the ProtocolSwitchState). Moreover, the QUIT request is simply associated to the final state, so that, when
it receives such a string, it simply closes the protocol. Notice that, if the ProtocolSwitchState
was not initialized with the start state as the next state, in case of an unknown request the protocol
would terminate.
Now let us try to interact with the server via a telnet session:
telnet localhost 9999
Trying 127.0.0.1...
24
Escape character is '^]'.
Hello World!
FAIL: UNKNOWN REQUEST
WRITE
Hello World!
OK
WRITE
How's it going?
OK
READ
Hello World!
REMOVE
Hello World!
READ
How's it going?
REMOVE
How's it going?
REMOVE
ERROR: nothing to read or remove
QUIT
Connection closed by foreign host.
2
If we want to test this server over UDP we will not have to modify a single line. However, we
cannot use telnet to interact with the server over UDP. So let us write a minimal generic client that
allows to interact to servers both over TCP and UDP.
Example 4.6 (examples.protocol.GenericClientConsole). The following client has a command
line interface: it reads lines and sends all the buffered lines to the server when the user inserts a
single dot `.' in a line. A concurrent thread will read responses from the server.
public class GenericClientConsole {
public class ReceiverThread extends Thread {
ProtocolStack protocolStack;
public ReceiverThread(ProtocolStack protocolStack) {
this.protocolStack = protocolStack;
}
public void run() {
try {
while (true) {
UnMarshaler unMarshaler = protocolStack.createUnMarshaler();
while (unMarshaler.available() > 0) {
System.out.print((char) unMarshaler.readByte());
}
protocolStack.releaseUnMarshaler();
}
} catch (Exception e) {
e.printStackTrace();
System.out.println("lost connection with the server.");
System.exit(0);
}
}
}
25
public GenericClientConsole(String host) throws ProtocolException, IOException {
SessionStarterTable sessionStarterTable = new IMCSessionStarterTable();
SessionId sessionId = SessionId.parseSessionId(host);
System.out.println("creating session " + sessionId + " ...");
ProtocolStack protocolStack = new ProtocolStack();
Session session = protocolStack.connect(sessionStarterTable.createSessionStarter(sessionId));
System.out.println("established session " + session);
// start the thread that reads answers
new ReceiverThread(protocolStack).start();
UnMarshaler console = new IMCUnMarshaler(System.in);
System.out.println("insert message terminated by a line containing only one .");
while (true) {
StringBuffer stringBuffer = new StringBuffer();
while (true) {
String line = console.readStringLine();
if (line.equals("."))
break;
stringBuffer.append(line + "\n");
}
Marshaler marshaler = protocolStack.createMarshaler();
marshaler.writeBytes(stringBuffer.toString());
protocolStack.releaseMarshaler(marshaler);
}
}
public static void main(String[] args) throws ProtocolException, IOException {
String host = "tcp" + SessionId.PROTO_SEPARATOR + "localhost:9999";
if (args.length > 0)
host = args[0];
new GenericClientConsole(host);
}
}
Notice that the ReceiverThread obtains a new unmarshaler each time it does not find any more
bytes to read from the unmarshaler. This makes it work smoothly both over TCP and UDP: as
hinted before, in the former case the unmarshaler returned by createUnMarshaler() is always
the same, and in the latter a new unmarshaler is returned only when a new DatagramPacket is
received.
Now we can run the server of Example 4.5 in “UDP mode” and test it with our client as follows:
java examples.protocol.GenericClientConsole udp-localhost:9999
creating session udp-localhost:9999 ...
established session udp-127.0.0.1:1026->udp-localhost:9999
insert message terminated by a line containing only one .
WRITE
Hello World!
.
OK
READ
.
Hello World!
2
26
5
Mobility
The purpose of the sub-package for code mobility in the IMC framework is to provide the basic
functionalities for making code mobility transparent to the programmer; all issues related to code
marshaling and code dispatch are handled automatically by the classes of the framework. Its
components are designed to deal with object marshalling, code migration, and dynamic loading of
code.
We describe the basic functionalities for code mobility provided by the package org.mikado.imc.mobility (referred to as mobility from now on). We will go into details of some parts
of the package in order to describe its architecture. However, let us stress that the user of the
package needs not know all these details: as shown later by the examples, the steps to use the
package are minimal, although some parts are still open to possible customizations. This package
defines the basic abstractions for code marshalling and unmarshaling and also implements the
classes for handling Java byte-code mobility transparently.
The base classes and the interfaces of this package abstract away from the low level details
of the code that migrates. By redefining specific classes of the package, the framework can be
adapted to deal with different code mobility frameworks. Nowadays, most of these frameworks
actually exchange Java byte-code itself. For this reason, the concrete classes of the framework
deal with Java byte-code mobility, and provide functionalities that can be already used, without
interventions, to build the code mobility part of a Java-based code mobility framework.
When code (e.g., a process or an object) is moved to a remote computer, its classes may be
unknown at the destination site. It might then be necessary to make such code available for
execution at remote hosts; this can be done basically in two different ways: automatic approach,
i.e., the classes needed by the moved process are collected and delivered together with the process;
on-demand approach, i.e., the class needed by the remote computer that received a process for
execution is requested to the server that did send the process. We follow the automatic approach
because it complies better with the mobile agent paradigm: when migrating, an agent takes with
it all the information that it may need for later executions. This approach respects the main aim of
this package, i.e., it makes the code migration details completely transparent to the programmer,
so that he will not have to worry about classes movement. Our choice has also the advantage
of simplifying the handling of disconnected operations (the agent can execute even if the owner
is not connected). This may not be possible with the on-demand approach: the server that sent
the process must always be on-line in order to provide the classes needed by remote hosts. The
drawback of this approach is that code that may never be used by the mobile agent or that is
already provided by the remote site is also shipped; for this reason we also enable the programmer
to choose whether this automatic code collection and dispatching should be enabled.
With the automatic approach, an object will be sent along with its class binary code, and with
the class code of all the objects it uses. Obviously, only the code of user defined classes has to be
sent, as the other code (e.g., Java class libraries and the classes of the mobility package itself) has
to be common to every application. This guarantees that classes belonging to Java standard class
libraries are not loaded from other sources (especially, the network); this would be very dangerous,
since, in general, such classes have many more access privileges with respect to other classes.
The package defines the empty interface MigratingCode that must be implemented by the
classes representing a code that has to be exchanged among distributed site. This code is intended
to be transmitted in a MigratingPacket, stored in the shape of a byte array:
public class MigratingPacket implements java.io.Serializable {
public MigratingPacket(byte[] b) {...}
public byte[] getObjectBytes() {...}
}
How a MigratingCode object is stored in and retrieved from a MigratingPacket is taken care
of by the these two interfaces:
public interface MigratingCodeMarshaler {
MigratingPacket marshal(MigratingCode code) throws IOException;
27
}
public interface MigratingCodeUnMarshaler {
MigratingCode unmarshal(MigratingPacket p)
throws InstantiationException, IllegalAccessException,
ClassNotFoundException, IOException;
}
Starting from these interfaces, the package mobility provides concrete classes that automatically deal with migration of Java objects together with their byte-code, and for transparently
deserializing such objects by dynamically loading their transmitted byte-code. These classes are
described in the following.
All the nodes that are willing to accept code from remote sites must have a custom class loader:
a NodeClassLoader supplied by the mobility package. When a remote object or a migrating
process is received from the network, before using it, the node must add the class binary data
(received along with the object) to its class loader’s table. Then, during the execution, whenever
a class code is needed, if the class loader does not find the code in the local packages, then it can
find it in its own local table of class binary data. The most important methods that concern a node
willing to accept code from remote sites are addClassBytes to update the loader’s class table, as
said above, and forceLoadClass to bootstrap the class loader mechanism, as explained later:
public class NodeClassLoader extends java.lang.ClassLoader {
public void addClassBytes(String className, byte[] classBytes) {...}
public Class forceLoadClass(String className) {...}
}
We define a base class for all objects/processes that can migrate to a remote site, JavaMigratingCode, implementing the above mentioned interface, MigratingCode, that provides all the
procedures for collecting the Java classes that the migrating object has to bring to the remote site.
Unfortunately, Java only provides single inheritance, thus providing a base class might restrict its
usability. The problem arises when dealing with threads: the interface Runnable in the standard
Java class library could solve the above issue but requires additional programming. For this reason
we make JavaMigratingCode a subclass of java.lang.Thread (with an empty run method), so
that JavaMigratingCode can be extended easily by classes that are meant to be threads. Thus, the
most relevant methods for the programmer are the following ones:
public class JavaMigratingCode extends Thread implements MigratingCode {
public void run() { /* empty */ }
public JavaMigratingPacket make_packet() throws IOException {...}
}
The programmer will redefine run if its class is intended to represent a thread. The method make_packet() will be used directly by the other classes of the framework or, possibly, directly by the
programmer, to build a packet containing the serialized (marshalled) version of the object that has
to migrate together with all its needed byte code. Thus, this method will actually take care of all
the code collection operations. The names of user defined classes can be retrieved by means of class
introspection (Java Reflection API). Just before dispatching a process to a remote site, a recursive
procedure is called for collecting all classes that are used by the process when declaring: data
members, objects returned by or passed to a method/constructor, exceptions thrown by methods,
inner classes, the interfaces implemented by its class, the base class of its class.
two classes, implementing the above mentioned interfaces MigratingCodeMarshaler and MigratingCodeUnMarshaler, JavaByteCodeMarshaler and JavaByteCodeUnMarshaler, will take
care of actually marshalling and unmarshaling a JavaMigratingPacket containing a migrating
object and its code. In particular, the first one will basically rely on the method make_packet() of
28
JavaMigratingCode, while the second one will rely on NodeClassLoader to load the classes stored
in the JavaMigratingPacket and then on Java serialization to actually deserialize the migrating
code contained in the packet.
A Marshaler and an UnMarshaler can be specified a MigratingCodeFactory that will be used
internally to send and retrieve code when migrating an object. This can be done either at the
constructor or by using the method setMigratingCodeFactory(). In particular, the JavaByteMigratingCodeFactory class is already provided by the framework, that implements the Java bytecode migration technique described above. In particular, such JavaByteMigratingCodeFactory
can be specified a NodeClassLoader that will be used during byte-code dispatching and retrieving.
Example 5.1 (examples.mobility.MobileCodeExample). The following example writes a migrating code into a file and then reads it back. Notice that we use a JavaByteMigratingCodeFactory
where we set a NodeClassLoader; we initialize the NodeClassLoader with true because we want
to force it to always load a class from the byte-code that comes with the migrating code.
public class MigratingCodeExample {
public static void main(String args[]) throws Exception {
JavaByteCodeMigratingCodeFactory javaByteCodeMigratingCodeFactory =
new JavaByteCodeMigratingCodeFactory();
javaByteCodeMigratingCodeFactory
.setNodeClassLoader(new NodeClassLoader(true));
Marshaler marshaler = new IMCMarshaler(new FileOutputStream("foo.bin"),
javaByteCodeMigratingCodeFactory);
marshaler.writeMigratingCode(new MyMobileCode());
marshaler.flush();
UnMarshaler unMarshaler = new IMCUnMarshaler(new FileInputStream(
"foo.bin"), javaByteCodeMigratingCodeFactory);
MigratingCode migratingCode = unMarshaler.readMigratingCode();
System.out.println("migrating code class: "
+ migratingCode.getClass().getCanonicalName());
}
}
2
The class JavaMigratingCode provides a method, setExcludeClasses() that allows to specify
which classes must not be inserted in the packet. We remind that the mobility package already
excludes all the Java system classes and the classes of the framework itself. An alternative to setExcludeClasses() is the method addExcludePackage() that allows to exclude a whole package
(or several packages) from the set of classes that are delivered together with a migrating object.
For instance,
code.addExcludePackage("mypackage.");
6
Nodes & Processes
The framework already provides some implemented protocols to deal with sessions. This can be
used to implement several network topology structures: a flat network where only one server
manages connections and all the clients are at the same level; a hierarchical network where a
client can be in turn a server and where the structure of the network can be a tree or, in general,
an acyclic graph of nodes; or, a peer-to-peer network.
A participant to a network is an instance of the class Node contained in the framework. A
node is also a container of running processes that can be thought of as the computational units.
29
The framework provides all the means for a process to access the resources contained in a node
and to migrate to other nodes. Thus, a developer of a distributed and mobile code system has all
the means to start to implement its own infrastructure or the run-time system for a mobile code
language.
A process is a subclass of the class NodeProcess that implements the JavaMigratingCode base
class (this allows to easily migrate a process to a remote site), and can be added to a node for
execution with the method addNodeProcess of the class Node. A NodeProcess has the following
interface:
public abstract class NodeProcess extends JavaMigratingCode {
public abstract void execute();
public final void run() { /* framework initialization operations; then call execute() */ }
public EventManager getEventManager();
public void setEventManager(EventManager eventManager);
public ProtocolStack getNodeStack(NodeLocation nodeLocation);
public void addNodeProcess(NodeProcess nodeProcess) throws IMCException;
public void executeNodeProcess(NodeProcess nodeProcess)
throws InterruptedException, IMCException;
}
Thus, a node keeps track of all the processes that are currently in execution. A concurrent process
is started by calling start() on the NodeProcess thread; the final implementation of run will
initialize the process structure (not detailed here) and then invoke execute that must be provided
by the programmer. Apart from methods dealing with events (see Section 7) a process is allowed
to spawn another process with the method addNodeProcess, and to retrieve a ProtocolStack
given a specific NodeLocation. The programmer can provide its implementation of the concept of
NodeLocation to address in a unique way a node in the net (by default the string representation
of a SessionId, is used). If there is a session with a node, then a location is mapped by the session
manager into a protocol stack. Thus a process can retrieve a stack to run its own protocols with a
remote node. The difference between addNodeProcess and executeNodeProcess is that while the
former spawns the passed NodeProcess for concurrent execution, the latter waits for the passed
NodeProcess to terminate before returning.
A different kind of process, called node coordinator, is allowed to execute privileged actions,
such as establishing a session, accepting connections from other nodes, closing a session, etc. Standard processes are not given these privileges, and this allows to separate processes that deal with
node configurations from standard programs executing on nodes. For these processes a specialized
class is provided called NodeCoordinator.
public abstract class NodeCoordinator extends Thread {
public abstract void execute() throws IMCException;
public final void run() { /* framework initialization operations; then call execute() */ }
public EventManager getEventManager();
public void setEventManager(EventManager eventManager);
public ProtocolStack getNodeStack(NodeLocation nodeLocation);
public void addNodeCoordinator(NodeCoordinator nodeCoordinator);
public void addNodeProcess(NodeProcess nodeProcess);
public void executeNodeCoordinator(NodeCoordinator nodeCoordinator)
throws InterruptedException;
public void executeNodeProcess(NodeProcess nodeProcess)
throws InterruptedException;
public ProtocolStack connect(SessionId sessionId) throws ProtocolException;
public void connect(SessionId sessionId, Protocol protocol) throws ProtocolException;
public void acceptAndStart(SessionId sessionId, Protocol protocol)
throws ProtocolException;
public Protocol accept(SessionId sessionId, Protocol protocol)
throws ProtocolException;
public ProtocolStack accept(SessionId sessionId) throws ProtocolException;
30
public void disconnect(ProtocolStack protocolStack) throws ProtocolException;
public ProtocolStack accept(SessionStarter sessionStarter) throws ProtocolException;
public void acceptAndStart(SessionStarter sessionStarter, Protocol protocol)
throws ProtocolException ;
public Protocol accept(SessionStarter sessionStarter, Protocol protocol)
throws ProtocolException;
public ProtocolStack connect(SessionStarter sessionStarter) throws ProtocolException ;
public void connect(SessionStarter sessionStarter, Protocol protocol)
throws ProtocolException;
public SessionStarter createSessionStarter(SessionId sessionId) throws ProtocolException ;
}
Notice that, although it has some methods in common with a node process, a node coordinator is
NOT a specialization of node process. In particular, a node coordinator is not supposed to migrate
to a remote site (this would represent a threat to the remote site).
A node coordinator can spawn or execute other node coordinator (apart from standard node
processes). Moreover, it can establish sessions (described in Section 3). In particular, when using
the versions of accept that take a SessionId (instead of a SessionStarter), only one session will
be accepted, and after that the node will not listen for other connection requests on that identifier
(until the next accept, of course). The variant acceptAndStart also starts executing the passed
protocol.
6.1
Connections & Disconnections
Above the concept of sessions (Section 3) there is the (abstract) concept of connection/disconnection. Again this concept is abstract meaning that it does not assume a physical/permanent connection, but only the fact that the two peers have acknowledged on the fact that they are somehow
connected and they still haven’t disconnected. The framework provides two protocol states for this
issue: ConnectionManagementState and ConnectState. The former is used server-side listening
for a connection request, and the latter is used client-side to send a connection request. These
requests are transmitted once a Session has already been established. These two states communicate by simple strings: CONNECT, DISCONNECT and results are communicated with the strings OK
and FAIL. The above states already deal with errors, i.e., wrong strings, double CONNECT requests
on the same session, DISCONNECT before CONNECT etc. When receiving a correct DISCONNECT string,
the ConnectionManagementState also closes the underlying session. By default, a ConnectionManagementState does not keep track of an established session; since the state that waits for a
connection request is different from the one that waits for a disconnection request (they are different instances), the only way for these two states to act correctly is to share a SessionManager
that has the task of keeping track of all the established connections. This can be set by using the
setSessionManager (as shown in Example 6.1).
Furthermore, a ConnectState by default is used to establish a connection; if it must be used to
disconnect, one must specify this by using the method setDoConnect passing false as argument.
Example 6.1 (examples.topology.ConnectDisconnectServer). The following server waits for a
CONNECT request, then enter an echo state and finally waits for a DISCONNECT request.
public class ConnectDisconnectServer {
public static void main(String[] args) throws Exception {
SessionStarter sessionStarter =
new TcpSessionStarter(new IpSessionId("localhost", 9999));
Protocol protocol = new Protocol();
protocol.setState(Protocol.START, new ConnectionManagementState("ECHO"));
protocol.setState("ECHO", new EchoProtocolState(Protocol.END));
protocol.setState(Protocol.END, new ConnectionManagementState());
System.out.println("waiting for connections...");
31
Session session = protocol.accept(sessionStarter);
System.out.println("established session: " + session);
protocol.start();
System.out.println("protocol terminated");
}
}
The protocol is built according to the goal of this server (start with ConnectionManagementState that passes to the next state only after receiving a CONNECT string, then an echo state, and
finally another ConnectionManagementState that terminates the protocol only after receiving a
DISCONNECT string).
This server can be tested, as usual, with a telnet session. Here’s an example of the telnet session
where we intentionally make some mistakes:
$ telnet localhost 9999
Trying 127.0.0.1...
Connected to localhost.localdomain.
Escape character is '^]'.
Hello World!
FAIL
CONNECT
OK
Hello World!
Hello World!
CONNECT
OK
Notice that the first interaction results in a FAIL response, since the server waits for a CONNECT
string; on the second attempt we get an OK meaning that the server accepted our connection. Then
the next string is sent back as it is by the echo state. The final string should be a DISCONNECT and a
CONNECT string should result in a FAIL response, but this is not the case. This is due to the absence
of a shared session manager (as explained before). Thus, a correct implementation of the server is
the following:
public class ConnectDisconnectServer2 {
public static void main(String[] args) throws Exception {
SessionStarter sessionStarter =
new TcpSessionStarter(new IpSessionId("localhost", 9999));
Protocol protocol = new Protocol();
SessionManager sessionManager = new SessionManager();
ConnectionManagementState initialState = new ConnectionManagementState("ECHO");
initialState.setSessionManager(sessionManager);
protocol.setState(Protocol.START, initialState);
protocol.setState("ECHO", new EchoProtocolState(Protocol.END));
ConnectionManagementState finalState = new ConnectionManagementState();
finalState.setSessionManager(sessionManager);
protocol.setState(Protocol.END, finalState);
System.out.println("waiting for connections...");
Session session = protocol.accept(sessionStarter);
System.out.println("established session: " + session);
protocol.start();
System.out.println("protocol terminated");
32
}
}
If we now try the telnet session once again we will have the expected behavior:
$ telnet localhost 9999
Trying 127.0.0.1...
Connected to localhost.localdomain.
Escape character is '^]'.
Hello World!
FAIL
CONNECT
OK
Hello World!
Hello World!
CONNECT
FAIL
DISCONNECT
OK
Connection closed by foreign host.
2
Example 6.2 (examples.topology.ConnectDisconnectClient). Instead of using a telnet session
to interact with the server of Example 6.1, we can implement a client as follows:
public class ConnectDisconnectClient {
public static void main(String[] args) throws Exception {
SessionStarter sessionStarter =
new TcpSessionStarter(new IpSessionId("localhost", 9999));
Protocol protocol = new Protocol();
protocol.setState(Protocol.START, new ConnectState("ECHO"));
EchoClientState echoClientState =
new EchoClientState(new IMCUnMarshaler(System.in),
new IMCMarshaler(System.out));
echoClientState.setNextState(Protocol.END);
protocol.setState("ECHO", echoClientState);
ConnectState disconnect = new ConnectState();
disconnect.setDoConnect(false); // used for disconnection
protocol.setState(Protocol.END, disconnect);
System.out.println("establishing connection...");
Session session = protocol.connect(sessionStarter);
System.out.println("established session: " + session);
protocol.start();
System.out.println("protocol terminated");
}
}
Notice that on the client side, in order to interact with the echo state, we use the EchoClientState
of Example 4.2. The final state is still a ConnectState where we set explicitly that it is used for
disconnection (through the above mentioned method setDoConnect).
2
33
The framework also provides means to compose protocols: it permits create a new protocol
automaton by adding a new start and end state and embedding an existing protocol. In order to
do this one can use the specialized protocol class ProtocolComposite whose constructor takes the
start and the end state and the protocol to embed (the end state can be omitted).
Protocol composition is also used internally by the classes of the framework, for instance by
accept and connect in the class Node (they have the same signatures of the homonym methods
in NodeCoordinator shown before): these methods given a protocol, return a new protocol that
embeds the passed one and adds the ConnectionManagementStates (ConnectState, resp.) at the
beginning and at the end, and they also take care of using a specific SessionManager to keep track
of all the sessions. Thus, all the operations seen in the previous examples are not necessary when
using nodes and node coordinators. For example, this is the implementation of the accept:
public Protocol accept(SessionStarter sessionStarter, Protocol protocol)
throws ProtocolException {
ConnectionManagementState conn_state = new ConnectionManagementState();
conn_state.setSessionManager(sessionManager);
ConnectionManagementState end_conn_state = new ConnectionManagementState(Protocol.END);
end_conn_state.setSessionManager(sessionManager);
ProtocolComposite protocolComposite = new ProtocolComposite(conn_state,
end_conn_state, protocol);
protocolComposite.setEventManager(sessionManager.getEventManager());
protocolComposite.accept(sessionStarter);
return protocolComposite;
}
Now, let us see how to use these features inside a NodeCoordinator. For instance, it is quite
easy to program a node coordinator that, given a specific SessionId continuously waits for incoming connections. When it receives one, it will create a protocol instance through a ProtocolFactory (see the Javadoc documentation) and spawns a thread (in particular an instance of
ProtocolThread) for executing such protocol on the created session. These tasks are so recurrent
that a specialized node coordinator is provided by the framework itself: AcceptNodeCoordinator,
shown in the next example.
Example 6.3 (topology.AcceptNodeCoordinator). This is the simplified code of the AcceptNodeCoordinator class provided by the framework.
public class AcceptNodeCoordinator extends NodeCoordinator {
private ProtocolFactory protocolFactory;
private SessionId sessionId;
private SessionStarter sessionStarter;
public AcceptNodeCoordinator(ProtocolFactory protocolFactory, SessionId sessionId) {
this.protocolFactory = protocolFactory;
this.sessionId = sessionId;
}
public void execute() throws IMCException {
sessionStarter = createSessionStarter(sessionId);
while (true) {
Protocol protocol = protocolFactory.createProtocol();
new ProtocolThread(accept(sessionStarter, protocol)).start();
}
}
34
}
The protocol created through the factory, is passed to accept that will return a composed protocol
with the appropriate ConnectionManagementState’s as explained above.
2
Now, by using the above AcceptNodeCoordinator we can build an echo server as the one seen
in Example 6.1 more easily, as shown in the following example:
Example 6.4 (examples.echo.EchoApp). This example basically implements the same functionalities of Example 6.1 by using a node and a node coordinator.
public class EchoApp {
protected Node node;
protected int port;
public EchoApp(int port) {
this.port = port;
node = new Node();
}
public void start() throws ProtocolException {
node.addNodeCoordinator(new AcceptNodeCoordinator(
new ProtocolFactory() {
public Protocol createProtocol() {
return new Protocol(new EchoProtocolState(Protocol.END));
}
},
new IpSessionId(port)));
}
public static void main(String[] args) throws ProtocolException {
EchoApp echoApp = new EchoApp(9999);
echoApp.start();
}
}
2
Both node processes and node coordinators delegate most of their methods to the node they
are running in. However, they do not have access to the node itself (to avoid security problems):
this is achieved by using a proxy; thus, the processes (also the coordinators) delegate to the proxy
and not directly to the node. In particular, a NodeProcess uses a NodeProcessProxy and a NodeCoordinator a NodeCoordinatorProxy.
7
Events
The classes of the framework use events that can be intercepted in other classes. The main class
for events is the class Event:
public class Event {
public final Object getSource();
public String toString();
}
35
Given an event instance, it is possible to retrieve the “source” of the event by using the method
getSource. The source depends on the specific kind of event, and it can be null.
Events are caught and handed by instances of interface EventListener:
public interface EventListener {
void notify(Event event);
}
Example 7.1 (examples.event.BufferedListener). This is a simple listener that stores all the
events it receives, in a string form, into a buffer (this is similar to the class of the framework
LogEventListener).
public class BufferedListener implements EventListener {
StringBuffer buffer = new StringBuffer();
public void notify(Event event) {
buffer.append("received event: " + event.toString() + "\n");
}
}
2
The association between a specific kind of events and all the listeners for that event is kept by
an object of class EventManager:
public class EventManager {
public void addListener(String event, EventListener eventListener);
public void removeListener(String event, EventListener eventListener);
public void generate(String event_id, Event event);
}
An event is identified by a string; when the generate is invoked, it must be passed the string
identifying a specific kind of events, and the event itself. Then, the manager will take care of
invoking the notify on all the listeners that are registered for that kind of events, passing the
event that was generated.
Example 7.2 (examples.event.SimpleEvents). Here we use the BufferedListener of Example 7.1, in particular two different instances of it, and generate some simple events:
EventManager eventManager = new EventManager();
BufferedListener listener = new BufferedListener();
eventManager.addListener("TEST1", listener);
eventManager.addListener("TEST2", listener);
BufferedListener listener2 = new BufferedListener();
eventManager.addListener("TEST1", listener2);
eventManager.generate("TEST1", new Event("Source1"));
eventManager.generate("TEST2", new Event("Source2"));
System.out.println("Buffer1:\n" + listener.buffer.toString());
System.out.println("Buffer2:\n" + listener2.buffer.toString());
eventManager.removeListener("TEST2", listener);
eventManager.generate("TEST2", new Event("Source1"));
System.out.println("Buffer1:\n" + listener.buffer.toString());
eventManager.addListener("TEST2", listener);
eventManager.generate("TEST2", new Event("Source2"));
System.out.println("Buffer1:\n" + listener.buffer.toString());
36
The output of this example is as follows:
Buffer1:
received event: Event from Source1
received event: Event from Source2
Buffer2:
received event: Event from Source1
Buffer1:
received event: Event from Source1
received event: Event from Source2
Buffer1:
received event: Event from Source1
received event: Event from Source2
received event: Event from Source2
2
The interface EventGenerator:
public interface EventGenerator {
void setEventManager(EventManager eventManager);
}
characterizes every class that can generate an event; such class will use an EventManager to do
so, and then it must implement the method setEventManager that is used to provide a specific
EventManager. In particular, a class implementing this interface is provided by the framework,
EventGeneratorAdapter:
public class EventGeneratorAdapter implements EventGenerator {
public void setEventManager(EventManager eventManager);
public void generate(String event_id, Event event);
}
This can be used, for instance, as a base class of a derived class (that does not derive from another
base class already).
7.1
Session Events
The framework provides a specific class for session events, SessionEvent, that also stores information about the session, and the operation of the session, i.e., whether the connection was successful
and whether a disconnection took place:
public class SessionEvent extends Event {
/** Connection successful. */
public final static int CONNECTION = ...;
/** Disconnection successful. */
public final static int DISCONNECTION = ...;
public SessionEvent(Object source, int type, Session session);
public final Session getSession();
public final int getType();
}
37
In particular, the method getType returns the strings CONNECTION or DISCONNECTION (whether the
connection was successful and whether a disconnection took place, respectively).
These events are generated by a SessionManager (seen in Section 6.1), which indeed inherits
from EventGenerator. In particular this class defines a constant, SessionManager.EVENTCLASS,
that characterized all the events generated by this class. The SessionManager generates a SessionEvent when a connection is established and when a disconnection takes place (using the
constants CONNECTION and DISCONNECTION, respectively).
Example 7.3 (examples.topology.ConnectDisconnectServerEvents). This is basically the same
code of Example 6.1 enriched with event handling, through the listener of Example 7.1:
public class ConnectDisconnectServerEvents {
public static void main(String[] args) throws Exception {
SessionStarter sessionStarter = new TcpSessionStarter(new IpSessionId(
"localhost", 9999));
Protocol protocol = new Protocol();
SessionManager sessionManager = new SessionManager();
EventManager eventManager = new EventManager();
sessionManager.setEventManager(eventManager);
BufferedListener bufferedListener = new BufferedListener();
eventManager.addListener(SessionManager.EventClass, bufferedListener);
ConnectionManagementState initialState = new ConnectionManagementState("ECHO");
initialState.setSessionManager(sessionManager);
protocol.setState(Protocol.START, initialState);
protocol.setState("ECHO", new EchoProtocolState(Protocol.END));
ConnectionManagementState finalState = new ConnectionManagementState();
finalState.setSessionManager(sessionManager);
protocol.setState(Protocol.END, finalState);
System.out.println("waiting for connections...");
Session session = protocol.accept(sessionStarter);
System.out.println("established session: " + session);
protocol.start();
System.out.println("protocol terminated");
System.out.println("Listener buffer:\n" + bufferedListener.getBuffer());
}
}
At the end of an interaction with a client (e.g., one as shown in Example 6.1) the buffer of the
listener will print:
Listener buffer:
received event: tcp-127.0.0.1:9999->tcp-127.0.0.1:3202
received event: tcp-127.0.0.1:9999->tcp-127.0.0.1:3202
The first one is due to the connection and the second one to the disconnection.
2
Example 7.4 (events.SessionEventListener). The following listener (included in the framework)
deals only with SessionEvent events:
public class SessionEventListener implements EventListener {
Vector<String> connections = new Vector<String>();
Vector<String> disconnections = new Vector<String>();
public synchronized void notify(Event event) {
if (!(event instanceof SessionEvent))
38
return;
SessionEvent connectionEvent = (SessionEvent) event;
Session sessionId = connectionEvent.getSession();
int type = connectionEvent.getType();
if (type == SessionEvent.CONNECTION)
connections.addElement(sessionId.toString());
else if (type == SessionEvent.DISCONNECTION)
disconnections.addElement(sessionId.toString());
}
public final Vector<String> getConnections() {
return connections;
}
public final Vector<String> getDisconnections() {
return disconnections;
}
}
2
39
Index
accept, 10, 11, 16, 19, 31, 34, 35
acceptAndStart, 31
AcceptNodeCoordinator, 34, 35
addClassBytes, 28
addExcludePackage(), 29
addNodeProcess, 30
JavaMigratingPacket, 28, 29
LogEventListener, 36
make_packet(), 28
Marshaler, 3, 5, 6, 16, 18, 20, 29
MigratingCode, 27, 28
MigratingCodeFactory, 29
MigratingCodeMarshaler, 28
MigratingCodeUnMarshaler, 28
MigratingPacket, 27
clear(), 4
close, 10, 11
CONNECT, 31, 32
ConnectionManagementState, 31, 32, 34, 35
connect, 10, 11, 19, 34
ConnectState, 31, 33, 34
createMarshaler(), 5, 16, 19
createUnMarshaler(), 5, 15, 16, 19, 26
newMarshaler, 8
newUnMarshaler, 8
NodeClassLoader, 28, 29
NodeLocation, 30
Node, 29, 30, 34
NodeCoordinator, 30, 34, 35
NodeCoordinatorProxy, 35
NodeProcess, 30, 35
NodeProcessProxy, 35
notify, 36
DatagramPacket, 26
DISCONNECT, 31, 32
doCreateUnMarshaler(), 5
doReleaseUnMarshaler(), 5
doCreateMarshaler(), 5
EchoProtocolState, 20, 22
enter(), 18, 20, 22
Event, 35
EventGenerator, 37, 38
EventGeneratorAdapter, 37
EventListener, 36
EventManager, 36, 37
executeNodeProcess, 30
execute, 30
OK, 31, 32
org.mikado.imc.mobility, 27
parseSessionId(), 14
Protocol, 18, 19, 22
ProtocolException, 10, 14
ProtocolFactory, 34
ProtocolStack, 4–7, 11, 12, 14, 17–19, 30
ProtocolState, 17, 19, 20, 22
ProtocolSwitchState, 22–24
ProtocolThread, 34
protocol, 17
ProtocolComposite, 34
ProtocolLayer, 4, 6, 9–11, 19
ProtocolLayerEndPoint, 6, 7
FAIL, 31, 32
forceLoadClass, 28
generate, 36
getConnectionProtocolId(), 14
getMarshaler(), 20
getNextState(), 19
getSource, 36
getType, 38
getUnMarshaler(), 20
releaseUnMarshaler(), 5, 6, 19
run, 30
SessionEvent, 37, 38
SessionManager, 31, 34, 38
SessionManager.EVENTCLASS, 38
SessionStarter, 9, 11–14, 16, 31
SessionStarterFactory, 13
SessionStarterTable, 12, 13
ServerSocket, 12, 16
Session, 9–11, 31
SessionId, 9, 10, 13, 14, 30, 31, 34
setDoConnect, 31, 33
IMCMarshaler, 3
IMCSessionStarterTable, 13, 14
IMCUnMarshaler, 3
insertLayer(), 19
JavaByteMigratingCodeFactory, 29
JavaByteCodeMarshaler, 28
JavaByteCodeUnMarshaler, 28
JavaMigratingCode, 28–30
40
setEventManager, 37
setExcludeClasses(), 29
setMigratingCodeFactory(), 29
setNextState(), 19
setSessionManager, 31
setState(), 19
Socket, 12
start(), 19, 30
TcpSessionStarter, 10, 11
TransmissionChannel, 18, 20, 23
TunnelProtocolLayer, 7, 8
tunneledMarshaler, 8
tunneledUnMarshaler, 8
UdpSessionStarter, 10
UnMarshaler, 3–6, 16, 18, 20, 29
41