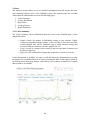
1
USHAHIDI GUIDE A STEP-BY-STEP GUIDE ON HOW TO USE THE USHAHIDI PLATFORM Anahi Ayala Iacucci [email protected] Table of Contents Ushahidi..........................................................................................................................................3 About this Guide ..........................................................................................................................4 1. Installing the Ushahidi platform .......................................................................................5 1.1 Server requirements.....................................................................................................................5 1.2 Downloading the application.....................................................................................................5 1.3 Uploading files & setting permissions ....................................................................................5 1.4 Installing the software .................................................................................................................6 1.5 Upgrading ...................................................................................................................................... 13 2. Customizing your platform .............................................................................................. 15 2.1 Logging in ...................................................................................................................................... 15 2.2 The Settings Section ................................................................................................................... 17 2.2.1 Website ...................................................................................................................................................... 17 2.2.2 Map.............................................................................................................................................................. 23 2.2.3 SMS .............................................................................................................................................................. 26 2.2.4 Email ........................................................................................................................................................... 32 2.2.5 Themes ...................................................................................................................................................... 33 2.2.6 Clean URLs ............................................................................................................................................... 33 2.2.7 API................................................................................................................................................................ 34 2.3 The Manage Section ................................................................................................................... 35 2.3.1 Categories ................................................................................................................................................. 35 2.3.2 Forms.......................................................................................................................................................... 36 2.3.3 Sharing ....................................................................................................................................................... 38 2.3.4 Pages........................................................................................................................................................... 39 2.3.5 News feeds ............................................................................................................................................... 40 2.3.6 Layers ......................................................................................................................................................... 41 2.3.7 Scheduler .................................................................................................................................................. 42 2.3.8 Cloudvox.................................................................................................................................................... 42 2.4 The Users Section........................................................................................................................ 44 2.4.1 View User.................................................................................................................................................. 44 2.4.2 Add/Edit User......................................................................................................................................... 45 2.4.3 Manage Roles and Permissions....................................................................................................... 46 2.5 Get Help Box.................................................................................................................................. 47 2.6 Search.............................................................................................................................................. 47 3. The Administration Section ............................................................................................. 48 3.1 Dashboard ..................................................................................................................................... 48 3.2 Reports ........................................................................................................................................... 49 3.2.1 View Reports ........................................................................................................................................... 50 3.2.2 Create Report .......................................................................................................................................... 53 3.2.3 Comments................................................................................................................................................. 55 3.2.4 Download Reports ................................................................................................................................ 56 3.2.5 Upload Report......................................................................................................................................... 57 3.3 Messages ........................................................................................................................................ 58 3.3.1 SMS .............................................................................................................................................................. 58 3.3.2 Email ........................................................................................................................................................... 61 3.3.3 Twitter ....................................................................................................................................................... 63 1 3.3.4 Laconica..................................................................................................................................................... 64 3.3.5 Cloudvox.................................................................................................................................................... 64 3.4 Stats ................................................................................................................................................. 66 3.4.1 Visitor Summary.................................................................................................................................... 66 3.4.2 Country Breakdown............................................................................................................................. 67 3.4.3 Report Stats ............................................................................................................................................. 67 3.4.4 Category Impact..................................................................................................................................... 68 3.4.5 Report Punchcard ................................................................................................................................. 69 3.5 Addons ............................................................................................................................................ 70 3.5.1 Plugins........................................................................................................................................................ 70 3.5.2 Themes ...................................................................................................................................................... 70 4. The User Interface ............................................................................................................... 72 4.1 The Home Page ............................................................................................................................ 72 4.1.1 The Map ...................................................................................................................................... 73 4.1.2 The Categories........................................................................................................................................ 77 4.1.3 The Timeline ........................................................................................................................................... 78 4.1.4 The Static Layers ................................................................................................................................... 79 4.1.5 How to Report Box................................................................................................................................ 80 4.1.6 The Incidents List.................................................................................................................................. 82 4.1.7 The Official and Mainstream News................................................................................................ 83 4.2 Reports ........................................................................................................................................... 84 4.3 Submit a Report........................................................................................................................... 86 4.4 Get Alerts ....................................................................................................................................... 90 4.5 Contact Us ...................................................................................................................................... 91 4.6 About us ......................................................................................................................................... 92 4.7 Additional Buttons ..................................................................................................................... 93 4.7.1 Languages................................................................................................................................................. 93 4.7.2 Search......................................................................................................................................................... 93 2 Ushahidi The first Ushahidi platform was launched during Kenya’s post-election violence in January 2008. Ushahidi means “witness” in Swahili. The Ushahidi platform is free and open source. The software allows individuals and groups to collaborate in creating live multi-media maps for all kinds of projects. For example, the Ushahidi platform has been used for projects focusing on local governance, environmental monitoring, public health mapping, human rights monitoring, citizen-based election observation, nonviolent protests, disaster response and crisis mapping. We recently launched the second version of the Ushahidi platform (Ushahidi 2.0), which allows for the use of apps or plugins to further extend and customize the platform. We also added geometry mapping so you can map infrastructure or areas and not just dots. This guide will give you a step-by-step overview on how to set up your own Ushahidi map and how to make full use of all the features that the Ushahidi software offers. If you’d like to learn more, we have additional resources available online for you: http://forums.ushahidi.com http://community.ushahidi.com http://wiki.ushahidi.com/doku.php http://www.ushahidi.com/get-involved/resources This guide will be updated based on the feedback we receive for from you. So please do get in touch with any suggestions or questions you may have. Finally, a big thank you to Anahi Ayala Iacucci for authoring this much needed guide for the community. 3 About this Guide This is a guide on how to use the Ushahidi platform. Within, we will explain how to download and install the Ushahidi platform, review the platform’s administrative capabilities, and briefly introduce the more advanced options for customizing and extending your deployment through plugins and themes. The guide will then introduce the main features of the Ushahidi platform, explaining all the tabs and functions that your users will interact with once your map is live on the web. As we cover Ushahidi’s administrative section we will explain how to manage the platform and will describe the different settings that users can use to can customize the platform, i.e. choosing the most appropriate base map for your project, syncing the platform with FrontlineSMS or other external systems for receiving and processing SMS messages, setting up the email address, and so on. This guide is meant to be a comprehensive learning guide for brand new users of the Ushahidi platform as well as a reference for those who are more technically savvy or have used it in the past in an administrative capacity. That said, we have some recommendations on where to start in this book given your level of expertise. Note that the Ushahidi community is a very active community and that you can always find someone to help you out if you have any problem not mentioned in this guide. If you are looking for guidance or help, please see the following guides and join these dedicated Skype chat groups: 1. Channel for Deployers, Researchers and Non-Tech volunteers - Share your best practices & Tips List: http://list.ushahidi.com/?1 2. Ushahidi Developer Chat. 1. What you are working on 2. Any challenges? 3. What would you like to work on next?. List at: http://list.ushahidi.com/ • • • • IF YOU ARE A USER GO TO SECTION 4. THE USER INTERACE IF YOU ARE AN ADMINISTRATOR AND WANT TO PROCESS MESSAGES COMING INTO YOUR PLATFORM GO TO SECTION 3. THE ADMINISTRATION SECTION IF YOU ARE AN ADMINISTRATOR AND WANT TO CUSTOMIZE YOUR PLATFORM OR CHANGE SETTINGS, GO TO SECTION 2. HOW TO CUSTOMIZE YOUR PLATFORM IF YOU HAVE ANY PROBLEM AND NEED SOME GUIDANCE OR HELP GO TO SECTION 2.5 GET HELP BOX 4 1. Installing the Ushahidi platform If you’ve ever installed WordPress, Drupal, or another, popular, downloadable content management system (CMS) or blogging platform, installing Ushahidi will be a walk in the park. If not, not to worry; like many popular web applications available today, Ushahidi features an installer to walk you through the process. While we’ll be providing as much detail as possible with each step, this guide assumes you’re comfortable with the following: what PHP and MySQL are, unzipping .zip files, connecting to a remote server via FTP, and setting permissions on directories and files on a remote server. If any of that didn’t make sense, you may want to consult with a web developer or someone in the Ushahidi community that has done this before. 1.1 Server requirements Before we get to downloading and installing the application, let’s consider what’s required on your server (or, more likely, the server owned by the hosting company you’ve purchased an account with) to run Ushahidi1: • • • PHP v5.2.3+ MySQL v5.1+ Apache v1.3+, Apache 2.0+, lighttpd, Microsoft IIS These requirements are fairly standard to most modern, PHP-based web applications available today. Since both PHP and MySQL are freely available products, it’s very likely your server meets these requirements. Ushahidi will perform a check on your server to see if you have the right versions of PHP and MySQL during the installation process and deliver a warning in case of a problem. If you don’t meet the requirements, you’ll have to move to a different hosting provider or contact them to see if provided more updated versions is an option. 1.2 Downloading the application There are 2 ways to download Ushahidi. The easiest is to visit the website, http://ushahidi.com/downloads, and download the complete application as a .ZIP file. For the more tech-savvy, the source code is available on github.com, a popular, hosted version control system. 1.3 Uploading files & setting permissions One you downloaded the files, unzip them and upload them to the server. Once uploaded, you have to change the permissions on a few files and directories. If we don’t do this, the Ushahidi installer will recognize this and remind you that this needs to be done during the first step of the installation process, so you may as well change them now. 1 The “+” sign beside the version numbers means “this version or higher.” 5 There are two ways to do this: a CHMOD command or using your FTP client. For the purposes of this guide and keeping it simple, we won’t be getting into the more technical process of CHMOD commands. Let’s consider what you can do with your FTP client. Most FTP clients – such as Transmit or Cyberduck for OS X, WS FTP or FileZilla for Windows – allow you to set these permissions without needing to do so from the command line. Here’s an example of that. Figure 2 is an example of using Transmit for OS X to set the permission on the same config.php as in the CHMOD example above. I’m able to use Command-I to get info on this file, the same as I’m able to do on the filesystem. In that window, you can see I’m able to check the boxes or enter the value of the level of permissions I want to grant on that file. Most FTP clients provide similar functionality, either in the same way, or by right-clicking on the file or folder. If you don’t see the option to set permissions in your preferred client check the documentation to see if it is a feature. With that figured out, again, here are the files and folders that need full read/write/execute (777) permissions: • • • • • • application/config/config.p hp application/config application/cache application/logs media/uploads .htaccess Figure 2. This is an example of using the Transmit FTP client for OS X to set the permissions of a particular file. If this is still confusing, not to worry, but you should enlist the help of someone more technical to assist you with this process. The Ushahidi Skype chat, forums, and wiki are also available as resources to help you. Once those are set, we’re ready to go. 1.4 Installing the software With the files uploaded and the permission set, you can start installing the application itself. Begin by visiting your website, either at the “root” directory, subdirectory, or subdomain where you put the files (most likely the “root” directory, meaning you’ll want to visit http://yourdomain.org. (Let’s assume, for the purposes of this guide, that you are installing this into the root folder.) 6 You’ll be automatically redirected to the installer subdirectory. If all of the files were uploaded, you should see this (fig. 1): Fig. 1 You’ve got two options for installation: Basic and Advanced. The descriptions provided under each option describe the difference between the two; let’s review those here. Basic Installation All you need is your website's root directory and your database information. Choose this option if you want to get up and running quickly; you can always configure everything else later. Advanced Installation Get all the basic settings completed through this 5-step process. This includes server, map, site name and contact details. If you’re familiar with Ushahidi or the installation process, basic will get you into the administration faster for configuration and setup. However, if this is your first time, advanced will help you make sure the basics are covered before getting into other settings like categories, SMS, etc. As we’re assuming this is your first time, let’s proceed with the advanced installation; all the parts of the basic installation are included within, anyhow. Click the Advanced installation box and you’ll be taken to the first screen in the installation process, describing what you’ll need to begin. While those are listed for you on this first screen, let’s break those down into what we need. Database 1. Database name 2. Database username 3. Database password 4. Database host Mail Server 1. Site alert email address 2. Mail Server Username 3. Mail Server Password 4. Mail Server Port 5. Mail Server Host 7 General 1. Site name & tagline 2. Site Email Address 6. Mail Server Type Map 1. Map Provider 2. API Key Database Also before we proceed, you’ll have wanted to setup a MySQL database for your website (Ushahidi will not do this for you). If you’re unsure how to do this but using a fairly standard website hosting provider, you likely have access to cPanel or another GUI to help set this up, or other documentation to help. General The “Site Email Address” will be one that is publicly displayed on the website; something to take into consideration before you launch as you may want to create a new account for this. Mail Server This one can be tricky; more on this when we get to that screen. Map Ushahidi provides several options for “base layers” for the map displayed on your website – many options Google, Yahoo, and OpenStreetMap. Technically, you don’t need a “Map Provider” to start but should you want to use Google Maps as your base layer, you’ll need to obtain an API key from them. Click on the Advanced Installation box to begin. The first screen [Fig. 2] is for entering our database information. By now you’ll want your database created and the login information handy, so enter that under “database name,” “user name,” and “password.” 8 Fig. 2 There’s a few other fields to take into account: Base Path: As noted in the installer, this is automatically detected. Database Host: Most of the time, this will be “localhost,” which is why it is prefilled for you. If you’re running on an more custom configured server, such as Amazon S3 or a private server, your database may be running somewhere else, meaning you’ll want to replace localhost with the right domain. This was likely provided for you when you or someone on your team setup the database; contact your hosting provider if you’re unsure. Table Prefix: As noted in the installation instructions, if you’re installing multiple Ushahidi instances from one database, you’ll need to change the table prefix. However, this is highly discouraged; you should have one database per deployment. It’s recommended you leave this field blank. 9 Once you have entered all of this information, click the Continue button to move on. The next screen [Fig. 3] covers general information about the website. Your website name, tagline (or slogan), default language, and site email address are all straightforward. Fig. 3 Site email address: Keep in mind this will be the email address displayed on the website to accept reports, should you enable that functionality. Clean URLs: What are “Clean URLs?” Clean URLs are URLs that do not display string information in the URL and show only the page and path. This is better explained with an example: Without Clean URLs enabled, here’s what the URL for your about page (once we complete the installation) would look like: http://yourdomain.com/index.php?page=about With Clean URLs set to “YES,” your about page will look like this: http://yourdomain.com/index.php/about Clean URLs are preferred as it makes things clearer to the user and improves search engine optimization for your website. It’s recommended you keep this enabled. 10 Fill out these fields, click the Continue button again, and it’s on to Step 3: configuring your mail server [Fig. 4]. Fig. 4 Setting up the mail server is important to receive reports via email as well as send out alerts to subscribed users and administrators. As mentioned, this can be tricky depending on your email provider.2 If you’re able to use Gmail, Hotmail, or Yahoo, as your email provider (Gmail especially), that can simplify the process. Hints are provided alongside the installer to help you with what you should enter. Again, if you can use one of these, it can make this process much simpler. If you’re using an email address off your domain, you’ll probably want to check the documentation, knowledgebase, or FAQ to figure out what the proper settings are for the “Mail Server Username,” “Mail Server Port,” and “Mail Server Host” fields. 2 See section 2.2.4 11 Click the Continue button when you’re ready, and it’s on the last step to configure the map options [Fig. 5]. [Fig. 5] The last step is, fortunately, the simplest. Choose the Map you would like – Google, Yahoo, or OpenStreetMap (OSM) – in the dropdown. Because of the way Ushahidi is configured as well, even if you choose Yahoo or OSM, you’ll need to enter a Google API key. Click the link beside that field to get one for your domain and enter in the value provided. That’s it – click the Continue button to finish up. 12 [Fig. 6] You are done! Follow the links provided to see your website, log in to the administration dashboard, or get right to the next important steps in setting up your website: further configuring the map settings3 and connecting your instance to an SMS server.4 Before you start exploring with your new instance, there’s two last things you need to do. Now that the installer is complete, we need to set the permissions on application/config/config.php and application/config/database.php to 755. This is a critical step but not one Ushahidi will do for you. Not doing so opens up your deployment to a big security risk. The second thing you’ll want to do is delete the “installer” folder from your website’s file system. 1.5 Upgrading For the purposes of this guide, before we move into learning the application itself, at some point you’re going to want to upgrade your Ushahidi deployment to keep up with minor security updates and all the cool new features. The upgrade process begins with a crucial first step, one that’s universal for upgrading any web application: backup the application files and the database. This is very important so that, should anything go wrong, you can restore your website to it’s current state. We can’t 3 4 See section 2.2.2 See section 2.2.3 13 fully stress how much you should do this before proceeding. While the Ushahidi team has put a lot of effort and testing into making sure this process goes smoothly, always plan for the worst. Now that your website is backed up, step two is to download the newest version of the application from one of the two sources we described earlier: the ushahidi.com website (recommended) or from our repository on GitHub. Once you have that, just like with our first installation, unzip the files on your computer. Next we have to upload these files to the server, but let’s be careful not to overwrite files and directories we changed during the initial installation. Let’s have a look at the complete application directory structure and review what we need to set aside while we upload the new files and folders. Since the 2.0 release of Ushahidi, we’ve taken steps to remove most of the folders you’ll will not want to replace during the upgrade process. These include the “plugins,” “themes,” and “media” folders. There’s two other files you’ll want to either download to your computer or move to another part of the server: the config.php and database.php files within the application/config/ folder. That in mind, you’ll want to replace the following files and folders (folders are listed in bold): application favicon.ico index.php installer modules sql system Upload these folders and files from the unzipped application folder on your computer, replacing the folders and files currently on your system. Since you’re replacing the files, we won’t have to do anything with the permissions as we did with the initial installation. Once those are uploaded, move or upload the config.php and database.php files back to their place. With all these files in place on the server, access your website’s administration section to begin the upgrade process. This should only take a few moments, and you’re ready to get back to running your website. 14 2. Customizing your platform Like many popular blogging platforms, Ushahidi comes with a complete administration section to manage the general platform settings and process user-contributed reports. Now that your Ushahidi instance is installed and ready to go, let’s start by looking into how this works and the available functionality. The Administrator of the Ushahidi platform has two main tasks. The first is to perform the final check on the submitted reports before they areis published on the website. We’ll discuss task in more detail in chapter three. The second task that the administrator performs is the customization of the platform, from the setting up of the map to the SMS number. This task is explained in this section of the guide. [Overall I think this second paragraph is too much detail for two points that are covered later in the guide. I removed a big chunk of it as such but still feel that this introduction should cover, in order, what is listed in the table of contents, not pointing out a couple of the features covered much later. –rob] 2.1 Logging in If your website is www.yourdomain.com, the administration login would be available at http://yourdomain.com/admin, or http://yourdomain.com/login. It will look like this: Enter the username and the password to access the Admin page. If this is your first time logging in, use “admin” for both the username and password, which you’ll want to be sure to change once you’re logged in. Now that we’re logged in, let’s look at the available options on the administration page to manage the incoming information in your platform: 1. 2. 3. 4. Dashboard Reports Messages Stats 15 5. Addons In addition, there are three additional tabs on the top right side of the page related to the customization and the settings of the platform: Settings[6], Manage[7], and Users[8]. Also, on the very top of the page you can see buttons that allow you to go back to the website, to see your profile or to logout. Under these buttons there is the Get Help[9] box and the Search box[10]. 16 2.2 The Settings Section The Settings section is the page where the administrator can set up all the settings to customize the Ushahidi platform based on the project they are working on. This section of the Ushahidi platform is the first one that needs to be customized once the platform is installed and allows for the main components of the platform, such as the map and the email address, to be set up by the administrator. To access the Settings Page the administrator just needs to click on the Settings tab, on the top right of the Dashboard page. Once opened, the Settings page has a toolbar with seven tabs, each one of them allows for the customization of the relative setting: 1. 2. 3. 4. 5. 6. 7. Website Map SMS Email Themes Clean URLs API 2.2.1 Website The Website page is the one where the administrator chooses the main appearance settings of the Ushahidi platform, mainly the characteristics of the homepage, the main navigation, and the contact information. 1. Site Name This is the main title that appears on the right side of the your homepage and it is normally the title of your project. 2. Site tagline This is the tagline that appears below the title on the home page, which normally gives more detailed description of what the platform is about or what the platform intends to monitor or show. 17 3. Site Email Address This is the email address that will be shown in the Information Box on the home page, which is the one that users will use to email you information or reports. This email address will be publicly displayed on the website, so it is recommended that you create an email address specifically for this, and not to use a personal one. To have this function working you need to configure the email account settings by clicking on the “configure your email account settings” or just by clicking on the Toolbar tab Email.5 4. Alert Email Address This is the address that will send the Alerts via email. It is possible to use the same address configured in the Site Email Address section above. In this case, remember that the POP function of the email account needs to be allowed in order to be able to send outgoing messages.6 5. Site Message The Site Message is an optional message that you can add on the top of your user page and that can be used for different purposes: you can use it to advertise your short code, if you have one; to put a disclaimer of responsibility, or anything else you want to let people know straight forward. An example is the following: 6. Site Copyright Message The Copyright message is where you can let you users know what kind of copyright license your platform submitted is under. The message will appear on the bottom of the homepage. 7. Site Language 5 See section 2.2.4 to see how to configure the email account settings and section 3.3.2 to see how to process incoming emails 6 Ibid. 18 Here is where you decided the language for your Ushahidi platform. This function will not translate the admin part of the platform, but only the homepage and the users settings.7 [POSSIBLE ABSTRACT: Brian’s work on the new translation project? How to create translation files (with link to the wiki)? –rob] 8. Display Contact Page Here is where you can decide to have the Contact page in the main Toolbar in the homepage8. If “No” is selected, the page will not be available for users to contact the administrators of the Platform, but they will still be able to send emails to the address showed on the homepage if configured.9 9. Item per page – Front End This is where you can choose how many items will be displayed in the pages opened by the user, such as the Reports page or the News Feeds page. 10. Item per Page – Admin This is where you can choose how many items will be displayed in the Admin page, like the Reports page or the Message page. 11. Allow Users to Summit Reports You can decide to have the Submit Reports in the main toolbar on the homepage to allow users to submit report using the online form. If the NO is selected, the page will not be available for users to submit reports directly on line10, but they will still be able to send emails to the address showed on the homepage or to send SMS if configured. 12. Allow Users to Submit Comments to Reports Here is where you can decide to have the Comments function in the Report page. If the “no” is selected, the users will not be able to comments on reports uploaded in the Ushahidi platform.11 13. Include RSS News Feed on the Website This is where you can decide if you want to have the RSS Feeds Box displayed on the homepage.12 14. Enable Statistics (Stored on Ushahidi's server) Hit statistics are stored on a server controlled by Ushahidi. By enabling this option, you gain access to hit statistics directly in your admin panel. By disabling it, you will stop 7 See section 4.7.1 for how to change languages from the homepage See section 4.5 to see more on the Contact Page 9 See section 2.2.4 for how to set up your e-mail address 10 See section 4.3 to see how to submit a report using the online form and section 3.2 to see how to process incoming reports submitted via the online form. 11 See section 3.2.3 to see how to manage incoming reports 12 See section 2.3.5 to se how to set up incoming feeds in your platform and section 4.1.7 to see how to use the Incoming Feeds box from the Homepage 8 19 collecting statistics and will be unable to recover traffic stats collected while this is turned off. 15. Cluster Reports on Map This is the function that combines the individual report markers in the same area on the map to display as a clustered dot displaying the number of individual reports in said cluster. This function allows one to see how a certain area is affected as compared to other areas. Once the user zooms in on the map the clustering disappears, while the more you zoom out the more the dots get clustered together. Note that this function has some known problems with the KML and KMZ files that carry data and that display areas, so if you have those files on your platform you may have to disable the clustering to have the areas display correctly on the map. 16. Default Color for All Categories This is the color of the All Categories tab. As default this color is set on CC0000, which is red. To change the color just click on the tab and use the pop up window that will appear to chose another color. 17. Cache Pages The administrator may decide whether to cache pages and reports on the website, speeding up loading time. This is particularly helpful when working with low-bandwidth audiences. 18. Cache Pages Lifetime If caching is enabled, here the administrator may set how long the pages are cached for before users visiting pages on the website should be served a new version of the page rather than the cached version saved on their personal computer. 19. Google Analytics This function allows the administrator to sync the platform with Google Analytics by inserting the proper ID.13 20. Twitter Search Terms This tab allows you to enter the Twitter hashtags connected with the platform. It is possible to choose more than one hashtag, separated by a comma. It is recommended that a short and clear hashtag be chosen. This hashtag will also appear on the Information Box on the homepage so that people can use it to post on Twitter messages related to your platform. All the twitter messages that will be posted on line with the hashtag(s) inserted here will also appear in the admin page on the Messages section/Twitter so that they can be transformed into reports directly by the admin.14 21. Akismet Key 13 14 For more on Google Analytic see here: http://www.google.com/analytics/index.html To see how to process Twitter messages go to section 3.3.3 20 The Akismet Key allows the administrator to have Akismet pre-screening the messages coming in to look for spam. To be able to use this function the administrator needs to be registered for a WordPress account and get a free API key.15 15 For more on Akismet see here: http://akismet.com 21 22 2.2.2 Map The default base map for the Ushahidi platform is a Google Map of Kenya. To change the map and have it set on another country, and to set up which base map to be displayed and how, you can click on the Map tab on the Settings page. The Map Setting page has three main components: 1. Default Location 2. Map provider 3. Configure Map 23 Default Location Here is where you can set up the country that you want your map to display in the homepage. The scroll down menu allows you to select a country[1]. Below the scroll down menu you can set up your Ushahidi platform to include different countries [3] and you can also retrieve cities from geo-names to have them displayed in the scroll down menu in your report form[2]. Map provider This section allows you to select which type of base map you want for your project. This section guides you step by step in the setting up of the base map. • • • Step 1: There are four default providers: Google map, Yahoo Map, OpenStreetMap and Visual Earth[1]. Step 2: If you chose a Google Map you need to get an API key and to put this key into API box. By clicking on Get API you will be forwarded to the page where the provider will give you the API key. Normally to get the key the provider requests the URL of the website. [2] Step 3: Once you’ve obtained the API, just copy and paste it into the “Enter your new API Key” box.[3] 24 Before adding the API key, you can see what the differences between the different maps are just by choosing one of them and looking at the map on the right of the screen. Configure Map This section of the Map page allows you to choose the default zoom of the map appearing in the main homepage. To choose the default zoom level, move the indicator on the bar [1] and wait for image below to show the map relative to that zoom level[2]. Once the zoom level has been chosen no other action is required other than to leave the marker on the right position in the bar[3]. On the right side of the zoom level bar there are two boxes indicating the GPS coordinates[4] of the red marker in the map[5]. This is where the red marker will appear to the user who is submitting a report from the web form, and can be set to the main city of the country for example, or left as default in the center of the country. Note that a user who subsequently submits a report will not be constrained to the exact location of the default marker. To change the default location of the marker, insert the GPS coordinates in the two boxes in decimal format. Those two actions, setting the zoom level and the position of the red marker, can be done also just by using the mouse and clicking on the map. It is possible to position the red marker by double clicking on the right location. By grabbing the map and moving it, you can decide which section of the map will be visible to the user on the homepage. Once all the settings in the map page have been set, they can be saved by clicking on the “Save Settings” tab on the bottom of the page. Every time one of the settings is changed it is required to save the settings again. 25 2.2.3 SMS This page of the Settings allows you to write the phone numbers that you have set up for your platform to receive SMS messages from users. We will explain here how to set up your phone numbers providers. There are three possible ways to set up the Ushahidi platform to receive SMS directly into the platform: 1. Using FrontlineSMS 2. Using an SMS Gateway like Clickatel 3. Using a Short Code Those three methods have significant differences and require additional investment in terms of PHP skills, economical resources and time. Using FrontlineSMS is easy and fast. FrontlineSMS is free and open source and it is possible to download it from their website16. The software allows for sending and receiving SMS by just having a computer and a laptop, or a computer and a GSM modem connected to it. You do not need to have Internet connection to use FrontlineSMS. The Ushahidi platform already has step-by-step instruction on how to sync it with the Ushahidi platform – see below. 16 The FrontlineSMS website from where to download the platform here: http://www.frontlinesms.com 26 The SMS Gateway is also easy to set up. This does require a bit of money because it is necessary to buy a local, 12-digit number within the country you’re focusing on, or a short code (normally 4 digits). The advantage of using an SMS gateway is that you don’t need to have a phone connected to the computer but you normally pay a monthly charge for the number and an activation fee. The Ushahidi platform already has step-by-step instructions on how to sync it – see below. Setting up an SMS short code is often the most effective way to use SMS with the Ushahidi platform. This is because a 3-5 digits number is a lot easier to remember and to advertise. That said, getting a short code could be a challenge because you need to obtain an agreement with the mobile companies. The short code can be synced with the Ushahidi platform but this does require having a PHP developer to set up. One advantage of using short codes is that you don’t need Internet connection, mobile phones, or GSM modem. Option 1: Use FrontlineSMS To configure FrontlineSMS as your SMS system in the Ushahidi platform you need to go to Addons section in the main toolbar[1], activate the FrontlineSMS plugin[2] and click on “Settings” on the site of the Plugin name[3]. 27 This page will give you a step-by-step guide to sync the Ushahidi platform with FrontlineSMS. 28 Step 1: Download and install FrontlineSMS on your computer. Open the program and check that the software is able to see the phone or modem connected to it. This process may require a couple of minutes. We suggest you test it by sending and receiving a couple of SMS text messages from your FrontlineSMS software. Step 2: In the admin section of your Ushahidi installation, click on the settings link on the right hand side, and then select the SMS tab. In this section click on Option 1: Use FontlineSMS. Remember that this is only for outgoing messages. Step 3: Enter the phone numbers you have connected to FrontlineSMS then copy the “FrontlineSMS HTTP Post LINK” provided. Step 4: In FrontlineSMS, open the Keywords tab, select the ”<BLANK>” keyword in the list on the left. Please note that with new version of FrontlineSMS ”<BLANK>” has been renamed to ”<NONE>”. Next, click on the “click here to go to advanced view” link on the right below the “Keyword Actions” section. 29 At the bottom of the screen, click on “Auto Reply” and in the menu that pops up select the “External Command” option, then click the edit button to the immediate right. Step 5: In the window that opens, select “HTTP Request” as the execution type, paste the URL you copied from your Ushahidi deployment above into the command text field that is in the “Execution Details” section and select the “Do Not Wait For Response” button. Leave all the other fields untouched. Step 6: Click on “Done” and that is it, any SMS messages sent to FrontlineSMS will also be forwarded to the admin page of your Ushahidi platform. Keep in mind that FrontlineSMS will not retry the HTTP Request if it fails for whatever reason. This means that any SMS messages that come into FrontlineSMS while your Internet connection is down will not be automatically forwarded to your Ushahidi deployment. For a quick fix to this (while the FrontlineSMS programmers are sorting out 30 the issue), have a look at the Ushahidi Wiki.17 Remember that your phone may freeze occasionally or the connection to the phone may be lost, so you need to keep an eye out for this and restart the phone and/or the computer to fix this.18 Option 2: Use a Global SMS Gateway To configure Clickatell as your SMS system in the Ushahidi platform you need to go to Addons section in the main toolbar[1], activate the Clickatell plugin[2] and click on “Settings” on the site of the Plugin name[3]. Image 1 Step 1: Sign up for Clickatell service by following the link on the page19 and get an API key. Step 2: Go back to the Ushahidi SMS page and enter your Clickatell API number that you received after signing up for Clickatell service. Step 3: Enter your Clickatell Username. Step 4: Enter your Clickatell Password. You should get it from Clickatell Step 5: Click on Save Settings button to save the entries. The Clikatell plugin will allow you to use Clickatell for outgoing messages (like the SMS alerts system). If you want to use Clickatell also to receive SMS messages, you need a 2way number from Clickatell, but once you have it you need to make some changes in the 17 http://wiki.ushahidi.com/doku.php For more on this see also: http://frontlinesms.ning.com/forum/topics/can-flsm-recover-messagesthat?xg_source=activity 19 http://www.clickatell.com 18 31 Ushahidi code to make this work for you. Please see the Ushahidi Wiki for instructions on how to do this.20 2.2.4 Email This page is where you can set up the email settings to be able to receive emails from users. To do so, you must have an email account already set up with Google, Yahoo or whatever domain. 1. Mail Server Username This is where you can enter the email address you want to use to receive and send emails. It is recommended to set up an separate email address for this purpose, preferably one that has lot of available space to avoid the account getting full in a short time, especially if the platform will be receiving a lot of submission via email. 2. Mail Server password In this section you should put the password of the email account inserted above. 3. Mail Server Port In this box you have to put the port that the email account chosen uses for incoming emails. This port is normally listed in the settings of the email account itself, and under the box there are some suggestions for the most common ports used. 4. Mail Server Host This is where you need to insert the mail server host. Under the box there are several suggestions on what those hosts can be. To verify which Mail server host you have, please look at the Settings page of your email account. 5. Mail Server Type Here is where you can insert the server type. The most common used are POP3 and IMAP, but again, the settings page of the email account chosen will list the correct server type. 6. Mail Server SSL Support In this box you should insert the data related the support of SSL from the server you are using for his email account. This information too is available in the setting page of the email account in use. Now you can just save the settings by clicking on the “Save Settings” tab, and all the data inserted will be saved. Every time something will be changed in those settings you need to click again on the “Save Settings” tab to have those changes saved. It is suggested to test the settings every time something is changed in this page to be sure that the new account is working properly. 20 http://wiki.ushahidi.com/doku.php 32 2.2.5 Themes Themes Settings In this page you can to choose or change the main theme of the platform. As default there are two main themes here, Default Ushahidi Theme and Terra by David Cobia, but it is possible to add as many themes as the administrator likes. It is suggested not to change themes once the platform is already working, because there is the risk to have some settings reformatted once the theme is changed21. Do not delete the Default Ushahidi Theme under any circumstance, even if you have selected a different theme for your deployment. Without getting overly technical in this guide, additional themes build off of the templates (or “views”) in this theme. Each additional theme built for the Ushahidi application pulls its base views form the default view. Deleting the default theme will cause your other themes, and the website, to break. Should you delete this theme, you can restore your website by dragging the “default” folder back to within the “themes” folder. without having to reinstall and start over. 2.2.6 Clean URLs Enable Clean URLs This function allows the platform to be reachable by users even if they don’t type ‘index.php’ in the address. This way it will be easier for the users to find the platform on line if they know the name used in the URL but not the exact address. By choosing YES in 21 See also section 3.5.2 to see more on Themes 33 [1] the scroll down menu you will allow for this function to be in place. After you click “Yes” or “No”, click on the “Save Settings” tab[2]. 2.2.7 API Applications with an Application Programming Interface (API) are fairly common these days. Ushahidi’s API allows for other online tools to securely access incident reports and application settings such as locations and categories via an API key. While this is a fairly technical process, the settings here are fairly straightforward: you may limit the amount of calls other tools may make to the system, generally or specifically (by IP address). If you would like to read more about the technical aspects of Ushahidi’s API, more information is available on our wiki at: http://wiki.ushahidi.com/doku.php?id=ushahidi_api 34 2.3 The Manage Section The manage section is the section that allows you to set up the main characteristics of the platform as related specifically to your project. The Manage page is accessible from the Admin page on the right end of the page. When accessing the Manage page a Toolbar will show the eight pages from which the following settings can be modified and customized: 1. 2. 3. 4. 5. 6. 7. 8. Categories Forms Sharing Pages News Feeds Layers Scheduler Cloudvox 2.3.1 Categories The Categories page is where the categories of the reports can be set up. The default Ushahidi page has default categories set up which can be deleted and substituted with the ones chosen by the administrator of the project.22 The categories list shows the name of the category[1], the description below the name[2], the color of the category on the side or the icon[3] and on the far end of the raw the actions that could be done: Edit[4], Visible[5], and Delete[6]. To delete a category just click on the Delete tab, and a confirmation message will appear: by confirming the action the category will be permanently deleted. To edit a category click on the Edit tab, and the characteristic of the selected category will appear on the far end of the page, in the section called Add/Edit. It’s possible to change [7] the name of the category[7], the description[8], the color[9], the parental relationship with other categories[10] and icon[11]. Click on Save to save the new characteristic of the category[12]. To create a new category fill the boxes in the Add/Edit section and then save the settings. It is also possible to do this by clicking on the Add New tab on the side of the Category tab on the Toolbar[13]. All the fields are required except for the Icon one. The Parental Category tab allows you to create sub-categories: if left on “Top Level Category” the category will be a main one, and be shown as such in the homepage under all categories. If you want to create a sub-category, you need to select in the scroll down menu the Top Category under which you wants to add as sub-category. The sub-categories will not show up in the category list on the homepage automatically, but only when the user selects the Top Level Category under which the sub-one is listed. 22 See section 4.1.2 for info on how to see reports by category in the Homepage 35 You can add as many categories or sub-categories as you wish, but only one level of subcategory is allow. The Ushahidi platform will list the categories in alphabetical order: to choose a different order, add a number in front of the category name, or a letter, and the system will automatically order the numbers/letters in ascendant order. After having inserted, deleted or edited the categories on this page, save the settings by clicking on the Save tab at the bottom of the page. 2.3.2 Forms The Forms page allows you to change the page where users fill in their reports after clicking on the “Submit a Report” tab. This form is set as default with a predefined number of fields, but it is possible to add other forms (surveys) or to edit the default one. The default form can be Edited[1], Deleted[2] or made Inactive by clicking on one of the tabs at the end of the row[3]. The fields of the default forms can be edited also by clicking on the [4] Edit Form Fields tab on the side of Default Form. Editing the existing form Click on Edit Form to have a tab appear on the bottom, just above the Create/Edit Field, called Add New Field[5]. Click on this tab and a box will appear, allowing you to create a new field in the default form. 36 To add a new field you first need to decide if the field will be a Text Area Field[6], which means that the user can insert free text in it, or a preselected Field, which means that specific text has to be inserted – like for example only a number. As a second step you have to insert the Field Name[7], which indicates what information is required in that specific field, then the default value required has to be inserted in the second box on the side of the Field Name box[8] – if left blank it will allow everything to be inserted in the new field. In addition to this, you can decide if the new field will be required[9], meaning that the users inserting the report will not be allowed to send the report until they fill that particular box, and also decide a limit of characters allowed for that specific field[10] and if it is a data field or not[11]. Once done, click on the Save tab to have all the changes saved[12] . Add a New Form To create an entirely new form there is a box at the bottom of the page, [1] Create/Edit Form. After inserting the Name of the new form[2] and the Description[3], which will not appear in the users interface, and clicking Save[4], the New Form will appear listed under the default one[5]. This new form will have all the fields existing in the Default Form, because those fields cannot be deleted. To add new fields to this new Form follow the steps explained above, starting from selecting Edit at the and of the row corresponding to the new form created[6]. You can add as many Forms as you’d like. Those Forms will be accessible by the users in a scroll down menu on the top of the Title in the Submit a Report page. 37 2.3.3 Sharing This function will allow you to share your platform with other Ushahidi websites or to have those websites sharing their platforms with you. If you want to share platforms, click on [1] Add/Edit, then just insert the name of the website[2], the URL[3] and decide the color of their reports on your map[4]. After clicking on Save your URL[5], an email address will be sent to them. In the list you can see all the Sharing Ushahidi platforms you added to your platform [6]and you can decide to edit them[7], making them invisible or visible[8] or delete them[9]. 38 2.3.4 Pages The Pages section is the page that allows you to add other pages in additions to the ones already existing in the main Toolbar in the homepage. From here it is also possible to [1] edit[1] or delete the About Us page[2], or make it invisible which is a default page in the main Toolbar[3]. To edit the About Us page, just click on the Edit tab under Actions, and then fill the blank in the page Description Box[6]. After clicking the Save tab, the page will be available to be read by users in the About Us page from the homepage. To add other pages, fill the boxes relative to the Page Title[4], Page Tab name[5] and Page Description[6]. Once saved this page will be listed in the main Toolbar in the Homepage and be accessible – if visible – to the users[7]. 39 2.3.5 News feeds From this page you can set up the Feeds that will appear in the ‘Official and Mainstream News’ box in the Homepage. To add a new RSS Feed click on the Add New tab on the side of the New Feeds title on the Toolbar[1], or just go on the Add/Edit box at the bottom of the page. The save an RSS Feed and have it appearing in the Homepage insert the name of the Feed[2] and the URL[3] After having saved the new Feed[6], the number of items coming in will be visible[4] after clicking on the Refresh Feed tab on the top of the page[5]. The actions tabs on the side of each Feed allow you to delete[7], edit[8] or made Invisible an RSS Feed[9]. To see the items of each feed you need to click on the name of the View Items of each Feed[10] and you will be directed to a page where all the items from that Feed are listed. For each item coming in you can delete it[11] or create a report out of it[12]. To see all the Feeds coming in there is also the Feed Items tab on the top of the page, where all the items coming from all the Feeds URLs are listed together. For each Feed Item coming in you will see if the geo-location is available, [14]the source[14] and a preview of the item[15]. 40 2.3.6 Layers In this section of the Manage section you can insert the static layers that will appear on the users Homepage under the Map. Those static layers are in the format of KMZ or KML Files and can display points or areas. To add a new Static layer use the Add/Edit box on the bottom of the page[1]. After inserting the layer Name[2], the Layer URL if existing[3], and the color[4], you can upload the file in the Upload KMZ/KML File section[5] and then Save[6]. Once saved, the Layer will appear in the list at the top of the page[7] and from there can be Edited[8], deleted[9] or made invisible[10]. If the layer is visible it will automatically appear in the Homepage, where users will be able to see it by clicking on it. 41 2.3.7 Scheduler This function of the Manage section allows you to schedule actions related to Alerts[1], Email[2], Feeds[3], Sharing[4] and Twitter[5]. The Alert section allows admins to schedule when and how often the Alert system will send out alerts to the users subscribed. For the Email, Feeds, Sharing and Twitter it allows to schedule the automatic refresh of the information coming into the platform. By default, all those Schedules are set on automatic refresh every day, every hour and every minute. To change those settings there is the Edit tab on the side of each item[6], which open a box at the bottom of the page where it is possible to change those settings according to Day of the Week[7], Day[8], Hour[9] and Minute[10]. The scroll down menu allows the administrator to choose in between All, or a particular day, hour or minute. Once done you need to save the settings[11]. If you have any issue you can also Force to Run the scheduler to refresh automatically all the incoming information[12]23. You can also decide to activate or deactivate a particular schedule for a specific incoming feed[13]. 2.3.8 Cloudvox This page shows the Cloudvox messages that form the Voice menu24. Once installed Cloudvox will show here a standard menu[1], but this one can be edited and customized. 23 If you are having problems in receiving incoming messages from any source, try to use this function because most of the times this is the problem. 42 The first thing that can be changed is the menu content itself, by adding or removing any of the listed messages. To do this click on Edit[2] and edit the text of the message in the bottom window that will open[3]. The second thing that can be changed is the sounds file: the custom file is an automatic voice reading your written message. This voice can be substituted with a recorded message as MP3 file. To do so you can use the Editing tab again and upload the MP3 file in the apposite field[4]. 24 See Cloudvox website for more: http://www.cloudvox.com and see here for more on the Cloudvox plugin: http://blog.ushahidi.com/index.php/2010/07/16/call-to-report-feature-via-cloudvox 43 2.4 The Users Section 2.4.1 View User The User section[1] is the page where you can see the Accounts set up in your platform, change and create accounts by setting up Passwords and User names, in addition to setting up the roles of the administrators, users and reporters of your platform. As we mentioned in the beginning of this guide, when Ushahidi is first, the default username and password for the administrator account “admin”. Again, it is strongly recommended that you change those settings immediately after having download and installed the platform by using the Edit button[2]. 44 2.4.2 Add/Edit User To change the user settings the Administrator can go to Add/Edit User[1] and just insert the Username[2], Full name[3], email[4], password[5], and then choose the level of administration access allowed[6] and activate or not the notification system[7]. This last system if activated by setting it on “yes” will send a notification to the User every time a new report is submitted to the platform. The drop down menu on the level of administration allows the administrator to choose in between three different roles[6]: None, Administrator and Super Administrator. Remember to click on Save Settings once you are done[7]. The Admin status allows the person holding it to access and process all the Messages in addition to edit and access the Manage section of the platform. The Super-Admin can do all the above function and in addition to that can access and edit the Settings page. 45 2.4.3 Manage Roles and Permissions Ushahidi 2.0 introduced much more advanced role creation with the ability to specific permissions for each role as well. Each user role can be created and edited by the Admin and Super Admin users at any time by going on the Manage Roles and Permission page[1] and clicking on Add/Edit[2]. On this page it is also possible to create specific roles[3] (like reporter, viewer, observer) and give to each one of them specific permissions to see or edit information inside the platform[4]. In this section you can also delete a role[5] or edit it[6]. 46 2.5 Get Help Box The Get Help box is always located on the top right side of the page. From here it is possible to access the following three sections on the main Ushahidi website: the Wiki[1], the FAQ’s section[2] and the Forum[3]. Those three sections are an invaluable resource for whatever problem the administrator should encounter in customizing or working on the platform. The Wiki25 is recommended for PHP developers and for more technical problems. The Forum26 is a very good resource for management questions and known bugs. The FAQ’s section27 is a very good starting point for questions on how to use certain functions or the general background of the platform and the organization. 2.6 Search The Search function of the Get Help box allows you to look for specific reports into the Ushahidi platform. By typing into the box the key word the system will show all the reports, in chronological order, starting form the most recent one, that contain that word. If you are looking for a specific report you can type in the exact title or the number of the report, if you know either. You can look for report of an event by a specific day, or related to a specific category, or in a specific place. 25 http://wiki.ushahidi.com/doku.php http://forums.ushahidi.com 27 http://ushahidi.com/get-involved/resources 26 47 3. The Administration Section 3.1 Dashboard The Dashboard page is the initial page that it appears once you access the platform. The Dashboard page provides a summary of all the information coming into the platform and displays a snapshot of the amount of reports over time. The Dashboard is composed of four main sections: 1. The Reports Timeline, allowing users to view graphically the trend of reports over a period of time. By clicking on the top right options the admin can see the trend over the past day, month, or year. 2. The Quick Stats Box, which gives an overview of reports in the system. It includes number of reports filed and gives the number of the ones inserted into the platform but yet to be approved, the number of categories set up in the platform, the number of locations inserted, the messages coming from media sources as RSS Feeds, and the incoming messages divided by typology: SMS, email, Twitter and Laconica. The admin can access each one of those information pages by clicking on the relative name. 3. The Recent Reports Box gives a summary of the most recent reports submitted by showing the title, the time of the incident, if the report has been approved and verified, and the source. From this box the admin can click on the title to access the report page. 4. The Incoming Media Box gives you an overview of the RSS feeds coming into the platform. 48 3.2 Reports The Reports section is where the Ushahidi system lists all of the reports that are submitted to the system – easily where you’ll be spending the most time with the system. Here you can view the full list of reports, access details of individual and reports, and manage reports that need to be approved or modified. The Report page has one toolbar listing actions you can do with the report list: Reports, where you can see all the View Reports[1], Create Report[2], Comments[3], Download[4] Report, and Upload Report[5]. 49 3.2.1 View Reports The View Reports section has its own sub-toolbar, which lists the following tabs: Show All[1], Awaiting Approval[2], and Awaiting Verification[3]. Show All is the section where you can see all the reports inside the Ushahidi platform, meaning verified reports, approved reports and reports submitted but yet not approved or verified. It is important to note here that reports submitted on the Ushahidi platform will not appear automatically on the public list of reports or the map; they must first be approved by an administrator with the proper permissions. Verifying the report is not a requirement to appear on the map, but it does let your viewers know that the information in the report itself has been verified by either another source or the administrator of the platform.28 Looking at the Show All reports you can see on the right side of each report if the report has been verified[4] or approved[5], or decide to delete it[6]. By clicking on each one of those three choices the administrator will be able to act on that report. The Awaiting Approval tab lists only the reports that have not yet been approved by an Admin, which means that those reports have been submitted but do not yet appear on the map. Once approved, the reports will immediately appear on the public map. The Awaiting Verification tab lists all reports that have not been verified by an Admin; these reports are already on the map but are flagged as not verified in term of course or content. In the list of reports, the administrator can see the report title[1], the first sentence of the description field[2], the date[3], the location[4], the associated categories[5] and the source[6]. 28 For more info on Verification of information see http://community.ushahidi.com/uploads/documents/c_UshahidiVerification-Guide.pdf 50 In each of those three lists, the administrator is able to see the report details by clicking on the report title, and from that page review all the specific detail of the report and insert information about the source and the reliability of the information. On the bottom right corner of the report there is an important box that only the admin can check, the Information Evaluation. This box has two questions and two evaluations to be filled by the administrator: approval and verification, and reliability and probability of the information. 1) Approving report: If the information in the report makes sense, the admin will approve the report by clicking “Yes” next to “Approve this report”. The report will then appear on the map as a dot. 51 2) Verify report: the administrator will select “Yes” to verify report if he/she has direct knowledge about the event and can be sure that it is true. It is strongly suggested not to click on verified if it is not possible to confirm the information in the report.29 3) Reliability: this section gives the administrator five choices to choose their impression on the reliability of the source submitting the information. 4) Probability: this section gives five choices to the administrators to give their impression on the probability of the information reported. When the administrator has reviewed the report, she can click on Save Report or Save and Close button, so that the report will be publish on the website. If the report is faulty and should not be published, the administrator can click on Delete This Report. 29 For more info on Verification of information see http://community.ushahidi.com/uploads/documents/c_UshahidiVerification-Guide.pdf 52 3.2.2 Create Report The Create Report tab will bring the administrator to the form to be filled to create a report. This form is identical to the form in the “user page” but also has the Information Evaluation Box. Through this page the administrator can create a report and publish it directly to the map30. 30 See section 2.3 to see how to create a report 53 If you have a new version of the Ushahidi platform you may see a slightly different box under the map. In the new version in fact you will have the options to select an area [1] or more than one point for your report location[2]. In the case you select one area or more than one point for one report report, in the public map your dot will be appear in the middle of the area. Ones the user will open you report page he/she will be able to see the area selected or the multiple locations associated with that report. In addition to that you will also have the possibility to see a larger map on the report page[3]. 54 3.2.3 Comments The comments section allows the administrator to view and manage all comments that are submitted to reports on the website. The comment lists[1] allows the administrator to view all comments in the system. It also allows them to see just those comments that are Awaiting Approval[2], have already been Approved[3], or have been identified as spam[4]. For each comment it is possible to see who submitted the comment[5], the report that the comment was made about[6], the text of the comment[7], and the date of the comment[8] and the IP address[9]. The right side of the comment in the comment list section allows the administrator to approve[10] or delete comments[11], or report as spam by clicking on the respective tab[12]. 55 3.2.4 Download Reports This section allows the administrator to download all the reports as a CSV file. There are options to choose what type of information to download and what kind of reports to download. By marking on the relative box it is possible to download: 1. Approved Reports 2. Verified Reports 3. Reports Awaiting Approval 4. Reports Awaiting Verification In addition to that it is possible to include in the report: 5. Latitude 6. Longitude 7. Location Information 8. Description 9. Categories Here you can also decide to download only reports relative to a certain period of time by inserting the dates in the boxes on the bottom part of the page[10]. Once all characteristic have been chosen the reports will be download as a CSV file by clinking on the Download tab [11]. 56 3.2.5 Upload Report This section allows the administrator to upload a CSV file to import reports into the Ushahidi platform. This system can be used if for example you need to upload reports from people that cannot send them to you via email or phone but who that have a computer to combine them in a CSV file. Another reason to use this function may be if you are transferring reports from one platform to another (minding that both platforms are using identical versions of the software). The format that needs to be used to have the system recognize the reports and upload them on the platform is the following: #, INCIDENT TITLE, INCIDENT DATE, LOCATION, DESCRIPTION, CATEGORY, APPROVED, VERIFIED Examples are: "1","Suspected death in Nairobi", "2009-05-15 01:06:00", "Nairobi", "Three cases have been confirmed in C. del Uruguay", "DEATHS, CIVILIANS", YES,YES "2", "Looting", "2009-03-18 10:10:00", "Accra", "Looting happening everywhere", "RIOTS, DEATHS, PROPERTY LOSS, ",YES, NO It is very important to remember that: • • • Reports must be uploaded specifically in CSV format. When incident ID already exists in the database, the entry in the CSV file will be ignored. The incident must contain at least Incident Title and Incident Date TIP: To make sure you’re working with the proper format, start by running an export from the system first. Even without any reports in the system, you can still work from the blank CSV file. 57 3.3 Messages All of the incoming messages are listed here, which in this case refer to: SMS, emails, Twitter, and Laconica messages. If you have also installed the plug-in that allows you to sync with Cloudvox, then you will also have in this section the voice messages coming into your platform. You can access this section of the admin page by both the tab in the main navigation or the link in the message section of the dashboard. As a clarification note keep in mind that with messages here we refer to the incoming information as they enter into the system. Those messages will not be displayed publicly until they are processed and transformed into reports via the report form and approved. 3.3.1 SMS The SMS messages are accessible from two tabs, one directly from the Messages section of the Dashboard, one from the Toolbar of the Dashboard. Clicking on the SMS tab will access the page were all incoming SMS are listed. In this section you can see Inbox[1], Outbox[2], All[3], Trusted[4], Spam[5] or the Reporters[6]. All Messages and Inbox will show all the SMS that has come into the platform, the ones, that have been transformed into report but not approved, the ones that yet have to be processed and transformed into report and the ones that have been already processed as report and approved so that they are publicly displayed on the map. On the side of each report there are two options you can click on Create Report[7] or Delete[8]. By clicking on the Crete Report tab, the admin will be directed to the Report form page where the SMS body will be already inserted in the Description. The admin have only to add a title, location and date, and then submit the report31. If instead of “Create Report” there is “View Report”[9] it means that the message has been already processed and is now a report. By clicking on that tab it is possible to see the report that was created form that SMS. 31 See section 3.2.2 to see how to fill the report form 58 The list of SMS messages can be displayed in two different ways: extended, meaning it is possible to see all the content, or partially hidden, meaning that you will have to click on the tab “Preview Message”[1] to see the text of the SMS. By re-clicking on it the text of the message will be hidden again. In addition, you will find below each message a function called “Reply” to be able to reply to the messages[2]. This function can be customized to insert default replies, i.e. a message that thank the sender and ask for more information. Under the SMS tab it is also possible to see the number of the sender[3], while on the right side of the message it is possible to see the date[4]. In the Reporters section there is sub-navigation, which allows the administrator to flag the SMS number sender as Spam[1], Trusted[2], Untrusted[3] or Trusted+Verified[4], or to Delete[5] and Delete while flagging them as Spam[6]. In the Reporters section you can see who has been registered as trusted reporter[7] or trusted + verified[8]. 59 To register a phone number as trusted and verified you need to click on the reporter number and you will be asked to flag that reporter as trusted or trusted+verified and also choose which means – meaning SMS, e-mail, Twitter or Laconica - this reporter will use to deliver messages to your deployment. Once you have chosen a reporter as trusted all the messages coming form him will be marked with the color corresponding to his mark, meaning in green for trusted+verified and in blue for trusted only. You can also set the location of a certain reporter by clicking on edit and choosing his location on the map. By doing this, if the reporter is trusted, his reports will be mapped automatically. 60 3.3.2 Email The email messages are accessible from two tabs: one directly from the Messages section of the dashboard and the other from the main navigation of the dashboard. The Email tab allows you to do exactly the same things that the SMS tab does, but with Emails sent to the email address you set up for people to email you reports. Here too it is possible to see the list of all Emails[1], Inbox[2], Trusted[3] and Spam[4]. In the email list you can see the email address that sent the email[5] and the date the email was posted[6]. If there is a name instead of the email address, this means that sender of the email has been registered into the platform as Reporter. On the right side of the message two tabs allows users to delete the email[7] or to create a report[8]. By clicking on the Create Report tab, you will be directed to the Report form page where the email body will be already inserted in the Description Box. All the administrator has to do is add a title, location and date, and then submit the report32. If instead of Create Report there is a green tab that says View Report, it means that the email has been already mapped and by clicking on this tab it is possible to access the report page. Just like the SMS tab, this section can be customized to show directly the text of the email or to show only the subject. In this second case there is a Preview message tab that allows the admin to see the entire body of the email[9]. By clicking again on that tab, the body of the email will return in its hidden format. 32 See section 3.2.2 to see how to fill the report form 61 The Reporters tab here works exactly in the same way as explained in the previous section on SMS. 62 3.3.3 Twitter The Twitter messages are accessible from two tabs, one directly from the Messages section of the dashboard, one from the Toolbar of the dashboard. The Twitter tab allows you to do exactly the same things as the SMS tab, but for the Twitter messages that are coming directly into the platform. Here too it is possible to see the list of all Twitter[1], Inbox[2], Trusted[3] and Spam[4]. In the Twitter messages list you can see the Twitter Account that sent the Tweet[5] and the date the Tweet was posted[6]. On the right side of the message two tabs allows you to Delete the Tweet[7] or to Create a report[8]. By clicking on the Create Report tab, you will be directed to the Report form page where the Tweet body will be already inserted in the report description. The administrators only have to add a title, location and date, and then submit the report.33 If instead of Create Report there is a green tab that says [9] View Report, it means that the Tweet has already been mapped and by clicking on this tab it is possible to access the report page. The Twitter messages most often come with a link attached to it. This link can be copied and paste in the Report Form called New Source Link, but it is suggested to always verify that the link is a correct one. This link often allows the mapper to look for the right location where the event happened and to control time and date of the event reported. The Reporters tab here works exactly in the same way as explained in the previous section on SMS[10], allowing the administrator to flag the Tweet source Trusted, Untrusted or Trusted + Verified. 33 See section 3.2.2 to see how to fill the report form 63 3.3.4 Laconica The Laconica34 messages are accessible from two tabs, one directly from the Messages section of the dashboard and one from the Toolbar of the dashboard. The Laconica tab allows you to do exactly the same things that the SMS and Twitter tab, but for the messages sent thought Laconica into your Ushahidi platform. It is also possible to see the list of all Laconica, Inbox, Trusted and Spam. In the email list you can see the Laconica Account that sent the Laconica message and the date the Laconica message was posted. On the right side of the message two tabs allows to Delete the Laconica message or to Create a report. By clicking on the Create Report tab, you will be directed to the Report form page where the body of the Laconica message will already be inserted in the Description. The admin have only to add a title, location and date, and then submit the report.35 If instead of Create Report there is a green tab that says View Report, it means that the Laconica message has already been mapped and by clicking on this tab it is possible to access the report page. The Reporters tab here works exactly the same way as explained in the previous section on SMS, allowing the administrator to flag the Laconica message source Trusted, Untrusted or Trusted + Verified. 3.3.5 Cloudvox The Cloudvox messages are accessible from two tabs, one directly from the Messages section of the dashboard, one from the Toolbar of the dashboard. The Cloudvox tab allows you to do exactly the same things as the SMS tab, but for the voice messages sent to your Ushahidi Cloudvox number. Here too it is possible to see the list of all Voice Messages[1], Inbox[2], Trusted[3] and Spam[4]. In the Cloudvox List you can see the Cloudvox number that left the message[5] and the date the voice message was left[6]. On the right side of the message two tabs allow you to delete the voice message[7] or to create a report[8]. By clicking on the Create Report tab, you will be directed to the Report form page where the voice message body will be already inserted in the report. The administrator only has to add a title, location and date, and then submit the report.36 If instead of Create Report there is a green tab that says View Report[9], it means that the voice message has already been mapped and by clicking on this tab it is possible to access the report page. 34 Laconica, renamed now StatusNet, is a FLOSS microblogging server written in PHP that implements the OStatus standard for interoperation between installations. While offering functionality similar to Twitter, StatusNet provide the potential for open, inter-service and distributed communications between microblogging communities. 35 See section 3.2.2 to see how to fill the report form 36 See section 3.2.2 to see how to fill the report form 64 The list of Cloudvox voice messages shows only the sender of the voice message. To see the audio file and listen to it there is a Preview message tab that allows the admin to access the two voice files[10]. By clicking on the Play symbol it is possible to listen to the files[11]. The Reporters tab here works exactly in the same way as explained in the previous section on SMS[12]. 65 3.4 Stats The statistics section allows you to see detailed information about the reports that have been submitted and the users of the Ushahidi system. The statistics page has a toolbar which allow the administrator to access the following pages: 1. 2. 3. 4. 5. Visitor Summary Country Breakdown Report Stats Category Impact Report Punchcard 3.4.1 Visitor Summary The Visitor Summary shows information about the users of the Ushahidi page. Visitor information tracks: • • • Unique visitors, the number of individuals coming to your instance; Unique Visitors are determined using cookies. In the case that a visitor does not have cookies enabled they will be identified using a simple heuristic taking into account IP address, resolution, browser, plugins, OS, etc. Visits, a record of a unique visitor coming to the site more than 30 minutes past his/her last pageview. Page views, the total number of pages that visitors have viewed on your site. Visitor information is available over time as well and allows the administrator to see only the statistic for a predefined interval of time by inserting the dates in the opposite fields, or by clicking on the date range buttons, which allows you to choose an interval of 1 month, three months or six months. 66 Under the main graph it is possible to see the list of days with the indication of how many unique visitors, visits or page views per day and the percentage. 3.4.2 Country Breakdown This section shows the countries where users of the Ushahidi pages are located. Country information is available over time and allows the administrator to see only the statistic referred to a predefined interval of time by inserting the dates in the apposite fields, or by clicking on the date range buttons, which allows you to choose an interval of one, three, or six months. The countries that have the higher number of visitors are highlighted in red on the map, while under the map there is the list if the countries with the numbers of unique visitors, visits or page views per day per country and the percentage over the total views. 3.4.3 Report Stats The Report Stats page shows the breakdown of reports on a pie chart, according to three criteria: -‐ Category -‐ Verified / Not verified -‐ Approved / Not approved Statistical information on reports submitted is also available over time and allows the administrator to see only the statistic referred to a predefined interval of time by inserting the dates in the apposite fields, or by clicking on the date range buttons, which allows you to choose an interval of one, three, or six months. 67 A table on the right of the chart indicated the number of reports visualized in the chart and the categories or the verified reports, or the approved reports visualized in the chart. 3.4.4 Category Impact The category impact is a graph that allows the administrator to view reports by category over time. By moving from the left to the right it is possible to see a comparative view o the different categories, while passing the mouse over the category itself, the name of the category and the number of the report submitted in that period of time will appear on the top of the graph. Statistical information on the reports submitted is available over time as well and allows the administrator to see only the statistic referred to over a predefined interval of time by inserting the dates in the apposite fields, or by clicking on the date range buttons and choosing an interval of one, three, or six months. 68 3.4.5 Report Punchcard The Report Punchcard is a graph that depicts the number of reports per day according to the hour of the event. The graph shows in the Y axe the time of the day and in the X axe the day of the week. Looking at the size of the dot in the graph you can easily see which times of which days the majority of the reports where submitted to the platform. 69 3.5 Addons 3.5.1 Plugins The Addons button will open a page where you will find the list of Plugins installed in your platform37. The list of plugins will show to you the plugins that are activated and the ones that have been installed but not activated. By clicking on the Activate button you will activate a plugin[1], while by clicking on the Deactivate button you will deactivate it – notice that even if you deactivate a plugin it will remain installed in your platform so that you can easily reactivate it at a later time[2]. You can also view which plugins you have Active or Inactive by clicking on the subnavigation buttons of the Addons page[3]. Each plugin has a Setting function which will bring you to the page where you insert or modify the settings of the plugin[4].38 3.5.2 Themes The Themes page will show you the different themes that you can chose for your Ushahidi platform. Upon installation you’ll find the default Ushahidi theme listed here. If you create or find new themes you can add them here. As mentioned earlier, never delete the default theme, even if your website is using a different theme. Additional themes are based off the default theme; deleting the default theme in any instance will cause your website to break. It is also important to note: pay attention to the theme you employ for your website. If you switch from one theme to another one, that theme may not support the display of certain 37 38 To see list of available plugins look at http://apps.ushahidi.com/ See section 3 to see how to install a plugin 70 types of data, so best to check the developer’s notes or run some tests before launching on a new theme. 71 4. The User Interface 4.1 The Home Page The default Ushahidi home page is composed of different sections, each of them providing different information: 1) The Map 2) The Categories 3) The Timeline 4) The Static Layers 5) The Reporting Box 6) The Incidents List 7) The Official and Mainstream News 72 In addition to that, on the Ushahidi user main page there is the toolbar, which has five navigation items in addition to the Home one, leading to different pages: 1) Reports 2) Submit a Report 3) Get Alerts 4) Contact Us 5) About Us Lastly, on the top of the Toolbar there are 3 additional buttons: A) Submit a report B) Languages C) Search In addition to that, you can customize your home page in order to add additional boxes, like a Twitter Box, a Picture Box, or a Google Finder Box, or anything you would like to have on the Home Page. Those customizations will require some work on the code and are not default functions of the Ushahidi platform. 4.1.1 The Map The Ushahidi map is an interactive map and it is composed of four different parts: the base map [1], the zoom bar [2], the dots on the map [3] representing the reports, and the layers button [4]. 73 The Map itself is the one you decide to use as the base map, and we will explain later how you can choose which map to use: Yahoo Maps, Virtual Earth Maps, Google Maps or the open source OpenStreet Map. The first two maps are not customizable, while the latter two are customizable39. This means that if you decide to use Virtual Earth or Yahoo Map, you cannot add or remove or change anything in the map itself, like names of streets, or locations of buildings. The Layer button is the blue button on the right side of the map, and the one that changes the base layer from one type of map to another, in addition to have the satellite view40. Additionally, the Layer button can allow you to add or remove the reports layer on the Map itself. 39 See here: http://wiki.openstreetmap.org/wiki/Editing for information on how to modify a map using OpenStreet Map, and see here for instructins on how to edt a Google Map: http://www.google.com/mapmaker/mapfiles/s/support.html 40 To be able to switch from one map to another (like from Google Map to OSM) using the layer button it is required to work on the code. As default function the button will only allow you to remove or add the Reports layer. 74 The red dots on the map represent reports submitted to the Ushahidi platform and the location of the event reported. Reports in a similar location are clustered41 and appear as larger dots with a number on it, which tells you how many reports there are in that location. To zoom in and out you can use the Zoom bar on the right side of the map. The way reports are clustered is by proximity; the more one zooms out, the more reports get aggregated, while the more you zoom in, the more reports will separate one from another and appear as a single dot. By clicking on a marker, an info window will appear showing you the title of that report. If you click on a clustered dot, the list of titles of all reports in that area will appear. If you then click on the title, the platform will forward you to the report itself, where you will be able to read the entire description of the report42. 41 42 See section 2.2.1 of this guide to see how to set up clusterization of dots. Go to section 3.2.1 to see how a report looks like and what information you can find in it. 75 76 4.1.2 The Categories On the right side of the Map you will find the categories. Each category indicates a typology of information and this may vary according to the issue you want to monitor. Each category can have a sub-category and you can have as many sub-categories as you want. For the sake of displaying several categories but keeping the site design simple, the sub-category will not appear automatically but will appear by clicking on the main category they belong to. The category section works in combination with the map. By clicking on all categories you will see all the reports submitted to the Ushahidi platform, while clicking on a certain category will display only the reports related to that specific category and the same will happen if you click on the sub-category. The color of the dots related to a certain category will be the same you have previously assigned to that category, or if you have assigned an icon, you will see the icon instead of the dot43. Users can see only one category or subcategory at the time44. 43 See section 2.3.1 to know how to assign to a category an icon or a color 44 Some deployments to date have overridden this functionality to display multiple categories at once, but this requires a rewrite of the underlying code. 77 4.1.3 The Timeline Below the Map display there is the Timeline. The timeline shows the number of reports mapped over time and by default shows the overall trend of the reports from the beginning of your deployment to the current day as a static graph[1]. The timeline can also be used in coordination with the map, turning the default, static visualization into a dynamic visualization displaying the reports as they were added to the system[2]. To view the published reports in a given period of time, you just have to insert the dates in the two boxes located in between the timeline[3] and the map. This will set the time interval you want to look at and you will see on the map only the dots representing the reports inserted in that time range. If you want to view an animation of the reports mapped over time and space over a certain period of time, simply insert the dates in the two boxes and click on the Play button. 78 4.1.4 The Static Layers Static layers are useful for your project in displaying information such as different regions, states, or provinces; demographic information; borders; or other general information that may help provide additional context to the real time information you are gathering on the ground, but information you don’t want to include as reports to clutter up your other sources. Ushahidi provides the means to include and abstract this information from your reports as well as the option for your users to toggle this information on or off depending on their preference. The static layers are the KML or KZL file45. Those files contain information about static points or areas on your map46. For example, these static points can represent refugee camps, or police stations, hospitals, geographic regions or risk areas. The reason you wouldn’t want to submit this information as reports for your map is because they will appear as incidents, which are likely to confuse your viewers. . Instead you can insert this type of data as a static layer [1]. This will allow you to view this data in relation to you’re the incidents (reports) you have mapped, which can help you identify possible connections between those static locations and the dynamic events happening in the same area. The Static Layer Box appears only if you use those files and will, by default, be listed under the category box. By clicking on the static layer you will see the points related to that layer appearing on the map. Administrators can decide to see as many static layers as you want in the same time. 45 See section 3.3.6 to see how you can insert those files into your map. You can alternatively insert them in the map itself if you are using OpenStreet Map. See here: http://wiki.openstreetmap.org/wiki/Editing 46 79 4.1.5 How to Report Box The Reporting Box appears below the categories where you can see all the information on how to submit reports to the Ushahidi platform. By default there are four ways to report information directly into the platform: SMS[1], email[2], Twitter hashtag[3] and directly on the website via online forms[4]47. As long as the administrator of the platform has created those reporting systems, you will find all the relevant data in this box. The “Submit a report” link will direct you to the report form into the platform48. The growing number of Ushahidi plugins is allowing for more types of submissions through integration other applications. One of the more popular plugins is the Cloudvox plugin; if you have set up a Cloudvox plugin, you will see your Cloudvox number[5] in that box too49. 47 See section 2.2.1 to know how to set up all those reporting system as administrator. This form is the same one you can access by using the “Submit a report” tab/button. 49 See Section 2.3.8 to see how to set up your Cloudvox plugin 48 80 81 4.1.6 The Incidents List The Incident List Box appears below the Timeline and it shows the list of reports in chronological order starting from the most recent one. The list shows the title of the report[1], the location [2], and the date it has been submitted, or the date referred to the event reported[3]50. By clicking on the title you will be directed to the Report Page, where you will be able to see the description of the event and all the specification of the event reported.51 50 51 It is up to the reporter to decide if he/she wants to use the date of the submission of the date of the incident. See section 4.2 to see the different parts that compose a report one it has been submitted. 82 4.1.7 The Official and Mainstream News The Ushahidi platform provides the ability to subscribe to RSS feeds from other websites and to display them on your website. This feature is optional but in some projects, particularly those that may be actively covered by the mainstream media or bloggers, it can be useful to provide additional context about your project without having to include related but not actionable content on your map. If you choose to include news feeds on your homepage, they will appear in the box below the Reporting Box52. The news will be displayed with their title, source and date. The news you will see into this box are Feeds coming from different website, blogs, twitter accounts, or anything relevant that the manager of the platform decided to subscribe to. The list shows the title of the report[1], the source[2], and the date it has been submitted[3]. This box works like a Google Reader, and by clicking on the title of the news you will be directed to the original source of the information. 52 To see how to set up the news feeds displayed here go to section 2.3.5 83 4.2 Reports By clicking on the Reports Tab you will access a page that provides a list of all the reports that are in the Ushahidi system. The report summary on the top of the page shows total reports approved[1], the average reports per day[2] and the percentage of verified reports over the total of approved reports[3] . The reports are listed in chronological order starting from the most recent one and from the list itself it is possible to have an overview of the multimedia connected to that report[4], the title of the report[5], with the initial sentence of the description[6], the date and time[7], the location[8], the verification status[9] and the categories associated with that report[10]. 84 Clicking on the title will access the full report with all of the information. The complete report details from the report page are the following: 1. 2. 3. 4. 5. 6. 7. Visualization on the map Date, time and location of the incident Category/ies Verification status Description Comment/s added by user/s Additional Reports related to that event In addition to that there is a small function[8] on the top of the Comment Box that allows the viewer to give scores to the report by saying if he/she trust it or not. This function is not going to affect the verification of the report, or of the comment, but can give to the administrator and to the user an idea of what people reading that comment think about its credibility53. 53 For more info on Verification of information see http://community.ushahidi.com/uploads/documents/c_UshahidiVerification-Guide.pdf 85 4.3 Submit a Report Submitting a report to an Ushahidi platform is as easy as filling in any online form; administrators will appreciate that the layout of the form is identical to the finished reports. Even geo-locating your report is as simple as clicking on the map provided; Ushahidi will figure out the latitude and longitude for you. To access the form, click the “Submit a Report” link in the main navigation. This entire page is the online form. There are 10 items in the form in which the user can contribute, in addition to the required title, description, and location, the following: A. Title B. Description C. Date and Time D. Category E. Map F. Refine Location Name and Find Location tab G. News Source Link H. Video Link I. Upload Photos J. Contact information 86 a) Title The person reporting an event (the reporter) provides a brief description of the event (no more than one sentence), including nearest landmark (eg. Rally near Al-Askari Mosque in Conakry). The title is the first thing that users of the map will see, so it is important that the title gives an idea of what happened and where. b) Description The reporter should describe the event in a few sentences. It is important to include the following pieces of information: ‘who’, ‘what’, ‘where’, ‘when’, ‘how’ and any additional, contextual information that you feel is important. It is also important to describe the source of the information – e.g., it is from a secondary or primary source. The description should be brief, but comprehensive, with all the additional information that is relevant to the event reported. c) Date & Time This should refer to the date and time of the event, rather than when the report is submitted. Note that the system automatically inserts the current date and time, so the reporter will need to change the entry if the event happened on a different date than when she is submitting the report. d) Category The categories help to categorize the incidents by type. The reporter must select at least one category type but it is possible to select as many categories that apply. If there are subcategories, to see them it is necessary to click on the plus sign placed before the category and a scroll down menu will appear with all the sub-categories. Correct categorization is important and should not be rushed. In general, try to select just one category if possible. e) Map The map allows viewers visually provide the location of the incident. If the name of the street, address, or GPS coordinates are not known, but the reporter can find the location on the map, she can double click on the location of the event on the map to place the red marker there. This will automatically record the coordinates and point on the Ushahidi map. It is important to zoom in on the map to a level where it is actually possible to accurately place the marker at the correct location. The more specific, the better. In addition to plotting the report location on the map, the reporter is required to write the name of the location in the “Refine Location name” box under the map. f) Refine Location Name and Find Location tab The location of the event is one of the most important pieces of information to be inserted into the report. If the reporter knows exactly where the event happened she can insert the GPS Coordinates by simply entering them in the box below the map and by clicking on the Find Location tab. The red marker will automatically move to the location identified by the GPS coordinates automatically. If there is no data available about the GPS coordinates and the reporter knows the location, he/she can just write the name in the box under the map and click on the “Find Location” 87 tab: the Ushahidi map will automatically find the coordinates of the location and place the red marker in the map in the right position. If the Ushahidi map cannot find the exact location, then it is highly recommended to use external, online applications such as Google Earth or OpenStreetMap to find more precise coordinates and then copy and paste them in the find location box. g) News Source Link This section should be used only if the report being submitted is from an online source: the box allows inserting only a URL address. If the information is coming from more than one on line source, it is possible to insert as many links as required by clicking on the plus (“+”) symbol on the side of the box. h) Video Link In this section the reporter can add a link to a video related to the event reported. It is important to be sure that the video is relevant to the accident monitored. Note that the Ushahidi platform doesn’t allow you to upload videos to the platform; the reporter can provide a URL to a video hosted elsewhere (such as YouTube). i) Uploads Photo The reporter can also upload a photo related to the event reported. Again it is important to be sure that the format is JPG or similar and that the picture is relevant to the event being reported on. Unlike videos, it is possible to upload pictures to the platform. j) Contact information The reporter may include her personal information with report: first name, last name and email address. Typically, this is important information to be include because if there is missing information in the report, or mistakes, the administrator can immediately contact the reporter for clarification. This is not required for the system to accept the report, but it can enormously help the managers of the platform. We should note that in some instances it would not be advised to collect this information, keeping in mind the safety and security of the contributors.54 k) Submission Button Once all form has been filled out, clicking the “submit” button will add the report to the administration queue for approval. If there are missing pieces of information or mistakes in the report, the system will ask the reporter to fix the mistakes. Note that the default functionality of the system is such that unless a site administrator or editor submits a report, the report remains unpublished (not public) until approved by an administrator. It is really important to review all information in the report for accuracy before clicking submit. After submitting the report, it will be sent to an administrator for approval and verification before appearing on the map unless otherwise decided by the administrator of the platform. 54 For more information on this see: http://irevolution.wordpress.com/2009/06/15/digital-security/ 88 You will re-directed to the same page also if you click on the button on the top of the home page will lead you to the same page that you can access by clicking on the Submit a Report tab on the main tool bar. 89 4.4 Get Alerts The fourth tab on the main page of the Ushahidi platform is called Get Alerts[1] and it allows you to receive alerts on your mobile phone, email, and/or subscribe to categories of reports as an RSS feed as new reports are published on the website. To set up an Alert via email or SMS it is just matter of four easy steps: a. Click the “Get Alerts” tab on the home page. b. Select the location to receive alerts about[2] and the size of the area[3]. The system will send an alert whenever a report is entered within 1/5/10/20/50/100 km from this location. c. Select mobile[4]or email alert[5] and enter mobile phone number or email address (or both). d. Click “Save Alert”[6]. On this page there is also possible to subscribe to the RSS feeds to get notifications about new reports submitted into the system: a. Click the “Get Alerts” tab b. Click on the Link in “RSS Feeds” box[7] c. Select the RSS Aggregated that you use from the dropdown menu and click “Subscribe Now”. Every time a new report will be uploaded on the Ushahidi map you will be notified the information to your RSS reader.55 55 In the new version of the platform you will also be able to choose the categories of report you want to receive alert for. In this case you can select the categories you are interested in and you will only receive alerts on report categorized under that specific category (or subcategory). 90 4.5 Contact Us The Contact Us tab directs to a page where it is possible for Ushahidi users to submit comments, questions, and suggestions to the administrators of the site. The form asks for personal information like name, email address and phone number in addition to message subject and text. 91 4.6 About us Fairly straightforward: this is a space for you to including information about the organization (or volunteers) setting up the platform and about the Ushahidi project. Typically, organizations explain who they are and what they want to achieve with the platform, in addition to give some background information on the country of the deployment56. 56 See section 2.3.4 to know how to set up the content of this page 92 4.7 Additional Buttons 4.7.1 Languages The languages option is on the top of the toolbar and it allows by default to switch from English to Spanish, French, Arabic, Polish, Cantonese, Russian and Kiswahili57. This function will not automatically translate all the options in the website but only the toolbar, and the default functions of the user menu. 4.7.2 Search The search option is also on the top of the toolbar and allows you to look for specific reports into the Ushahidi platform. By typing into the box the key word the system will give you all the reports, in chronological order, starting form the most recent one, that contain that word. If you are looking for a specific report you can type in the exact title or the number of the report, if you know it. In the same way you can look for report by a specific day, or related to a specific category, or to a specific place. 57 It is possible to add other languages and to also translate the admin page and the other functions of the platform by working on the code. The translation of the categories has to be done manually. To find all the pother translation available go to the Github repository of the Ushahidi platform at https://github.com/ushahidi. In addition to that Ushahidi has set up a translation website Tafsiri, see here for more info: http://tafsiri.ushahidi.com/ 93 94