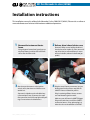
1
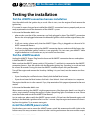
Remote control your Mercedes
Mercedes G-class 2004-2012 (W463)
cliMATE ® M1 Installation Manual
M1 for Mercedes G-class (W463)
Contents
3
5
6
7
Getting started
Installation instructions
Testing the installation
Warranty and Return Policy
Safety Information
Carbon Monoxide warning
Never run the vehicle in an enclosed area or area without proper ventilation. Running engine produces dangerous gas byproduct Carbon Monoxide. When parking in such an area, the remote starting capability must be disabled by turning off the cliMATE power switch. It is the user’s responsibility
to properly handle and keep out of reach from children all ignition keys and remote transmitters to
prevent the unintentional start of the vehicle. THERE MUST BE A CARBON MONOXIDE DETECTOR
IN THE LIVING AREA ADJACENT TO THE VEHICLE. ALL DOORS LEADING FROM LIVING AREAS TO THE
VEHICLE STORAGE AREA MUST AT ALL TIMES REMAIN CLOSED.
Servicing your Mercedes
When having the vehicle serviced, always disable the remote start by turning off the cliMATE power
switch. This will not only prevent the possible missdiagnosing the vehicle electronic system by the
technician, but also prevent possible accidental remote starts while somebody is working on the
vehicle.
W463_cliMATE_installation_manual_20131221
2
M1 for Mercedes G-class (W463)
Getting Started
Welcome
Welcome to the growing fan base of Comfort Electronics.
We are committed to delivering top quality innovative products that increase the Comfort in your
life.
We tried to make this manual as easy as possible, read it first to shorten your time needed for installation.
The cliMATE® module you just purchased is a very intelligent multiprocessor unit with many surprising functions, typically not found in other units. Our work is our love, so we pay attention to the
smallest details.
We know you love your Mercedes like we do. That is why there is no wire cutting required for this
installation. Start by unplugging your ignition key unit, plug our module between your ignition key
unit and the original harness… done.
If for some reason you need to put it all back to the original state, no problem, just unplug and plug
some connectors… done.
Please visit us online at www.mbclimate.com for latest information or additional questions.
The concept explained
No one wants to enter their hot or freezing Mercedes. It can take 15 minutes for the temperature
inside to become comfortable.
The solution is to Remote Control your Mercedes cliMATE®. Our cliMATE® module enables the Mercedes climate to run even though there is no ignition key inserted.
We know that without cliMATE® the temperature in your car will be so unpleasant that you might
ask your stunt double to start the car for you. (If you want to see what we mean, check out our short
Art Film online).
It is very convenient to remote start your Mercedes climate and have no need to carry anything extra
in your pocket - just use your existing Mercedes Smartkey.
Because it has no dedicated button to activate the cliMATE®, we had to come up with an alternative:
a Smartkey button-pressing sequence. Just click Lock – Unlock – Lock buttons in a sequence; or just
click the red Panic button if your key has one. The engine will start running, which will turn on your
climate control unit to the last setting.
Using cliMATE® is perfectly safe and no security is breached. The doors remain locked, the steering wheel remains locked and the shifting in automatic transmission will remain disabled.
The car cannot be driven until the original key is in the ignition and turned to RUN position.
W463_cliMATE_installation_manual_20131221
3
M1 for Mercedes G-class (W463)
What is in the package
This cliMATE® package contains everything you need to remotely activate your Mercedes climate
control unit, whether you want to cool or heat your vehicle before you enter. In the package you will
find:
•
cliMATE® module (the heart of the system)
•
cliMATE® connection harness with a power switch
•
Ignition Switch Removal Tool (our design, original available only from the dealer for about $85)
•
cliMATE® Bypass Plug (our invention - by plugging this instead of cliMate® module, your Mercedes will function like from the factory WITHOUT THE NEED OF REMOVING OUR HARNESS, see
more info in the cliMATE® User Manual)
Required tools
Additionally, you have to have the following tools:
•
Medium Philips screwdriver
•
Panel removal tool (or wooden spatula from your kitchen)
If you have access to a Mercedes diagnostic tool, we recommend that you read and reset all diagnostic faults before any installation work, in the case there are some existing problems with the vehicle.
That way you will be assured that the cliMATE installation didn’t cause them. We would also reset all
diagnostic faults after the installation.
Installation concept
The installation for this Mercedes model takes approximately 20 minutes:
•
Gain access to the Mercedes ignition switch
•
Unplug the factory harness from the ignition switch, and…
•
… plug the same factory harness into cliMATE® module
•
Plug the cliMATE® connection harness into the ignition switch
•
Reinstall the ignition switch
In short, the cliMATE® module is plugged between the Mercedes ignition switch and its
harness.
W463_cliMATE_installation_manual_20131221
4
M1 for Mercedes G-class (W463)
Installation instructions
This installation manual is valid only for Mercedes G-class 2004-2012 (W463). Please visit us online at
www.mbclimate.com for latest information or additional questions.
1
Remove the instrument cluster
frame
Using the panel removal tool, gently pry up
the plastic frame just below the instrument
cluster. Put the frame aside.
3 Now that you have access to the ignition
switch, notice, that there are 3 harnesses attached to it.
Squeeze the sidetabs on the wide black connector and pull it out. Disconnect the small
blue connector (rock it left and right while pulling). Do not remove the third harness.
W463_cliMATE_installation_manual_20131221
2 Release driver’s knee bolster cover
Remove 5 Philips screws holding the driver’s
knee bolster cover in place (2 screws are on the
top, below the just removed frame; 3 screws
are on the bottom, above the brake and gas
pedals).
4 Plug the same 2 factory connectors (you just
disconnected in the previous step) into the
cliMATE® harness included in your kit.
Plug 2 remaining cliMate® harness connectors into Mercedes ignition switch.
Make sure you still have the cliMATE® Bypass
Plug on the other loose end of the cliMATE®
connection harness. If not, please plug it in,
otherwise the next installation test will fail.
5
M1 for Mercedes G-class (W463)
Testing the installation
Test the cliMATE connection harness installation
Start the vehicle with the ignition key as usual. After it starts, turn the engine off and remove the
ignition key.
If it started, it means that you have installed the cliMATE® connection harness properly and you are
ready to proceed to install the electronics of the cliMATE® system.
In the case the Mercedes didn’t start:
•
please make sure that all the connectors are firmly plugged in place. The cliMATE® connection
harness has to be plugged in between the Mercedes ignition switch and the original factory harness.
•
if still not starting, please verify that the cliMATE® Bypass Plug is plugged in at the end of cliMATE® connection harness.
•
if still not starting, please unplug the cliMATE® connection harness and reinstall the factory harness into the Mercedes ignition switch as it was originally. If it starts now, your cliMATE® cable
might be defective. Just to make sure, try to install it one more time.
Test the cliMATE module
Unplug the cliMATE® Bypass Plug from the loose end of cliMATE® connection harness and replace
it with the cliMATE® module.
Make sure that the cliMATE® power switch is ON (position ‘1’) and that it is connected to the cliMATE®
connection harness. Start the vehicle with the Mercedes ignition key (Smartkey) as usual and wait
for at least 20 seconds. During this time the cliMATE® module will pair with your Mercedes.
Turn off the engine and remove the Smartkey. Holding it in your hand, test the remote start functionality:
•
if your Smartkey has red Panic button: Shortly click the Red Panic button.
•
if you do not have the Panic button: click Lock - then Unlock - then Lock buttons in a sequence
The engine should start in a few seconds. If yes, skip remainder of this page and proceed to the next
section.
In the case the Mercedes didn’t start:
When remote starting, the cliMATE® might encounter errors, like the engine hood is not closed. In
such a case instead of starting the engine, it flashes the parking lights to indicate an error. Please
count the flashes and consult the cliMATE User Manual.
Just to make sure, please verify the cliMATE® power switch is ON and start the Mercedes again with
the key in the Mercedes ignition and let it run for 1 minute. Stop the engine and remove the Smartkey from the ignition. Try to remote start again.
Install the cliMATE power switch
Decide where you want to mount the cliMATE power switch. We recommend to drill a hole in the
bolster cover, but many customers choose to leave it sticking out between the cover and the carpet.
W463_cliMATE_installation_manual_20131221
6
M1 for Mercedes G-class (W463)
Warranty and Return Policy
cliMATE Warranty Policy
Comfort Electronics, Ltd offers a 30 day satisfaction guarantee on cliMATE® as well as a one year warranty against defects in materials or workmanship.
Comfort Electronics, Ltd’s liability under this warranty shall be limited to the correction or replacement of any defective part or product in question which Comfort Electronics, Ltd determines to be
necessary.
Warranty freight charges are the responsibility of the dealer, distributor and/or consumer. Excessive
exposure to heat/sun, liquids and physical abuse will not be covered.
The cliMATE® warranty is to the original purchaser and is non-transferable.
This warranty is void unless proof of purchase is submitted. Purchase price must be consistent with
Comfort Electronics, Ltd’s Minimum Resale Price (MRP) pricing policy.
Removal of serial numbers and/or alteration of product or packaging will void all warranties.
Comfort Electronics, Ltd. is not responsible for damages, including but not limited to improper installation, installation by a non-certified technician, damages to the vehicle, loss of time and loss of
profit resulting from installation or use of our product. In no event is our responsibility higher than
the purchasing price paid for our product.
Return Policy
Comfort Electronics, Ltd. will not warranty, credit, or exchange any product returned without a valid
Return Merchandise Authorization (RMA) number.
All RMA numbers are issued by Comfort Electronics, Ltd. RMA department.
Defective units shall be repaired and returned in like kind. All units that must be refurbished to like
new condition are subject to labor and parts charges to be determined by Comfort Electronics, Ltd.
All refunds for Comfort Electronics, Ltd. products must be collected at original point of purchase Comfort Electronics, Ltd. will not credit dealers/customers that did not purchase products directly
through Comfort Electronics, Ltd.
Governing Law and Venue
This warranty shall be governed by and construed in accordance with the laws of Czech Republic,
and venue for any legal proceeding or action at law arising out of or construing this Agreement shall
lie in the courts of South Moravian Region of Czech Republic, and the parties specifically waive any
other venue.
Laws in some local communities may restrict the use of remote starters. For example, some laws
require a person using a remote start to have the vehicle in view. Check local regulations for any
requirements.
Copyright 2013 Comfort Electronics, Ltd
W463_cliMATE_installation_manual_20131221
7