1
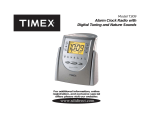
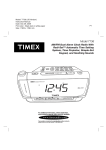
T116 IB P1
Color: Black, material: 210gsm2, Nov 2, 2007
size: 420mm x 165mm
CAUTION
RISK OF ELECTRIC SHOCK.
DO NOT OPEN
CAUTION:
TO REDUCE THE RISK OF ELECTRIC SHOCK, DO
NOT REMOVE COVER (OR BACK). NO USER-SERVICEABLE PARTS
INSIDE. REFER SERVICING TO QUALIFIED SERVICE PERSONNEL.
WARNING: TO REDUCE THE RISK OF FIRE OR ELECTRIC SHOCK,
DO NOT EXPOSE THIS APPLIANCE TO RAIN OR MOISTURE.
The lightning flash with arrowhead in an equilateral triangle is
intended to alert the user of the presence of uninsulated
“dangerous voltage” within the product’s enclosure that may
be of sufficient magnitude to constitute a risk of electric shock.
The exclamation point within an equilateral triangle is intended
to alert the user of the presence of important operating and
maintenance (servicing) instructions in the literature
accompanying the appliance.
The symbols above are located at the bottom of the cabinet.
CAUTION: To prevent electric shock, do not use this (polarized)
plug with an extension cord receptacle, or other outlets unless the
blades can be fully inserted to prevent blade exposure.
ATTENTION: Pour prévenir les chocs électriques ne pas utiliser
cette fiche polarisée avec un prolongateur. Une prise de courant,
ou une autre sortie de courant sauf si les lames peuvent étre
insérées à fond sans en laisser aucune partie à decouvert.
A Consumer Guide to Product Safety
IMPORTANT SAFETY INSTRUCTIONS
When used in the directed manner, this unit has been designed and manufactured to
ensure your personal safety. However, improper use can result in potential electrical
shock or fire hazards. Please read all safety and operating instructions carefully before
installation and use, and keep these instructions handy for future reference. Take special
note of all warnings listed in these instructions and printed on the product.
1. Water and Moisture — The unit should be kept dry and away from water or other
liquids. If liquid is spilled on the unit, or if the unit should fall or be accidentally placed
in or on a wet or damp area, immediately unplug the unit.
2. Ventilation — The unit should be set up in an area and position that does not
interfere with its proper ventilation. Check to see where the ventilation opening is on
the product. Do not set up the unit on a bed, sofa, rug, or similar surface that may
block the opening. Do not keep the unit in a tight-fitting installation, such as a
bookcase or cabinet, which impedes the flow of air through the ventilation openings.
3. Heat — The unit should be situated away from heat sources such as radiators, space
heaters, stoves, or other appliances (including amplifiers) that produce or emit heat.
4. Power Sources — The unit should be connected to a power supply only of the type
described in the operating instructions, or as marked on the appliance.
5. Grounding or Polarization — This unit is equipped with a two-pronged, polarized
alternating-current line plug (a plug having one blade wider than the other). This plug
only fits into your power outlet in one direction. This is a safety feature. If you are
having difficulty inserting the plug fully into your outlet, try reversing the plug blades;
do not force the plug into the outlet. If you are still having difficulty, contact your
electrician to replace your obsolete outlet.
6. Power-Supply Cord Protection — Power-supply cords should be routed so that
they are not likely to be walked on or pinched by items placed upon or against them,
paying particular attention to areas at the outlet and where they exit from the unit.
7. Overloading — Do not overload wall outlets, extension cords, or integral
convenience receptacles as this can result in a risk of fire or electric shock.
8. Cleaning — The unit should be cleaned only as recommended by the manufacturer.
See the Maintenance section of this manual for cleaning instructions.
9. Periods of Nonuse — If the unit is to be left unused for an extensive period of time,
such as longer than a month, the power cord should be unplugged from the outlet.
10. Object and Liquid Entry — Care should be taken so that objects do not fall and/or
liquids do not spill into any openings or vents located on the product.
11. Damage Requiring Service — The appliance should be serviced by qualified service
personnel when:
A. the power-supply cord or plug has been damaged.
B. objects have fallen and/or liquid has been spilled into openings or vents.
C. the unit has been exposed to rain.
D. the unit has been dropped or the enclosure damaged.
E. the unit exhibits a marked change in performance or does not operate normally.
12. Servicing — The user should not attempt to service the unit beyond those methods
described in the operating instructions. Any servicing not covered in the instructions
should be left to qualified service personnel. Please also see the Warranty Information
for more information on product servicing.
For questions or comments regarding this or other products, please
call our toll-free number: 1-800-888-4491.
Limited 90-Day Warranty Information
Timex Audio Products, a division of SDI Technologies Inc. (hereafter referred to as
SDI Technologies), warrants this product to be free from defects in workmanship
and materials, under normal use and conditions, for a period of 90 days from the
date of original purchase.
Should this product fail to function in a satisfactory manner, it is best to first return it
to the store where it was originally purchased. Should this fail to resolve the matter
and service still be required by reason of any defect or malfunction during the
warranty period, SDI Technologies will repair or, at its discretion, replace this
product without charge (except for a $3.00 charge for handling, packing, return
UPS/postage, and insurance). This decision is subject to verification of the defect
or malfunction upon delivery of this product to the Factory Service Center listed
below. The product must include proof of purchase, including date of purchase.
The fee for service after the warranty period or without proof of purchase is $6.00.
Model T116
Jelly Clock
Before returning this product for service, please first replace the batteries (if
applicable) with fresh ones, as exhausted or defective batteries are the most
common cause of problems encountered.
If service is still required:
1. Remove batteries (if applicable) and pack the unit in a well-padded,heavy
corrugated box.
2. Enclose a photocopy of your sales receipt, credit card statement, or other proof
of the date of purchase.
3. Enclose a check or money order payable to the order of Soundesign, for the
sum of $3.00 (or $6.00 if after the warranty period or without proof of purchase).
4. Send the unit prepaid to the Factory Service Center listed below:
Consumer Repair Department
SDI Technologies Inc.
Timex Audio Products Division
1401 Pullman Drive, Suite A
El Paso, TX 79936-7726
NOTE: This warranty is valid only if the product is used for the purpose for which
it was designed. It does not cover (i) products which have been damaged by
negligence, misuse or accident, or which have been modified or repaired by
unauthorized persons; (ii) cracked or broken cabinets, or units damaged by
excessive heat; (iii) damage to CD’s or tape cassettes (if applicable); (iv) the
cost of shipping this product to the Factory Service Center and its return to the
owner.
This warranty is valid only in the United States of America and does not extend
to owners of the product subsequent to the original purchaser. Any applicable
implied warranties are also limited to 90 days, and SDI Technologies will not be
liable for consequential damages. (Some states do not allow limitations on
implied warranties or exclusion of consequential damages, so these restrictions
may not apply to you.) This warranty gives you specific legal rights, and you may
also have other rights which vary from state to state.
For questions or comments regarding this or other products, please call
our toll-free number: 1-800-888-4491.
TIMEX is a registered trademark of Timex Corporation in the United
States and other countries.
T116-102207-0
Printed in China
For additional information, online registration,
and exclusive special offers visit our website:
For questions or comments regarding this or other products,
please call our toll-free number 1-800-888-4491.
Para instruccionese en Espanol, llame al 1-800-888-4491.
T116 IB P2
Color: Black, material: 210gsm2, Nov. 2, 2007
size: 420mm x 165mm
T116 IB P2
Color: Black, material: 210gsm2, Nov. 2, 2007
size: 420mm x 165mm
Getting Started
Controls and Indicators
Setting Clock Time and Calendar
Installing Backup Batteries
Setting Clock Time
Advance
Button
Note: After installing the backup batteries and reading the Maintenance
section, plug the AC line cord correctly into a wall outlet.
Battery Backup
If the backup batteries have been installed and a power failure occurs or
the AC cord is accidentally disconnected, the current time and alarm time
settings will be temporarily maintained.
If the backup batteries have not been installed or are dead, when the AC
power resumes the display will show 12:00 and you must reset the time
and alarm settings.
1. Open the battery compartment cover
located on the bottom of the unit.
2. Install 2 “AAA” size batteries into the
compartment, making sure that the + and
– polarities match the diagram next to the
compartment.
3. Close the battery cover.
Press and hold the Time Set Button until the display flashes. (If no buttons are
pressed within approx. ten seconds, the display will stop flashing and return to
normal mode.)
Alarm 1 Button
When display is flashing, press the + Button and - Button to adjust to the correct
time. Press and hold the buttons to advance/reverse rapidly. A PM Indicator
will appear to the left of the current time; there is no AM indicator.
Alarm 2 Button
Reverse
Button
Setting Calendar
Battery Backup
Once the time is set in clock setting mode, the year will flash on the display. If
needed, press the + Button and - Button to adjust the year. Press the Time
Set Button when the correct year is showing. Two beeps will confirm the year
is set. The date will flash on the display.
Snooze/Dimmer Button
Alarm Reset Button
For the Best Possible Performance
We recommend the use of alkaline batteries for longer life.
• Different types of batteries or new and used batteries are not to be mixed.
• Only batteries of the same or equivalent type as recommended are to be
used.
• Batteries are to be inserted with correct polarity.
• Remove exhausted batteries from the unit.
• Do not attempt to recharge non-rechargeable batteries.
• Remove rechargeable batteries from the unit before charging.
• The supply terminals are not to be short-circuited.
• Batteries should be removed if the item is not going to be needed for an
extended period of time (approximately 30 days or more) to prevent
leakage or damage to the unit.
Time Set Button
1
If needed, press the + Button and - Button to adjust the date. Press the Time
Set Button when the correct date is showing. Two beeps will confirm the date
is set.
Note: This unit comes with a Daylight Saving Time (DST) Switch (located on
the bottom of the unit) to make adjusting for Daylight Saving Time simple. Just
move the DST Switch to +1 to add an hour or to -1 to subtract an hour from
current time.
7-5-2 Button
Setting Alarm Time
DST Switch
Press and hold the Alarm-1 or Alarm-2 Button until the alarm time display
(located at the lower right part of display) flashes. If no buttons are pressed within
approx. ten seconds, the display will stop flashing and return to normal mode.
Press the + Button and - Button to adjust the alarm time. Press and hold the
buttons to advance/reverse rapidly. A PM and AM Indicator appears to the left
of the alarm time display.
LCD Display
Maintenance
• Protect your furniture when placing the clock on natural wood or a lacquered
wood finish. A cloth or other protective material should be placed between
the unit and the furniture.
• Clean the casing with a soft cloth moistened only with mild soap and water.
Stronger cleaning agents may damage the surface of the case.
• If the clock is not to be used for a prolonged period, remove the batteries to
prevent possible corrosion. Should the battery compartment become corroded
or dirty, clean it thoroughly and replace the batteries.
Press the Time Set Button when the correct time is displayed. 2 beeps will
confirm the clock setting is completed.
Alarm 1, Alarm 2
PM Indicator
Wake to Alarm
After setting the alarm time(s), you can press the Alarm 1 or Alarm 2 button to
arm or disarm the associated alarm. The Alarm Indicator Icon(s) will appear on
the display, showing that the alarm is armed and will sound at the displayed
time.
After the alarm sounds, press the Alarm Reset Button to turn it off and automatically
reset it for the same time the following day.
To turn off the alarm without setting it for the following day, just press the armed
alarm button again. The Alarm Indicator Icon will disappear.
NOTE: The alarm will sound for approximately 1 hour and then turn off
automatically. This cycle will repeat every 24 hours unless the controls are
changed.
Snooze Operation
During normal operation, press the Snooze button once to adjust the LCD
backlight brightness to Hi, Med, Lo or Off.
To program the snooze time, just press and hold the Snooze/Dimmer Button
until the display shows the current snooze time (default is 9 minutes). Press the
+ Button and - Button to adjust snooze time from 1 to 30 minutes. Press the
Snooze/Dimmer Button again. Two beeps will confirm the snooze time is set.
Press the Snooze/Dimmer Button when the alarm sounds to shut off the alarm
for the programmed amount of snooze time before sounding again. You may
repeat this several times during the one-hour alarm cycle.
Battery Low indicator
The Battery Low Indicator is located on the lower left corner of the display and
will flash if backup batteries are low and need to be replaced with fresh batteries.
When the desired alarm time is set, press the 7-5-2 Button to select the desired
alarm frequency: 7 to wake you everyday, 5 to wake you on weekdays or 2 to
wake you only on the weekend. Using the dual alarms, you can easily set the
alarm clock to wake you at different times during the week and on the weekend.
When the alarm time has been set, press the alarm button again to return to
normal mode. 2 beeps tone will indicate Alarm Setting is complete.
Battery Indicator
Alarm Clock display
Time display
2
3
4
T116 IB P1
Color: Black, material: 210gsm2, Nov 2, 2007
size: 420mm x 165mm
CAUTION
RISK OF ELECTRIC SHOCK.
DO NOT OPEN
CAUTION:
TO REDUCE THE RISK OF ELECTRIC SHOCK, DO
NOT REMOVE COVER (OR BACK). NO USER-SERVICEABLE PARTS
INSIDE. REFER SERVICING TO QUALIFIED SERVICE PERSONNEL.
WARNING: TO REDUCE THE RISK OF FIRE OR ELECTRIC SHOCK,
DO NOT EXPOSE THIS APPLIANCE TO RAIN OR MOISTURE.
The lightning flash with arrowhead in an equilateral triangle is
intended to alert the user of the presence of uninsulated
“dangerous voltage” within the product’s enclosure that may
be of sufficient magnitude to constitute a risk of electric shock.
The exclamation point within an equilateral triangle is intended
to alert the user of the presence of important operating and
maintenance (servicing) instructions in the literature
accompanying the appliance.
The symbols above are located at the bottom of the cabinet.
CAUTION: To prevent electric shock, do not use this (polarized)
plug with an extension cord receptacle, or other outlets unless the
blades can be fully inserted to prevent blade exposure.
ATTENTION: Pour prévenir les chocs électriques ne pas utiliser
cette fiche polarisée avec un prolongateur. Une prise de courant,
ou une autre sortie de courant sauf si les lames peuvent étre
insérées à fond sans en laisser aucune partie à decouvert.
A Consumer Guide to Product Safety
IMPORTANT SAFETY INSTRUCTIONS
When used in the directed manner, this unit has been designed and manufactured to
ensure your personal safety. However, improper use can result in potential electrical
shock or fire hazards. Please read all safety and operating instructions carefully before
installation and use, and keep these instructions handy for future reference. Take special
note of all warnings listed in these instructions and printed on the product.
1. Water and Moisture — The unit should be kept dry and away from water or other
liquids. If liquid is spilled on the unit, or if the unit should fall or be accidentally placed
in or on a wet or damp area, immediately unplug the unit.
2. Ventilation — The unit should be set up in an area and position that does not
interfere with its proper ventilation. Check to see where the ventilation opening is on
the product. Do not set up the unit on a bed, sofa, rug, or similar surface that may
block the opening. Do not keep the unit in a tight-fitting installation, such as a
bookcase or cabinet, which impedes the flow of air through the ventilation openings.
3. Heat — The unit should be situated away from heat sources such as radiators, space
heaters, stoves, or other appliances (including amplifiers) that produce or emit heat.
4. Power Sources — The unit should be connected to a power supply only of the type
described in the operating instructions, or as marked on the appliance.
5. Grounding or Polarization — This unit is equipped with a two-pronged, polarized
alternating-current line plug (a plug having one blade wider than the other). This plug
only fits into your power outlet in one direction. This is a safety feature. If you are
having difficulty inserting the plug fully into your outlet, try reversing the plug blades;
do not force the plug into the outlet. If you are still having difficulty, contact your
electrician to replace your obsolete outlet.
6. Power-Supply Cord Protection — Power-supply cords should be routed so that
they are not likely to be walked on or pinched by items placed upon or against them,
paying particular attention to areas at the outlet and where they exit from the unit.
7. Overloading — Do not overload wall outlets, extension cords, or integral
convenience receptacles as this can result in a risk of fire or electric shock.
8. Cleaning — The unit should be cleaned only as recommended by the manufacturer.
See the Maintenance section of this manual for cleaning instructions.
9. Periods of Nonuse — If the unit is to be left unused for an extensive period of time,
such as longer than a month, the power cord should be unplugged from the outlet.
10. Object and Liquid Entry — Care should be taken so that objects do not fall and/or
liquids do not spill into any openings or vents located on the product.
11. Damage Requiring Service — The appliance should be serviced by qualified service
personnel when:
A. the power-supply cord or plug has been damaged.
B. objects have fallen and/or liquid has been spilled into openings or vents.
C. the unit has been exposed to rain.
D. the unit has been dropped or the enclosure damaged.
E. the unit exhibits a marked change in performance or does not operate normally.
12. Servicing — The user should not attempt to service the unit beyond those methods
described in the operating instructions. Any servicing not covered in the instructions
should be left to qualified service personnel. Please also see the Warranty Information
for more information on product servicing.
For questions or comments regarding this or other products, please
call our toll-free number: 1-800-888-4491.
Limited 90-Day Warranty Information
Timex Audio Products, a division of SDI Technologies Inc. (hereafter referred to as
SDI Technologies), warrants this product to be free from defects in workmanship
and materials, under normal use and conditions, for a period of 90 days from the
date of original purchase.
Should this product fail to function in a satisfactory manner, it is best to first return it
to the store where it was originally purchased. Should this fail to resolve the matter
and service still be required by reason of any defect or malfunction during the
warranty period, SDI Technologies will repair or, at its discretion, replace this
product without charge (except for a $3.00 charge for handling, packing, return
UPS/postage, and insurance). This decision is subject to verification of the defect
or malfunction upon delivery of this product to the Factory Service Center listed
below. The product must include proof of purchase, including date of purchase.
The fee for service after the warranty period or without proof of purchase is $6.00.
Model T116
Jelly Clock
Before returning this product for service, please first replace the batteries (if
applicable) with fresh ones, as exhausted or defective batteries are the most
common cause of problems encountered.
If service is still required:
1. Remove batteries (if applicable) and pack the unit in a well-padded,heavy
corrugated box.
2. Enclose a photocopy of your sales receipt, credit card statement, or other proof
of the date of purchase.
3. Enclose a check or money order payable to the order of Soundesign, for the
sum of $3.00 (or $6.00 if after the warranty period or without proof of purchase).
4. Send the unit prepaid to the Factory Service Center listed below:
Consumer Repair Department
SDI Technologies Inc.
Timex Audio Products Division
1401 Pullman Drive, Suite A
El Paso, TX 79936-7726
NOTE: This warranty is valid only if the product is used for the purpose for which
it was designed. It does not cover (i) products which have been damaged by
negligence, misuse or accident, or which have been modified or repaired by
unauthorized persons; (ii) cracked or broken cabinets, or units damaged by
excessive heat; (iii) damage to CD’s or tape cassettes (if applicable); (iv) the
cost of shipping this product to the Factory Service Center and its return to the
owner.
This warranty is valid only in the United States of America and does not extend
to owners of the product subsequent to the original purchaser. Any applicable
implied warranties are also limited to 90 days, and SDI Technologies will not be
liable for consequential damages. (Some states do not allow limitations on
implied warranties or exclusion of consequential damages, so these restrictions
may not apply to you.) This warranty gives you specific legal rights, and you may
also have other rights which vary from state to state.
For questions or comments regarding this or other products, please call
our toll-free number: 1-800-888-4491.
TIMEX is a registered trademark of Timex Corporation in the United
States and other countries.
T116-102207-0
Printed in China
For additional information, online registration,
and exclusive special offers visit our website:
For questions or comments regarding this or other products,
please call our toll-free number 1-800-888-4491.
Para instruccionese en Espanol, llame al 1-800-888-4491.
T116 IB P2
Color: Black, material: 210gsm2, Nov. 2, 2007
size: 420mm x 165mm