1
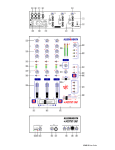
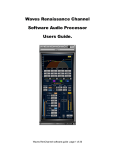
Manual
Mixer
MXA 5400Z
Table of contents
1.
Safety instructions ............................................................................................................................ 3
1.1.
2.
Introduction ....................................................................................................................................... 4
2.1.
3.
4.
FOR SAFE AND EFFICIENT OPERATION ............................................................................ 3
Product features ...................................................................................................................... 4
Controls/Connections ....................................................................................................................... 5
3.1.
Front View................................................................................................................................ 5
3.2.
Back view................................................................................................................................. 7
USB operation .................................................................................................................................. 8
4.1.
Windows configuration ............................................................................................................ 8
4.2.
MAC configuration ................................................................................................................... 9
4.3.
Using both USB ports simultaneously ..................................................................................... 9
4.4.
Troubleshooting ..................................................................................................................... 10
2 / 11
1. Safety instructions
•
Read the safety instructions and also this manual carefully.
•
Keep the manual.
•
Observe all red flags.
•
Observe the manual.
•
To prevent fire or electric shocks, protect the device against rain and
humidity
•
Pull the plug before opening the housing.
•
To prevent an electric shock you should not remove the cover.
•
Do not operate the device in the near of water.
•
Use only a dry cloth for cleaning.
1.1. FOR SAFE AND EFFICIENT OPERATION
Be careful with heat and extreme temperature
Avoid exposing it to direct rays of the sun or near a heating appliance.
Not put it in a temperature bellow 41°F /5°C, or exceeding 95°F /35°C.
To avoid placing on un-stable location
Select a level and stable location to avoid vibration.
Do not use chemicals or volatile liquids for cleaning
Use a clean dry cloth to wipe off the dust, or a wet soft cloth for stubborn dirt. Pull the plug before
cleaning.
If out of work, contact sales agency immediately
Any troubles arose, remove the power plug soon, and contact with an engineer for repairing, do not
open the cabinet by yourself, it might result a danger of electric shock.
Take care with the power cable
Never pull the power cable to remove the plug from the receptacle, be sure to hold the plug. When not
using the device for an extended period of time, be sure to disconnect the plug from the receptacle.
Ventilation
It is not allowed cover fans and air in and outlets.
3 / 11
Safety
Do not remove the grounding. It is for your safety. If you remove the grounding it can cause electric
shocks.
Hearing
To avoid hearing damages, you should not operate a sound system with high levels. This applies to
monitor systems, which are in the near of the ear, headphones or IEMs also.
Accessory
Please use only the accessory which is set by the manufacturer.
Important
Damages caused by the disregard of this user manual are not subject to warranty. The dealer will not
accept liability for any resulting defects or problems. Make sure the electrical connection is carried out
by qualified personnel. All electrical and mechanical connections have to be carried out according to
the European safety standards.
2. Introduction
Thank you very much for buying this device. This device was developed for professional applications.
Please read and keep this manual carefully.
2.1. Product features
-
5 Channel mixer
-
4 Stereo zones
-
Each input channel can be assigned to a zone
-
„Ultraglide“ Crossfader
-
3 Stereo channels with Gain and 3-Band-EQ (-32dB)
-
3 microphone inputs
4 / 11
3. Controls/Connections
3.1. Front View
1. Power LED
This LED lights up when the mixer is turned on.
2. Mic Gain
With this control you adjust the preamp of the input level of the microphone.
3. Mic Bass
With this control you can set the low frequencies of the microphone input.
4. Mic Treble
With this control you can set the high frequencies of the microphone input.
5. Mic input
At this input you can connect a microphone. You can use both a XLR connector and a
6.35mm jack.
6. Channel Gain
With this control you set the preamp of the input level.
7. Channel Treble
With this control you can edit the high frequencies of t he current channel.
8. Channel Mid
With this control you can edit the mid frequencies of the current channel.
9. Channel Bass
With this control you can edit the low frequencies of the current channel
10. Input selector
With this switch you can choose the signal source. The connections for the different
sources are on the back of the device.
11. PFL
If you press this button at the current channel, the signal is output as pre-fader and postEQ at the monitor headphones and at the LED meters.
12. Channel Fader
With this fader you can control the output level of the current channel.
5 / 11
13. Master
With this fader you can control the output level of the master.
14. Zone 1
With this fader you can control the output level of Zone 1.
15. Zone 2
With this fader you can control the output level of Zone 2.
16. Zone 3
With this fader you can control the output level of Zone 3.
17. Stereo/Mono
If this button is pressed the output signal of the master is mono.
18. Master/PFL
If this button is pressed you can read out the pre-fader signal of the channels where PFL
is activated on the LED meters. If this button is not pressed you can r4ead out the postfader signal of the master at the meters.
19. Headphones
Here you can connect your headphones for monitoring.
20. Cue Gain
With this control you can set the level of your headphones.
21. Cue Blend
Slide this to mix the Cue channel and program mix in the headphones. When all the way
to the left you hear the channel cue input selection(s), when turned to the right you hear
the master program mix output.
22. Zone 3
Select, when pressed the stereo signal of the selected channel will go to stereo Zone 3
output and the red LED is on.
23. Zone 2
Select, when pressed the stereo signal of the selected channel will go to stereo Zone 2
output and the red LED is on.
24. Zone 1
Select, when pressed the stereo signal of the selected channel will go to stereo Zone 1
output and the red LED is on.
25. Master
Select, when pressed the stereo signal of the selected channel will go to stereo Master
output and the red LED is on.
26. LED VU Meters
Can indicate either the master output or cue channel input levels, depending on the
position of the MASTER/PFL switch (18.)
.
6 / 11
3.2. Back view
1. AUX inputs (RCA)
CD, DVD-players, Tape Decks and other line level devices may be connected to these jacks.
The red colored RCA jack represents the right channel input and the white represents the left
channel input.
2. Line inputs (RCA)
CD, DVD-players, Tape Decks and other line level devices may be connected to these inputs.
3. MIC inputs
Connect microphones to these inputs.
4. Zone 3 output (RCA)
Connect this output to an extra amplifier, powered monitors or a lighting console.
5. Zone 2 output (RCA)
Connect this output to an extra amplifier, powered monitors or a lighting console.
6. Zone 1 output (balanced)
Connect this output to an extra amplifier, powered monitors or a lighting console.
7. Master
Connect this output to an extra amplifier, powered monitors or a lighting console.
8. USB Ports
These connections receive audio from a connected computer.
9. Power Switch
10. Power connector
7 / 11
4. USB operation
The MXA-5400Z is equipped with two USB ports that allow you to play content from your computer
through the mixer. The USB interface on your mixer works with your computer just like a standard
USB “plug and play” sound card.
4.1. Windows configuration
1. Turn on your computer and the MXA-5400Z.
2. Use a USB cable to connect on or both ports f the MXA-5400Z to your computer.
3. Windows will immediately recognize the mixer as a
“USB Audio Device” or “USB Audio CODEC” and will
automatically install any required system components.
To change system audio preferences in windows, you
will need to access the sounds audio devices
properties, located in the control panel.
The first time you connect the mixer to your computer,
the mixer will be automatically assigned as the default
or “preferred” device for sound playback on your
computer. All of your computer’s sounds will be now
sent to the mixer channel indicated above the USB
connection.
Note: If you have connected both USB ports to your
computer, the ports will be numbered in the order they
were connected. For example, if you connected USB A before USB B, USB A will appear as “USB
audio CODEC” and USB B will appear as “USB audio CODEC (2)”.
Tip: To prevent windows from playing systems sounds (beeps and bleeps) through the MXA-5400Z,
we highly recommend disabling these by clicking on the sounds tab and selecting no sounds from the
pull-down menu.
8 / 11
4.2. MAC configuration
1. Turn on your computer and the
MXA-5400Z.
2. Use a USB cable to connect one
(or both) ports of the 5400Z to your
computer.
3. your MAC will immediately
recognize the mixer as a “USB
Audio Device” or “USB Audio
CODEC”.
To change system audio
preferences on a MAC, you will
need to access the audio MIDI
setup preferences located in
Applications X utilities.
Note: If you have connected both USB ports to your computer, the ports will be numbered in the order
they were connected. For example, if you connected USB A before USB B, USB A will appear as
“USB audio CODEC” and USB B will appear as “USB audio CODEC (2)”.
To send an audio from your computer into the MXA-5400Z, select USB Audio CODEC in the default
output field. This allows you to play audio from your computer into one of either of the mixer channels,
depending on which USB port is used to make the connection
If your sound playback or recording application does not have its own audio input and output settings
(for example, Apple ITunes), it will use the devices set in audio MIDI setup. Please note that these
settings are loaded upon application startup, so if you change device settings while the application is
open, you will to restart your application for the settings to take effect.
4.3. Using both USB ports simultaneously
Since the MXA-5400Z has two USB ports, you can attach a different computer to each USB jack or
you can connect both jacks to a single computer. Each USB jack on the mixer will appear as a
separate USB audio device to your computer. You can play two audio files simultaneously from one
computer and send both of those audio streams to separate channels of your mixer by using two USB
cables. If you do this, we suggest using one of the many commercially available software programs
that support multiple sound cards. However, if you don’t have software like that, you can use two
separate software media players instead. To do this you need to start the first media player and then
change the preferred audio device to the second USB port, then start your second media player.
9 / 11
4.4. Troubleshooting
Problem
Solution
The computer did not recognize my mixer.
The mixer is not turned on. Turn on your mixer.
The USB cable is not connected. Connect the
USB cable to your computer and mixer
You have already installed a USB Audio device
before. In that case, your mixer should work
without any installation process. Just plug it in.
you may have to change your computers default
sound playback device.
I’m trying to play one song into channel 3 and the
The sound playback device was not set properly
other into channel 4, but they both be mixed
for one of you audio applications. Close one of
together into only one channel.
the playback applications, then change you
preferred sound playback device as described
above, the re-open the application. Note that this
technique will not work with all media player (e.g.
Real Player).
Use a dedicated audio program that supports two
sound cards.
The sound is coming out of my computer
The sound playback device was not properly set.
speakers instead of going to may mixer.
Close your audio playback application, the
change your preferred sound playback device as
describes above, the re-open the application.
My computer’s system sound (beeps and bells)
The sound playback device is still set to your
are going into my mixer.
mixer. Change the preferred sound playback
device as describes above.
Silence you computer’s systems sound
altogether by doing the following: Select sounds
and audio devices in the control panel and switch
to the sound tab. Under sound scheme, choose
the no sounds option and click OK.
If you have a MAC, you didn’t select play alerts
and sound effects through internal speakers. See
the MAC section for how do this.
10 / 11
Importer:
B & K Braun GmbH
Industriestraße 2
D-76307 Karlsbad
11 / 11