1
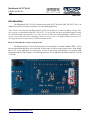
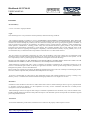
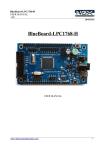
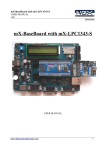
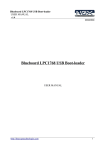
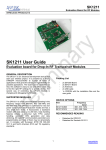
BlueBoard-LPC1768-H
USER MANUAL
参考資料
v2.0
20/09/2011
BlueBoard-LPC1768-H
USER MANUAL
http://shop.ngxtechnologies.com
1
BlueBoard-LPC1768-H
USER MANUAL
参考資料
v2.0
20/09/2011
Table of Contents
Revision history....................................................................................................................................3
Introduction .........................................................................................................................................4
Features.................................................................................................................................................5
Hardware..............................................................................................................................................5
Getting Started......................................................................................................................................6
Requirement.........................................................................................................................................6
Validating the BlueBoard LPC1768-H ...............................................................................................6
How To Enter USB Boot Loader Mode?..............................................................................................6
For Blueboard-LPC1768-H.............................................................................................................7
For Blueboard-LPC1768-H V2.......................................................................................................7
Using JTAG with BlueBoard................................................................................................................7
Information...........................................................................................................................................8
Revision History........................................................................................................................8
Legal...........................................................................................................................................8
Disclaimers ................................................................................................................................8
Trademarks ................................................................................................................................8
http://shop.ngxtechnologies.com
2
BlueBoard-LPC1768-H
USER MANUAL
参考資料
v2.0
20/09/2011
Revision history
BlueBoard-LPC1768-H V2.0
•
•
The mass storage for USB bootloader is enumerated using SW1 and SW2 buttons.
BlueBoard-LPC1768-H v1.0 schematic is changed to BlueBoard-LPC1768-H v2.0.
BlueBoard-LPC1768-H v1.0
•
version: v2.0 author: Nagaraj M Baddi
version: v1.0 author: Milind Kakati
BlueBoard-LPC1768-H v1.0 User manual.
http://shop.ngxtechnologies.com
3
BlueBoard-LPC1768-H
USER MANUAL
参考資料
v2.0
20/09/2011
Introduction
The BlueBoard LPC1768-H is header board with LPC1768 from NXP. The LPC1768 is an
ARM Cortex-M3 based microcontroller for embedded applications.
Note: Please note that the BlueBoard-LPC1768-H has undergone a minor hardware change. The
new version is called Blueboard-LPC1768-H V2. V2 version has the been designed keeping in mind
the USB bootloader functionality. User can now use the SW2 for USB bootloading. Whereas in the
earlier version the user had to manually connect a wire on P2.12 to GND while powering ON or
resetting the board, to enter into the USB bootloader mode.
How do I identify the version of my board?
The Blueboard-LPC1768-H V2 boards have been labelled as <Product Number V2>. Check
the product numbering label at the backside of the board, as shown in the image below. If the board
has no V2 in the label then it is the earlier version of the board (and therefore you cannot USB
bootload using the SW2 button). In following figure the circle indicates the Blueboard-LPC1768-H
V2 board.
http://shop.ngxtechnologies.com
4
BlueBoard-LPC1768-H
USER MANUAL
参考資料
v2.0
20/09/2011
Features
The BlueBoard LPC1768-H has most of the pins brought out to the male header.
Hardware
Power
• 7.5V/1A DC female jack / USB mini connector
• Slide switch ON / OFF
Interface
• USB mini
• 20 pin JTAG header
• Reset and ISP button switch
General
•
•
•
•
Two layer PCB (FR-4 material)
32 MHz crystal for RTC
12 MHz crystal for controller
256 Kb on board EEPROM chip with I2C interface
Software
Firmware
•
•
Pre-loaded USB boot-loader for programming through USB.
Pre-loader LED and EEPROM test program
Source
•
LED Blink example source code.
http://shop.ngxtechnologies.com
5
BlueBoard-LPC1768-H
USER MANUAL
参考資料
v2.0
20/09/2011
Getting Started
Before starting you would need the following.
Requirement
The requirement is put in two sections.
Hardware
• USB cable with type B connector
• 7.5V/1A DC power supply
• USB or Parallel JTAG
Software
•
•
•
H-JTAG Software
C Cross compiler(gcc / Keil / Rowley Crossworks for ARM)
PC / Laptop with Linux / Windows
Validating the BlueBoard LPC1768-H
Once you have all the accessories connect the USB cable and power jack. Switch on the
board.
The power LED D5 should glow. The Reset LED D4 should switch OFF when the RESET
button is pressed. The test LED D8 should blink 4 times after power up or RESET. If it remains ON
after blinking it confirms that EEPROM test was successful. To validate the USB interface get the
board into USB bootloader mode. The details of which are mentioned below.
How To Enter USB Boot Loader Mode?
Entering into USB bootloader mode is similar to ISP. If during reset or power up the ISP pin
is LOW the controller enters the ISP mode. Similarly to enter USB bootloader mode one needs to
hold some pin (as implemented in the USB bootloader program) LOW during reset or power up.
Note: You should have connected the USB cable to the PC.
http://shop.ngxtechnologies.com
6
BlueBoard-LPC1768-H
USER MANUAL
参考資料
v2.0
20/09/2011
For Blueboard-LPC1768-H
The USB bootloader program for this version looks for pin P2.12 to be held LOW during
reset or power up. To enter the USB bootloader mode connect the P2.12 pin (On connector J14) to
GND and press the SW1 (RESET) switch or power up. You should now see the board as a mass
storage device. You can now drag and drop your binaries onto this drive, remove the P2.12
connection to GND and then RESET using SW1 to execute the binary.
For Blueboard-LPC1768-H V2
Hold down SW2 (ISP) and SW1 (RESET), then release SW1 first and finally SW2. Now the
pre-loaded USB boot-loader allows you to enumerate the board as a Mass Storage Device. Drag the
compiled binary file and drop onto the device and reset the board using SW1 and the firmware
executes.
Using JTAG with BlueBoard
The BlueBoard LPC 1768-H v2.0 has a 20 pin male box connector. Using the NGX ARM
USB JTAG connect with the ribbon cable. Connect to the PC with USB cable.
•
•
•
•
•
OpenOCD
Keil(refer here)
Rowley Crossworks 1.7(refer here)
Rowley Crossworks 2.0 setting for NGX ARM USB JTAG is already present
CoIDE has NGX ARM USB JTAG listed in its debuggers list
http://shop.ngxtechnologies.com
7
BlueBoard-LPC1768-H
USER MANUAL
参考資料
v2.0
20/09/2011
Information
Revision History
version: v2.0 author: Nagaraj M Baddi
Legal
NGX Technologies Pvt. Ltd. provides the enclosed product(s) under the following conditions:
This evaluation board/kit is intended for use for ENGINEERING DEVELOPMENT, DEMONSTRATION, EDUCATION OR
EVALUATION PURPOSES ONLY and is not considered by NGX Technologies Pvt. Ltd to be a finished end-product fit for general
consumer use. Persons handling the product(s) must have electronics training and observe good engineering practice standards. As
such, the goods being provided are not intended to be complete in terms of required design-, marketing-, and/or manufacturingrelated protective considerations, including product safety and environmental measures typically found in end products that
incorporate such semiconductor components or circuit boards. This evaluation board/kit does not fall within the scope of the
European Union directives regarding electromagnetic compatibility, restricted substances (RoHS), recycling (WEEE), FCC, CE or
UL and therefore may not meet the technical requirements of these directives or other related directives.
The user assumes all responsibility and liability for proper and safe handling of the goods. Further, the user indemnifies NGX
Technologies from all claims arising from the handling or use of the goods. Due to the open construction of the product, it is the
user’s responsibility to take any and all appropriate precautions with regard to electrostatic discharge.
EXCEPT TO THE EXTENT OF THE INDEMNITY SET FORTH ABOVE, NEITHER PARTY SHALL BE LIABLE TO THE
OTHER FOR ANY INDIRECT, SPECIAL, INCIDENTAL, OR CONSEQUENTIAL DAMAGES.
NGX Technologies currently deals with a variety of customers for products, and therefore our arrangement with the user is not
exclusive. NGX Technologies assumes no liability for applications assistance, customer product design, software performance, or
infringement of patents or services described herein.
Please read the User’s Guide and, specifically, the Warnings and Restrictions notice in the User’s Guide prior to handling the product.
This notice contains important safety information about temperatures and voltages.
No license is granted under any patent right or other intellectual property right of NGX Technologies covering or relating to any
machine, process, or combination in which such NGX Technologies products or services might be or are used.
Disclaimers
Information in this document is believed to be reliable and accurate. However, NGX Technologies does not give any representations
or warranties, expressed or implied, as to the completeness or accuracy of such information and shall have no liability for the
consequences of use of such information.
NGX Technologies reserves the right to make changes to information published in this document, at any time and without notice,
including without limitation specifications and product descriptions. This document replaces and supercedes all information supplied
prior to the publication hereof.
Trademarks
All referenced trademarks, product names, brands and service names are the property of their respective owners.
http://shop.ngxtechnologies.com
8