1
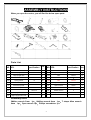
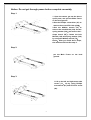
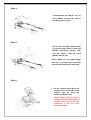
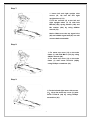
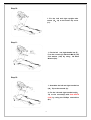
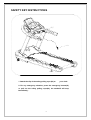
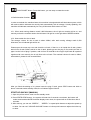
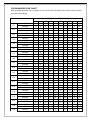
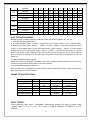
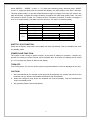
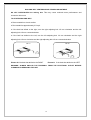
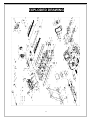
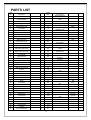
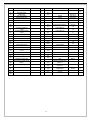
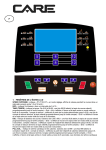
F2000 Treadmill
Operating Instructions Manual
Special tips:
1.
2.
Before installation and operation, please read this operation manual carefully.
Please save this manual for future reference.
3.
Product may vary slightly from the item pictured due to model upgrades
1
IMPORTANT SAFETY INSTRUCTIONS
WARNING - Read all instructions before using this treadmill. It is important your
treadmill receives regular maintenance to prolong its useful life. Failing to regularly
maintain your treadmill may void your warranty.
Danger–To reduce the risk of electric shock disconnect your treadmill from the electrical outlet
prior to cleaning and/or service work.
DO NOT USE AN EXTENSION CORD: DO NOT ATTEMPT TO DISABLE THE GROUNDED
PLUG BY USING IMPORPER ADAPTERS OR IN ANY WAY MODIFY THE CORD SET.
1) Install the treadmill on a flat level surface with access to correct voltage and frequency,
grounded outlet.
2) Do not operate treadmill on deeply padded, plush or shag carpet. Damage to both
carpet and treadmill may result.
3) Do not block the rear of the treadmill. Provide a minimum of 1 meter clearance between
the rear of the treadmill and any fixed object.
4) Place your unit on a solid, level surface when in use.
5) Never allow children on or near the treadmill.
6) When running, make sure the plastic clip is fastened on your clothing. It is for your
safety, should you fall or move too far back on the treadmill.
7) Keep hands away from all moving parts.
8) Never operate the treadmill if it has a damaged cord or plug.
9) Keep the cord away from heated surfaces.
10) Do not operate where aerosol spray products are being used or where oxygen is being
administered. Sparks from the motor may ignite a highly flammable environment.
11) Never drop or insert any object into any openings.
12) To disconnect, turn all controls to the off position, remove the safety key, and then
remove the plug from the outlet.
13) The pulse sensors are not medical devices. Various factors, including the user’s
movement, may affect the accuracy of heart rate readings. The pulse sensors are
intended only as exercise aids in determining heart rate trends in general.
14) Use handrails provided; they are for your safety.
15) Wear proper shoes. High heels, dress shoes, sandals or bare feet are not suitable for
use on your treadmill. Quality athletic shoes are recommended to avoid leg fatigue.
16) Allowed temperature: 5 to 40 degrees.
Remove the safety key after use to prevent unauthorized treadmill operation.
IMPORTANT ELECTRICAL INFORMATION
WARNING!
1) NEVER use a ground fault circuit interrupt (GFCI) wall outlet with this treadmill. Route
the power cord away from any moving part of the treadmill including the elevation
mechanism and transport wheels.
2
2) NEVER operate treadmill on Generator or UPS power supply.
3) NEVER remove any cover without first disconnecting AC power.
4) NEVER expose this treadmill to rain or moisture. This treadmill is not designed for use
outdoors, near a pool, or in any other high humidity environment.
IMPORTANT OPERATION INSTRUCTIONS
1) Insert the power plug into the socket directly.
2) The constant running time is less than 2 hours. Be sure to read the entire manual before
operating your machine.
3) Understand that changes in speed and incline do not occur immediately. Set your
desired speed on the computer console and release the adjustment key. The computer
will obey the command gradually.
4) Use caution while participating in other activities while walking on your treadmill; such
as watching television, reading, etc. These distractions may cause you to lose balance
or stray from walking in the Centre of the belt; which may result in serious injury.
5) In order to prevent losing balance and suffering unexpected injury, NEVER mount or
dismount the treadmill while the belt is moving. This unit starts with a very low speed.
Simply standing on the belt during slow acceleration is proper after you have learned to
operate this machine.
6) Always hold on to handrail while making control changes.
7) A safety key is provided with this machine. Remove the safety key will stop the walking
belt immediately; the treadmill will shut off automatically. Insert the safety key will reset
the display.
8) Do not use excessive pressure on console control keys. They are precision set to
function properly with little finger pressure.
9) This appliance is not intended for use by persons (including children) with reduced
physical, sensory or mental capabilities, or lack of experience and knowledge, unless
they have been given supervision or instruction concerning use of the appliance by a
person responsible for their safety, Children should be supervised to ensure that they do
not play with the appliance.
10) Please consult your doctor at first before running, if you have one of the following
diseases:
a. Cardiopathy, hypertension, sugar diabetes, respiratory disease, smoking, and
other chronic diseases, complication disease.
b. If you are over 35 years old and heavier than common weight.
c. Women in pregnant or in breasting period.
11) Please stop exercising immediately and consult your doctor when you feel giddy, surfeit,
thorax ache or other symptoms.
12) Please drink adequate water after taking exercises on our treadmill for more than 20
minutes.
Warning: Now here we suggest that you should consult with your physician or health professional
before starting your workout, especially for the age up to 35 old or once-health problem people. We
take no responsible for any troubles or hurts if you don’t following our specification. Treadmill will be
carefully assembled and covered the motor shield, then connect to the power.
3
ASSEMBLY INSTRUCTIONS
When you open the carton, you will find the below spare parts:
Parts List:
NO. DES.
Specification
Nos
.
NO. DES.
Specification
Nos.
1
Main Frame
1
E
Left handle bar
C
Left upright tube
1
F
Right handle bar
D
Right upright tube
1
133
Bolt
M8*15
8
106
Bolt
M10*20
16
124
Washer
8
8
126
Spring washer
10
16
138
Bolt
M5*16
4
120
Flat Washer
10
16
77
T shape Allen wrench
6mm
1
A
Console top cover
1
78
Open wrench
19mm
1
B
Console panel
1
79
8#Allen wrench
8
1
96
Screw
11
80
5#Allen wrench
5
1
15
Left upright tube cover
1
81
Phillips screwdriver
16
Right upright tube cover
1
ST4.2*12
1
1
Assembly tools:
5#Allen wrench 5mm 1pc、8#Allen wrench 8mm 1pc、T shape Allen wrench
6mm 1pc、Open wrench 1pc、Phillips screwdriver 1pc
4
1
Notice: Do not get through power before complete assembly
Step 1:
1. Open the carton, get out the above
spare parts, and put the Main Frame
on the level ground.
2.Use the Phillips screwdriver (81) to
remove the screw ST4.2*20(116);
3.Use the 8#Allen wrench (79) to
remove the bolt M10*20 (106) and the
spring washer (126),and remove the L
shape board ( G ), fasten the bolt
M10*20 (106) and spring washer (126)
by using the 8#Allen wrench (79)。
Notice:After you finish above steps,
the machine will look like step 2.
Step 2:
put the Main Frame on the level
ground.
Step 3:
1.Lift up the left and right motor side
covers (13 、 14) by using Phillips
screwdriver (81) and ST4.2*12 screw
(96).
5
Step 4:
1. Disassemble bolt M6*12 (113) by
using 5#Allen wrench (80), remove
the motor top cover (11).
Step 5:
1.Fix the left and right upright tubes
(C, D) to the main frame (1) with bolt
M10*20 (106),spring washer (126)
and flat washer (120) by using
8#Allen wrench (79).
Notice: Make sure the middle signal
wire (47) and lower signal wire (48)
are well connected before assemble.
Step 6:
1. Fix the console panel (B) to the
console top cover (A) with screw
ST4.2*12 (96) by using the
Phillips screwdriver (81).
Notice: Make sure the wire of
console panel (B) and the wire of
console top cover (A) are well
connected as per the color
before assemble.
6
Step 7:
1. Insert left and right upright tube
covers (15, 16) into left and right
upright tubes (C, D).
2. Fix the console (A) to the left and
right upright tubes (C, D) with bolt
M10*20 (106), spring washer (126) and
flat washer (120) by using 8#Allen
wrench (79).
Notice: Make sure the top signal wire
(46) and middle signal wire(47) are well
connect before assemble.
Step 8:
1. Fix motor top cover (11) to the main
frame (1) with bolt M6*12 (113) by using
5#Allen wrench (80).
2. Fix motor top cover (11) to the main
frame (1) with screw ST4.2*12 (96)by
using Phillips screwdriver (81).
Step 9:
1. Fix the left and right motor side covers
(13、14) to the motor top cover (11) with
screw ST4.2*12 (96) by using Phillips
screwdriver (81).
7
Step10:
1. Fix the Left and right upright tube
covers (15、16) to the motor top cover
(11) .
Step11:
1. Fix the left and right handle bar (E、
F) to the console (A) with bolt M8*15(133)
and washer (124) by using 5# Allen
Wrench (80).
Step12:
1. Assemble the left and right handle bar
(69、70) to the console (A) .
2. Fix the Left and right handle bar(69、
70) to the console(A) with Bolt M5*16
(138) by using the Phillips screwdriver
(81).
8
SAFETY KEY INSTRUCTIONS
1. Attach the clip of the safety pulling rope (64) to
your cloth.
2. For any emergency situation, press the emergency button(63)
or pull out the safety pulling rope(64), the treadmill will stop
immediately .
9
GROUNDING METHODS
This product must be grounded. If it should malfunction or breakdown, grounding provides
a path of least resistance for electric current to reduce the risk of electric shock. This
product is equipped with a cord having an equipment-grounding conductor and a
grounding plug. The plug must be plugged into an appropriate outlet that is properly
installed and grounded in accordance with all local codes and ordinances.
DANGER – Improper connection of the equipment-grounding conductor can result in
a risk of electric shock. Check with a qualified electrician or serviceman if you are in doubt
as to whether the product is properly grounded. Do not modify the plug provided with the
product – if it will not fit the outlet, have a proper outlet installed by a qualified electrician.
This product is for use on a suitable voltage and has a grounding plug that
looks like the plug illustrated in sketch. Make that the product is
connected to an outlet having the same configuration as the plug. No adapter should be
used with this product.
10
OPERATION GUIDE
WINDOW DISPLAY:
1.” Time” window: Display running time. Display the exercise time positive direction clock from 0:
00-18 hours and 12mins ,when count to the end, the machine will not stop and count again from
0:00;When count down, it will show from the setting time to 0:00, when down to 0:00 , the machine
will stop smoothly and show ‘ End ’, and will enter into stand by mode.
2.” Distance” window: Under the standby mode , press the “program” button, the window will display
“ P1,P2, … … ,P23-P24-U01-U02-U03-FAT ” Circulatory; During operation, display the running
distance positive direction clock from 0.00-99.9, when up to 99.9, it will count again from 0; When
count down, it will show from setting data to 0; When down to 0, the machine will stop smoothly and
show ‘ End ’, enter into the initial situation after 5 seconds.
3.” Calories” window: Display runner’s calories. When display calories, it will count from 0 to 999,
when up to 999, it will count again from 0; when count down, it will count from the setting data to 0,
when down to 0, the machine will stop smoothly and enter into standby mode.
4. “Pulse “window: When the runner holds handle pulse with two hands, the system can calculate
the runner’s heart beat and window will display the runner heart beat, the range is 50-200 beats/min
( this data is just for reference, can not be used as the medical data).
5. “Speed “window: Under the initial situation, this window will show speed, the speed range is
0.5-22km/h. Under the program setting mode, display the speed date of the first section for each
program.
6” Incline” window: When display incline, this window will show inline from level 0 to level 18. Under
the program setting mode, display the incline date of the first section for each program.
7. MATRIX window: When press “START” button, the matrix window will show “3-2-1”.Under stand
11
by mode, this matrix window will show 400m running track. Once you finish running a circle, the
machine will remind with sound of BI and show the number of circles you have run. When press the
“program” button, the window will display MATRIX of program. Under the count down situation of
time、 Distance、Calories, this window will show ”T”、”D”、”C”.
BUTTON FUNCTION:
1. “ Program ” button: Under initial situation, press this button to choose the program from “0:00”、
“ P1-P2-P3-P4-P5.....P24-U1-U2-U3-FAT” 28 programs; “0:00” is the system default running mode,
“P1-P24” are pre-set programs, FAT is the body fat test function.
2. “ MODE ” button: Press this button to choose ““0:00”、“15:00”、“1.0”、“50”circularly(0:00 is
the manual running mode, “15:00” is time counting down mode, “ 1.0 ” is distance counting down
mode, “ 50 ” is calories counting down mode).). When setting each mode, you can press speed +/and incline +/- to set the data, press “ START” to start the machine
3. “START” button: When getting through the power and safety key attached, press this button at
any time to start the machine.
4. “STOP” button: When the machine is running, press this button to stop any time and all the data
will be initial data.
5. “SPEED +”, “SPEED –” button: Under initial situation, set the data with this button. When the
machine is running, press the button to adjust the speed, 0.1 KM at each press, when press the
button over 0.5 seconds, the speed will be up or down continuously.
6. “INCLINE+”、“INCLINE-” Button: Under initial situation, set the data with this button. When the
machine is running, press the button to adjust the incline, 1 level at each press, when press the
button over 0.5 seconds, the incline will be up or down continually.
7.”INCLINE: “3, 6, 9, 12” are shortcut buttons to set incline quickly.
8.”SPEED: “3, 6, 9, 12” are shortcut buttons to set speed quickly.
9. Entertainment functions:
MP3 function: You can connect external MP3 with MP3 wire to play the music
USB function: You can insert USB card to USB card slot to play the music.
Headphone function: If you insert your headphone to headphone jack, the voice from
USB or MP3 will transfer to headphone.
Notice: The priority for the functions of USB and MP3 display is: The later function choice will
instead the previous function choice.
“PREV” button: Press this button can search the previous song,
“NEXT+” button: Press this button can search the next song ,
“VOL+” Press this button can increase the volume.
“VOL-” Press this button can reduce the volume.
12
”PLAY/ PAUSE” button: Press this button, you can stop or restart the music.
10.Self-lubrication function:
In order to maintain the machine better, this machine is designed with self-lubrication system, which
will make machine lubricate the running belt automatically with oil storage. Usually speaking, this
machine will lubricate automatically for every 20 kilometer with volume of 2-3ml.
10.1. When total running distance reach 3,000 kilometers, the oil light on console will be on, and
remind you that the machine need to be lubricated. Oil light is on the right side of SPEED window.
10.2. How to add oil to the oil tank:
The storage volume for the oil tank is about 400ml, after total running mileage reach 3,000
kilometers, the oil indicate light will be on.
Please open the motor top cove and check the oil tank, if there is no oil inside the oil tank, please
add oil into oil tank. Before add oil to the oil tank, please get out the plug C first, and insert the oil
pipe A to the hole of plug C position, add oil from oil bottle B to the oil pipe A(oil bottle B is packed
together with user manual), the oil will flow to the oil tank. The maximal volume for tank is 400ml,
when add oil, please do not exceed 350ml.
After you finish the adding of oil, please insert the plug C back, press STOP button and hold on
about 3 seconds under standby mode, the oil indicate light will be off.
START-UP QUICKLY (MANUAL)
1. Open the power switch, enter into the standby mode.
2. Press STATR/STOP button,the system will enter into 3 seconds count down, the buzzer will
make sound and the MATRIX window display count down, the speed will run 0.5km/hour after 3
seconds.
3. After start-up, you can use “SPEED+”、 “SPEED -” or speed quick buttons to adjust the speed up
or down. You can use” INCLINE+/INCLINE-“button or incline quick buttons to adjust the incline up
or down.
13
THE OPERATION OF EXERCISE PROCESS:
1. Press speed-down will reduce the running speed.
2. Press speed-up will increase the running speed.
3. Press incline down will reduce the incline section.
4. Press incline up will increase the incline section.
5. Press speed shortcut button will adjust speed correspondingly.
6. Press incline shortcut button will adjust incline correspondingly.
7. Press STOP will reduce until it stopped.
8. When the user holds the hand pulse by both hands, the computer will show the user’s pulse data
after 5 seconds.
MANUAL MODE:
1.Under standby mode, press START button directly, the treadmill will work from the speed 0.5km/h,
incline 0. The other windows will start to count from positive direction from windows default, press
“SPEED+”, “SPEED-” change the speed, press “INCLINE+”、“INCLINE -”to change the incline;
2. Under standby mode, press “MODE” button to enter time count down, the TIME window will
display“15:00” and glittering. Press “SPEED+”, “SPEED-” , “INCLINE+”、 “INCLINE –“ to set up
the time what you need. The setting range is 5:00-99:00.
3.Under Time setting mode, press “ MODE “ button to enter into distance count down, the
DISTANCE window will display “1.0” and glittering. Press “SPEED+”, “SPEED-”, “INCLINE+”、
“INCLINE –“ to set up the distance what you need. The setting range is 0.5—99.9.
4. Under Distance setting mode, press “MODE” button to enter into calories count down, the CAL
window will display “50’ and glittering. Press “SPEED+”, “SPEED-” , “INCLINE+”、 “INCLINE –“ to
set up the calories what you need. The setting range is 10-999.
5. When setting is finished, press “START” button to start up, the treadmill will run after 3 seconds,
press “SPEED+”, “SPEED-”, “INCLINE+”、 “INCLINE –“ to adjust the speed and the incline; press
the STOP, the treadmill will stop.
INNER INSTALL PROGRAM
Press “PROGRAM” button DISTANCE window will display P1-P24 to choose the program you like.
Setting of running time, then the TIME window display glittering. Display the advance setting
time10:00, press “SPEED+”, “SPEED-”, “INCLINE+”、 “INCLINE –“ to set up the exercise time what
you need. Press “START” button to start the inner install program, the inner install program is
divided into 10 sect. Each exercise time=the setting time/10. When the system enter into the next
sect will make 3 sound “Bi—“ and the speed will be changed according to the setting program, then
press
“SPEED+”, “SPEED-”, “INCLINE+”、 “INCLINE –“ to change the SPEED and INCLINE,
When the program enter next section will come back to the current speed and incline, when the
machine finish the whole program that user has set, the system will make sound “Bi—Bi—Bi“ and
stop steadily, then show “END” in window display. The machine will enter standby mode after 5
seconds.
14
PROGRAM EXERCISE CHART
Each program will divide into 10 grades for the exercise time and each time section has the speed
and incline accordingly.
TIME INTERVAL=SETTING TIME/10
P1
P2
P3
P4
P5
P6
P7
P8
P9
P10
P11
P12
P13
P14
P15
P16
P17
P18
P19
1
2
3
4
5
6
7
8
9
10
SPEED
2
4
3
4
3
5
4
2
5
3
INCLINE
1
2
3
3
1
2
2
3
2
2
SPEED
2
5
4
6
4
6
4
2
4
2
INCLINE
1
2
3
3
2
2
3
4
2
2
SPEED
2
5
4
5
4
5
4
2
3
2
INCLINE
1
2
2
3
1
2
2
2
2
1
SPEED
3
6
7
5
8
5
9
6
4
3
INCLINE
2
2
3
3
2
2
4
6
2
2
SPEED
3
6
7
5
8
6
7
6
4
3
INCLINE
1
2
4
3
2
2
4
5
2
1
SPEED
2
8
6
4
5
9
7
5
4
3
INCLINE
2
2
6
2
3
4
2
2
2
1
SPEED
2
6
7
4
4
7
4
2
4
2
INCLINE
4
5
6
6
9
9
10
12
6
3
SPEED
2
4
6
8
7
8
6
2
3
2
INCLINE
3
5
4
4
3
4
4
3
3
2
SPEED
2
4
5
5
6
5
6
3
3
2
INCLINE
3
5
3
4
2
3
4
2
3
2
SPEED
2
3
5
3
3
5
3
6
3
3
INCLINE
4
4
3
6
7
8
8
6
3
3
SPEED
2
5
8
10
6
9
5
3
2
2
INCLINE
1
3
5
8
10
7
6
3
2
3
SPEED
2
5
5
4
4
6
4
2
3
4
INCLINE
3
5
6
7
12
9
11
11
6
3
SPEED
2
7
4
7
8
9
4
5
3
2
INCLINE
5
6
6
4
6
5
8
9
4
2
SPEED
2
6
5
4
8
6
5
2
3
3
INCLINE
5
6
5
8
4
5
5
10
6
3
SPEED
2
6
5
4
8
7
5
3
3
2
INCLINE
3
4
5
6
3
5
5
6
4
3
SPEED
2
5
7
5
8
6
5
2
4
2
INCLINE
1
5
6
8
12
9
10
9
5
3
SPEED
2
5
6
7
8
9
10
5
3
4
INCLINE
3
5
6
8
6
5
8
7
5
3
SPEED
2
3
5
6
8
6
9
6
5
2
INCLINE
5
7
5
8
6
5
9
10
6
2
SPEED
3
7
6
5
9
7
6
3
5
2
15
P20
P21
P22
P23
P24
INCLINE
3
5
6
8
5
6
5
12
8
3
SPEED
3
7
9
10
11
12
10
8
5
2
INCLINE
2
5
6
7
6
5
8
6
3
2
SPEED
3
6
8
7
9
10
5
8
3
2
INCLINE
3
6
8
9
9
6
8
10
6
3
SPEED
3
5
8
6
9
10
8
12
6
3
INCLINE
2
6
8
10
12
10
12
8
5
2
SPEED
3
5
9
11
12
8
6
5
3
2
INCLINE
2
6
8
10
9
7
8
10
6
3
SPEED
3
8
10
11
12
10
10
8
5
3
INCLINE
3
6
8
9
10
12
9
6
3
2
SELF-DEFINE PROGRAM
Besides 24 inner installed programs, there are 3 user self-define programs: U1, U2, U3
1. User self-define program setting:
In the initial situation, press “ program” continuously till U1,U2,U3, and the “ time ” window glitter,
show the time 15:00, press “ incline+”, “ incline-”, “speed+”, “speed-” to set the running time; press
“mode” to set program data, set the first interval time, press “speed+”, “speed-” or press speed
shortcut button to set the speed; press “incline+”, “incline-” or incline shortcut button to set the
incline; then press “mode” button to finish the first interval time and enter into the second interval
time, until finish 10 interval time. The data will be kept till the next setting, the data will not lost for
power off.
2. User self-define program starting:
When the machine is waiting for operation, press the “program” button continuously till U1,U2,U3,
set the running time then press “start” to start the machine.
3. User self-define program instruction:
Each program will be divided into 10 time section, set the speed and incline in each interval time,
then press “start” to run the machine.
RANGE OF SPECIFICATION:
Initial
Initial Data
Set Range
Display Range
15:00
INCLINE(LEVEL)
0:00
0
5:00-99:00
0-18
0:00-99:59
0-18
SPEED(Km/h)
0.5
0.5
0.5-22
0.5-22
DISTANCE(KM)
0.00
1.00
0.50-99.9
0.00-99.9
P
N/A
N/A
50-200
0
50
10-999
0-999
TIME(MIN:SECOND)
PULSE(HYPO/MIN)
CALORIE(THERM)
0
BODY TESTER:
At the beginning state, press “ PROGRAM” Continuously entering FAT body fat tester, press
“ MODE “ enter F-1、F-2、F-3、F-4、F-5 ( F-1 SEX, F-2 AGE, F-3 HEIGHT, F-4 WEIGHT, F-5 FAT
TESTER ),
16
Press “SPEED+”、“SPEED -” to set F-1 – F4 ( refer to the following chart), after that, press “ MODE”
to set F-5, grasp the hand pulse, the window will display your body quality index after 3 seconds.
The body quality index is to test the relation between height and weight. The body FAT suits for any
male and female, to adjust the weight according it together with other body quality index. The idea
FAT should be 20-25, if under 19, it means too thin. If between 25 and 29, it means overweight, if
over 30, it means obesity. (The data is just for reference, can not be as medicinal data)
F-1
F-2
F-3
F-4
F-5
Sex
Age
01 male
02 female
10------99
Height
Weight
100----200
20-----150
≤19
=(20---25)
=(26---29)
≥30
FAT
FAT
FAT
FAT
Under weight
Normal weight
Overweight
Obesity
SAFETY LOCK FUNCTION:
Press the emergency stop button the treadmill will stop immediately. Then the treadmill will enter
into standby mode
POWER SAVE FUNCTION:
The system is with saving on power function, at the state of waiting for operation, if without any
operate, the saving on power function will be available after 10 minutes, the display will be closed
up. You can press any button to wake up the display.
TURN OFF:
Turn off the power: You can turn off the power to stop the treadmill; it won’t be damaged at any time.
CAUTION:
1. We recommend that you maintain a slow speed at the beginning of a session and hold on to the
handrails until you become comfortable and familiar with the treadmill.
2. Press the emergency stop button the treadmill will stop immediately. Then the treadmill will
enter into standby mode
3. Any question please contact with dealers.
17
EXERCISE INSTRUCTIONS
WARM UP STAGE
If you are over 35 years old, or not very healthy, also it’s your first time exercise, please
consult with your doctor or professional person.
Before you use the motorized treadmill, please learn how to control the machine, know well
how to start, stop, adjust the speed and so on, don’t stand on the machine at this time. After that,
you can use the machine. Stand on anti-slip pad both sides and handle the handle bar with your
both hands. Keep the machine at the low speed about 1.6~3.2 km/h, then test the running machine
by one foot, after get used to the speed, then you can run on the machine and you can add the
speed between 3 and 5 km/h. Keep the speed about 10 minutes, then stop the machine.
EXERCISE STAGE
Learn how to adjust the speed and incline before using. Walk about 1 km at stable velocity and
write down the time, it will take you about 15-25 minutes. If walk at 4.8 km/h, it will take you about
12 minutes in 1 km. If you feel comfortable at the stable velocity, you can add the speed and incline,
after 30 minutes, you can have good exercise. At this stage, you can not add the speed or incline
too much at one time, it can keep you feel comfortable.
EXERCISE INTENSITY
Warm up at the speed 4.8 km/h in 2 minutes, then add the speed to 5.3 km/h and keep walking
in 2 minutes, then add to 5.8km/h and walk in 2 minutes. After that, add up 0.3 km/h in each 2
minutes, until rapid breath but not feel comfortable
Calorie burning---the best effective way
Warm-up for 5mints by the velocity:4-4.8KM/H, then slowly increase the speed by
0.3KM/H/2Mints ,until up to the stable speed which you feel is comfortable for 45Mints.For improving
the intensity of movement, you can maintain the speed during 1H of TV program, then increase the
speed by 0.3KM/H each Advertisement interval time, after that return to the original speed . You can
acquaint the best efficiency of workout for calorie burning during the advertisement time and
subsequent heart frequency increasing time. Finally , you should slow down the speed step by step
for 4Mints.
EXERCISE FREQUENCY:
The cycle time: 3-5times/Week, 15-60mints/Times.Make up the schedule of workout scientific,
not only for your hobby.
You can control the running intensity through adjusting the velocity and incline of treadmill. We
suggest that you don’t set the incline at first; improve the incline is the effective way to strengthen
the exercise’s intensity.
18
Consult with your physician or health professional before starting your workout. The
professional people can help you make up the suitable exercise time-chart according to your age
and health condition; determine the velocity of movement, the intensity of exercise. Please stop at
once, If you feel chest tightness, chest pain, irregular heart beat, breath difficulty, dizziness or other
discomfort during exercise. You should consult with your physician or health professional as keep
going.
You can choose the normal walking speed or the jogging speed, if you always take workout
with treadmill.
If you don’t have enough experiences or confirm the testing velocity, you can follow the
instruction:
Speed 0.8-3.0KM/H
not well physical
Speed 3.0-4.5KM/H
less movement and workout
Speed 4.5-6.0KM/H
normal walking
Speed 6.0-7.5KM/H
fast walking
Speed 7.5-9.0KM/H
Jogging
Speed 9.0-12.0KM/H
intermediate speed walking
Attention: The velocity of movement ≤4KM/H , the normal walking; The velocity of movement ≥
6.0KM/H ,the runner.
MAINTENANCE INSTRUCTIONS
Warning: Unplug the treadmill before cleaning or repairing the treadmill.
Clean: Cleaning all the time will prolong the treadmill using life.
Get rid of the dust all the time to keep the components clean. Clean the two exposed sides of
the running belts will avoid the dust getting under the belt. Keep the running shoes clean otherwise
the dirt on the shoes will wear the running board and running belts out. Clean the surface of the
running belt with clean rags. Be aware of the water spill on the electrical parts or the running belts.
Warning: Plug the treadmill at the wall before removing the motor cover.
19
WALKING BELT CENTERING AND TENSION ADJUSTMENT
DO NOT OVERTIGHTEN the walking belt. This may cause reduced motor performance and
excessive roller wear.
TO CENTER WALKING BELT:
● Place treadmill on a level surface
● Run treadmill at approximately 3.5 mph
● If the belt has drifted to the right, turn the right adjusting bolt 1/2 turn clockwise and the left
adjusting bolt 1/2 turn counterclockwise
● If the belt has drifted to the left, turn the left adjusting bolt 1/2 turn clockwise and the right
adjusting bolt 1/2 turn clockwise and the right adjusting bolt 1/2 turn counterclockwise
PIC B
PIC A
Picture A If the belts has drifted to the RIGHT
Picture B If the belts has drifted to the LEFT
WARNING: ALWAYS UNPLUG THE TREADMILL FROM THE ELECTRICAL OUTLET BEFORE
CLEANING OR SERVICING THE UNIT.
20
EXPLODED DRAWING
21
PARTS LIST
PART
NO.
Description
1
Main Frame
2
Incline Bracket
3
Console Bracket
4
Left upright tube
Qty
PART
NO.
1
70
1
1
1
72
Handle bar decoration
strip
Wheel bushing
73
AC single wire
Brown
2
Blue
1
71
1
Qty
Description
Right handle bar
2
4
Right upright tube
1
74
AC single wire
6
Front roller
1
75
Magnetic ring
1
7
Rear roller
1
76
Magnetic core
1
77
T shape Allen Wrench
6mm
1
78
Open Wrench
19mm
1
8mm
1
5mm
1
5
8
9
Motor belt
Running desk
1
1
Running belt
1
79
8# Allen Wrench
11
Motor top cover
1
80
5# Allen Wrench
12
Motor front cover
1
81
Phillips screwdriver
1
13
Left motor side cover
1
82
Big washer
2
83
Square oil bottle
1
10
14
Right motor side cover
1
15
Left upright tube cover
16
Right motor trim cover
17
Left side rail
1
86
Oil driving system top
cover
Oil driving system
bottom cover
Oil bottle fix plate
18
Right side rail
1
87
Oil control protect cover
1
19
Top side rail
2
88
Oil pipe 1
1
20
Left back end cover
1
89
Oil pipe 2
1
90
Oil pipe 3
2
1
21
Right back end cover
1
84
1
85
1
1
1
1
Rear top cover
2
91
Oil pipe 4
23
Side rail anti-slip pad
2
92
Glass tube fix button
3
24
Cushion
4
93
Speed sensor
1
25
Pipe cushion
6
94
Bolt
M5*10
22
95
Screw
ST3.5*10
ST4.2*12
19
22
26
Spring Ⅰ
6
Versatile Foot pad
2
96
Screw
28
Side rail fix plate
6
97
Screw
ST2.9*8
33
29
Brush
1
98
Nut
M8
17
30
Power line
1
99
Nut
M10
7
100
Nut
M16
4
101
Bolt
M16*50
4
27
31
32
Square switch
Power socket
1
1
61
Overload protector
1
102
Bolt
M10*45
4
34
Pressure plate frame
1
103
Bolt
M8*100
6
35
Ball bearing
2
104
Bolt
M10*70
1
105
Bolt
M10*45
1
106
Bolt
M10*20
M8*35
18
33
36
37
Incline tube
Tension bolt
2
1
Tension spring
1
107
Bolt
39
AC motor
1
108
Bolt
M8*16
1
40
Incline motor
1
109
Bolt
M8*65
1
41
Inverter
1
110
Bolt
M8*80
2
111
Bolt
M10*70
1
38
42
Error code board
1
22
4
Wheel
Ball bearing with
prismatic base
2
1
46
PCB board
Top signal wire
47
Middle signal wire
1
48
Bottom signal wire
1
43
44
45
Console top cover
49
50
Console bottom cover
53
Console middle top
cover
Console middle bottom
cover
Console panel
54
51
52
Bolt
M8*12
Bolt
M6*12
114
Screw
115
ST4.2*12
ST4.2*13
16
Screw
116
Screw
ST4.2*20
2
117
Screw
ST4.2*8
8
118
Extra large washer C
Flat washer C
(φ11*φ
34*3.0)
1
16
4
112
2
113
1
1
1
119
Flat washer C
1
120
10
Flat washer C
1
121
8
4
10
9
26
6
1
122
Flat washer C
5
1
bookrack
1
123
Lock washer
10
2
55
Speaker
2
124
Lock washer
8
12
56
Speaker cover
125
Lock washer
16
4
57
Speaker net
1
126
Lock washer
10
23
58
Hand pulse frame
1
127
Lock washer
14
59
Hand pulse top cover
Hand pulse bottom
cover
1
128
Bolt
8
M6*10
Screw
ST4.2*30
Hand pulse left cover
Hand pulse right cover
1
130
Screw
ST4.2*12
1
131
Left handle bar frame
63
Emergency button
1
132
Right handle bar frame
64
Safety key with rope
133
Bolt
65
Emergency inside on/off
button
Rope press plate
60
61
62
66
Spring Ⅱ
67
1
1
129
1
1
135
Upright tube clamping
washer 1
Upright tube clamping
washer 2
136
Rubber pad
Oil pipe
十字槽盘头螺钉
134
1
2
68
Hand pulse iron piece
4
137
69
Left handle bar
1
138
23
4
4
2
1
1
M8*15
8
2
2
φ105*φ
40*3.0
2
1
M5*16 带垫圈
4
TROUBLE SHOOTING
There are some indication lights on the right of on/off button, if there is something wrong with
machine, the light will indicate the problem, you can check as below:
1.Signal transfer problem: The signal light will be on, please check by following steps:
A- Please check the connection of top and middle and lower sign wires are well connected.
B- Please change a new PCB board.
C- Please change a new inverter.
2. Inverter problem: The inverter light will be on, please check by following steps:
A- The inverter is too hot, please stop the machine and make inverter cool down.
B- Please change a new inverter.
3.
ABCD-
Incline problem: The incline light will be on, please check by following steps:
Please check incline signal wire is well connected, change a new wire.
Please check the incline AC wire is well connected with inverter wire.
Change a new incline motor.
Change a new inverter.
4. Over voltage problem: The over voltage light will be on, please check by following steps:
A- Please make sure the voltage is right working.
5. Over current problem: The over current light will be on, please check by following steps:
A- The loading current is too heavy, please restart machine after some minutes.
B- Possible part of machine is blocked, and AC motor can not move which leads to heavy current,
please restart machine after some minutes, or lubricate the machine.
C- Please change a new AC motor.
6. There is no display on LED.
A- Please check the overload protect button, and press this button to start machine again.
B- Please check the wires of electronic parts are well connected.
C- Please check the connection of top and middle and lower sign wires are well connected.
24
All FreeForm treadmill models carry a Lifetime Frame & Motor Warranty to ensure your confidence
and enjoyment from the moment of purchase.
Coverage is detailed as follows:
Home models: F20, F40, F60, F80 & F100
Frame = LIFETIME (5 years lifetime expectancy)
Drive Motor = LIFETIME (5 years lifetime expectancy)
Electronics = 5 YEARS
Belt, Deck and Rollers = 5 YEARS
Labour = 2 YEARS – Return to base
Commercial models: F1000 & F2000
Frame = COMMERCIAL LIFETIME (5 years lifetime expectancy)
Drive Motor = 2 YEARS
Belt, Deck and Rollers = 2 YEARS
Labour = 2 YEARS – Return to base
FreeForm F20, F40, F60, F80 and F100 treadmills carry a return to base warranty honouring
coverage for use within a private / domestic, non-commercial / non-fee paying environment.
FreeForm F1000 and F2000 treadmills are graded for commercial usage with one of the best
warranties in the industry for this coverage. This warranty is valid for the original owner of the
equipment and is not transferable. FreeForm 抯 obligation under this warranty is limited to repairing
or replacing the treadmill at the discretion of FreeForm.
Responsibility for freight or transport expenses incurred in delivering the product to the place of
purchase falls upon the customer. Delivery expenses for spare parts sent directly to the owner will
be the responsibility of the owner.
Repairs for which warranty claims are made must be pre-approved by FreeForm and can only be
performed by FreeForm accredited service dealers unless authorised in writing from FreeForm
customer service personnel.
FreeForm warranties do not cover any damage to a product caused by or attributable to freight
damage, abuse, misuse, improper or abnormal usage, conjunctive usage with other equipment and
applications, repairs performed by anyone other than the pre-approved FreeForm accredited service
dealer or any commitments made be any external warranty. The owner 抯 manual includes
instructions for general maintenance which is the responsibility of the purchaser. This includes belt
tracking, alignment and lubrication which are not covered by warranty. General wear and tear on
aesthetic components such as covers, rubber or foam hand grips are not covered by this warranty
and will not affect the performance of the product.
FreeForm can not be held responsible for any damages with respect to financial loss, property loss,
installation or removal expenses, loss of enjoyment or usage during repair or replacement periods. If
the product is not able to be repaired FreeForm will provide a replacement of comparable
25
performance. The replacement product may be of higher, equal or lower selling price due to
technological advances or economic change.
This warranty adheres to all Australian Consumer Rights applicable to this product. We at FreeForm
take pride in our after sales service. If you have any queries or concerns regarding your FreeForm
purchase simply contact our friendly customer service team.
26