1
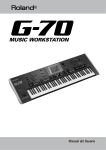
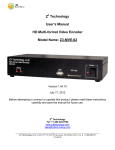
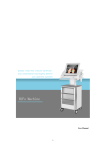
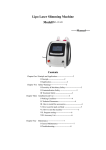
Micro-Needle
Fractional RF Machine-MNF100
VER:1.0
USER MANUAL
Warning
Dear user:
Thanks for using our company's products, in order to fully make use of the products,
we sincerely suggests follow:
◆◆ Please read the instruction in detail and keep it well for further reading and
consulting.
◆◆ Please follow the instruction to fit and operate the machine correctly.
◆◆ Please do not remove and change any accessories of the machine.
◆◆ It forbids others to open and remove the mainframe except the authorized people in
the company.
◆◆ It forbids others to change and maintain the machine except the professional
people.
◆◆ Please contact us if there is any trouble during operation.
This product does not belong to medical, please don’t use for disease treatment!
~1~
Parts Introduction
Accessories
Key switch:
The Emergency stop button is in
reset state
Turning key switch to clockwise
—turn on
Turning key switch to counterclockwise
—turn off
2
1
Emergency stop button:
Press—EMG stop
Reset—Rotate 90 °CW
NOTE: Ensure that the EMGstop button is RESET
before using
Cryo & Heat wave hammer
3
4
12
13
5
Low-spped adjustable handle
6
7
8
11
10
9
NOTE:
The colloidal particle must be
plug back to the hole of valve
after cleaning in order to
prevent leakage.
Service brake
1.Touchscreen
2.Accessory frame
3.Low-speed adjustable handle jack
4.Service brake jack
5.Cryo & Heat wave hammer output connector
6.Coolant inlet
Micro-needles RF work head
25-needles,49-needles,80-needles
7.Coolant level window
8.Overflow
9.Coolant discharge valve
10.Power switch
11.Power supply line socket
12.Plug of Cryo & Heat wave hammer
13.Buttons on plug of Cryo & Heat wave hammer
Thermage work head
Any part of instrument made of PMMA material (for example: accessories shelf,
panel, transparent handles,etc.). Do not use alcohol or corrosive solvent to wipe clean.
~2~
Before Transportation
1. The coolant should be cleared before transportation.
2.Method:
Open the coolant discharge valve[9] as the picture shows (turning it to the counter
clockwise and
the pull out the colloidal particle ), discharge the coolant, move the
machine to help the coolant get out completely.
Notice:
While discharging the coolant, the Cryo & Heat wave hammer should be placed at
the handle support.
Steps of Add Coolant
1.Use purified water(or special coolant);
2.Make sure the coolant discharge valve[9] is closed;
3.Use special funnel to connect to coolant inlet[6];
4.Add purified water(or special coolant) from the funnel;
5.Add liquid until the level of the coolant level window[7] arrive at 4.5;
6.Add cooling fluid successfully first time;
7.Connect power supply line to[11], turn on Power switch[10]. Input password“000000” to
enter interface as (Fig1) shows, click on “Set” to enter interface as (Fig 2) shown. Click
on “Liquid setting” to enter interface as (Fig 3) shows, click on “Start” to become
counter down.
8.When stopped, please observe the status of coolant level window, if it doesn’t arrive at
level 4.5, please add cooling fluid again until the level is above 4.5 ,then take off the
funnel.
NOTE:
1.Add about 1L pure water or special cooling fluid, change the water after 3 months.
2.When could not add into the coolant, please open the coolant discharge valve,
Add the coolant and observe the valve. when the liquid is smooth outflow,
blocked it and continue to fill...
3.If not using the device 15 days or above, we recommended to put the coolant
clean and clear.
Steps of Assembly Cryo & Heat Wave Hammer
1.Turn off the power switch first.
2.Please press the buttons on plug of Cryo & Heat wave hammer [13] and insert it into the
output connector [5].
3.If you want to replace the Cryo & Heat wave hammer, please press [13] and pull it out.
~3~
Basal Operation
1.Assembly the accessories frame into host, fasten
the hexagonal screws.
2.Put accessories well and connect them to host.
(1)Insert the plug of Low-speed adjustable handle
into jack [3], and fasten it.
(2)Put service brake on ground and insert the plug
into jack [4].
(3)Insert the plug of Cryo & Heat wave hammer to jack[5].
(Fig 1)
3.Insert power supply line to jack[10], turn on the Power switch [11], input default
password “000000” to enter interface as shown in
(Fig 1).
(1)Click on “SET” to enter interface as (Fig 2).
(2)Click on “Picture” to enter interface as (Fig 4)
shows.
4.In interface as (Fig 2) shows:
(1)Click on “Basic setting” to select Language, set
(Fig 2)
Date and Time.
(2)The “Advanced setting” is only for manufacturer, Users do not use.
(3)Click on “Liquid setting” to enter interface as
(Fig 3) shows. The details please refer to <Steps
of add coolant>.
(4)Click on “picture” to enter interface as (Fig 4)
shows.
5.In interface as (Fig 4)
(1)Click on “Cryo & Heat ” to enter interface as
(Fig 7)
“Cryo & Heat wave hammer” care
(Fig 3)
procedure.
(2)Click on “Superficial RF”, “boot into”, “SRF &
MRF” to enter interface as (Fig 5) “Choose Part”
interface. Click on “eyes” for example, click on
eyes picture and then click on “→ ” to enter
interface as (Fig 9) eyes “SRF” treatment.
(3)Click on “Superficial RF” ,“Directly into”, “SRF &
MRF” to enter interface as (Fig 10) “SRF”
treatment.
(Fig 4)
~4~
(4)Click on “Micro-needles RF”, “Boot into”, “SRF &
MRF” to enter interface as (Fig5) “CHOOSE
PART”shows. Eyes for example, click on “eyes
picture”, and then click on “→ ” to enter interface
as (Fig 6) “Micro-needle depth confirmation”.
According to the treated part, select appropriate
micro-needle into the depth range. the eyes
treated Micro-needle depth range is <=0.3mm(saftey) to
(Fig 5)
<=1.0mm (danger). When you select more than the standard will cause harm, the
system will display the prompt “Exceed the
standard, whether to perform?” .Continue
operating click to “Yes”, re-choose click to “X”.
And then click on “→” to enter interface as (Fig 11)
eyes “ MRF” treatment.
(5)Click on “←” to return to superior interface.
(6)Click “
” to return to interface (Fig 4).
(Fig 6)
~5~
Cryo & Heat Treatment
Cool Therapy
1.Click on “Cryo & Heat” in interface as (Fig 4) to
enter interface as (Fig 7) “Cryo & Heat” shows.
2.The system default is “Cryo” therapeutics.
3.Set work time
Click on “working timing” to set treatment time.
The system default time is 30 minutes, click on
“<<” and “>>” to regulate, the range is 1~120 minutes.
(Fig 7)
4.Set cryo temperature
Click on “Temperature” to set cryo temperature.
The system default time is 5℃ , click on “<<” and
“>>” to regulate, the range is -5℃to 20℃.
5.The “Real-time temp.” stands for the actual
temperature of Cryo wave hammer reached when
working.
6.Cleaning treated parts, And classify the regions,
such as: forehead, eyes, cheeks, chin, neck and so on.
(Fig 8)
7.Do cryo treatment according to regions, and adjust appropriate required temperature.
8.When the local skin temperature reached low temperature (about 3℃ to -2℃), please
immediately do MRF treatment or SRF treatment at the site.
Note: If the Cool therapy use before MRF or SRF, can make the skin at a low
temperature paralysis state, which can effectively reduce the stinging sensation;
If the Cool therapy use after MRF & SRF, it will soothing the skin and reduce
swelling.
Heat Therapy
1.The system default is “Cryo”, Click on “Heat” to select heat therapy. The system to enter
interface as (Fig 8) “Heat treatment”.
2.Set the working time.
3.Set heat temperature, the system default is 42 ℃,click on “<<” and “>>” to regulate, the
range is 37℃to 45℃.
4.The “Real-time temp.” means that the actual
temperature of Heat wave hammer
reached when working.
5.Daub essential oil on treated part, make heat wave hammer cling to the skin and move
slowly.
Note: The heat therapy can be used before MRF & SRF for facial lymphatic drainage.
~6~
SRF Treatment
SRF Nursing process
1.Deep clean the treated skin.
2. Applied anesthetic in the nursing area, and to be
anesthetic effect.
3.Apply freezing gels in the treated skin.
4.In interface as shown (Fig 4), click on “Superficial
RF”, “boot into”, “SRF & MRF” to enter interface
as (Fig 5) “Choose Part” interface. (If click on “Superficial RF”,
(Fig 9)
“Directly into”, “SRF & MRF” to enter interface as (Fig 10) “SRF” care procedure.
5.Choose nursing parts, and Click on the picture
directly and “→ ” to enter interface as (Fig 9)
“SRF” treatment.
6.Insert the Thermage work head into low-speed
adjustable handle.
7.Set working time.
8.Select the work mode:
(Fig 10)
Automatic mode: M1 3000ms(long)
M2 2600ms
M3 2200ms
M4 1800ms
M5 1400ms
M6 1000ms(short)
Manual mode: 1000ms to 3000ms.
9.Rugulate the RF output intensity:
Eyes RF output intensity is 1(weak) to 5(strong)
Face RF output intensity is 1(weak) to 8(strong)
Body RF output intensity is 1(weak) to 8(strong)
10.Click on “PDT”, select turn on /turn off led therapeutics.
11.Click on “||”, the system begin to work, the beautician hold the low-speed adjustable
handle cling to skin. Step on the service brake with foot once, then release, move the
handle in a different part to continue operating. Beautician step on service brake each
time, means that the Thermage work head output engage once at same time.
12.When SRF treatments is completed. we may use Ice to cool the skin, it can relieve
swelling, relieve pain effect.
~7~
MRF Treatment
MRF Nursing process
1.Deep clean the treated skin.
2. Applied anesthetic in the nursing area, and to be
anesthetic effect.
3.Apply effective products on the treated skin.
4.Click on “micro-needles”, “Boot into”,and “SRF &
MRF” to enter interface as (Fig 5) choose part
shows.
(Fig 11)
5.Choose nursing parts, and Click on the picture directly and “→ ” to enter interface as
(Fig 6) shows.
6.Choose appropriate type micro-needle RF work head, insert it into low-speed
adjustable handle.
7.Depending on the interface, adjust the length of the micro-needles (twisting yellow
ring), and confirmation in interface as (Fig 6).
0.25, 0.5 is suitable for eyes;
1.0, 1.5, 2.0 is suitable for face;
2.0, 2.5, 3.0 is suitable for body.
8.Click on “→ ” to enter MRF operating function interface as (Fig 11) eyes “MRF”
treatment.
(1)set working time
Click “working time” to set working time.
(2)Select “Time of needles being out”
Click on “Time of needles being out” ,make the cursor “V” move on Time of needles
being out, the system default is 300ms, click on “<<” and “>>” to adjust, the range is
250ms to 600ms.
250ms to 300ms is suitable to eyes;
300ms to 450ms is suitable to face;
450ms to 600ms is suitable to body;
(3)Select “Time difference of RF and needles being out”
Click on “Time difference of RF and needles being out” ,the system default is 2ms, click
on “<<” and “>>” to adjust, the range is 1ms(fast) to 10ms(slow). 0-stands for RF and
needle output at same time.
(4)Regulate the “RF intensity”
Click on “RF Intensity” to regulate RF output intensity. The system default is 1, click on
“<<” and “>>” to adjust.
~8~
intensity for eyes:1(weak)~5(strong)
intensity for face:1(weak)~8(strong)
intensity for body:1(weak)~10(strong)
OFF stands for turn off RF function.
9.Click on “PDT”, select turn on /turn off red therapeutics.
10.Click on “||”, the system begin to work, the beautician hold the low-speed adjustable
handle cling to skin. Step on the service brake with foot once, then release, move the
handle in a different part to continue operating. Beautician step on service brake each
time, means that the micro-needles RF work head output engage once at same time.
CAUTION: During face and body treated, when the length of RF micro-needles
work head arrive 2.0mm or above; RF intensity arrive 8 or above; we
recommended only operate one time in the same location. Do not repeat
operating twice.
11.When MRF treatment is completed. we may use Ice to cool the skin, it can relieve
swelling, relieve pain effect.
SRF & MRF Cautions
1.When insert Micro-needles RF work head or Thermage work head into the handle, you
must check and confirm whether fully inserted.
2.During the treating, the customer do not wear any metal ornaments.
3.Must apply cool gels during SRF treatment.
4.We recommended to turn off red led therapeutics when do eyes treated.
Forbidden Group
1.People with heart disease or high blood pressure, or configured cardiac pacemaker.
2.Patients with acute inflammation, asthma, deep vein thrombosis, thyroncus, cancer.
3.People with hemorrhagic disease, trauma or who is bleeding.
4.Pregnant women
5.Medical Plastic parts, or parts with artificial in filling inside.
6.People with metal inside the body(include metallic tooth)
7.Patient with skin inflammation or with edema.
8.People with an abnormal immune system.
9.Numb or insensitive to heat.
~9~
Technical Parameters
Input Voltage: AC 220V□/50Hz □
AC 110V□/60Hz□
Output Power: 150VA
Red LED: Red 650nm/5mW
Operating Frequency: 5M
Packing List
1.Host
1SET
2.Cryo & Heat wave hammer
1PC
3.Low-speed adjustable handle
1PC
4.Micro-needles RF work head(25needles)
2PCS
5.Micro-needles RF work head(49needles)
2PCS
6.Micro-needles RF work head(81needles)
2PCS
7.Thermage work head
2PCS
8.Service brake
1PC
9.Two pieces of liquid addition accessory
1SET
10.Power supply line
1PCS
11.User manual
1COPY
12.Transparent silicon tube (With CPC mail plug)
1PCS
13.Accessories frame
1PC
14.Hexagonal screws wrench(M3)
1PC
15.Hexagonal screws(M4*16)
2PCS
16.Keys
2PCS
~10~
Symbols and Meanings
Meaning
Warning Symbol
Danger
If used incorrectly will bring the risk of death or serious injury!
Waning
If used incorrectly will cause possibility ill of death or serious injury!
Attention
If used incorrectly will cause personnel injury or damage to the goods!
Danger
Device exists high pressure risk of high voltage output terminals!
Waning
If used incorrectly will cause personnel injury!
*Things damage refers to housing, property, livestock and pet damage.
Contraindications
1.The following symptoms were forbidden to use
(1)Patients who used by Heart rate regulator, cardiac pacemaker, ECS;
(2)The use of artificial bone; Patients with silicosis;
(3)Drunk or high fever patients;
(4)Patients with higher sensitivity mental disease and epilepsy patients
(5)Patients with no independent expression consciousness and can not take
care of themselves.
(6)Patients with metal materials in body (including metal teeth), pregnant
Danger
women, cachexia, malignant tumor.
(7)Severe hypertension and severe patients with cardiovascular and
cerebrovascular disease.
(8)Patients with renal failure.
(9)Patients with severe infection
2.The following please use under the guidance of professionals
(1)Women during menstruation;
(2)Children;
(3)Hemorrhagic disease or trauma, inflammation, skin disease, skin infection;
(4)Patients with feeling numb, no response to cold and heat;
(5)The immune system has defects, scar formation history, physical disease;
(6)The people who has taken face-lifting or her body has artificial thing.
~11~
Warning
Attention
1.First check the host, accessories, power supply line is broken or not before use.
2.Start system, in addition to television, refrigerator, Do not open electrical power device at same
time.
3.Before use, please take the hearing aid, electronic wristwatch, magnetic card, mobile phone
and other things off first. Pay attention to the child's care to avoid touching.
4.During the using process, drink more water based on your physical.
5.In case of happen special circumstances or accident, please immediately stop using and
consult professionals.
6.Patients with following medical electrical device cannot use this system at the same time.
——Patients who implantable cardiac pacemaker,heart rate regulator, other electronic devices.
——Artificial heart lung device and other device to sustain life.
——Patients with ECG scanner device .
——Patients with metal materials in body (including metal teeth), using artificial bone.
7.The following user should be agreed by the professionals before using this device.
——Patients with acute disease.
——Patients with malignant tumor.
——Patients with Infectious disease.
——Pregnancy women.
——Cardiac disease.
——Patients with high fever.
——Being treated or physical abnormalities.
8.Please immediately turn off power supply, stop using if following abnormal situation happened.
(1)Water and other matter into the host.
(2)Host, power supply line, accessories line and plug etc. occur the abnormal heating, leakage.
(3)The sound to be unusual.
(4)Abnormal smell, smoke.
(5)Any accessories damaged.
(6)Natural disasters and earthquake, the sudden thunder
9.When the treatment is finished, please cut off the power supply, be sure to unplug the power
plug from the power socket.
10.Please check the power supply line, accessories line carefully every time before use, if found
damaged, you should stop using and replacing it.
11.Transportation and storage conditions: Transport according to the requirements of the order
contract, the transport process should be to prevent sun and rain; packaged equipment should
be stored in relative humidity of not more than 80%, no corrosive gas and ventilated room.
12.The warning mark produce in the specification, its purpose is to enable you to safely and
correctly using this device, and to prevent you and others to injury.
~12~
Maintenance
1.Appliances and medical equipment close to the machine may be resulting in operational failure
due to interference.
2.Prohibit use of the equipment in the following environment
――Hot and humid environment
――Dusty environment
――Environmental with much smoke or stream
3.If there comes a failure, please shut down the power immediately, and send it to the distributor
or manufacturer for maintenance. Do not repair by yourself.
4.Exclusion of liability.
The Company is not responsible for the following circumstances:
(1)If fire, earthquake, war occurred;
(2)The fault of the user, operator error;
Held onto the filter
with hands,pull it out
according to cursor.
after cleaning, push
it back.
(3)Damage caused by using other method(not included in the use manual).
(4)Operate without the manual's guide.
5.After using the machine for over 40 hours, please take off the dust filter and clean it (If have).
6.Do not make the machine close to the wall, keeping a 30CM space around for cooling.
Safety and Environmental Considerations
Hazardous Substances or Elements Contained in the Product
Toxic and Hazardous Substance or Element
Part Name
Lead
(Pb)
Mercury
(Hg)
Cadmium
(Cd)
Hexavalent
chromium
(Cr(VI))
Polybrominated
biphenyls
(PBB)
Polybrominated
diphenyl ethers
(PBDE)
Remark
Plastic parts
Metal structures
/decorations
Printed Circuit
Assembly
Power Line
Plug of Power
supply line
Relay
Buzzer
Toxic and hazardous substance in at least one homogeneous materials of the part exceeds the concentration limit
requirement described in SJ/T11363-2006.
Toxic and hazardous substance in all the homogeneous materials of the part is either below the concentration
limit requirement described in SJ/T11363-2006 or is not applicable because the part is not used.
Products to be discarded after use, Please treat in accordance with electronic and information products recovery,
re-use legal regulations.
Technical note:
Hardware structure of the machine parts, injection molded parts, and the majority of electronic components,
connectors meet the requirements of the EU and China RoHS directives.Only a few parts as the global technology
limitations that may affect product reliability, and not find a substitute for the toxic and hazardous substances, please
be assured to use, use under normal conditions will not cause health effects on users.
~13~