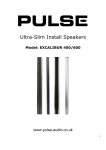
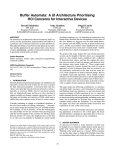
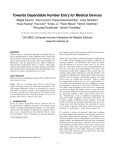
1
ADOBE PHOTOSHOP
AUTOSTEREOGRAMS
3D pictures
magic eyes • sirds
autostereograms • hollusions
A powerful Adobe Photoshop 3.0 plug in filter for the Macintosh, which draws three
dimensional pictures from any suitable artwork. Works in grey scale, duotone, RGB,
L*a*b, CMYK and multichannel image modes. Once drawn in Photoshop,
autostereograms can be modified in various ways to improve their artistic impact, for
example by adding text or frames.
The filter provides “quick start” features so you can draw your first autostereograms
quickly. In advanced modes, it can draw wallpaper and other forms of
autostereograms.
▲ 1 ▲
INSTALLING AUTOSTEREOGRAMS
The Autostereograms plug in filter is a standard Photoshop plug-in, which is installed
in the usual way. Drag the Autostereogram icon (the plug in) from the floppy disc to
the Plug-ins folder in your Adobe Photoshop 3.0 folder. If you are running Photoshop,
you will need to quit it and start Photoshop again for the changes to take effect. (There
is no need to restart your Macintosh.)
▲ 2 ▲
QUICK STEPS TO YOUR FIRST 3D PICTURE
1
Create a new file:
• Select RGB mode.
• About 5 inches wide, 4 high.
• Choose 72 dpi for speed, or 300 dpi if you want to print a proof.
2
Create a nice texture:
• Run the Autostereograms>Autostereograms filter.
• Click the “Quick texture” button.
3
Create a channel for the 3D image:
• Use the menu Palettes>Show Channels to show the channels palette.
• Click
in the channels palette to create a new channel.
4
Draw a 3D shape in the new channel:
• Run the Autostereograms>Autostereograms filter.
• Click “Quick image.” (The quick image is a hat in a picture frame.)
5
Create the 3D picture:
• Shift-click to select all channels in the Channels Palette.
• Run the Autostereograms filter again.
• Click on Eye guides, either or both, as you wish.
• Click “OK” to draw the autostereogram.
6
Hide the 3D shape, so you just see the autostereogram:
• Click RGB in the Channels Palette so you only see the RGB image.
7
Stare at it, or print it in the usual way.
▲ 3 ▲
FEATURES
Quick start features
Quick texture
Draws a simple texture to help get you started. You should
only have the RGB channels selected when you use this
button. The texture is designed so that it can be joined
seamlessly. It can be used to make ‘tiled’ pictures and
wallpaper.
Quick image
Draws a simple 3D model in the alpha channel (the last
channel selected) to help get you started. The image is an
optical illusion, too: it looks taller than it is wide — but it is
really the same.
Basic features
OK — draw the autostereogram
Uses the selected method, eye guides, and eye separation to
draw the autostereogram. The autostereogram will be drawn
using the texture in all but the last channel, which contains the
3D model. The autostereogram will replace the texture. Note
that you can always use Undo to restore the texture and try
different settings in the autostereogram plug in.
Eye guides
To make viewing autostereograms easier, eye guides can be
drawn at the top or bottom of the image, or both the top and
bottom.
You can chose whether the eye guides are drawn in
foreground or background colours. Eye guides can be either
basic triangles or more distinctive arrow heads: arrow head
or triangle
Of course, you can modify the eye guides in Photoshop later.
You can change background and foreground colours for the
eye guides in the normal way using the colour selection box,
by clicking on the large squares.
Eye guide separation
Eye guide separation refers to how much depth an image can
handle. The greater the separation, the greater the depths, but
the harder the image is to see. If the separations are made
small, the image is easy to see but has little depth. The
autostereogram filter initially sets the separations to generally
useful values.
Units
You can set eye separation distances in inches, centimetres or
pixels. The filter works internally in pixels, and you may wish
to use the accurate pixel values, for instance, with the Adobe
Others>Offset filter, or KPT’s Seamless Welder to help create
good textures.
▲ 4 ▲
Method
Uniform or symmetric stretching provides the best three
dimensional image, but in some cases distorts the texture
excessively. You have to experiment to get best results, but
start with symmetric as this is generally best.
Advanced features
Click the Advanced button to enable the advanced features:
wallpaper, no background, minimal, and error rate. You are
generally advised to get an autostereogram design to work
satisfactorily before choosing this option.
Wallpaper
In the ‘symmetric’ autostereogram drawing methods you can
draw wallpaper autostereograms, which are designed to have
a continuous texture. They can then be printed on rolls of
paper, and the 3D effect will be seamless across the vertical
paper joins. (The quick image button provides an image that is
generally unsuitable for wallpaper.)
No background
White parts of the 3D model are treated as if they are not
there, rather than at the maximum distance, which otherwise
provides a flat background for the picture. The effect is that
there is no ‘distant’ image. This feature is especially useful
when drawing wallpaper.
Minimal
White parts of the 3D model are not drawn in the
autostereogram at all, so the autostereogram is ‘minimal.’
Accuracy
The plug in normally works at full accuracy, but for creative
effects (to make seeing autostereograms harder, for instance)
you may wish to reduce the accuracy. If the accuracy number
is not zero, every so-many pixels in the 3D model will be
ignored. Having a low accuracy enables you to handle more
complex shapes — but they will be harder to see. (Note that
low accuracy is most effective when the plug in is used at a
higher DPI than you wish to print the results — otherwise the
low accuracy is visible in the result.)
BASIC AUTOSTEREOGRAMS
The quick steps to your fist 3D picture (above) takes you through the basic steps of
creating an autostereogram. We now explain how the autostereograms filter works, so
that the steps make sense. When you understand how the filter works, you will be able
to control it for very creative effects.
Photoshop images have channels. Examples are the red, green and blue channels of an
RGB image. An autostereogram also needs a three dimensional model as well; this has
to be stored in an additional channel, called an alpha channel — though you can give it
any name you like.
The autostereograms filter works by mixing the 3D model in the alpha channel with
the pattern you have in the other channels. When you have run the filter, you would
▲ 5 ▲
normally hide or delete the alpha channel, though often you will want to keep it
around so that you can try other effects with the same model. The 3D model itself is
not changed when an autostereogram is drawn.
What you paint in the model channel as black is close; what you do in white becomes
distant. Grey gives you intermediate depths. Illustrated is a simple ramp, going away
from you to the right.
So, to create an autostereogram you:
1
Create a texture or pattern using Photoshop as usual. You can import existing
artwork, fill with a pattern, or — to be quick — use the Quick texture button in
the Autostereograms plug in, or just use the Noise>Add Noise filter.
2
Create the new channel for the 3D model image (with the channels palette). Use
this channel to draw the three dimensional object. You may like to call the new
channel ‘3D image.’
3
After creating the texture and 3D image, select all channels (shift-click on them)
and then use the Autostereograms filter. Ensure that the 3D image channel is the
bottom of the list of channels selected. If you were using a monochrome image
(with just one channel for the texture, and one channel for the model), the two
channels selected would look like this:
4
After the Autostereograms plug in has finished, deselect the 3D image channel to
leave just your autostereogram showing. (The 3D channel remains in the
Photoshop file for later use, until you delete it using the channels palette.) You
may now print it, or do any other Photoshop operations to achieve further
artistic effects.
The autostereogram shown was drawn at the low resolution of 72dpi to help illustrate
quality issues. As would be expected, the 72dpi looks low resolution! You can see steps
▲ 6 ▲
in the triangular eye guides. When viewed as a 3D picture, you will also see definite
steps in the slope.
To the left of the autostereogram you may find it hard to get your eyes to follow the
slope upwards, and it may seem to drop down again. This is an unnecessary problem
you would normally avoid. It is generally easy to do so — but you may as well know
you don’t always get excellent results without experimenting a bit first!
Later parts of this leaflet give hints on drawing better autostereograms, and hints on
viewing them easily.
ALIGNED AUTOSTEREOGRAMS
The plug in tries to copy the texture as faithfully as possible when it makes an
autostereogram. There are two ways to use the texture.
Normally, the texture is copied (stretched and shrunk a bit) into the autostereogram.
The method used minimises the stretching and shrinking in the middle of the picture. In
other words, you don’t need to waste time making the original texture look wonderful
at the left and right edges of the picture, since these areas aren’t likely to be used. You
could draw a rainbow (or a simple gradient fill) across the picture as the texture to see
which bits of it really get used.
The normal approach is easy to use and ensures the final autostereogram texture is as
close to the original texture design as possible.
The alternative method copies the texture, again making the centre best, but making it
fit exactly to the 3D model. This is a more complex operation and which needs to be
understood to exploit fully.
First, create a new four channel document and create an autostereogram in order to
get the eye guides. Create a texture any way you like, possibly using the Noise or
Clouds filters, your own artwork, or even leaving the texture a uniform colour. Paste a
clip art image, such as a butterfly into the RGB channels.
The important bits are to:
1
Ensure the clip art is central.
2
Scale it so it is smaller than the distance between the eye guides.
Then copy the image to the model and edit it so it has the desired 3D effects.
(You can do this best using a layer so that the texture is not messed up in the process.)
Original butterfly in RGB channels, taken
from Claris clip art.
Butterfly copied to the alpha channel and
redrawn with gradient fills to make the 3D
butterfly have raised wings.
▲ 7 ▲
Typically you will want to put the image (here, the butterfly) onto a textured
background. We’ll use a marble texture.
Now choose ‘symmetric, aligned’ from the menu as the autostereogram plug in
method, and you will get a 3D butterfly image correctly aligned with the butterfly
colours from the texture.
The illustration shows the result:
The autostereogram will work with just two copies of the repeating texture, as shown
here. (The width of this picture is twice the eye guide separation.)
If you select Advanced features and set Minimal, you can draw similar pictures without
a background pattern.
WALLPAPER AND FLOOR TILES
Wallpaper means a pattern that will work when printed on wallpaper: there is a
horizontal repetition in the pattern so that when rolls of wallpaper are used, the
autostereogram pattern matches smoothly across the joints.
Wallpaper is intended to be viewed with the paper running vertically, and with the
depth of the 3D image matching across the joins of the rolls of paper as well, can be
made by using the Wallpaper check box and a symmetric method. To ensure an
accurate match, use the Offset tool and touch up the joints in the texture before
running the autostereograms filter (the Adobe tutorials describe the Offset filter to do
this, in order to create seamless patterns).
Although the filter will arrange for the autostereogram to run smoothly over the edge
of the wallpaper, you need to take several precautions:
•
Abstract textures are much easier to get good results with, otherwise the
stretching and matching may cause the texture to noticeably overlap in ways that
you’ll find difficult to eliminate.
•
Make sure the depth of the 3D model is continuous around the edges, otherwise
there will be steps in the autostereogram when it is wallpapered.
•
If there are no horizontal cues in the texture (such as horizontal banding), the folk
putting up the wallpaper on a wall with have a horrendously difficult job lining
the paper up!
•
The width of the wallpaper must be larger than three times the eye guide
separation, preferably as wide as possible.
▲ 8 ▲
The need to make the wallpaper work puts severe constraints on the autostereogram
itself. Therefore the Autostereograms plug in provides ways of relaxing the
constraints, but still allowing you to draw wallpaper.
•
By setting ‘No background,’ you allow the plug in to ignore the background, so
there is less problem in making the background match up from sheet to sheet of
wallpaper.
•
By setting an error rate, you allow the plug in to ‘make mistakes.’ The more
mistakes it makes, the better the wallpaper will look — as wallpaper — but the
harder it will be to see — as an autostereogram. You can adjust the error rate to
find a compromise for your design. Generally, you use the error rate feature
when working at a higher DPI than you plan for the final artwork.
•
The plug in’s idea of error rate is random, and the No background feature may
be excessive for your concept. In this case, darken the 3D model slightly (so that
there is no pure white background). Then the No background feature can be
used; by introducing white patches on troublesome lines in the wallpaper, you
can very selectively relax the constraints.
There are no constraints on how the autostereogram wallpaper works vertically up the
wallpaper. You will normally want the texture and the 3D model to run continuously
up and down the paper, and you do this in the normal way — perhaps using Adobe’s
Offset filter or KPT’s Seamless Welder.
You can also design wall and floor tiles, though you may find a non-autostereogram
border/frame ends up looking better.
MORE CREATIVE IDEAS
Posters can be made very easily. You must decide what viewing distance you want to
work with when experimenting. Typically, posters to be viewed up to 2 yards distance
cause no special problems. Large posters intended to be viewed at greater distances
are quite tricky. (Surprisingly, old people can see them more easily than youngsters!)
With large posters, try a plain (e.g., grey) border all around. Try them at low
resolutions (e.g., one dot per inch or less). You can use overhead projectors and
acetates as a cheap way of testing posters (drawn, of course, to scale on the acetate).
The World Wide Web can be used to display your autostereograms. GIF is the
standard format for graphics files, and autostereograms can easily be converted to this
format — and they need only be drawn at screen resolutions, such as 72dpi.
1
Save your file in Photoshop format for future reference. Saving a file in GIF
format loses information which you will not be able to recover unless you save in
Photoshop format.
2
Convert the image to Indexed Color using the Mode menu.
3
Delete the alpha channel (containing the 3D image). You can do this by dragging
the alpha channel to the waste basket in the channels palette.
4
Use File>Save As… to save the file as CompuServe GIF. (If CompuServe GIF is
greyed out, then you need to check you did steps 2 and 3.) For the picture to
work from HTML, make sure the ending of the file name is ‘.gif’.
▲ 9 ▲
HINTS FOR GETTING GOOD RESULTS
If an autostereogram does not work, there are some obvious points to check:
1
Did you use the correct channels when drawing the autostereogram? See below
for a summary of how channels are used for all features supported by the plug
in.
2
If you see a ‘rubbish’ 3D image, this may be because you are over-converging or
over-diverging your eyes. You will find it helpful to use eye guides, and ensure
that when your eyes are diverged/converged that you see exactly three eye
guides. Check by getting someone else to have a look.
3
Your autostereogram may be too narrow. It has to be wider than the 3D model.
4
The 3D model may be too obscure or too abstract for most people to make sense
of. Try more recognisable, organic or smoother shapes — or even raised flat
shapes.
5
Your 3D model may be too complex. If this is unavoidable, use either of the
asymmetric drawing methods, and see which is better.
6
This user manual has hints written throughout it. Although this section gives
most hints for getting best results, you may find a solution to your problem in
another section! You can also fax, email or phone Harold Thimbleby for advice
(contact details can be found at the end of this manual).
Autostereograms work by ‘stretching’ and repeating the texture horizontally in clever
ways to get the 3D illusion. If a texture is stretched too much it is said to tear, and has
irritating vertical scratches in it. If the texture repeats too much it is said to streak, and
has irritating horizontal lines in it.
Drawing an autostereogram involves getting the best results without getting
noticeable tears or streaks.
Tears can be avoided or hidden. To avoid a tear: draw choose a higher resolution;
check that the 3D model does not have sharp steps in it — try using the blur tool to
smooth edges. To hide tears, blur the finished autostereogram or scale it smaller (but
don’t forget to set the eye guide separations correspondingly further apart).
Streaks can be avoided or hidden. To avoid streaks, have fewer or more gradual depth
changes on the affected horizontal lines — rotating the 3D model often helps. Streaks
are very sensitive to the exact choice of eye separation (and dots per inch resolution):
try adjusting the eye separation a tiny bit, making it either larger or smaller. Finally,
hiding streaks sounds more drastic: simple delete them from the final autostereogram,
or duplicate a line above or below over them.
Eye separation
The minimum and maximum eye separations determine how deep an image you
create. The deeper the image, the harder it is to see at first, but the more impressive it
is when it is seen! The range of depth covered depends most on their difference. The
smaller both numbers are, the easier the image is to view, but it must be looked at
▲ 10 ▲
holding it closer to the face. You can get autostereograms down to postage stamp sizes
if you fiddle enough.
If you take the maximum separation much above 2 inches (the distance between your
eyes), the autostereogram can only be viewed cross-eyed or at greater distances. If
you go much below 0.5 inches for the maximum, then you won’t get much depth in
the image.
If you put eye guides on an autostereogram, try to make the part of the 3D image
adjacent to the eye guides white in the model. This means that the eye guides will be
precisely the right distance apart for the person looking at the autostereogram to use
them at that point.
You can use Photoshop to select both eye guides and move them elsewhere from
where the filter draws them, for example if you prefer them at the bottom left rather
than in the bottom centre.
Textures
A good autostereogram requires a texture that varies in contrast a lot horizontally,
such as a picture of a field of wheat or a row of trees. A bad choice would be a texture
of uniform horizontal lines (starting with a streaky texture!) such as a venetian blind.
Actual texture colours don’t matter much (except to colour blind people); contrast is far
more important. You can change colour mappings, levels and so forth later, after
drawing the autostereogram.
Designing a good texture is tricky! You can start by using the standard Offset, Pattern
and Fill tools. To get accurate sizing (so the repetitions merge nicely), one method is to
draw an autostereogram in a scratch window showing eye guides. You can then use
the ends of the guides as accurate markers to scale a texture to the exact size you want
in another window. (If you align the left/right edge of your selection with the
left/right eye guide, you can drag the other edge of the selection so the mouse aligns
with the other eye guide.)
The best results are often achieved by designing the texture so that the tears or streaks
are less apparent or appear a deliberate part of the final result. The more noisy or
blurred the texture the less obvious either tears or streaks become, except in extreme
cases. (Blurring will make the autostereogram harder to see; noise will make it easier.)
Bad texture
Good texture
Accuracy
The autostereograms filter normally works with total accuracy. This means that it
makes no compromises when it comes to stretching and tearing the texture, and
sometimes the texture gets completely messed up. You can reduce accuracy to make
the autostereogram’s texture more like the original, with no or fewer streaks or tears.
As you reduce the accuracy, as you would expect, the 3D image in the autostereogram
▲ 11 ▲
gets harder and harder to see. You can compensate for this by increasing the
resolution (dots per inch) to be higher than you require for the final image.
The number you type in the field can be zero, which means no errors. Otherwise, the
number means ignore one pixel of the 3D model every so-many pixels. Thus, 1 would
mean get every pixel wrong (!); 2 would mean get every other pixel wrong; 100 would
mean get 1% of the pixels wrong. And so on.
From this it follows that if you think you need to reduce accuracy, you can try the
following:
1
You can probably do Undo (in the Edit menu) to restore the picture to its state
before you ran the Autostereograms plug in.
2
Use Photoshop to tell you how many pixels wide your image is. You can do this
by putting the mouse in the box in the lower left corner of Photoshop’s
document window, and click the mouse while holding down the Option key.
3
Choose Advanced in the Autostereograms plug in. (Otherwise the error rate is
ignored.)
4
Enter an error rate about one half the width of the autostereogram you are
trying to draw.
5
If this does not help, halve the number and try again.
You can draw an autostereogram in several strips, perhaps only decreasing accuracy in
those strips that need help in improving the texture.
Wallpaper is particularly susceptible to streaking, and often needs help by using a
reduced accuracy — though it is preferable to make the wallpaper wider, or use the No
background button, which is described in the section on Wallpaper.
No background
The error rate mechanism gives you no control over where the plug in discards parts
of the 3D model. It will give you an idea whether it is possible to redeem you design
and get an autostereogram out of it. Instead, you can choose No background.
In No background, the Autostereograms plug in ignores all parts of the 3D model that
are white (that is, in the background). You can therefore introduce the same effects as
the accuracy but with greater control. Parts of the image that you want to lie in the
background, you now simply make a light shade of grey — anything other than pure
white.
A more positive way of using the No background feature is to eliminate parts of an
image for creative effects.
Speed
There are many tricks to speed up the process of drawing an autostereogram.
Proofing in monochrome is about twice as fast as using RGB.
▲ 12 ▲
Using a simple monochrome noise so that you get the 3D model to work properly first
is better than spending a long time designing a cute texture that is later found to be
impractical.
Instead of monochrome, you can use just one channel (in any mode) that looks close
enough to the texture; you can test autostereograms just with that channel. This will be
faster than working with all channels at once. Once you have got this channel to work
nicely, select the other channels and the 3D image and run the filter again with the same
settings (e.g., by pressing ⌘F).
The filter works line by line. If you want to do tests on how your settings affect the
texture quickly, you can therefore select smaller parts of the image to work with. Or
you can do the top and bottom part of the picture in stages, quite independently.
Once you get the hang of the filter, don’t bother to use it for the whole image, but only
select regions you are trying to get perfect. (Of course, when you finally do the
autostereogram, you have do the entire image with the same settings.)
Ways to scale
Good autostereograms have nicely designed textures, and this requires accurate
scaling. There are two easy ways to scale, by hand or by giving measurement as
numbers.
If you draw an autostereogram with eye guides, you can use these as markers to help
scale a texture accurately. Select the texture you wish to scale, and move it so that its
left (or right) edge is aligned with the left (or right) eye guide. Choose Effects>Scale
from the Image menu, hold down the Shift key (if you want uniform
horizontal/vertical scaling), and drag the mouse so that it is over the other eye guide.
The selection will now be exactly the width of the eye guide separation.
Another method is to copy or cut the selection and create a new document (⌘N).
Photoshop will by default create a new image the same size as the selection. You can
then use the Image Size (in the Image menu) to change the size of the image to any
specified size. Having done this, you can copy the image and paste back to the original.
Note that when you have the texture in a separate window that wrapping the edges so
that the texture makes a smooth join is easier.
When you have scaled the texture appropriately, use Define Pattern in the Edit menu,
and then fill the entire image using Fill.
Once an autostereogram is drawn, don’t rescale it too much. If you must rescale an
image, check it still works.
Size
Autostereograms cannot draw 3D images right up to the left or right edge. As a rule of
thumb, leave at least an eye guide’s separation space around the 3D image. The quick
image that comes with the filter shows you how close you can get to the edge with the
current settings you’ve selected.
For the same reasons, once an autostereogram is drawn, don’t clip its left or right
edges, because you risk losing more of the 3D effect than you anticipate.
▲ 13 ▲
You can mask out any parts of the autostereogram for pretty effects (e.g., to overlay
directly readable text), but do not get closer than a couple of inches horizontally to the
3D effects you want to retain.
Landscape autostereograms are slightly easier to see. Portrait autostereograms are
slightly easier to design.
3D shapes
Rounded ‘organic’ 3D images work best. Sudden depth changes are hard to see. Try to
make images that lead the eye slowly up slopes. Things that are easy to recognise, such
as faces, always work better than abstract figures that can be misinterpreted.
Narrow raised lines in the 3D model are difficult to see; narrow lowered lines are even
harder; again, lines running vertically rather than horizontally are harder. Try to make
lines at least 0.1 inches wide so that they are big enough to be obvious. Forget lines
that are only a few pixels wide, unless you want special effects (or have a skilled
viewing audience).
Don’t expect to get precise 3D shapes without a lot of practice. A soccer ball may end
up looking like a Rugby ball end on! Fortunately few people will notice. (In fact, the
apparent depth of an autostereogram changes with viewing distance.)
HINTS FOR EASY VIEWING
Many recommendations for viewing have been published elsewhere. We give a few
additional hints here.
Certainly some people cannot see autostereograms. As a general rule, if you can see
those 3D images using red/green spectacles you will have no trouble with
autostereograms — provided you persevere!
If you don’t view an autostereogram with your head horizontal (i.e., in line with the
picture) you won’t be able to see anything.
Try viewing autostereograms with ‘eye guides’ — usually two spots or, with the filter,
two eye guide ▲ shapes. You have to move your eyes to make them look like three
spots, either by going cross-eyed or going ‘boss’ eyed. (More precisely, each eye sees
two spots. You move your eyes. At first you will see four spots, each eye seeing two.
You carry on moving your eyes so that eventually the left eye’s right spot is on top of
the right eye’s left spot, or, if you find it easier, the other way around. You then see
three spots.) Once you see three spots, move your eyes onto the autostereogram, and
you should see it ‘latch into place’ either above or below the paper, depending on how
the picture was designed.
Viewing autostereograms on-screen is easier than on paper.
If you are viewing on paper, try viewing in bright light.
When viewing on screen, note that you must have an eye separation difference large
enough to show up at screen resolution. (Try at least 0.25 inches.)
▲ 14 ▲
If you are short or long sighted (more-or-less equally in both eyes), try removing your
glasses. If short sighted, you then need to view ‘boss eyed,’ or if long sighted you need
to view ‘cross eyed.’
COMPARISON WITH KPT’S 3D STEREO NOISE
Kai’s Power Tools provides a simple autostereogram tool, 3D Stereo Noise. It is very
limited: the texture has to be random dots (either monochrome or colour). Apart from
the eye separation and 3D image, you have no creative freedom. KPT’s 3D Stereo
Noise uses Autostereogram’s stretch on right method, and provides no alternatives.
KPT’s tool has an educational advantage over the current version of Autostereograms:
it provides a fast preview that you can look at while changing the eye guide
separation. You may therefore get an intuitive feel for the constraints on
autostereograms, and, in particular, the way in which eye guide separation can affect
texture streaking.
See also the 3D Stereo Noise Apply (Weiss Noise) in the Texture Explorer in the
obsolete KPT version 2.1. This allows you to use the explorer’s range of textures, but
gives you no control over the autostereogram itself. You don’t even get to do the eye
guides.
CHANNELS SUMMARY
The Autostereograms filter uses channels. The most common problems arising with
the filter arise because the wrong channels are selected when using it. Here is a
summary of the channels and how they are used:
For drawing an autostereogram
Select all texture (e.g., RGB) and image channels. The texture should be in all but the last
channel selected, and the 3D model in the last channel selected.
For drawing a quick image
The quick image is drawn into the last channel selected, which is generally the alpha
channel for the 3D model. Of course, the quick image works if only one channel is
selected. You get odd, strange coloured, results if you only selected RGB and forgot to
select the alpha channel for the quick image.
For drawing a quick texture
Select all texture channels (e.g., RGB). Do not select the image alpha channel.
▲ 15 ▲
AUTOSTEREOGRAMS LICENCE
This Adobe Photoshop 3.0 (Macintosh) plug in filter is supplied as is.
The user may work with the program in any artistic way whatsoever without
limitation. The program is licensed for use with one copy of Photoshop on one
machine. The program itself and associated documentation is copyright and must not
be copied or reverse-engineered or equivalent.
Although every effort has been made to supply a high quality product, correct
operation and performance with specific software or machinery cannot be guaranteed.
Liability for loss or consequential loss is not accepted.
Special versions of the filter may be created for particular customer requirements.
ABOUT THE AUTHOR
Prof. Harold Thimbleby is Director of Research in the Faculty of Technology at
Middlesex University, London. He has been working with autostereograms since 1990.
He has consulted widely, and has been invited to speak at many conferences on
autostereograms and optical illusions in the UK and abroad. He recently wrote the
entry in Microsoft’s encyclopaedia Encarta 1997 CD rom for autostereograms.
Address:
Prof. Harold Thimbleby
Computing Science
Middlesex University
Bounds Green Road
LONDON, N11 2NQ
Email: [email protected]
Phone: 0181 362 6061
Fax: 0181 362 6411
▲ 16 ▲