1
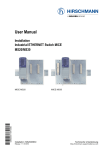
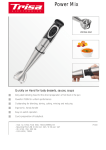
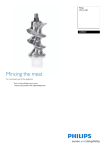
Mincing Machine
MM12 & MM22 Operating Manual
Introduction
Thank you for purchasing a Pantheon Catering Equipment product. In this
booklet you will find instructions for safe operation so please read carefully
and retain for future reference.
Warnings and Precautions
The following warnings and precautions are important and must be observed:
• Ensure voltage and frequency power requirements for the mincing
machine match that of the supply.
• The machine must be earthed when used. There is a danger of electric
shock if it is not earthed.
• In case of emergency, please turn off the power switch and unplug the
machine.
• If the electric wire becomes damaged, a qualified engineer or the
manufacturer must replace it.
Pantheon Catering Equipment is not responsible for any accidents or faults
caused by amendments made to the machine or improper use by the user.
Technical Data
Specifications:
Model:
Voltage (V)
Power (W)
Capacity (kg/hr)
Weight (Kg)
Dimensions (mm)
MM12
220-240V 50Hz
1100
120
20
430w x 210d x 460h
MM22
220-240V 50Hz
1600
150
26
670w x 250d x 480h
Installation
The installation of the unit must be performed by a qualified technician only.
Place the device on top of a solid, even, safe and stable surface that tolerates
the weight of the unit.
Ensure no flammable products are placed near the unit, as it may get hot.
Position the device appropriately so that the plug is always accessible. Also
ensure the unit isn’t placed close to any water.
Operating Instructions
To operate the mincer correctly please follow the instructions below and use
‘figure 1’ to help familiarise yourself with the parts on the unit.
1.
2.
3.
4.
5.
6.
7.
8.
Firstly ensure the mincer is plugged in and turn on at the mains
Place the required quantity of meat to mince on the tray
Now turn the unit on using the power switch on the side of the mincer.
Then using the white plastic ‘pusher’, feed the meat into the mincing
unit.
Apply constant pressure to ensure the meat is minced uniformly.
The minced meat will emerge from the side of the mincer.
Once the mincing process has been completed turn the unit off and
switch it off at the mains.
Be sure to follow the cleaning process regularly in the ‘maintenance’
section of this manual, to ensure the mincer continues to operate
correctly.
Note: ALWAYS use the ‘white plastic pusher’ to feed the meat into the mincing
machine; do NOT use your hands. Also, never overload the mincer, as it may
begin to function incorrectly.
Tray
Grind parts
Fixhandle
Body
Switch
Nut
Blade
Sleeve
Worm
Round blade
Figure 1
Maintenance
Cleaning:
Please ensure the unit is turned off and unplugged prior to cleaning. Also
ensure that the unit has sufficiently cooled down if cleaning shortly after use.
To clean the mincer, use the following procedure:
1. Unscrew the large nut to take out the circular knife and the grinding
cage.
2. Unscrew the lock screw to take out the grinding tank.
3. Use hot water and detergent to clean both of these parts.
After cleaning, assemble them in order. Be careful not to screw the nut too
tight or too loose which may damage the machine or affect the meat grinding
process.
Caution: When cleaning the mincer, ensure that no water is allowed near the
motor.
To clean the outside and front stainless steel parts of the unit simply use a
damp cloth to wipe all grease and food from the unit. Regularly cleaning the
unit will help prolong its life.
Parts Diagram
Parts List
Diagram No.
1
2
3
4
5
6
7
8
9
10
11
12
13
14
15
16
17
18
19
20
21
22
23
24
25
26
27
28
29
30
31
32
33
34
Part
Feeding Bar
Meat Tray
Feeding Cylinder
Pin
Nut Cap
Hole Plate
Flower Knife
Knife Driving Screw
Spiral Grinding Screw
Grinding Cylinder
Oil Seal
Turbo Shaft
Bearing
Circlip for shaft
Turbo
Circlip for shaft
Deep groove ball bearing
Circlip for shaft
Gear box
Hex Nut (M10)
Worm
Oil Seal
C-Ring
Key
Motor
Hex Head Bolt (M8*18)
Hex Socket Head Cap Screw
Pin
Machine Housing
Key
Hex head bolt (M10*8)
Flat Washer
Hex Head Bolt (M8*12)
Lock Screw
Quantity
1
1
1
1
1
1
1
1
1
2
1
1
1
1
1
1
1
1
1
1
1
1
1
1
1
2
1
1
1
1
1
5
5
1