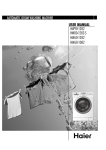
1
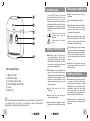
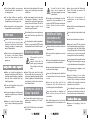
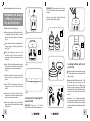
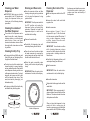
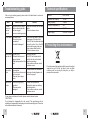
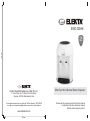
175 mm
EWD-323HN
Elekta Household Appliances (India) Pvt Ltd.,
Table Top Hot & Normal Water Dispenser
7, Hemu Plaza, 28, D J Road, Vile Parle (West),
Mumbai – 400 056, Maharashtra, India.
For complaint redressal you may either dial Toll Free Number: 18002702929
or e-mail us at [email protected] or write in at the address.
www.elektaindia.com
K
125 mm
Please read the guidelines provided in this User Manual
on Important Instructions, Appliance Usage &
Warranty before using the product.
Intended use
1
HEAT
ON
2
POWER
ON
HOT
WATER
3
4
5
Your ELEKTA Table Top Hot and
Normal Water dispenser has been
designed to give you years of
enjoyment and trouble free operation
as described in this manual. Do not use
this appliance for any other purpose.
This product is intended for household
use only.
Read this entire manual
carefully before using the
appliance.
Denotes the risk of electric
shock.
Safety instructions
6
Parts Identification
1. Water Funnel
2. Indicator Lights
3. Hot water Faucet Tap
4. Normal Water Faucet Tap
5. Lever
6. Drip Tray
Note:
Above illustration is only for indication and may not be same in the product.
In pursuance with our policy of continuous product improvement,
specification is subject to change without notice.
Wa r n i n g ! W h e n u s i n g m a i n s powered appliances, basic safety
precautions, including the following,
should always be followed to reduce
the risk of fire, electric shock, personal
injury and material damage.
The intended use is described in this
manual. The use of any accessory or
attachment or the performance of any
operation with this appliance other
than those recommended in this
instruction manual may present a risk
of personal injury.
Retain this manual for future
reference.
Always route the cord carefully to
avoid a tripping hazard.
Never operate an appliance directly
below the socket-outlet it is connected
to.
Using your appliance
Always take care when using the
appliance.
Do not use the appliance outdoors.
Guide the power supply cord neatly so
it does not hang over the edge of a
work top and cannot be caught
accidentally or tripped over.
Never pull the power supply cord to
disconnect the plug from the socket.
Keep the power supply cord away
from heat, oil and sharp edges.
If the power supply cord is damaged
during use, disconnect the appliance
from the power supply immediately.
Do not touch the power supply cord
before disconnecting from the power
supply.
Disconnect the appliance from the
power supply when not in use and
before cleaning.
Safety of others
This appliance is not intended for use
by persons (including children) with
reduced physical, sensory or mental
capabilities, or lack of experience and
knowledge, unless they have been
given supervision or instruction
concerning use of the appliance by a
person responsible for their safety.
Children should be supervised to
ensure that they do not play with the
appliance.
Do not allow children or any person
unfamiliar with these instructions to
use the appliance.
Do not use the appliance if the power
supply cord or mains plug is damaged
or defective.
Do not allow children or animals to
come near the work area or to touch
the appliance or power supply cord.
If the power supply cord or mains plug
is damaged or defective it must be
repaired by an authorised repair agent
in order to avoid a hazard. Do not out
the power supply cord and do not
attempt to repair it yourself.
Close supervision is necessary when
the appliance is used near children.
After use
Never attempt to remove or replace any
parts other than those specified in this
manual.
Switch off and remove the plug from
the socket before leaving the
appliance unattended and before
changing, cleaning or inspecting any
parts of the appliance.
Do not attempt to repair the appliance.
Take it to your nearest ELEKTA owned
or authorised Service Center for repair.
When not in use, the appliance should
be stored in a dry place. Children
should not have access to stored
appliances.
Before use, check the appliance for
damaged or defective parts. Check for
breakage of parts, damage to switches
and any other conditions that may
affect its operation.
Do not use the appliance if any part is
damaged or defective.
Have any damaged or defective parts
repaired or replaced by an authorised
repair agent.
Before use, check the power supply
cord for signs of damage, ageing and
wear.
Electrical safety
This product must be
earthed.
Always check that the
power supply corresponds
to the voltage on the rating
plate.
Power Plugs must match the outlet.
Never modify the plug in any way. Do
not use any adapter plugs with earthed
(Class 1) appliances. Unmodified plugs
and matching outlets will reduce the
risk of electric shock.
Extension cables &
Class 1 product
A 3-core cable must be used as your
appliance is earthed and of Class 1
construction.
Up to 30m (100ft) can be used without
loss of power.
To avoid the risk of electric
shock, do not immerse the
cord, plug or appliance in water
or other liquid.
If the supply cord is damaged, it must be
replaced by the manufacturer or an
authorized ELEKTA owned or authorised
Service Center in order to avoid a
hazard.
Additional Safety
instructions for
Water Dispenser
Always route the cord carefully to avoid a
tripping hazard.
Do not place the appliance near heat
sources.
Do not use the appliance in the presence
of explosive or flammable materials.
Keep your water dispenser in a dry place
away from direct sunlight.
Never use this dispenser with water that
is unsafe to drink or is from an unknown
source.
Never use any other liquid in the
dispenser other than known and
microbiologically safe bottled water.
Never allow children to dispense hot
water without proper and direct
supervision.
The Water dispenser must not be left
unattended while it is connected to the
supply mains.
Never clean parts with flammable
fluids. The fumes can create a fire
hazard or explosion.
If the unit is damaged or it
malfunctions, do not continue to
operate it.
Always install your water dispenser on
a level counter.
Never locate the product where it may
fall.
Do not use in bathrooms or outdoors.
Make sure to turn OFF the unit when
the hot water tanks are empty. Always
have water inside the tanks before
turning ON any switch. Overlook of this
warning may cause permanent
damage to the unit from overheating.
Always disconnect the appliance from
the supply before cleaning, or carrying
out any maintenance on the appliance.
Do not immerse the appliance, core
set or plug in liquids.
Regular cleaning of your water
dispenser is required for your warranty.
Please follow cleaning instructions
outlined in this manual and clean the
dispenser every 4 months.
Do not attempt to repair or adjust any
electrical or mechanical functions of
the unit, as this may void the warranty.
Remove all packaging from the
appliance.
Clean the appliance before first use.
WARNING! Please make sure to turn
OFF the unit when the hot water tank is
empty.
Installation & Usage
of Water Dispenser
for the First time
HEAT
ON
POWER
ON
Always have water inside the tanks
before turning ON any switch.
HOT
WATER
HEAT
ON
POWER
ON
HOT
WATER
Ensure the unit is unplugged.
Fill water reservoir with tap water to the
full capacity. Allow the water to settle
into the hot water tank for 5 minutes
(fig. 1)
Fig.1
18 L
Push water lever (hot temperature) to
ensure water is running through the
unit. (Fig 2)
HEAT
ON
POWER
ON
11 L
HOT
WATER
HEAT
ON
POWER
ON
HOT
WATER
Plug the dispenser unit into the
electrical outlet. Please review the
important safety instructions before
doing so.
Turn ON the hot water switch and wait
for 5 minutes to allow the unit to reach
the minimum hot water temperature.
(Fig. 3)
Fig.2
Loading bottles with spill
proof cap
This unit contains a funnel with a prong
to avoid spills when using bottles with
spill proof cap.
Check if hot water is coming out of hot
water faucet by pouring water into
glass.
HEAT
ON
Turn OFF the hot water switch and
unplug the unit from the electrical
outlet.
Proceed to drain the water from the
faucets one at a time by pushing levers
until no more water remains.
Your unit is ready to be used. Please
proceed with the water bottle loading
instructions.
POWER
ON
HOT
WATER
Fig.3
Instruction for loading the
water bottle.
WARNING! Only use 11 or 18 litre
water bottles on this water dispenser.
Be careful while lifting the bottle. To lift
the bottle bend your knees, do not
bend your back. Do not place your
hands over the opening of the bottle
while placing it on the unit. Please seek
help if you are unable to lift the water
bottle.
Invert the 11 or 18 litres water bottle
over the unit and gently let the neck of
the bottle slide into the funnel, making
sure the spill proof cap slides down into
the prong.
The prong will break the spill proof cap
allowing the water from the bottle to go
down into the funnel and into the main
reservoir without any spills.
Allow the water to fill the tank of the unit
for approximately one minute.
Push in all water levers to make sure
water flows from all faucets.
Push the unit back into the electrical
outlet.
Turn ON the hot water switch. Allow the
unit to reach the minimum hot water
temperatures.
Push in on all water levers to make sure
water flows from all faucets.
Push the unit back into the electrical
outlet.
Turn ON the hot water switch. Allow the
unit to reach the minimum hot water
temperatures.
Test the water temperatures by pushing
once again on the water levers.
Your water dispenser is now ready for
use.
Check if hot water is coming out of hot
water faucet by pouring water into
glass.
POWER
ON
HOT
WATER
Do not use an extension cord with this
appliance.
Plug the appliance in and switch ON.
Steps to replace water
bottles
WARNING! Please make sure to turn
OFF the unit when the hot water tank is
empty. Always have water inside the
tank before turning ON any switch.
Unload the empty bottle from the water
dispenser .
Proceed to load the new bottle following
the instructions for loading the water
bottle.
Loading bottles without
spill proof cap
Remove the cap from the 11 or 18 litres
water bottle and use a clean cloth to
wipe off the neck of the bottle.
Using the water
dispenser
Be careful while lifting the bottle. To lift
the bottle bend your knees, do not
bend your back. Do not place your
hands over the opening of the bottle
while placing it on the unit. Please seek
help if you are unable to lift the water
bottle.
7
Do not use an adapter plug with this
appliance.
HEAT
ON
Turn OFF the hot water switch.
Your water dispenser is now ready for
use.
Invert the 11 or 18 litres water bottle
over the unit and gently let the neck of
the bottle slide into the funnel, making
sure the prong goes into the neck of
the bottle.
Locate the unit away from direct
sunlight and sources of heat (stove,
heater, radiator, etc.)
Allow the water to fill the tank inside the
unit for approximately one minute.
Before connecting the unit to the power
source, let it stand upright for
approximately 24 hours.
HEAT
ON
POWER
ON
HOT
WATER
Place the unit on the level surface that is
strong enough to support the dispenser.
Keep area around the unit free of dust
and dirt.
ATTENTION: If you do not plan to use
the water heating function for more
than three days, we recommend that
you turn off the hot water power switch.
Cleaning and
maintenance
Warning! Before cleaning and
maintenance, remove the plug from
the socket.
Warning! Do not immerse the
appliance, the cord set or the plug in
water or any other liquid.
Like most appliances, your water
dispenser requires periodic
maintenance for maximum efficiency
and performance and must be cleaned
on a regular basis (i.e. every 4
months). To maintain a hygienic
environment within your water
dispenser and prevent potential
formation (growth) of bacteria, we
strongly recommend regular cleaning.
Allow 6 inches of space between the unit
and the wall, to allow for proper air
circulation.
8
Cleaning your Water
Dispenser
IMPORTANT: Make sure you turn the
power switch to the OFF position and
unplug the dispenser before performing any of the following cleaning
procedures.
Cleaning the outside of
the Water Dispenser
The outside of the dispenser can be
wiped clean with a water dispenser
cleaning solution or a mild soap and
water mixture. Never use harsh
chemicals or abrasive cleaners. Rinse
thoroughly with clean water and then
dry surfaces.
Cleaning the Drip Tray
To remove, take the grill off the tray and
firmly lift the tray up, dislodging it from
the guides. Drain and clean.
The drip tray should be emptied and
cleaned regularly to remove spotting
and any mineral deposits. Clean with a
water dispenser cleaning solution or a
mild soap and water mixture. For tough
deposits, add vinegar and let it soak
until the deposits come loose. Then
wash, rinse and dry thoroughly ( not
dishwasher safe).
To replace, put the grill back on the tray
and slide the tray onto the guides.
Draining and Reservoirs
Drain the reservoirs before and after
cleaning, when going on long vacations
or if not using the dispenser for long
periods of time.
IMPORTANT! Turn the power switch to
the OFF position and unplug the
dispenser before performing this
procedure. Dispense hot water until
temperature drops to a safe level to
avoid the risk of scalding.
Remove the water bottle.
Press/hold all dispensing taps until
water stops flowing from the faucet.
Place the unit over the sink and drain
hot water reservoirs by removing the
spring clamp and cap from drain outlet
located on the bottom of the unit.
Make sure the power switch is in the OFF
position.
the dispenser and drain the reservoirs.
Follow initial product cleaning procedures upon return and start-up of
the dispenser.
Remove the water bottle and bottle
support collar.
Drain the reservoirs.
Pour a mixture of 4 cups / 1 Litre of
vinegar with 4 cups / 1 Litre of hot water
into the reservoir and wait 20 minutes. If
using a water dispenser cleaning
solution, please follow the manufacturer's instructions.
IMPORTANT! To avoid water overflow
while cleaning dispenser, always
remove the bottle support collar before
pouring water or cleaning solution into
the reservoir.
Press/hold all dispensing buttons until
water stops flowing from the faucet.
When the water completely stops
flowing, refix the drain cap and spring
clamp.
Drain the reservoirs.
IMPORTANT! Drain the water into a
container and / or sink, not the drip tray.
IMPORTANT! Drain the water into a
container and / or sink, not the drip tray.
Rinse with clean water.
Replace the bottle support collar and the
water bottle.
Hot
bottom of dispenser
9
Cleaning the Inside of the
Dispenser
IMPORTANT! Drain approximately 4
glasses of water from each button before
initial use. This does not need to be done
with replacement bottles.
When not using the dispenser for long
periods of time or when going on
vacation, conserve energy by setting the
power switch to the OFF position, unplug
10
Troubleshooting guide
Technical specifications
If the unit is not working properly, please refer to the table below to solve most
common problems:
Issue
No water
comes out
from the
faucets
Possible Cause
Solution
• No water inside the tanks. • Make sure the tanks are filled with
water.
• Tanks or tubes inside the
• Contact customer service.
unit are clogged.
• Levers not working properly.
No hot water • Hot switch is OFF.
• The unit may have
overheated.
• Hot switch is damaged.
• Turn ON the hot switch. Check the
temperature 45 minutes later.
• Turn OFF the hot switch and allow
the unit to rest for 1 hour. Turn ON
the hot switch again (make sure
there is water inside the tank).
• Contact customer service.
• Empty the drip tray.
Water leaking • Drip tray is full.
• Turn OFF the hot water switch
from the unit • The water bottle was not
and dry the unit on the outside
properly loaded.
• Water leakage inside of the and its surroundings.
• If the problem continues contact
unit.
customer service.
Odor in the
water
• Please proceed with installation
• New machine.
• The unit has not been used and usage of water dispenser for
first time on page 5.
for a long time.
• There may be an algae
issue.
Low Electric • The unit is not properly
grounded.
shocks
• The power cord is
damaged.
Model No
EWD-323HN
Hot Water Tank Capacity
0.8 litre
Heating Capacity
5 litre/hr
Hot Water Temperature (C)
≥90°
Power Consumption
550 Watts
Voltage/ Supply
220-240V~ 50/60Hz
Protecting the environment
Do not throw away the appliance with the normal household
waste at the end of its life, but hand it in at an official
collection point for recycling. By doing this, you help to
preserve the environment.
• Please call a professional
electrician to assist you with any
electrical problem.
• If the problem continues, contact
customer service.
For any issue not shown on the table, please contact customer service
18002702929
Do not attempt to disassemble the unit yourself. The manufacturer will not
undertake any responsibility from damages or incidents resulting from it. This action
will void the manufacturer’s warranty.
11
12
Warranty and service
For any information or problem, contact your local ELEKTA dealer or
authorized service centre: For a list of authorized ELEKTA service centres
visit: www.elektaindia.com or contact our Toll Free Number 18002702929 or
mail us to [email protected]
Warranty card
This apparatus is covered under warranty against any defect due to defective
material or workmanship or TWO YEARS from the date of purchase. Should a
defect develop during the period of a warranty, ELEKTA undertakes to repair
the apparatus FREE OF CHARGE through the dealer from whom it has been
purchased or at any of the ELEKTA authorized Service Centres.
The warranty is not valid in case:
1. Apparatus is not used according to user manual.
2. Defects caused by improper or reckless use.
3. Repairs done by persons other than ELEKTA Authorized service centre.
4. Modifications of any nature made in the apparatus.
5. Tampered serial number.
6. Incomplete warranty card after purchase.
7. Product if used for commercial purpose (i.e. other than domestic use).
8. Usage of parts not recommended by ELEKTA or those made by other
manufacturers.
All consumables and parts susceptible to normal wear and tear are not
covered under warranty
Week/S.No.:
Date of purchase:
Dealer's name:
Dealer's stamp:
Customer's name and address:
Model No.:
Dealer's signature:
13