1
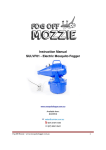
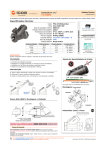
www.scintex.com.au | [email protected] Model: SNADFM03 Auto Shut Off Nozzle with Digital Meter User’s Manual WARNING Read carefully and understand all INSTRUCTIONS before operating. Failure to follow the safety rules and other basic safety precautions may result in serious personal injury. Save these instructions in a safe place and on hand so that they can be read when required. 1. INTRODUCTION 1.1 Technical Data 1.1.1 The liquids compatible with Auto shut off digital nozzle must be at low viscosity, namely as below: Model No. SNADFM03 Flow rate Up to 60LPM/16GPM Operating pressure (Max) 50psi/3.5bar Operating temperature -10℃ ~ +50℃/14℉ ~ 122℉ Accuracy ±1% Fluid type Diesel & kerosene 5-Digit present total (0.01~999.99) Screen 7-Digit non-resettable total (1~9999999) Unit (Liter, Gallon, Pint, Quart) Inlet and outlet 3/4" Weight 1.3Kgs/2.7 lbs Power supply 2×AAA 1.2 LCD DISPLAY The “LCD” of the meter features two numerical Registers and various indications displayed to the user only when the applicable function so requires KEY Partial register (5 figures with moving comma from 0.1 to 99999) Indicating the volume dispensed since the reset button was last pressed. Indication of battery charge Indication of calibration mode Indication of resetting present total to Zero Total register Indication of flow rate mode Indication of unit of measurement of partial: L= Litres GAL = Gallons PT = Pints QT = Quarts Fig. 1 1.3 USER BUTTONS The turbine digital meter features two buttons (MENU and RESET) which individually perform two main functions and together, other secondary functions. The main functions performed are: For the reset key, resetting the partial Register and reset table total (reset total) For the menu key, entering instrument calibration mode. Used together, the two keys permit entering configuration mode 1.4 BATTERY REPLACEMENT When replacing the battery, please open the cover, remove the plug and replace the battery. 2. INSTALLATION This nozzle is designed to dispensing diesel fuel under 0.5~3.5bar/7~50psi pressure system. 2.1 Connect the nozzle directly with the delivery hose. Please be ensured the thread is sealed. 2.2 Turn on the dispenser, open the trigger of nozzle to start dispensing. For first time using, it is necessary to turn the trigger on and off 2-3 times to discharge the air inside. 2.3 After dispensing, turn off the nozzle and take back to nozzle holder. 3. METER SETTING 3.1 BUTTON USAGE, CALIBRATION AND MEASUREMENT UNIT CHANGE Reset the present total (See Fig. 2) 1) 2) 3) When the meter is on standby, press the RESET key. The display shows all the segments. The meter resets the present total already. Fig. 2 Show current correction factor and general total (See Fig. 3) Press MENU and RESET together and hold for two seconds. Value “1.4000” is the correction factor which can be reset; “1234567” is the general total which cannot be reset. Fig. 3 Measurement unit change (See Fig. 4) Press MENU and RESET together and hold for five seconds. Zone 7 on the display is the current unit. Press RESET to chose a different measurement unit and then press MENU to confirm. Fig. 4 3.2 RESET THE RESETTABLE TOTAL (See Fig. 5) When the meter is on standby, press the RESET key for 2 seconds to reset the present total first. Fig. 5 3.3 PROCEDURE FOR ENTER THE CORRECTION FACTOR DIRECTLY Carefully follow the procedure indicated below. FORMULA Proper correction factor = current correction factor×(actual value/ display value) Example: Actual value Display value Current correction factor Proper correction factor 20.75 18.96 1.000 1.000×(20.75/18.96)=1.000×1.094=1.094 1 Wait for the meter to go to standby. 2 Reset the resettable total. 3 Press the MENU key. Keep it pressed until similar with the image showed (the digit flash in zone), it means the meter is in correction factor modification mode. 4 Press the RESET key to choose the right digit from 0 to 9. Press the MENU key to start the next digit. So the digit of correction factor can be changed one by one. 5 Make sure the correction factor is right, press the MENU key. Keep it pressed until quit calibration mode, the factor is saved. The meter goes to standby again. 3.4 MODIFY THE CORRECTION FACTOR IN FIELD PLEASE CAREFULLY FOLLOW THE PROCEDURE INDICATED BELOW. 1 Wait for the meter to go to standby. 2 Reset the resettable total. 3 Start dispensing into a measuring glass. Stop dispensing when over 5 Litres of volume is reached, read out the actual value. The volume that is displayed on the LCD is the Display Value, not the Actual Value which may be slightly higher. For example, in the figure on the right, the Display Value is 18.96 while the Actual Value is 20.75. 4 Press the MENU key. Keep it pressed until showed as the right fig., the digit flash in zone, Press the RESET key to choose the right digit from 0 to 9. Press the MENU key to go the the next digit so that the Actual Value can be input. 5 Make sure the correction factor is right and then press the MENU key. Keep it pressed until calibration is finished and the factor is save. The meter will then return to standby. 4. MALFUNCTIONS Problem Possible Cause Corrective Action LCD: no indication Bad battery contact Check battery contacts Imprecise measurement Wrong FACTOR With reference to paragraph 3.3 & 3.4, check the FACTOR The meter works below minimum acceptable flow rate Increase the flow rate until an acceptable flow rate range has been achieved Reduced or zero flow rate Turbine blocked Clean the turbine The meter does not count, but the flow rate is correct Incorrect installation of turbine after cleaning Repeat the reassembly process. Possible problems Contact the dealers or manufactures electronic 5. DIAGRAM AND PARTS LIST No 1 Description Nozzle cover Qty. 1 2 Screw 4 3 Meter cover 1 4 LCD Display 1 5 Battery AAA 2 6 Meter base 1 7 Nozzle body 1 8 Screw 1 9 Spout 1 card