1
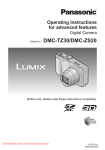
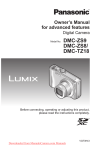
PHOTOGRAPHERʼS GUIDE TO THE PANASONIC LUMIX LX5
Manual Exposure Mode
The LX5 has a fully manual mode for control of exposure,
which is one of the great features of this camera. Not all compact cameras have a manual exposure mode, which is a boon
for serious amateurs who want to exert full creative control
over exposure decisions.
The technique for using this mode is not far removed from
what we discussed in connection with the Aperture Priority
and Shutter Priority modes. To control exposure manually, set
the Mode dial to the M indicator. Now the rear dial will control
both aperture and shutter speed. Earlier, we saw how the rear
dial has two or three functions in the Aperture Priority and
Shutter Priority modes: controlling either aperture or shutter
speed, and also controlling exposure compensation, as well as
manual focus if MF is set on the focus switch. In Manual Exposure mode, you shift back and forth between controlling aperture and controlling shutter speed by pressing in on the rear
dial, and you then adjust the settings for the selected function
by turning the rear dial. You no longer can control exposure
compensation, because that would be of no use when you’re
already controlling the exposure manually. However, you still
can control manual focus if that option has been selected with
the focus switch.
To control the aperture, first press in on the rear dial (more
than once if necessary). The aperture number (such as 2.8 or
3.5) will turn yellow, and can now be increased by turning the
dial to the right, or lowered by turning it to the left. To shift to
65
PHOTOGRAPHERʼS GUIDE TO THE PANASONIC LUMIX LX5
controlling the shutter speed, press in on the dial again. The
shutter speed number (such as 1/30 or 1/100) will turn yellow,
and can now be changed to a faster speed by turning the rear
dial to the right, or to a slower speed by turning it to the left.
Two notes to remember: if you recall, with Aperture Priority
mode, you cannot set the aperture to f/2.0 when the lens is fully zoomed in. The same situation is true with Manual mode;
you cannot set the wide-open aperture of f/2.0 when the lens
is zoomed all the way in to the 90mm equivalent setting. Also,
as with Aperture Priority and Shutter Priority modes, as discussed above, you cannot set a shutter speed faster than 1/2000
second along with an aperture wider than f/4.0.
With Manual Exposure mode, the settings for aperture and
shutter speed are independent of each other. When you
change one, the other one stays unchanged until you change
it manually. The camera is leaving the creative decision about
exposure entirely up to you, even if the resulting photograph
would be washed out by excessive exposure or under-exposed
to the point of near-blackness.
However, the camera is not going to abandon you completely,
so you won’t have to use a separate light meter or other external aids to gauge the correct exposure settings. Even though
you have selected Manual exposure control, the camera will
66
PHOTOGRAPHERʼS GUIDE TO THE PANASONIC LUMIX LX5
still provide help if you want it.
Once you are in Manual Exposure mode, either before or after you have started adjusting the aperture and shutter speed
with the rear dial, press the shutter button halfway down until
the camera beeps. The screen then shows a scale of tick marks
ranging from -2 to +2 EV, with a zero at the mid-point and
a little yellow indicator that moves along the scale. With this
scale on the screen, you can adjust either aperture or shutter
speed in turn until the yellow indicator settles over the zero
point, indicating a standard exposure. Of course, you can adjust the settings however you want, leaving the indicator far to
the right or left, as you please. But the camera is providing this
display to show you what settings it would consider to yield
a correct exposure given the lighting conditions in existence.
The scale stays on the screen for as long as you are making adjustments with the rear dial, and for about ten seconds if you
are not making adjustments. You can press the shutter button
down to take the picture at any time.
Scene Mode
Scene mode is a rather different animal from the other shooting modes we have discussed. This mode does not have a single
defining feature, such as permitting control over one or more
aspects of exposure. Instead, when you select Scene mode, and
then choose a particular scene type within that mode, you are
in effect telling the camera what sort of environment the picture is being taken in and what kind of image you are looking
for, and you’re letting the camera make a group of decisions as
67
PHOTOGRAPHERʼS GUIDE TO THE PANASONIC LUMIX LX5
to what settings to use to produce that result.
I did not use Scene mode very much at first; however, after using it for a while, I came to appreciate its usefulness, particularly in certain situations. Let’s take a look at how it works and
you can decide for yourself whether you might take advantage
of it on some occasions.
Turning the Mode dial to the SCN indicator places you in
Scene mode, but unless you want to settle for whatever scene
setting is already in place, you now need to make another
choice, and pick one from the fairly impressive list of possibilities.
To make this further choice, you need to use the menu system.
When you select Scene mode, the menu system itself changes.
Ordinarily (unless you’re in Playback mode), the menu system
has only three branches: Record, Motion Picture, and Setup.
Now that you’re in Scene mode, there is a fourth branch of the
menu system, named Scene. It takes over as the first choice at
the top of the menu system once you have pushed the Menu/
Set button (the center button in the five-button array). (The
Scene menu may appear automatically once you select SCN
on the Mode dial; that option is controlled by the Scene Menu
setting on the Setup menu.)
Push the Menu/Set button, and you are faced with the Scene
68
PHOTOGRAPHERʼS GUIDE TO THE PANASONIC LUMIX LX5
menu. Next, press the right button, and the selector (a yellow
outline) moves onto the first choice of scene types, which is
Portrait. One very good thing about the Scene menu system is
that each scene is labeled as you move the selector over it, so
you are not left trying to puzzle out what each icon represents.
If you want a bit more information, press the Display button
(the furthest button down on the left of the camera’s back, just
to the right of the LCD screen) while in the Scene menu, and
the display will give you a brief description of the Scene type
that is shown in the menu.
Keep pushing the right button to move the selector over the
other scene types; when you reach the right edge of the screen,
the selector moves down to the left item in the next row down.
That’s all there is to do to select a scene type. But there are numerous choices, and you need to know something about each
to know whether it’s one you would want to select. In general,
each scene type carries with it a variety of settings, including
things like focus mode, flash status, range of shutter speeds,
sensitivity to various colors, and others. With a few exceptions, including High Sensitivity, Hi-Speed Burst, and Flash
Burst, you can set Quality to RAW, so you can take advantage
of the special settings for the various Scene types and still enjoy the flexibility of RAW shooting. Let’s look at the complete
list of scene types, so you can make an informed choice.
Portrait: For rich skin tones. You are advised to stand fairly
close to the subject and set the zoom to full telephoto, so as
to blur the background if possible. The camera sets itself to a
wide aperture if possible and initially sets the autofocus mode
to Face Detection. The flash mode is initially set to Auto/RedEye Reduction.
69
PHOTOGRAPHERʼS GUIDE TO THE PANASONIC LUMIX LX5
Soft Skin: Similar to Portrait; detects skin tones in faces and
adds a “soft effect” to those areas. Intelligent Exposure is set.
Flash mode is initially set to Auto/Red-Eye Reduction.
Self-Portrait: This Scene type is intended for you to take
a photo of yourself, such as by holding the camera at arm’s
length and pointing back at you. The user’s manual recommends that you set the self-timer for two seconds. The camera
automatically sets the zoom range to wide angle, which you
should leave as is. The focus range will be from about 1 foot to
3.9 feet (30 cm to 1.2 m). Flash mode is initially set to Auto/
Red-Eye Reduction.
Scenery:
This style is intended for photographs of landscapes and vistas in the distance. The autofocus range is set
from about 16 feet (4.9 meters) to infinity. The flash is set to
off. (One interesting point about this Scene type is that, even
if you open up the flash unit, it will be automatically set to be
forced off, and will not fire. Ordinarily, there is no way for the
user to force the built-in flash off when the unit is open, but
the camera can do so automatically when set to the Scenery
style and a few others.)
70
PHOTOGRAPHERʼS GUIDE TO THE PANASONIC LUMIX LX5
Panorama Assist: This mode is designed to help you take
multiple pictures that you can later stitch into a panorama using the software that came with the camera or other editing
software. When this mode is first selected, the camera shows
you a screen for choosing the direction for your panorama: left
to right, right to left, down to up, or up to down. Highlight one
of these choices, then press Menu/Set. On the next screen, the
camera displays a grid of horizontal and vertical guide lines to
help you line up the first shot, so it is level and you can judge
where its edge is. After you press the shutter button to take
that shot, the screen will give you the choices of Next, Retake,
and Exit. If the first picture was satisfactory, keep going by
highlighting Next and pressing the Menu/Set button. For the
next image, the camera will display a faint view of the previous
image, so you can make sure the next image overlaps the first
one. Repeat these steps for as many images as you need for
your panorama; choose Exit after the final picture.
When you’re taking your shots, stay in one position and try to
keep the camera as level as possible (using a tripod can help,
but is not absolutely necessary). What I sometimes do is wear
the camera’s strap around my neck and hold the camera out at
arm’s length so the strap tightens and helps keep the camera
71
PHOTOGRAPHERʼS GUIDE TO THE PANASONIC LUMIX LX5
steady. Try to overlap each image roughly 40 percent with the
previous one, until you have taken enough pictures to make up
your panorama. Also, try not to vary the exposure as you pan
through the various parts of the scene and don’t zoom the lens
in or out. Once you have all the images, use a program such
as PHOTOfunSTUDIO, Photoshop, Photoshop Elements, or
others that are specifically designed for creating panoramas to
stitch the various parts of the panorama into a single image.
Sports: This style is meant to stop the action of sports in
bright daylight using fast shutter speeds at distances of 16 feet
(4.9 meters) or more. The camera sets itself to use Intelligent
ISO, with maximum ISO set to 1600. (I’ll discuss ISO, or sensitivity to light, later. Briefly, with a higher-numbered ISO setting, the camera is more sensitive to light, and therefore can
use a faster shutter speed. The tradeoff is the possibility of
added “noise” or fuzziness of the image.) The flash can be used
if you want to activate it.
Night Portrait: This style is designed for a portrait in lowlight conditions, preferably with the camera on a tripod and
possibly even using the self-timer to avoid shaking the camera. You should open the flash (or attach an external unit), and
it will be set to slow sync red-eye reduction. The camera will
be set to Intelligent Exposure. If possible, the subject should be
asked not to move for about a second while the image is being
exposed. The purpose of this mode is to expose the main subject with the flash, but to keep the shutter open long enough to
also expose the background with the ambient light.
Night Scenery: This style is meant for night-time scenes
with the camera on a tripod, and also using the self-timer to
minimize camera shake. The shutter speed will be set for an
exposure as long as 8 seconds, using only the available light.
Because this style is for scenery and not portraits, the focus
range will be from 16 feet (4.9 meters) to infinity. The flash will
72
PHOTOGRAPHERʼS GUIDE TO THE PANASONIC LUMIX LX5
be forced off, and will not fire.
Food: This scene is for those occasions when you’re in a restaurant and are so impressed by the presentation of your meal
that you want to photograph it, or for those people who are in
the habit of documenting every meal they eat. Or you could
use it for taking pictures for your cookbook. In any event,
the idea here is to take a fairly close-up picture without flash,
though the flash will be available if you want to use it. The
autofocus range will be the same as for autofocus macro, or
about two inches (5 cm) at wide angle, or two feet (61 cm) at
telephoto, to infinity.
Party: For taking pictures in lighted interior settings, such as
wedding receptions and other social events. It’s recommended
to use a tripod, and you can use flash if you want to. The recommended distance for shooting is about five feet (1.5 meters).
Candle Light:
The name is self-explanatory, but oddly
enough, this Scene type allows the flash to fire if you want it,
which would seem to defeat the purpose. The manual does say
it would be better if you didn’t use flash, and I would think you
would want to follow that advice. Focus range is the same as
for autofocus macro, or about one-half an inch (1 cm) at wide
angle, or one foot (30 cm) at telephoto, to infinity.
Baby 1 and Baby 2: These two settings both are geared
for taking baby pictures in the same way. The only reason
there are two different settings is because you can enter the
birth dates and names of two children into the camera, and
have the child’s name and age displayed along with the picture.
The attraction here is that the camera will keep track of what
age the child is in each photo.
When you select one of these settings, the camera will present
73
PHOTOGRAPHERʼS GUIDE TO THE PANASONIC LUMIX LX5
you with a screen with options for name and age; you can leave
either or both of these set to Off if you want, or enter the data.
If you want to enter them, the camera gives you menus from
which to choose year, month, day, and letters for the names.
Apart from the names and ages, the Baby 1 and Baby 2 scene
styles set the camera to use a weaker-than-normal flash output, a focus range the same as for macro mode, Intelligent ISO
(light sensitivity) activated, and ISO Limit (see later discussion) set to ISO 1600.
Pet: The Pet scene style is similar to Baby 1 and Baby 2 in
that you can set your pet’s name and age. The initial setting
for the AF Assist lamp is Off. In this scene type, the camera
turns AF Tracking on, with the idea that your pet may not be
sitting still to have his or her portrait made.
Sunset: This scene style is designed to highlight the vivid
reds of a sunset. The flash is forced off, and won’t fire even if
you open it up in dark conditions. Don’t take the label “sunset”
too literally; you can use this mode for sunrise also, and, as a
matter of fact, for any scene in which you would like to emphasize the reddish or orange tones. For example, the photo
on the next page was taken using Sunset mode in the early
morning while the reddish beams of sunlight were lighting up
some buildings with red tones of their own.
74
PHOTOGRAPHERʼS GUIDE TO THE PANASONIC LUMIX LX5
High Sensitivity : With this scene type, the camera sets
the ISO high, in a range between ISO 1600 and ISO 12,800,
making it possible for the camera to expose the picture correctly at a faster shutter speed than it could otherwise. The
Quality setting is automatically placed at Standard and the
Picture Size at 3 MP or less, depending on the aspect ratio setting, so the resulting pictures will not be suitable for big enlargements, possibly only 4 by 6 inch (10.2 by 15.2 cm) prints.
The focus range is that of macro mode. This scene type is suitable for reducing motion blur when shooting in low light, such
as indoors. Obviously, you will be sacrificing quality if you use
this style, so it’s best used only if there are no other viable options, unless image quality is not a particular concern for the
pictures you’ll be taking with this setting.
The image on the next page was taken at night with the LX5
in High Sensitivity mode, with no lighting except that from an
adjacent room. The camera took this shot at ISO 3200, with an
exposure of 1/13 second at f/3.0.
75